Hello and welcome to Part Two of The Emperor Protects, my series of posts following the growth of my Adepta Sororitas Order Minoris, the Order of the Dying Light. In Part One, I discussed my motivations for starting a new 40K army and my love of the Ecclesiarchy, as well as covering my overall colour scheme on my Canoness Veridyan, the first 10 Battle Sisters and Celestine, the Living Saint. In Part Two, we’ll be getting into arguably the grittiest (and coolest) element of the Adepta Sororitas – the Repentia.
I’m just going to jump in right now and deal with the elephant in the room – I am using the old metal Repentia in my army. At least for the first squad, anyway. I’ve got a few reasons for this, although first and foremost was that, well, I already kind of had the miniatures. I purchased these Repentia back before the new Sisters of Battle plastics were released due to a misguided belief that I’d be dropping everything and making a start on the army immediately. That being said, one of these reasons that I bought them in the first place was that, well, I do still really like these minis. They are comparatively smaller in stature than the new Sororitas plastics, but this can be partially explained away by a lack of power armour (Repentia Superior not withstanding). On pure aesthetics alone – and I might catch some flak for this – I still think they’re pretty cool.
Don’t get me wrong – I’m not hating on the new Repentia miniatures. In fact, I think the new Repentia kit is amazing in just about every way. They’re way less, uh.. problematic, for starters. Not everyone is going to be comfortable with the getups on the old metal minis, and while I do like the leather hoods and gas masks BSDM aesthetic for Repentia, I am glad that the miniatures currently in production are a little less potentially alienating. The new minis have all the hallmarks of a good modern Sororitas kit – dynamic poses, faithful to the spirit of the originals, head options for days. In the highly likely scenario that I pick up a second unit of Repentia, these will undoubtedly come from the plastic kit. Still, I think there’s a lot to be said for the knee high boots, hooded leathers and tabards of the old school Repentia minis – they’ve got a bit of a those creepy party scenes in The Matrix vibe to them, even if the somewhat busty aspect of the sculpts make me a cringe a little. On the whole, they’re a little bit uncomfortable, and that’s part of what makes them great.
That, and the Sister Superior with a literal brazier burning away on her helmet. Scale issues aside, she is.. Yeah, I mean, she’s pretty awesome.

I have a few interesting points to note with regards the assembly of these miniatures. The old Repentia are monopose pewter, and on 25mm slotta bases. The new Repentia however are on the fancy new 28mm bases that Games Workshop produce, and these – being designed for plastic miniatures1 – do not have slots in them. I could’ve just cut the slot piece off of the miniatures, but instead I opted for a different approach for basing. Gone were the Kromlech Urban Rubble bits, and in their place I used little cuts of cork (although I did keep the ubiquitous candles, because theme). The reason for this was that I could cut the cork in nice straight lines and glue these on top of my plastic 28mm bases to create a sort of improvised slot for the miniatures to glue into. This increases the contact area that the miniatures have with the base (bottom of slotta and both sides of the cork slot) and thus the stability on the miniature on top. I then applied texture paint over the whole base to make it not look like, well, cork2 as well as concealing any protruding pewter between the legs.
One gripe I do have with these older Repentia sculpts is that there is only really four unique sculpts in the whole unit, two of which are very samey. You’ve got a lefty, a righty, a charging gas masked lady3 and one kind of holding their Eviscerator out in what’s either a challenge or a moments calm. There’s only a single twin of each (and one triplet) and as far as metal miniatures go this isn’t the worst, but as I said, the lefty and righty minis look a little samey – not ideal as together they make up 5/9 of the total miniatures. I figure I’m already going to cop a little flak for using the old miniatures in the first place4, so thought it might help to do a little converting in an effort to ensure each one of my Repentia were unique in some way. Due to the limitations of working with pewter and my even more limited ability to sculpt with screen stuff, this pretty much amounted to swapping around heads and Eviscerators, but it did mean that almost5 every Sister had a unique head/pose combination at least.
So, that about covers the assembly – how about the paint job? Well, for once, I thoroughly enjoyed painting these Sisters. Something about that older, more restrained style of miniature is just a joy to paint compared to a lot of the newer stuff. The Repentia Superior was a little more cluttered, but it did at times remind me a little bit of painting a Middle-earth miniature due to the pewter medium and the tightly folded cloak.
Most of what I said over on my regular Battle Sisters applies for these Repentia, although I did make a couple of notable departures which I plan on applying to all of my ‘penitent’ minis (including Penitent Engines, Mortifiers and Arco Flagellants). The first and arguably most obvious was a lack of ivory – it’s a bit of a cliché move to paint a contingent of your army that have ‘fallen from grace‘ in black, but it’s a cliché because it’s cool. In lore terms, I like to think that my Battle Sisters represent the dying light of the God Emperor – embodied by the imagery of candlelight – and my Repentia are those who have let their flame extinguish, leaving only a blackened wick.
Another means with which I try to accentuate the darker, moodier tone of the Repentia is by use of Blood for the Blood God. It’s a subtle effect – blood effect doesn’t really show up that well on black after all – but it does add a little bleakness to the miniatures. After painting, varnishing and basing, I paint a little bit of Blood for the Blood God mixed with a tiny bit of black paint across their weapon blade to represent dried blood, followed by a light brushing of pure blood effect for the fresh kill. Then, I compliment the toothbrushed sepia spots with a little toothbrush flicked Blood for the Blood God (thinned down with a little water).
Of course, there’s no point in sending unarmoured Sisters onto the battlefield on foot. Thankfully, Adepta Sororitas have access to one of the most iconic vehicles in all of miniature wargaming – the Rhino.
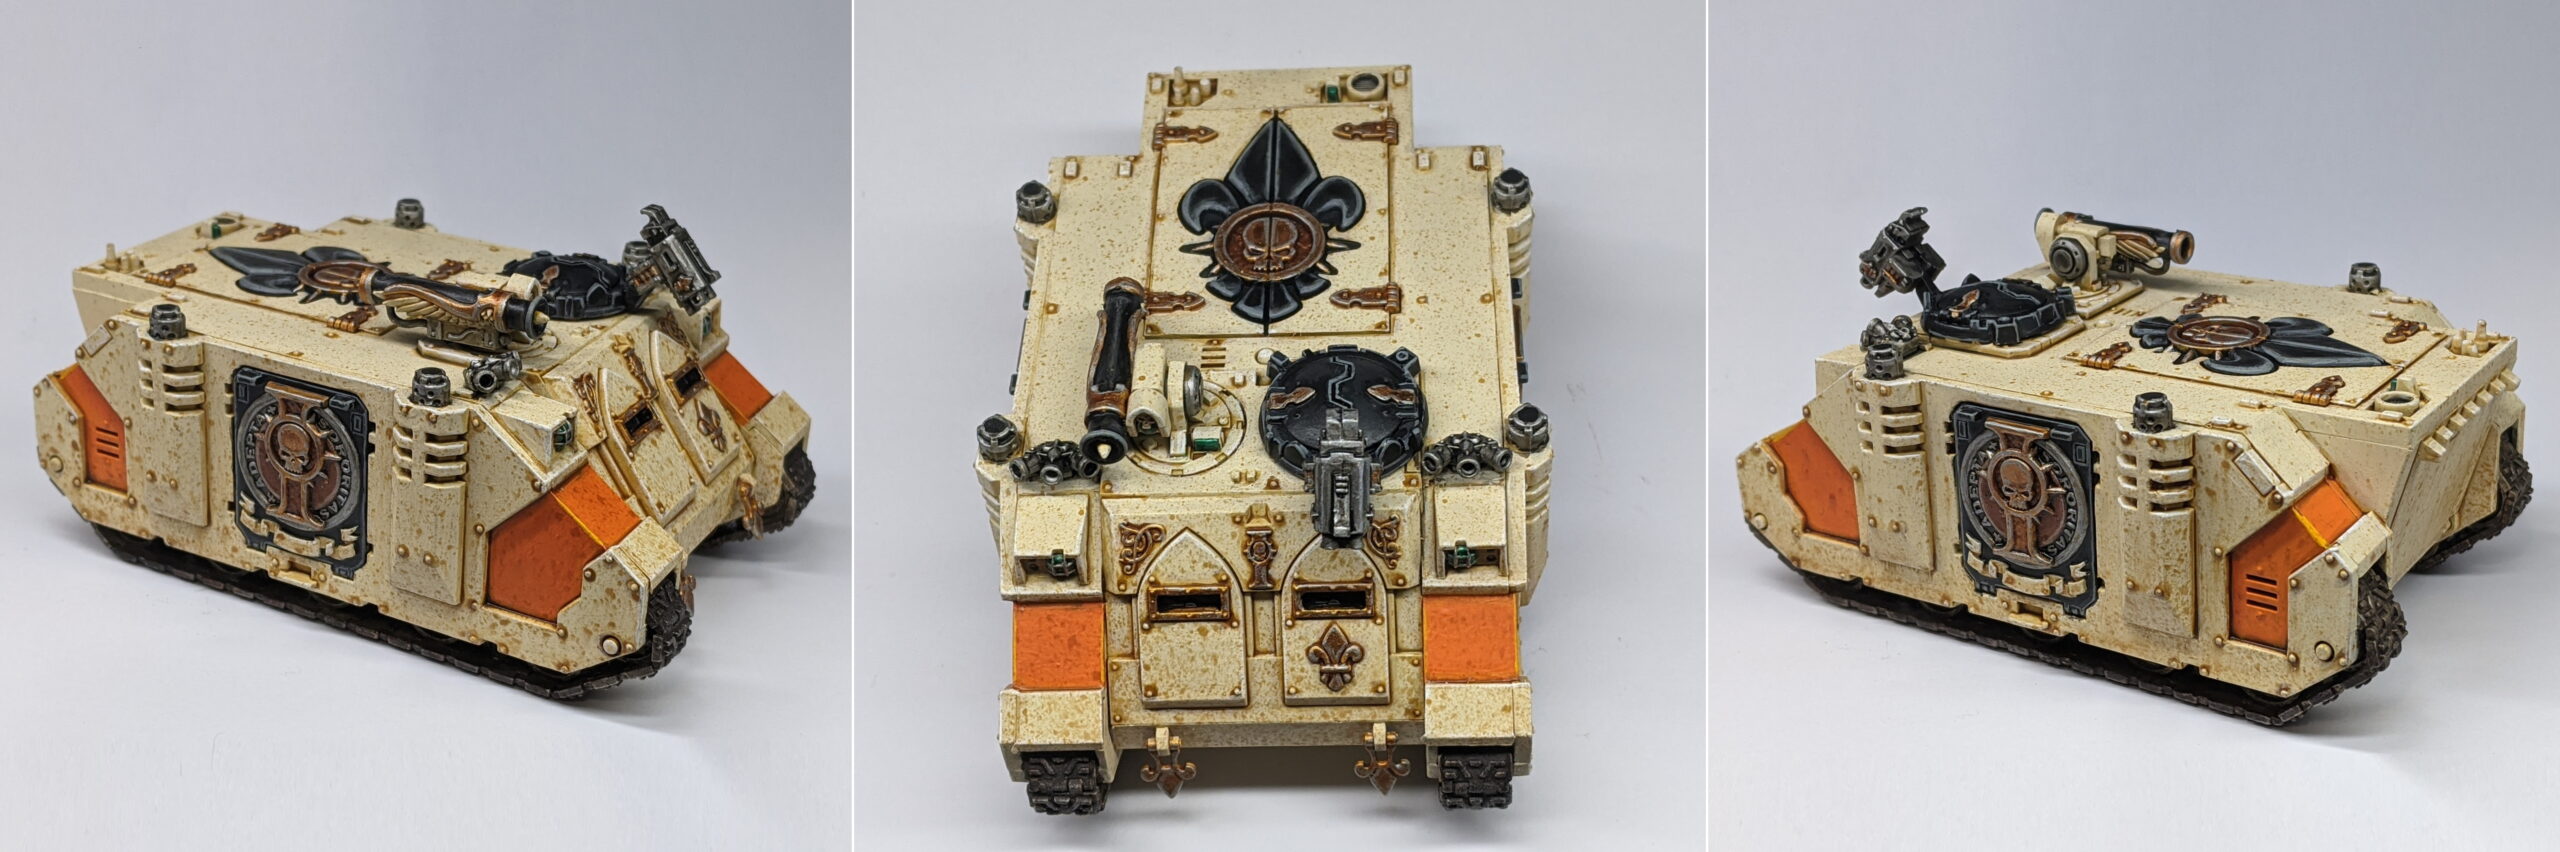
Hot damn, I love Rhinos. In the four and a half years that I’ve been painting Warhammer again, this will be my 6th Rhino (and my 7th Rhino chassis vehicle) and I’m pretty certain it’s not going to be my last. The Sororitas upgrade sprue does an excellent job of breathing new life into this venerable kit – the top and side doors are resplendent with nice, chunky detail and the frame is bristling with loads of optional extras from Sororitas-emblazoned smoke launchers and ornate looking hunter killer missiles to completely cosmetic details such as ceremonial swords, braziers and filigree. What I really love about this optional sprue however is just how optional it really is. You can go whole hog modern Games Workshop and absolutely load up your little APC with an crazy amount of detail (or clutter, depending on your perspective), or you can let the timeless design of the Rhino speak for itself, utilize a restrained selection of ornamentation and give each of your vehicles a little something unique to them. It’s great to have that level of freedom on a kit like this.
I am a little confused as to why they didn’t just make the Sororitas Rhino APC the same Deimos pattern chassis as the Exorcist and the Immolator. The Exorcist and Immolator both share the same new style sprue for the bottom and sides of the vehicle plus one unique frame for the top part – considering how much effort was put into the Rhino upgrade frame, I’m not convinced they couldn’t just have made a Deimos Rhino top instead. Reserving the Deimos design pattern for the Exorcist and Immolator does give each of these tanks a little more unique flair over the Rhino APC (lower suspension for heavier firepower yadda yadda yadda), it’s just weird. Still, with Space Marines moving away from Rhinos and Land Raiders into Impulsors and, um, Repulsors, it’s nice to know at least one faction will still be representin’ the venerable Mars-pattern Rhino way off into the future.
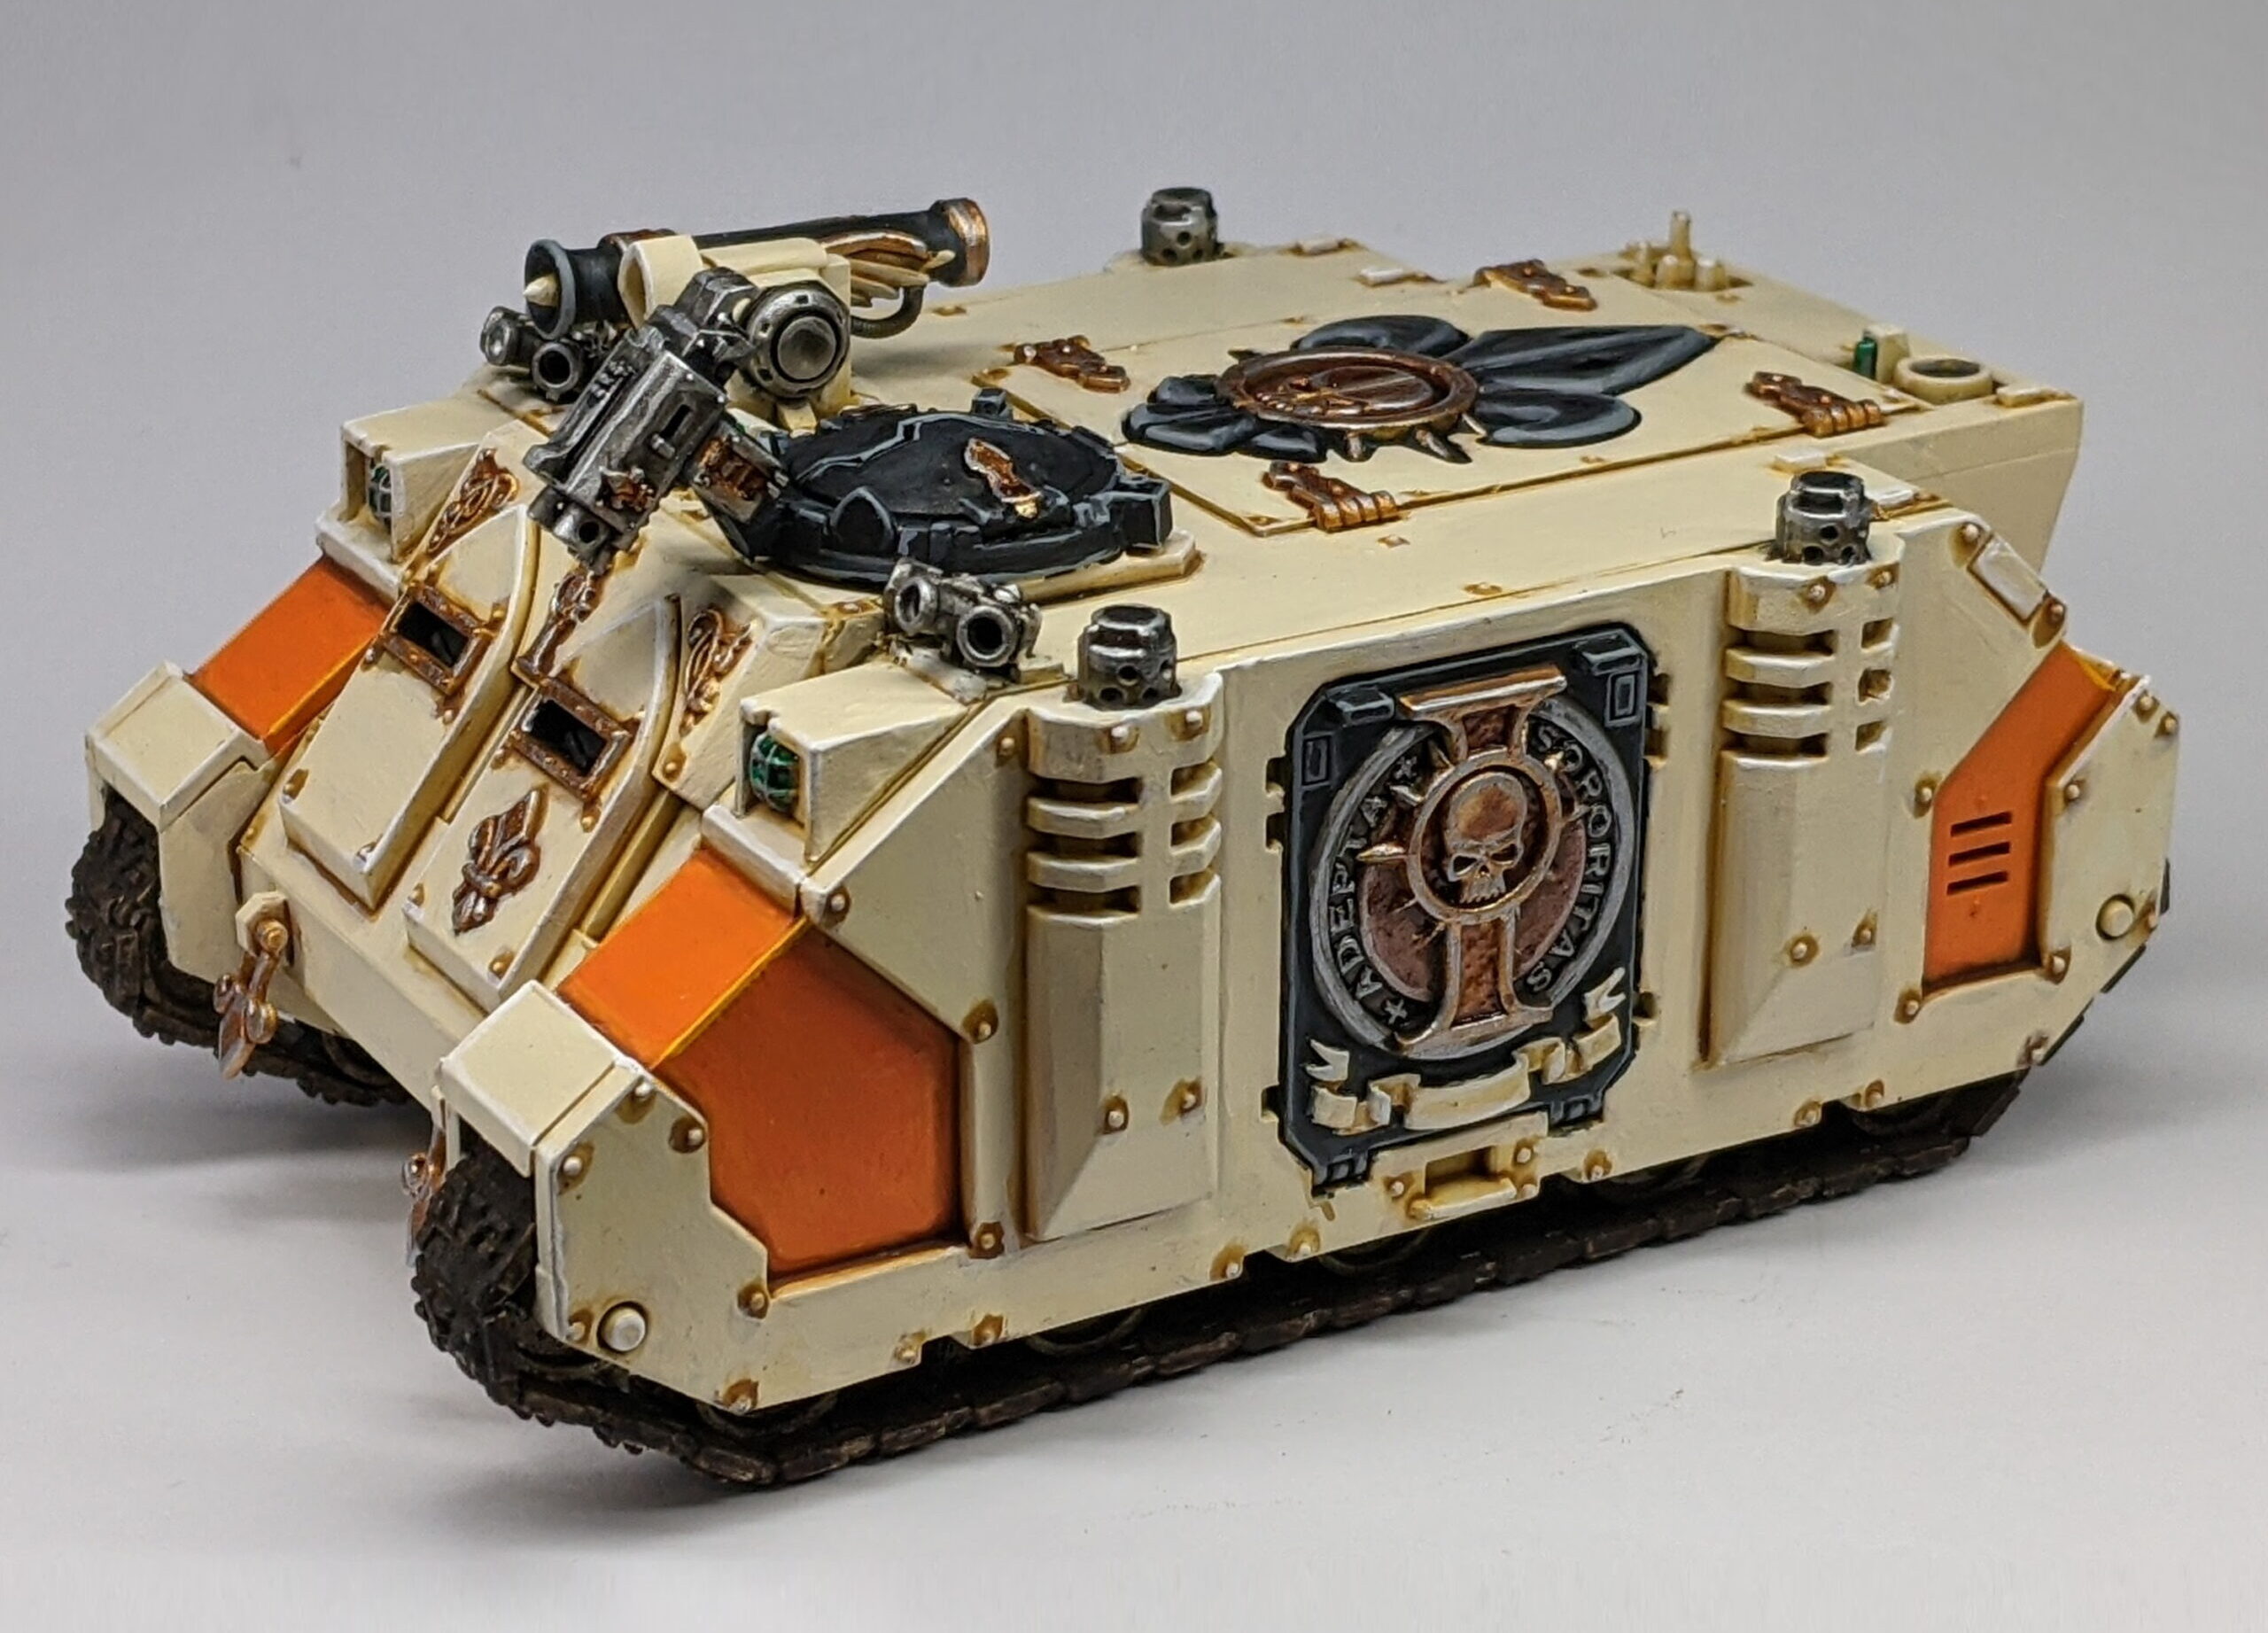
I’m rambling a lot about the kit itself here, I suppose because I don’t really have all that much to say about the paint job. I primed it white, airbrushed Elfic Flesh over the whole thing, painted some panels Black and others Fiery Orange. The filigree and trim were basecoated in Bright Bronze, the textured areas in the Sororitas icons on the doors in Hammered Copper and the exhaust, storm bolter, tracks, smoke launchers and ‘coin’ on the doors in Vallejo Metal Color Silver.
Instead of washing the whole thing, I decided to make my life a little easier and pin washed all the recesses with Seraphim Sepia. I also placed a little blob of wash over each of the rivets to shade them. The warm metals were washed with Reikland Fleshshade Gloss and the silvers in Nuln Oil gloss – with one exception being the tracks, which I just covered in Typhus Corrosion. Nice and simple.
Highlights were as you might imagine – White on the harshest edges of the ivory, Shining Silver on the metallics, Gold Yellow on the orange. At this point, I also painted the various lenses and headlights in silver and then put a couple thin coats of Waystone Green over the top of this for easy, understated detail. Finally, I took out my toothbrush and flicked Seraphim Sepia at it, taking care to focus and repeat mostly around the bottom of the vehicle where the dirt would spray the most (although the top was not left clean by any means). A quick trip to the garden for a blast of Dullcote later and my first Sororitas Rhino was done and dusted.
While we’re on the subject of mechanised Sisters Repentia, let’s take a look at my unit of Mortifiers next.
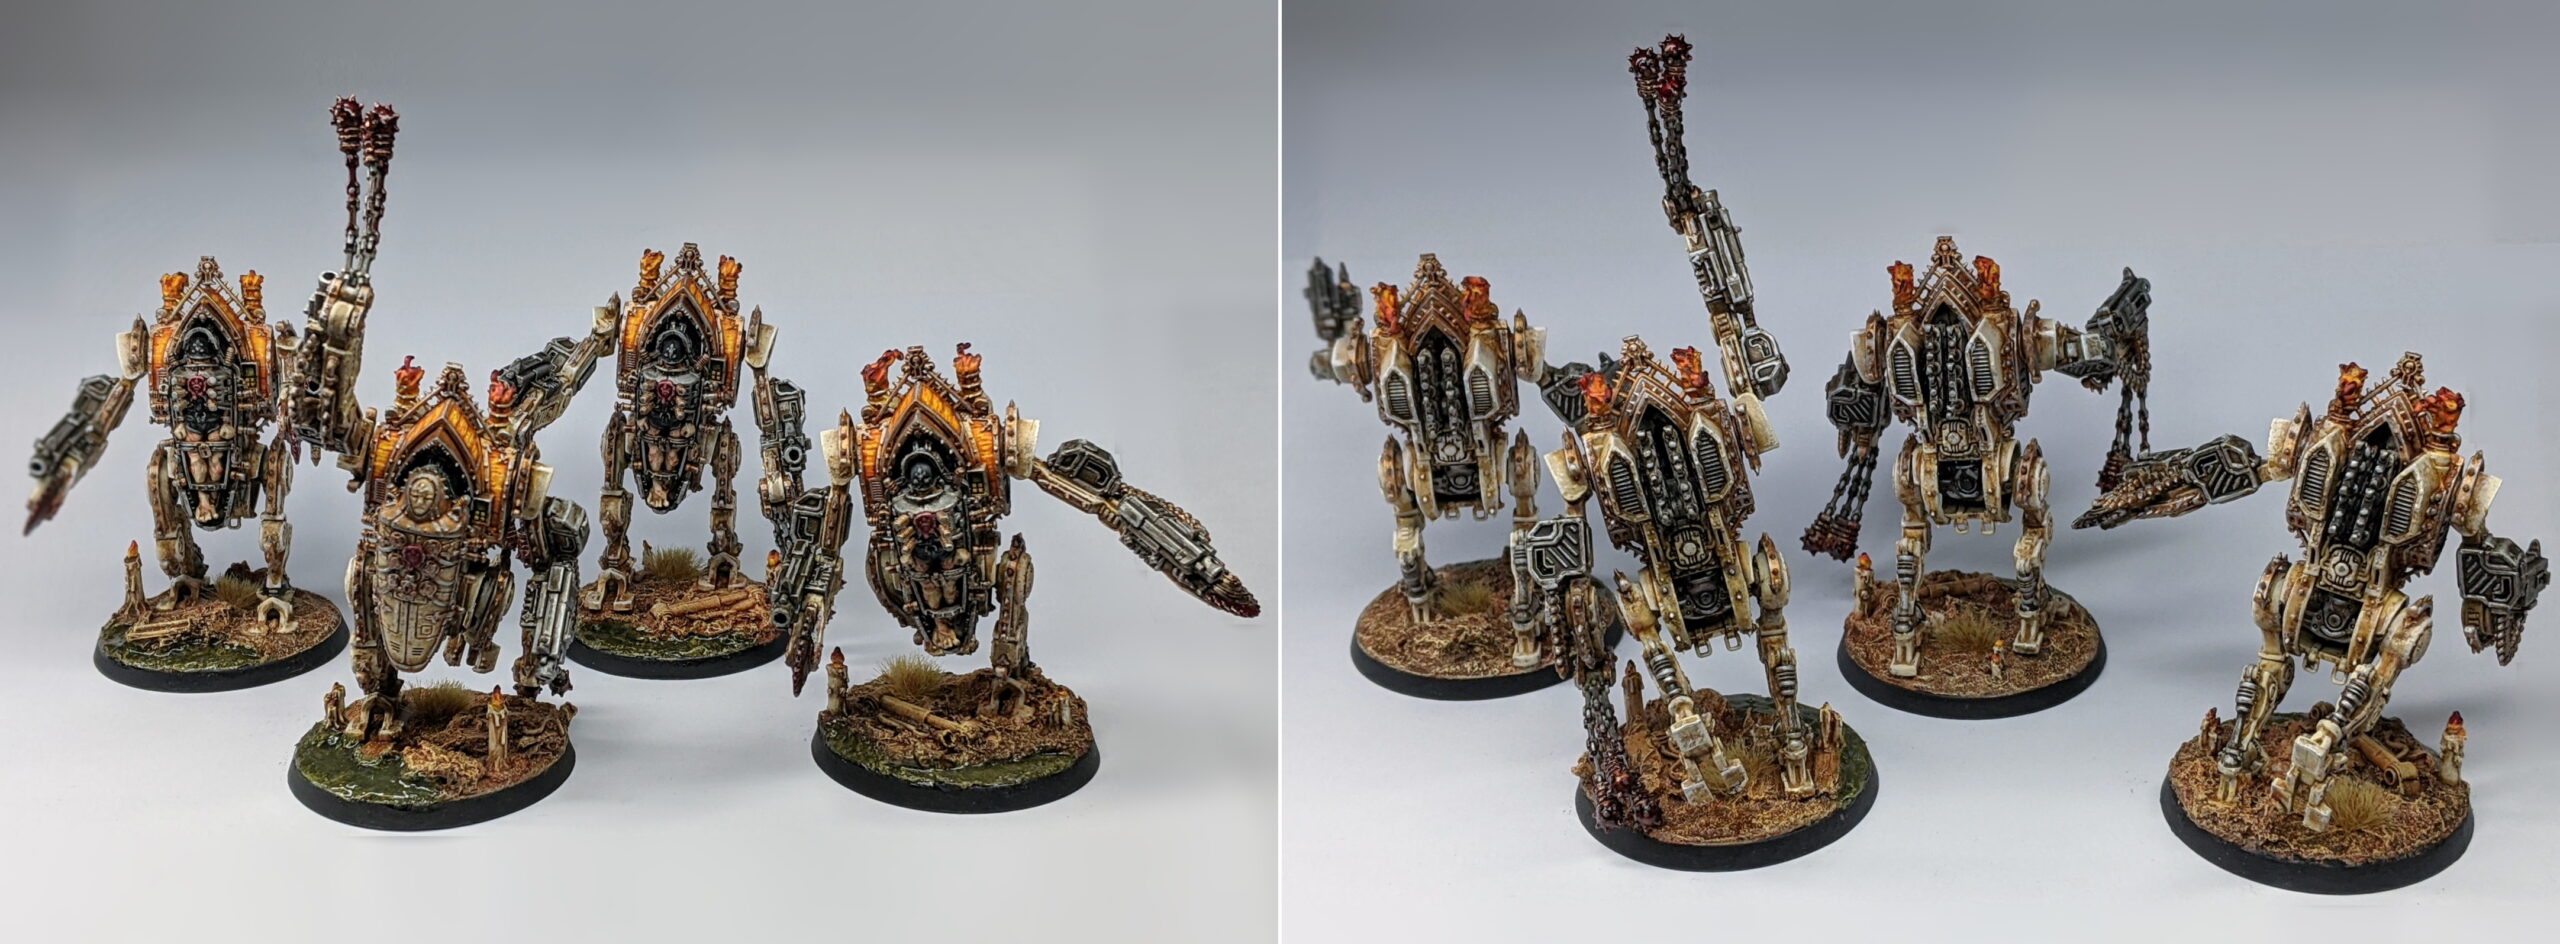
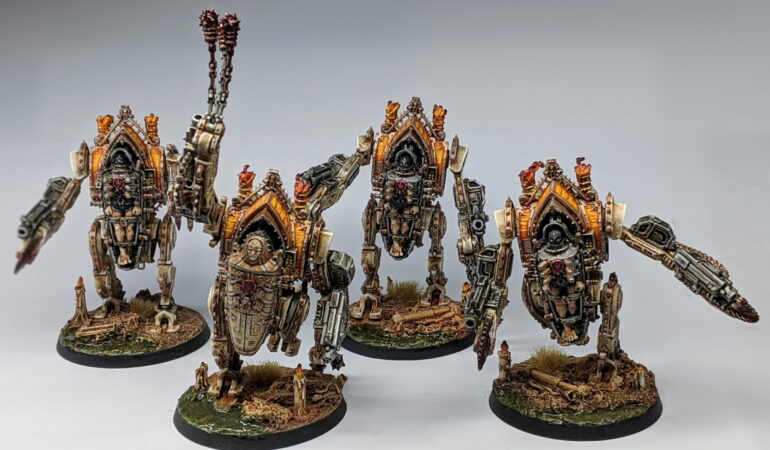
The new Mortifiers – and Penitent Engines for that matter – are kind of a weird unit to build and paint. Each Engine is roughly the size as a Contemptor Dreadnought (if a little less chunky), yet they are not only packaged in kits of 2 but can be fielded in units of up to 6 for a single Heavy Support slot. They are also – in a move from Games Workshop that I can only describe as utterly baffling – actually really genuinely smaller than the old pewter Penitent Engine6 miniature. In fact, while I applaud the versatility of the kit – it can produce options for a standard Mortifier, an Anchorite, 2 variants of Penitent Engines as well as a pair of options each for both ranged and melee weapons – in a few ways, I find it one of the most disappointing of range overall. Beyond simply being smaller, the general design of the Penitent Engine is overall a little less intimidating than the old pewter kit – and not just because you could take skulls for the skull throne with that chunk of pewter. The arms are skinnier, the legs a little less manic, the penitent pilot a little less sinister looking.
I don’t want to come off as a negative nelly here – I do like these miniatures overall, and there’s a lot about the kit to praise beyond just their versatility, wealth of options and ample conversion resources (more on that in a future blog post). For starters, the shoulders are fully posable – these slide onto the body on a nice, taught peg such that if you were a little more careful than I, you could have them as both articulated and interchangeable. You can also control the angle that you glue the arm into the shoulder, giving you a little more flexibility in your posing. The legs can also be assembled out of the box in one of two ways (left leg up or right leg up), but with a very small amount of work you can make them fully posable at the thigh for creating stationary engines as well (which I did for two of them). Finally, both arms can be used as either left or right, giving you flexibility to build your engines in one of six different configurations. These are all very good things in a kit such as this – particularly so when the game encourages you to take multiple of these in a single unit. Six of these together will look better than six of the old metal models.
In the end, I decided to build my first batch of Engines as Mortifiers. This was mostly for the rules, but also from a lore perspective – I prefer that my Penitent Engines are being manned by actual penitent Sororitas. As I was running these as Mortifiers, I equipped them all with Heavy Bolters. Heavy Bolters made better use of the Mortifiers superior Ballistic Skill – and the ability to run and fire them felt more valuable than the flamer special rule, given that vehicles can treat heavy weapons as Pistols in 9th edition anyway. I’ll probably make an equivalent unit of Penitent Engines and give them all flamers sometime down the line to help balance things out.
Learning absolutely nothing from my Battle Sisters or Celestine, I went ahead and assembled these Mortifiers in a single sitting – leaving no subassemblies whatsoever. I told myself this was for sturdiness, but really it’s that when I finish a step – whether it be assembly, priming, painting or varnishing – I intend never to return to it again, damned be the consequences.
I am, of course, a complete idiot. Don’t be like me. If you can at all help it, I thoroughly recommend leaving off the Penitent/Mortifier/Anchorite itself as well as the.. I don’t know what to call them? Needle controls? Yeah, all of those on the back. If you do glue either of these down, it’s not the end of the world – particularly if you prime black – but they are a right pain in the arse to fully get into once they’re glued in place. The last thing you want is to take your painted miniature for it’s first game and notice that in bright, natural light conditions there is a very visible unpainted area in the back of your miniature. The good news here is that they are fairly simple bits to paint – at least the hard to reach bits are – so you really don’t need to leave these bits off for too long.
Other than forgetting to sub-assemble some bits, the paint job for these actually went somewhat smoothly – although they were a lot more involved than I expected. For starters, I had entirely intended to paint the majority of these Mortifiers as big metal constructs – base coat with a can of Leadbelcher, paint the trim and maybe put a few traces of ivory7 and orange on the chassis. However, when I had a look at how they were painted on the box art – predominantly in the colours of Our Martyred Lady – I thought about how they’d look in big grimy ivory and I couldn’t help myself. I primed them in white, airbrushed them in Elfic Flesh and went about picking out the details. As ever, I did this with Metal Color Silver, Game Color Bright Bronze and Fiery Orange. For the exposed skin on the Repentia, I wanted them to look a little bit ill given the copious amounts of drugs in their system, so I mixed a little Vallejo Game Dead Flesh into my Rosy Flesh for the base coat and into the Pale Flesh highlights (but still washed it with Reikland Fleshshade).
Washing these miniatures was a messy affair, but the job got done eventually. Copious amounts of Nuln Oil deep into the vast cavities on the back and behind the penitent, Seraphim Sepia over the ivory and Reikland Fleshshade over the skin and brass. I didn’t bother pin washing with the sepia wash this time, because I had an idea that I hoped might make painting these minis quicker. Instead of traditional layering, I decided to sponge some Elfic Flesh back over the washed ivory, hoping that it would pick out the exposed areas for me first and leave a messy, scratched and muddy speckled finish that became sparser and darker towards the recesses. This.. worked. A bit. Sponging wasn’t nearly as fast as I’d hoped it would be, and I found myself compelled to go back over certain areas with further sponging where I wasn’t happy with the coverage. It was also extremely messy and basically necessitated me going back over a lot of the other colours again. I was a little disappointed with the result at first, concerned I’d mucked up the miniatures with this technique – until started putting down some edge highlights with White. This little extra bit of contrast really helped bring it all together and I was reasonably pleased with the results by the end. If I were to do this again, I’d probably do the sponging before painting a lot of the other details and trim and save myself the hassle of painting over those areas again.
Much else was standard affair and not a lot different to how I painted the Rhino or the Repentia. I still toothbrushed a little Seraphim Sepia at the end, but didn’t bother flicking at Blood for the Blood God at them – being predominantly white, I was worried it would look a bit much. Lots of dried blood and fresh gore on their melee weapons though.
I have one final miniature left to show for this entry of the Emperor Protects – and that is my Missionary.
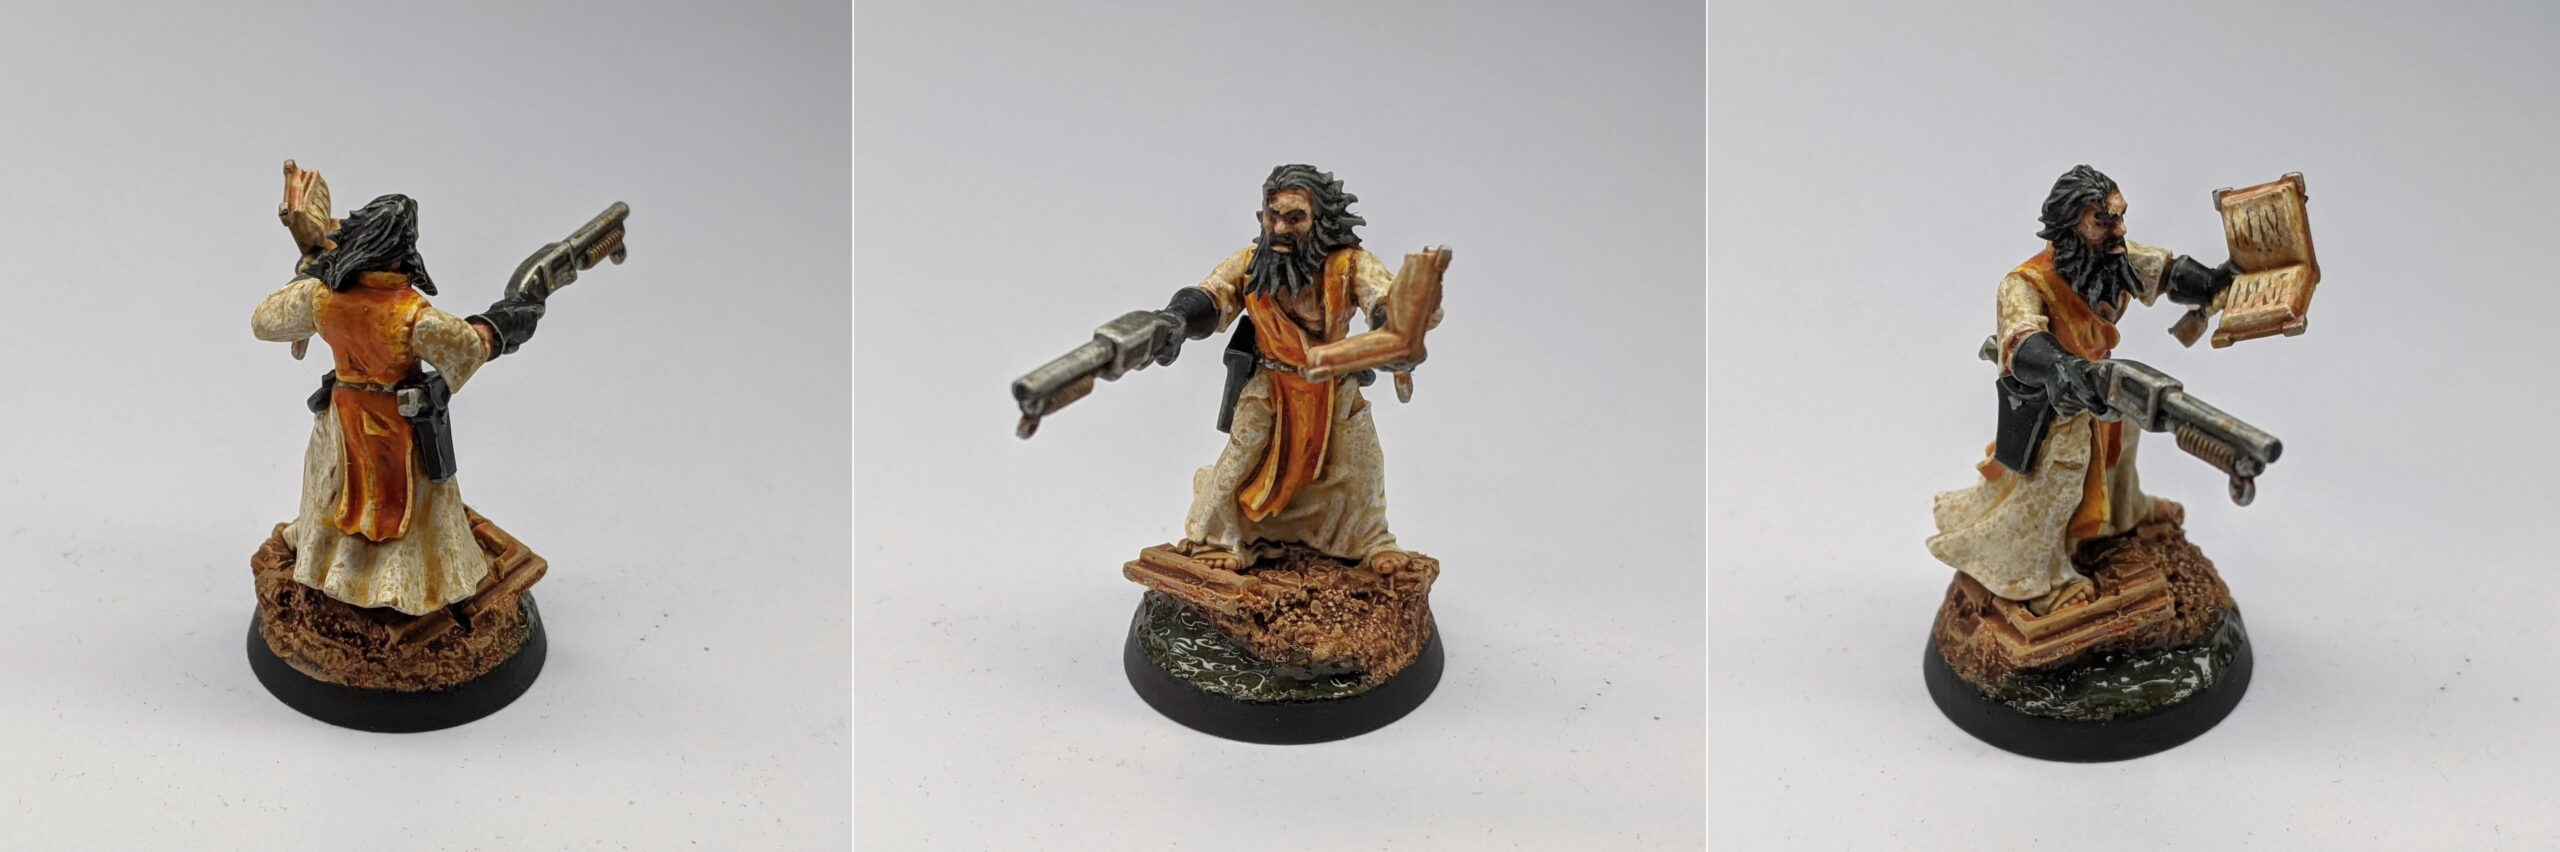
In Part One, I stated what a profound influence John Blanche’s original artwork of Canoness Veridyan had on me, and a key element of that was the grimy old men in the background. There was absolutely no way I was going to run a Sisters of Battle army without a few Preachers and Priests peppered throughout.
Along with Crusaders, Death Cult Assassins and Preachers, Missionaries are one of those oddball Ministorum units that have been there since Sisters of Battle were somewhat blurred with Daemonhunters. They’re in the new Codex out of historical significance and the fact that the models are technically still in production, although many of these are about as old as I am. The currently available minis for Missionaries and Preachers aren’t the best8, but the lack of a modern miniature does provide an opportunity to kitbash something cool of your own design.
Given that, in all likelihood, I would eventually be including a Priest or two in my army as well, I wanted my Missionary to have something a little unique about them. Something that – in the high likelihood that all of these would just get made from Empire Flagellants – would unambiguously mark one of them out as the HQ choice. The best way to unambiguously achieve this was by giving them wargear that only the Missionary gets access to – the bolt pistol and shotgun. I took a head and a body from the eternally useful – you guessed it – Empire Flagellants kit, added an arm holding an open book from the Sororitas Retributors kit, a holstered pistol to represent his laspistol and an arm pointing a shotgun from the Atalan Jackals kit. Conveniently, the flowing robes and glove from the Retributor Superior arm not only went pretty well with the Flagellants attire, but it helped give him a shared visual element to tie him in with the rest of the army. I kept the arm roughly as is, shaved down the exposed power armour on the elbow and smoothed it over to look like a naked arm. The arm from the Atalan Jackals of course did not match, but the glove was kinda sorta close enough. I took an unused extended bolt pistol arm from my Seraphim kit and switched out the glove holding the bolt pistol for the glove holding the shotgun. The end result was a pretty cool looking priest, bellowing war hymns to the God Emperor from his holy scripture and directing His fury at the end of a shotgun. Awesome.
I toyed with the idea of painting my Missionary in a unique scheme – plain brown friars robes, for example – but I’m a sucker for tying things into the army today. As such, his colours were once again fairly by the book – Elfic Flesh for the robes, Fiery Orange for the tabard, Black for the gloves, leathers and hair, Rosy Flesh/Pale Flesh for the skin, and Silver/Bright Bronze for the silvers and golds. For the holy text, I base coated the cover in Dark Fleshtone and the pages in Elfic Flesh. A quick wash of Seraphim Sepia, some leather brown highlights on the cover, some Elfic Flesh highlights on the pages and a few little scribbles and Fuegan Orange stains to finish it off. Easy as, from primer to painted in a single evening. I quite enjoyed painting this miniature – it was pretty low stress, and there wasn’t an awful lot to it in terms of ornamentation. A nice little palette cleanser before getting back to the constant grind of Battle Sisters.
Well, that about wraps up Part Two of The Emperor Protects. These miniatures were a lot of fun to paint, and significantly less painful than my experiences with the Battle Sisters and Celestine. It’s been a welcome break, but – looking forward towards Part Three – I think it’s time I got back to grinding through my big pile of Battle Sisters. As there’s not going to be much with regards to the paint job that I haven’t already covered in parts one and two, I’ll be taking the opportunity to deep dive into what I believe to be the optimal combination of kits to create a useful, future proof and flexible pool of Battle Sisters, Dominions, Celestians and Retributors. I’ve spent a lot of time obsessing over this build order, so I’m looking forward to sharing my findings with the community.
Until then, thanks for reading and happy wargaming!
1 Notable exceptions to this “plastic doesn’t use a slotta base” rule includes pretty much all of the plastic miniatures from the Lord of the Rings period of the Middle-earth Strategy Battle Game and even modern plastic Blood Bowl miniatures.
2 I’m a big fan of cork as a basing material when used in conjunction with sand, gravel and/or texture paint. I know that cork can sometimes get a bad rap because, on it’s own, it almost always just looks like painted cork – but throw some texture paint over the top and sides and you’ve got some pretty convincing rock.
3 There is a cruel irony in the fact that the Repentia miniature with by far the most interesting features – a sense of motion, a really cool/creepy gas mask hood, sci-fi dreadlocks and an awesome bulky Eviscerator littered with purity seals – is by far the hardest to do anything unique with. Not only can you not swap her head with another Repentia as it’s fused to her arms, those same arms also kind of block how much of it you can see in the first place. It’s a crying shame.
4 On the whole, most wargamers that I’ve met have been very lovely people, but you do get the odd judgemental comment from time to time. One charming opponent once informed me that there’s a “new plastic Great Unclean One that’s cheaper and looks better” than my Exalted Great Unclean One from ForgeWorld that I’d just painted and brought to it’s first tournament.
5 My hands were kind of tied on the Sister with a gas mask – but their heads are mostly obscured anyway, and they have unique Eviscerators at least.
6 Photo credit: Miniwargaming. I really do wonder if this is a first for Games Workshop.
7 I see the Penitent Engine itself as property of the Order, so while it would be pretty imposing to see a big unit of black Penitent Engines in an otherwise ivory army, it didn’t really feel right. The Sisters Repentia strapped into the engine are in black though.
8 But they’re not the worst either. There’s some scale issues – look at the derpy chainsword on the Preacher model – but overall I think these miniatures are still pretty cool.