Last month I took my Rivendell High Elves to a local(ish) Middle-earth tournament, and I found myself in the enviable position of not really having anything to prepare for the event.
My Rivendell High Elves – similar to my Heresy-era Space Wolves – are a relatively ‘feature complete’ army at this point. In most Matched Play games (at the usual points limit of 500-1000), I can field just about any kind of pure Rivendell force I can imagine without the need to buy and paint any more miniatures. There’s a couple of outliers – I cannot field a full Cavalry force (unless I field a lot of heroes), and I have no idea what I’d do to represent an armoured, mounted Lindir – but those extremes aside, I’ve got enough infantry and characters finished that I could take the army to several events and not play quite the same army twice. The dream has been realised.
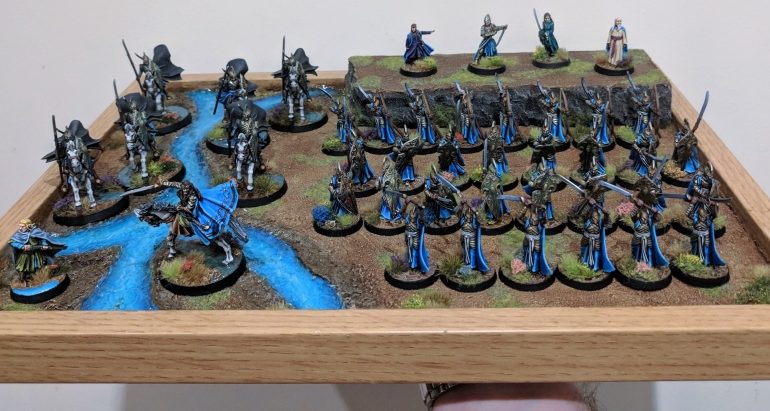
With most of my major projects done and dusted and the narrative campaign goodies well underway, I decided to take some time out and very quickly knock out a display board for the army – and by extension, pretty much all of my ‘Good’ armies.
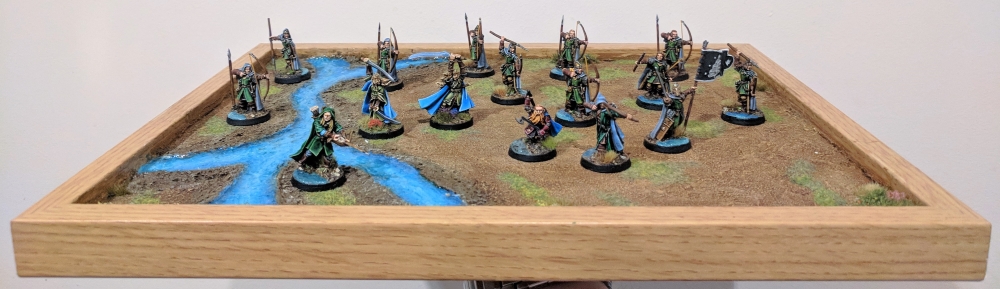
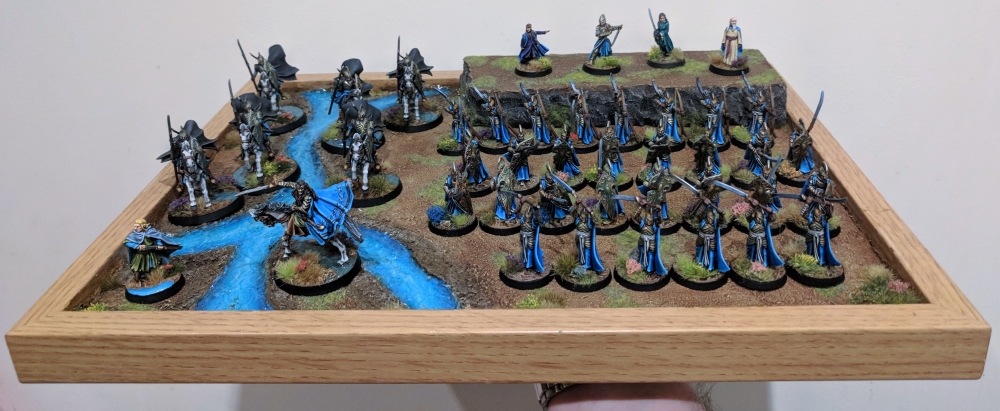
The first attempt – which I took to the event – was pretty low effort, if I’m honest. I didn’t really put much thought into it. I had this baking tray that I took with me in my case – it was just small enough that it would fit into the front pocket, but generally be just big enough for transporting my whole army from table to table. The fact it was a reasonably sturdy piece of ferrous metal meant that the magnets on the underside of my bases would have a really nice bond to the tray, making it especially safe – handy when you’re a ham-fisted clutz with your miniatures, like I am.
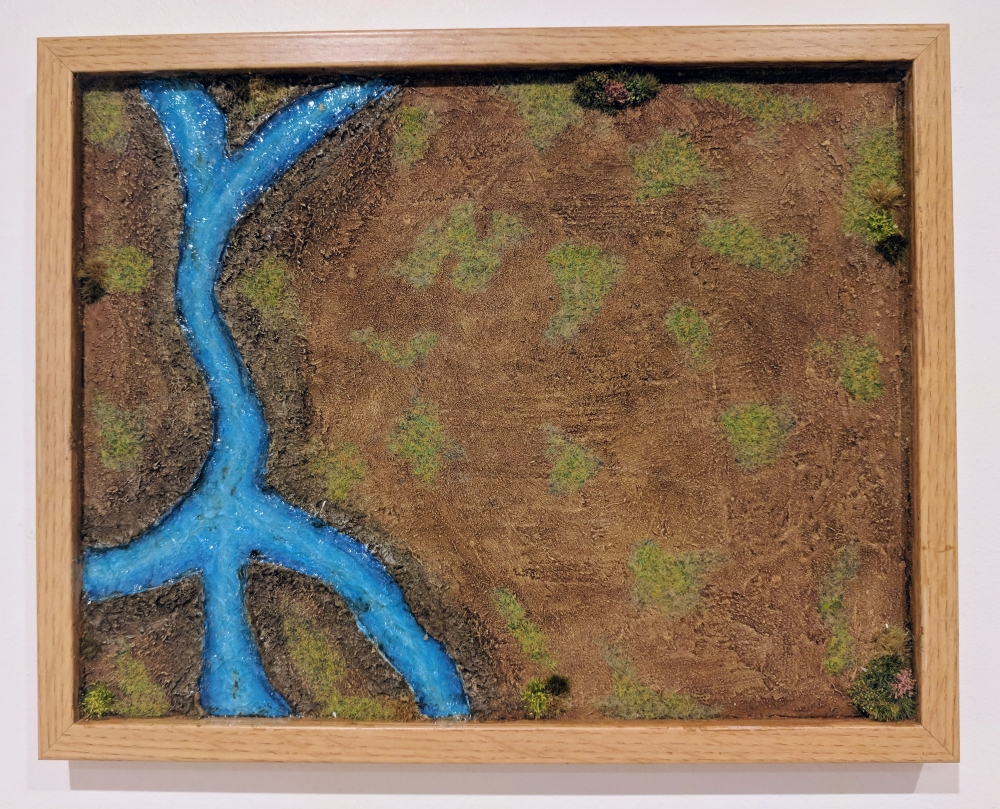
The premise was simple; I wanted it to look and feel pretty much like my Rivendell army’s basing scheme. To that end, I primed the whole sheet black (after really going at it with an emery board to remove the non-stick coating and provide a little texture to bond to) and slathered Vallejo Mud Effect over it, leaving a channel at the far right for a river. Once dry, the whole thing was drybrushed and washed like I normally do my bases – and the river handled much like I do my water effect. Two thin coats of Nihilakh Oxide, with a little Guilliman Blue wet blended into the recesses. Once dry, I threw down a nice thick coat of Vallejo Water Texture and waited for the whole thing to cure. The final touch was a few tufts and some static grass.
And it was fine. Visually, it looked good enough. As a last minute extra with the materials I had on hand, it did the part – though it had it’s share of issues. For one, the mud texture was thick and it was a very irregular finish, which meant that it obstructed the magnet and the metal a little too much – meaning the bond was there, but not nearly as strong as it should have been. From a size perspective, it did the job. It fit all of the miniatures in my army, including the dismounts for my Rivendell Knights, but it felt a bit cramped at 800pts and above. The final issue was that it still very much looked like a tray – I had even looked into getting some white pine beading and cutting it to size myself, but the cost of materials and time/effort ratios never really felt all that worth it. I really liked the board though, and so after some deliberation I decided I wanted to work on a MKII.
For all the planning and effort that went into the MKII, I’m a little ashamed I didn’t take more ‘work-in-progress’ photos. Silly me.
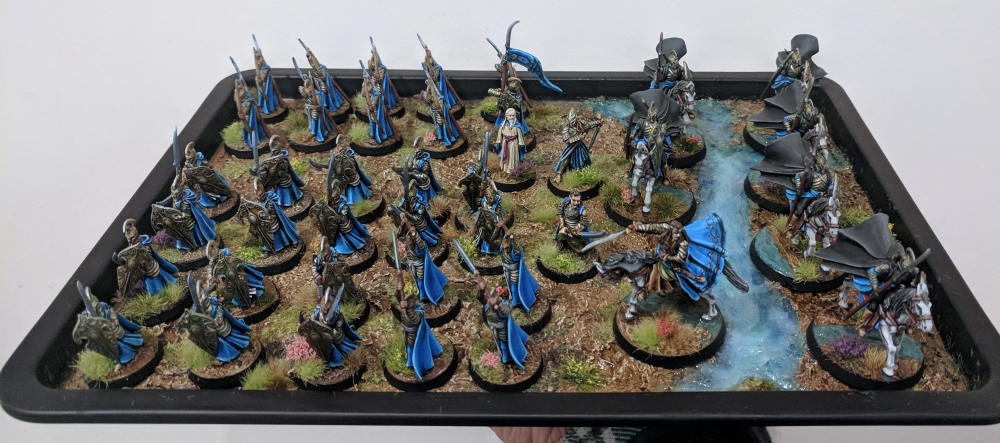
The MKII Display Board, as I would come to call it in my several (I’m sure tedious) conversations I had about it with friends would be a worthy successor of The Display Tray. In order to succeed where it’s forefather had failed, it would need to meet the following criteria:
- Foremost, this is a display board. It had to have a nice frame.
- It had to be large enough to feasibly display a full, 1000pts tournament army of Middle-earth miniatures. Maybe not Hobbits, but certainly my current (reasonably elite) armies – High Elves, Grey Company and Iron Hills (more on that later).
- The magnetic gimmick of the Display Tray was 2 legit 2 quit; maintain the magnetism!
- It still had to fit in the front pocket of my BattleFoam PACK GO.
Seems.. achievable.
The first thing I needed was a good frame – so I went straight to Amazon to look at photo frames.
I had originally had one in mind that I bought for an art print several years ago – not an expensive thing, but the grain looked rustic and appealing and seemed to fit the aesthetic I was aiming for. Unfortunately, it was just a little bit too big to fit in my PACK GO, making it unfit for purpose. Still, the size was fairly close, so I knew I would be looking at 11×14″ frames. What I needed was a narrower border. After a good bit of searching, I managed to find one at just the right dimensions.
Of course, the next issue was how would I maintain the magnetic element. For that, I decided to hunt down some sheet metal. Thankfully, eBay is absolutely bustling with hardware shops that will not only sell you all sorts of materials, but even cut sheets of mild steel to custom specifications (within a couple mm tolerance) for pretty reasonable prices. I ordered up a sheet that would replace the glass pane of my frame, and when it arrived I removed the back of my photo frame, binned the sheet of glass, and carefully inserted my mild steel – as it wasn’t quite big enough to fill the frame without potentially shoogling too much in one direction and leaving a gap, I used super glue to glue it directly to the frame, and then glued the wooded back panel down, finally gluing the little metal claps down after pressing them tightly to the wooden panel for extra security.
Now it was time to texture the surface. Instead of Vallejo Mud Texture all over this time, I used Vallejo Brown Earth instead – it’s a finer grained, smoother finish, and I took greater care in making sure I had a reasonably thin and consistent coverage across the surface. I applied two thin coats to ensure consistent, opaque coverage over the metal surface, though on the second coat I switched back to Mud Texture across the edges of the river channel to give a bit a muddy river bank feeling. It’s a subtle effect, but it works.
Once the surface was dry, it was time for drybrushing. As with my bases, I did this in two faces – one sloppy drybrush of Leather Brown, and a lighter, more controlled drybrush of Elfic Flesh. Afterwards, I washed the whole surface in Seraphim Sepia, and the earth was finished.
As with the earth, the river was painted in a similar fashion to my bases. First, I covered the whole thing in a coat of Nihilakh Oxide to provide even coverage, and then applied Guilliman Blue glaze to the edges of the water. While this was drying, I wet blended the two tones together to create a more natural looking finish. As the river was slightly thicker and larger than my bases, I also put a very thin and transparent coat of Elfic Flesh mixed with Nihilakh Oxide down the centre of the dream in a sort of wavy line to finish. This was sealed with Vallejo Gloss Varnish and left to dry before water effects were added.
Applying the water effect was – can you sense a pattern yet? – like applying the effect on bases but on a larger scale. I pretty much slopped it on with a Citadel L Base brush and tried to spread it thickly and evenly across the whole channel. This required a thicker, longer coat than usual and as a result took a long time (several days) to properly cure and become transparent again. Frustratingly, on my first attempt, it became clear that my Seraphim Sepia wash had not fully dried and some managed to get into the water effect, giving a nasty yellow streak. I had to cut the water effect out with an X-Acto knife and try all over again – only to find my second application of the river paint had not dried properly and rubbed off on the water effect application.
Third time was a charm – I left the paint on the river to cure overnight that time before applying my third attempt at Water Texture (I think I wasted just about a full jar in my three attempts), and this time it all came together nicely. I did have a couple of brown splotches underneath in the blue paint for whatever reason, but it didn’t look bad enough to justify another attempt – and frankly added a little realism to the river, in my opinion.
When the water had dried enough that it was no longer sticky, I then applied my tufts and static grass. Here, I had learned from the mistakes on my first board, and I mixed my Gorilla Wood Glue in a 50/50 mix with Vallejo Matt Varnish to ensure that any areas that didn’t have 100% static grass coverage wouldn’t leave big glossy glue stains. I applied various thin blobs of the glue across the whole surface, and dusted in two layers with my static grass. The first was a bright, almost luminous green static grass that I got from Games Workshop some decade ago, scattered roughly in the centre of the glue blobs. The second was using Gale Force Winter Grass around the edges. After this, I stuck down a few clusters of tufts around the edges of the board exclusively to prevent them getting in the way of the miniatures this time – and the miniatures’ bases are covered in tufts themselves anyway.
With that, the first phase of the display board was finished.
I am, however, never quite content. There were still a few issues to work around, and those became apparent when I tested the board out to see exactly how many High Elves I could cram onto the surface – with an entirely flat board, it’s not the easiest to actually display every miniature equally, whilst others obscure vision to the ones behind.
My solution? Modular cliffs.
In a fashion that many wargamers will be familliar with, I built a couple of corner hills out of dense styrofoam – using a 25mm thick block of the stuff, I cut the pieces from the blocks sides and then roughed up the ‘cliff’ edges with my thumbs and an X-Acto Knife. I then installed a couple of magnets on the underside to allow the hill to grip to the board like the miniatures do (and also for transport purposes). To finish, I covered the tops and edges with a nice even coat of Vallejo Earth Texture and – when cured – I painted the cliff edges Mechanicus Standard Grey. Next, I drybrushed the tops with Elfic Flesh before giving them a wash in Seraphim Sepia (like the display board surface itself) and the cliff edges Agrax Earthshade. To finish, I gave the whole thing a drybrush of Khaki and glued down some static grass with a 50:50 mixture of PVA glue and matt varnish.
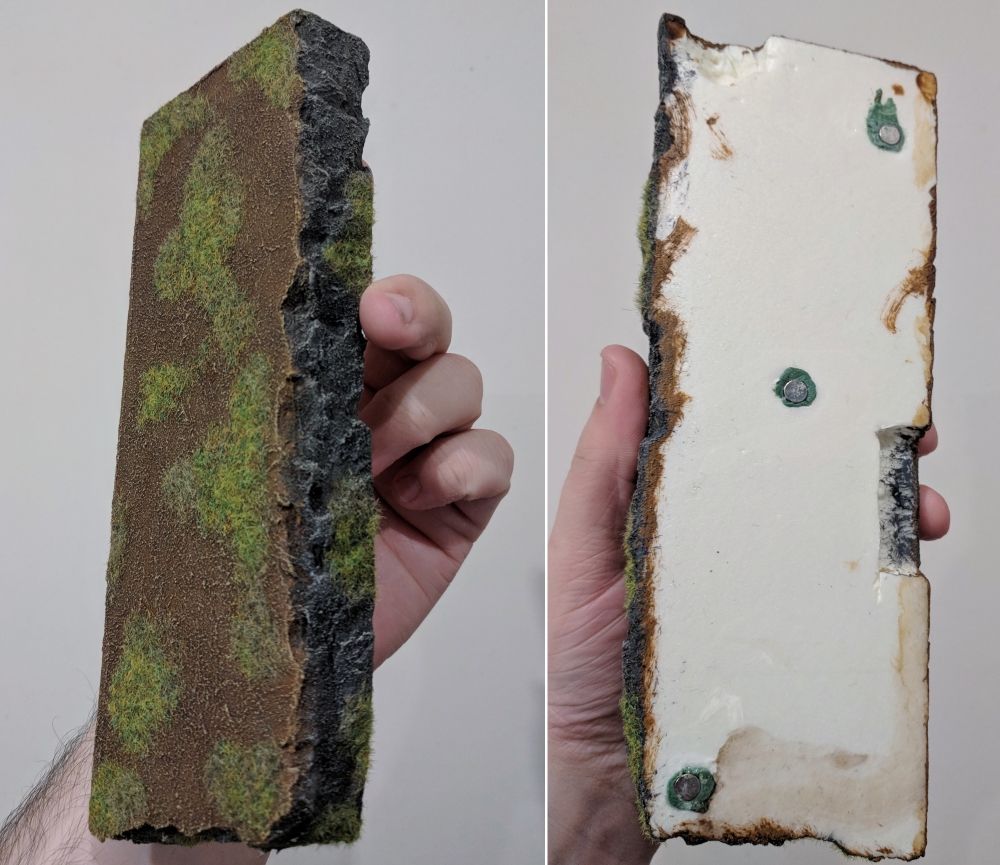
I opted to make two of these cliffs – one smaller, edge cliff, and one much larger two-stepped corner cliff. This way, the display board could have as much or little vertical feature as I wanted – a flat plain for smaller games such as 500pts or with my Grey Company; a single stepped hill to display my Heroes separately from the rank and file; or the two tiered hill which also covers over some of the river section, giving me a little more floor space for my miniatures if I really need it.
I’m really happy with how the cliffs look, and they turned out pretty much exactly how I imagined them in my head. The magnetic bond is extremely happy as it adds stability, and also makes them really easy to transport separately in the case. The only downside, however, is that while their top surface provides a decent amount of grip thanks to the fine grit of the texture paint, it’s no substitute for the magnetic bond of the actual board itself; I imagine I will be removing the hills when using the board as a tournament tray to carry my models between tables. Not really an issue, but it’s a little bit of a missed opportunity.
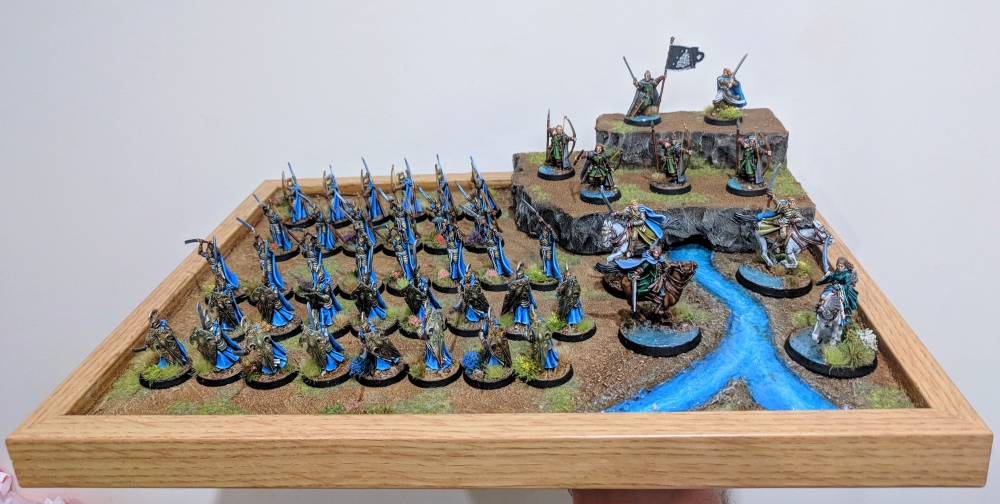
With the completion of the modular cliffs, my MKII Display Board was officially finished. It’s still not quite perfect – frustratingly, I never quite could get the river looking as good as it did on the first board; it’s not entirely free from the odd visual imperfections, such as the blemishes in the river. There are a few areas where the magnets are a little too obstructed by the texture paint for a good grip – mostly on the mud around the river. And, of course, I do wish the cliff surfaces were ferrous too. On the whole though, I’m really rather proud of it. Visually, it looks reasonably interesting without being over the top. Thanks in part to it’s relatively generic design and my consistent basing across ‘Good’ and ‘Evil’ armies, it has a lot of potential for re-use. The ferrous steel surface and the idea to leverage it for modular terrain features were two one of my better ideas – and I’m definitely going to expand on that idea for future visual features to add to the board.
Until next time, thanks for reading, and happy wargaming!
1 thought on “The MKII Display Board”