Things have been a little sleepy on this blog so far in 2024, but I can assure you that I have been anything but idle. Back in December, I decided to grit my teeth and push on with painting a batch of 50 Haradrim Warriors for the Ambush at Ithilien scenario, leaving two Mumaks as a ‘reward’ for completing that massively repetitive task. While I did manage to finish the Warriors within the month, this pushed me into some pretty serious Middle-earth burnout – resulting in me just kind of giving up halfway through painting the Mumaks. After a short break, I decided to shelve that project for the time being and get a head start on one of my big new projects for 2024 – Necromunda.
A few of us are headed down for a trip to Warhammer World in the summer and we made the decision to bring only skirmish games in an effort to reduce the amount of luggage needed for the weekend – thus it was decided that we’d bring Blood Bowl (as this could be played in Bugman’s) and Necromunda (as skirmish games work well on the more scenic boards available in the WHW gaming area).
I was excited to take my first steps back into Necromunda, a game I’d somehow managed to avoid thus far in my return to the hobby. Necromunda is one of modern Games Workshops best and most consistent ranges of miniatures, with nostalgic yet modern sculpts that seamlessly walk the line between the campy punk rock aesthetic of the original Necromunda and the more grimdark style of games like Inquisitor. It was exciting and energising and the prospect of working on models for this game felt like the perfect antidote to Middle-earth burnout.

But I’m not here to talk about my Necromunda gang(s) – not yet, anyway. As exciting as it was to cobble together my first Necromunda gang for the summer, it’s the follow up project that I want to talk about today. You see, I have this problem – without fail, every time that I start a new warband/gang/army project for a brand new system, I can’t help but want to make some scenery for that game. I have my fair share of 40K and industrial terrain at this point, but I really wanted something a bit more vertical for Necromunda. I’d considered biting the bullet and doing a board of the new plastic Zone Mortalis stuff – that does feature a wide array of stairs, ladders and platforms to make it more three dimensional – but the thought of blocking in all those little arched alcoves put me right off1. Instead, I turned my eyes to Games Workshops previous solution for three dimensional gaming – the Sector Mechanicus range.
Since it’s initial release with Shadow War: Armageddon, I’ve always had a soft spot for the Sector Mechanicus terrain. It’s practical, it’s modular and it’s absolutely dripping with characterful detail. You can just as easily build one off battlefield terrain pieces for full scale wargames as you can stack and combine the gantries and platforms to create multi-level environments for skirmish games – and the possibilities have only grown over the years thanks to it’s compatibility with the Zone Mortalis terrain as well as numerous other adjacent kits such as the Haemotrope Reactors and Thermic Plasma Conduits.
I’ll get one thing out of the way right off the bat – this was not a cheap or remotely efficient way to fill a table with terrain. Building a 4’x4′ structure with interconnected floors of Sector Mechanicus requires a ton of plastic kits, some of which are out of production and/or unavailable from 3rd party retailers. If you’re just looking to create a vertical gantry heavy board, there’s a number of great MDF kits out there that do the trick – and 3D printing is always an option for stuff like this. Nothing quite captures that 40K vibe like a Games Workshop kit, mind you.
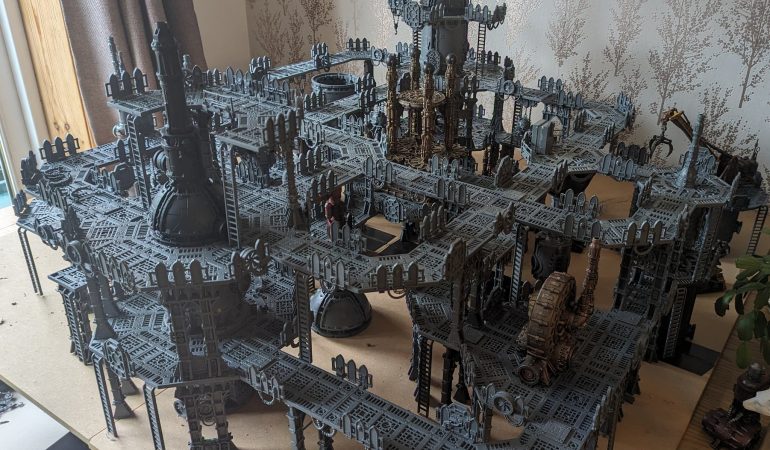
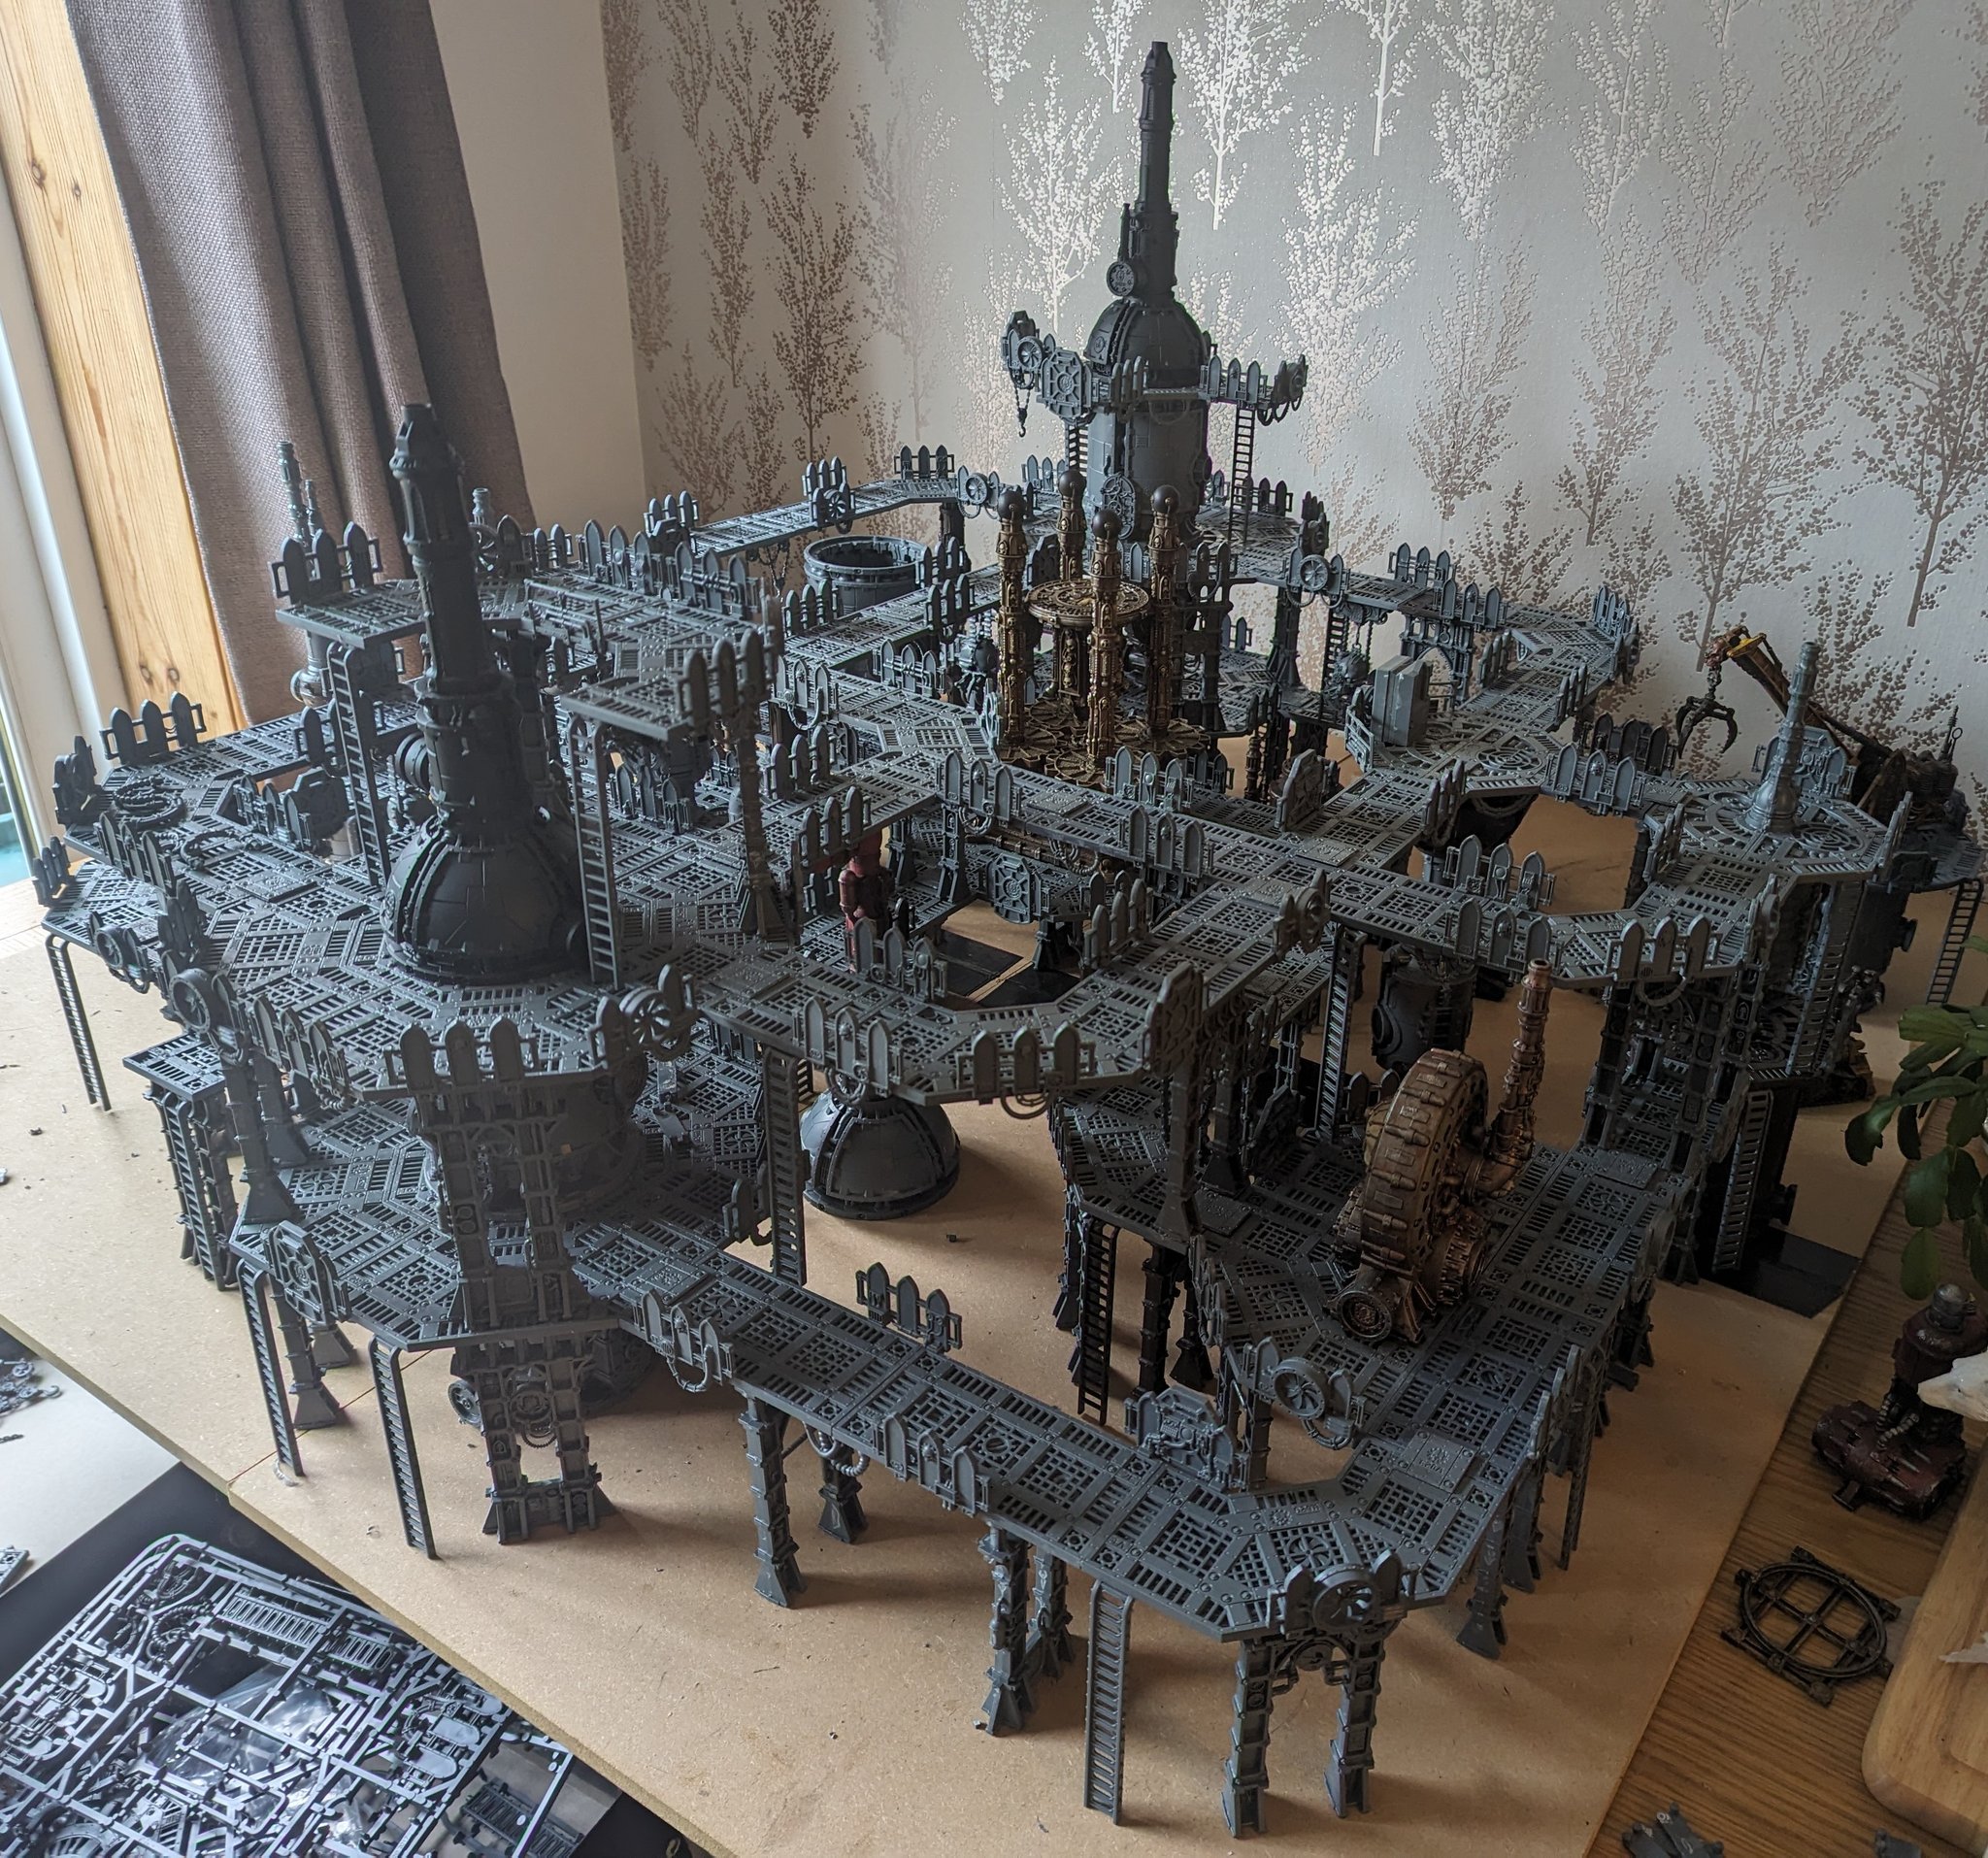
The first step in this process was the most miserable by a long shot – clipping the pieces from the sprue and removing the mould lines. Using the boxes my various kits came in, I tried to keep everything I clipped reasonably organised – a box for platforms, a box for legs, a box for clips, a box for barriers, a box for pipes and so on and so forth. All in all, this phase took me a little over a weeks worth of evenings sat in front of the TV clipping parts from sprues and/or slicing off the mould lines. By the time I finished, the spring in my clippers was long dead and my hands were red and aching. No blisters though, so I’m taking that as a win. With all of the parts removed and organised, it was time to move onto the fun stage – planning and dry assembly.
I hadn’t done a great deal of planning on paper ahead of time, having only really done a bit of research into other similar sized builds to get a rough estimate of exactly how much of each part I’d need. Once I had the parts, it was simply a case of putting them together and seeing what I could build in real time. That meant that until the layout of the structure was at least somewhat finalised, I couldn’t glue anything together. Parts would have to be held together either by push fitting, by use of the underside clips/cables or with good old fashioned gravity. This made building the structure quite enjoyable in it’s best moments, a bit like a fancy Lego set almost. At it’s worst however, this process became incredibly infuriating as one wrong move could lead to the entire structure falling down like a house of cards. Frustrations of dry fitting aside, this was probably the most liberating and exciting phase of the entire project. I was able to experiment in real time with different layouts and explore the strengths and limitations out of the different pieces.
There were a few technical kinks I needed to figure out when I was laying out my floor plan. All of the floor pieces ultimately share the same dimensions – the rectangular gantry flooring was equivalent to two square pieces next to each other. The hex pieces are equivalent to two overlapping rectangular pieces in a cross filled to make a hex shape. This means that – in theory – the hex works well as a crossroads, given that either side running north to south or east to west will be equivalent in length to a rectangular piece. In practice however, you cannot directly connect the north side of a hex to the east of another – as this would result in a half-square sized gap. Two overlapping rectangles is equivalent to a square piece with half a square attached to each side, which means that the hex will substitute perfectly for a rectangular section in a straight line, but if you try to connect one of it’s sides to another piece, you’re starting from a half-square out. Thus, the only way that you can connect one side of a hex to a perpendicular side is by connecting first to the side of another hex. If all of that sounds complicated to you, well, then.. Good, I feel vindicated, I guess. This whole thing caused a lot of confusion and trial and error before I figured out why it was happening in my layouts.

Another technical hurdle to overcome was figuring out how to adequately support the second floor of the gantries. The easiest solution to this problem is simply to layer the floors directly above one another, but that doesn’t exactly make for the most compelling map design. Instead, I tried to design my walkways such that they’d partially overlap or intersect each other, as well as getting creative with the reactors, stacks and generators that came with the various kits. I found that sections of pipe, the main body of the Alchomite Stack as well as the Ferratonic Furnace were all the same height as the platforms legs, while the Dome part of the Alchomite Stack was roughly half that. Combining these, I found them incredibly useful as support structures to hold up the long stretches of second floor gantries that didn’t overlap the first floor. The domes in particular worked great directly beneath a hex piece, which allowed me to connect them to Alchomite Stacks and pipes – somewhat narrower pieces that allowed them to fit into the harder to reach areas. I’m particularly proud of one monstrosity that I concocted out of three Alchomite Stack chimneys, a dome piece and a hex platform – which not only provides a little platform above the Corpse Starch Plant, but supports two second floor gantry pieces – with a little clip that glued nicely into a recessed area on the stack helping to these walkways in place. It’s cool, it’s structurally sound and it serves several practical uses – that’s a win-win in my books.
The final technical issue that had to be overcome was modularity. There are two levels of modularity that I’m talking about here – the first and most important was how it would assemble and disassemble for storage. I wanted the terrain to be stable enough that you could play a game on it without having to worry that it’s going to come crashing down on top of the miniatures – a little bit of creaking is to be expected of a project like this, but I didn’t want it swaying about or falling apart every time somebody knocked the table during a game. Additionally, it had to come apart into small enough pieces that storage wasn’t going to be impossible, but few enough parts that disassembly and reassembly wasn’t going to be prohibitively time consuming. This isn’t the sort of table you put together for a quick pick up game in an evening, but anything longer than an hour to set up (including time spent getting it out of the attic) would end up putting me off playing with it. The second level of modularity was re-use of components for different layouts or styles of game. Realistically speaking, I fully expected to have to make compromises here in order to ensure stability and storability, but I still hoped I’d be able to get a couple of standalone pieces that I could use in games of 40K at the very least.

Of course, there were more than technical issues to solve here – it still had to feel interesting to play on, it needed to make ‘narrative’ sense as a structure and above all, it had to be cool to look at. I remembered the crazy oil rig that they built for White Dwarf back when the kits were first released alongside Shadow War: Armageddon and how seeing that made me feel. It was unique, epic in scale and presented an opportunity for interesting, unique gameplay that wasn’t possible otherwise. Above all, it really felt like a real location within the Warhammer 40,000 universe and taught me that on a large enough scale, the building blocks of Sector Mechanicus could be used to create something that really felt like a unique location with a purpose rather than some generic Mechanicus structure.
As I’d said earlier, I did my fair share of trawling through Google and Pintrest searches for Sector Mechanicus, trying to find inspiration for how to build my table. I found a handful of interesting ideas and concepts of sprawling Sector Mechanicus tables. A lot of them, however, seemed somewhat linear to me. What I mean by this is that the structure itself would be several floors tall, but generally originate at a central nucleus and have a number of linear paths coming out of it. Travel between those paths, however, was pretty much non-existent – you’d have to go to the ground floor if you wanted to go anywhere but forward or backwards. This approach has it’s advantages: you get a nice risk/reward trade-off of faster traversal across a more exposed ground floor and it keeps the board open for ease of access. The downside, however, is that traversal across the Sector Mechanicus terrain – the most interesting and exciting part of the battlefield – becomes kind of mundane and railroaded.
For my layout, I really wanted the Sector Mechanicus terrain itself to feature branching paths and alternative routes across it – that for any particular turn, you have the option to move up/down, forward/back or take the left/right path. I didn’t want the two floors of the structure to overlap each other, but to intersect and run parallel to each other so that gangers could have firefights across different floors or jump down on enemies from above. Additionally, I wanted it to be roughly symmetrical – for two sides of the board to have an equal number of vantage points and pathways across the board – without necessarily being mirrored.
To that end, I found myself just continuously tinkering with the layout as I built it. I tried to keep the amount of gantries that overlapped each other to a minimum and kept adding additional branching pathways. Eventually, I found myself contented with the number of potential routes from a gameplay perspective, but became confused as to what their actual in universe function was supposed to be. For example, there’s a big loop on the northwestern side of the 2nd floor that – while providing an alternative route across – didn’t really make sense to me. Why was it there and why would anyone ever take it when there’s a more direct route to the other tower? To solve this, I put an open-topped Ferratonic Furnance on the first floor right next to this outer loop, which I stuck piece of plasticard into and filled with papier-mâché, Plaguebearer bits, skulls, glass agitaor beads and other bits of junk to make a Corpse Starch vat. Now, this outer loop wasn’t just a scenic route across, but an access walkway to survey the cursed soup.
From the symmetry standpoint, I managed to keep things mostly balanced – 3 paths each from both the north and south towers on both levels largely converging on a central path – though I did manage to prevent it from looking mirrored. On the first floor, I tried to segment things into specific areas of productivity – the western side is very much the ‘kitchen’ while the eastern is more focussed on packaging and fulfilment. On the ground floor, we have a Corpse Starch Plant that I ordered from eBay2 which is converted from a Nachmund Landing Pad terrain kit with some 3D printed industrial plant bits on top (and a whole lot of texture). This is flanked by a surrounding walkway and a little platform area where body parts can be thrown into the vat. Further north, we have the aforementioned Storage Vat on the first floor. On the Eastern side however, we have a large D-shaped platform featuring a Haemotrope Reactor and further north there’s an open area where I planned to put a few Munitorum Armoured Containers down, overlooked by the round Ferratonic Furnace platform from the Killzone: Bheta-Decima kit onto which I’ve placed a Galvanic Servohauler crane. The second floors asymmetry was a little less deliberate and simply a case of using whatever tools and parts I had at my disposal to keep it supported, such as the inclusion of additional Hex platform on the Northeast side so that I could support it with an upside down dome piece connected to an Alchomite Stack chimney.
Verticality can be a huge advantage in game, so I was conscious that the highest accessible point had a counterpoint on the opposite side of the board. That said, something just felt wrong to me about having both sides having an equal ‘height’ on the silhouette. To solve that, I added a third floor to each of the towers, though achieved these in different ways. The North side received a Ferratonic Furance, on which stood an Alchomite Stack domed chimney with three square platforms facing inwardly to give models a place to snipe from. On the southern tower, I placed the same domed chimney piece directly on the centre of the 3rd floor, but added a half circle gantry with a control box in front of it. This gives both sides equal opportunities for high ground sniping, while still allowing me to sit one of the chimneys a level higher than the other, creating a nice asymmetrical look to the board without giving one side too much of an advantage.
So, that’s roughly everything I have to say about this build. It was a ton of fun to research, build and experiment with and I still feel like I’ve barely scratched the surface of the potential of these kits and their ability to combine with other Games Workshop plastic terrain kits. But assembly is only one half of the battle here – now I’ve gotta paint this monstrosity. Check back in soon for Part Two where I elaborate on my method for painting this this and share photos of the finished product.
Until then, thanks for reading and happy wargaming!
1 Not to mention that I’ve already got a board of 3D printed Zone Mortalis bits and pieces which – due to their relative simplicity, softer detailing and far less expensive price tag – I felt more comfortable knocking out quickly with spray paints and sponging.
2 In all honesty, discovering this piece was probably the impetus I needed to make this board focussed on Corpse Starch. Maybe one I’ll go back and replace this piece with a plant kitbashed from purely Games Workshop kits – there’s a certain joy to be found in working with limitations and finding creative solutions, after all.
That’s an awesome bit of terrain! You also posted this at quite a fortuitous moment, as I’m half a step behind you, gazing at my boxes of pre-sorted Sector Mech terrain with a mix of excitement and dread. 😅
My plan is having several large tiles of self-contained stuctures with modular gantries so I can vary setups more. Loses a bit of narrative cohesion, but makes storing and use for various games easier. I’m also using the ZM stairs and the new half-height pillars from the bheta decima set to make traversal between levels a bit easier, since the long ladders have often interfered with movement during games.
Well anyway, this is your show and I’m really looking forward to your painting tips!
Honestly, that’s not a bad idea. I did try to keep a couple “modules” apart so that I could potentially put together some additional sets down the road and make this terrain reconfigurable, but for the most part it’s pretty much set in stone. I’ve definitely learned a few harsh lessons as well – everything being interconnected is fun for the models on the terrain, but it does pretty much make the ground floor unusable which means I’m limited in how much scatter terrain I can use with this board as well.
Funnily enough, I actually bought a Bheta Decima box myself with the intent of making some half height areas for exactly that reason – to integrate ZM Stairs and half ladders – but in my building and experimenting I ended up not really having space for any of it, another thing that would’ve been solved with building a few standalone pieces rather than one interconnected behemoth. Ah well, live and learn!
The inaccessibility of the ground floor acurred to me, too. That’s why I got a double-sided murky water/lava battle mat.
Makes those “test to not fall off” rolls extra spicy. 🤭
This is just super cool. Seeing those kits in the box art you imagine something like that is possible but actually seeing it done is something else.
I’ve been keeping a keen eye on the Necromunda range, so much of what is coming out of that corner of the studio is just great. Makes me want to add some more projects to the neverending backlog.