
A few years ago, my lovely wife made the pivotal decision to get me something miniatures related for my birthday, eventually settling on the venerable but magnificent Treebeard. I was quite unable to contain my excitement for this and proceeded to build and paint the miniature the same day. Desperate to use this miniature in a game, I knocked out pair of plastic Ents to join him and took them to a Middle-earth doubles event where my partner (who brought Eagles) and I came dead last (but had a lot of fun doing so). Other than bringing Merry with me to Scouring of Stirlingshire 2023 to enter into the Hobbit or Ruffian Single Miniature competition, my Ents haven’t really seen much action or expansion since. That doesn’t mean I didn’t have further plans for them, however.
A few years ago, Games Workshop ran a Middle-earth Made to Order which featured the old metal Ent kit at a semi-affordable price. These models are wildly different to the plastic Ents, with chunky hand sculpted texture to the bark and of considerably shorter stature, closer in scale with the older Treebeard model without the height modifications that I made to mine. Needless to say, I snapped up three of them at the time with the intention of eventually expanding my Ents1 into a full blown 800-1000pts army. As is so often the fate of limited run miniatures however, I wasn’t yet ready to give them the attention they deserved – and so they would languish in my backlog for months, patiently awaiting their time. Once work began in earnest on the Two Towers leg of the Lord of the Rings narrative campaign however, the end was finally in sight for my Ents.

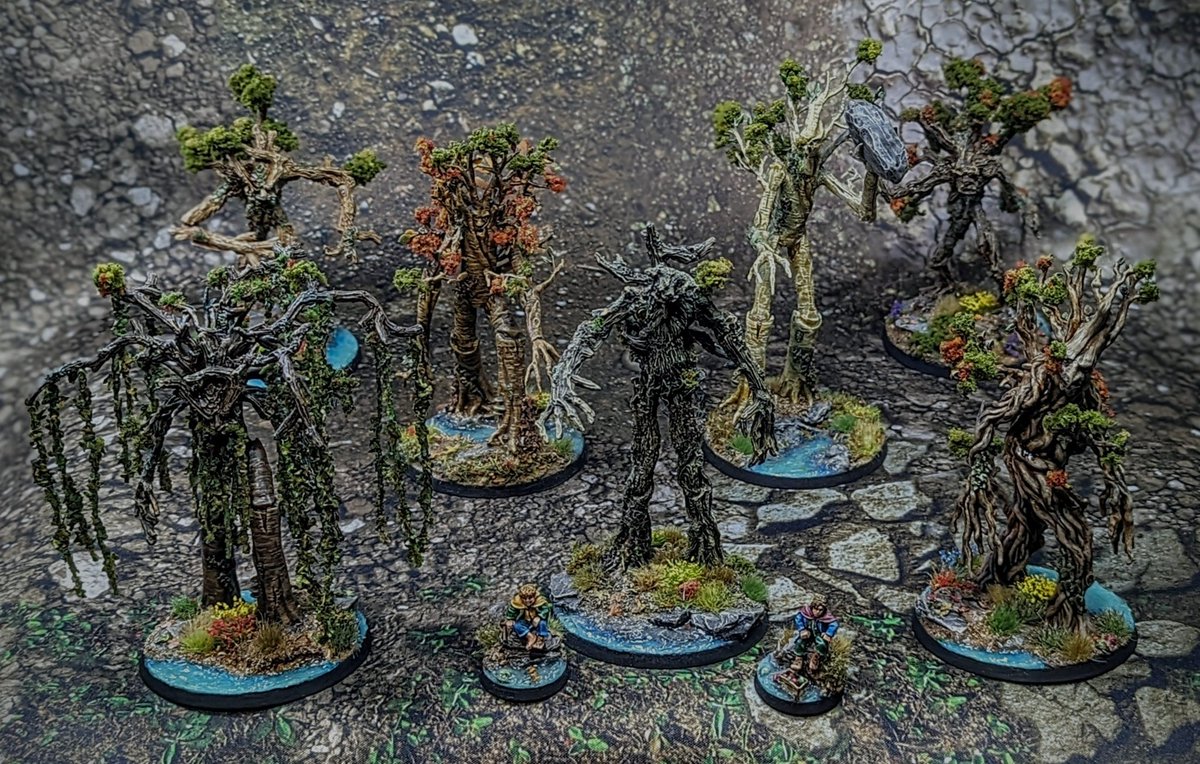
When you’re staring down the barrel of over 100 infantry to clean up, assemble and paint, any brief reprieve from another variation of “28mm dude with a cloak” is incredibly welcome. While the Ents are technically among the last of the models actually needed to play the campaign, I found them incredibly helpful as a means to break up the tedium of painting the endless swathes of Rohan, Dunland and Harad. Any time I found myself too fed up to paint another Rohan Warrior, I’d crack open an Ent and clean up some of the parts. When I felt the hordes of Dunland starting to crush my spirits, I’d assemble another Ent. Before I could even bring myself to get started painting the 48 Harad Warriors needed for the Ambush at Ithilien, I took a week off of hobbying before weaning myself back into the process by painting my forest of Fangorn.
Assembling and painting the basic metal Elves and even Quickbeam (in ForgeWorld resin) was pretty painless, all things considered. The parts all went together nice and snug and any gaps leftover were pretty simple to fill, thanks to the rough organic texture of the miniatures themselves. Aaand then there’s what would become the Willow Tree.

The metal Ent kit comes with a single body and set of legs, but contains two different sets of arms, two different sets of branches and two different heads – the idea being you can build two completely different Ents and then a further two unique models by mixing and matching the heads and arms. That’s fine, but given that this army has such a low model count, I wanted to keep my Ents looking as unique as I possibly could. As I now had both key variants of both the plastic and metal Ent kits, I thought about maybe making a hybrid of the two kits for my final Ent.
My initial experiments here were kind of mediocre. The kits didn’t go together quite as well as I’d have hoped – not without extensive green stuff work at least. Eventually, I turned to the movies for inspiration and was reminded of perhaps the single most striking Ent in the films – the Willow Tree. After taking another look at my bits3, I discovered that I had a couple of spare branches left over from assembling the first two plastic Ents, which incidentally would be perfect for creating Willow tree branches. In the end, I used the legs and torso from the plastic Ent kit, with the arms and head from the last metal kit and all five remaining branches from the three metal kits to create the overhanging branches to dangle leaves from. All in all, this wasn’t actually too bad too assemble and needed surprisingly little green stuff to hide the joins, mostly just around where the metal arms meet the plastic torso.

Painting the models themselves was a breeze, for the most part pretty much coming down to washes and drybrushing. I tried my best to vary up the colours I used on each of the miniatures to prevent the forest from looking too “uniform”. Even the most common colour tone employed on the group – the dark brown tone on Treebeard, the Willow tree and one of the metal ents – is still three different variations, with Treebeard leaning towards a greeny brown and the metal Ent reading a little lighter than the willow. That being said, there were a couple of exceptions. Due to combination of the colour I chose for Quickbeam and the smoother texture of the model, I found it quite tricky to avoid making him look chalky. Although I eventually reached a point that I was happy with, I’m not sure I have any useful advice for anyone else struggling with this issue other than to just keep applying layers of paint and wash until it works for you. More layers of paint obviously means more depth, but be mindful that your washes don’t make your recesses too flat and dark.
For the Willow tree, however, no amount of drybrushing was going to cut it. A combination of the dark brown colour scheme and the fairly smooth texture on the plastic kit meant that drybrushing and washes simply resulted in the model looking either chalky or flat, which meant I had to resort to somewhat more manual means. As with on the caramel brown plastic Ent that I’d painted last time, I found the best approach was to paint hundreds of tiny little vertical lines across the body and legs of this guy. I applied these in layers, changing colour each pass from dark browns to lighter browns to desaturated greens and varying up how many and where each of these little scores would go every time. After a few layers, this starts to create a nice, textured look to the wood and – if you’re careful and deliberate enough to go a little heavier on the lighter colours towards the edges and raised areas – lets you create the effect of shading and highlighting without having to think too much about what you’re doing.
With the painting done, we come to the fun bit – gluing stuff on. For whatever reason, I can never quite strike a comfortable balance when painting the leaves – they’re so small and fiddley, I often start out spending ages edge highlighting them individually, though eventually end up giving them a wash and drybrush when I burn out and that never looks great. So, to compensate, I glue flock to the models. I use a mixture of tones here, starting with my forest green Woodland Scenics clump foliage and adding two tones of Gale Force 9 green flock (a darker cold green and a lighter warm green) plus an ‘Autumn’ mixture Gale Force 9 flock to add depth and vary up the tones. This is generally done by applying a little bit of super glue to the plastic leaf then squishing some flock onto it and tapping the excess off. Much like using tufts or static grass on bases, I find this step incredibly liberating as there’s nothing really to paint. It’s quick and gratifying and it immediately gives the model an interesting and varied texture. I find it helps tie the miniature into the base a little more – I have a tendency to use different textures such as tufts, gravel, slate, clumps, static grass and flock on my miniature bases, so putting this on the miniature itself I think helps make these miniatures look more a part of their environment. Very fitting for the Shepherds of the Forest!

The Willow Tree, of course, required a somewhat more specialised approach for their leaves. Although I did add a few clumps of flock to the top of the branches, the vast majority of leaves on this model are the trailing leaves hanging from his branches. For these, I used some creeping vines that I bought off of eBay forever ago (so long that I unfortunately cannot remember the manufacturer), which were just bits of twine with a bunch of model scale leaves glued to them. They come in a natural colour scheme, but it’s easy enough spray them a couple tones of green with an airbrush or a rattle can. After painting, these were just super glued underneath the branches and cut to size with a pair of clippers. Pretty simple to do, although it does make the miniature a bit of a pain to pick up – as if the overhanging branches weren’t fragile enough. I also made him a beard out of the same leaves, which I hope distinguishes his face enough from the other metal Ent with which he shares a head. He’s not quite the spitting image of the Willow Tree from Peter Jacksons movies, but I am happy with the miniature overall.
The final step that I like to put on my Ents is some tree sap, which I make using a mixture of Water Texture, plus a little Yellow and a little Sepia wash. After mixing, I apply it to various deep crevices on the model, in some cases hiding joins that I missed during assembly. It’s a neat little effect that adds some extra visual interest and texture to the model; if you’re going to “cheat” and use things like flock effects, unpainted tufts or water effects, I reckon the more variation that you add to the model the less any individual effect looks out of place.

While I’m here, I should probably also mention my Merry and Pippin dismount bases. At the time that I built Treebeard, I wanted to ensure that Merry and Pippin were an optional extra. Practically speaking, I can’t think of any valid reason not to include them in the army, but I like having the option of running a ‘pure’ Fangorn force should the need arise. As such, I built the Hobbits with little pins underneath and drilled a pair of very subtle little holes into the branches on which they normally sit, allowing Treebeard to be fielded with or without the Hobbits atop. This was all well and good until I was about to take them to their first tournament, where I realised I’d need dismounted versions of the Hobbits as well2. As my only other Merry and Pippin miniatures were based for Moria like the rest of my Fellowship, I thought I might be able to re-use the pair that I painted to sit atop Treebeard – all I had to do was make 25mm bases to move the minis to. Now, where else would Merry and Pippin be hanging out with Treebeard and the Ents while sitting down? Why, the ruins of Isengard, of course!
These bases were constructed mostly of green stuff, sand and a little bit of plasticard and paperclip. The stones that Merry and Pippin are sitting on are sculpted from green stuff – I wanted something I could mould to sit the models on flush and soft enough to comfortably drill a hole into for their pins to attach to. Once that was down, I filled up the back of the base with a bit of sand and rubble. On the front side where the water would go, I rolled up a few balls of green stuff for apples, a couple larger ones for cabbage, some cones for carrots and made a little plasticard crate for the apples to sit in. A lick of paint, some Water Texture, a couple tufts and a tiny puff of cotton wool for pipe smoke later and I had myself a couple of handy dismount bases. I’m rather chuffed with them!
I think that about covers everything I have to say on these new additions. For the most part, they were quick and painless to build and paint and I’m very pleased with how they turned out as a group. They’ve got a nice, unified look to them despite the wide variation of plastic, metal and resin models of various heights and shapes.
That’s about all I have to show for now, but there’s plenty yet in the pipeline. I’m still making my way through the additional Rohan models for the campaign as well as well as a fairly substantial Haradrim force for the Ambush at Ithilien – and once all that’s finished, I should be good to go for my half of the Two Towers! That said, I’m starting to feel a bit of burn out creeping in so I’m currently planning out a bit of Necromunda to break things up a bit – but more on that in a future update.
Until then, thanks for reading and happy wargaming!
1 Which – despite their low numbers – have been very good to me over the years.
2 They are very useful for capturing backline objectives.
3 Yes, yes, I heard it too, very amusing.