It’s come up a few times lately that I’ve been working my way through the extensive miniature backlog required to play through the Two Towers portion of the Lord of the Rings narrative campaign. After coming out guns blazing with a new Army of Dunland force for the Burning of the Westfold portion of the campaign, progress just kind of fizzled out for a little while there while other projects consumed my time.
The reality is that The Two Towers (and the Return of the King) are far more demanding from a miniature painting perspective than The Fellowship of the Ring. Where Fellowship features one massed battle (The Last Alliance), the vast majority of the scenarios feature a subset of the same Forces of Good warband (the 9 model Fellowship) with only the Forces of Evil fielding models en masse. Even then, the worst you’ve got to deal with is maybe 24-36 new models for scenarios such as Ambush at Amon Hen or Balin’s Tomb – a far cry from battles such as Ambush at Ithilien or The Battle of Helm’s Deep which feature anywhere from 75-200 figures on the board. Even with a friend to offload half of the workload onto, the sheer volume of 28mm human figures that I had committed to painting immediately after finishing up two substantial armies worth of 28mm human figures was enough to put anybody off. With TurnipCon III on the horizon, I decided to break things up by doing some comparatively more relaxed painting for Turnip28 – which led to painting a ton of terrain for Turnip28, which eventually brought me full circle back to making terrain for the Lord of the Rings.
With the prospect of actually starting this narrative playthrough sometime in the near future, I’d started thinking about the Fellowship of the Ring again. I’d played through that leg of the narrative campaign once before and, in hindsight, there were a few of areas of play that I thought could be improved upon. Before starting again fresh, I thought it might be a fun diversion to revisit the scenarios I’d cut corners on, skipped or otherwise half arsed.
To be entirely transparent here, the exact order that I painted these miniatures and terrain pieces is kind of lost to time. I didn’t take WIP photos of everything, I didn’t photograph everything as and when I finished it, some of it I didn’t post on social media until later or at all and all the while I was working on this stuff I was interspersing the odd Rohan hero or small batch of Warriors. Most of this was really just an excuse to paint something a little different or a bit less demanding while I made my way through the new stuff and – unlike when I got distracted by other systems entirely – all of it still feeds back into the narrative play experience I’m trying to build, improve and expand upon. With that said, I think the most obvious order to show these off is chronological in terms of their position in the Quest of the Ringerbearer. Let’s get started, kicking things off with a couple of Hero miniatures.
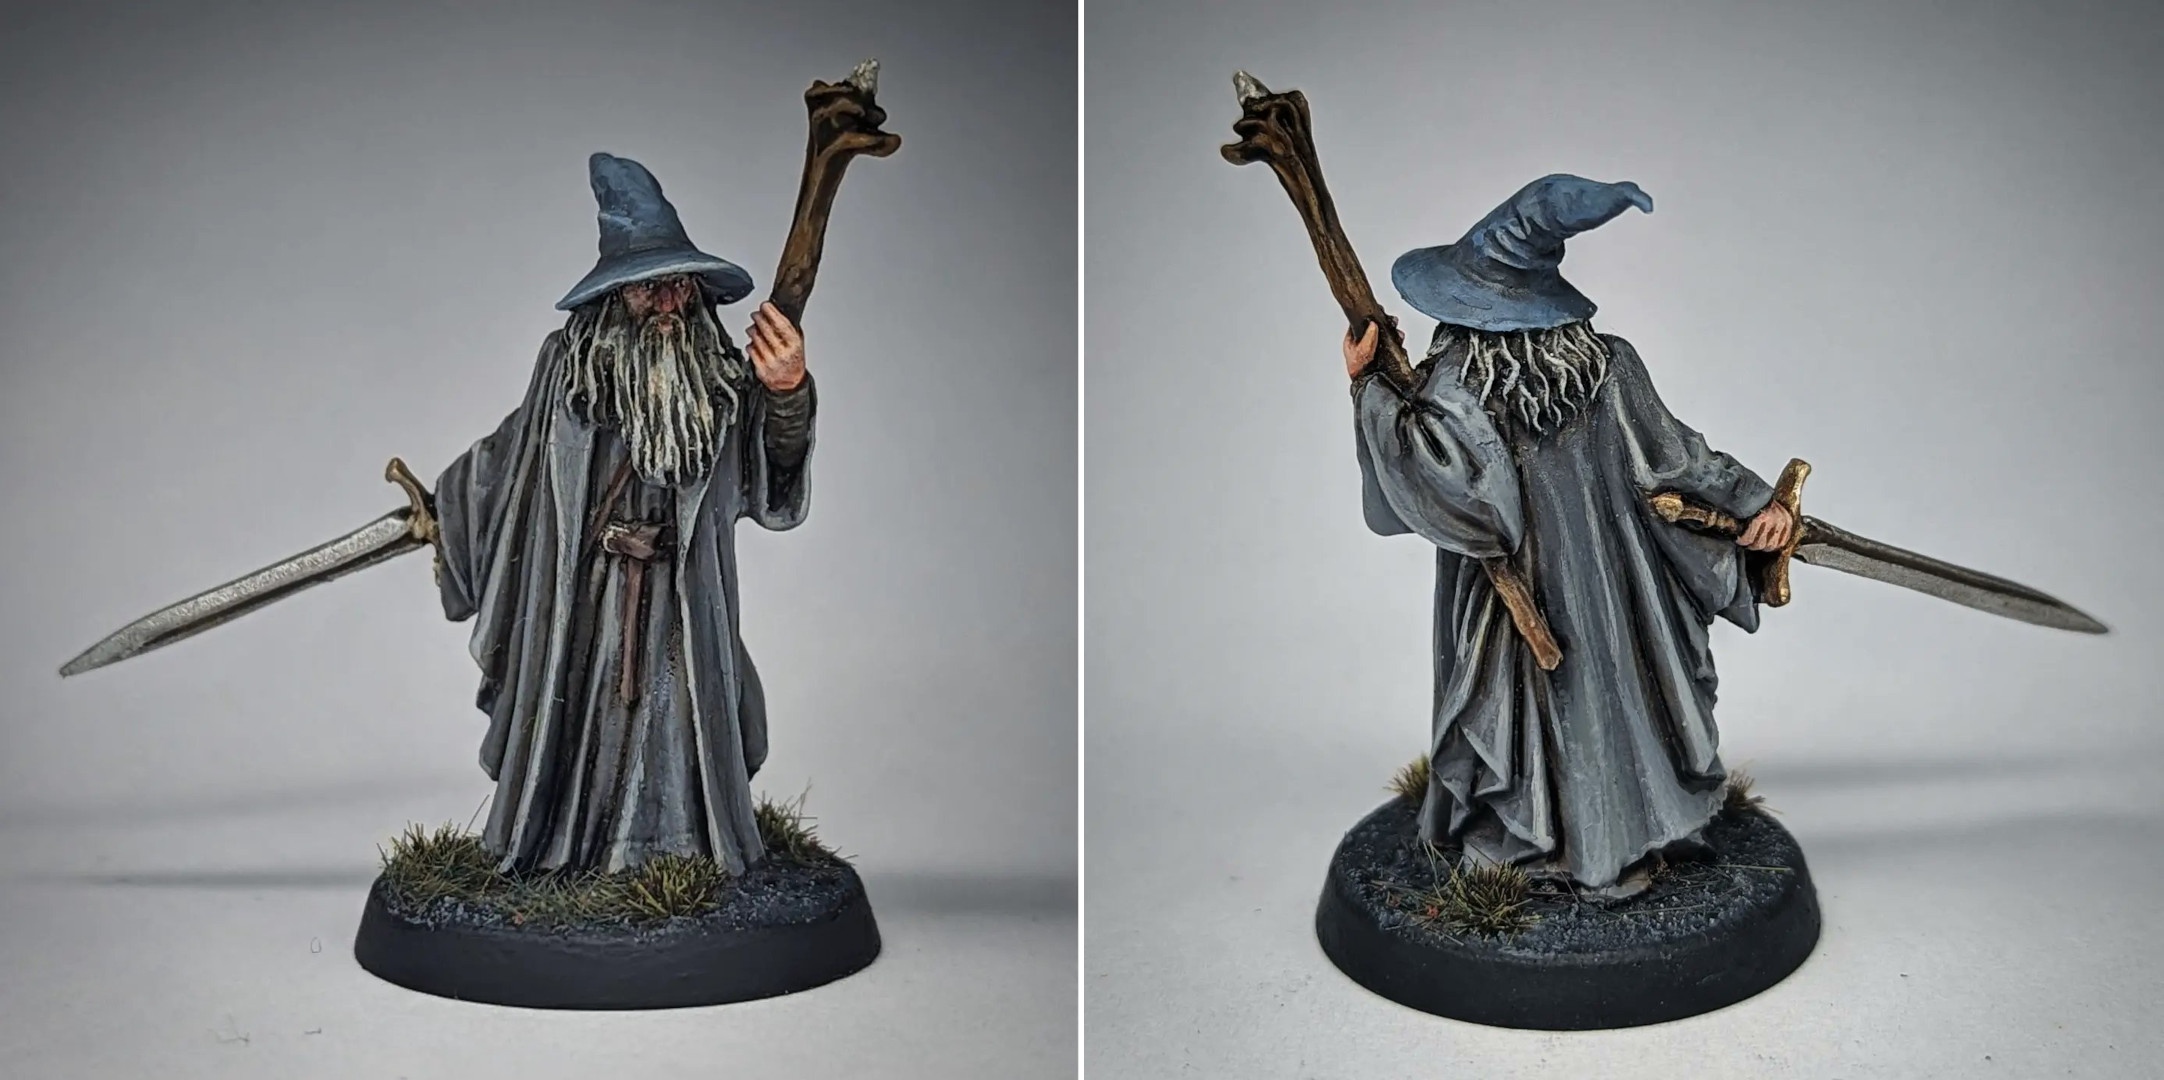
You don’t get much more back to basics than this one – Gandalf the Grey. This particular Gandalf is the original, classic Gandalf from the very first Fellowship of the Ring kit and quite possibly still my favourite to this day. Despite this, I’ve somehow managed to avoid painting this miniature for all these years.
My current Fellowship is a set of miniatures made from a handful of figures I’ve had kicking around in a bitz box for 20 odd years (after getting them with the Battle Games in Middle-earth partworks magazine) alongside a few select eBay purchases. As a result, the Gandalf that I’d been using previously is the hatless variant from the Bridge of Khazad Dûm. This is annoying for a couple of reasons – the first and most importantly being that he’s missing his iconic hat, of course. The second is that I display my Fellowship on the little Balin’s Tomb display plate that was sent out to subscribers of BGIME and the little base inlays are clearly designed for the original sculpt, meaning my Gandalf was always ever so slightly facing the wrong direction.
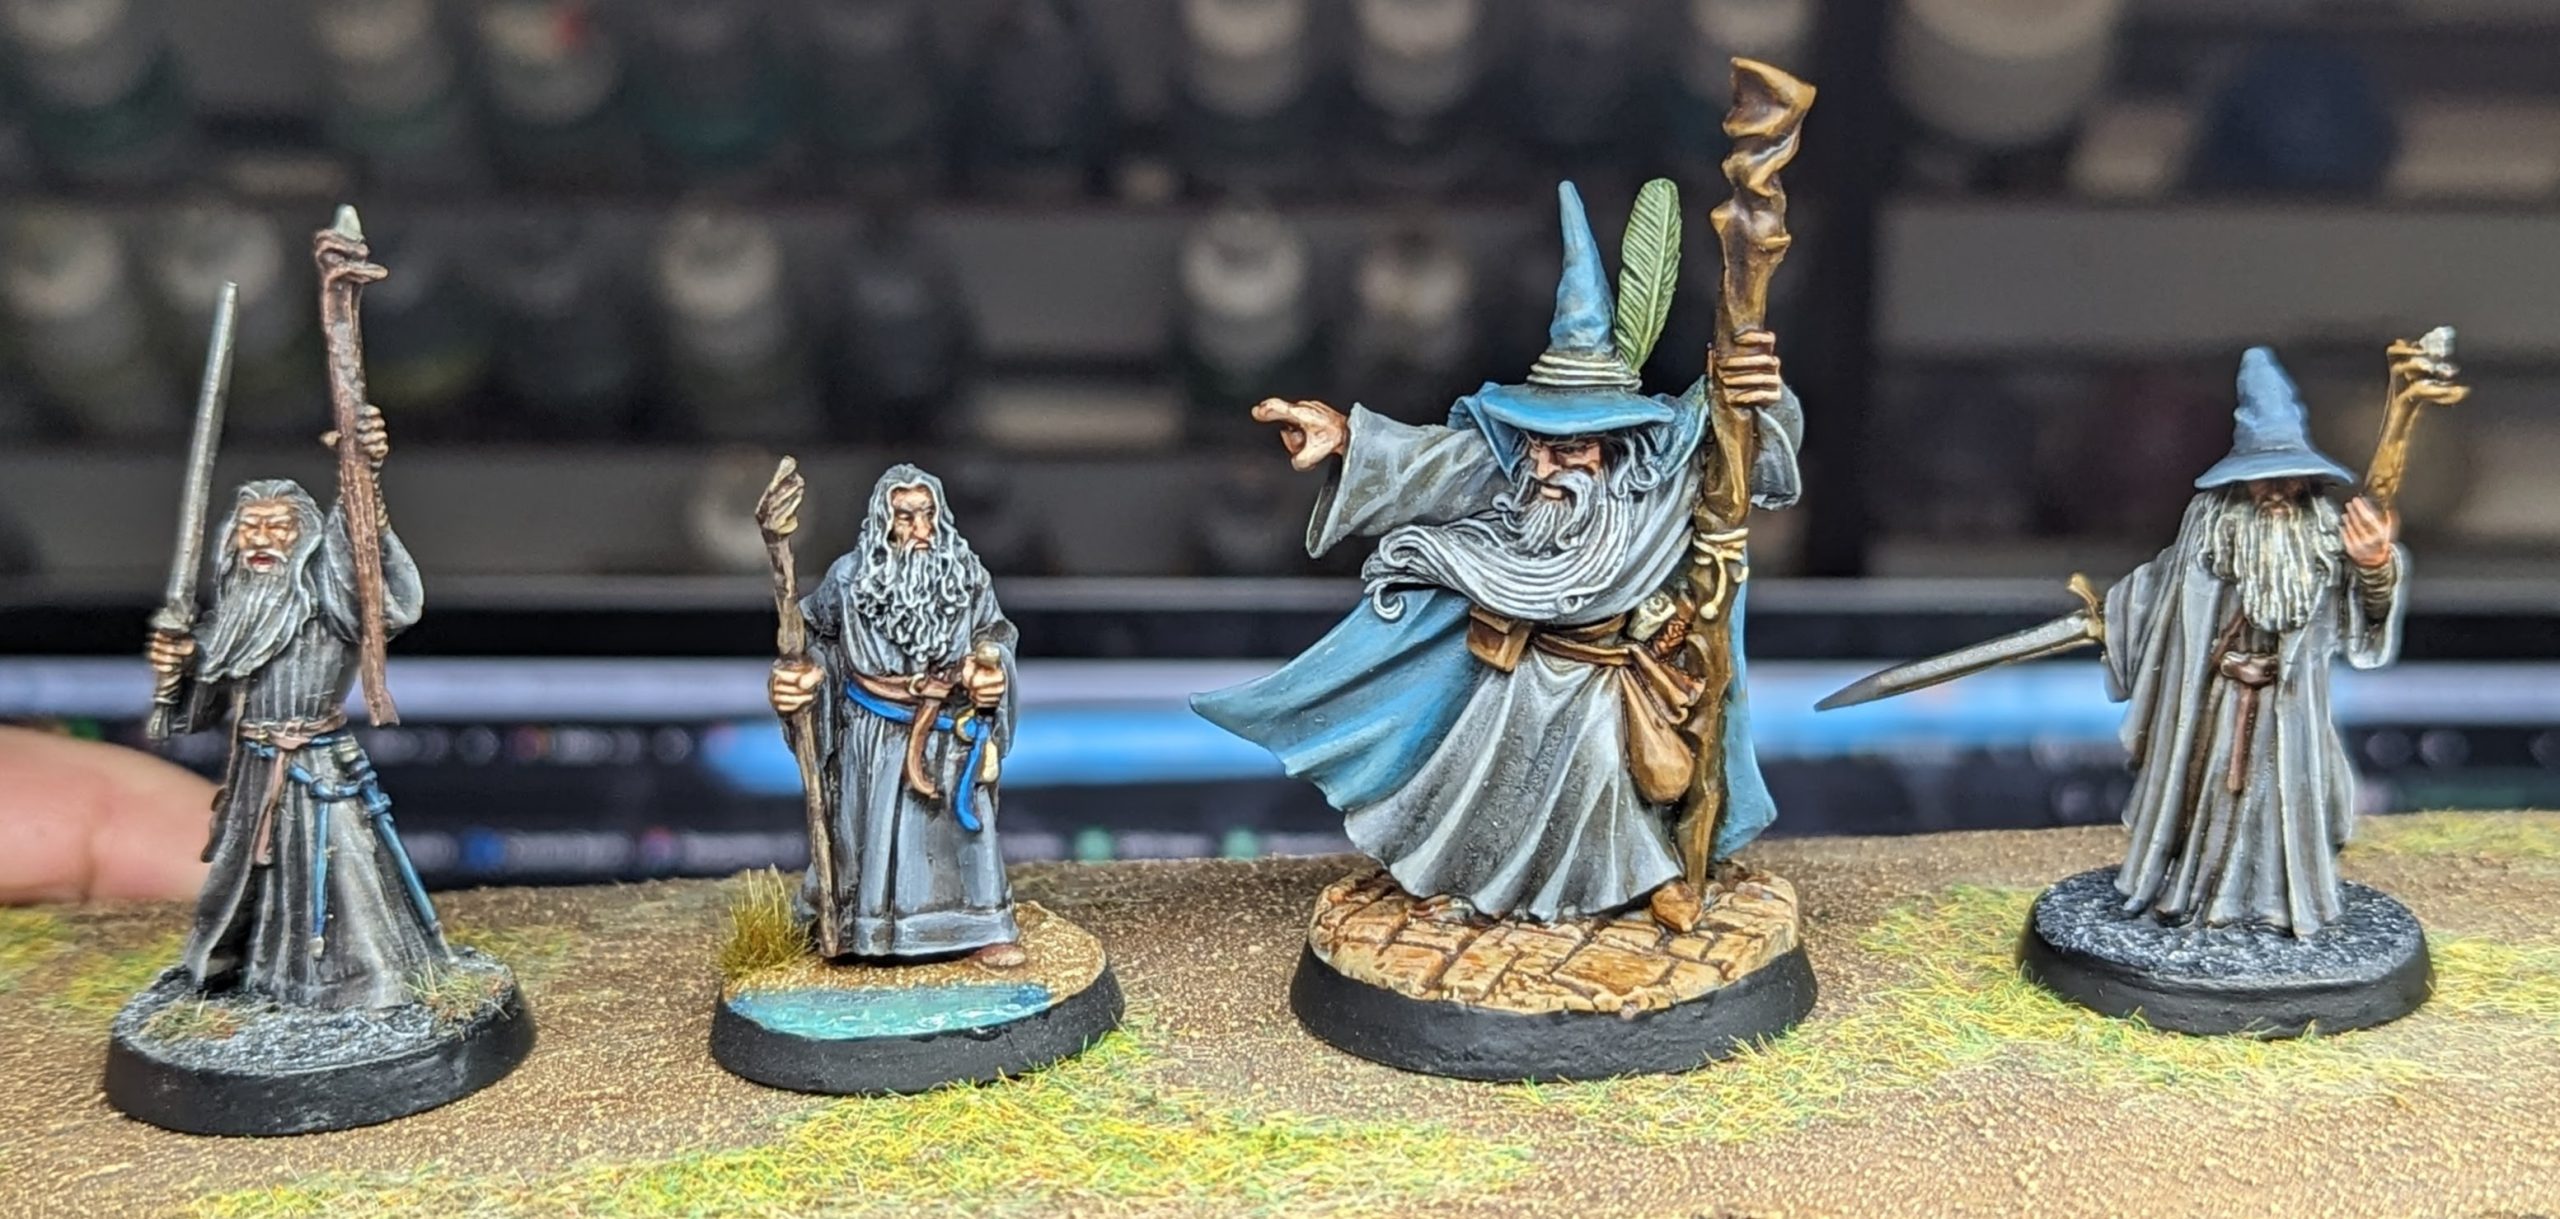
As I was painting this particular miniature, I felt an odd sense of déjà vu – I felt like I already knew what I was doing with the particular shade of blue on his hat. I didn’t need to think about which paints I owned would be suitable, I just grabbed the colours off of my paint rack (Sombre Grey and Heavy Bluegrey) out of muscle memory. The reason this is so odd is that I was fairly certain that – until now – I didn’t actually own any Gandalf miniature with his famous blue hat on.
Curious, I went hunting through my collection and discovered that this both was and was not the case. It’s true that I hadn’t painted any Gandalf the Grey miniatures with his wizard hat on, but I had painted Nicodemus (Greatest Wizard in Ye Known World) from Mordheim in those colours!
I realise now that I own three (and a half) different fully painted Gandalf the Grey on foot miniatures and not one of Gandalf the White or even a mounted Gandalf the Grey. I should really fix that sometime.
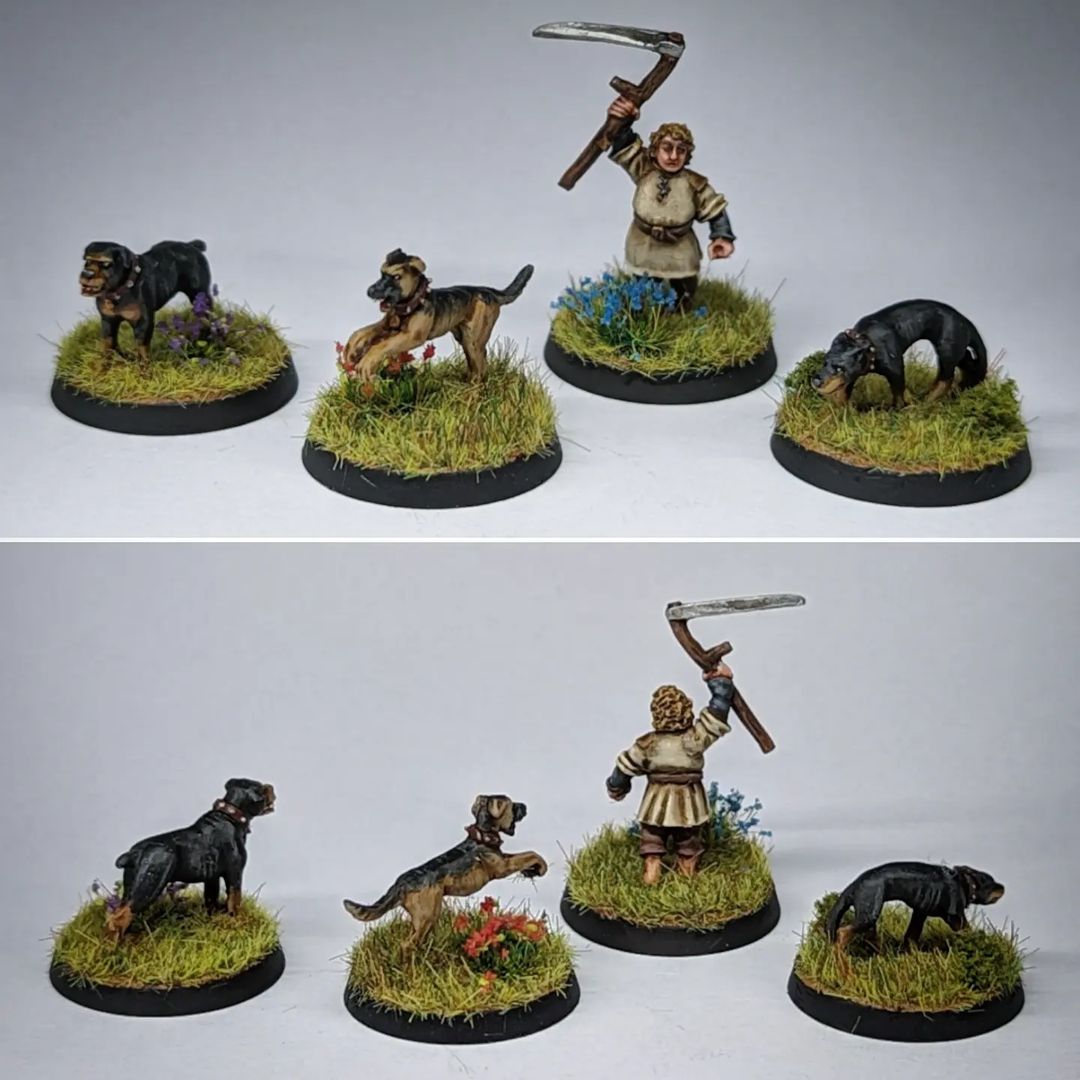
The next miniature that I tackled was Farmer Maggot. I don’t know if Farmer Maggots Crops was a new scenario for Quest of the Ringbearer or perhaps I’d just written it off as unessential on the first pass, but I kind of fancied painting this little guy this time around.
Hobbits are fun miniatures to paint – the 28mm Middle-earth SBG miniatures are already fairly diminutive as it is, which makes the Hobbits almost feel like 15mm scale. This makes painting their tiny little faces an absolute nightmare, but aside from picking out their tiny little eyes I do find they come together satisfyingly quickly. It’s also been a very long time since I painted a dog and these three little chaps were an absolute joy to knock out with little bit of stippling.
From a basing standpoint, I wanted to pick something that I could happily commit to when I inevitably do a Shire army down the line, so I went for a similar approach to how I did my Rohan bases with the static grass applicator – this time using much brighter and greener static grass and flower tufts to give them a nice, wholesome look.
For the Farmer Maggots Crops scenario, we also need a Hobbit Hole and a bunch of crops. The former I delegated to my friend, the latter of which I just purchased from eBay out of laziness. Every corner cut helps!
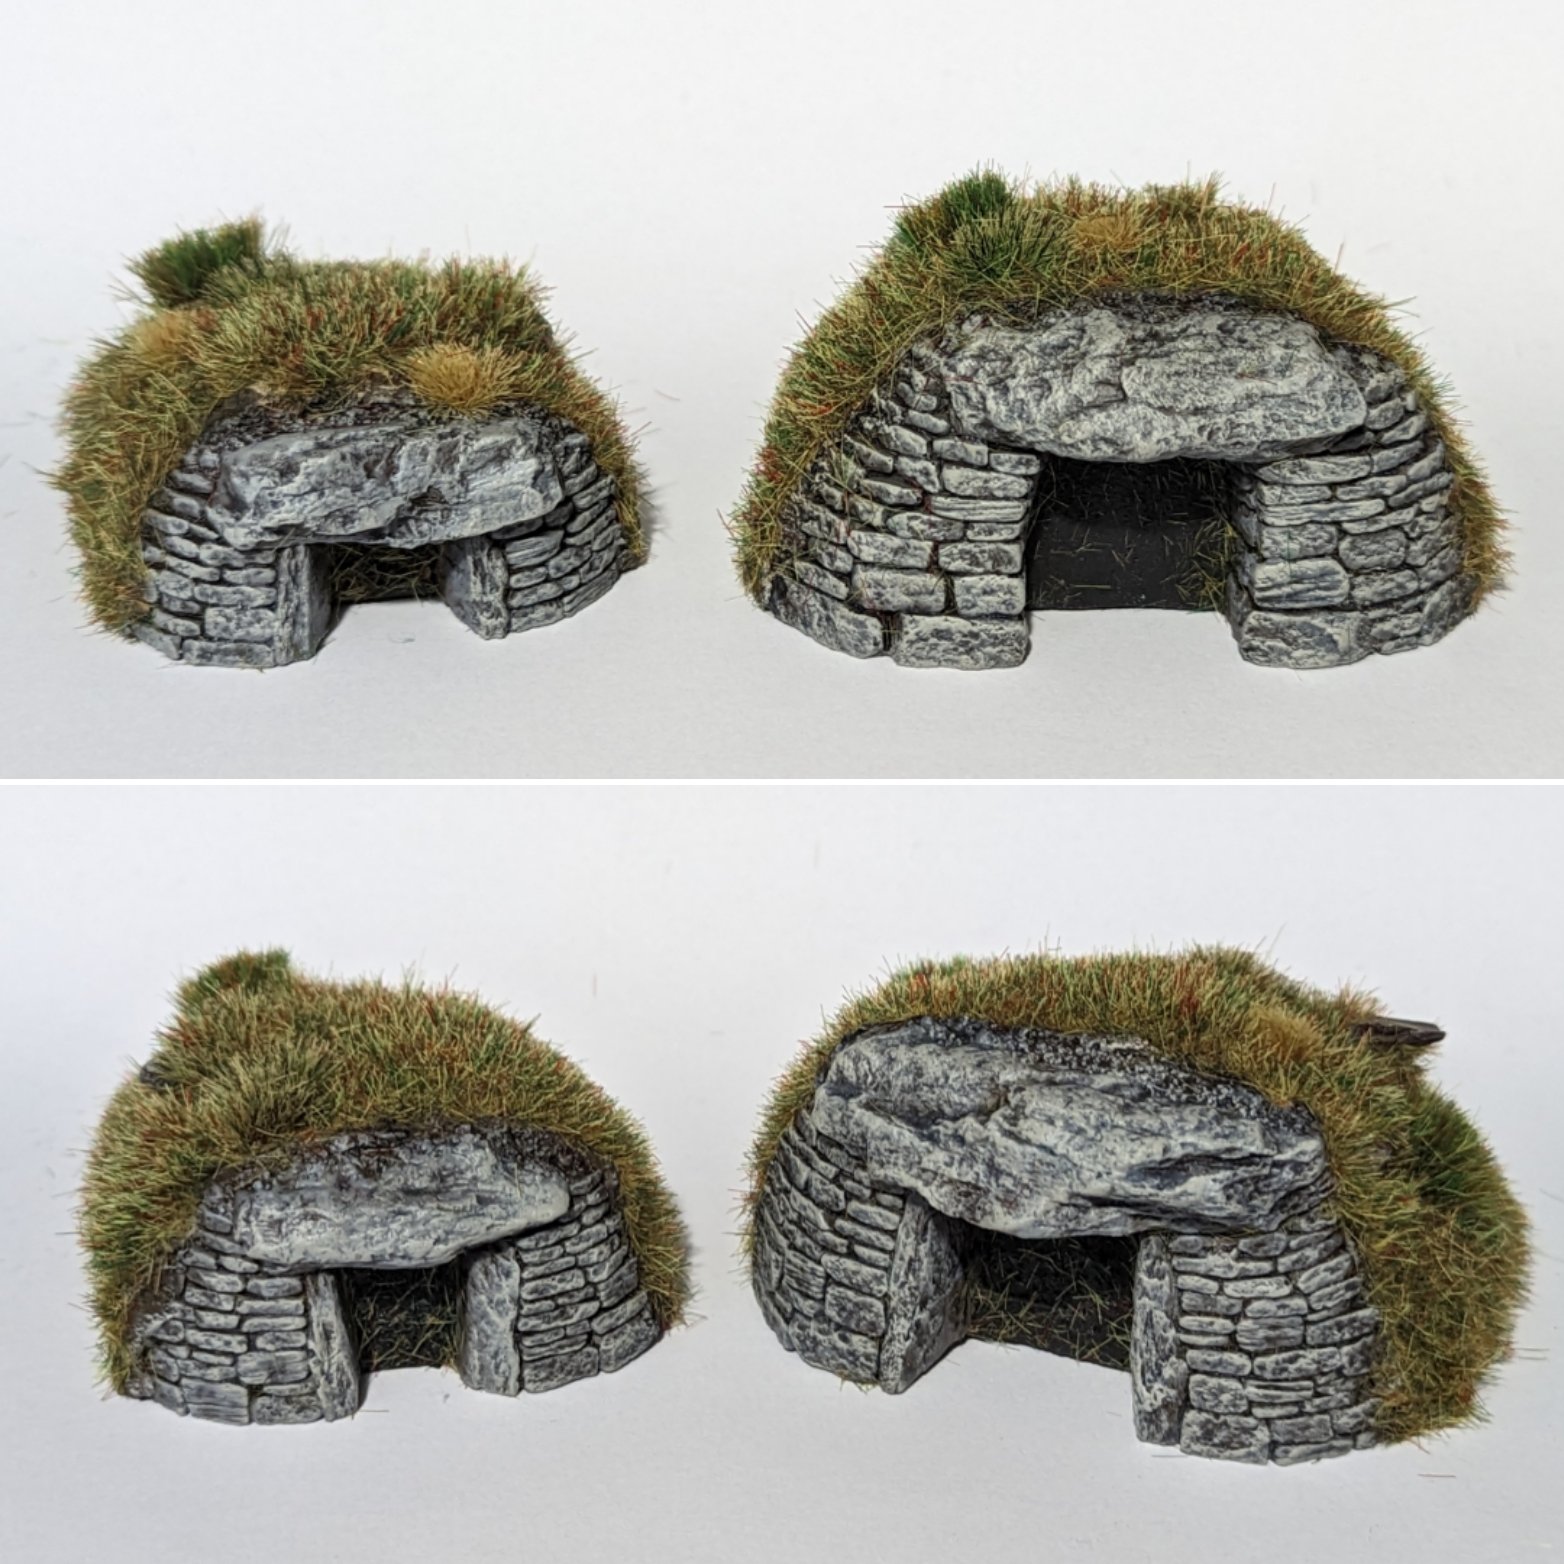
The next scenario that I felt I didn’t quite do justice to last time around was Fog on the Barrow Downs. A classic little bit of misadventure for the Hobbits and the only appearance of everyone’s favourite walking question mark, Tom Bombadil. The scenario is pretty simple – 4 Hobbits, 4 Barrow Wights and Tom Bombadil with his wife Goldberry. The terrain for this particular scenario isn’t even especially challenging either, only really requiring 4 Barrows for the Wights to appear from. Last time around, I decided to cut some corners and used some rocky crag pieces as makeshift barrows and it felt a bit flat and lazy.
I really like the early scenarios in Quest of the Ringbearer – I think they do a great job of showing just how different narrative wargames can play out compared to matched play games – but there’s no denying that they are considerably simpler than the battles to come as the narrative progresses and the stakes get higher. Knowing that, it can be easy to cut corners on these scenarios and do the bare minimum you need to keep things moving forward. It certainly was for me in the past, anyway. That said, I do think there’s something to be said for putting in that little bit of extra effort in order to make these games feel more visually appealing and exciting – so this time around I decided that I would do the Barrows justice.
I shopped around for a little while on these, considering making them entirely from scratch or just buying a pre-made set from a terrain builder online. In the end, however, I stumbled upon this excellent range called “Grave Concerns” from Fogou Models. They’re essentially little resin cast facades to attach to a mound of foam, clay, paper mache or even just a clump of lichen. They’re scaled nicely for Middle-earth Barrows and quite inexpensive to boot.
Within hours of receiving them, I had attached them to a little brick of XPS foam, carved out the mound shape, primed them, quickly drybrushed the stone and applied static grass (a little darker and more wild looking than on Farmer Maggots basing scheme) as well as the odd tuft to the mound. It’s quick, cheap and goes a long way to giving the Fog on the Barrow Downs scenario a bit more of a sense of occasion to it. As an added bonus, they’re reusable as scatter terrain on most grassy tables.
Okay, this next one was probably the first big refurb project – the Weathertop hill.
While I don’t own the impressive resin-cast ForgeWorld Weathertop terrain piece, I do have a foam cast ‘Watchtower’ from a (now defunct) company ‘Ziterdes’. It’s not 100% accurate to the design of the Fellowship movie and it’s a little tighter quarters than ForgeWorld’s Amon Sûl, although it partially makes up for this with arches wide enough to fit a 25mm base between them. Playability was never really the issue here – the problem was that it looked kind of crap on a flat surface.
See, the terrain piece itself looks great on a grass mat as a makeshift ruin or something for Matched Play. In that regard, it’s maybe even better than the ForgeWorld Amon Sûl, as it has a set of accessible steps on the outside rather than descending internal staircase. The problem is that when you’re playing the Knife in the Dark scenario, you know exactly what you’re meant to be recreating – you know that the Watchtower is supposed to be on top of a great big hill. In that regard, playing on a flat surface falls a little flat for me.
Determined to correct this mistake, I went hunting in my attic for some suitable materials to make the hill itself. I found some large blocks of XPS foam and cut and assembled these to create the basic shape of the hill. I tried to use a still from the film as a reference for the overall shape, and made the kind of hourglass hill shape to provide the shade under which the Hobbits could cook their nice crispy bacon. Additionally, I added two layers of slopes that miniatures could comfortably sit on to ascend the hill in as natural looking way as I could manage. Once the basic shape was carved, I stuck down a ton of dried tree bark to the sides to creature a natural stone looking surface before filling all of the gaps with Geek Gaming Scenics Modelling Compound.
At this stage, I did regularly have to put the Watchtower itself down on top in order to create a snug little lip for the ruin to sit in so it’s not just sitting on a totally flat surface, although the process did result in me getting a bit of plaster on the finished terrain piece which was a bit of a pain to clean off afterwards.
Once the plaster was dry and cured, I mixed up some black acrylic paint and PVA glue and slopped it over the hill to both prime it and give the plaster a bit of an protective elastic coating to hopefully stop it from crumbling too much when handled. After this had dried, I used a huge brush and slapped on various layers of additional paint – first grey, then a lighter grey, then a khaki tone and finally a near-white grey. This got the basic grey colour of the stone, but it did look altogether too cold and blueish, so I followed this up with a Brown Umber oil wash. After wiping off the excess and leaving it to dry, I went back in again with one more quick drybrush of khaki to the stone before applying the final step – weathering pigments. I used both Light Slate Grey in the raised areas as well as a heavy dusting of Rust Oxide in the recesses before blasting away some of the excess with my airbrush. When the Watchtower was sat back on top of my painted hill, I was pretty happy with how well I’d colour matched a paint job I did nearly four years ago.
The final step was applying the static grass. This was pretty simple really – for the first layer I slathered the piece in PVA glue and threw down some 1mm medium green static grass. This layer looked almost more like moss than grass, but that was really just the base layer that I wanted to shine through the longer layers of more desaturated looking grass. After this, I’d just pour out a little matt varnish over the surface and dust the surface with varying tones of greens and browns around 2mm in length. I think this gave the grass a nice, chaotic and asymmetrical looking tone to it that reads as quite natural. A few green, brown and the odd wild flower tuft went down as a finishing touch and that was pretty much that1.
I’m quite happy with how my Weathertop Hill turned out. It makes for a very cool and three dimensional terrain piece, adding a bit more of a sense of occasion to narrative games and makes for an intimidating line of sight blocker for matched play. You can even leave the Weathertop ruin off and use it as a hill in it’s own right (albeit with a slightly odd lip) or a natural arena.
Next up, we have the journey into Moria. A lot of my terrain for this section of the campaign is fairly serviceable, however I absolutely despise the cave wall piece that I made for the Doors of Durin (as well as the entrance to the Dwarrowdelf and exit from the Bridge of Khazad Dûm). Visually, it looks okay but for two fairly major issues. The first of these is that the wall is comprised of two separate pieces which combined are longer than the scenarios require but come up short with only a single piece down. The second is that it’s horribly fragile – the polystyrene it was built from was salvaged from some packaging that I had on hand. It’s the cheap nasty stuff that pulls apart very easily. It doesn’t take much to pull a piece of it loose, creating an ugly immersion killing white spot; it’s not ideal.
This time I was making a more deliberate effort, so I ordered some 20mm thick blue foam styrene and built my wall of several pieces hot glued together over three layers in descending height – like the Fellowship Journey Book suggests. The three layers overlap at the joints, making it nice and tough while the extra depth provides greater stability on a flat surface. I set about roughly cutting and pulling away chunks from it to create a natural looking rock texture and cut a decent sized looking doorway recess in the centre of it. Finally, I sealed and primed the foam with a couple coats of black paint mixed with some PVA glue. After this had dried, it was a simple matter of drybrushing and a little bit of static grass to finish the facade itself.

My new facade already was a massive improvement over the older, flimsier version – but I didn’t want to stop there. Although it would only really see use for a single scenario, I really wanted to do the iconic Doors of Durin justice this time around. I found a fairly common STL online of the Doors of Durin and commissioned a nice chunky resin 3D print of it in transparent black resin. After this arrived, I sponged on a layer of black primer and a couple layers of grey paint onto the stone, leaving the recessed detail of the door unpainted. As the resin itself is black, this doesn’t look too jarring on it’s own – and allows me to shine a light behind it.
I alternated between wet sanding the back and carefully etching a knife in the grooves of the door while holding the piece up to a lightbulb until I was happy that enough light was shining through then I rigged up the back with a strip of battery powered blue LEDs and then sealed it with a layer of tinfoil. The tinfoil not only prevents the light escaping from behind the door but also reflects it forward towards the door, allowing it to shine a little brighter. The lighting effect isn’t perfect – there are some areas I couldn’t etch neatly enough and it’s certainly not evenly lit, but I still think the effect works quite well overall.
I did have to cut away at the bottom of the wall facade a bit to get Durins Door to sit flush against it as the base was a little chunkier than I anticipated, but I think it works pretty well as an optional extra. This will make a fun and immersive little addition to the Watcher in the Water scenario.

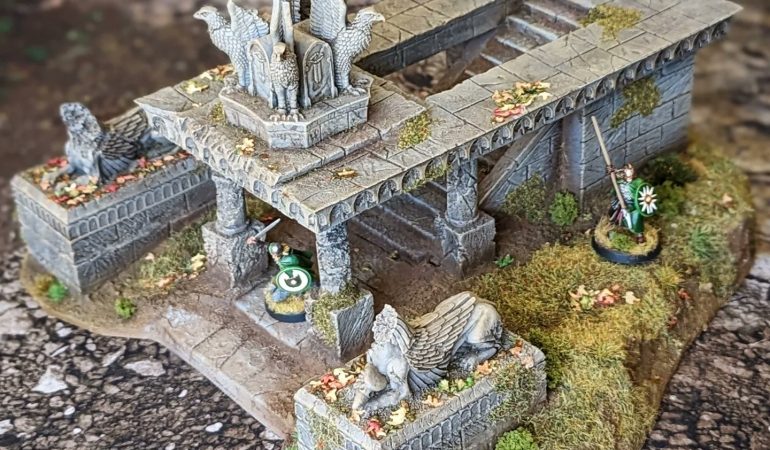
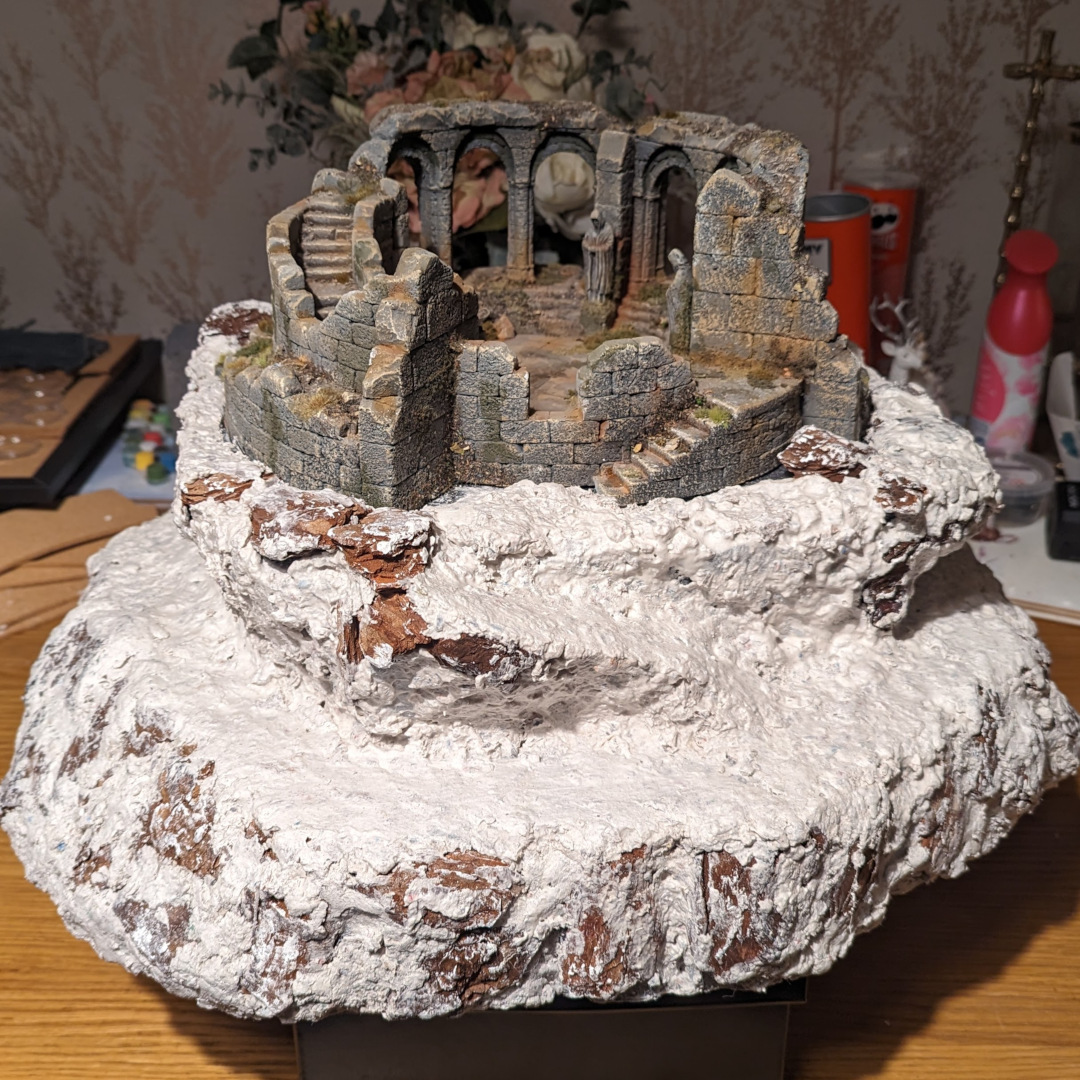
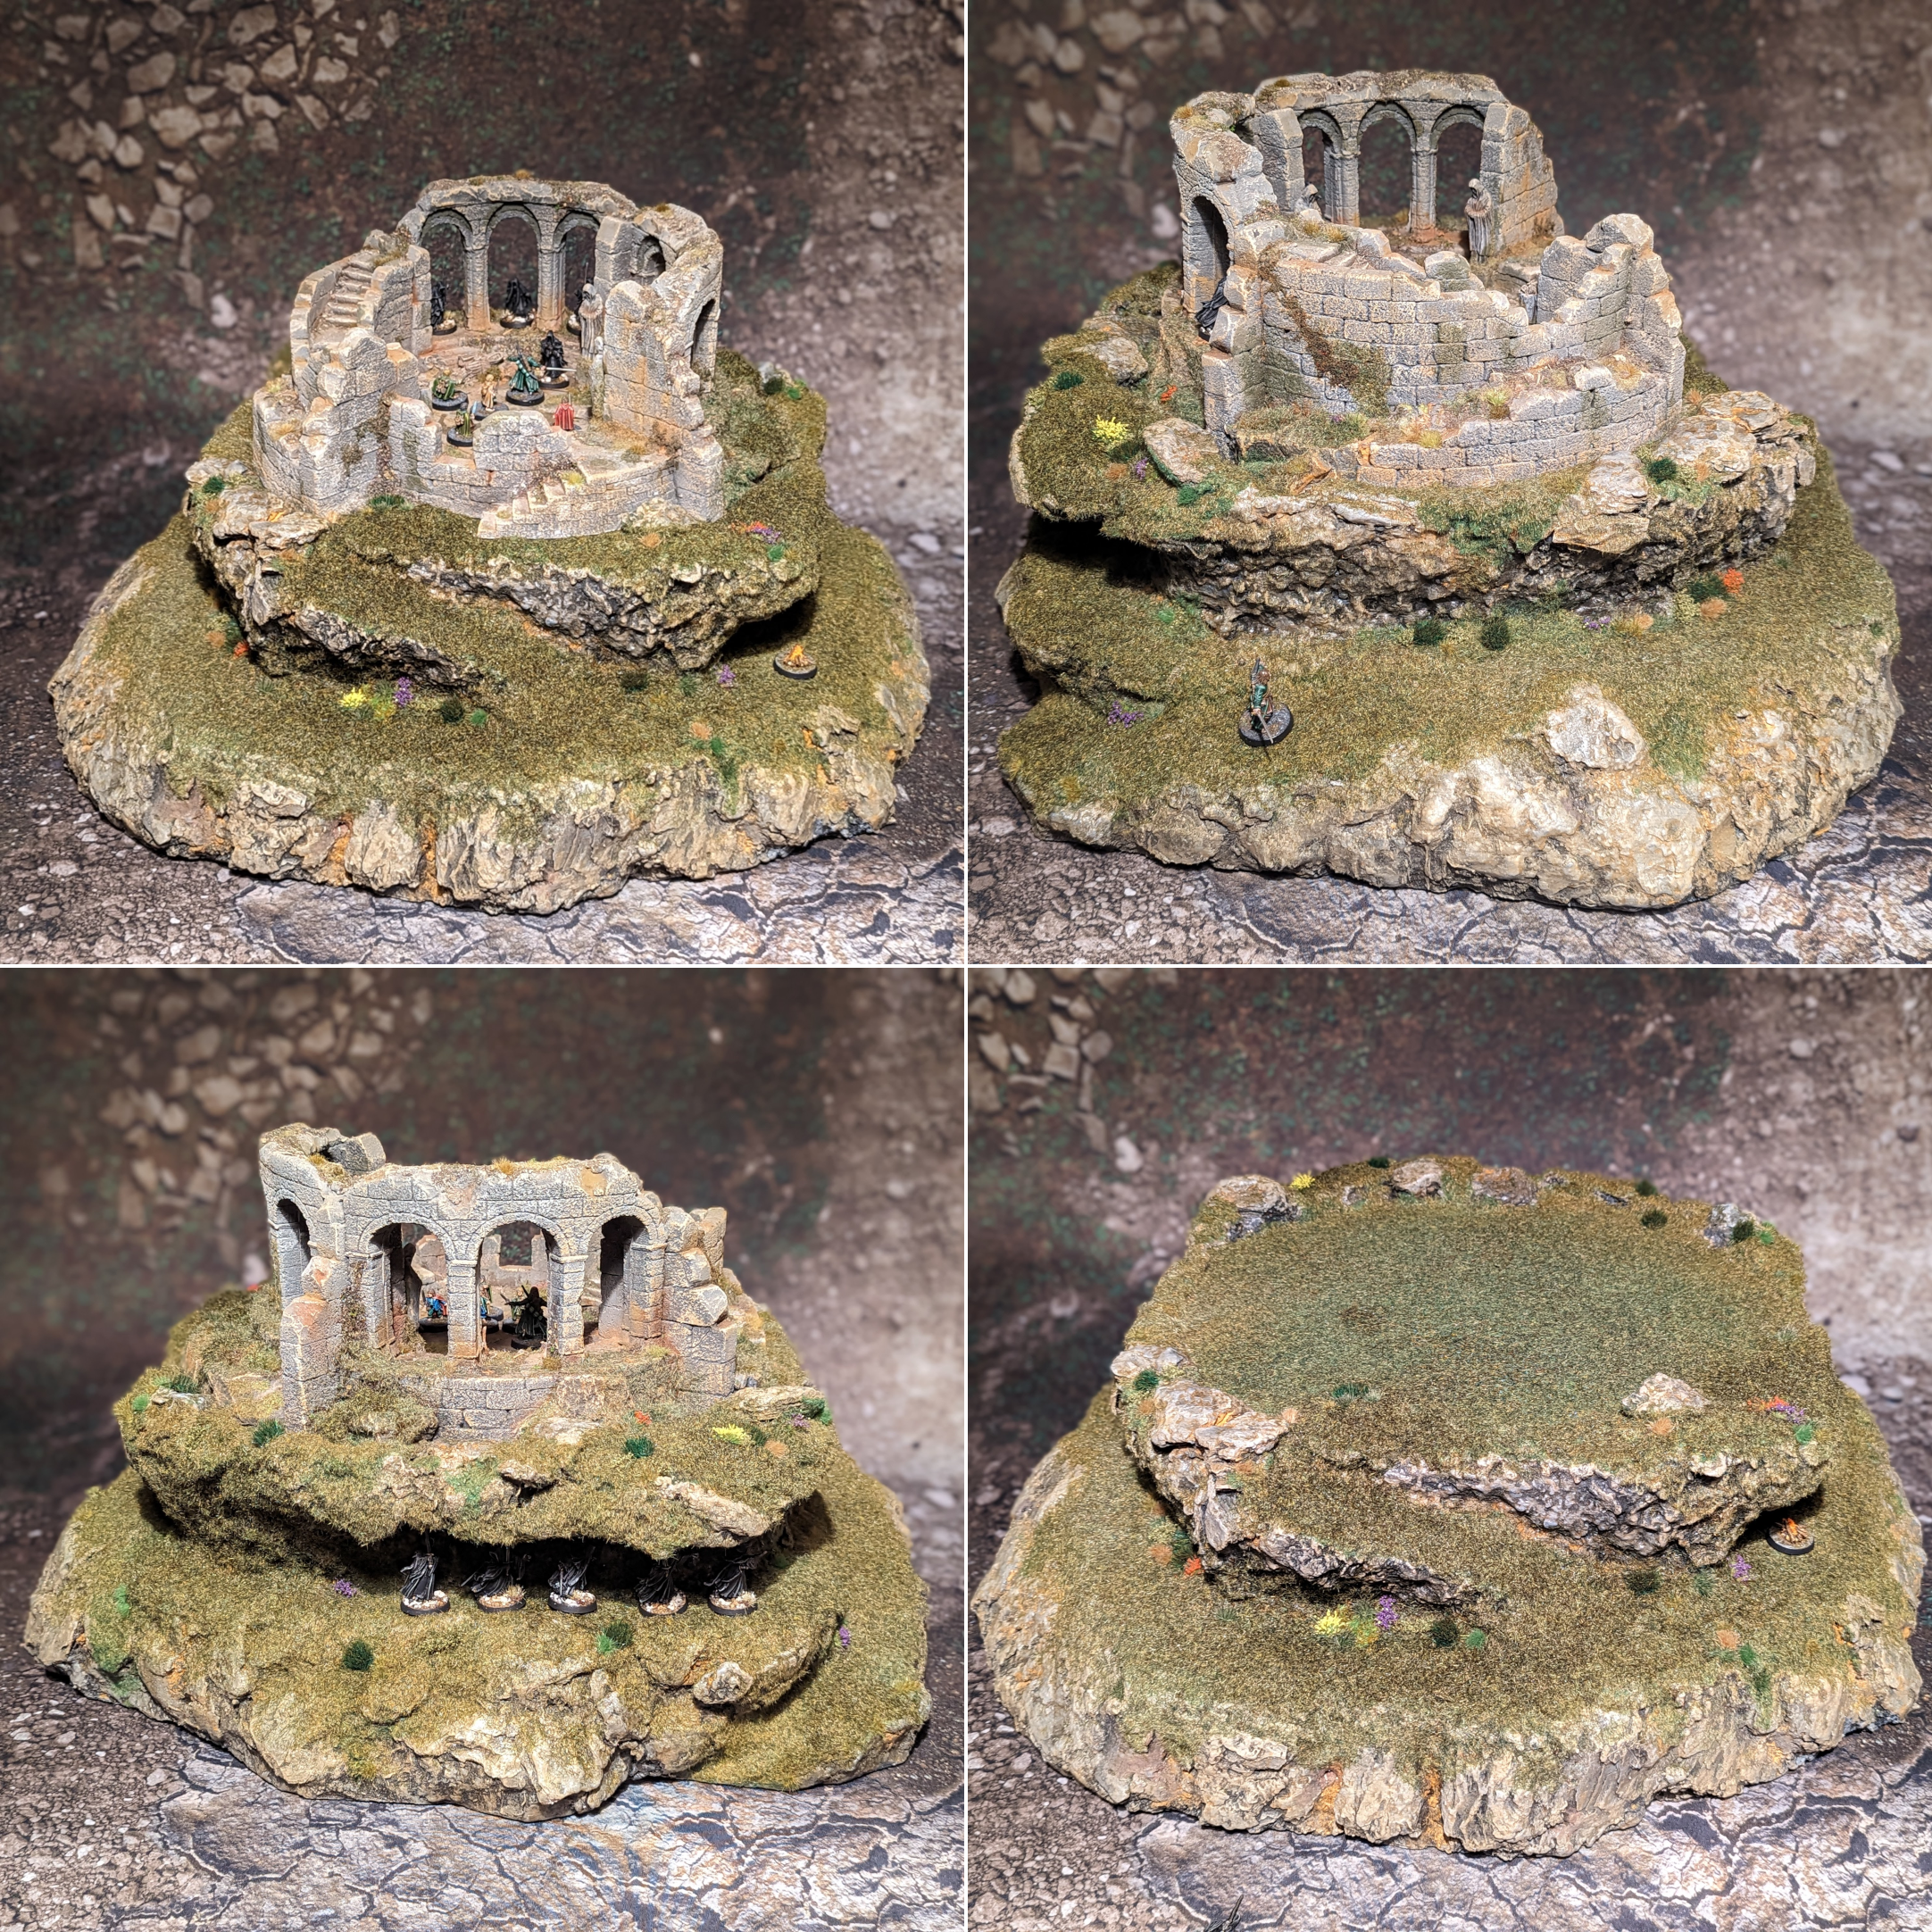
Finally, we come to the last of my Fellowship of the Ring narrative scenario enhancements – the Ambush at Amon Hen. I just bit the bullet and bought the ForgeWorld model this time.
Okay, look. My previous version of this terrain piece – a 3D printed Amon Hen itself and a pair of resin statues from Thormarillion – was fine, but next to ForgeWorld’s resin cast piece, there’s not really much comparison to be made. The sloped earth bass really gives this thing some physical presence on the board and visually reads much more like a hill than a base, with some nice details like the paving stones and the boulder breaking up the earth. And my God, man, the detail! It’s a terrific piece of terrain and – while it’s not cheap by any means – it’s at a price point that’s just a little bit easier to swallow than the ForgeWorld Weathertop kit. If I had only one criticism to make about it, it’s that the underside of the ‘roof’ piece is completely smooth and untextured. You’re not really going to see this on the tabletop during gameplay or even most close up photography, but I store mine on a shelf next to my painting desk and see the underside of it nearly every day – and I have to wonder whether the time or effort saved was worth not adding a little texture to this part of the model.
As this model has a base to it – letting me add a bit of brown earth and green grass to the model – I decided to go for a much more basic stone colour scheme this time around. After priming the model in brown, I picked out the stone with Mechanicus Standard Grey, drybrushed it with Stonewall Grey and then drybrushed the whole thing in Khaki. This was followed by a wash with Agrax Earthshade and a subsequent drybrush of Stonewall Grey and Khaki. Finally, I used some Burnt Umber pigment powder and sparingly brushed this into the recesses on the stairs and the bottoms of pillars before sealing it down with a layer of matt varnish.
That was all there really was to it with regards to the paint job. For the final touches, I applied various tones of green static grass to the base with my applicator and then super glued down a range of different tufts and fallen leaves. Once this was dry, it received one further airbrush of matt varnish to seal everything down and take the shine off of the static grass – then it was complete.
Overall, I’m very happy with it. It’s a much nicer terrain piece than the 3D printed one ever was and the base blends in very nicely with my forest-design neoprene gaming mat.
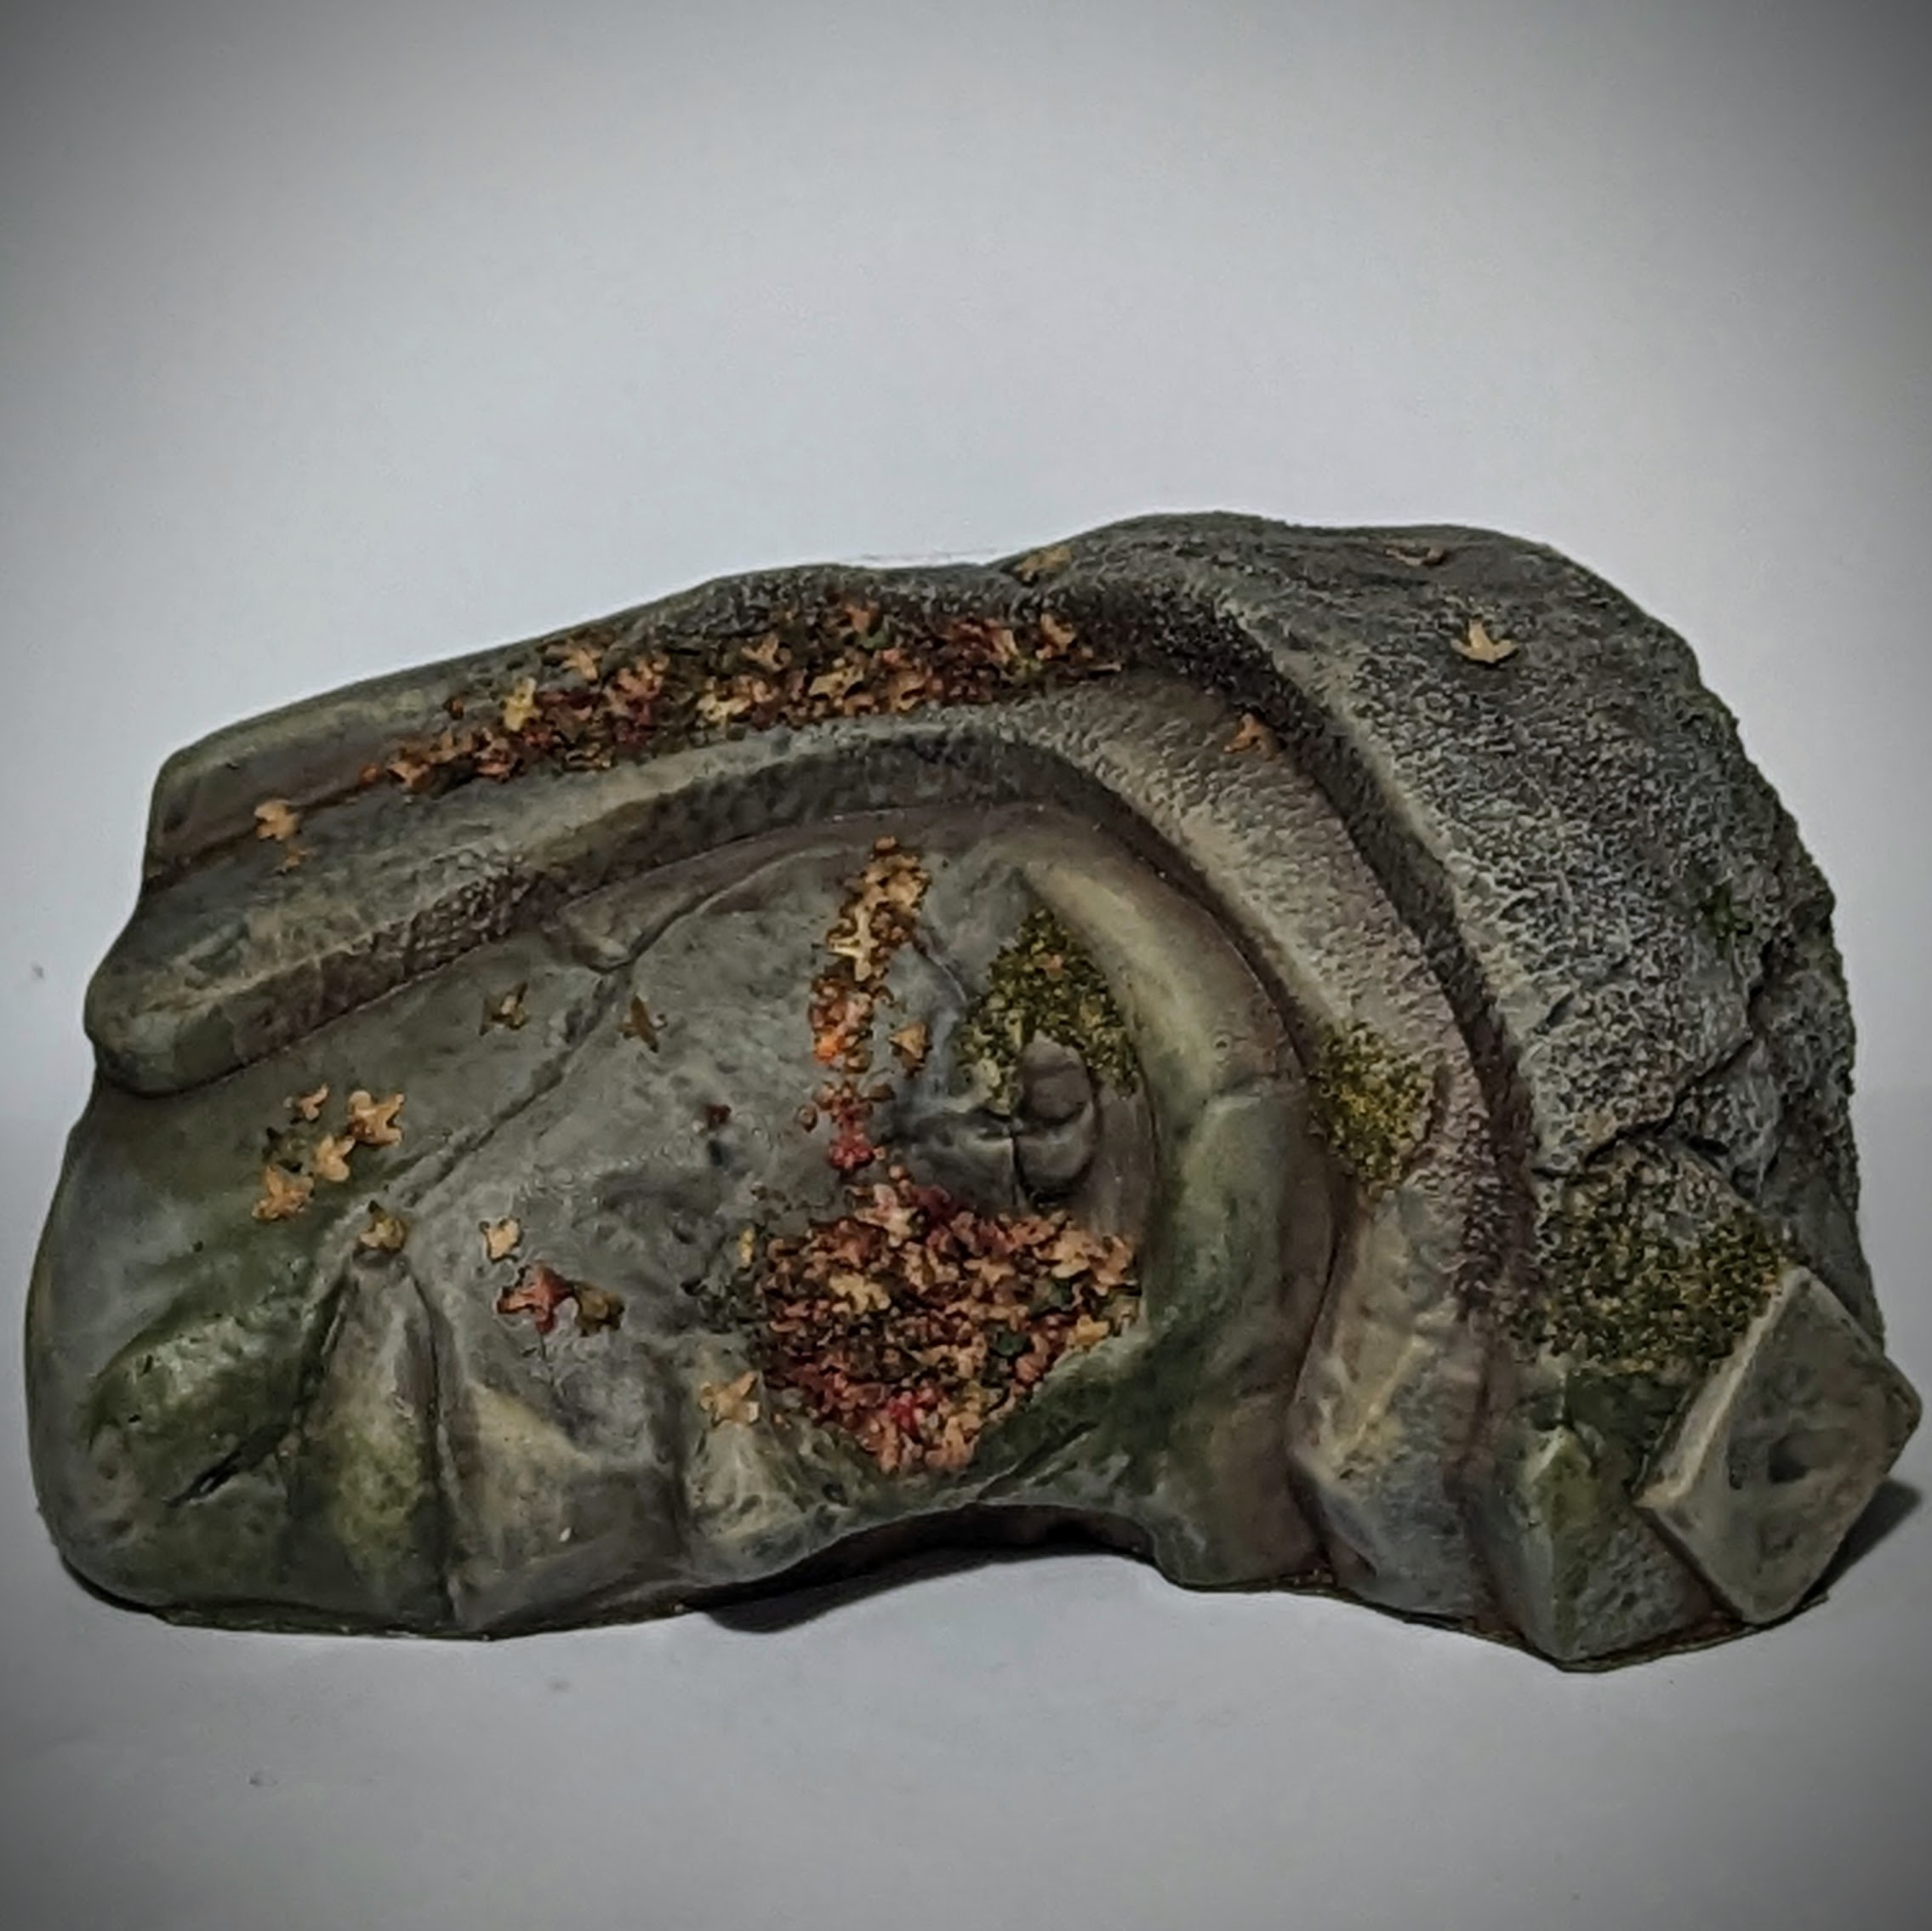
The other part of my Amon Hen improvements is what I like to refer to as ‘The Amon Head’. Yeah, it’s that giant fallen statue head that Frodo looks at in the movies. This particular piece is not, in fact, the ForgeWorld model – I purchased and painted this a couple of months before the official model actually released – but it’s a pretty decent piece none the less. It’s a nice weighty2 resin cast piece that I reckon has been cast from a 3D printed original. I say this because there’s a bit of a softness to the detail and I’m fairly sure you can spot some feint print lines still on the smooth areas over the face if you look closely. Nevertheless, it’s a decent bit of kit that adds a little more flavour to the board.
Painting wise, it’s pretty much the same process as on Amon Hen itself, only with way way more leaves and a little bit of Vallejo Slimy Grime painted in a few locations to break up the monotony of the grey.
And that’s about all I have to show for now!
Overall, I’m very happy with these latest additions and enhancements that I’ve made to the Fellowship of the Ring leg of the narrative campaign. I feel like I’ve managed to make significant quality of life improvements to pretty much every leg of the journey; from the Shire to the Emyn Muil, there’s a little something that’s new and improved for this playthrough.
Despite all of these new additions to the Fellowship of the Ring, I have not been entirely forsaking the Two Towers leg of this journey. In between each of these pieces I have been chipping away at everything from terrain for the new scenarios to reinforcing my Rohan. I’ve even made a start on the Last March of the Ents and the Haradrim half of the Ambush at Ithilien. There’s lots more yet to do, but I’ll have plenty to show off soon.
Until then, thanks for reading and happy wargaming!
1 Additional WIP photos on my Twitter.
2 Seriously, you could do some serious damage with one of these.
Hello I just found your blog, these models are insane!