
Alright, so.. Recently, I went for a visit to Deep Sea World with my wife. While I was there, I noticed they had little capsule machines dotted around the place with fossilised shark teeth1 in them. Like a child, I harassed her for the change in her purse – eventually leaving with five capsules worth of teeth in my pockets. I wasn’t really sure what I was going to use them for, though I thought they might make a cool and rather thematic addition to the blobfish Scab Tank that I was thinking of making at the time.
Flash forward a couple of weeks and my Blobfish tank is now a reality. I’m pretty happy with it, though I realised shortly afterwards that I entirely forgot about the shark teeth. Thus, I ended up with five capsules worth of shark teeth capsules and no obvious project to use it on. Well, why not make another terrain piece? Having already made the Juan Diaz tooth bog, the Sad Carrot bog and the Toad bog, I was but one bespoke dangerous terrain tile away from retiring the more boring/plain bog pieces in my collection.

As with the Juan Diaz inspired tooth bog, I started out with an MDF base and the outline of a mouth onto it with a mixture of Green Stuff and Milliput. Once I was happy with the overall size and shape, I just started jamming teeth into it and moulding the putty around the base of the teeth. After all the teeth had been placed and the putty blend has set, I then started to think about what else would go down on this bog to fill out the rest of the floor space. I considered leaning heavily on the teeth angle again, but this felt a bit much like retreading ground to me. Fortunately, inspiration often comes from the most unlikely of sources – and I started thinking about the capsules that the teeth came in. One of the main reasons that teeth are so prevalent in Turnip28 is that teeth have roots – well, so do eyeballs. Sort of.
While the rest of this terrain piece was pretty much just slapping down mud texture paint or Streaking Grime, the eyeballs turned out to be a bit of a fun freehand painting challenge. I varied directions that they were each looking to increase the likelihood that they might stare down a unit on the battlefield. Additionally, I mixed up the iris colours – a greenish tinged hazel/brown, a jade green and a kind of speckled blue/green. This was partially to add a bit of colour variation, but also kind of as an experiment to see which produced the best results. Perhaps unsurprisingly, the brown turned out the most realistically with just enough tonal variation to not look entirely cartoonish.

Of course, the eyes had to be bloodshot, so I made my very best attempt paint to paint thin little veins branching out from the iris in Warlord Purple and accented with Bloody Red. Once the veins were down, I smeared some streaking grime over the whole thing to dirty them up and sealed it all with a coat of gloss varnish for a nice wet look. The final little touch – a suggestion from my wife – was a little bit of jaundiced yellow crusty goop which I did with a bit of Mustard Yellow oil paint over the glossy eyes, smeared towards the recess where the eyes meet the ground.
I’m pretty happy with my work on the eyeballs. I probably could’ve gotten something a little more photorealistic had I just ordered a set of fake ping pong ball eyes online or something, but then I would’ve missed out on a fun painting challenge. I quite enjoy the purity of experience when something is completely hand painted and scratch built – especially when it comes to Turnip28.
The eyeball bog ended up being a fun little use of my fossilised shark teeth – and I could have happily called it a day after this piece – but something was kind of bothering me. At this point, I now had four properly thematic Dangerous Terrain pieces – the Eyeballs, the Sad Carrot, the Juan Diaz mouth and the Toad Bog. Of these four terrain pieces, the Toad Bog just wasn’t quite living up to the character of the others. It’s always felt a bit low effort and rushed to me and as much as I liked the character of the toad at the time – it just didn’t quite fit in with the stylised look of the sad carrot or the eyeballs. It still just looked a bit too much like a garden ornament for my tastes. Something had to be done.
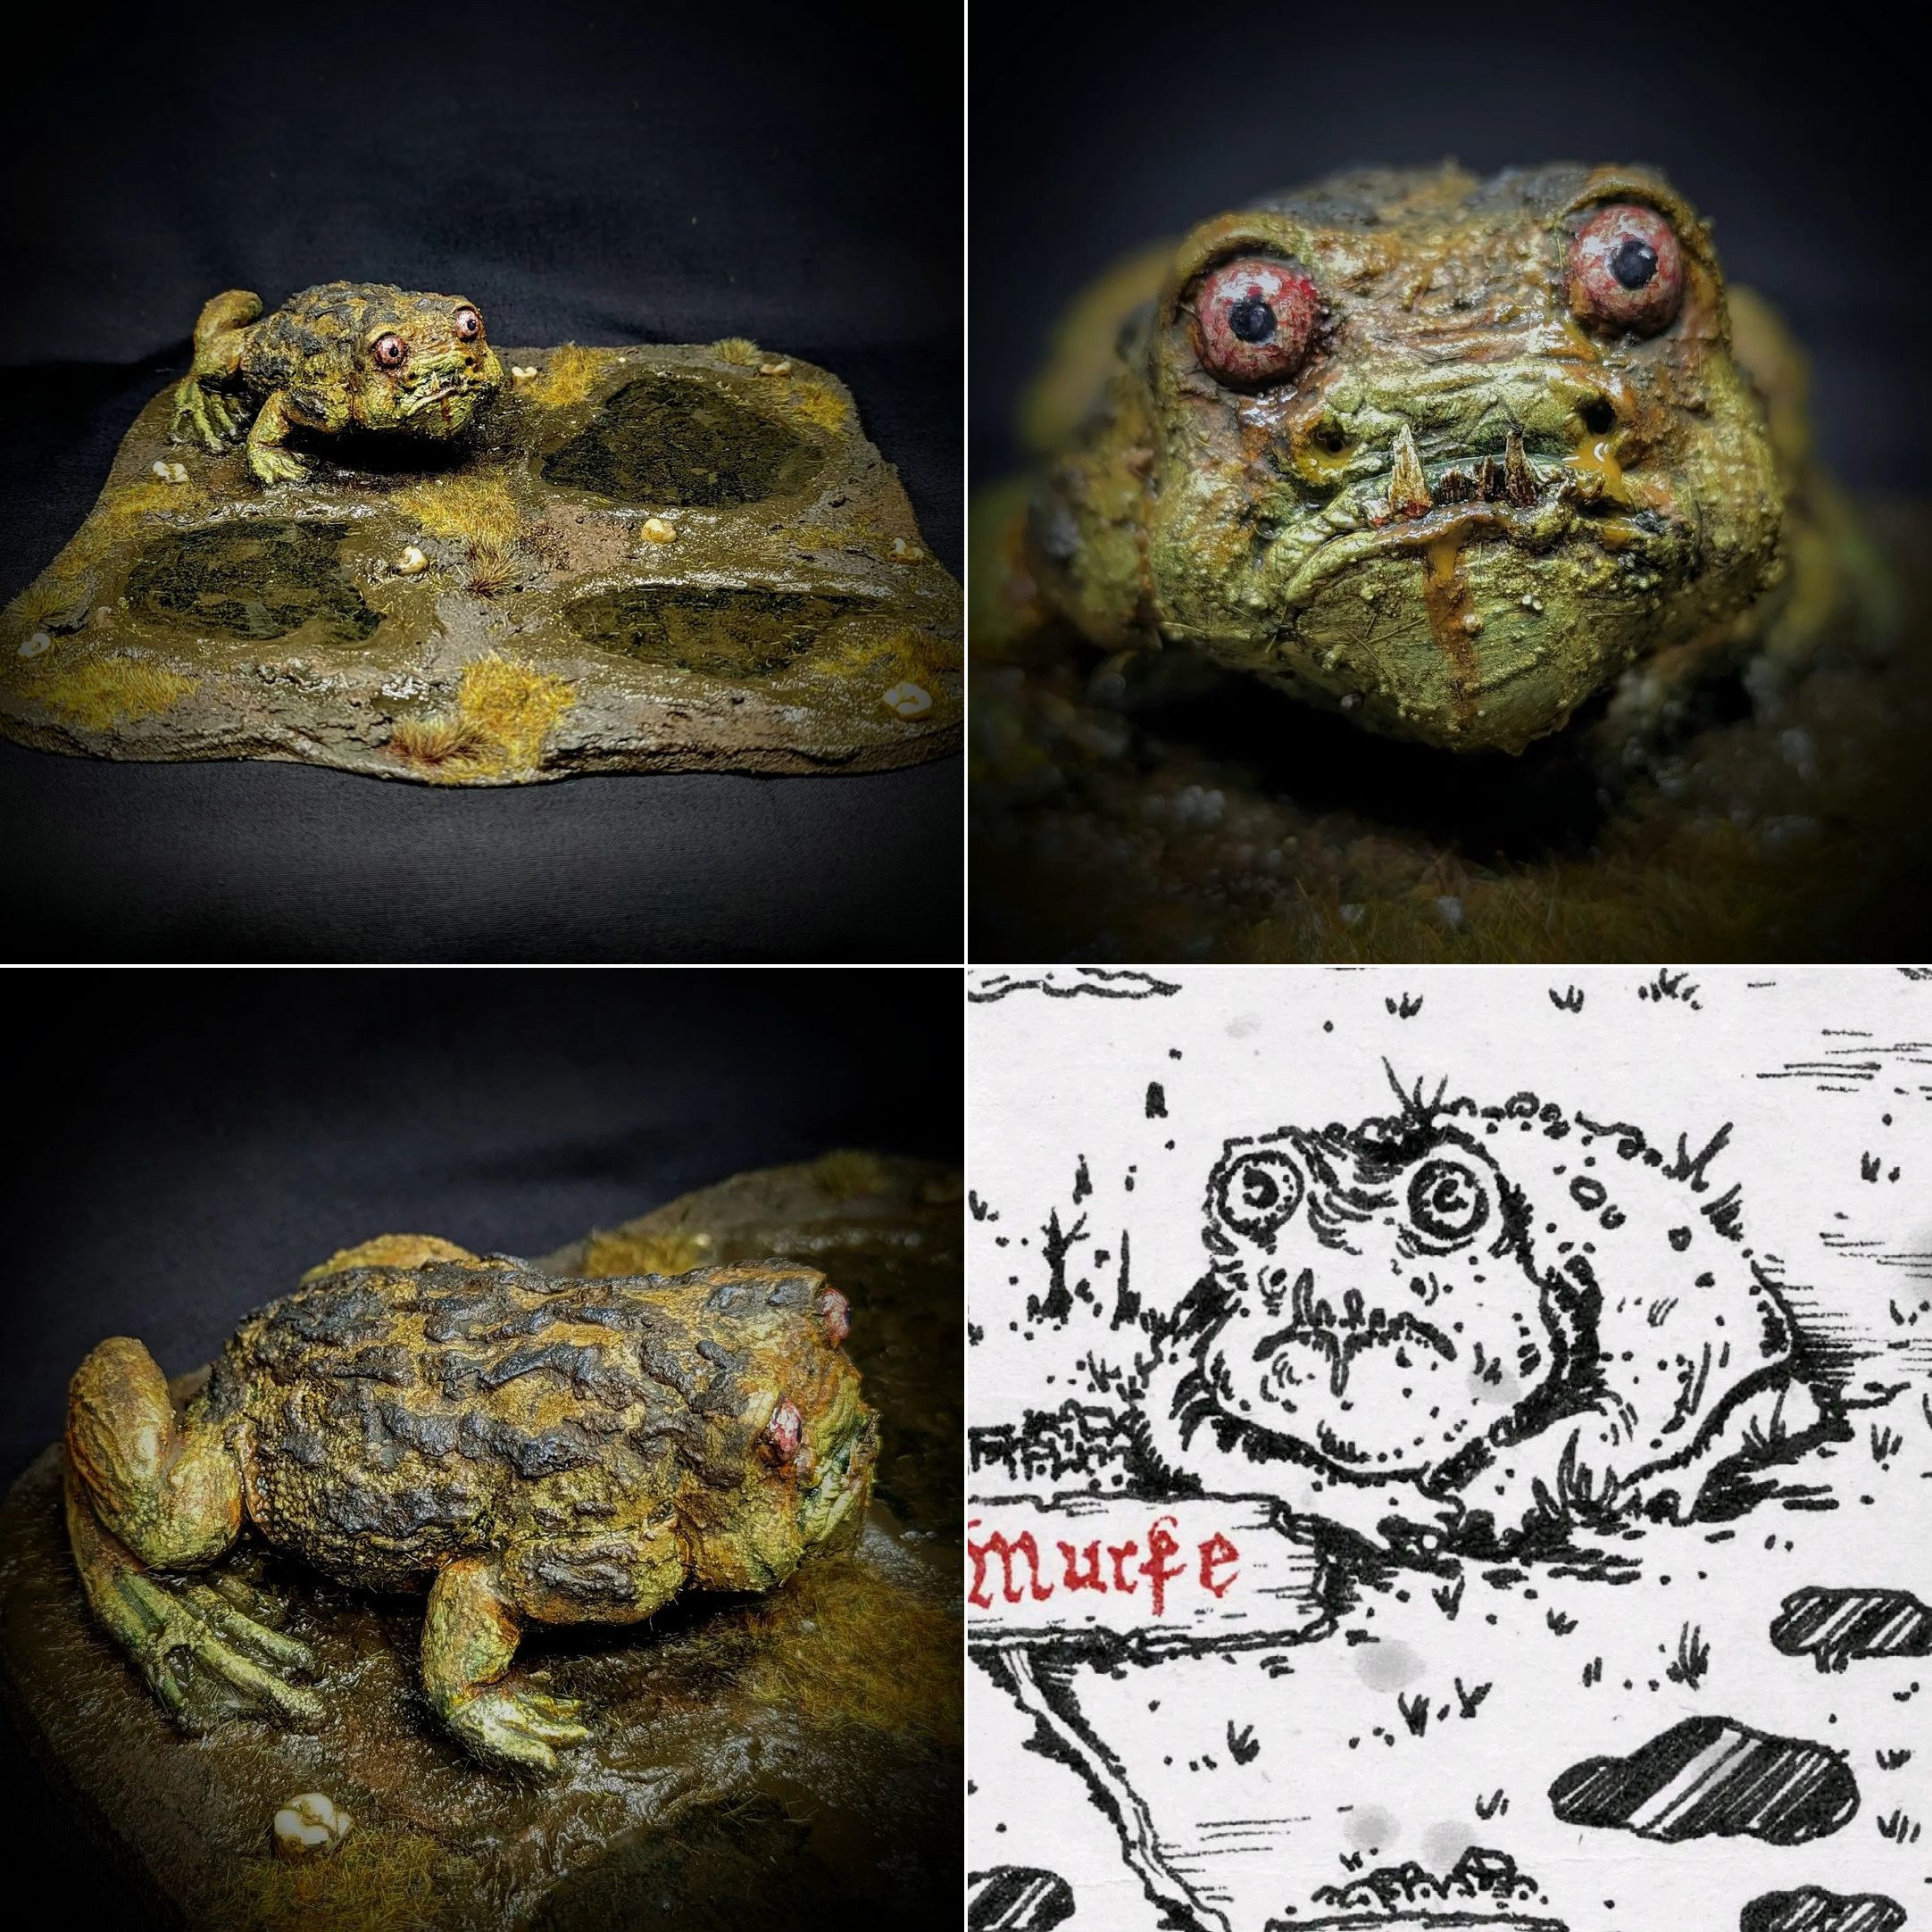
In the end, I decided to crack out my trusty putty hybrid, fire up the Swollen Maglette on my laptop screen and set to work trying to closer replicate the look of the disgruntled toad from the map of Cist. I opted against cutting off or removing any parts from the base toad and just started bulking up the body with more and more putty. Once I felt like I’d achieved the appropriate girth, the face began to take shape. First the eyesockets, then the beady eyes. Next came the shape of the mouth, the lips, the nose and the nostrils. While the putty was still malleable, I shoved some little shards of popsicle stick into the underbite for the teeth.
I did make a token effort to smooth out the surface of the putty before it cured, but I didn’t sweat it too much since I was going to add some grit and texture anyway. Once the putty was solid, I covered the whole thing with a slightly watered down coat of AK Interactive Mud Texture. The whole toad was then painted with Vallejo Dead Flesh, using liberal coats of Citadel Fuegan Orange wash in the nooks and recesses to imply shadow and/or inflammation. As a final touch, I painted on some irregular stripes and spots along his back with AK Interactive Dark Earth Texture Paint and drybrushed these with black and grey once dry. A pair of bloodshot eyes and a Streaking Grime enamel wash later and I had myself a much meaner, more stylised looking toad.
This was an extremely gratifying little project to work on that completely transformed one of my most underwhelming terrain pieces into something much more interesting and unique. So, of course, I was now completely bitten by the terrain making bug. I decided to have a flick through the Taster Campaign book, gawping at it’s wild array of unique scenarios full of fun modelling opportunities. While some would require a bit more effort than others, I did very quickly notice that I was but one more tooth-themed bog away from having an appropriate set to play the scenario ‘The Smile That Wins’.
Well, I’d be silly not to make another, right?
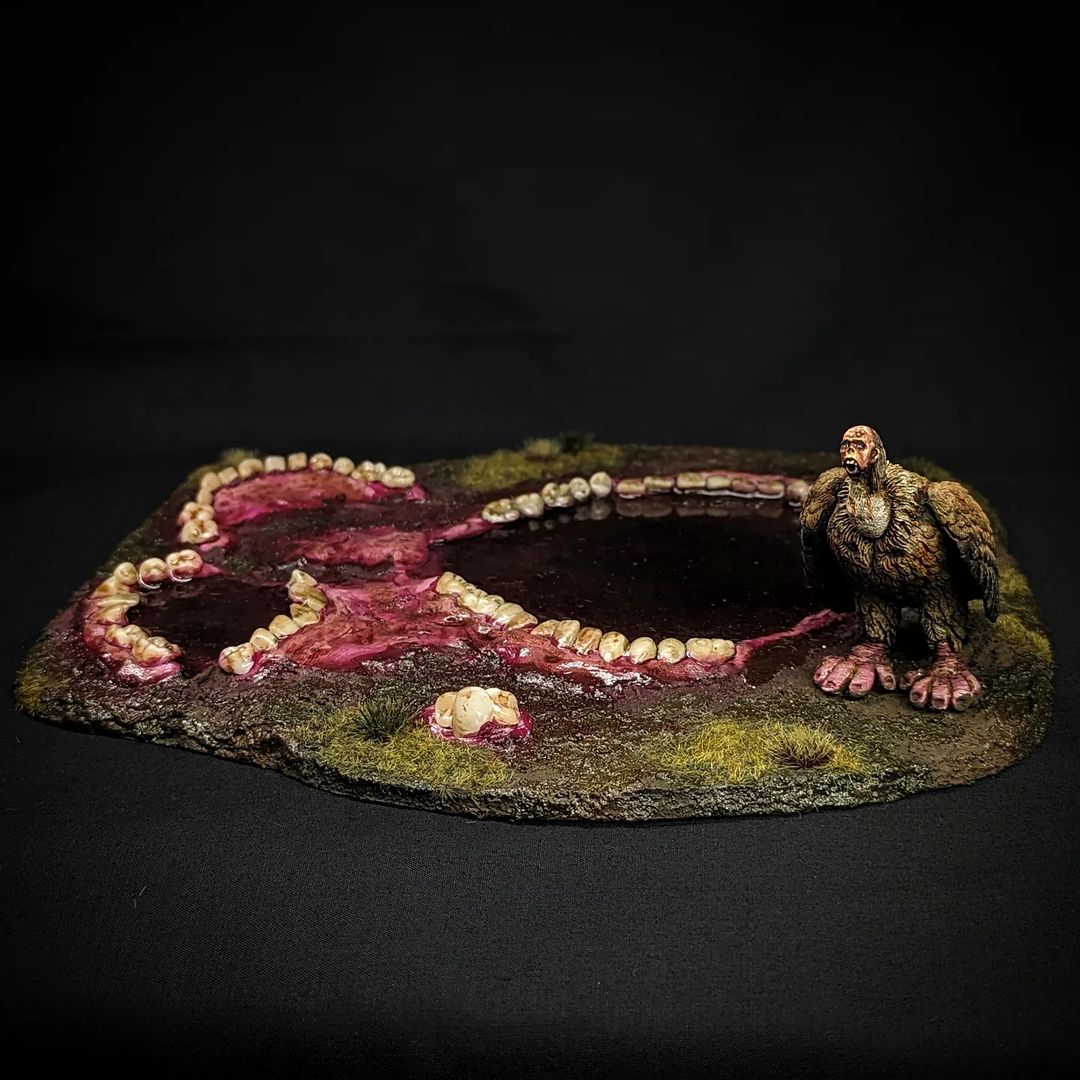
My third and (probably) final tooth-centric bog was this time based on the scenario layout artwork for The Smile Than Wins. I noticed one of the bogs pictured featured a horrible little harpy – a vulture with human hands for feet and a bald human head – standing next to a set of three mouths forming out of the ground. This instantly resonated with me, as it provided opportunity for a new take on the whole ‘mouths on the ground’ bog while simultaneously continuing my theme of having a little character on my dangerous terrain pieces.
Them mouths themselves I put a little more effort into this time around. I built up a nice big central mouth with a smaller one and a sort of ‘roof of the mouth’ area on the fringe. Much like on the scenario art, I built up a bit more fleshy gum area with my putty mix to help tie the three separate mouths together as well as putting a bit more effort to blend them into the dirt with my paints afterwards than I did on the shark tooth piece. As with all my mouths, I filled the central areas with a bit of UV resin mixed with some Reikland Fleshshade wash – I find this helps suggest depth a bit better than painting on a black hole. It’s also a mercifully smooth area to be able to sit minis on. Fun and practical.
For the vulture, I was lucky enough to find an appropriately sized children’s toy on Amazon for under a tenner, whose feet I replaced with some green stuff hands. For the head, I managed to find a loose head bit from Quovandius (a mutant character from Games Workshop’s 54mm Inquisitor game) on eBay for a similarly low price. It turned out to be maybe just a tiny bit smaller than I would’ve liked, but it’s close enough and really quite hideous to look at. Mutants and monsters are always far more terrifying when they’re painted in pale skintones, I don’t know why.

By this point, I was well and truly down the Taster Campaign rabbit hole. I was now flipping through the scenarios, trying to rank each scenario by how much additional terrain I’d need to make. I knew I’d burn out before I finished them all, but if I started small and built up in complexity, I’d have a good few new scenarios to choose from for my next game of Turnip28.
Probably the easiest of these scenarios was ‘Steal the Bacon‘.

Steal the Bacon is a bit like a King of the Hill style game, with a twist – the Hill moves in random directions. The terrain setup isn’t super complex and if you’ve got the terrain to play A Long March then you’ve got what you need to play Steal the Bacon. The only additional feature is the Pig objective marker.
For my pig, I scoured the internet for something suitably ugly out of the box. I did consider using a piglet from Malifaux, particularly as there’s one that matches the Juan Diaz artwork pictured above reasonably closely – but I wasn’t super keen on spending the guts of thirty quid on the Making Bacon box set for that one miniature. In the end, I settled on a 3D printed pig that I managed to find on Etsy – not quite as manic looking as I’d hoped for, but suitably unimpressed looking, I figured.
When it arrived, however, I didn’t think the pig looked quite as ugly and ticked off in person as it did in the renders, so I set about resculpting his face with green stuff by hand. The changes aren’t drastic – he’s got a thicker brow for more inset eyes, chubbier cheeks and more of an overbite than before. Thanks to my incredibly rudimentary sculpting abilities, he’s now officially 200% uglier1!
With my pig now suitably ugly, I just had to slap on a few finishing touches. I sculpted a collar from green stuff and attached a bell from the Empire Flagellants set, then cut up some ribbon to make a bow around him. Instantly iconic! I stuck him down on a 40mm base with a bit of slate and that was pretty much that.
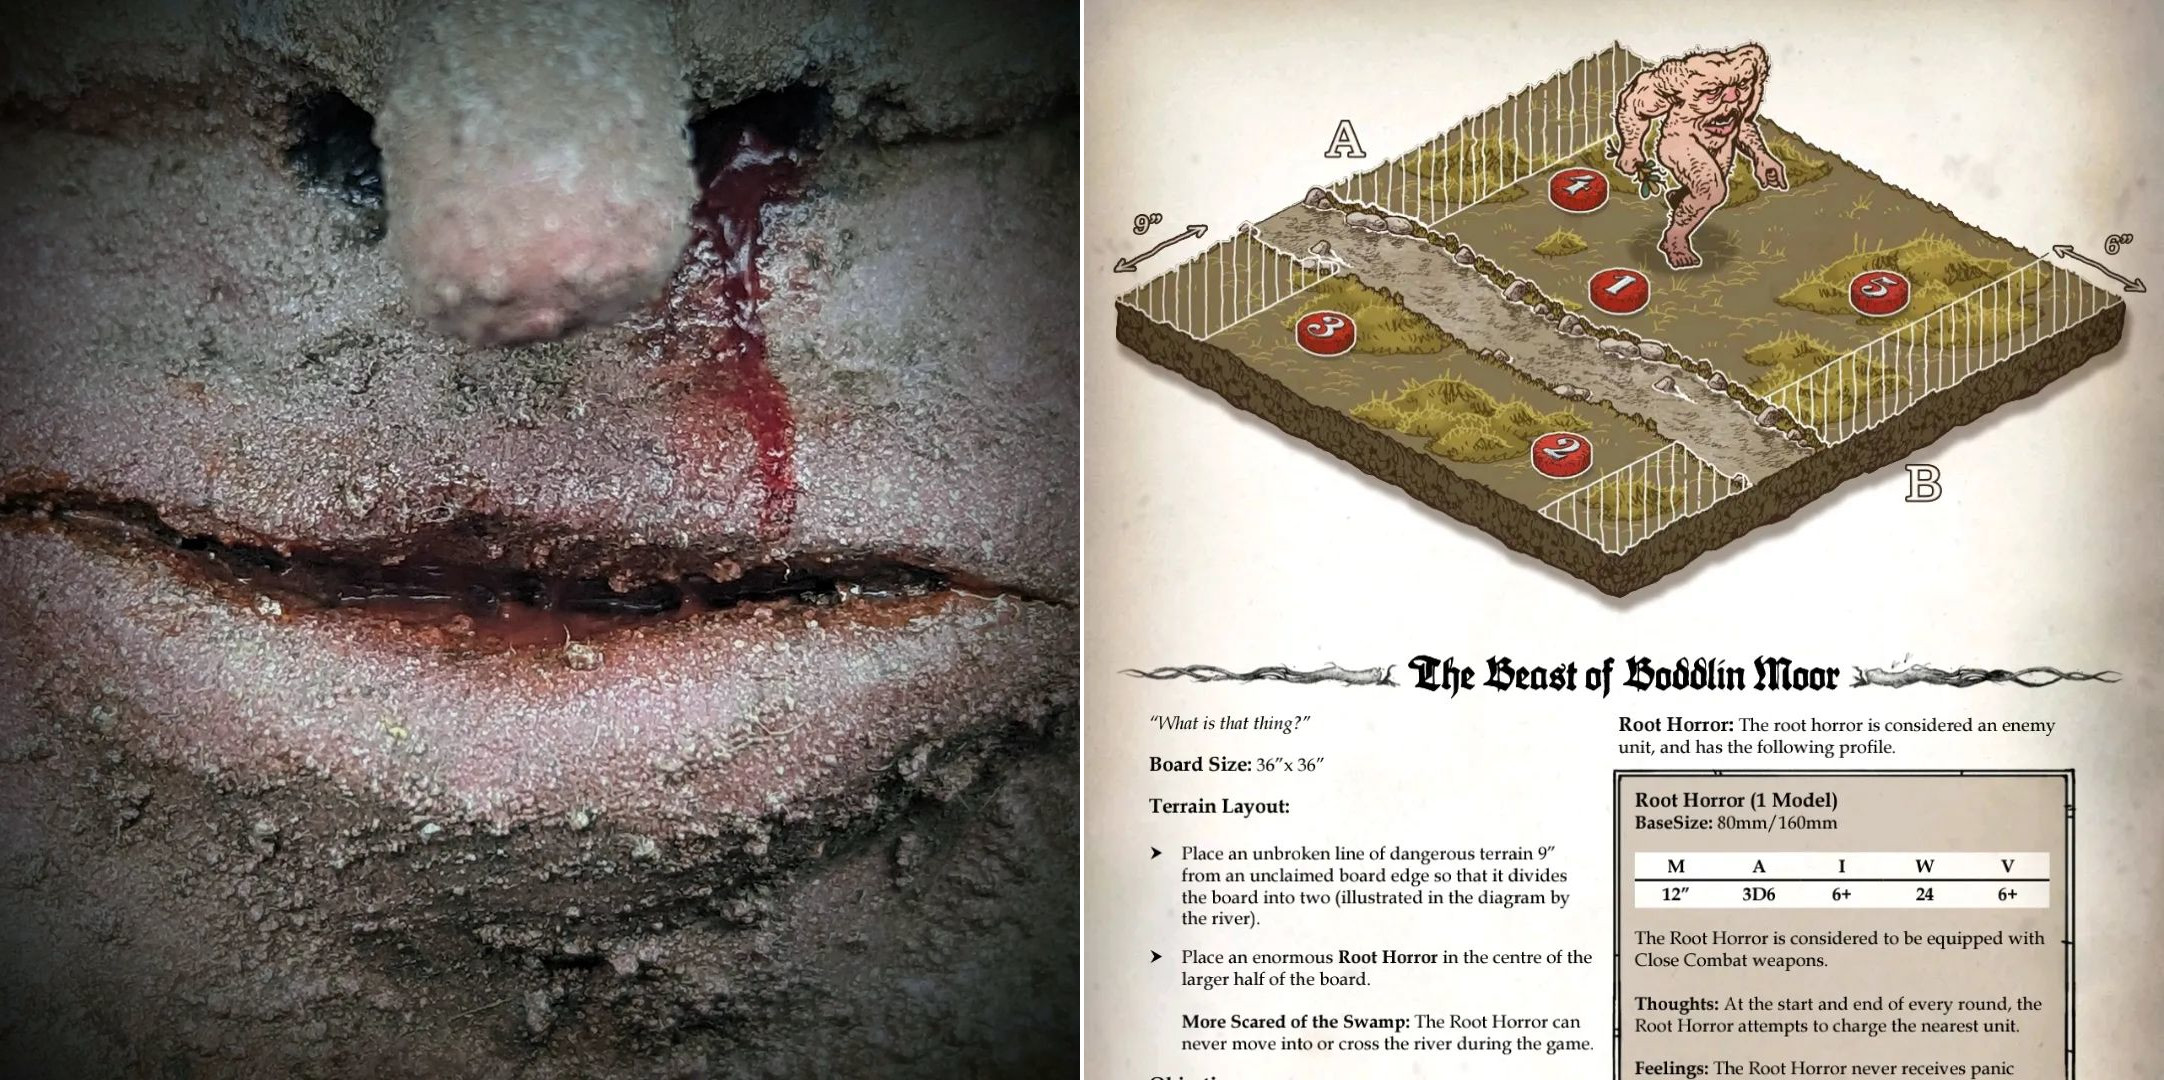
Full of piss and vinegar from smashing out two more scenarios, I felt suitably prepared to take on the most fascinating and exciting modelling challenge in the Taster Campaign book – The Beast of Boddlin Moor.
I think this monstrosity might just be my Turnip28 masterpiece. The premise of this particular scenario is five objectives on a board divided by a river, with three of the five objectives sharing a side with a “Root Horror” that will charge and attack the nearest unit. You either win the game by holding the most objectives, or by landing the killing blow on the Root Horror.
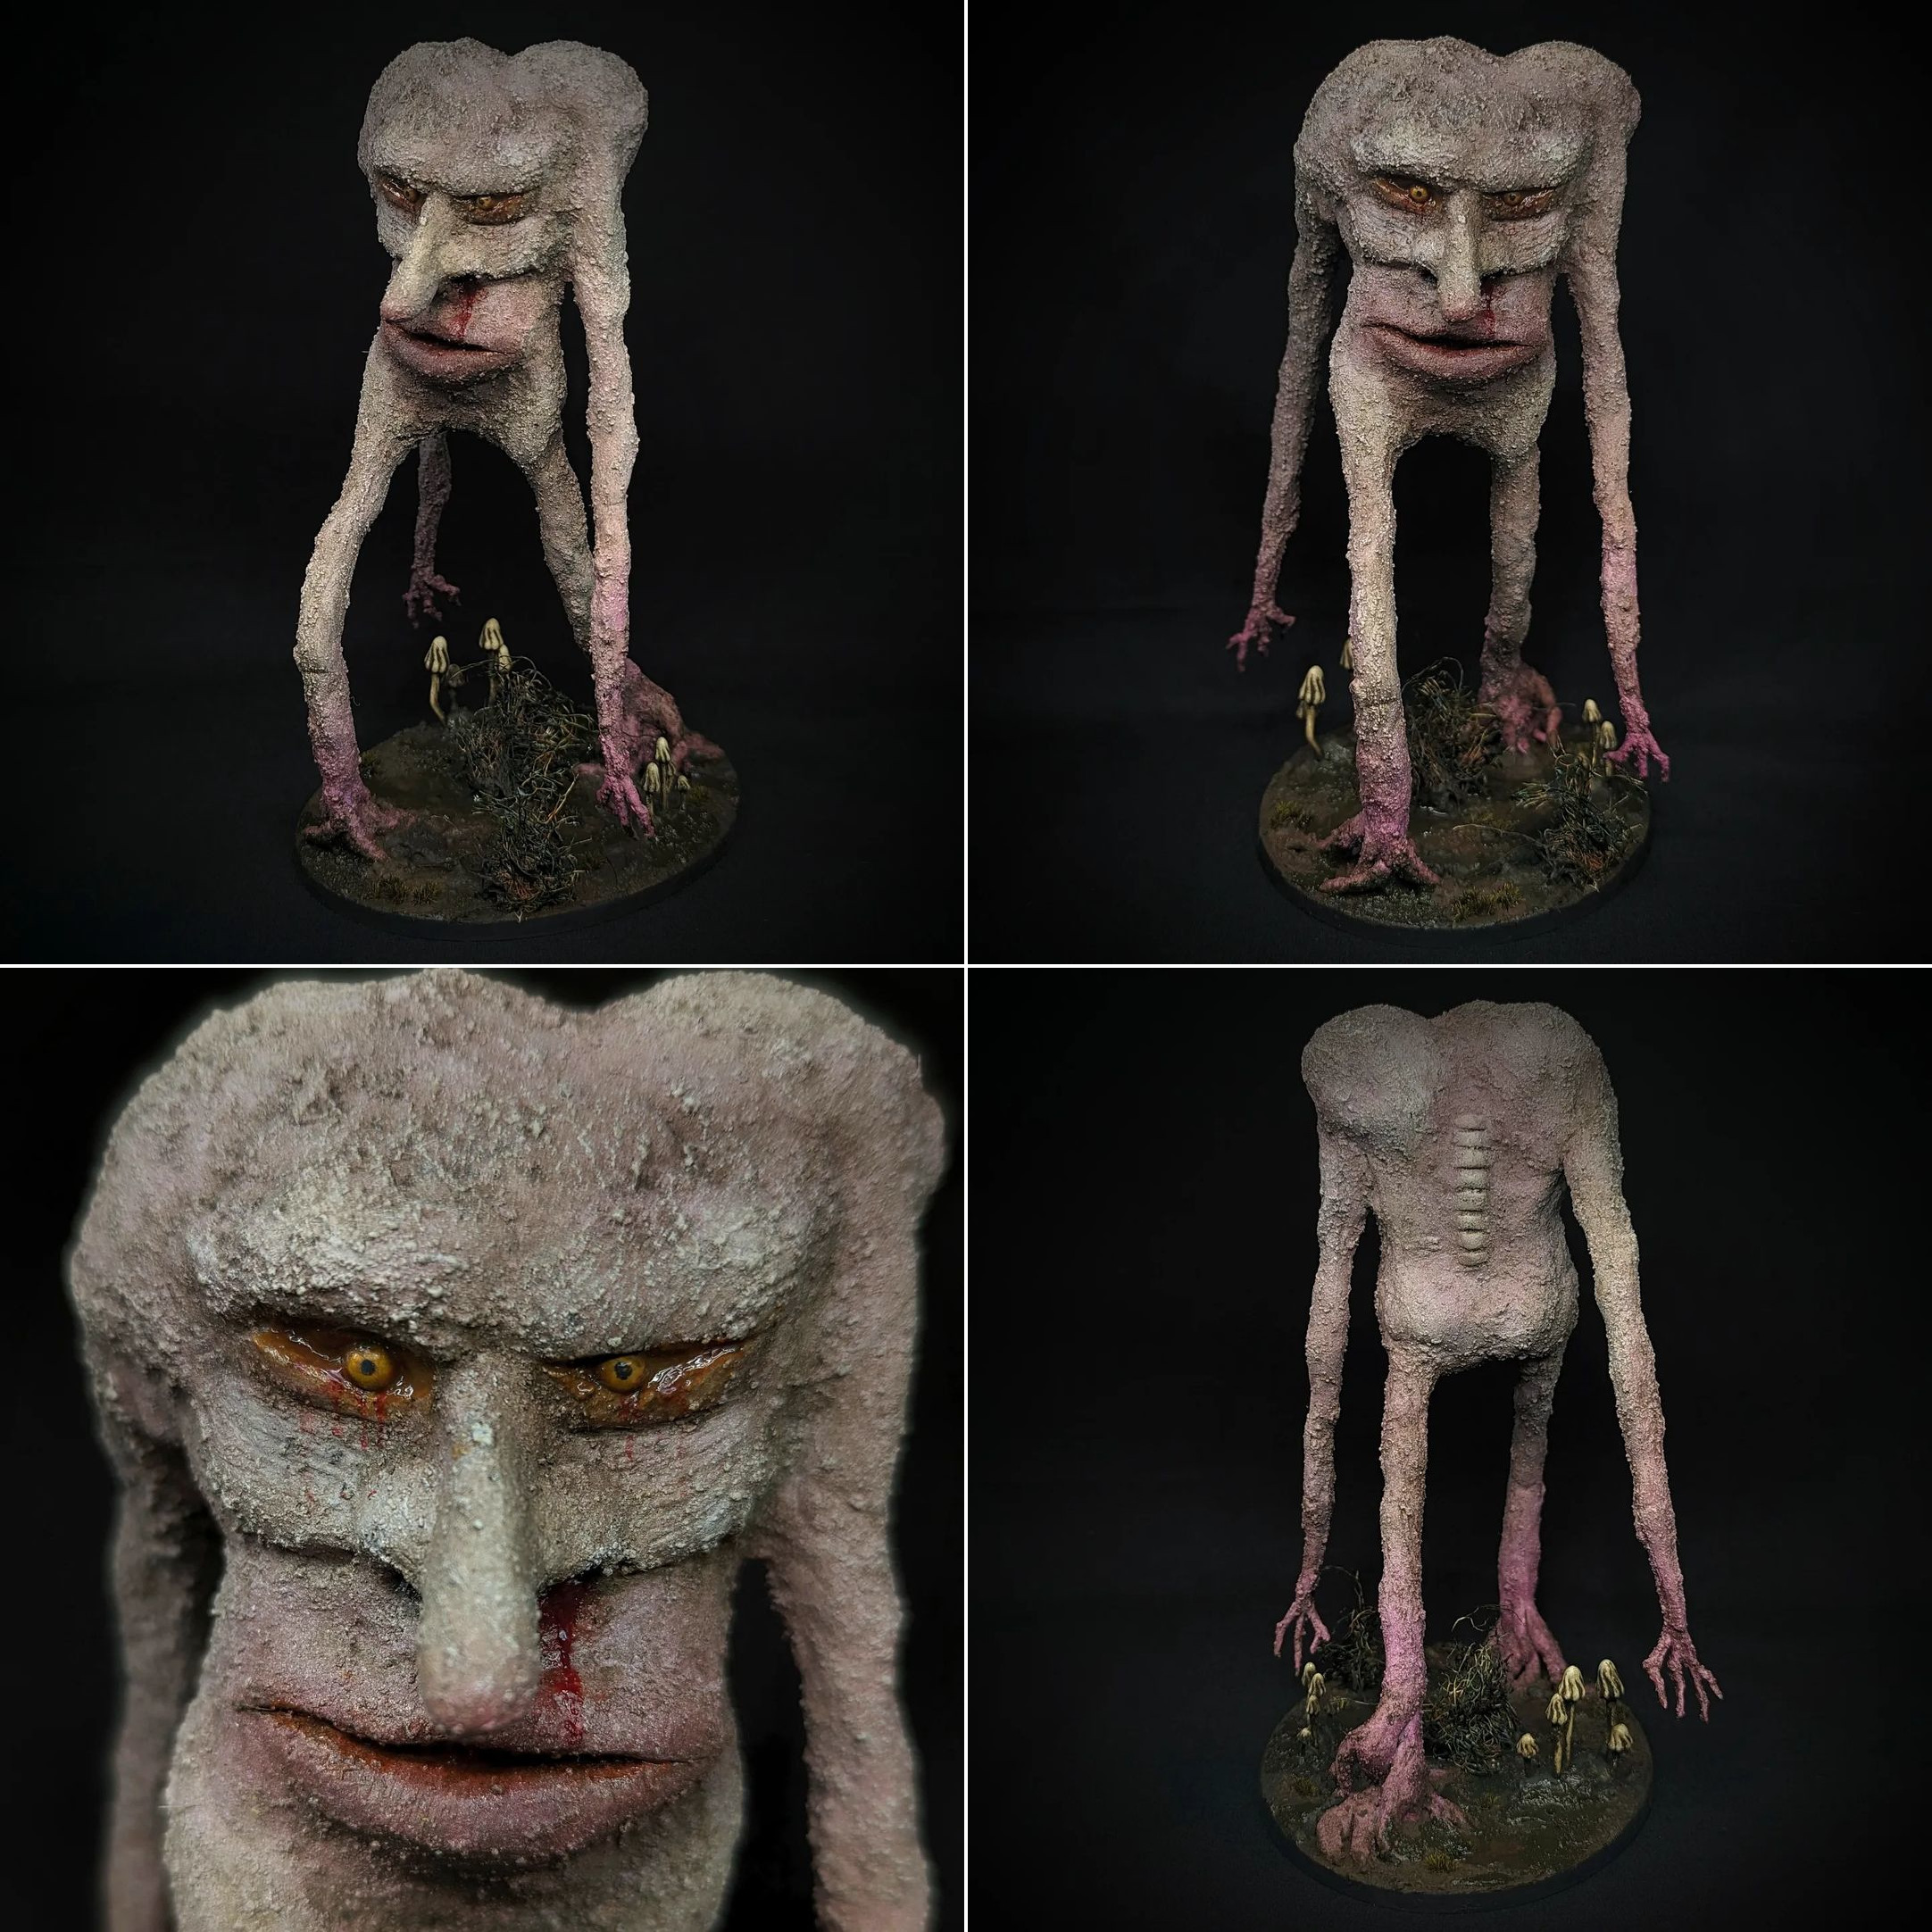
As far as what the Root Horror actually is, there’s not really all that much to go on. All we have is a name, a base size and an image on the map of a headless man. That was plenty enough to inspire me, however. I did consider doing something completely out of left field, but honestly the headless man design really spoke to me – although I thought it looked a touch too human and perhaps not quite rooty enough, which I like to think I resolved on my own interpretation of this creature.
To start, I built the frame of my Root Horror from popsicle sticks and super glue. This helped me quickly prototype the pose, height and scale of the model as well as giving me something rigid to stick the putty to. The only actual miniature components that I ended up using here were two forearm pieces from the Games Workshop plastic Ent kit. They were just coincidentally the right scale, looked suitably rooty and saved me having to fiddle around sculpting delicate little fingers. Aside from the wooden frame and the plastic hands, this miniature is 100% putty.
Once again, I mixed up a huge batch of 50:50 Green Stuff and Milliput and initially set about just squeezing it onto the frame. Once I had enough of a solid foundation, I started to build up certain areas like his lumpy shoulders and tried to smooth out the transition between the putty and the plastic forearms. This was left to cure before I came back in to start building up details. The basic facial structure such as the brow, nose and lips were all sculpted at this stage, as was the spine that I added to make the back side of the miniature a little more unsettling. I used the image on the scenario map as sort of a reference to understand the shape of the lips and face, though I did deviate somewhat with the particulars, such as the eyes and the nose. I tried to keep his expression as cold and neutral as I could – it just felt a thousand times more unsettling that way.
As with on the toad, I did try to smooth out the flesh as much as I could, but there were a great number of imperfections still left on the body. I could’ve gone back over and cleaned them up with a thin layer of green stuff, but decided instead to coat the majority of the miniature with Muddy Ground texture paint again to give it a lumpy, gritty texture. Texture paint really is a godsend for cutting corners in modelling.
From a painting standpoint, the Beast of Boddlin Moor was pretty quick and painless. I primed him in grey, basecoated with Pallid Wych Flesh and wet blended in some Warlord Purple into his recesses and extremities. This was followed by light drybrushes of Pallid Wych Flesh and pure White to build up some contrast and tonal variation then followed up with a thinned down wash of Streaking Grime.
It’s the little details that make simple miniatures like this pop, however. For his eyes, I rolled up tiny little balls of green stuff and painted them in Filthy Brown with tiny little black dots for pupils. These were set in his eyesockets alongside a bunch of sticky eye goop which I made by mixing Blood for the Blood God and Nurgles Rot togethe with a little Water Texture gel. The combination of the green and red creates a lovely mucus brown while the water texture gives it a bit of body and translucency. The final touches were a little more of the mucus between his lips, as well as a trickle of Blood for the Blood God down his left nostril for a sad nosebleed. I’m not looking forward to tangling with this guy on the battlefield!
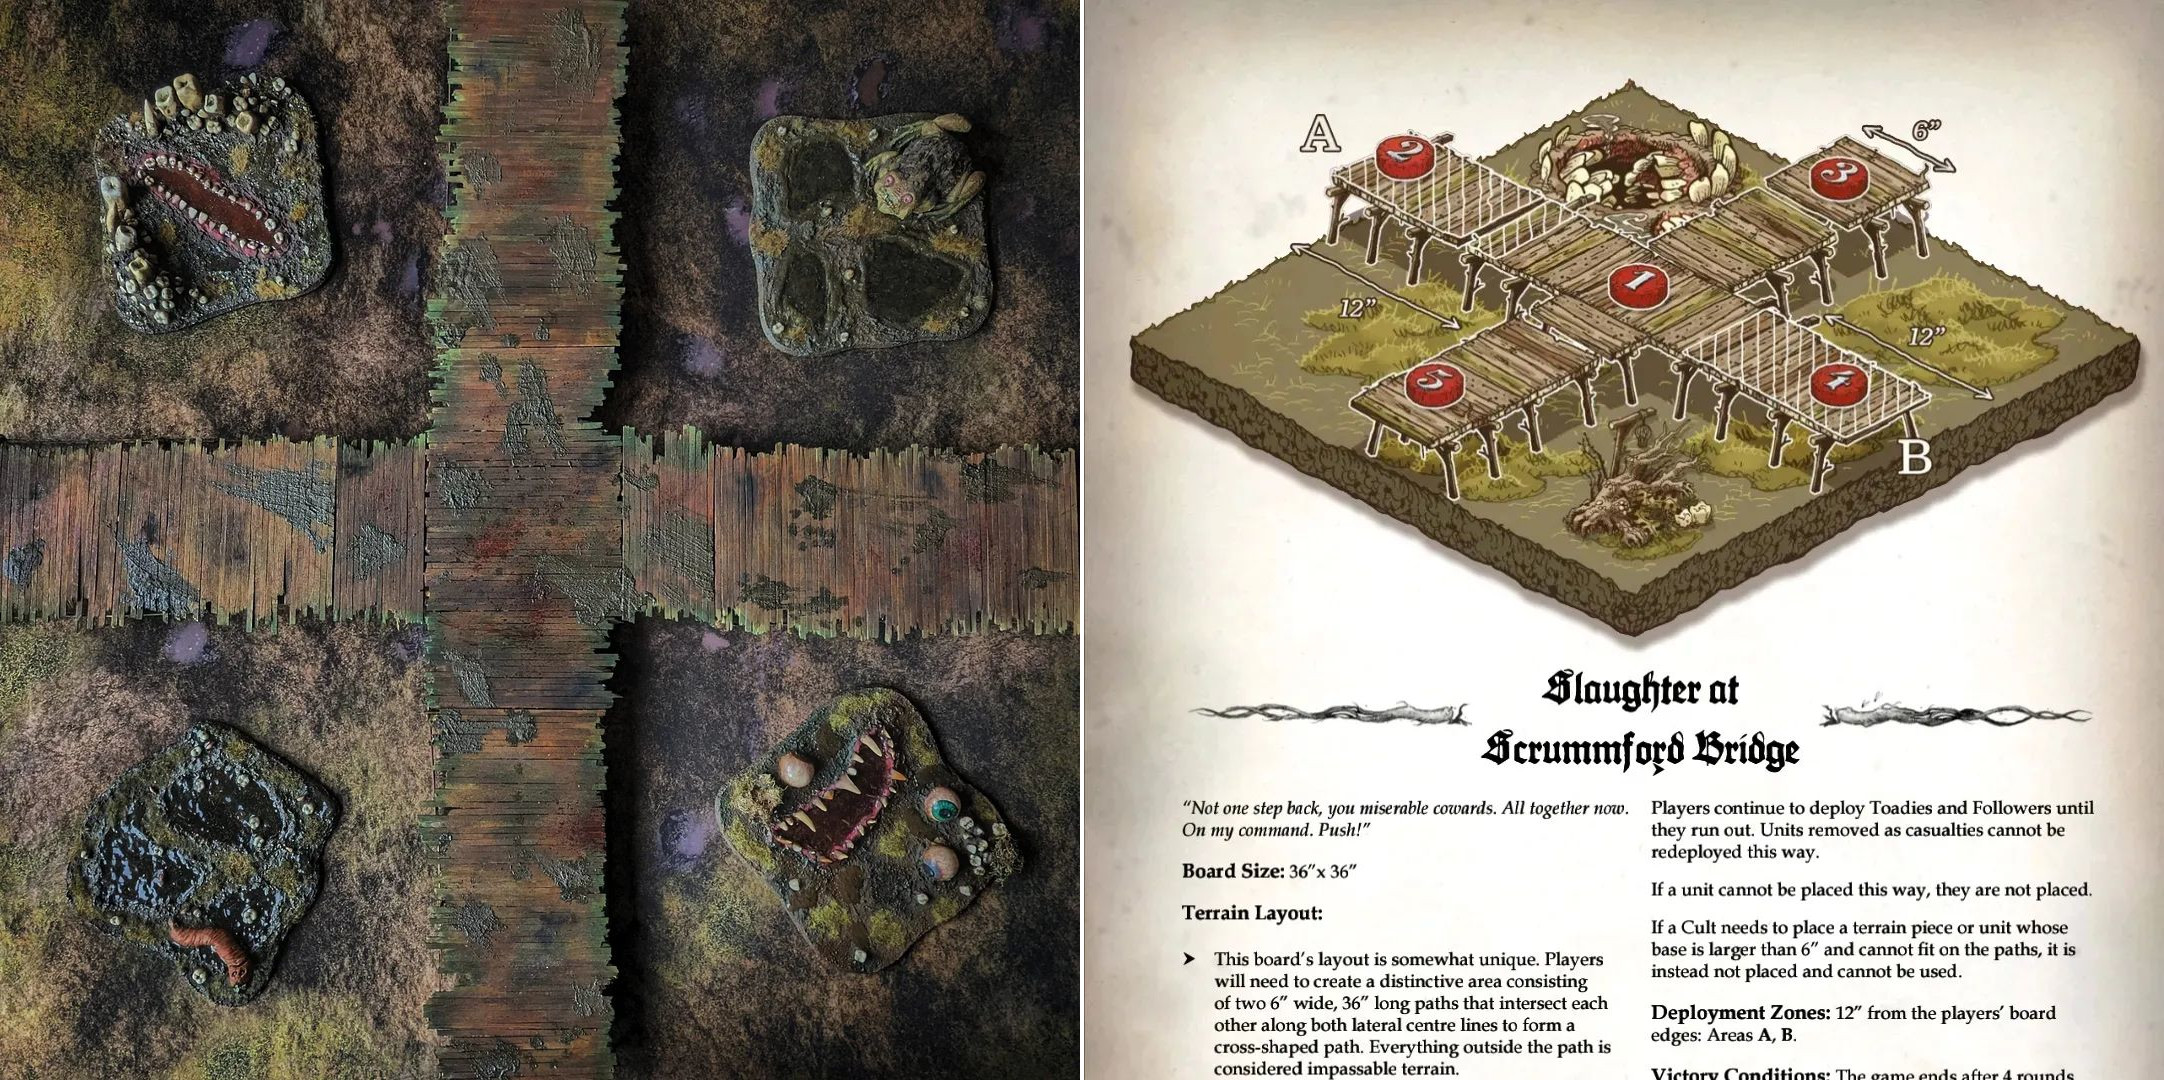
The next scenario I looked at was the Slaughter at Scrummford Bridge.

This one is a pretty simple premise for a scenario. The battlefield is reduced to a 6 inch wide crossroads with an objective marker at all four extremes, plus one in the centre. It’s quick, claustrophobic and terribly bloody – so I had to build it, didn’t I?
Originally, I had these grand plans to make the bridge fully collapsable, with each bridge section having removable legs that could be stored flatpacked. While I still believe that it’s possible to build this (and support the weight of two potentially metal Turnip28 armies on top), I kind of lost interest in doing so when my initial prototype turned out a little less rigid as I’d hoped for. After a couple of failed attempts to reinforce the removable legs, I opted to build the bridges as five standalone pieces with a fairly low profile. It’s not quite as easy to store as my initial flatpacked attempt, but it did greatly simplify the process of reinforcing the bridge. It also means there’s a not as far for your minis to fall if you manage to knock them off, you big butterfingers!
It’s never fun to have to kill your darlings, but the build was better off for it in the end. They still fit in a reasonably small box for transport and each of the bridges are able to take the weight of a couple pints of water without too much strain or wiggle. The trick here was to attach each leg together with another popsicle stick – this prevents the legs from sliding outward when the weight pushes down on the platform (a big issue I had with my detachable legs at first). As a final little decorative measure, I then got some twine and tied it around each of these joins. This added a nice rustic flair with the added benefit of masking any visible superglue from the joins.
Much like the Beast of Boddlin Moor, painting the Scrummford Bridge was significantly less painstaking than building it. To start, I drybrushed the bare coffee stirrer sticks with biege and white paints, then stained the whole thing with a mixture of washes and watered down paints. To make it look worn and well trodden, I tried to mix up the areas of coverage and direction of my brushstrokes with each new coat of paint or wash, overlapping a little bit each time. Once I felt comfortable that the textures had enough going on, I took out my airbrush and applied thin coats of Vallejo Sepia Ink and Agrax Earthshade wash to tint the whole thing a little darker. Afterwards, I airbrushed in a little Vallejo Green Ink onto the broken edges of the bridge to simulate slimy algae buildup from the marsh underneath.
The final step was the surface details. I applied some AK Muddy Ground and Wet Ground texture paints to the top and scraped it around like mud trails from under boots. I applied some Blood for the Blood God to a toothbrush and flicked it onto the surface, gradually increasing the density of spatter towards the centre where I expect the most conflict to be taking place. Finally, I made a few small holes with my hand drill and filled them and the surrounding area with a little black pigment powder for soot and black powder deposits.
I’m pretty happy with how the bridge turned out in the end – it looks particularly cool on my muddy battlefield mat with four of the dangerous terrain tiles down for visual interest. All the various steps I took to weather it all add up nicely to tell the narrative of a rickety old bridge with a long and bloody history of violence.
As I expected, I found myself starting to burn out a bit on all this terrain building by the time I finished Scrummford Bridge, but I had one more scenario left in me – Grave Matters.

Grave Matters is, as the name implies, set in a graveyard. There’s a couple dangerous terrain tiles present, but the meat of the scenario is in the ambush style deployment and the Scenario Blunder, in which your opponent digs up corpses and ghoulishly employs the lifeless bodies as reinforcements. Just normal Turnip28 things, you know.
As far as terrain goes, there’s nothing essential here. A couple of basic bogs will do for the dangerous terrain and beyond that, some gravestones would be nice to set the mood.
I did a bit of digging online to find suitable tombstones and eventually stumbled on a 50 pack of 30mm MDF tombstones from a store called Spots and Screens for just £5.50 – including postage! I combined these with some leftover MDF bases and I was good to go. The recipe is dead simple – glue the headstones to the base. Spray the headstones with stone texture spray paint. Cover the base in Muddy Ground texture paint, then apply a few thick layers of Dark Earth texture paint at the base of the headstone for the mound. A quick Khaki drybrush and a little Streaking Grime over the headstone then stick some static grass and tufts on and you’re good to go. Easy peasy. I did consider putting some funny grave puns and jokes onto the headstones, but I wasn’t happy with how my freehand handwriting looked, so I ended up patching that idea.

The centrepiece for this board is the Belfry in the deployment zone which I ended up getting from a small Polish company called Mini Monsters. It took a while to arrive from overseas, but it was a very nice quality cast made from very sturdy resin, so I would heartily recommend them if they stock anything that tickles your fancy. Nothing to write about on the paint job, just a quick drybrush and Streaking Grime job, but I think it looks cool and captures the scenario map reasonably well.
I didn’t bother making the well and rubble pieces pictured on the scenario map because it didn’t really seem important at the time. After seeing the layout from a birds eye view however, I think it would add a nice bit of much needed visual interest to the board. I’ve actually got a well and some rubble from a now defunct old terrain piece painted and ready to go (minus the base), so I might just bash it out before I play this scenario for the first time. Maybe I’ll add a bit of blood spatter on the gravestones to add a bit of visual interest there while I’m at it. I think this might be a good scenario for my more basic bogs that I used for my first games of Turnip, rather than the flashier character bogs pictured above. Hindsight is 20:20, of course, but you can probably tell I was getting a bit burned out on this last piece. Ah well. Live and learn.
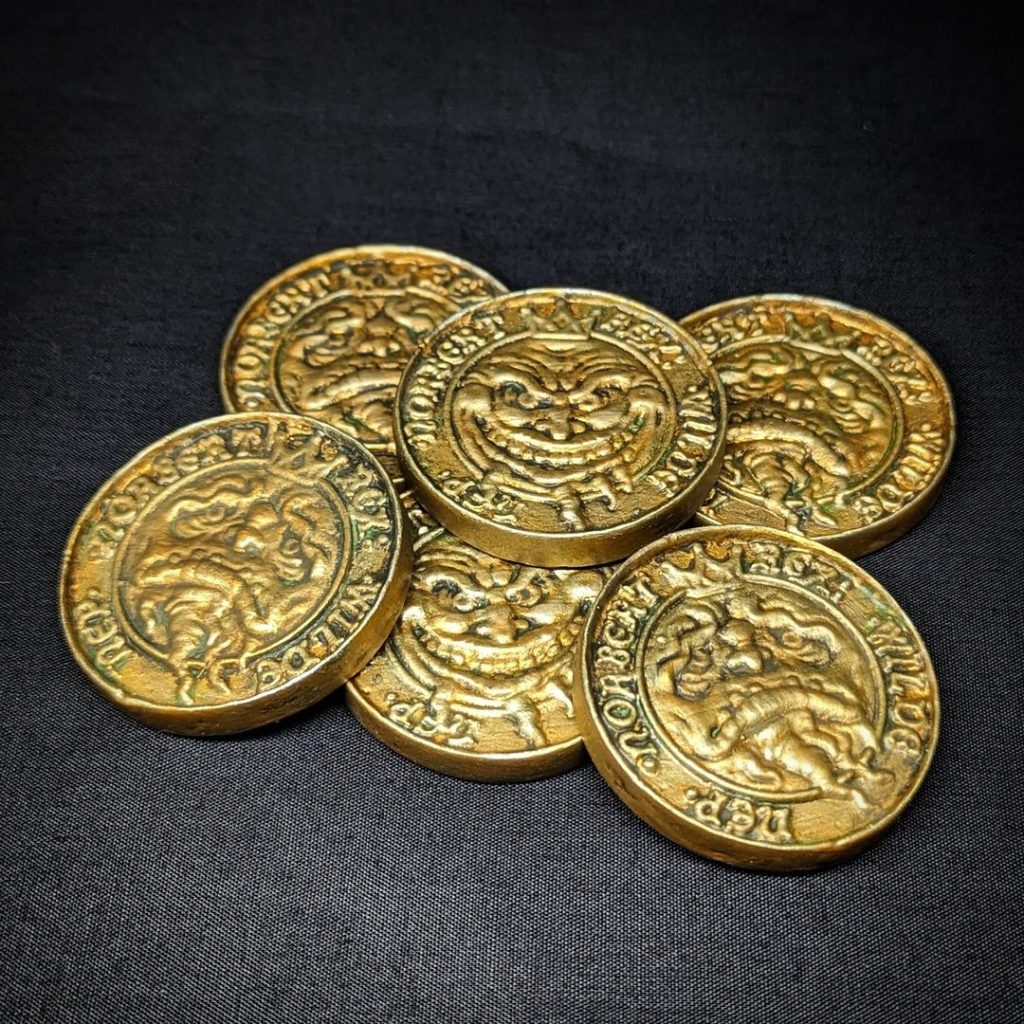
Aaaand that’s just about everything I have for the moment. Enough new terrain and objectives to play another five(!) scenarios out of the Taster Campaign book, in addition to the three standard scenarios from the main rulebook, plus Gone Fishing and Spin the Wheel3 using my fish and windmill terrain pieces respectively for a total of ten possible scenarios. I’d still like to go back and do some Cist houses for Burnt Toast, gift boxes for Gift Wrapped and mushrooms for Chanterelles Disaster – but for now I’ll leave you with a handful of Shiny Norberts, the official currency of Cist.
With that, my return to the world of Turnip28 is coming to a bit of a close for now. While I do expect to return to Cist in the near-ish future4 – particularly with TurnipFest #3 fast approaching – it’s high time we returned to Middle-earth and cracked on with the narrative campaign preparation. I’ve got a whole load of additional Rohan Heroes finished up for the occasion and even some exciting new terrain on the go.
Until then, thanks for reading and happy wargaming!
1 For those unaware, sharks actually lose and regrow dozens of teeth every month.
2 A friend of mine told me he looks a bit like Alf. Remember Alf? He’s back – in Pig form!
3 I’d originally intended to make a water wheel like the one pictured in the scenario, but to be honest, Spin the Wheel feels like the single best use for my sunken windmill terrain piece. Not a ton of scenarios actively call for a large piece of impassable terrain and – given that scenario is fairly barebones otherwise – it feels like a nice to put my windmill front and centre.
4 I’ve got a half built unit of melee Fodder for the 22nd Bloody Beet Brigade on my desk right now for starters.