
Welcome back fellow followers of the root to part three of The 22nd Bloody Beet Brigade – the series chronicling my steady descent into the murky mires of Turnip28. In part one, I did my best to elaborate on what Turnip was while detailing the core units in my army for the system – The 22nd Bloody Beet Brigade. Part two focussed on the various cult units I added to the force at the time. In this instalment, I’m going to show off my Turnip28 ‘pets’ and objective markers alongside a bunch of terrain that I built for the system. We’ve got a lot to cover this time around, so let’s get into it!
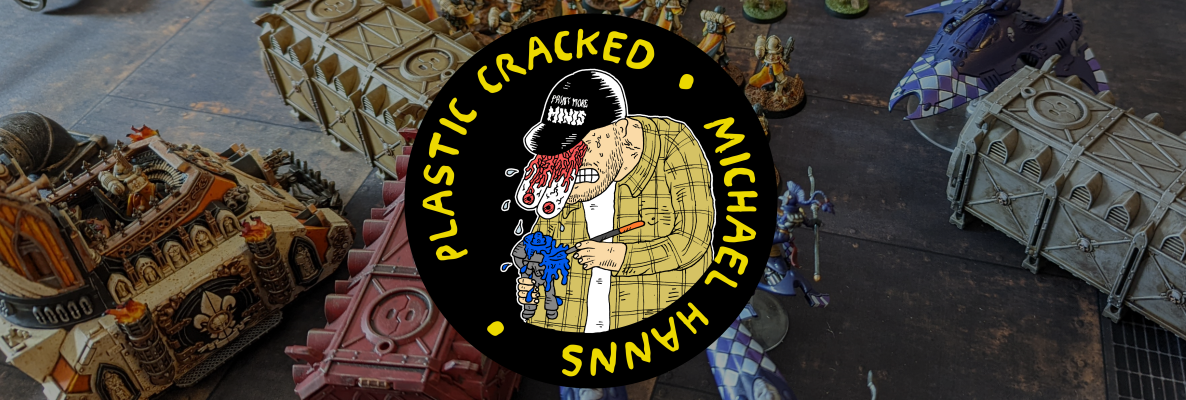
The first ‘complete’ (i.e. not a conversion kit) original miniatures for Turnip28 are the only new non-terrain items this time around. These are very fun, characterful miniatures to paint – each with their own unique challenges and textures.
I was quite apprehensive about painting these at first. The miniatures themselves are reasonably cartoonish looking when compared to the historical miniatures that make up the majority of a Turnip28 force. With that in mind, I played it safe and did my best to try and imitate Max’s paint jobs from the Turnip28 rulebook. There are details I took from these examples – such as the browning around Ergot’s edges or the warm pinkish hue around Molar’s face – that I probably would never have thought up myself but really enhance the overall paint job. That’s not to say I didn’t put a few of my own ideas into these miniatures – though many of these were quite by accident. Take Ergot as an example – I wanted to try and replicate the flour dusting effect on Max’s paint job and did so using a layer of satin varnish followed by a light dusting of some old Army Painter snow powder I had lying around. The grains were, unfortunately, way too large to look convincingly like flour. However, as I dusted the excess off, I realised that the scattering that remained on top looked more like thick grains of sea salt than a fine powder – but hey, it works. On Musk, I applied a thinned down wash of Streaking Grime and followed up with another layer and highlight of Pallid Wych Flesh and Dead White – this does a decent job of replicating the creamy white hue Max’s musk though it leaves the recesses looking plenty grimy. Very happy with how his root horns turned out as well – a combination of Orange Fire and Dwarf Skin makes for some excellent carrot tones, which will prove useful knowledge later.
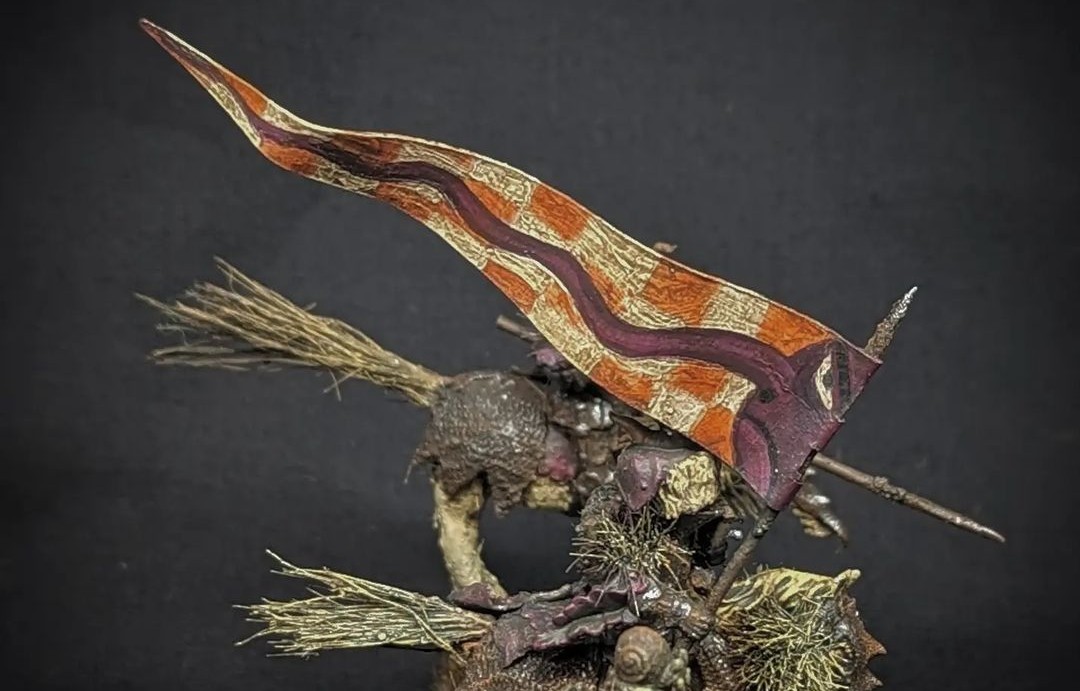
Moving on, we have some 22nd Bloody Beet Brigade themed Objective markers.
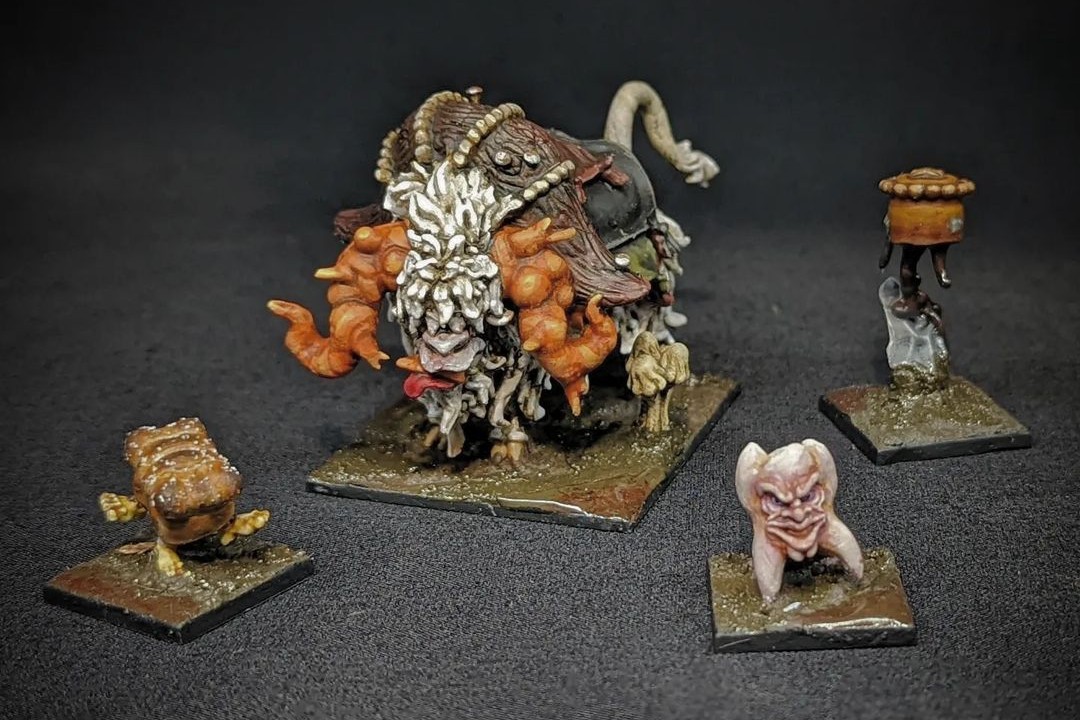
As of the time of writing, most of Turnip’s scenarios are based around the loose concept of controlling one or more objective markers. Objective markers begin the game as neutral and once a unit claims a marker by ending a move next to it, it belongs to that army. With that in mind, I wanted to paint up a set of markers that looked distinctly like the Bloody Beet Brigade had been there – planting vegetables or other local markers of their homeland, The Gaping Moors. One of these would have to look like a miniature Bloody Beet, complete with horrific facial features just kind of crowning out of the Earth. I also knew that I wanted to include some teeth somewhere – for reasons that will become apparent later – so I built a little spring surrounded by a wall of teeth with a twisted little beetroot in the centre poking upward like a tongue. After walling off the teeth with mud texture, I finished with a drop of UV resin for the moisture within. The next two were kind of playing on the “Scotland” theme of the army – I made a giant thistle from a little seed thingy that had fallen off a tree behind my house and built it a stalk and leaves using some Games Workshop Creeping Vines. Once assembled, I painted the seed thing in purple to make it suggest a thistle. I couldn’t help myself making it look gross so I painted the interior in flesh tones, added a little Nurgle’s Rot for Mucus and dropped a bit of UV resin in there for good measure. The other ‘Scotland’ themed objective marker was a standing stone made from a long piece of slate. I’d initially attempted a kind of crude painting of the Bloody Beet on it – you can still see this on my original Instagram post – but this strangely neither looked crude enough nor enough like my Bloody Beet banners. In the end, I decided to paint over it and try and scratch a rough shape into the stone – it looks rough and a bit scrawled, but I think that works more in it’s favour than the sub-par freehand attempt. My final – and personal favourite – objective marker was built from a bit of twig, twine and greenstuff to create a beetroot hanging from a bit of rope. I built a little sign out of plasticard, painted with the not-suspicious-at-all words: Not Bait. This really plays into the idea of ‘planted’ objective markers, which I really liked. Overall, a fun little creative project that took no time at all to paint.
Even faster were my set of ‘Neutral’ markers which are quite literally some Muddy Ground and Wet Ground texture paste on a set of 5 bases. I’m not going to waste screen space here with a photo of five empty bases, but you can click here to see a picture, if you’re just that curious. It’s low effort, but it beats using a coin or a counter as neutral objectives. I like the narrative that there’s nothing really special about the land they’re fighting over, and having objectives ‘put’ there once you take them really helps sell the idea of claiming the land for your own regiment.
Now, what wargame is complete without a table of thematic terrain to fight over? The land of Cist is like a character in and of itself in Turnip28, so there was no way I was ever not going to paint up a board or two’s worth of terrain.
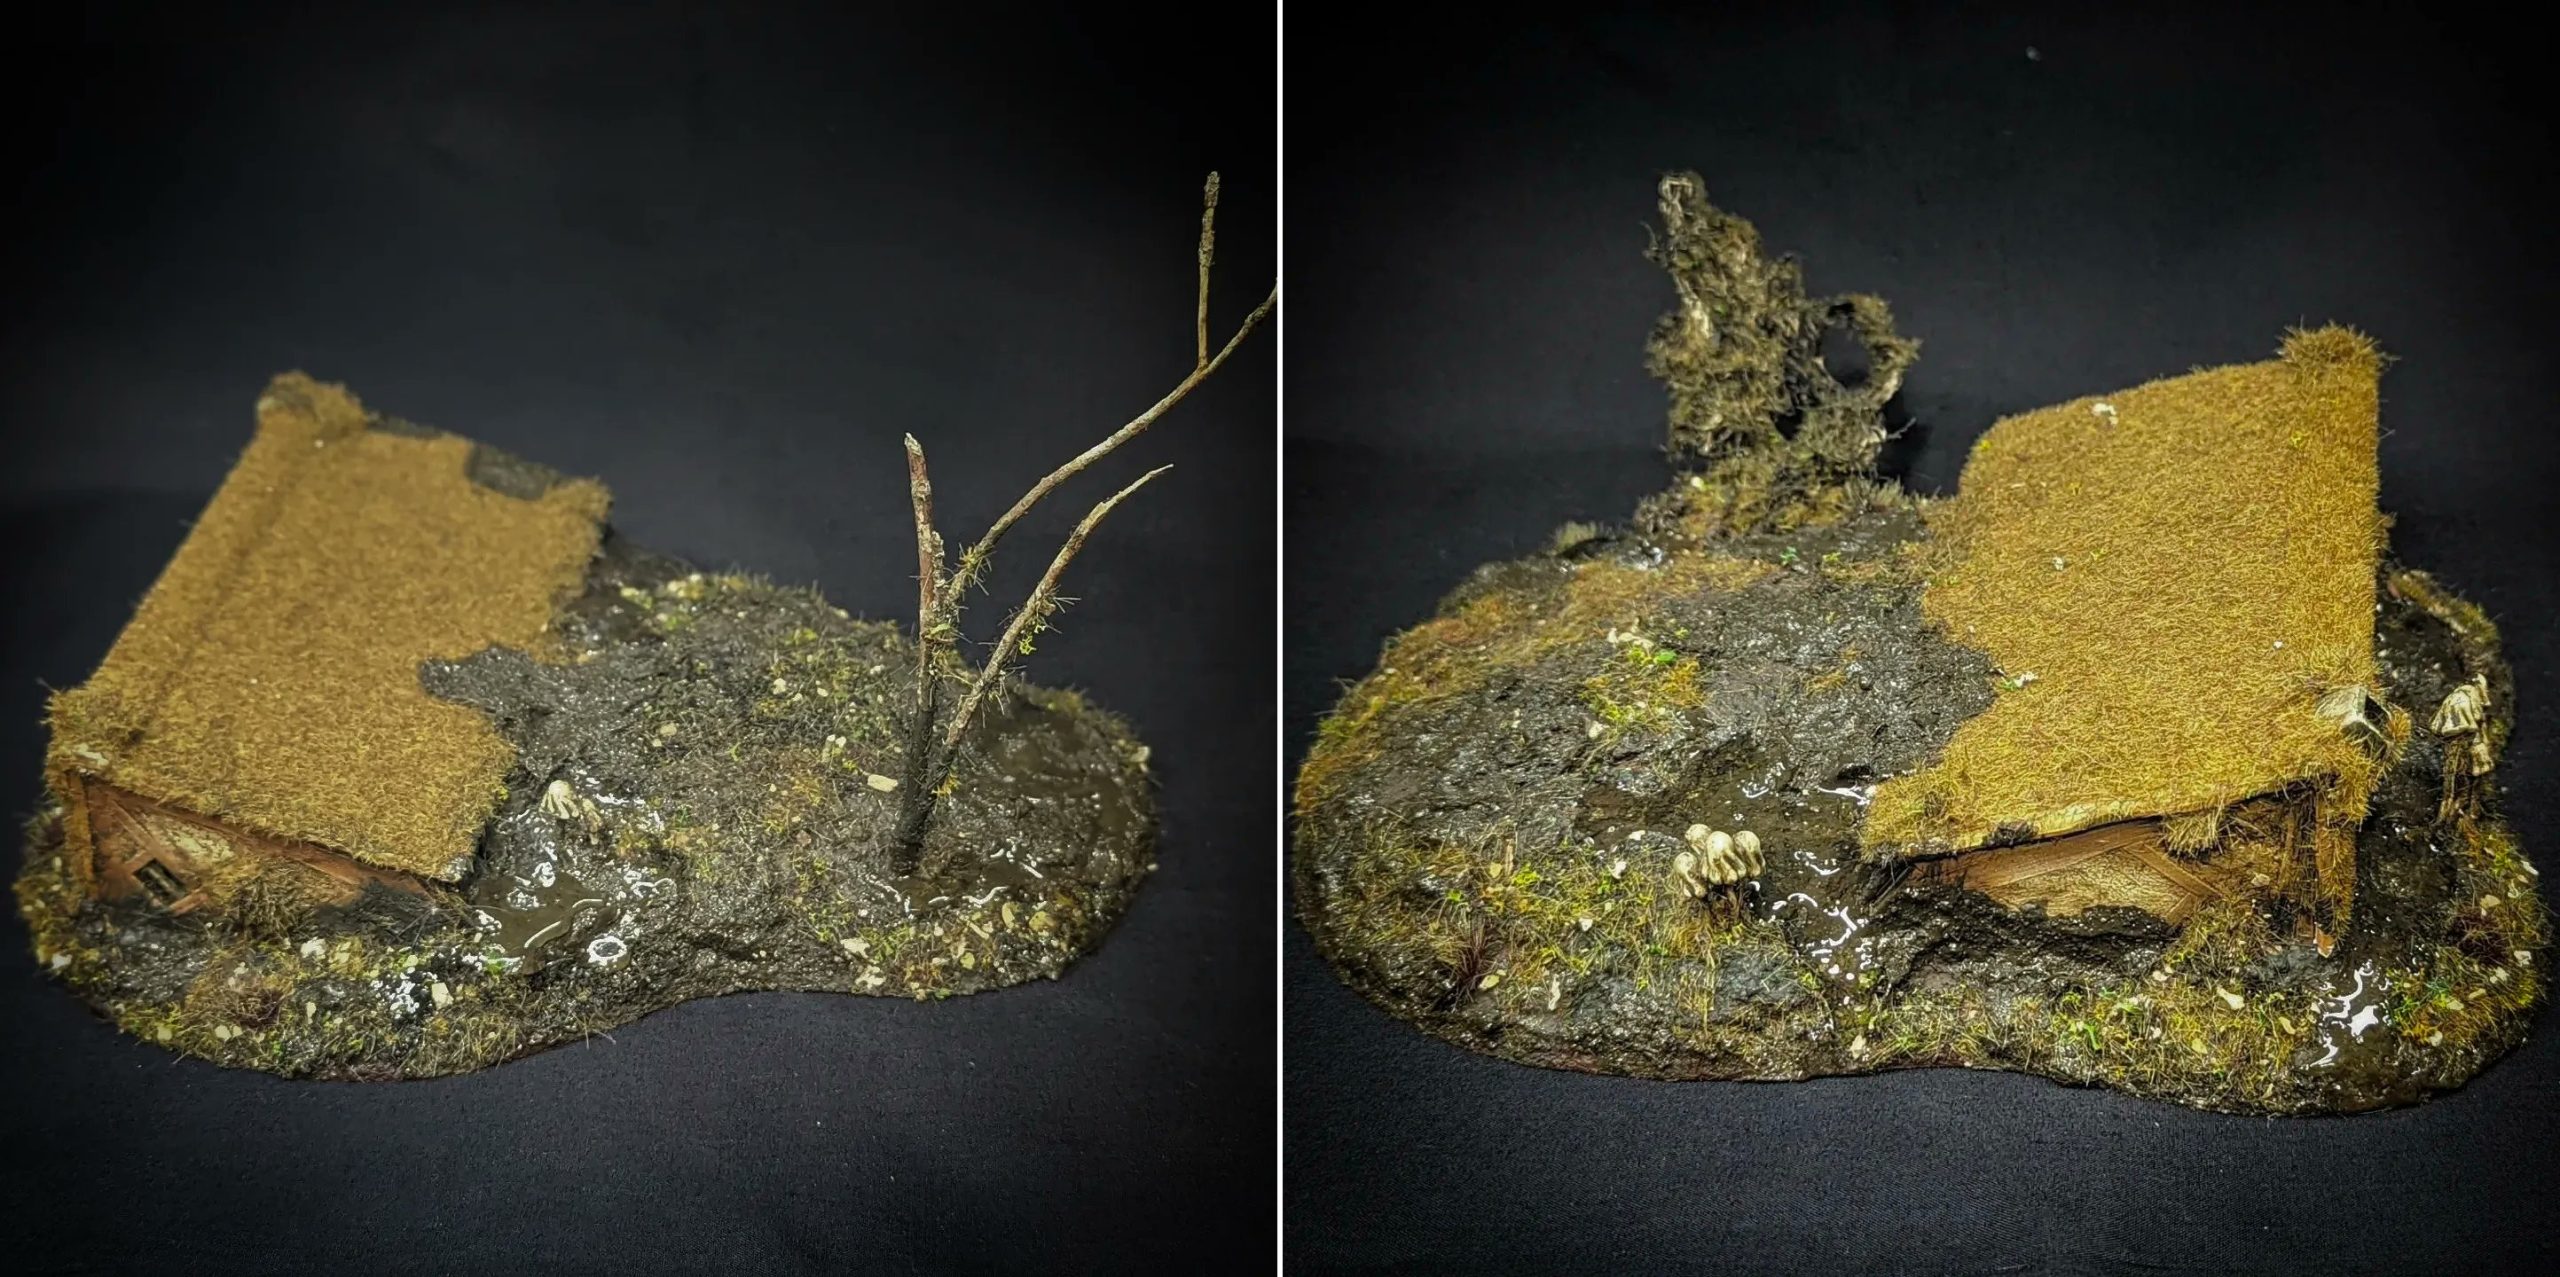
Probably the most iconic piece of Turnip28 terrain is Max’s sunken row house. The first time I read the concept of using sunken houses as hills, I was absolutely enamoured with the idea. So, I decided to make a pair of them.
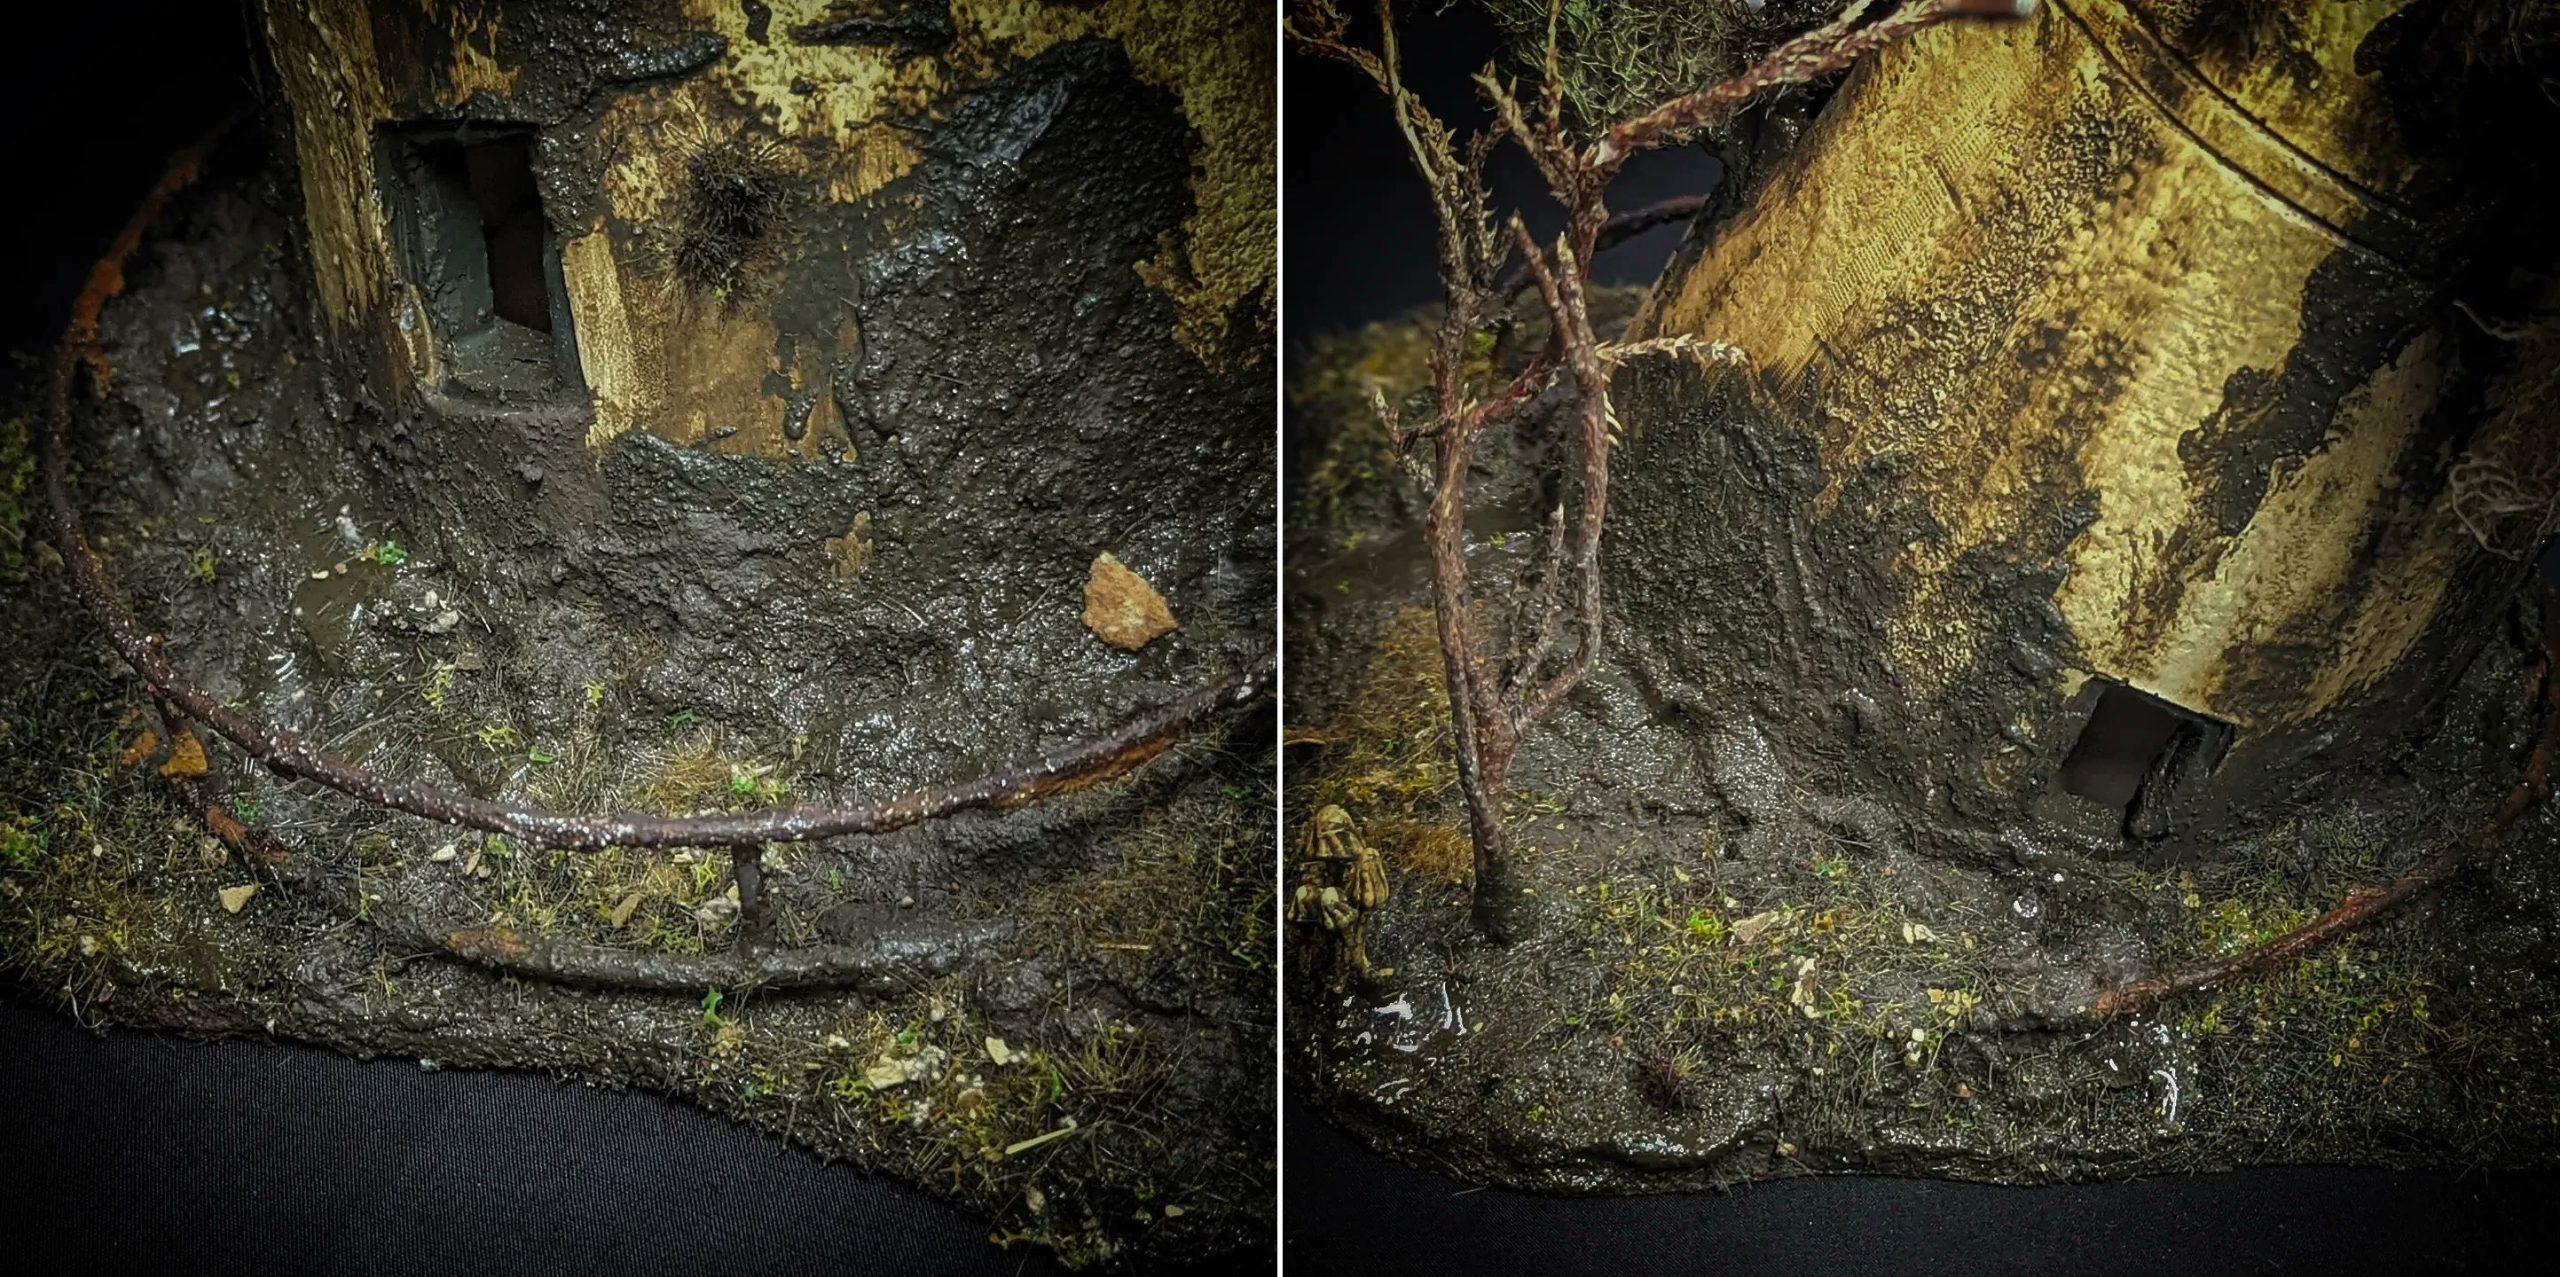
My approach here involves taking a Perry Miniature’s Medieval Cottage, cutting away a big diagonal out from the bottom of it and then inserting it onto an MDF base built up with Modelling Compound from Luke’s APS. Once everything had dried together, I added some 3D printed mushrooms a little visual interest. With the model built, I took out my airbrush and basecoated the cottage – Khaki for the thatched roof, white for the sides and brown for the wooden beams, Pallid Wych Flesh for the mushrooms. I slathered the house and mushrooms in Streaking Grime, wiped most of it off and that was pretty much it for the the painting phase. I set about coating the modelling compound with a layer of Muddy Ground and Wet Ground texture paste and once dry, I went in and painted some PVA over the entirety of the thatched roof and around dotted around the mud itself. I grabbed my static grass applicator and applied some brown 2mm static grass all over the roof, followed by some 2mm and 4mm static grass in brown and green in patches of grass around the mud. Once the grass had been applied, I gently brushed down the grass on the thatched roof such that it all went in one direction and – after it had dried – sealed it with a layer of matt varnish through my airbrush. This gives it a roof nice textured thatched straw look and takes away some of the excessive shine from the grass. One of bases got a twig with some static grass applied, while the other received a bit of natural loofah that had been pulled apart and airbrushed with a bit of dark green and Streaking Grime for colour. As a final step, I carefully applied some layers of UV resin to help sell the wet, saturated bog idea.
I’m pretty happy with how they turned, though it took a bit of effort to get the houses to slant enough that miniatures to sit on top without sliding around. If I did it again, I might have just made the houses out of plasticard or foamboard – plastic house models are a bit harder to cut around and work with and the roofs of these houses in particular are a bit pointy, which meant the houses had to be a bit more slanted in the mud than I wanted them to be. Live and learn.
Next up is what will most likely be the centrepiece on most of my Turnip games – the Abandoned Windmill.
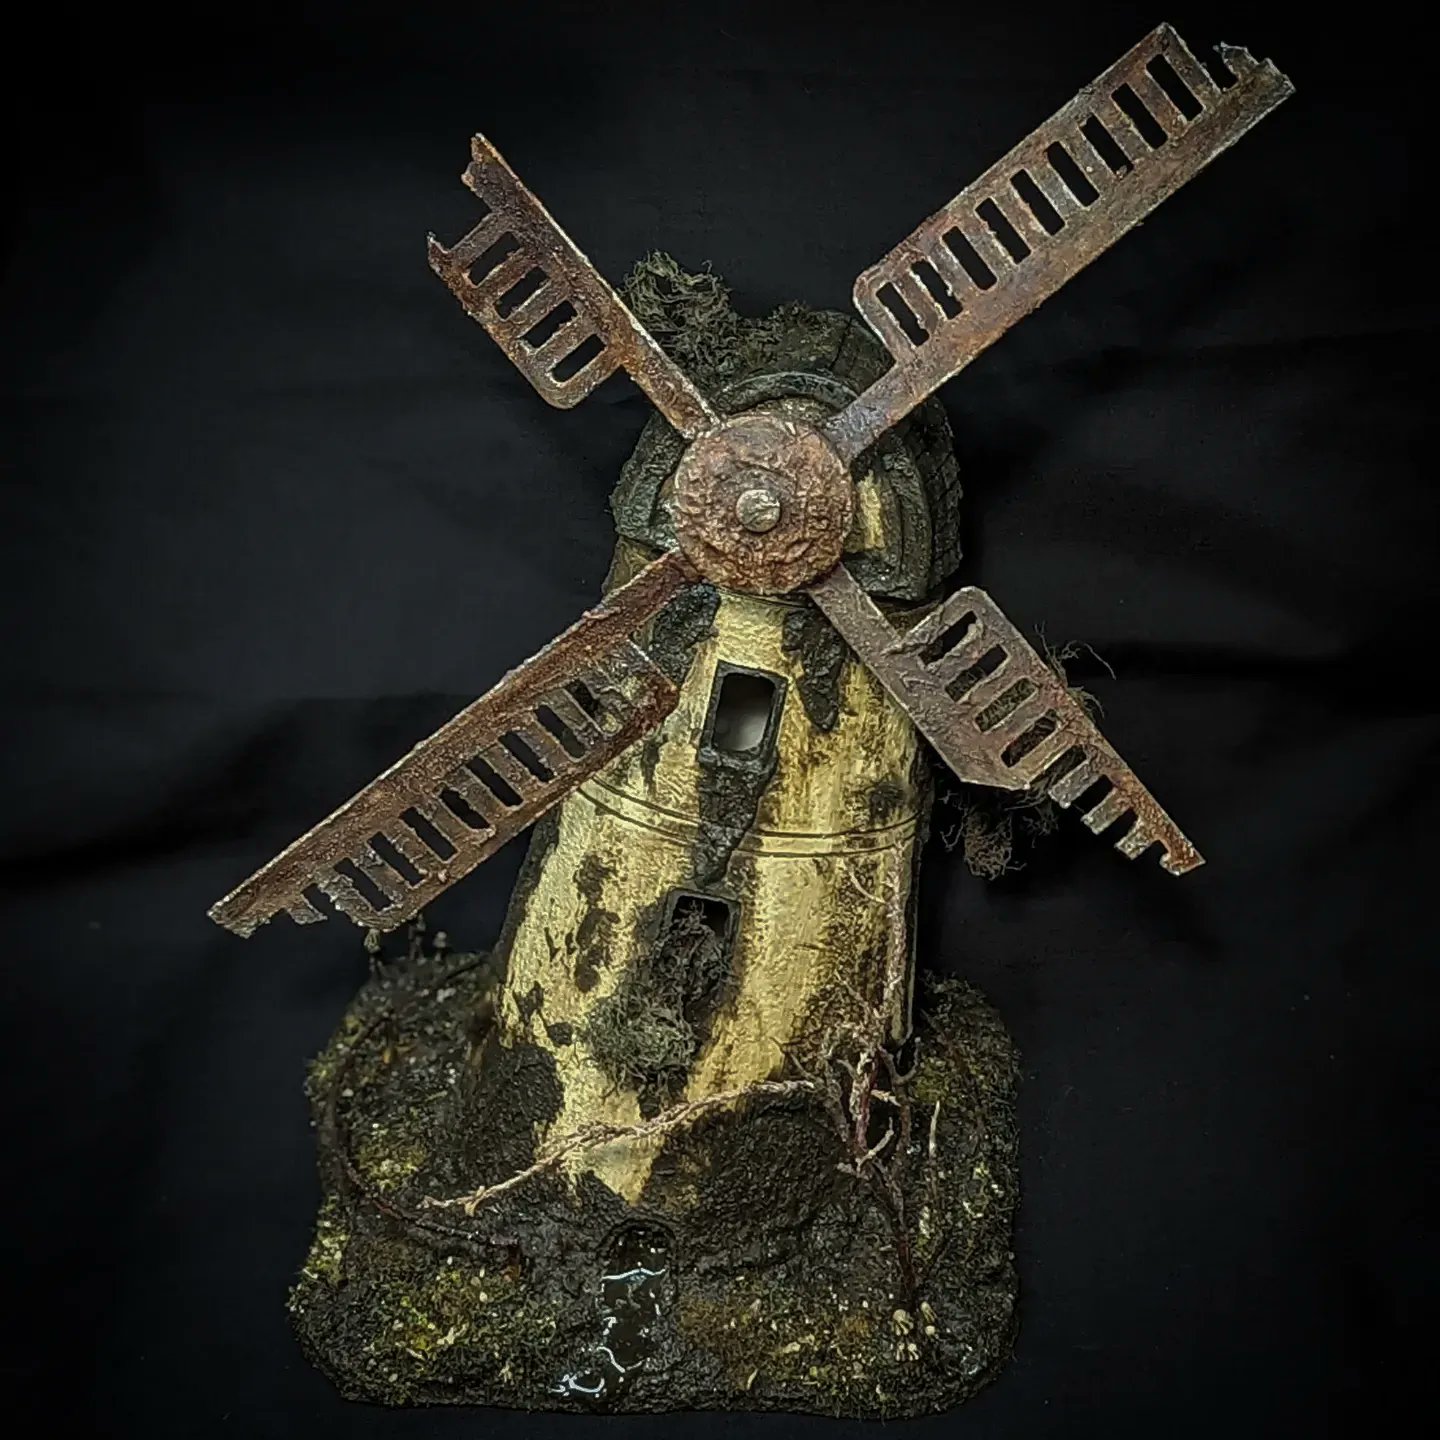
So, I’ll be honest – I never actually intended to do this particular project. One day, I found myself at B&M Bargains, hoping to purchase a few large Mushroom garden ornaments that I would repurpose as terrain. Unfortunately, it had been a few weeks since I had seen them last and B&M tends to have a pretty high turnover for items like these. Alas, they were long gone. So there I was, moping around the shop, regretting my past choices when at last I saw it – the windmill. It came in a pretty huge box and was reduced to clear for at the low low price of £10 because of superficial packaging damage. Curious, I decided to take it out of the box and have a look for myself and to my astonishment the door and windows were perfectly scaled for 25/28mm. Sure, it had a solar panel on top (to power a naff LED light inside) that I’d have to cover up, but otherwise this was pretty serviceable terrain. Better yet, it was pretty much already painted – all I’d have to do is grime it up and slop mud on it. I was sold, and walked out of the store not with the mushrooms I’d hoped to find but a happy look on my face regardless.
To go from garden ornament to tabletop terrain piece I had to do a few things, the first was taking out a band saw and sawing it off of its “base”. The windmill originally came with a kind of round raised bottom resembling a stony cliff with some painted grass, a set of stairs and a little metal railing around the whole thing. As cool as these features were though, I really wanted this building to be sloping – the row houses are sinking into the mud, why not the windmill too? After sawing the base off, I stuck what remained of the windmill onto a 10″x10″ MDF base with super glue and – after some clipping and hacking – managed to salvage the metal handrail ring from the base as well.
Most of the paint work from here was super trivial. I covered the whole windmill in Streaking Grime, then proceeded to slop on layers of Muddy Ground and Wet Ground to the windmill, creeping up along the bottom and sloughing down out of windows and openings. I added a bunch of roots growing out of the windows and roofing (an easy way to hide the solar panels) with some more pulled apart loofah. The base was treated in the same way as the sunken row houses, with resin mushrooms glued down and mud texture smeared everywhere followed by some tufts, static grass, some UV resin and twigs.
The most involved part of the paint job here was the windmill blades. These were made of very cheap plastic with big mould lines, holes, injection rings and other signs of manufacturing which would have been a paint to deal with if I was painting directly onto the blades or treating them as wooden. Instead, I took the easy route and decide to paint them as rusted metal. The golden rule of Turnip, after all, is to hide all manner of sins behind texture and grime – and this would be no different. To create the rusty metal effect, first I’d cover the blades in their entirety with Vallejo Earth Texture to them an uneven, gritty texture. This helps sell the effect of the rust, but also helps to cover up the mould lines, holes and other imperfections. Once dry, I sprayed the whole thing with Leadbelcher paint out of a rattle can to give them a metallic base. Finally, after warming them up the blades with a hairdryer, I slathered on a generous coat of Dirty Down Rust. If you’ve never heard of this product before, it’s got a bit of a reputation for being talent in a bottle – and it absolutely lives up to the hype. The effect comes out thin and is easy to apply even over very textured surfaces and once dry, the effect is immediate and impressive. A nice, gritty mixture of warm umber brown and orange hues with a matte, almost powdery texture to the finish. Hit the edges again with a drybrush of bright silver and you’re pretty much good to go. I applied this method to both the blades and the metal railing around the windmill and my largest terrain piece to date was completed. A very fast but rewarding project that kind of came out of nowhere.
Around about this time, I started playing the odd game of Turnip28 here and there and swiftly realised that by far the most prevalent terrain piece on Turnip boards is Dangerous Terrain. There are scenarios that can require up to five of these and at the time I only had a couple of bogs to hand, originally purchased back when I’d planned to build a Bayou board for Malifaux. It was clear I needed some more dangerous terrain, so I looked to the Turnip28 rulebook and the Swollen Maglette for inspiration – and I found some, in the form of some official Turnip28 art by Juan Gómez.
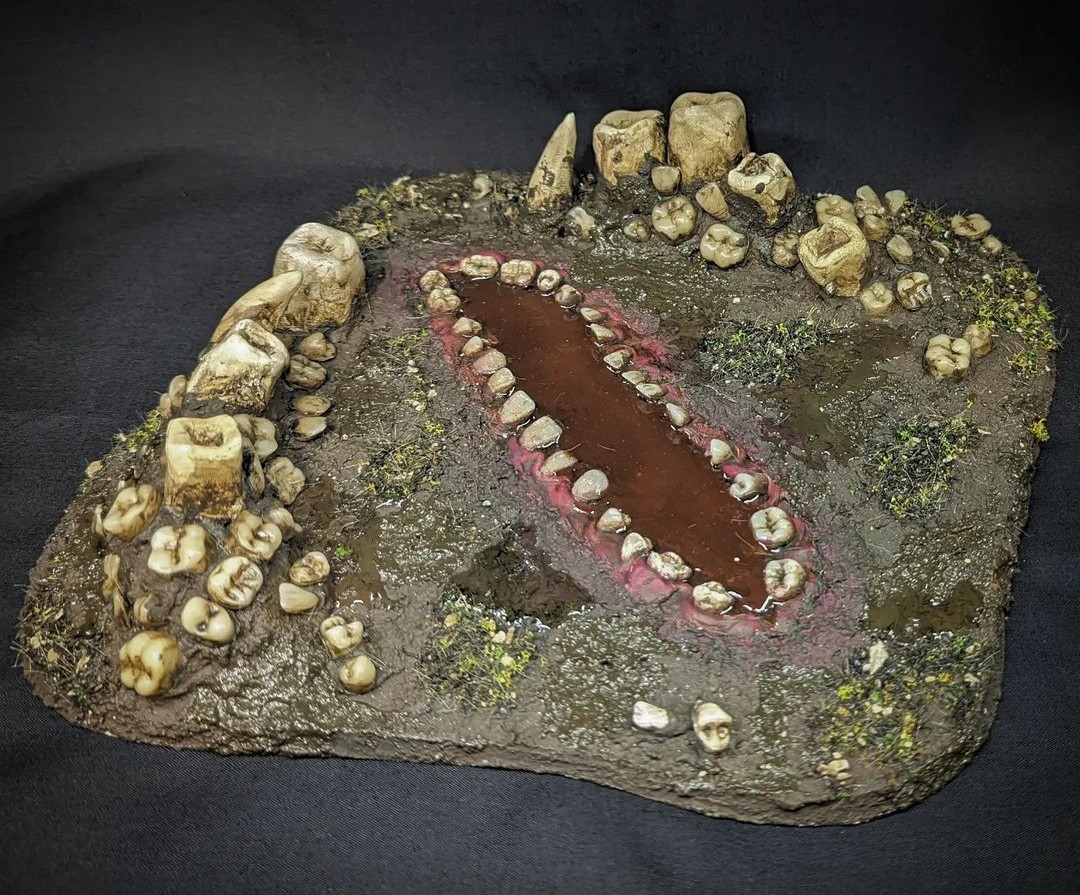
On this piece I had two things in mind really – I wanted to keep this piece authentic to the original art while keeping this terrain piece as practical for gaming as possible. That meant I needed a good amount of genuinely flat area that miniatures – either individual or multibased – could sit on comfortably without having to worry about balance. Both of these reasons led me to building two mounds of teeth on adjacent edges, while keeping the majority of the centre relatively clear. The mouth itself is wide enough to fit a single infantry model between the teeth, while narrow enough that bases of 4 models could balance comfortably across the teeth themselves. I tried to create a natural looking range of small, medium and large teeth and paid close attention to the original art to get the placements of the larger teeth and the canines in the right places.
Alright, elephant in the room – if you weren’t already thinking it back on my objective markers, you’re probably wondering where on Earth I got all of these teeth from. The truth, you might be relieved to hear, could not be more mundane if I tried – I got them from Amazon. There are two types of teeth on display here – the majority of which are resin teeth designed for building dentures, while a few of the slightly larger molars are plastic temporary crowns. The largest of the teeth – and I’d hope this would be obvious – are not teeth at all. Instead, I sculpted these out of Milliput Superfine1 wrapped around a 16mm dice – like any hot blooded wargamer, I have way more dice than I’ll ever be able to roll and using an excess die from China that probably cost me the guts of a penny is still more economical than using a core of Milliput. Once the teeth and gums were all glued together, I primed the gums with white brush on primer, painted them in Warlord Pink before slathering everything in Streaking Grime. I covered the rest of the piece with Muddy Ground and Wet Ground texture paste, applied some static grass and UV resin wet patches and filled the mouth with a bit of UV resin mixed with Reikland Fleshshade and the piece was complete.
I’m really happy with this little toothy bog – it helps add a bit of Turnip character to the board and feels just a little bit more exciting than your average muddy puddle. Seeing it in action, however, it was a bit jarring to me that the board had this one toothy mound and nothing else – so I set myself on building a second bog.
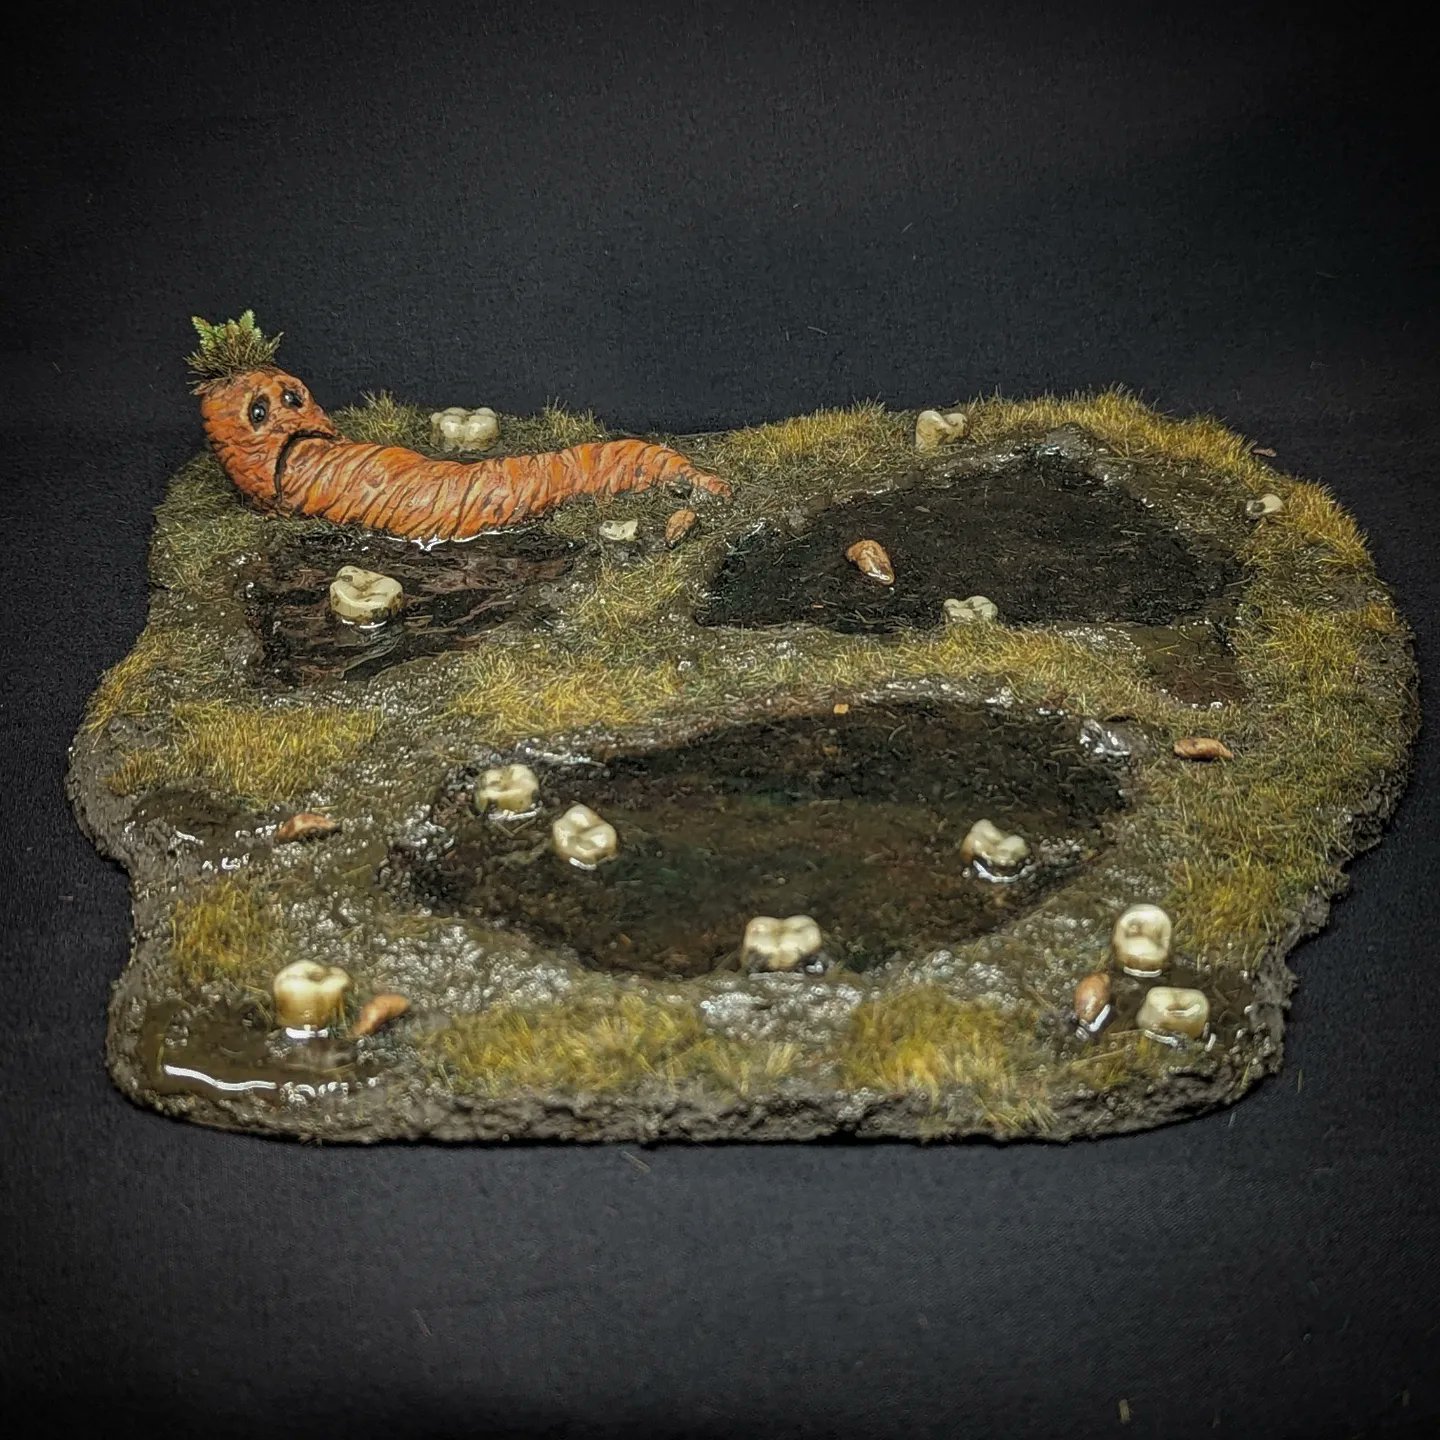
This next piece draws inspiration from the Turnip28 rulebook in a couple of places. The most obvious of this is the sad carrot – sculpted out of a mix of green stuff and Milliput, this miserable vegetable is a nod to the sad looking carrot on the art for the map of Cist in the T28 rulebook. The other, more subtle addition was the leeches; one of the suggestions in the rulebook for Difficult Terrain is something called a ‘leech bog’, so I wanted to incorporate these into the piece to help distinguish it from my other bogs. The leeches are incredibly easy to make – just a lump of excess green stuff, shaped into a short worm with pinched ends and placed in a slithering U shape.
After sculpting and gluing down the carrot, I covered the base with a ton of Muddy Ground then pushed and smoothed it into three distinct little puddles. While the texture paste was still wet, I took out my little container of temporary crowns and pushed some of these – along with the leeches – into the texture paste to add a little visual interest and help tie the bog in with the the previous piece. After this, I painted the carrot with Orange Fire highlighted with Dwarf Skin – the same scheme as on Musk’s horns – then coated the teeth and the carrot in a layer of Streaking Grime. The leeches were painted in Rosy Flesh with a Streaking Grime wash – I found giving them a fleshy colour rather than black really helped distinguish them against the brown mud. A little static grass and UV resin later and the Leech Bog was finished. Once again, I’m really very happy with this one. The sad carrot has a ton of character and really helps add an extra flash of colour to the muddy board and it’s very useable to boot!
Alright, so that about wraps up this instalment of the 22nd Bloody Beet Brigade. If I’ve learned one this this past month, it’s that building terrain for Turnip28 can be as much fun as making miniatures for the game – if not even moreso. I’ve had a lot of fun getting creative and trying to find the sweet spot between visual interest and usability, and you can definitely expect to see some more scratch builds for Turnip on this blog, sooner rather than later.
Until then, thanks for reading and happy wargaming!
1 Not because I needed especially fine detail, but because Superfine is a white putty – compared to the brownish yellow of the regular stuff. This kind of allowed me to save a step in painting, as I could apply Streaking Grime directly over the putty instead of having to prime it first.