Welcome back fellow rootlings for the fourth and final (for the time being) instalment of the 22nd Bloody Beet Brigade. I’ve got a bit of a smorgasbord of terrain pieces and cult units to show off this time, the final bits and pieces I added to my Turnip28 collection in 2022. Let’s kick things off with a Defensible Rootling Farm.
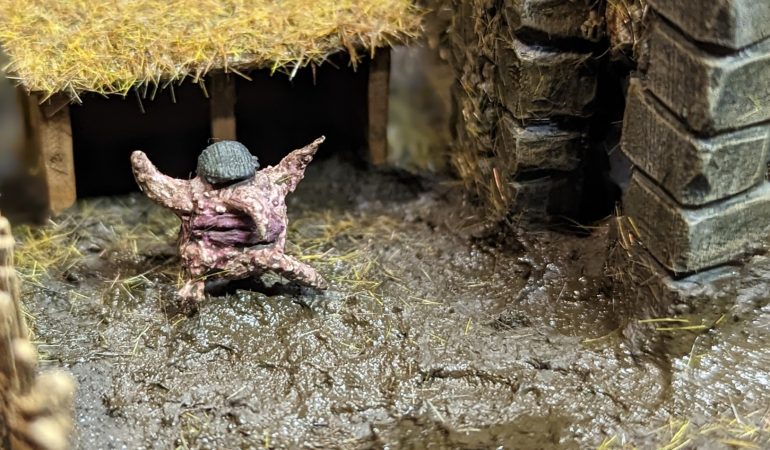
This was the first terrain piece for Turnip28 that I built after actually playing game. After gaining a little experience, I found that the most practical scenery for this game is area terrain with clear boundaries and enough flat open space to be able to place a large miniature (such as a Rootshrine). That being said, I didn’t just want to turn my Turnip28 table into a boring square of 2D template terrain – so I came up with the idea for this abandoned farm piece. I cut a nice big square cardboard base and plopped down a Warlord Games Ruined Farmhouse that’s been gathering dust in my attic since my first few games of Age of Sigmar. I kneaded up a few long rolls of green stuff and placed these in rows in front of the farmhouse to create crop rows – close enough to each other that a 20mm base can comfortably balance on two of them. Next, I fenced off the area terrain with some leftover wicker fencing from a Perry Medieval cottage kit (the very same that I built my Aunts Ascendant basket with) and added a little hen roost I had leftover from the same kit as an extra bit of interest. A nice thick slop of AK Interactive Muddy Ground and Wet Ground texture pastes later (pressing some temporary crowns into the crop rows at random points while the paste was still wet) and the piece was mostly there. I hastily slapped on some quick basecoats on the unpainted bits of the miniature – a little Khaki paint on the fencing and some Beasty Brown on the hutch with khaki on the straw roof, then doused everything but the mud itself in Streaking Grime. After wiping off the excess and gluing down some tufts and static grass1 on the piece, I was 95% of the way there.
Something about this terrain piece was bothering me though. It wasn’t bad by any means, but it lacked a little bit of character next to the tooth bog or the sad carrot leech bog. To rectify this, I quickly knocked up an additional Rootling with a farmers flat cap from a Warlord Pike and Shotte kit and stuck him down in front of the hen hutch. This was exactly what the piece needed – an angry farmer. My headcannon is that the farm was abandoned, slowly creeping into disrepair until a stray rootling stumbled it one day, picked up a cap he found in the rubble and wanders around the confines like he owns the joint now. I’m especially fond of his raised arm roots – this, coupled with the thick, downturned lips gives him a bit of a disgruntled ‘you kids get off my lawn!’ vibe. I did build this terrain with the notion of using it as a defensible terrain centrepiece (an alternative to the sunken houses), but honestly I think it would work just as well as dangerous terrain in a pinch too.
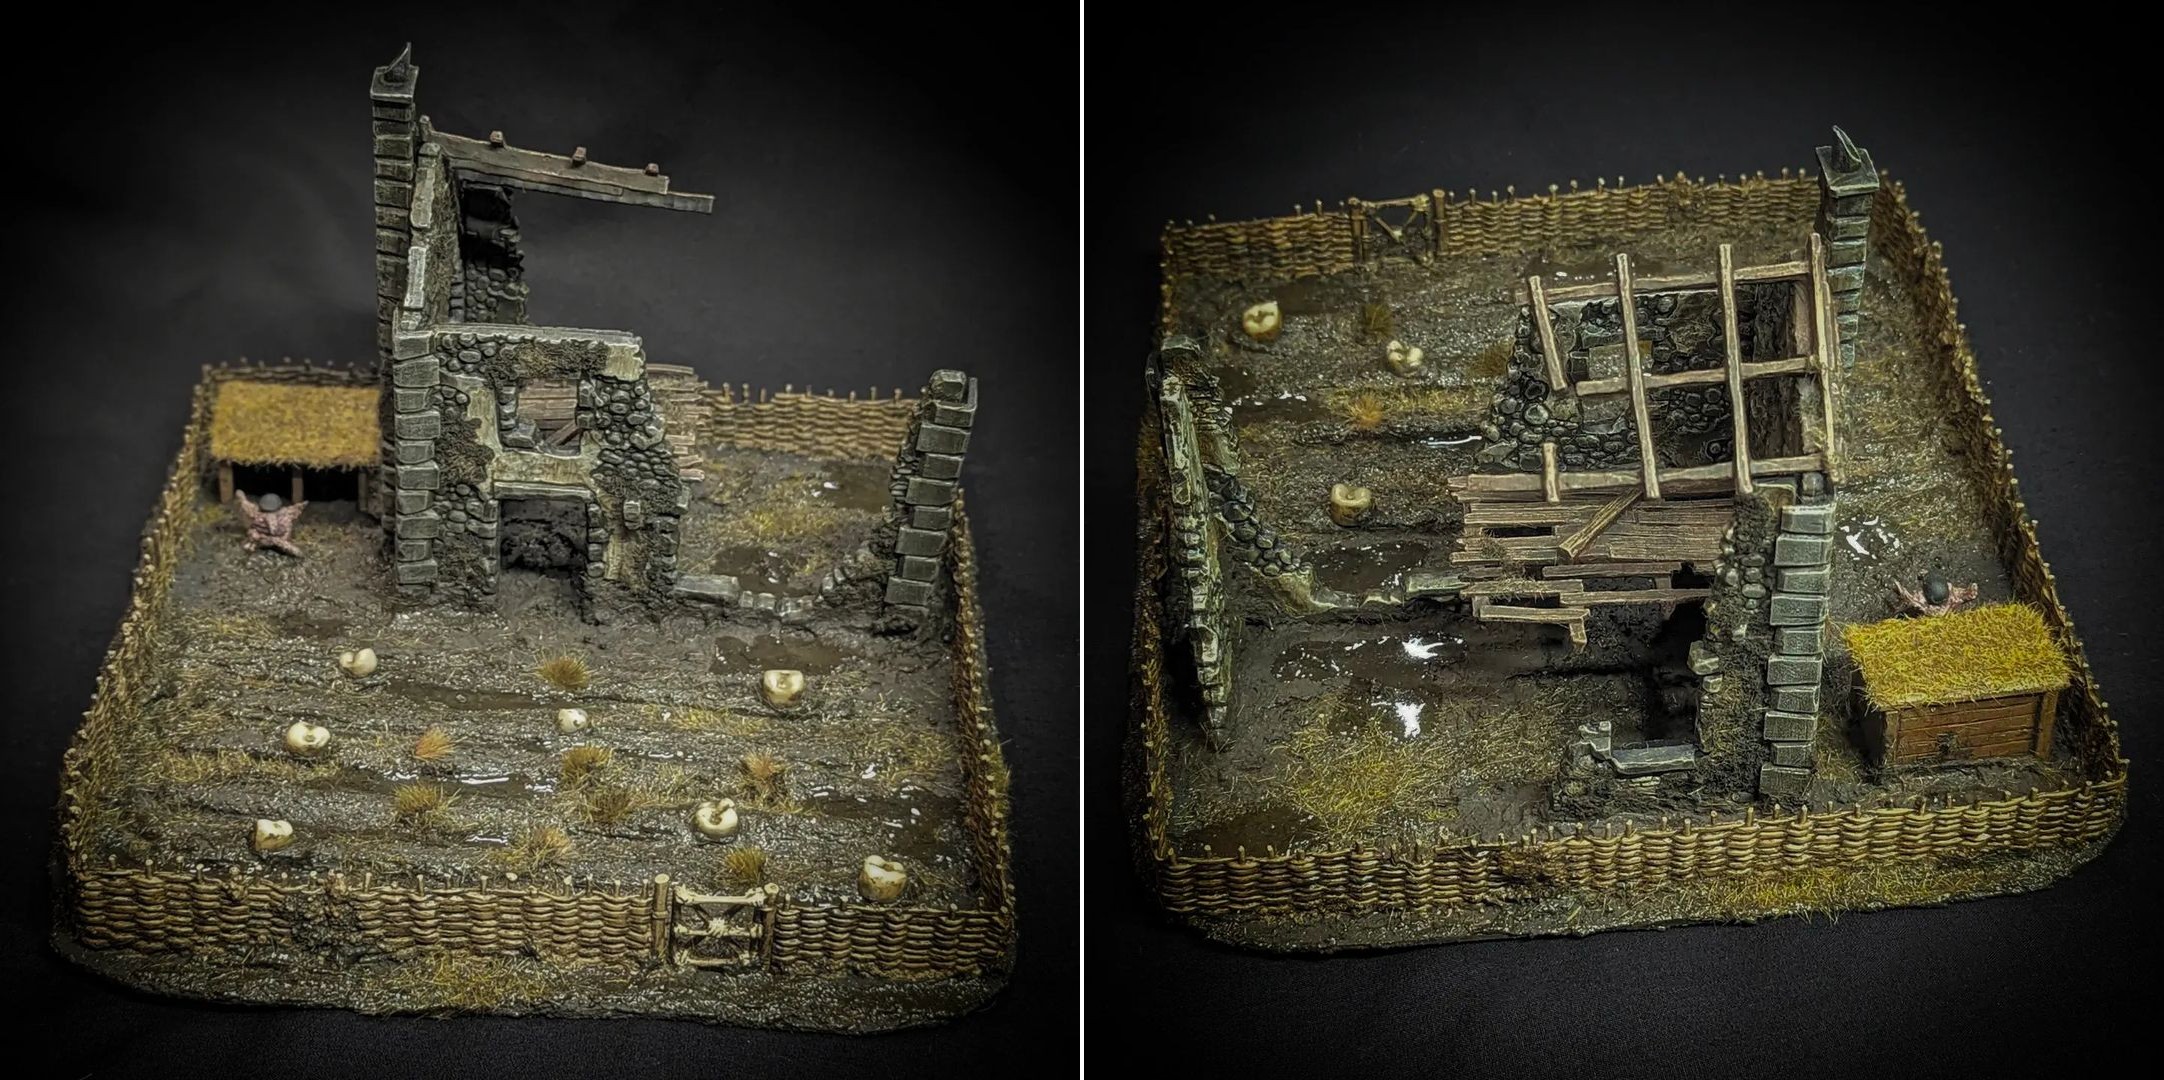
Next we have the toad bog. This is a piece I wanted to do after spotting the disgruntled looking toad on the map of Cist in the Turnip28 rulebook – I liked the idea of a giant frog sitting in the middle of a piece of dangerous terrain, grumpy but docile unless you get too close. With this idea in mind, I took to the internet, trying to find a suitably weird looking frog ornament that I could turn into this piece of area terrain – before eventually stumbling upon this little beauty. While not quite the ‘disgruntled frog’ I was looking for, he’s got this wonderfully blank expression and a wide, flat mouth that I just kind of love. I threw him on my Amazon wish list and lo and behold, my wife purchased him and slipped him into my stocking for Christmas. During the holiday break, I decided to knock out a another quick piece of dangerous terrain using the model and, well, here you go. Quick and dirty – a base of mud with some UV resin marshes along with a spaced out looking toad in the corner. I didn’t even bother repainting the toad; I mean, look at him – how do you improve upon perfection? I simply slapped a little Streaking Grime on him along with the temporary crowns and left him to it.
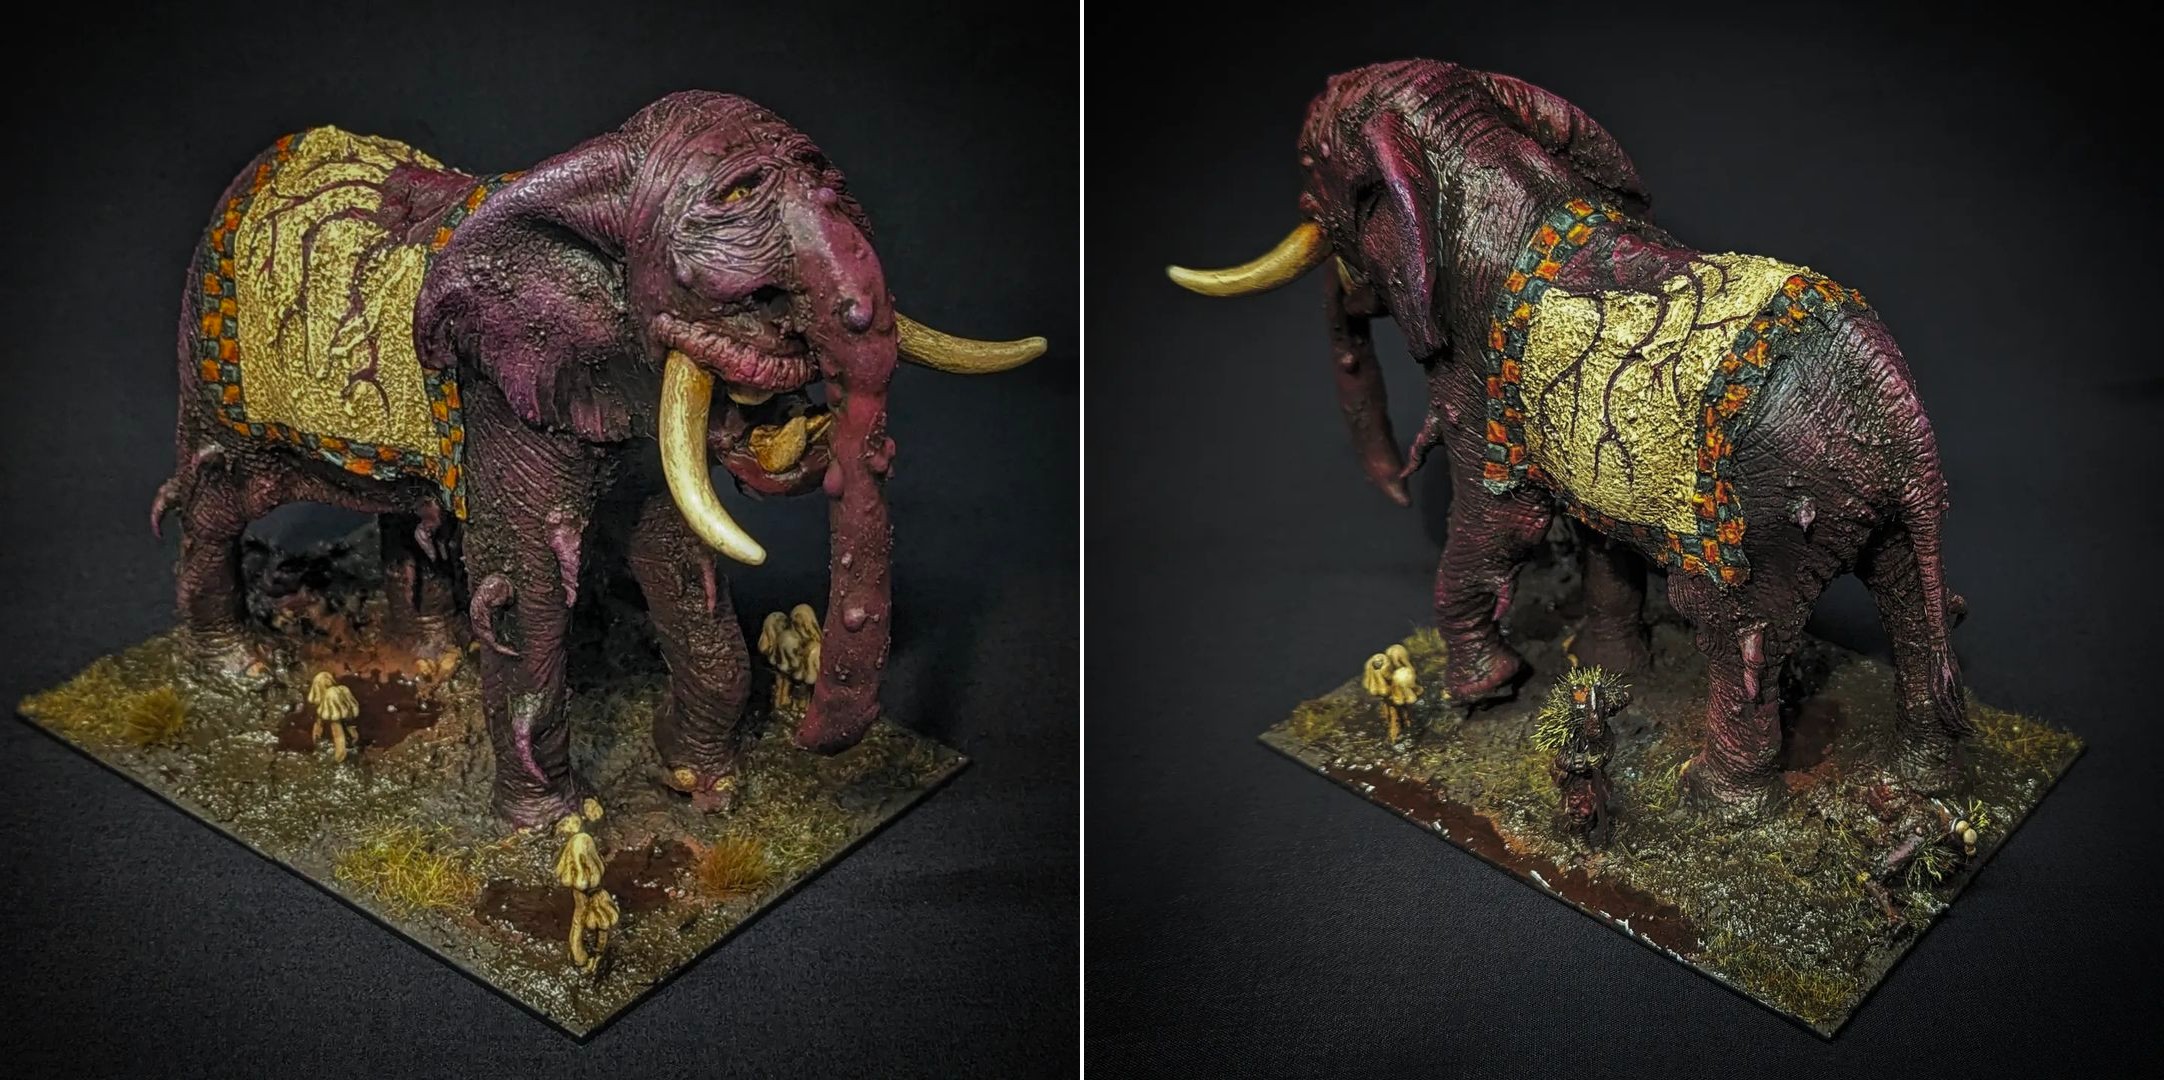
Taking a break from terrain for a moment, this is one of my newest Cult models – The Great Proboscis, part of the new March of the Proboscis cult coming in the latest version of the Turnip28 rulebook (due out any day now as of when this post was published). The concept behind this cult just really appealed to me – a big impressive hulking monster with a giant nose appendage gleefully crushing and/or swallowing whole enemy infantry and cavalry alike. My take on the concept is simple – start with a toy elephant, saw it’s face off and replace it with something more akin to The Bloody Beet. How hard could it be to turn a gleeful little rubber elephant into an avatar of inconvenience of discontent?
A bit part of the creature was always going to be the proboscis itself, so I wanted to do something a little different here to help mine stand out. Taking some inspiration from my own prior work, I decided to make my proboscis a very long nose with prominent nostrils at the base – like design of the banner I did for my Bastards in Part Three. Something about replacing an elephants trunk with a long, disproportionate human nose just feels wonderfully cursed to me.
I’m super pleased with how it all turned out. The happy, dopey looking face with oversized teeth, the squinted and asymmetrical tusks, the flaccid proboscis and the deep set eyes positioned a little too upward to be able to tell where it’s going. I just love it.
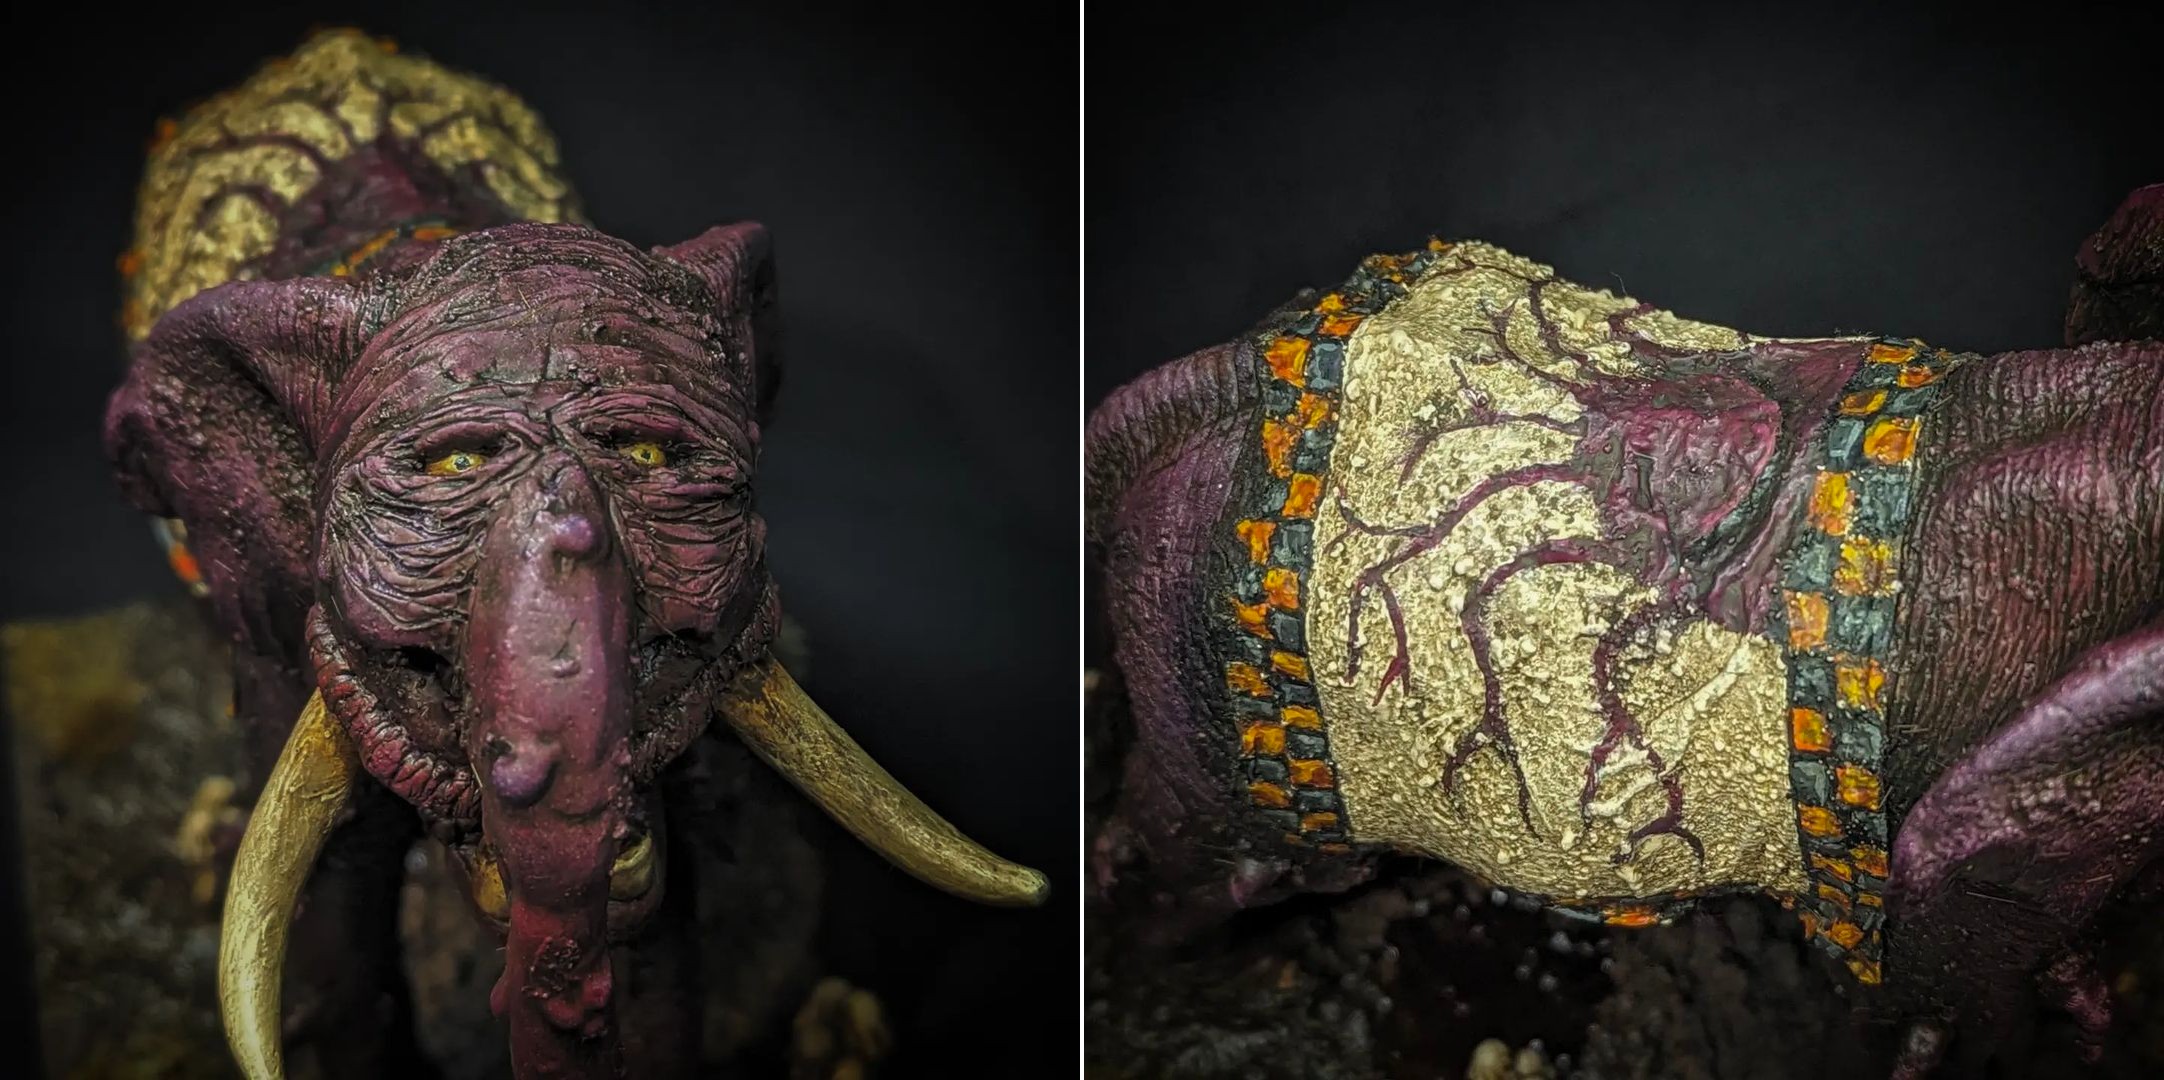
Sculpting the face from scratch wasn’t as difficult as you might imagine. I started from a core made out of Milliput and Green Stuff in roughly 60:40 proportions and attached this to the stump left after sawing off the original face. Once the general shape of a head was re-established, I formed the basic outline of the facial features, pressing a couple of glass agitator beads into the putty for the eyes plus a few resin teeth and the elephants tusks into the mouth. After the putty had cured in this shape, I started to build up a bit more of the shape of the face – thicker cheek bones and a deeper brow to set the eyes into, some thick lips around the mouth and, of course, the proboscis itself. For this layer, I used a little more Green Stuff than Milliput in my putty mix to give it a little more flex and shatter resistance. When I was happy with the overall shape, I started sculpting the details, attempting to head into the neck and applying some thick and heavy bags under the elephants eyes. The final sculpted addition to the elephant were the roots – taking influence from the artwork in the rulebook, I took some green stuff and twisted up some little root tendrils that would attach to the elephants legs and underside in order to make it look.. uhhh.. rootier? A little Muddy Ground texture paint over the joins and imperfections in the green stuff and the sculpting work was done.
As much as I loved the face on the elephant, I knew that a big purple elephant with a goofy face was going to look a little plain, so I took some kitchen roll and made a little decorative blanket to sit over the elephants back, attaching it to the model with a bit of texture paste. To break up the solid mass of purple, I painted the blanket in ivory white, trimmed with black and orange checkers. This left a wide open area prime for a bit of freehand heraldry, so I painted the lower half of the Bloody Beet – the sad mouth and roots branching out from the middle.
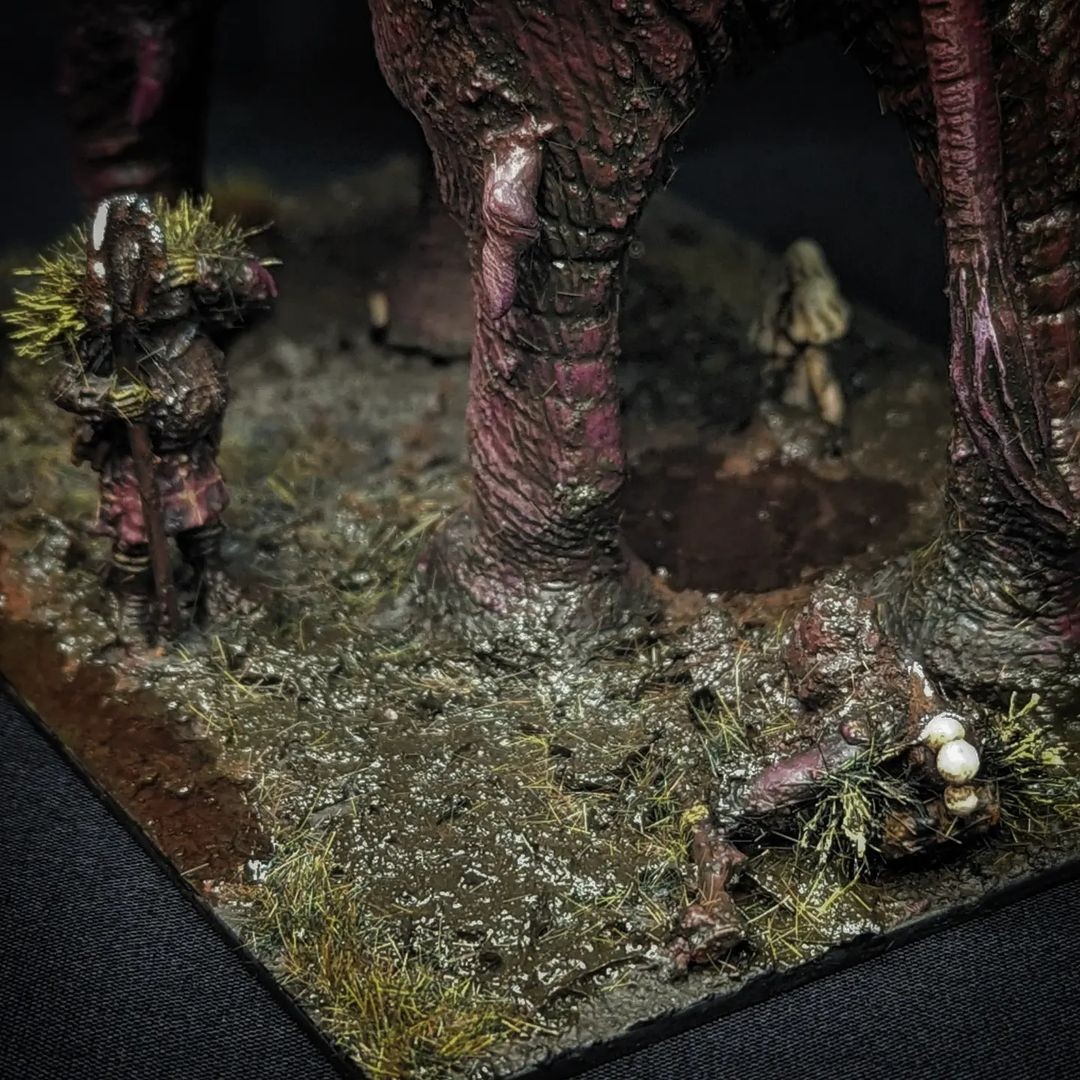
The base was the final piece of the puzzle on this model. I gave the elephant the same base as my Rootshrine – two ‘Cannon’ sized bases glued lengthways in the middle. This felt like a good size for the Proboscis, with enough space left over to make a little diorama of it. I don’t know how well it translates to a photograph, but essentially what’s happening here is a poor Fodder getting crushed by a hefty elimination from the elephant’s backside. Meanwhile, there’s another Fodder standing at the ready with a shovel for just such events, facepalming in exasperation. It’s a little busy and hard to make out in the above photograph, but I’m happy with the narrative on the base nonetheless.
Okay, so, that’s the elephant. Now let me tell you about the fish.
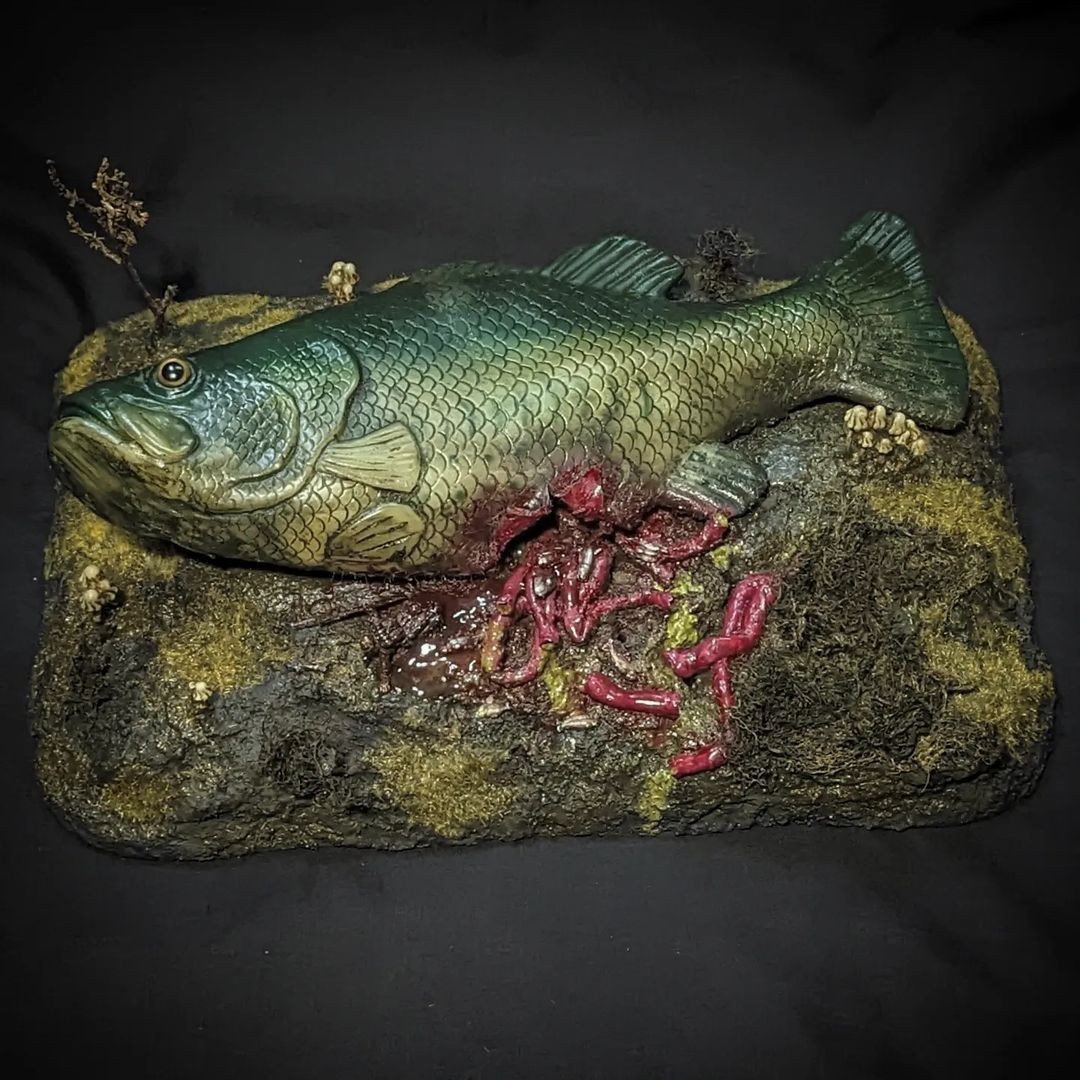
Back in November, I got myself on a flight to Bristol and attended the first ever organised Turnip28 event. I could probably fill a whole blogs worth of thoughts and opinions on the event itself, but suffice to say I had a great time. I played four excellent games against four gracious opponents, each one with a unique and interesting army to show off of their own. There were honestly so many excellent creations on display over the event. I had a lot of very interesting conversations with some of the most passionate and enthusiastic wargamers I’ve ever had the great pleasure to meet. I also played the Turnip28 Taster Campaign scenario ‘Gone Fishing’ for the first time. Immediately, I knew that I had to make a piece of giant fish terrain for playing this scenario at home. It’s just such a wonderfully inventive and surreal concept for a scenario – how could I not?
For those not in the know, the idea behind ‘Gone Fishing’ is that a giant fish has swallowed two warbands before eventually getting stuck on dry land. Both parties emerge from the belly of the fish, hungover from a hard days grogging and upon sight of each other decide to fight over the remains of the fish. If the concept alone doesn’t engage your imagination, one of the possible victory conditions is to make your opponents Toff retreat back inside the fish. It’s just so gloriously stupid, I absolutely love it.
And I had an equally stupid idea of how I was going to make my own fish terrain.
Eagle eyed readers of a certain age will no doubt recognise this fish – it is, in fact, a Billy Bass Fish. One of those charming/irritating2 singing bass fish on a plaque that activate on a motion sensor. My big idea here was to take one of these fish, disconnect the speaker3 and convert the plaque into a muddy hill or something. And that’s exactly what I did.

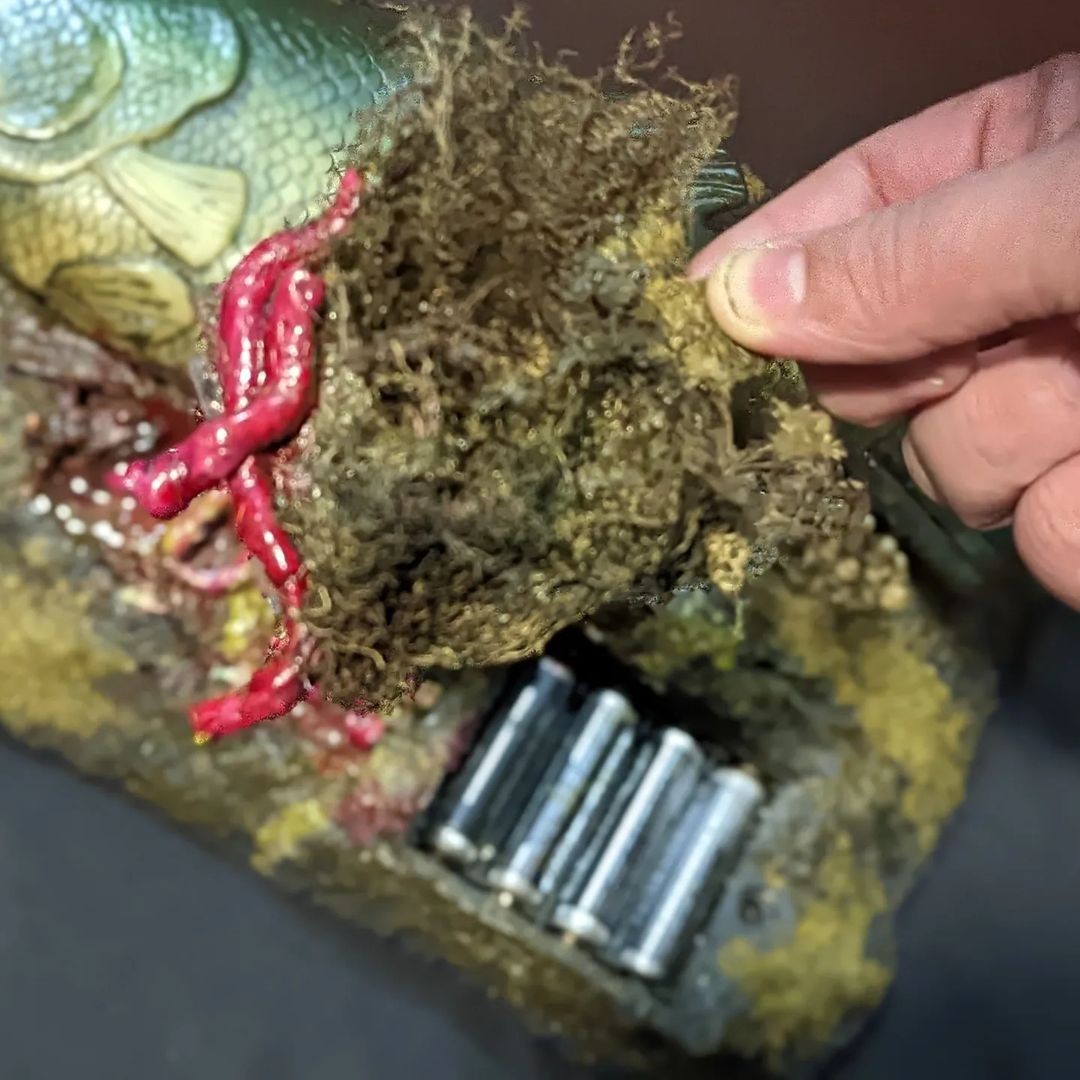
The plastic plaque that the Billy Fish Fish comes mounted on is pretty beefy, so the first thing I did was to remove the back mount, then take a robust pair of clippers and a model saw and just start hacking away at the plastic to reduce it’s profile. While doing so, I discovered that my first roadblock – the battery compartment. This thing takes 4x AA’s and consequently adds a good bit of height to the model, as well as being difficult to access through the MDF base, so instead I opted to cut away at the back board around it until I could separate the battery compartment entirely and place it to the side of the fish. Fortunately, the wire was just long enough to place it to the side and my MDF base was large enough to accomodate both the fish and the battery pack.
I mounted both the considerably slimmer plaque and the battery pack to the MDF base with hot glue and set about smoothing everything into a hill. To do this, I used crushed up newspaper to help create a smoother gradient from the raised areas and smoothed everything over with plaster. This did not go well. Frustratingly, the powdered ‘just add water’ plaster that I used was both very brittle and bonded poorly to flat surfaces. The amount of times I’ve had to make repairs because little bits have cracked off around the edges has been downright infuriating, especially as the white plaster is extremely noticeable in the otherwise dark and muddy finish. If I did this again, have ordered some Modelling Compound from Luke’s APS or just made it with paper mache or something, because this stuff sucks.
Fragility aside, the plaster did the job of smoothing and bulking out the hill. Once it had dried, I was free to absolutely slather this thing in Muddy Ground and Wet Ground texture paste, taking care to get it into all the nooks and crannies while trying not to gunk up the on/off switch or make the battery compartment lid hard to remove.
After the texture paste had dried, I was then able to start mutilating the fish and sprucing up the base. I sliced open the rubber belly and super glued the folds back in the area I figured would least impact movement. Then started gluing down some guts and entrails spilling out of the body. The intestines were just simple rolls of Milliput with a hole stabbed into either end. I also glued down a few resin fish from Green Stuff World in amongst this area to represent smaller fish that this fish had consumed along with the warbands. To help sell the idea that the warbands had cut their way out of the belly of the fish, I also put down a simple Fodder miniature face down in the mud, crawling out with his musket in hand.
Oner particular challenge I had to overcome was obscuring the battery compartment lid without impacting it’s accessibility. It’s important that I’m able to remove and replace the batteries without damaging the model, however nothing is more immersion breaking than a big obvious seam for the battery compartment. For this, I covered most of the lid in roots made up of natural loofah which overhang the top and bottom sides of the compartment. I didn’t want to overdo it with the roots in one area here so I added some additional intestinal pieces overhanging the left seam of the compartment. I’m pretty pleased with how well this turned out; you can still see where the battery compartment is if you’re really looking for it, but it’s not so obvious as to be immersion breaking either.
After adding a handful of resin mushrooms and a twig tree to fill out the rest of the base, it was time to paint the thing. This was a pretty basic job, to be honest – I wanted it to look messy and gory and I didn’t want to have to spend a ton of time painting details on a terrain piece this size. To that end, I painted the intestines in Warlord Purple with a layer of Squid Pink and washed with some Reikland Fleshshade. For the Fodder, I simply blocked out some simple basecoats of Dark Fleshtone, Charcoal and Dead Flesh with some metals for the musket and bayonet. The mushrooms were just a simple base coat of Pallid Wych Flesh. Once the wash on the intestines had dried, I picked out the little fish from the intestines and painted those in Chainmail Silver and applied a washes of Biel Tan Green, Coellia Greenshade and Drakenhof Nightshade to different fish. Once everything was dry, I took out my airbrush and absolutely coated the Billy Bass Fish, the mushrooms and the Fodder in Streaking Grime and rubbed most of it off of the surfaces with a little white spirits. I did think about repainting the Billy Bass fish myself, but much as on the toad earlier, I wasn’t especially convinced I could do any better than the factory paint job – and the less additional ‘paint’ on the moving parts, the better. Instead, I made a concentrated effort to grime up the fish, keeping as much Streaking Grime in the recesses of his scales as I could to help sell the effect and pop the detail a little more.
After the Streaking Grime was cleaned up and dried, I airbrushed some Polyurethane Acrylic Varnish over the whole model to seal everything down. I then applied some tufts and some patches of static grass through my Static Grass Applicator to add a little more texture and colour to the muddy hill. Next, I applied copious amounts of Blood for the Blood God (and a little Nurgle’s Rot) around where his intestines were spilling out, covering the intestines, the fish and the emerging Fodder in blood and gore. As a final step I added some puddles of UV Resin around the base as well, to keep things looking appropriately wet.
And yes – the Billy Bass Fish does still move! Here’s a short video of what it looks like when you trigger the motion detector. I was hoping that with the speaker disconnected it would look like it was flopping around and it.. does.. kind of? Either way, there’s something deeply ominous about seeing this Billy Bass Fish animate in silence – and that’s kind of cool.
One minor point I will add – you might notice in the above photographs and video that there’s a bit of visible wear around where the rubber creases when the fish moves. I took the photographs and video for this blog before I realised this was happening, but it’s down to the acrylic varnish not really being designed for stretching and folding and hard wear like this. I asked for some advice on how to get around this on the Turnip28 Discord channel and one helpful person suggested I use varnish designed for leather working. I found a product called ‘Angelus Acrylic Finisher’ on Amazon for around £7 and I’m happy to say that this worked an absolute treat! No more flaking, just like that. Highly recommended if you’re varnishing anything that’s going to bend and crease a lot.
With the fish complete, I’m pretty happy with my Turnip28 terrain collection. I’ve got 3 ‘feature’ bogs, 2 to 3 plain bogs, a farm, two sunken row houses, 20 loose gabions, 4 barricades, a giant fish and a massive windmill. More than enough variety for my own uses and enough to run two, maybe three tables with different scenario/terrain configurations. My aim from the outset here was always to be able to run two concurrent tables should I want to run any demonstrations of the game, so this is a pretty good start.
Well, that about wraps up this instalment of the 22nd Bloody Beet Brigade. I’ve had a lot of fun this past couple of months working on bits and pieces for Turnip28 – and it’s a magnificent game and a ton of fun to hobby for. It’s a new year, however, which means it’s time for a new army. This time last year, I’d planned to hit the ground running with Rohanuary and, well, I’m happy to say it’s finally happening. The wheels (or should I say hooves) are in motion, the gears are turning. January has called and Rohan will answer.
Until then, thanks for reading and happy wargaming!
1 This includes a bit of brown static grass applied to the hutch’s straw roof that is then smoothed down in one direction and sealed with matt varnish – as I did on my sunken row houses.
2 Delete as appropriate.
3 Motion activated flopping on your terrain is a fun and mostly tolerable gimmick while trying to play wargame. Hearing a dodgy cover of ‘I Will Survive’ over and over is going to encourage players to turn it off sooner rather than later.