Yes, it’s finally happening.
Back in January 2022, I had big plans to get back into Middle-earth SBG with a brand new Rohan army. I bought the models, I tied off my outstanding projects and set myself up for success as best I could. I pushed through the cleanup, assembly and most of the base coats for 12 Warriors and 18 Riders of Rohan. And then, I just.. stopped. For the first time since re-entering this hobby back in 2017, I’d bitten off more than I could chew and I couldn’t bring myself to continue with the project. So, I did something I’d never done before: I packed all the miniatures away in a Really Useful Box and put them into storage for a rainy day. I opted instead to return to my Skaven army for Warhammer Fantasy Battles. Over the festive break, I’d painted a few bits and bobs to flesh them out, something to tide me over until the new year. What I didn’t expect however was how far this project would get it’s hooks into me. I was finally working on exactly what I wanted to work on and – as if like magic – my hobby mojo returned. I ended up spending a further three full months working on Skaven before I had finally had enough. Satisfied with working on large scale army projects for the time being, I then decided to finally get that Thunderhawk I’ve always been threatening to paint. Following the completion of the enormous flyer, I then started working on some 54mm Inquisitor. By this point, I realised that I had entirely lost interest in painting anything new for Middle-earth – I decided to forget about the impending Scouring 2022 deadline and pursue whatever passion projects excited me instead. I painted armies for Star Wars Legion and Turnip28, as well as knocking out some Daemons of the Ruinstorm and even a Mordheim warband that’s been sitting on in my backlog for over 20 years.
As we approached the end of 2022 however, I found myself getting more and more excited to give Rohanuary another go in 2023. As the festive period approached, I decided to give myself a few weeks off from productivity and recharge my batteries over the Christmas break, rather than risk getting sucked down another rabbit hole. After a few relaxing weeks off spending time with my family and loved ones (and playing a whole lot of God of War and Elden Ring), I was recharged and ready to tackle this intimidating army project.
Before I get into the details of painting, let me break down roughly what I’m aiming to paint for this first pass at a Riders of Rohan army. My intention was to run the Riders of Theoden Legendary Legion1, with Theoden, Eomer, Dernhelm and Gamling with a Royal Standard leading 18 Riders of Rohan and 6 Royal Knights. With this being Middle-earth SBG, I’d also need some dismounts – so I settled on 12 Warriors of Rohan and 6 Royal Guard on Foot. While I wasn’t going to risk being without a dismount for the Royal Knights, it seemed unlikely to me that all 18 Riders of Rohan in the army would be dismounted without at least 6 casualties. You gotta cut the corners where you can, right?

As is my usual approach, I started out with a test model – a single Warrior of Rohan – to figure out what my colour choice and process was going to be. Once I happy with the end result, I replicated the scheme from start to finish on another Warrior of Rohan and then another. At this point, I was comfortable with my ability to replicate the scheme, so the remaining 9 Warriors of Rohan were painted in a single batch.
I was pretty happy with how the process turned out overall – but I’ll be honest, it was bit of a shock to the system after the last few months of fingerpainting my Turnip28 miniatures. The miniatures for Middle-earth SBG are quite small, making finer details such as belt buckles very fiddly to pick out. Given many of these kits – the Warriors and Riders of Rohan included – are well over 20+ years old at this point, the detail can be pretty delicate in places. That’s not to say this wasn’t an issue on the similarly scaled Victrix and Perry Napoleonics I’d just been working with, but you need to be a lot more precise when painting a clean style miniature.
As far as colour schemes go, I wanted to keep things pretty grounded on these guys. While I’ve enjoyed experimenting with colour schemes on my Hobbit miniatures, I generally like to keep things quite close to the source material when it comes to factions from the Lord of the Rings. For reference, I used a combination of still images from The Two Towers and Return of the King, as well as images from Games Workshop’s webstore and printed materials to get an idea of what colours to use. In the end, I settled for Charred Brown for the leathers; Mutation Green for the cloaks; Brown Fleshtone for the boots and gloves; Heavy Brown for the woods such as bows or spears and either Heavy Red or Charcoal (depending on what fits the particular miniature better) for undershirts and/or belts and straps.

I tried to keep the different browns looking distinct by washing the Charred Brown with Agrax and highlighting with Heavy Brown, while the warmer Dark Fleshtone was washed with Reikland Fleshshade and highlighted with Leather Brown. The wooden spears and bows were painted in Heavy Brown and recess washed with Seraphim Sepia. Of course, probably the single largest colour represented on these miniatures was the green – and this took me a bit of trial and error to puzzle out. I ended up building up my Mutation Green base with Goblin Green and Lime Green, then shading it back down with an Athonian Camoshade wash. Repeat this process a couple of times until the blends look relatively clean and finish off with a final edge highlight of Lime Green on the folds and a Lime Green/Elfic Flesh mix on the edges. This process is not only reasonably fast when you’re repeating it over several miniatures, but the resulting colour is a satisfying mid point between Emerald and Olive. It’s maybe a little more saturated than the colour as seen in the movies and fits nicely into my general Forces of Good approach of making everything just a little brighter and saturated.
The most technically challenging detail to paint on the miniature I found was the scale mail armour, which just didn’t quite look good enough to me with a wash and a drybrush2. Instead, I opted to wash the silver armour twice with Agrax Earthshade to get a good dark recess shade before picking out each scale individually with a little drop of Runefang Steel. This gives the armour an adequate level of pop, but it can be pretty tedious and time consuming even working in Middle-earth SBG’s (relatively) low model count. Areas of chainmail which could not be picked out manually were done with two washes of Agrax applied over the base coat of silver, followed by an extremely delicate overbrush with Runefang Steel to catch the raised edges.
Now, for the bases. I like to give all of my armies on the same side (Good or Evil) pretty similar basing schemes, allowing for just a little deviation here and there on different armies. Some armies absolutely deserve a unique flair, but I don’t want them to look so different that models from different factions would look out place together. On my forces of good, I will generally use a golden soil, green tufts and blue water effect as a unifying trait, although armies such as Iron Hills will also feature pieces of slate while my Rivendell Elves feature brightly coloured flowers. For my Riders of Rohan, I wanted something that better represented the realm of Rohan without alienating the rest of my miniatures. To this end, I decided to go heavy on the grass – with some rocky hills, tufts and thickets for flavour.
There’s only so much you can fit on a 25mm base, but I started with a nice thick coat of AK Interactive Dark Earth texture paste, highlighted with a quick drybrush of Leather Brown. This was much darker and closer in tone and colour to the bases for my Forces of Evil, but I really wanted a realistic looking dirt ground for the base – the majority of this would be getting covered up with static grass anyway, so whatever was left visible ought to contrast nicely. Now, in the past when I have applied static grass, I have simply spread a little bit of matt varnish on the base and sprinked on the static grass with my fingers. This does a fine job of creating patches of trodden on grass to break up an otherwise plain textured base, but it doesn’t look ‘right’ when you’re filling a whole base with the stuff. For that, we need a Static Grass Applicator.
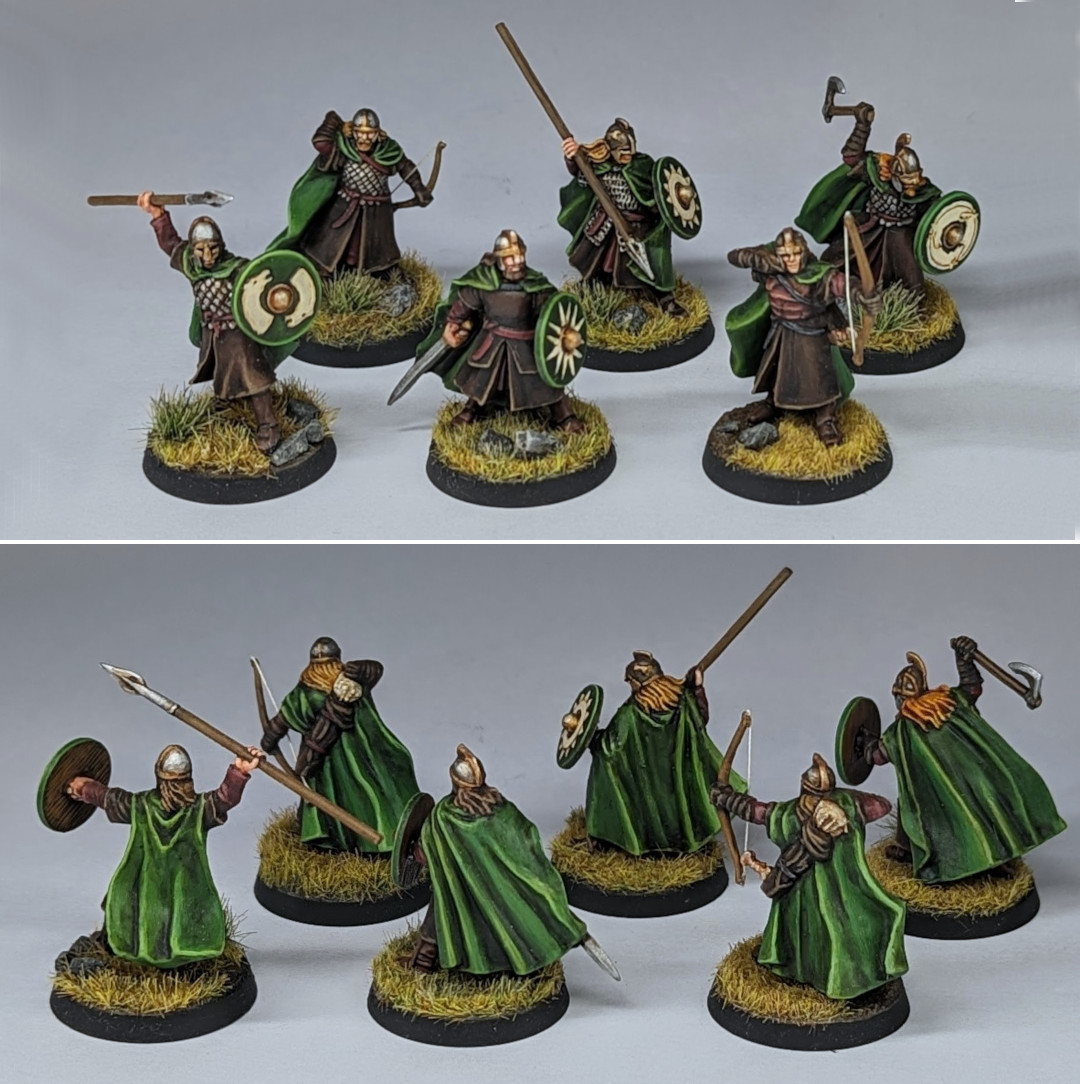
After doing a bit of research, I came to the conclusion that the ‘box’ style of applicator would be best for individual basing for miniatures. The idea is simple – you apply the glue/varnish/whatever to the top of your base, attach the crocodile clip to the side or bottom of the base, sprinkle some static grass on top of the box, hold it the base above and flip the switch. Hey presto, the static grass lifts up off of the tray and onto the base – and standing up straight just like real grass does. For my Rohan bases, the main static grass that I used was PG Studio ‘Arid’ grass in 2mm, although I blended this with some PG Wild Meadow and WWG Dead Grass in 2mm to prevent it from looking too uniform. After the first pass, I’d go back in again with some Geek Gaming Scenics Autumn grass in 4mm to add a further bit of variety to the length, height and colour. The end result is a nice looking golden highland field but with a little bit of a natural greenish tinge – much like the plains of Rohan itself.
After applying the grass to all of the bases in the batch and the glue had dried nice and solid, I remove a painted model from it’s temporary painting base and attach it to the new grassy base with a bit of superglue. At this point, I’ll have a better idea of the remaining space on the base and put on some final flourishes. These include clumps of Woodland Scenics foliage, some Army Painter tufts (Swamp, Mountain or Highland are my preference for these bases) or some small chips of slate (which receive a light drybrush of Ghost Grey to pick out the edges). As a final touch, I also added some bowstrings to all of the models with a bow in their hands3. I opted for 0.25mm off-white cotton thread for this, rather than the clear nylon thread I’ve used on past projects. The material itself not only looks better, but the much finer width also feels much better scaled for these 25mm miniatures.
Once the model is attached to the base and all the final touches and flourishes have been made, I’ll then seal everything in with a couple light dustings of Vallejo Matte Varnish through my airbrush. It might seem odd to apply the varnish after attaching the static grass, but I can’t express what a massive improvement it makes to the grass effect. The clear varnish gives each blade of grass a little better definition, while removing the artificial looking sheen from the static grass material itself.
With that, my first batch of 12 Warriors of Rohan were finished. I sat back and admired my handiwork for a minute or two until a feeling of dread crept over me. It dawned on me that these were merely dismount miniatures for the actual Riders of Rohan which make up the majority of the army. I’d painted exactly 0pts so far. Wonderful. Okay, onto the cavalry, then!
So, it turns out that painting 18 Riders of Rohan in a single batch can be something of a gruelling, mentally draining experience. I’d started this year with noble intentions of painting this army in small batches of 3 or 4, updating my social media regularly as I slowly made my way through Rohanuary. That just straight up didn’t happen. After painting my 12 Warriors of Rohan, the idea of painting another 18 of these with horses had lost all of it’s appeal. Instead of a small batch approach, I resigned myself to myself racing through these models as quickly as I could without sacrificing quality. Something had to give, so I capitulated to the lesser evil of big batches and accepted no interruptions for trifling matters such as social media.
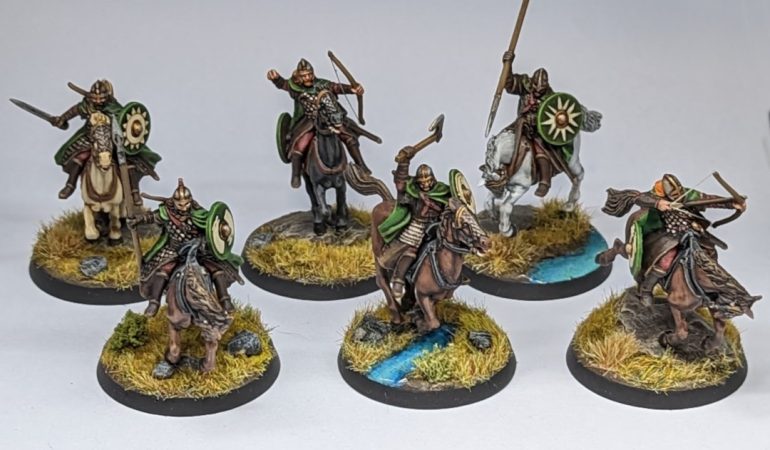
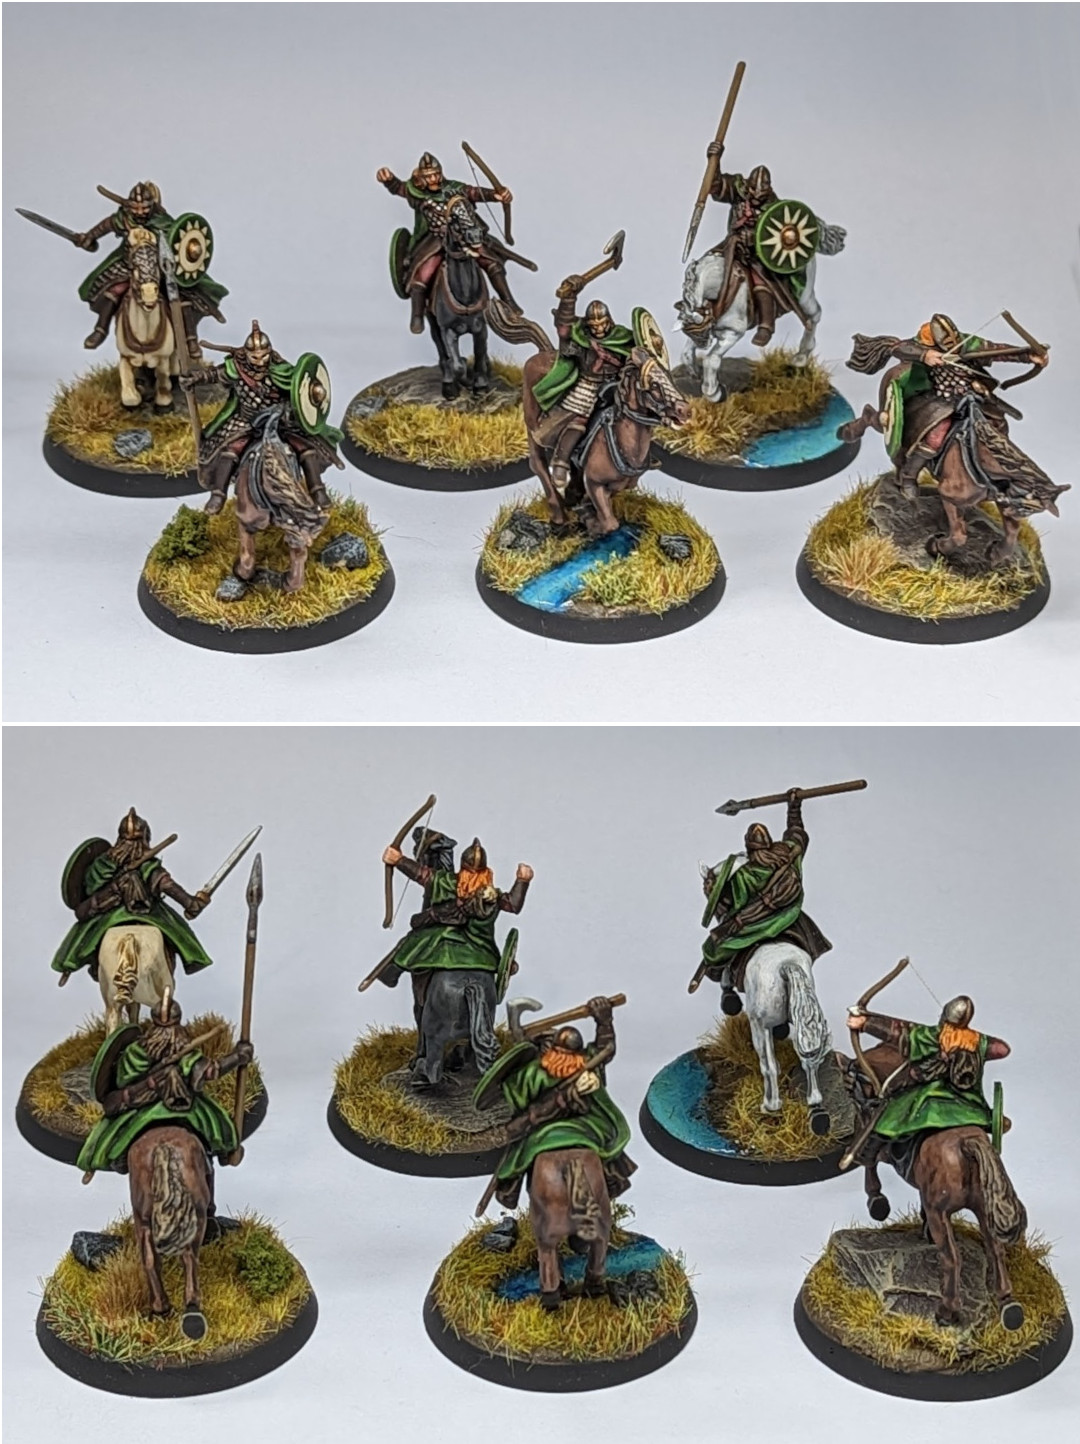
The Riders themselves are essentially the exact same miniatures as the Warriors of Rohan, but there were a few additional considerations to make when painting these models – the main being that there are only 6 unique sculpts for these instead of the 12 we have for Warriors. This meant that maximising variation and minimising repetition in the paint schemes would be even more important here. While I tried to introduce a bit of variance in hair colour on the Warriors of Rohan – brown, blond and red – on my Riders of Rohan, I allocated one of these hair colours to each duplicate Rider. Additionally, while I was painting the horses, I made sure to paint a wide variety of colours – including black, two tones of brown, a warm white/cream and a cold white/grey – evenly split between the two different horse poses. As a final step to ensure variety, when I brought my subassemblies of Rider and Horse together, I tried to give each duplicate trio of Rider poses a different colour of horse and both horse poses. It took a bit of trial and error to figure out the best and most even spread of colours and poses, but I think it was worth it for the end result. Not only is there only one duplicate of each horse and rider pose combination, but every single duplicate rider has a different hair and horse colour combination to help distinguish them. In a pinch, I could refer to any single one of my Riders of Rohan by their Weapon4, Hair and Horse Colour combination and have no exact duplicates. I’m definitely making life difficult for myself should I wish to add to my Riders in the future, but to be honest I’m far more likely to add some more Royal Guard or even Outriders should I expand this army any further anyway.

Of course, the biggest departure for painting Riders of Rohan over Warriors of Rohan is the horses. Honestly, these were a refreshing change from the monotony of the Riders. As there are only two different poses, I painted these in a wide range of colours including Black, Dark Brown, Light Brown, Caramel, Khaki, Cream/White and Grey/White. For each of these I used (deep breath) Black/Nuln Oil, Dark Fleshtone/Agrax Earthshade, Beasty Brown/Reikland Fleshshade, Leather Brown/Seraphim Sepia, Khaki/Seraphim Sepia, Elfic Flesh/Seraphim Sepia and Ghost Grey/Thinned Nuln Oil as my basecoat/wash/layer combination respectively and built up my highlights by adding increasing amounts of Elfic Flesh into the base tone (or White for the last two). As for how to highlight them, I can suggest no finer guide than Nick Bayton’s Theory Horse on Warhammer Community. Not too much else to add here, except that I painted the straps and saddles using Dark Fleshtone, highlighted with Leather Brown and shaded with Agrax Earthshade on all of my horses but the two Brown ones, whose straps and saddles I painted using Black, Black+Elfic Flesh and Nuln Oil.
The bases for my Riders of Rohan followed a very similar process but for two minor departures. The first was the inclusion of some larger pieces of flat slate – there’s more space on those bases for bigger, more obvious rocky outcrops, so I pressed some big bits of slate into a few of the bases while the texture paste was still wet. These were painted in the exact same manner as the smaller rocks – just a light drybrush of ghost grey around the edges to accent them. The other difference is the addition of some water effects on a few of the bases. This is something that I’ve repeated on a lot of my Middle-earth miniatures over the years, beginning with my Rivendell Knights, although the technique and approach has changed a little over the years. To achieve the effect on these models, I leave a channel running through the texture paste for the water to go. Once this dries and I’ve drybrushed the dirt, I’d paint the inside of the channel with a couple layers of Nihilakh Oxide with a little thinned down blue ink running along the banks of the channel. After completing the rest of the miniature, attaching the Rider and additional gubbins like tufts to the base and everything has been sealed with matt varnish, I then apply a little UV resin over the top of the river and cure it with a UV light before it starts to spill over the edges of the base. Simple and very effective, it adds a nice little spot colour to the army and helps tie the models in with the rest of my Forces of Good.

And with that, I have 18 Riders of Rohan and 12 Warriors of Rohan dismounts for these models. I’m still a long way from having a legal Rohan army, but it’s a pretty good start. With 18 Riders and their dismounts out of the way, that leaves just 6 Royal Guard and 4 Heroes left to paint. I’m well and truly back in the saddle now, so keep your eyes peeled for part two of Forth Eörlingas, where I’m hoping have to polished off 6 Royal Guard and bite off a good chunk of those Heroes.
Until then, thanks for reading and happy wargaming!
1 Deeeeeeeaaaaaaaaath!
2 I think this probably has something to do with the scale. The smaller the miniature/detail, the more contrast you need for it to look adequately defined.
3 I draw the line at stringing a bow in a quiver – there’s nothing for it to attach to!
4 That’s weapon, not just pose. For example there are six different spear armed riders – three holding upwards and three about to throw the spear. Every one of these models has a unique Hair and Horse Colour combination from the five other throwing spears, not just the other two with the same pose. This may seem pedantic, but the point of mixing up these colours is not simply to prevent duplicate models on paper, but to make the whole set look unique and individual en masse. Two Riders with bows on horses with the same hair colours and horses would still look like repetition at a glance, regardless of whether one’s arm is a little lower than the other.