
It’s been a while since we checked in on the 22nd Bloody Beet Brigade, but with TurnipCon #3 coming up in November, I thought I’d get in a few practice games here and there to build up some hype. Well, mission accomplished – and since I’m still a little bit burned out on Middle-earth, I thought I’d take a detour through Cist and knock out a few projects.
But first, a little housekeeping.

Earlier this year, Max unleashed Turnip28 version 17 upon the world – featuring a significant number of tweaks and changes. Among those tweaks was a little buff to Rootlings, bumping the unit up from four to six models. This was a welcome change, as I think it helps distinguish them from Chaff, as well as giving them a little more of a physical presence on the tabletop. This did mean, however, that I’d need to bump up my model count.
I shaved some of the detail off of another couple of Nurglings, added some leaves pruned from the GW Creeping Vines kit and sculpted on some root limbs, floppy root noses and a pair of glum looking mouths. Frustratingly, I had managed to run out of the teeny tiny single model Rendera bases that I’d put the other four on somehow, so I improvised and put both of them on a double sized base instead. Not ideal, but at least it’s one less model to have to physically push around, I suppose!
Next up, we have a third Highland Cow Knight, turning the other pair into a full fledged unit of Bastards.
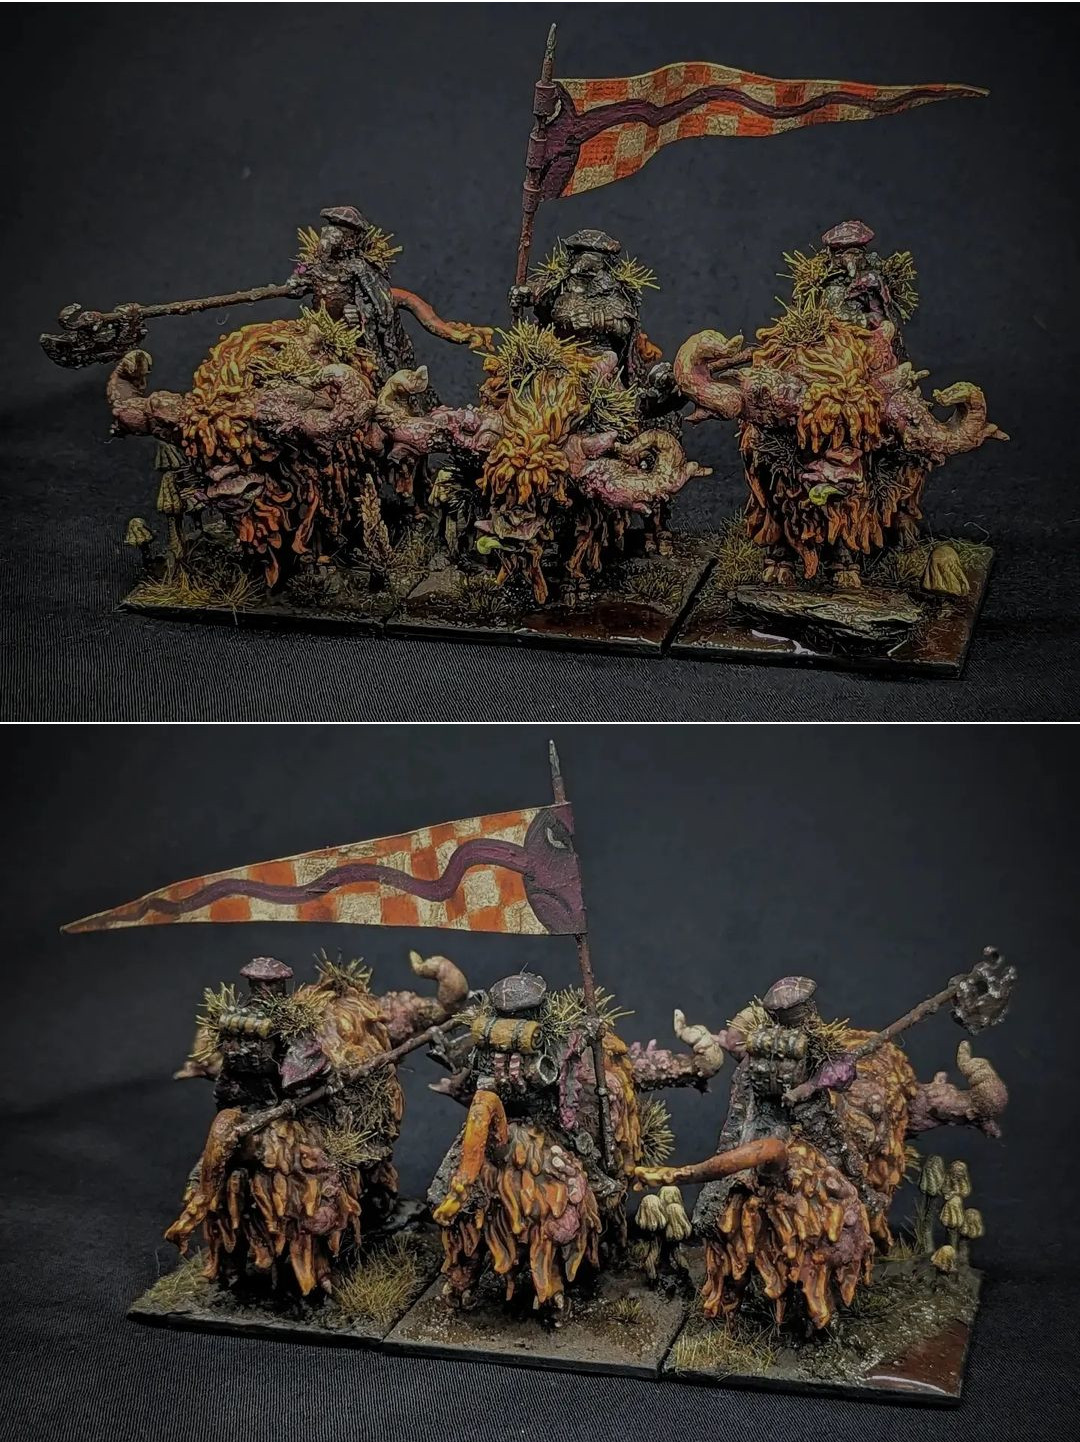
Back when I started this army, I found myself with a spare packless Musk miniature and – struck by the visual similarities to Scotland’s favourite bovine – I decided to reverse his horns and paint him as a Highland Cow. With a little trimming of the fur, I was able to stick a rider on and equipped him an old fashioned Scottish weapon converted from a lance and a spare axe I had leftover from a Putrid Blightkings kit. Unsure what to actually do with him, I settled on running him as a Snail Knight and bashed out a second model to join him. After playing a couple of games with them however, I wasn’t too keen on running these models as Snail Knights anymore. It’s not that they didn’t look the part – a stubborn Cow works fairly well as an alternative for a Snail – but the model just felt a little too small to me to count as a whole unit by itself. Using two of these models as Snail Knights just shrank the footprint of the army way too much for my tastes. As a consequence, they languished on my shelf in favour of other Cults until it eventually hit me – one more model and I could field all three of them as a unit of Bastards.
Not a lot to add on these guys that I haven’t already covered in a previous post, but they do look rather fetching in a unit of three. I did, however, utilise a backpack from the fancy new Forlorn Hope minis complete with a nice spare pair of striped socks.
Okay, onto the new new things. Next up, we have the illustrious Tod himself.

Like most fans of the Turnip28, I generally find myself gravitating towards kitbashing my own silly and repugnant concepts over reproducing exact copies of Max’s Turnip 28th regiment. It’s fun to be creative, to carve out your own little niche in the grimsnug land of Cist. With that said, some characters are too dashing, too charismatic, too damn iconic to settle for less than an official miniatures. Tod is one such character.
This is a miniature that I’ve been excited to get my hands on since the first time I laid eyes upon the Turnip28 rulebook – and oh boy does this sculpt does the iconic character justice. I’ve had this guy rattling around in a box of 3D prints for a couple of months now and I’m thrilled to finally have gotten some paint on the mini.
That said, I don’t have a ton to say about his paint job; even his froggy face was painted using the same greyish green flesh tones I use on my regular chaps. I did put a bit more effort into the little details such as the checkered patch on his rabbit ears and a bit of reddish purple glazing around his eyes and mouth. I’m pretty happy with him overall – he’ll make a fine occasional leader of the 22nd Bloody Beet Brigade!
Next up is another miniature from my box of Turnip28 prints – The Grand Bombard!

One of the earlier official (and free) Turnip28 STLs , I’ve had the 3D printed components of this model sitting around in a drawer for months now, patiently awaiting it’s turn to receive a coat of paint. Since I was on a roll with Turnip28 stuff, it’s time has finally come. It’s a nice, easy win that gives me another Cult to play around with, after all.
With this model, the bombard itself is only half the battle – I’d have to put it on a suitable base and build up some crew for it as well. I actually had quite a lot of fun with this part, which afforded a decent amount of creativity despite the majority of the miniature being a single piece 3D print.
For the base, I built up a little bit of a hill and ran along either side with a bunch of snapped pieces of popsicle sticks to create the palisades as seen on the artwork for the cult. As this was a bit of a fancier Cult model, I decided to bust out my Forlorn Hope Kickstarter minis and kitbashed a few of the bits along with my Victrix Highlanders and my Victrix Cannon crew. The size and scale of the Fornlorn Hope miniatures seems ever so slightly larger than Perry/Victrix kits, but not so much so that they’re incompatible. I’d considered adding a fourth crewman standing at the front of the Bombard to convey the ridiculous number of crew members on as shown on the artwork for the Bombard, but I decided against it in the interests of keeping the model from becoming to cluttered.

The pièce de résistance for the Bombard was stuffing a fancy looking Forlorn Hope head with a bicorne onto a torso and a pair of arms then jamming it inside the Grand Bombard – a nice little nod to the Aristrocratic Ammunition rule that lets you launch your Snobs as a bonus action. I did give this a rudimentary base coat paint job, but ended up slobbering him in Streaking Grime to the point of covering up all but the faintest of notions of colour underneath. Aside from wanting the inside of the bombard to deep dark and cavernous, I figure he’d be absolutely caked in soot anyway.
Speaking of artillery, next up we have St Alamei’s Rocket Batteries.

The final item from my box of Turnip 3D prints – and another miniature that was surprisingly fun to get creative with. As with the Grand Bombard, I wanted to try and capture the vibe of the artwork of the rocket batteries in the rulebook with the crew. This involved a whole lot of reposing arms, sculpting green stuff mohawks, adding nylon thread for rope and tearing up kitchen roll to make the cloaks. I used a couple of the basing candles I use for my Adepta Sororitas for the ignitor stick thingy1 and for Mr Candle Head. In the end, I’m quite pleased with how well I managed to capture the likeness of the scene.
From a painting standpoint, this was fairly quick and painless overall. I added some classic Turnip28 heraldry on the shield and a somewhat dodgy miniaturised version of my Bloody Beet heraldry. I found the latter somewhat challenging to paint – freehand is hard enough on a large, flat surface let alone a tiny wavy resin banner. I think it turned out okay given the circumstances, but it’s definitely the dodgiest instance of this heraldry to date – and the main reason I decided to oft for roots and chequers on the shield.
Okay, moving onto the centrepiece of this post – my Scab Tank.
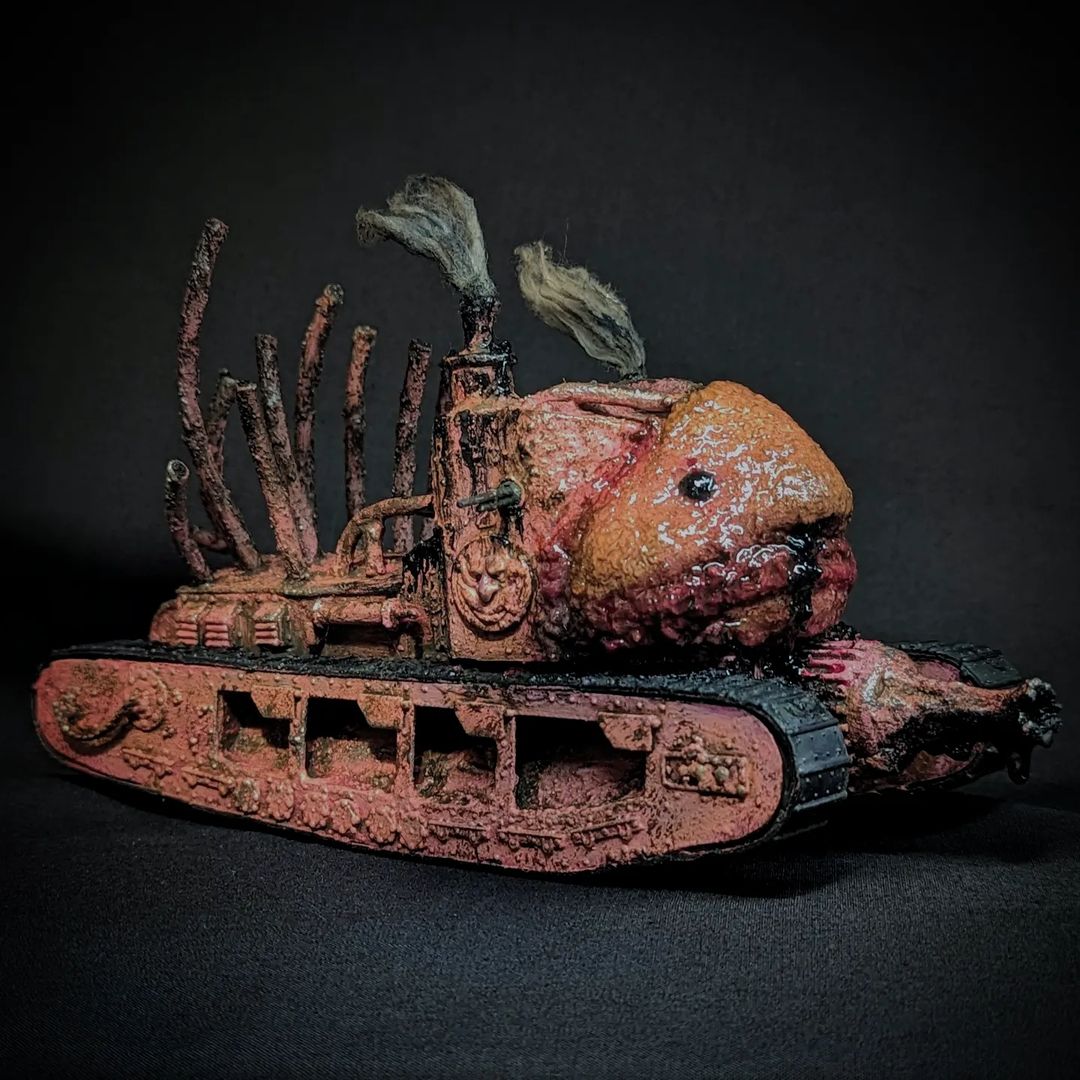
While I may have missed out2 on the Scab Heap Challenge (the official Scab Tank kitbashing competition run by Max a little under a year ago), I still enjoyed the idea of kitbashing a horrible tank together. I mightn’t have bothered were it was going to be exclusively a Swill thing, but the presence of new and experimental rules for the Scab Tank in games of Turnip28 eventually sealed the deal for me.
The first thing any good kitbash needs is a concept or a theme of sorts. As the tank itself would be from Swill – not a part of the 22nd Bloody Beet Brigade – I had free reign over how I was going to style the tank, rather than sticking to my usual purple. After grappling with decision paralysis for a short while, I eventually took inspiration from the most unlikeliest of sources – my feet. Well, my slippers, to be more accurate. My novelty Blobfish slippers, to be exact.
Inspired, I took to the internet to find Blobfish-related bits I could build the kitbash with, when eventually I stumbled upon a Blobfish stress toy – and I knew immediately that I’d found my gimmick. I’d stretch the silicone face over the front of the tank and paint it using leather paints like I’d used to seal the paint on my fish terrain. A little bit of research on Google Images (and a touch of trial and error with scale) later and I’d settle on an Emhar 1/35 Scale MkA “Whippet” tank as my chassis – it had a low enough tech look to it and a nice flat area to attach the stress toy face to, provided I assembled it backwards.
Aside from reversing the tracks and gluing a silicon stress toy to the front of the tank, I made a few other embellishments to the kit as well. I added some stowage on the back using a barrell from the 40K Munitorum Armoured Containers kit, slapped a couple of Turnip28 face shields onto the sides of the hull for a little decorative flair and chopped up an old power cable to make the t-shaped pipes going out of the back of the cockpit where a third gun used to be. I didn’t think to add the rootlike pipes sticking up out of the rear of the tank until much later, but those too were made from cut up power cable (coated with a bit of texture paste). The final embellishment was the main cannon, which I installed between the tracks beneath the face and was made from the lid of an old super glue bottle.
Painting the main chassis was pretty painless. I primed in grey and basecoated the whole thing Screamer Pink, followed by several thick and sloppy overbrushes of Squid Pink. I wanted it to look like it had been given several, thick and sloppy layers of enamel paint that was cracking and flaking off, so there was no thinning of paint here – straight from the pot, with no care taken to preserve the detail on the kit. After applying the base coats, I gave it an all over wash with Streaking Grime to pick out what was left of the details, then I sponged it with Typhus Corrosion and Shining Silver to give it the beat up and chipped look. To help sell the idea that this is powered by Swill, I used some Glossy Black to paint streaks of black ichor leaking out from the gun turret, under the face and out through the gun ports and exhausts, suggesting it’s literally leaking out from every seam and oraface. One final detail was a couple bits of cotton wool smoke coming out the top exhausts, which I tinted with a bit of black and grey paint through the airbrush, then soaked in thinned down Streaking Grime to give it a nasty, unclean look.
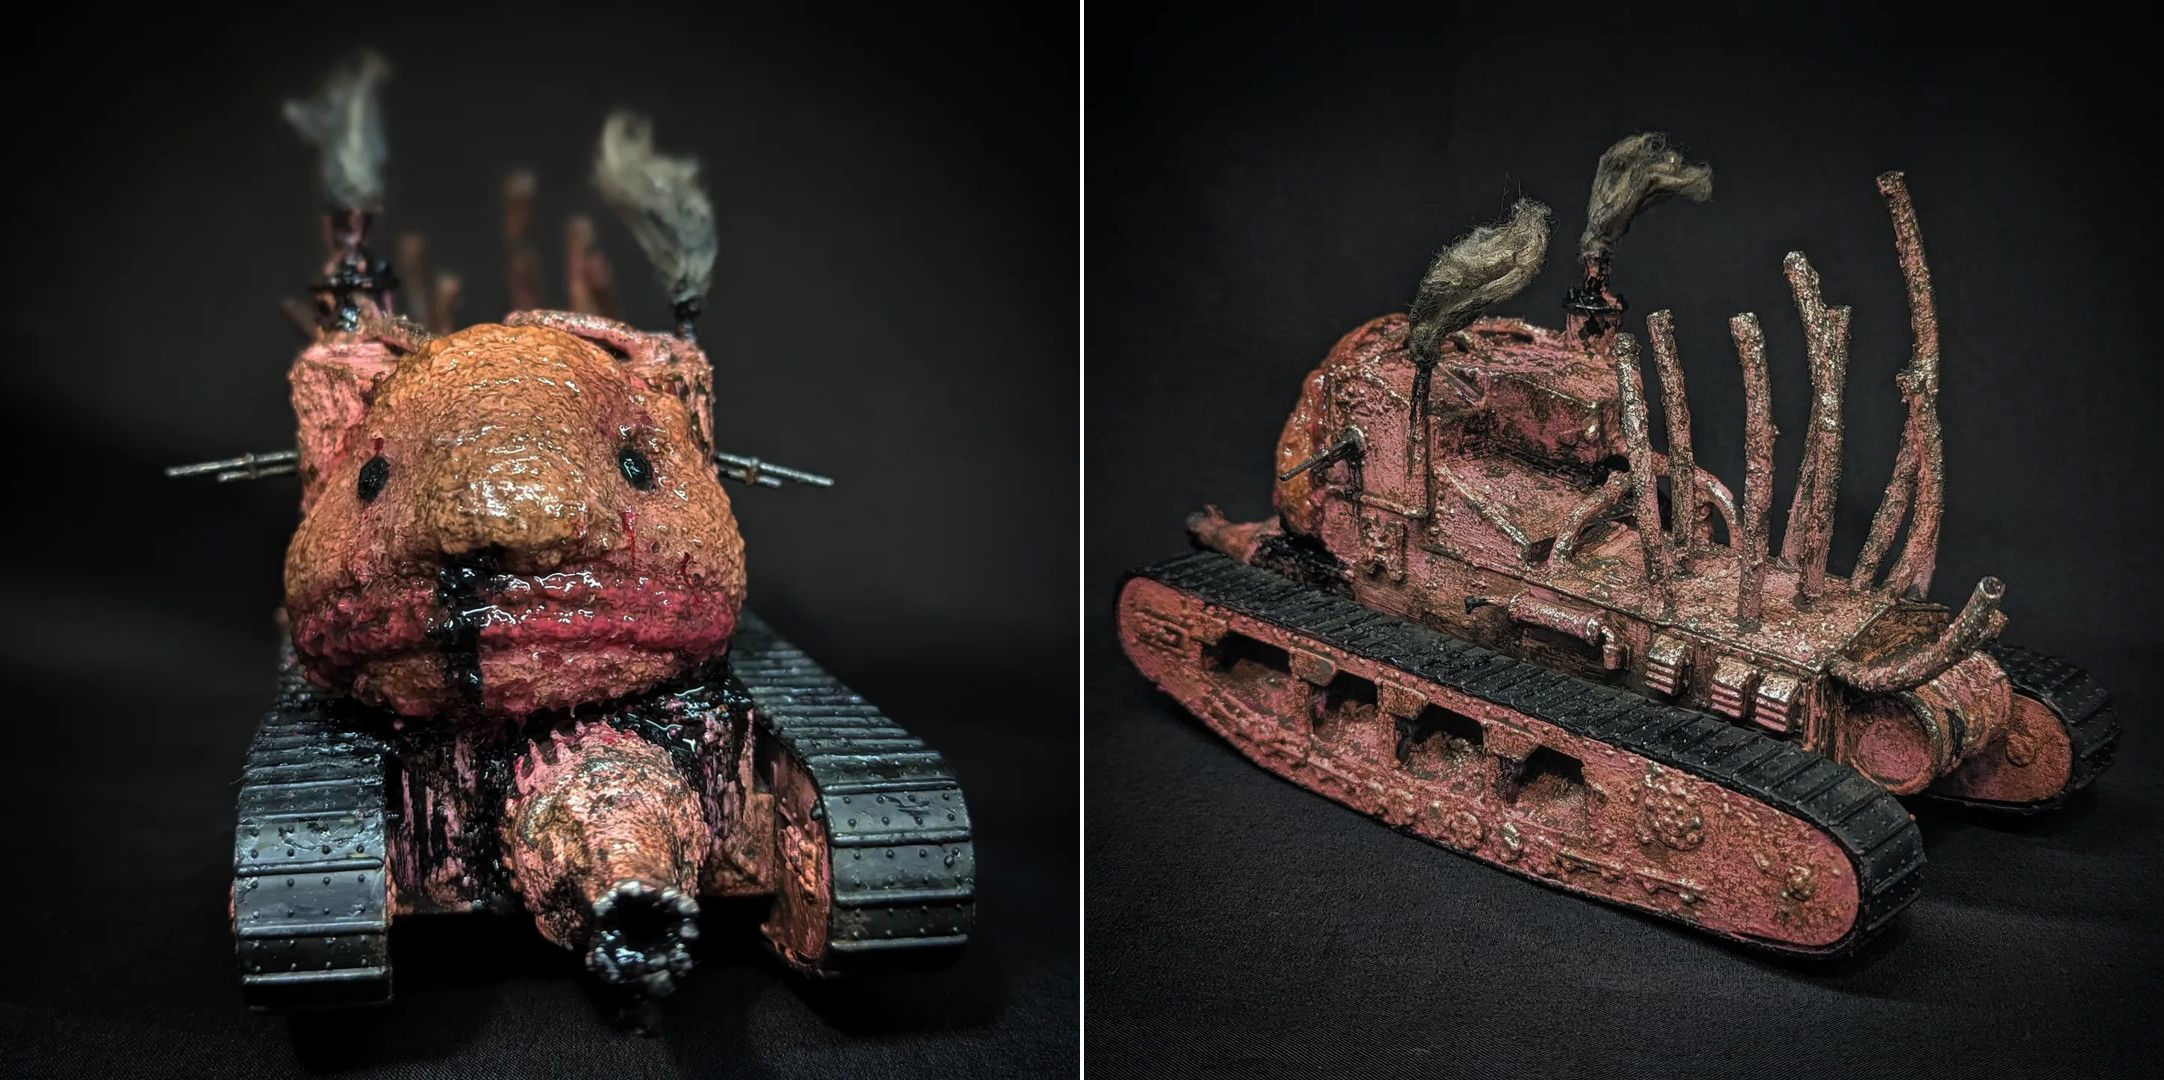
If that was all there was to it, painting this tank would have been an absolute breeze. However, there remained the small matter of the silicone blobfish face.
I naively believed that flexible leather paints would do the trick here, so I purchased a black, a red and a purple and pink that roughly match Screamer Pink and Squid Pink and set about painting the face with a number of thin layers. Unfortunately, the leather paints had neither the flex nor the grip to work on the jiggly silicone face and would with minimal prodding begin to crack and flake off. I experimented for a while using different mediums and hardeners until someone in the Turnip28 Discord group recommended trying Liquid Latex.
My initial experiments with Liquid Latex were fairly positive, if you can forgive the god awful stink3. I mixed a little colour from my leather paint (figuring this would still be a more flexible pigment than my mini paints) into the liquid latex and applied it in layers. After a little experimentation, this actually seemed to work – resulting in a flexible layer of paint that adhered nicely to the miniature. The only downside was that it dried a little sticky, which meant you couldn’t really touch the face. To resolve this, I tried mixing a little of my matt varnish into the liquid latex. This seemed to dry just as flexible, although a lot less sticky – to the extent that you could even boop my Scab Tanks snoot! Sadly, this was not to last. It didn’t happen overnight, but as few weeks went on, the latex began to separate again. In it’s current state, the face is yet again wet and sticky. Still, the paint seems to be holding up, so while it might require a bit of creativity to transport, all is not lost – though I wouldn’t necessarily recommend using this method in future. Were I to start over with a fresh Blobfish face, I might try experimenting with thinned down caulk and oil paints, or perhaps rubber cement. One day, perhaps.
I’ve had a lot of fun adding to my Turnip28 battalion with this latest batch of units – supporting a whopping four new Cults and adding to a pair of units that needed a little reinforcement. So much fun, in fact, that I carried on with my little Turnip28 detour and cranked out a whole bunch of new scenery. There’s a little too much to cover in this post however, so watch this space for an update soon!
In the meantime, thanks for reading and happy wargaming!
1 I believe that’s the technical term for it, yes.
2 I just can’t/won’t hobby to an external schedule. I couldn’t drop everything to start my Sororitas army at launch, I couldn’t stick to Rohanuary and I’ll be damned if I’m going to start working on my Scab Tank a moment sooner than 6 months after the competition ends!
3 Liquid latex contains ammonia, which absolutely reeks of urine. Fortunately for my future opponents, it loses it’s smell once the latex ‘sets’.