
Back in the “good” old days of 2020, I released a post titled “Cities of Death“, showcasing a system-agnostic gothic city board comprised of Tablescapes tiles and Pegasus Hobbies Gothic Ruins. I had a lot of fun building and painting those – I even iterated on the board, adding a little additional verticality for skirmish games like Mordheim. It was my first real attempt at a cityfight style board, a concept that has fascinated and intrigued me since the first time I laid eyes on Codex Battlezone: Cityfight back in the day. Since putting that board together, I’ve played a fair few games on it and had time to learn what I liked and disliked about it. I started to experiment with neoprene mats over the Tablescapes tiles which – while very pretty to look at – made it difficult at times to place the ruins thanks to the irregular surface. This made placing scenery a little easier (and setup/teardown a lot quicker), but something still wasn’t quite right.
One of the main reasons that I opted for Pegasus Hobbies Gothic Ruins in the first place was their relative simplicity in design. They had a bit of texture and detail on them that would take a wash and a drybrush well enough, but lacked the extraneous gubbins of the Sector Imperialis ruins that Games Workshop had just released. There were no power boxes, no metal trim, no excessive inlaid skulls everywhere. They were clean and – above all – setting agnostic. Nothing about these Gothic Ruins meant they had to be used for Warhammer 40,000. And that was fine – a selling point even. That is, until I played Boltgun.

Boltgun is a boomer shooter set in the Warhammer 40,000 universe, following the trials and spent shell casings of Malum Caedo, an Ultramarines Sternguard Veteran picking up where Captain Titus left off in the video game Space Marine. Despite it’s myriad flaws, bugs and performance issues, I’ve been really enjoying it. It’s simple, braindead fun that I can play for an hour or two when I’m too tired after work to sit down and hobby. More than that, however, it’s a goldmine for inspiration. Just about everything in this game comes from a Games Workshop model kit, whether it’s the enemies – ranging from Pink Horrors and Flamers of Tzeentch to Chaos Space Marines and even the occasional Ambull – or the environments themselves; towering Sector Imperialis buildings littered with Aegis Defence Lines, Munitorum Armoured Containers and even the occasional Void Shield Generator. Everything is incredibly recognisable despite the low-fi Doom visuals and it really makes me want to paint some of those models.
Over the years, I’ve painted (or at least commissioned) a fair amount of scenery. I can put together a table with strong thematic elements of Warhammer Fantasy, Turnip28, Mordheim, Star Wars Legion – I have several options at my disposal for Middle-earth Strategy Battle Game. But while I can certainly put together a solid Gothic Science Fiction board, very little about my Warhammer 40,000 terrain collection actually says Warhammer 40,000. Well, that is about to change!
Before I even had a plan for it, the first new piece of Warhammer 40,000 terrain that I painted was a Void Shield Generator.
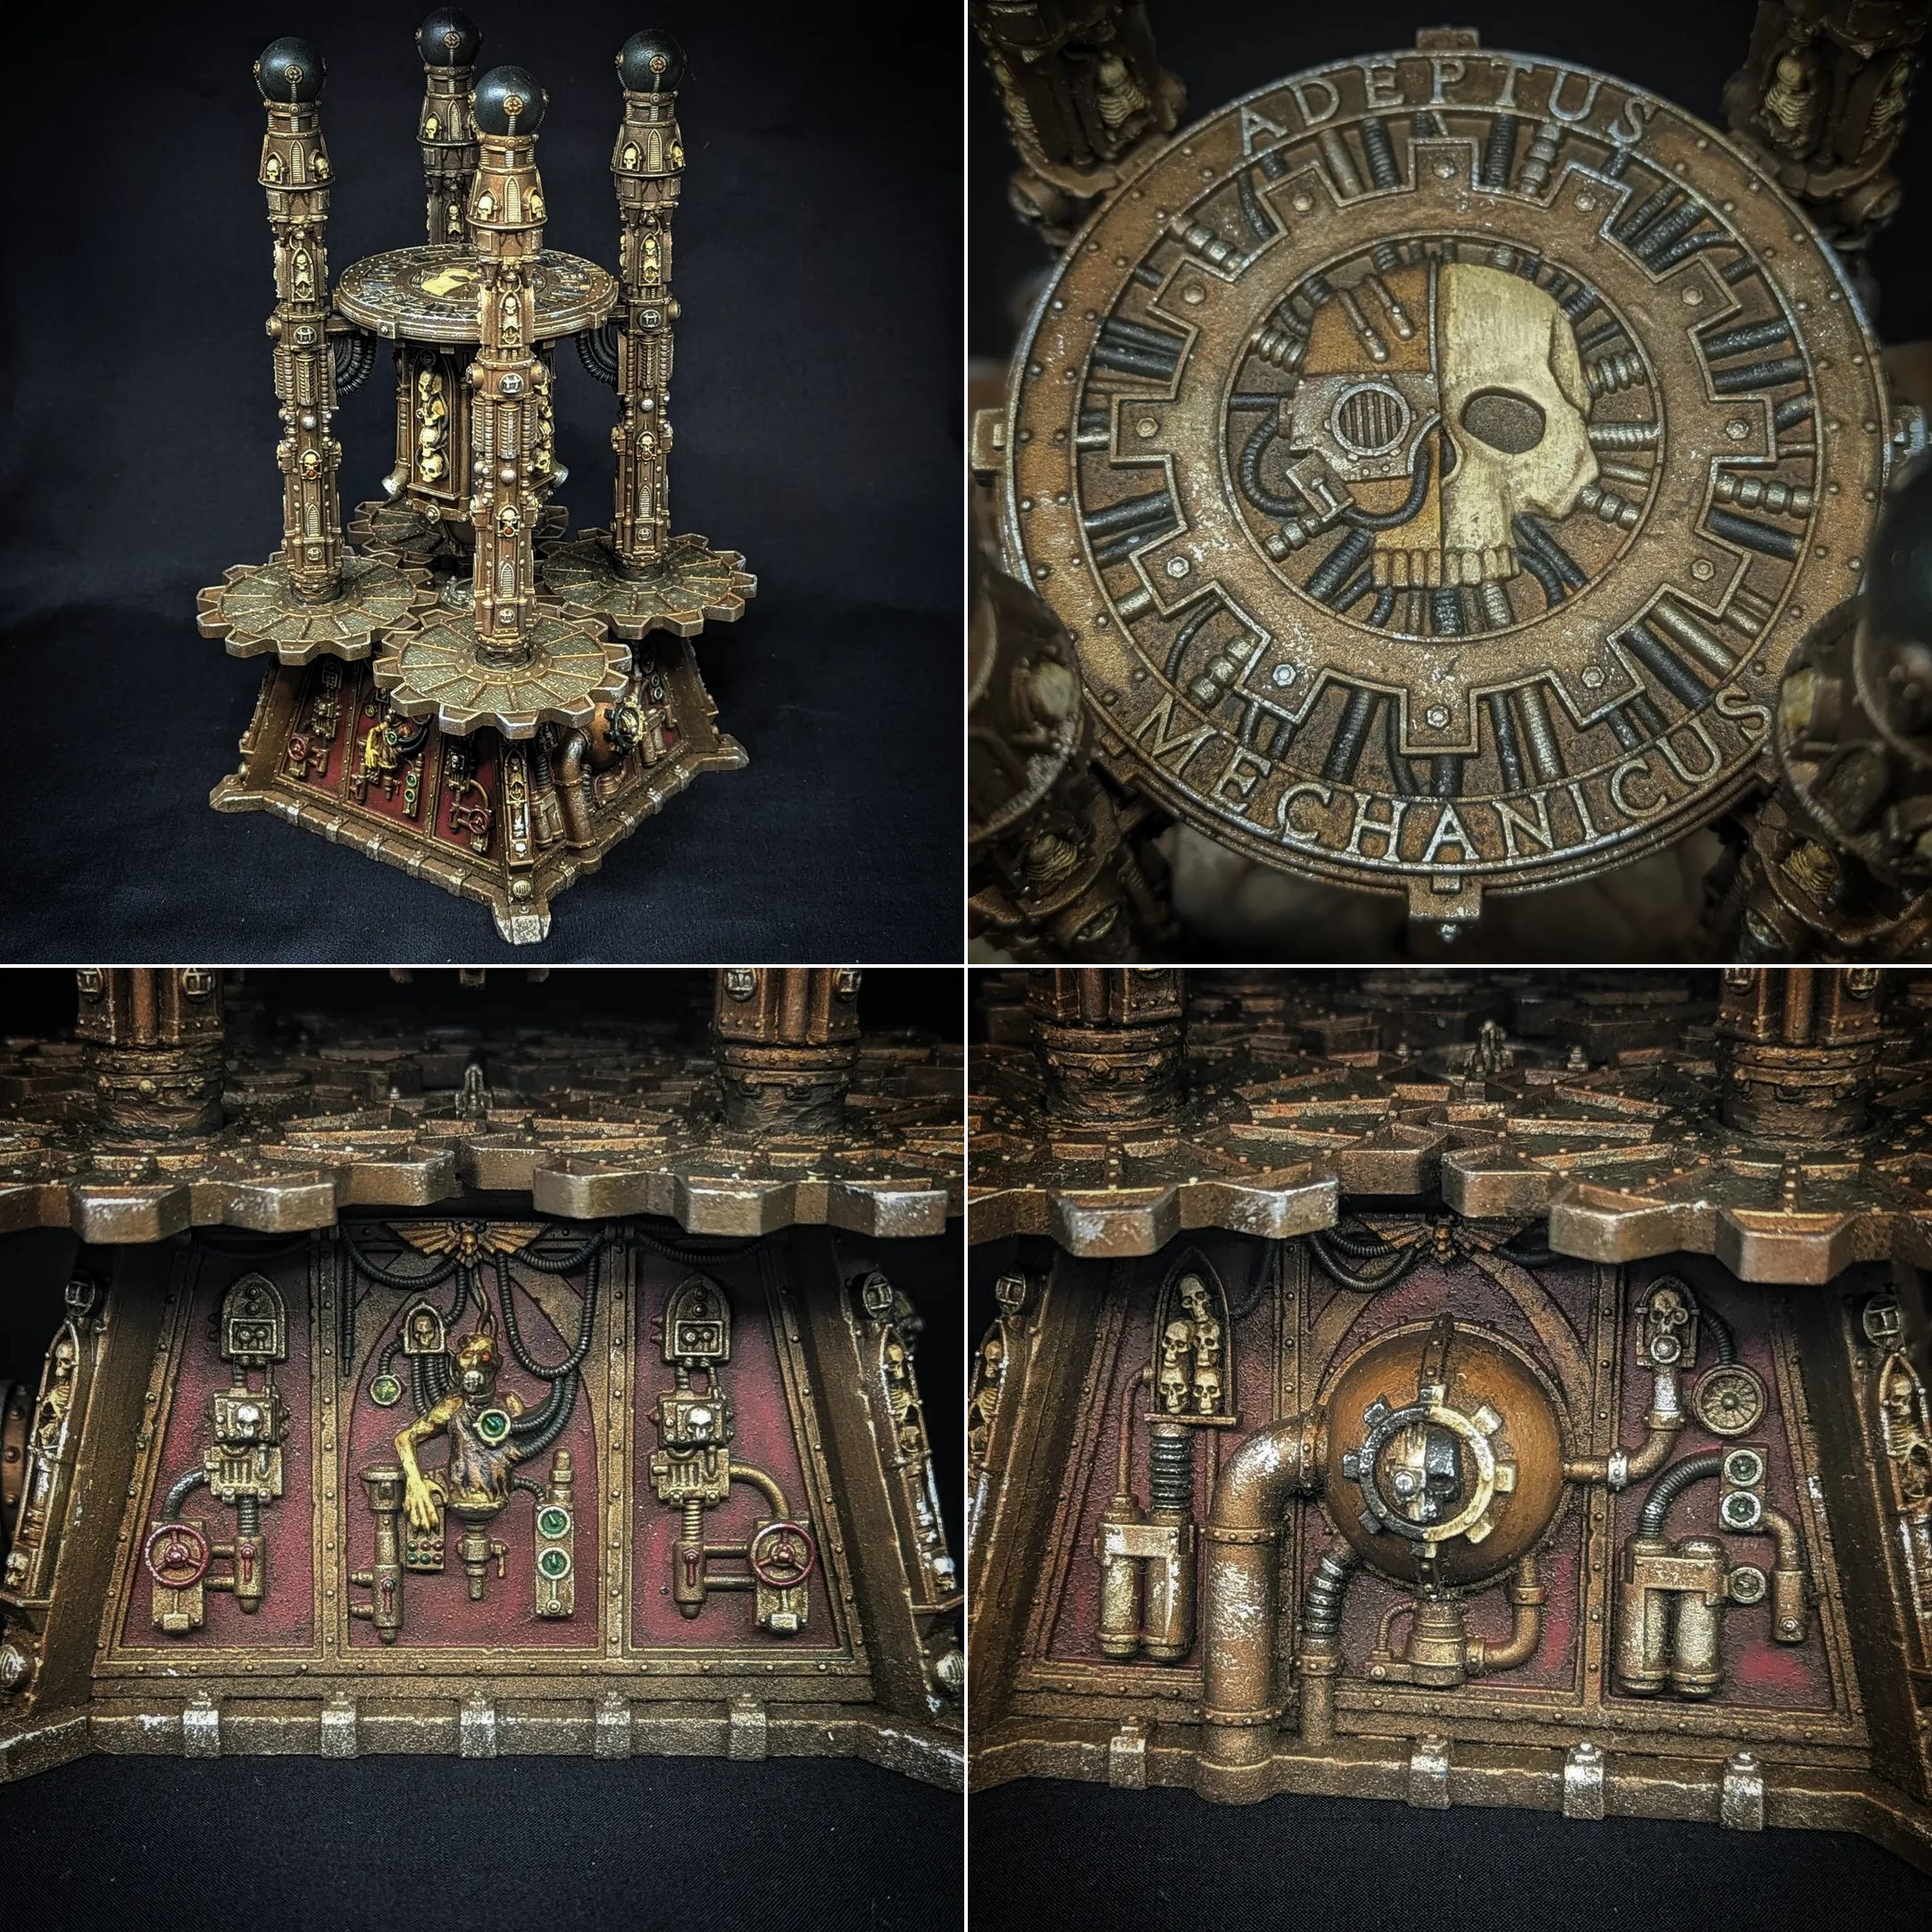
I love this thing. It’s tall, it’s imposing, and it’s futuristic in a very Warhammer 40,000 way. You’ve got servitors, giant mechanical cogs and skulls for days; even the vents and alcoves are shaped like gothic arches. I’m also super happy with how it turned out, despite a very rocky start.
Probably the single worst bit about having a sudden 180 on Games Workshop terrain kits is that the vast majority of the kits that I wanted to buy are now long out of production. That leaves me at the mercy of the second hand market, which is now flooded with scalpers and – of course – pre-assembled ‘used’ models. If you’re patient enough, you can eventually find something in good condition for an alright price. If you’re impatiently chasing the whims of your fickle hobby inspiration – as I was – sometimes, you kind of just need to take what you can get. This Void Shield Generator came to me in a bit of a state, to be honest. The cogs were not only glued in place1, but the previous owner had clearly gotten impatient when trying to glue the pillars on and used great big blobs of green stuff around the base to keep them in place. Also, it was painted in a horrible blue colour. The green stuff ended up being removable with a bit of patience and an x-acto knife, although the columns were a little worse for wear as a result. I probably should’ve tried to file these down smooth afterwards, but I didn’t really notice the extent of the damage until after painting and taking these photographs. Ah well.
At least painting the Void Shield Generator was an absolute doddle. An all over coat of Tinny Tin through my airbrush, followed by a zenithal of Brassy Brass and a light drybrush of Chainmail Silver created the foundation. Afterwards, I went in and picked out the alcoves with Heavy Red, the skulls with Bonewhite and the various cabling with Chainmail Silver and Black. The servitors were base coated in Dead Flesh. With the basecoats down, it was time for a wash.
Over the years, I’ve slowly come to learn that acrylic washes are not ideal for big structures such as these. There’s too much pooling on the surfaces which leaves unnatural staining and tints the surface too much to correct it unless you’re willing to layer the whole thing. For a while I’ve been using Streaking Grime as an alternative solution to this, however can get quite expensive on larger models. And so finally, I decided to dip my toe into Oil paints. I ordered a set of non-toxic Oil Paint from Amazon and another bottle of mineral spirits and made my Streaking Grime alternative with 2 parts Umber Brown, 1 part Green and like 5 or 6 parts mineral spirits. Mixing this was a little more of a faff than just using Streaking Grime out of the bottle (an experience not dissimilar to making a powder milkshake), but the results were every bit as good. I could thin the paint down as much as I needed to and while it takes a little longer to ‘dry’ than Streaking Grime does, it was just as easy to wipe away the excess from surfaces.
When the oil wash had dried, all that was left to do were the finishing touches. I gave the servitors skin a little more pop with a Fuegan Orange wash and a highlight of Dead Flesh. I put some Blood for the Blood God over the various wheels and controls to give them a deep metallic red colour. I threw a little Waystone Green Gem paint (thinned with a little Cassandora Yellow) into the various dials and screens and picked out the various lenses with Spiritstone Red. Finally, I sponged a bit of Chainmail Silver onto the edges and blasted the whole thing with an all over matt varnish.
Overall this was a pretty quick and enjoyable painting project, although to be fair I did opt to paint the tesla orbs at the top of the miniature in a satin black rather than attempting to freehand lightning effects on them. Hey, I was enjoying myself – why ruin it with a time consuming and stressful detail?
Of course, I couldn’t just stop there. What else was there a lot of in Boltgun?
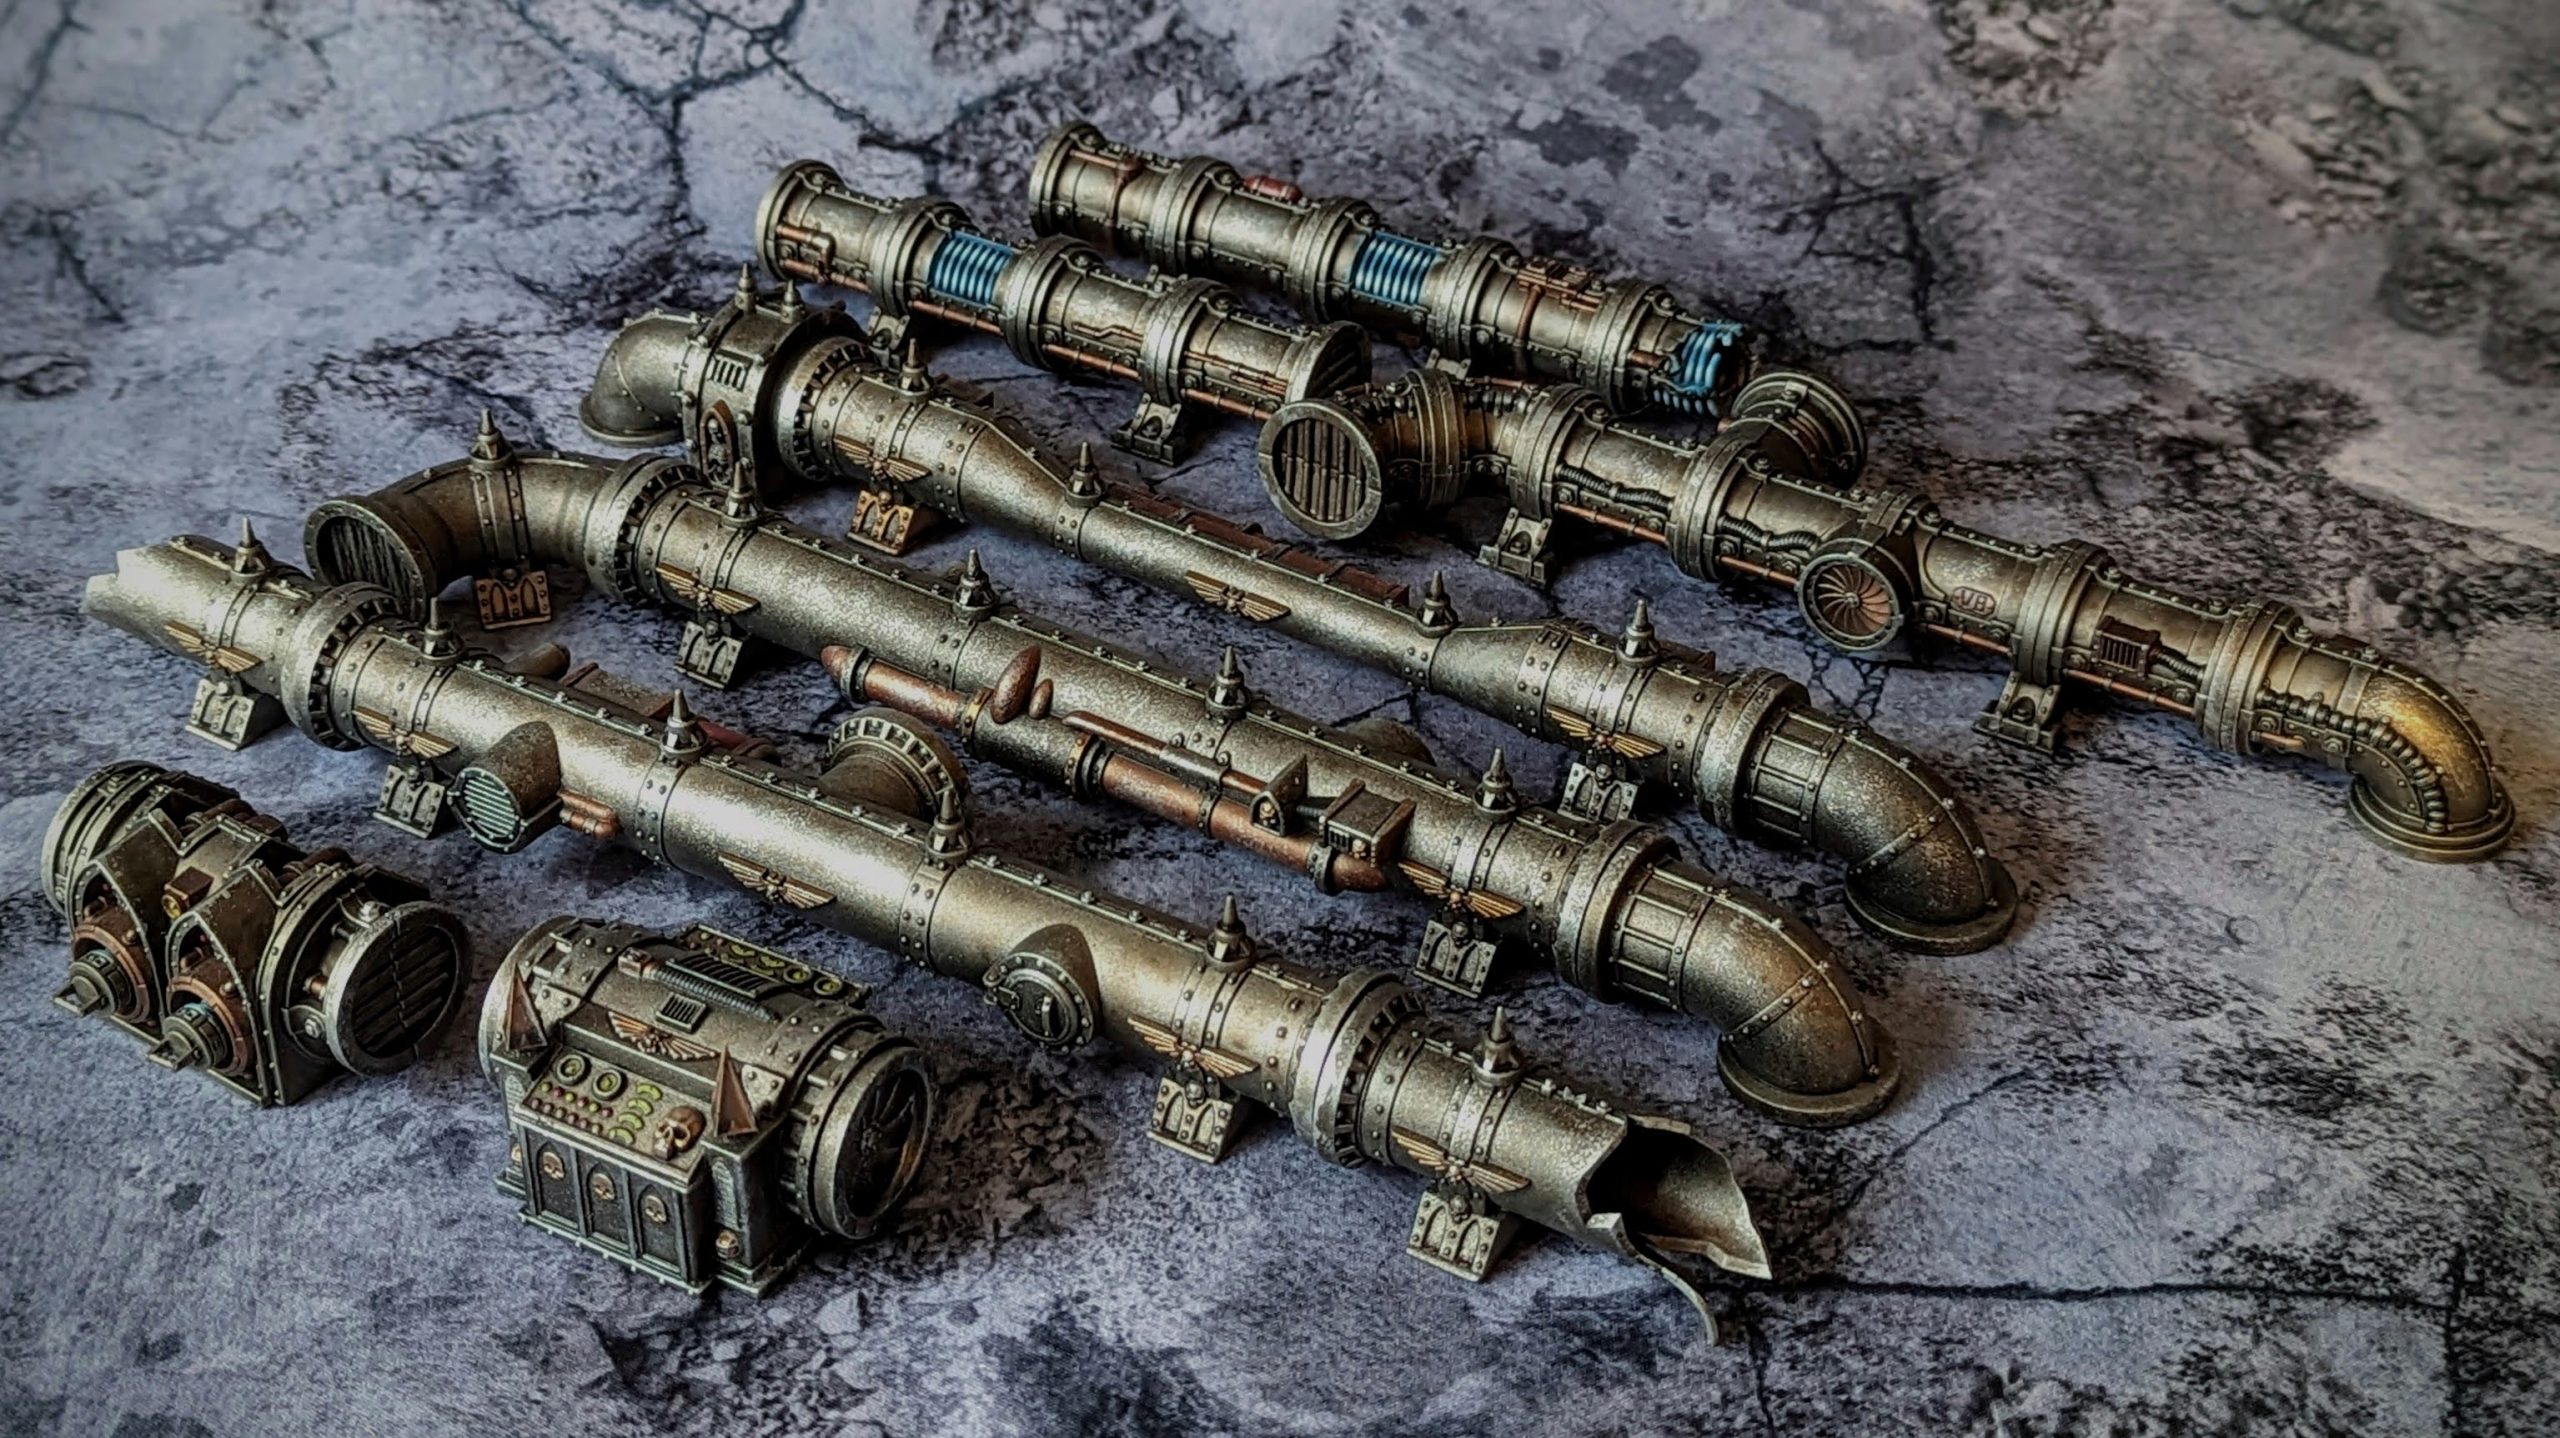
Pipes. Pipes are everywhere in Boltgun. Creeping up walls, along the floors. On the tabletop, they make for nice chest high cover and – somehow – Games Workshop have managed to make something as simple as a metal tube look distinctly Warhammer. I’ve had the Thermic Plasma Conduits at the back for a while now, having picked them up to add a little bit of visual interest to my 3D printed Zone Mortalis board – but I’ve always thought I could do with a few more.
To beef them up, I snagged a set of Promethium Relay Pipes from eBay in pretty good condition, assembled and primed silver and for a pretty reasonable price to boot. These look a little less chunky than the plasma conduits do, but they line up nicely with the set and help add a good few inches of much needed length and a couple of broken ends for when you run out of space. Not a ton to say about painting these bad boys – I picked out the little sub pipes in Hammered Copper, details like the Aquillas in Brassy Brass and some lights and dials in Lime Green before dousing the lot in Agrax Earthshade. A quick drybrush and a little sponging of Chainmail Silver and they were good to go.
One last bit of industrial terrain before we get onto the cities part…
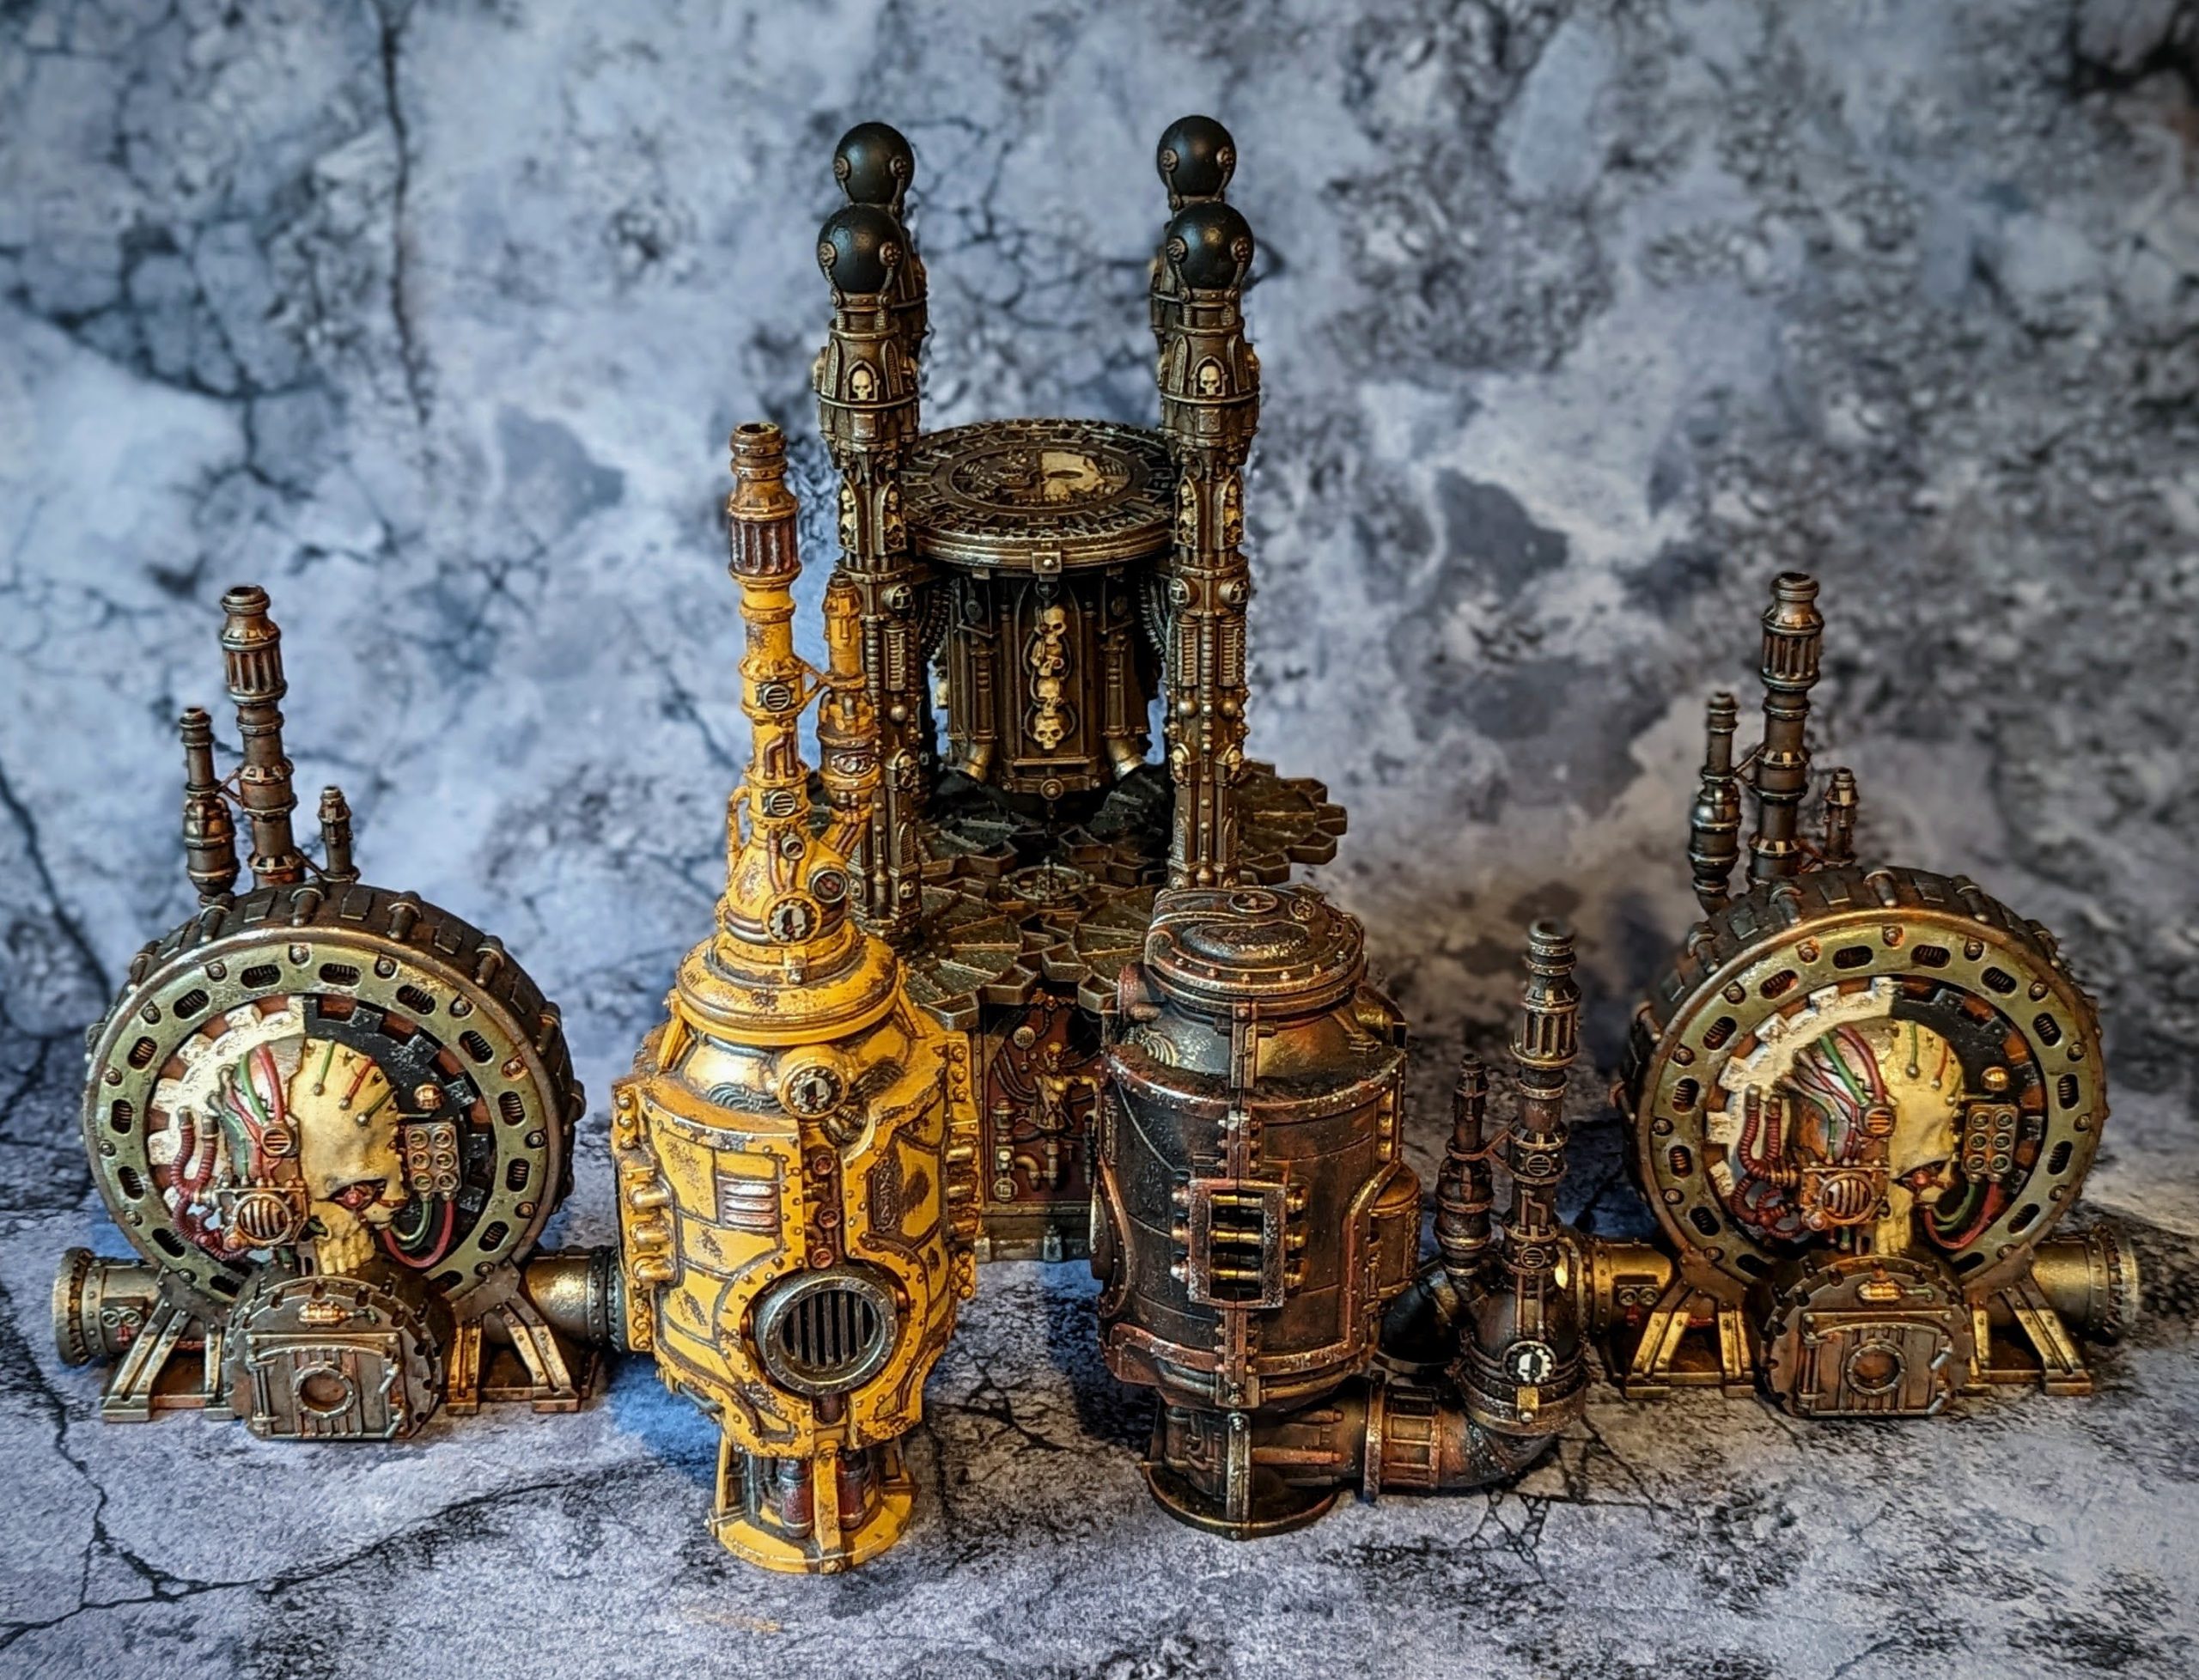
The last of the ‘industrial’ terrain that I add added were a pair of Haemotrope Reactors and a pair of Alchomite Stacks. The four of these were eBay rescues, so I can’t take too much of the credit for painting them. These were all just kind of impulse buys – I saw them for a decent price and they didn’t look like they’d require a ton of work, so I snapped them up. For the Alchomite Stacks, all I really did was pick out the Mechanicus symbols and add a bit of sponge weathering. The Haemotrope Reactors on the other hand were a little more involved. Once I got those in my hands, I discovered they’d been imperfectly assembled, with the chimneys on the back pointing up at a jaunty angle. After attempting to remove them with a bit of force, I ended up having to saw these off and glue them back on. This worked out really well for one of them, although the other has a bit of a nasty scar from the operation at the base of the pipe; nothing I couldn’t cover up with a bit of “rust”. Surgery aside, I did make a few additional improvements to the paint job – namely repainting the cog behind the skull from a flat silver to the split black/white colour you see now, along with repainting the pipes running along the bottom so that they’d match my Promethium Relay Pipes.
All in all, a little more stressful than I was hoping, but a fairly quick win nonetheless. I bought this stuff mostly to use as scatter terrain to tech up the sides of my Pegasus Hobbies ruins, but I reckon it will also work equally well as set dressing for my 3D printed Zone Mortalis board.
But there’s a reason I named this article ‘Cities of Death Redux’ – that’s because I finally bit the bullet and built me a whole bunch of Sector Imperialis ruins.

Of course, it turns out that building an Imperial Sector is a lot more complicated these days than it used to be. In their infinite wisdom, Games Workshop have discontinued the vast majority of the Sector Imperialis range now – with the two exceptions being the scatter ruins set and the Sanctum Administratus, an admittedly very nice and practical three story ruin kit with a compact footprint and Mechanicum themed doors and windows. With the exception of these two kits, everything else was an eBay job. This mean conditions ranging from new in box or assembled in serviceable condition, all the way up to requiring me to rip it apart and build something better out of it. Well then, let’s dig in, shall we?
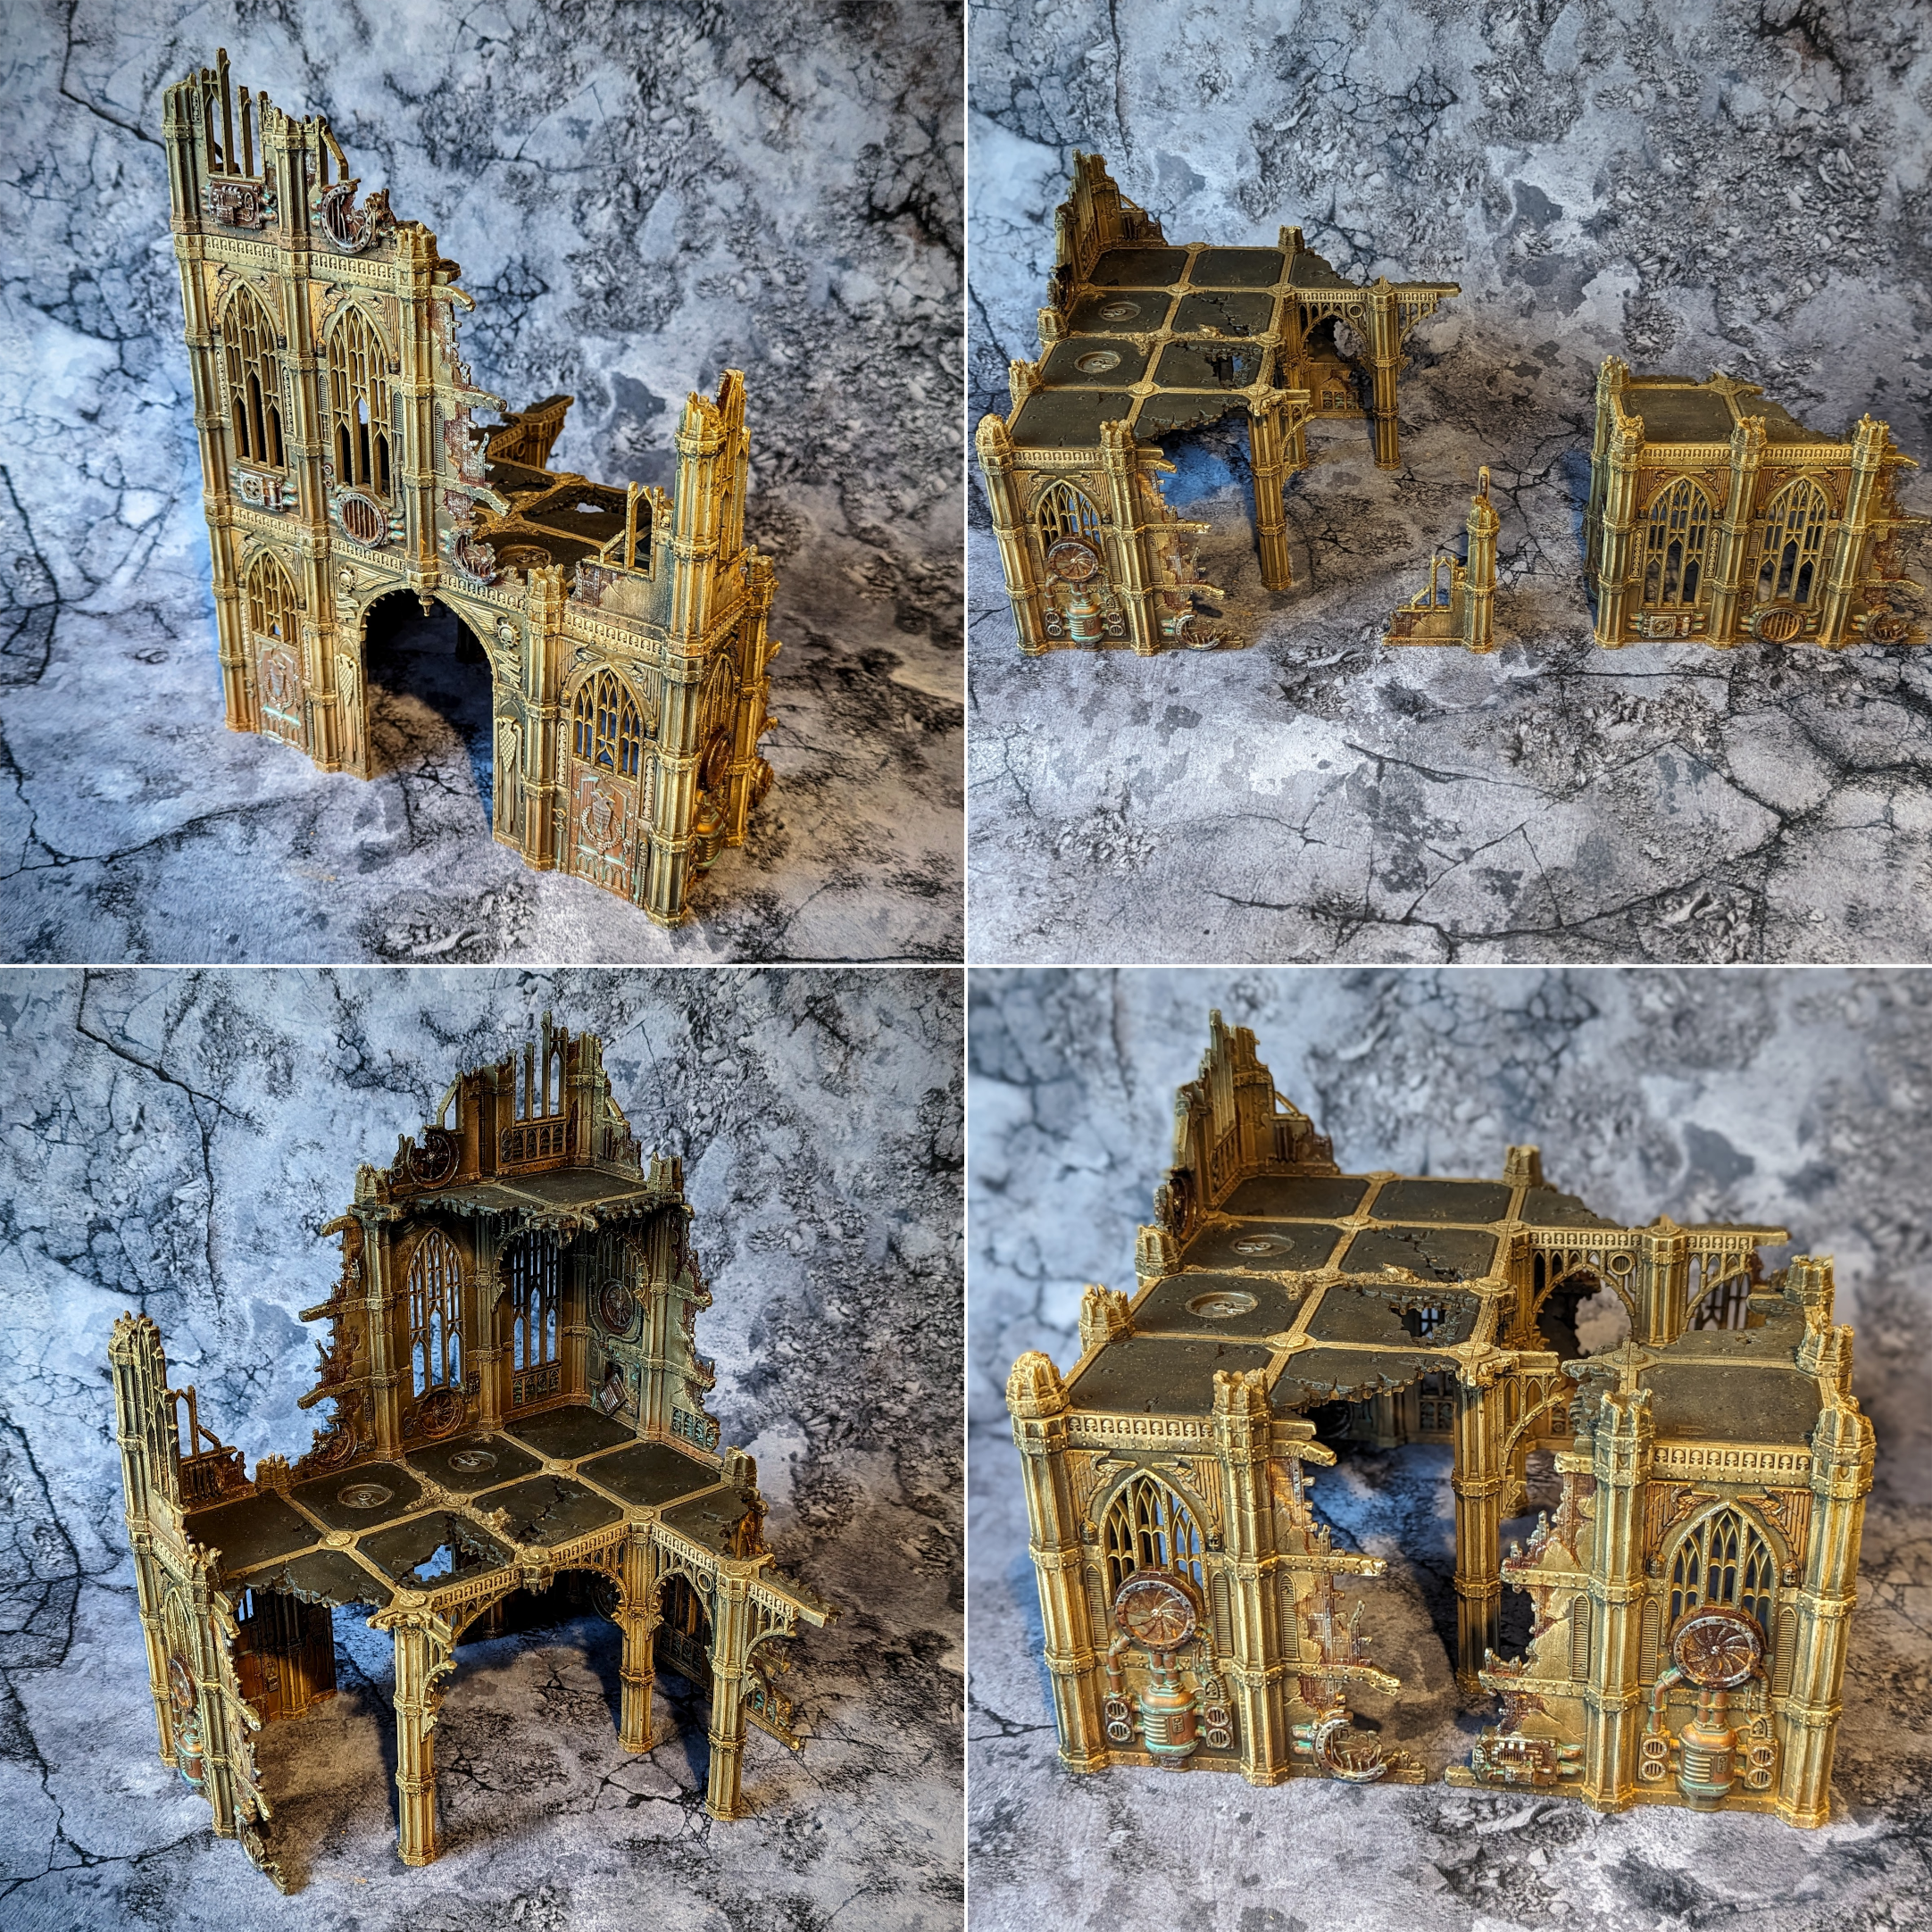
Where better to start than the ruin that started it all? This right here is the main Sector Imperialis ruin, built (just about) as per the instructions from the original Kill Team box set in which it originally appeared. I managed to pick this bad boy up pre-assembled and at a surprisingly fair price from eBay, along with the gameboard2 from that original version of Kill Team. This was the kit that had my lusting after these Sector Imperialis ruins back in the day – and I think the reasons why are plain to see. The design itself is really nice sure, but beyond pure aesthetics I just think that they’re remarkably practical. Each of the panels is chunky and robust, there’s a good amount of nice even ground on the upper floors to fit miniatures – and that’s saying nothing of the modularity. Each floor stacks neatly on top of the other with a decent enough grip that you’re not going to be worried about sections of buildings toppling off onto your miniatures mid game. Not only does this help massively with storage, but it provides a lot of options for how you use the ruins in the game. Got plenty of ruins and want a bit of height? Stack ’em all! Board looking a bit sparse? Take a floor off and you’ve got yourself another ruin. Like I said – practical.
This piece wasn’t entirely smooth sailing, however. The previous owner hadn’t quite glued the centre floor pieces together flush and it gave me a bit of hassle trying to get it to sit flat on the table. In the end I had to rip a few pieces off, re-glue them and cover up some of the damaged joins with a bit of sand. Nothing too strenuous overall, however. Not like my next ruin.

This next ruin was an absolute disaster. I managed to pick it up for a pretty good price at a time when there wasn’t a whole lot to choose from on eBay. It looked to be in pretty good condition despite having obviously been removed from a base at some point. It came painted – in a charcoal grey, the whole thing given a single, neat all over drybrush. At the time of purchase, I hadn’t yet decided on the scheme I was going to use for my Sector Imperialis stuff, so I thought I might even get to skip a step on this one. Err, well…
When the ruin arrived, I gave it a once over. Everything looked pretty good at first. Then, eventually, I noticed it. Whoever had assembled this ruin had put a door on the first floor. I don’t mean on a balcony or anything, I mean a literal door to nowhere sitting right above the big arch on the ground floor. It couldn’t be unseen, it was just so stupid. I considered a number of possible solutions for covering it up, but I couldn’t think of anything that wasn’t just a bandage over the issue. In the end, I grabbed the ruin and started snapping it apart. Fortunately, some areas appeared to have been glued with super glue, which meant that it came apart fairly easily with a bit of force. Other areas however, were not budging. I ended up having to saw it in a few locations and pull plastic out of recesses with a pair of clippers. It was messy and miserable – but it worked. I ripped the first and second floors off of the thing and installed it on the ground floor, extending the width of the piece at the expense of height. What was previously a tall, L shaped ruin became more of a large right angled corner ruin. With whatever bits I had left and a couple pieces from a Sector Imperialis scatter ruins set, I rounded off the edges on the first floor and the model was pretty much there.
Ripping apart and reconfiguring a ruin like this takes a toll, however. There were a ton of little gaps and areas where pieces didn’t go together perfectly anymore – but I managed to cover these up with a bit of super glue, sand and texture paste. Once that dried, you almost wouldn’t be able to tell I had done any work to it. I don’t love that the ground floor has two doors next to each other now, but it beats the hell out of a door to nowhere.
After a couple of stressful experiences from buying used, I wanted to try my hand at something off the sprue. Luckily, I managed to stumble upon a new in box Administratum kit for not a lot more than it would have cost at retail now. This is a fairly laid back kit, essentially just a two-story corner ruin with no frills. It went together without too much trouble, though I did find myself almost3 gluing a couple of the little round pillar caps on upside down before I realised they had tiny little arches in them. I guess it can happen to anybody.
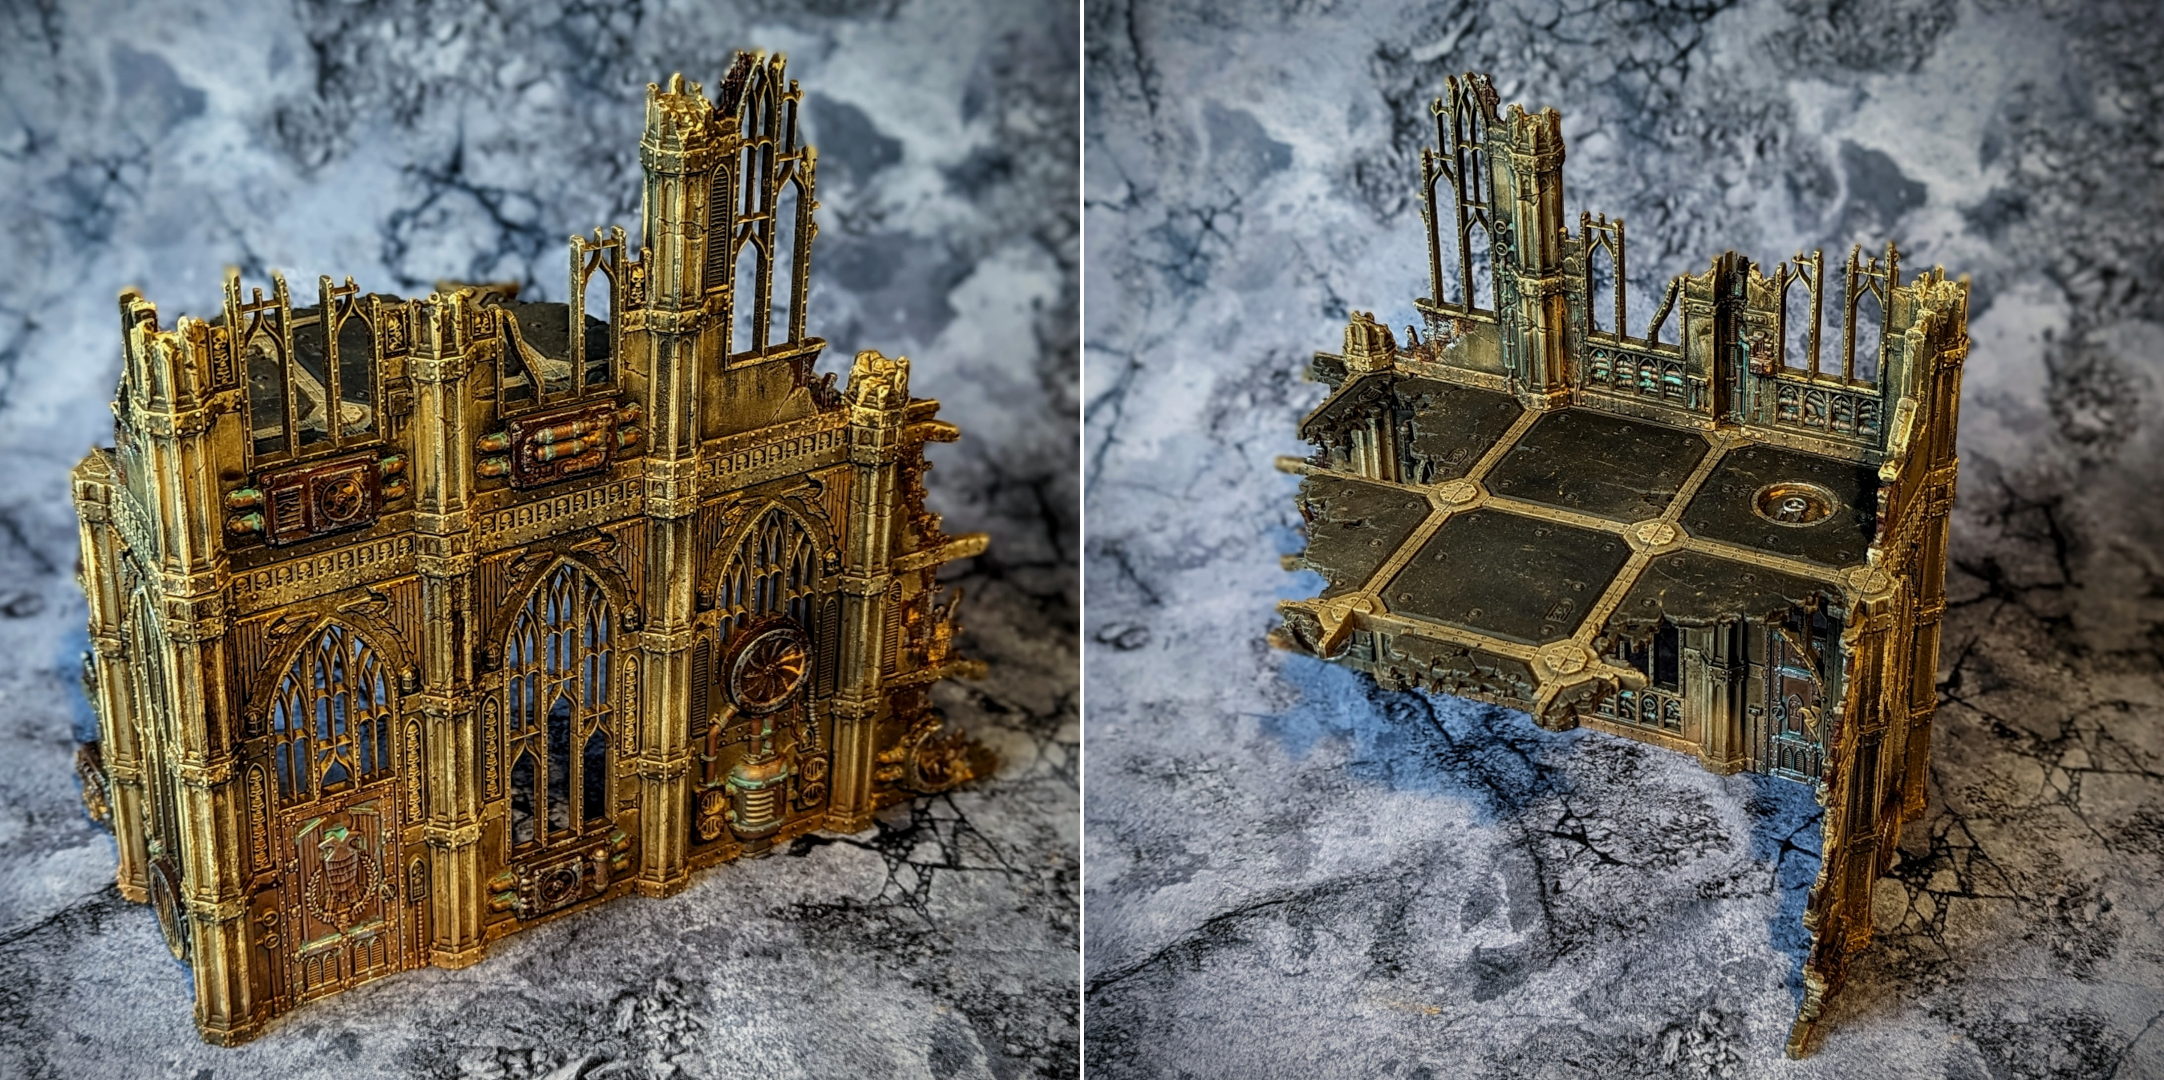
With three of the standard Sector Imperialis buildings under my belt, I felt I could probably justify mixing things up and adding the only large ruin that Games Workshop currently sell – the Battlezone Manufactorum Sanctum Administratus.

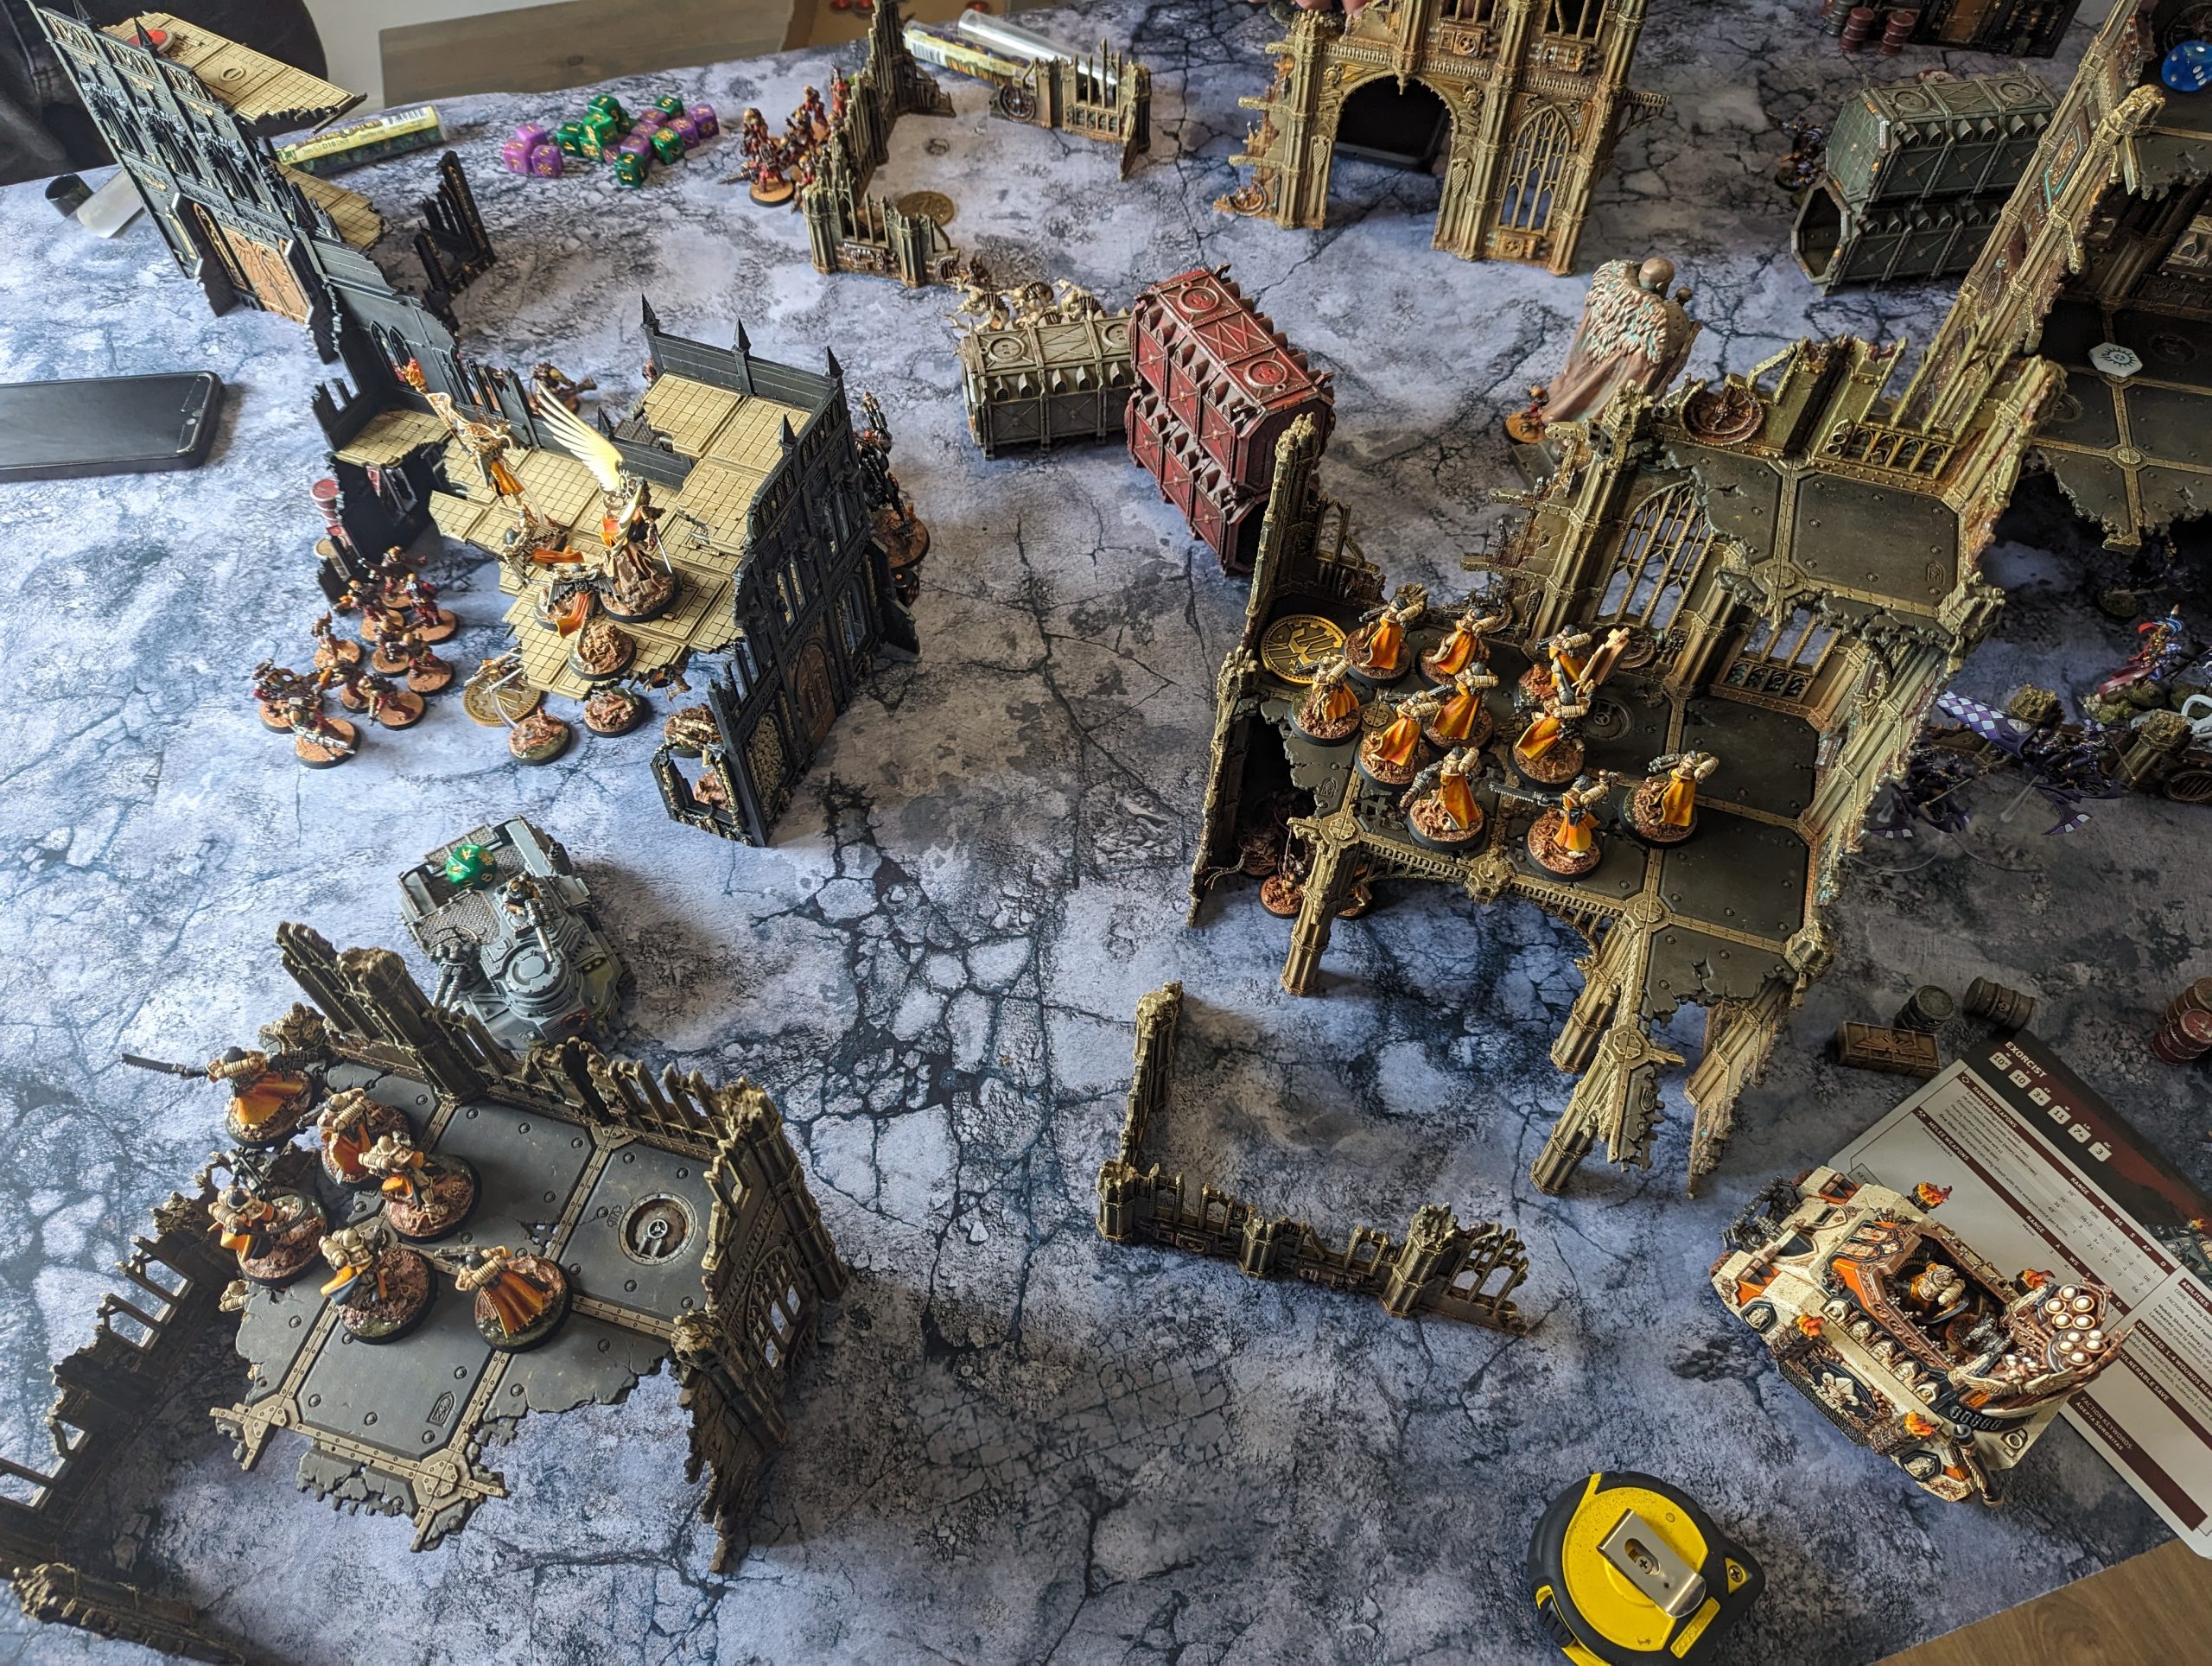
Honestly, I didn’t love the Sanctum Administratus the first time I saw it on the Games Workshop webstore. This might have just been me being petty about the lack of “proper” Sector Imperialis ruins in production, but something about the paint scheme on the box art put me off a little bit. It made it look a bit like a Fire Station or something, which felt a little mundane next to these previous gothic cathedrals. That being said, beggars can’t be choosers and this kit has a lot of upsides to it besides simply being in production. The footprint of this ruin is fairly excellent – the 3x3x3 shape is handy for blocking line of sight and takes up just enough space to fit a decent sized unit inside without being excessive. There’s a decent amount of floor coverage on each floor, making it very practical for utilising verticality or if you prefer to use it as two separate ruins. After putting this thing together and painting it in my scheme, I’ve grown to quite like it – at least as a bit of flavour sprinkled in with the rest of the Sector Imperialis buildings.
Before I move onto the next set of ruins, I should probably mention how I went about painting these. For the most part, I followed Vince Ventruella’s guide to painting these with a few adjustments of my own. In a nutshell, the process involves spraying the buildings black, followed by spraying the buildings with Khaki coloured spray paint (I used Krylon Camoflague). I then roughly drybrushed the buildings (with a huge brush) with white paint. Next, I took out my airbrush and sprayed some Fuegan Orange around the base of each building section and Athonian Camoshade around the tops to give a little subtle tinting. Then, I took a large flat brush and basecoated the various details. I used a thinned down Charcoal paint for the individual floor panels, Vallejo Metal Color Steel for the vents/generators and wiring and Vallejo Hammered Copper and Brassy Brass for doors, details on the wiring and a few other bits and bobs. After all of this was applied, I mixed up a huge oil wash with mineral spirits, brown umber and green oil paint again and slapped it down over all of the buildings. This was left to dry before wiping off the excess with some mineral spirits on a makeup sponge. When all of the above had dried, I sealed it in with a matt varnish and then put some Nihilakh Oxide into the nooks and crannies of the brass/coppers and slathered some Dirty Down Rust over the Steel. Once dry, I sponged some Chainmail Silver onto the metallics and finished with a little Rust Oxide weathering pigments on the rusty silver metallics before finally calling it a day. All in all, pretty quick and painless.
If I were to do this scheme again, I’d maybe have rattle canned another, lighter cream tone over the Krylon Camoflague Khaki spray paint that I’d used for my base coat. My can of Khaki paint also ran out towards the end of this basecoating step and left a bit more black gradient than I had intended; I’m not entirely sure how I feel about the end result. While I don’t think any of this looks bad – it makes for a decent grimy sandstone – it’s not quite what I was aiming for originally. Lessons learned for the future, I suppose.
Onto the next ruin!

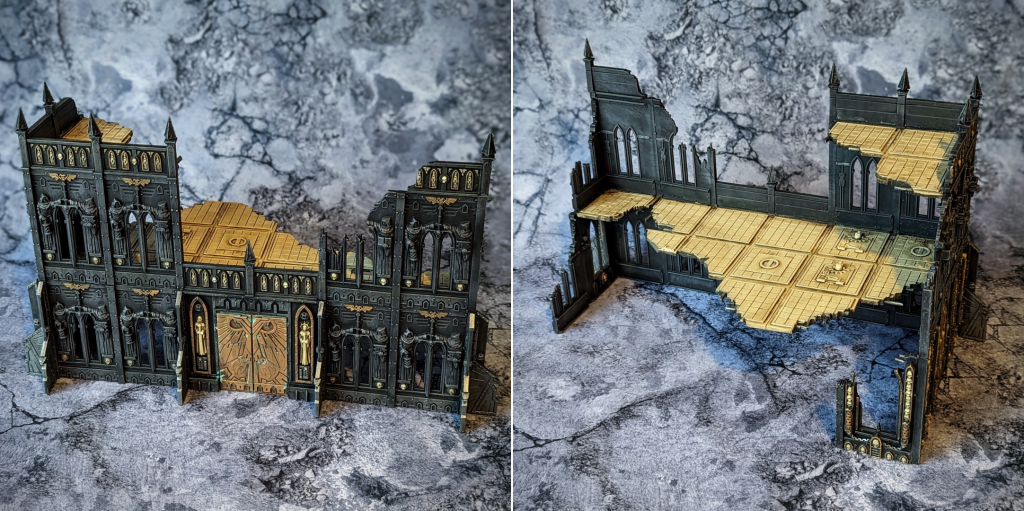
While scouring eBay for Sector Imperialis ruins, I came across a decent amount of the old(er) Imperial Sector ruins that Games Workshop put out alongside their “Cities of Death” supplement. While significantly less robust than the Sector Imperialis stuff, they still have a distinctly Warhammer 40,000 look about them and variety is the spice of life. These buildings came in three distinct variants – the Administratum-style buildings (with statues and scrolls), the Basilica style buildings (with a lot of skulls) and the Manufactorum style buildings (with industrial gubbins and Mechanicum iconography) – and I managed to snag a sample from each of these. Most of them arrived in some state of disrepair, either with sudden straight edges or missing pieces (which I’d repair or expand with a big bag of bits from a job lot). The larger office building below was expanded pretty significantly. Wherever possible I tried to give them three corners to suggest a clear footprint.
I decided to lean into the unique visual aesthetic of the Imperial Sector kits and painted them in an inverted scheme – this time opting for black buildings with white flooring. I figured this would help to create more visual interest and make the table look a little more realistic – but also set a nice precedent that different styles of buildings have different colour schemes. In the long term, this means that if Games Workshop release more interesting and exciting ruins that I’d like to add to my collection, I’m not locked into painting them all in this scheme. In the short term, it also means that I can fairly seamlessly mix in some of my existing grey Pegasus Hobbies ruins to help bulk up the table. I call that a win-win.
My recipe for the Imperial Sector buildings is pretty much as follows: spray black, drybrush heavily with Dark Seagreen followed by Heavy Bluegrey, pick out all of the silver metallics – eagle buttresses, chains, control panels, light fixtures and a TON of rivets – then slather the whole thing in a black oil wash. Cleanup and remove to taste with a makeup sponge soaked in mineral spirits and seal with matt varnish. Next, pick out all of the brass details – doors, trim, weird little flame vent things and Imperial Aquillas – followed by all of the stone details in Bonewhite. This includes recessed statues, skulls (of which there are a LOT) and the top side of the flooring. Finally, give all of these details a Brown Umber oil wash and wipe away the majority of it – and you’re pretty much good to go.
Overall, I enjoyed painting these ruins a lot more than I did the Sector Imperialis ones. I don’t know how much this has to do with the model itself as it does painting black in this way. You can go pretty hard on the drybrushing and a black oil wash will knock that right back – and the exact amount is very easy to control. I found that with hardly any effort at all, I got a good amount of depth to my black tones that – crucially – still read very clearly as black. Even flat surfaces like the interior walls looked pretty natural without appearing too scratchy or monotone. Any overspill or mess I made with the brown wash over the white details just served to add a little further depth and colour to the black finish. The whole experience was very forgiving with a lot fewer imperfections and mistakes visible in the final product.

The Manufactorum was a little more involved than the office buildings, mostly due to all the mechanical gubbins and electrical wotsits adorning the outside of the building. I didn’t do anything crazy with these, simply following the same steps on the previous buildings – albeit with a bit more time spent basecoating. There were two very fetching symbols of the Adeptus Mechanicus on the sides of the buildings which I picked out in black and white and – like on the industrial terrain earlier – I think it pops quite nicely.
I did diverge in one way from the previous buildings however, and that was with the internal flooring. This flooring had been installed upside down, exposing the more mechanical looking panels instead of the smooth gridded flooring.of the above ruins. I decided to lean into this and paint it differently – the exact manner of which was inspired by the final ruin below.

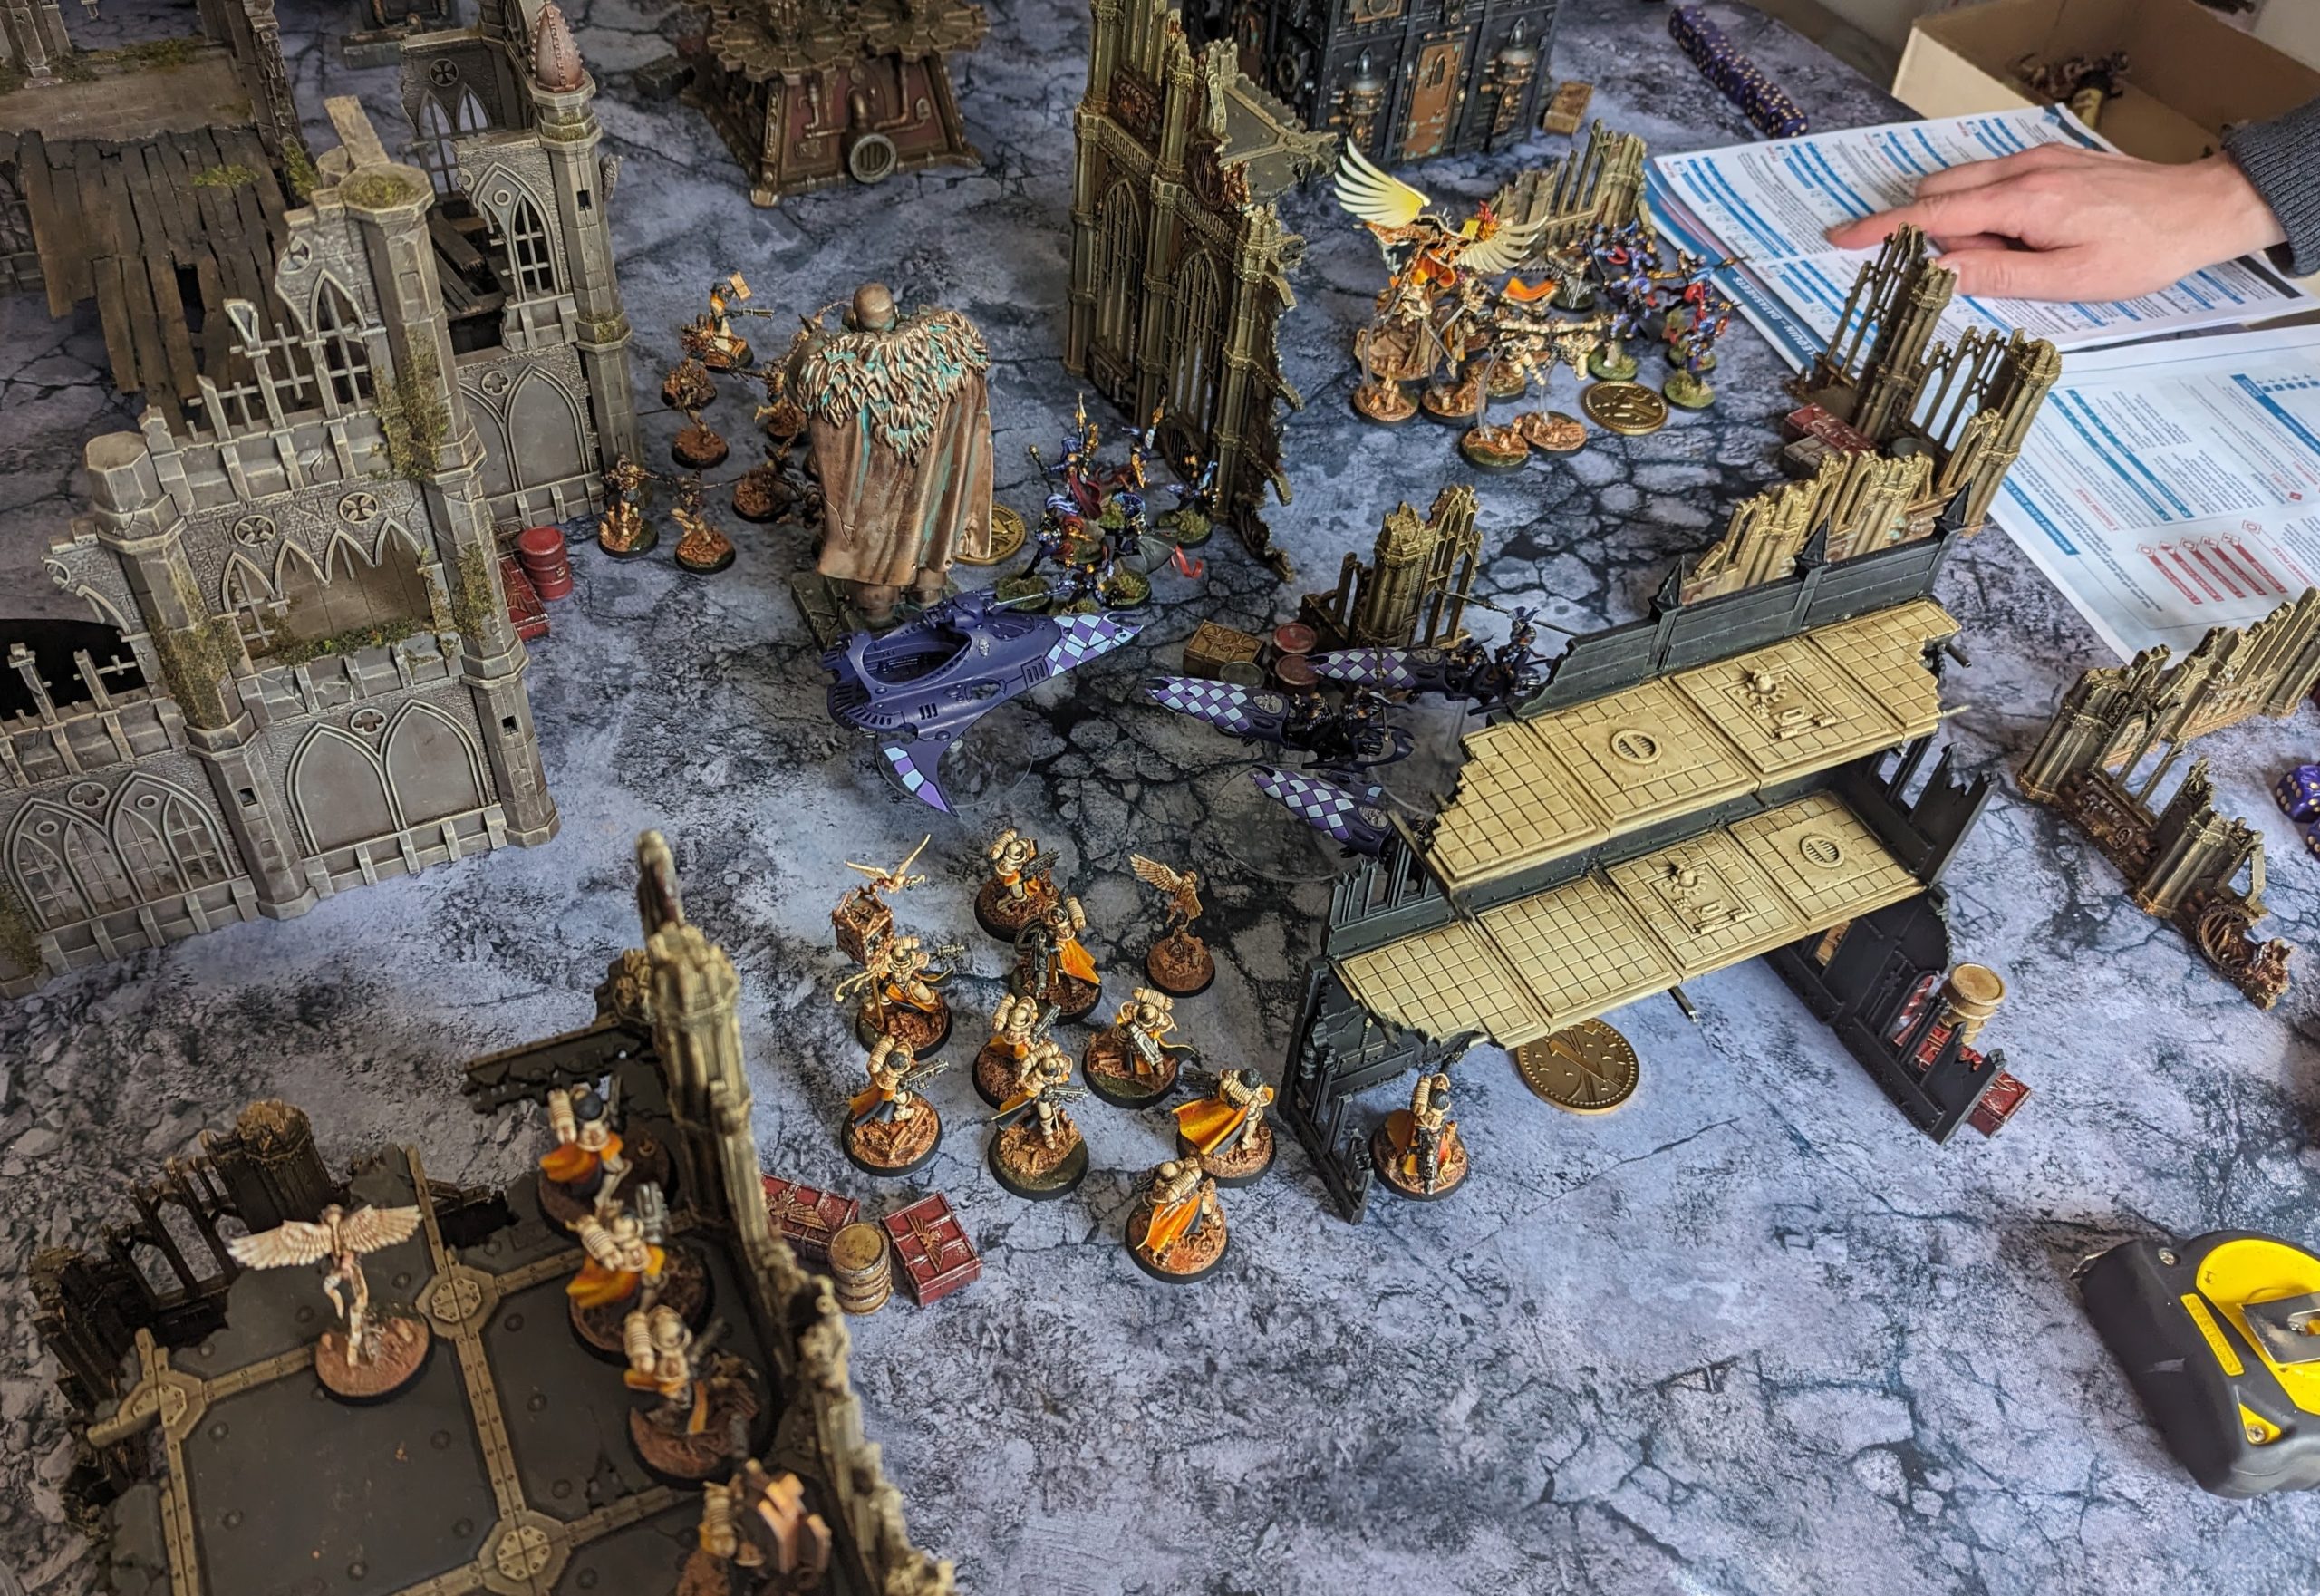
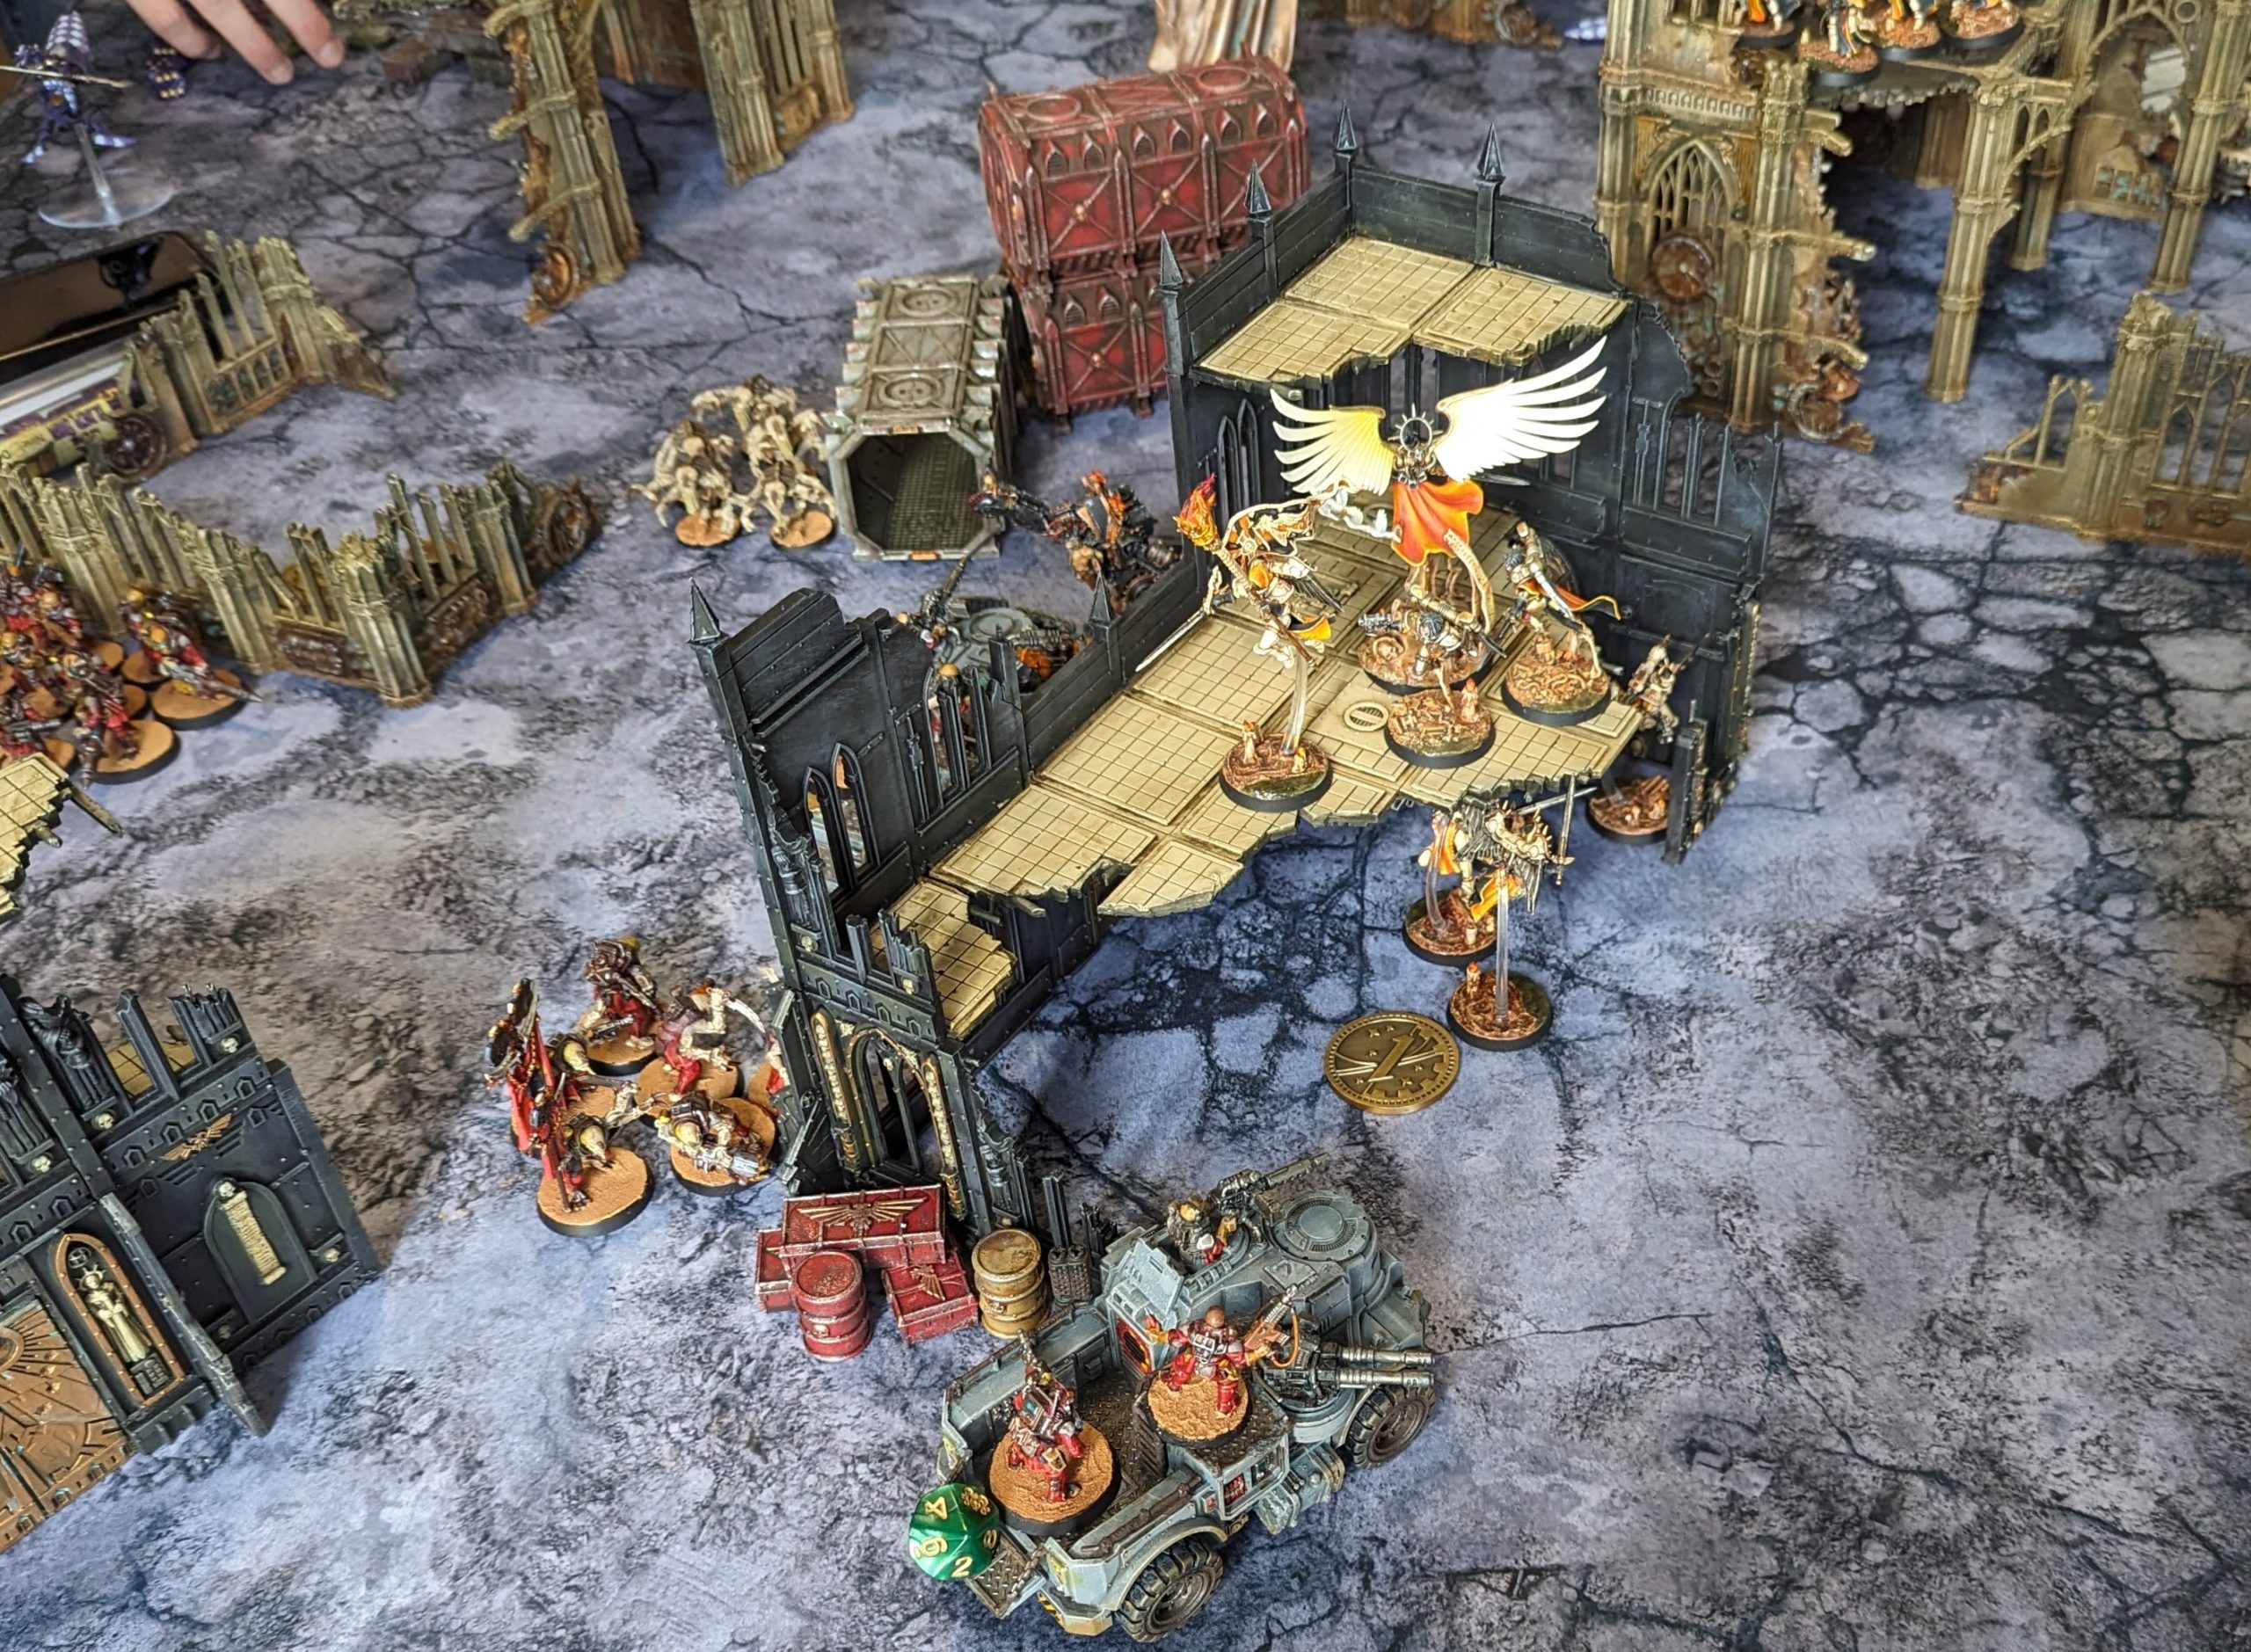
Some time after I’d started painting the previous set of ruins, I spotted this Shrine of the Aquilla on eBay and decided to throw in a cheeky bid, seeing as the paint job was near enough identical to my (admittedly not very original) colour scheme on the previous two. To be completely clear and up front – I’m not responsible for anything on this particular piece save for a little tidy up here and there, but I thought it was worth sharing anyway. It completes the holy trinity of Shrines, Offices and Manufactorums. The only area in which this paint job significantly differs from the first two Imperial Sector ruins that I’d painted is that the flooring is painted black with rusty metallic silver panels. The floor also happened to be installed the same way up as the Manufactorum, so I decided to paint mine to match it. Altogether, these four make for a pretty satisfying mix of height, visual style and footprint. With a handful of my Pegasus Hobbies ruins thrown in for good measure, I felt I had a sufficiently busy, varied and interesting cityscape4. My friends and I had a lot of fun test driving the new 10th edition 40K rules on it!
For anyone curious, the mat in the photos is a PWork Wargames ‘Urban Ruins‘ neoprene mat, which I thought was a nice neutral colour for a ruined cityscape without no roads or markings to dictate where ruins should be placed. I like the freedom that this offers, though I do think the grey is a bit cold next to the generally warm tones on my buildings. I’m planning on giving ‘Imperial Sector’ from Deep Cut Studios a go in future – I think the more sepia tones of that mat would suit this terrain a little better, while it’s singular road breaks up the design a bit without being too restrictive on layout. I’ve still got a use for this Urban Ruins mat, however – I’ll have more details on that in a future post.

Well, that about does it for now. I’ve actually got a bit more Warhammer 40,000 terrain (inspired by another heavily featured item in Boltgun) ready to go – but I think that might deserve it’s own post.
Until then, thanks for reading and happy wargaming!
1 As a big fan of interior detail and moving parts on models like these, I was devastated to learn later that the cogs are meant to left unglued as a moving part.
2 This wasn’t something I was ever that bothered about seeking out, but I didn’t pay anything extra to get it and I’m kinda glad I have it. I’d really like to get into Kill Team some day, as coffee table Warhammer does sort of appeal to me.
3 Okay, I full-on did – but I was able to prize them off and glue them down the right way around afterwards.
4 No Shrine of the Aquilla pictured simply because it hadn’t arrived yet.