I have been playing a lot of Dark Souls lately. For a number of reasons, this is not something that I ever thought that I’d find myself saying, let alone typing out on my hobby blog. Since getting back into the hobby, the amount of time I’ve had to play video games has dropped significantly; there’s only so many hours in a day, and mini painting eats up a lot of the leisure time I’d otherwise spend in front of the TV with a gamepad. One side effect of this is that I’m a lot less inclined to pick up any video games that require a sizeable time investment; my short attention span hates trying to inch my way through a sprawling epic an hour or two at a time.
But we live in unusual times – times where even pasty faced geeks like myself are finding themselves cooped up more often than they’d like. Despite having all this additional free time for hobbies, there’s only so many new army projects you can motivate yourself to paint when you can’t actually field them on the tabletop. Eventually, motivation starts to taper off and you begin looking for new ways to fill those hours.
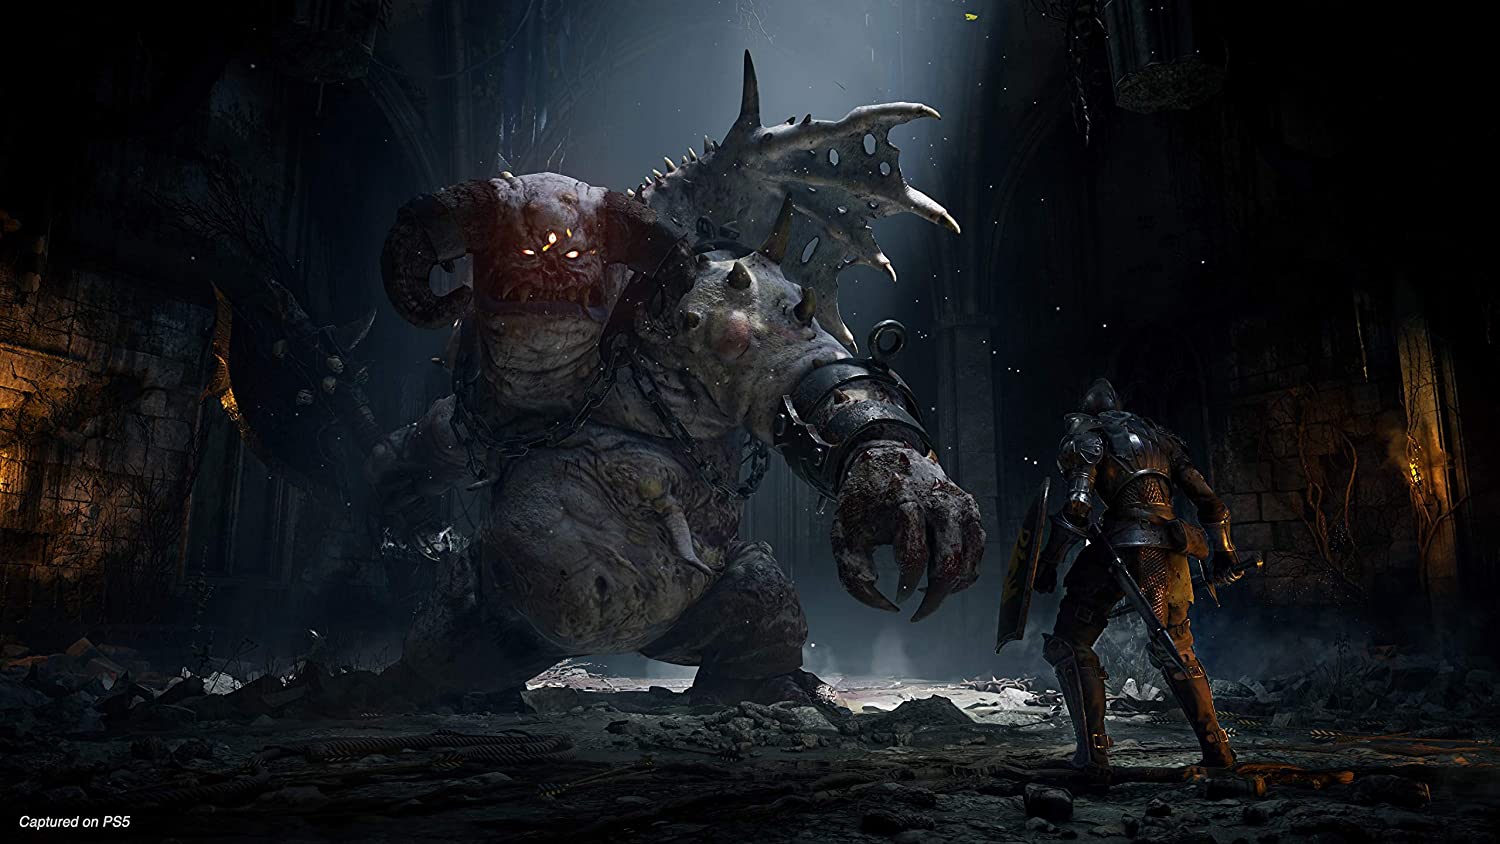
For Christmas last year, my fiance and I decided to gift each other a PlayStation 5, and we were lucky enough to snag a pre-order at launch. While my better half keenly anticipated the upcoming epic adventure games1 on the platform – Assassins Creed, Horizon, God of War, etc – the tech nerd in me just wanted to see what the new hardware could do. Without a shadow of a doubt, the showcase title for this was Bluepoint Games’ remake of venerable PS3 exclusive Demon’s Souls. I had some initial misgivings about picking this up – the ‘Soulsborne’ series has a reputation for being notoriously difficult and frustrating until it clicks. I knew first hand that this was no exaggeration, because the last video game I played before getting back into tabletop was Bloodborne on the PS4. It kicked my ass over and over again, until eventually I quit in frustration. I can’t say I was looking forward to revisiting that painful experience, but the Demon’s Souls remake looks really really pretty, and I just couldn’t resist the temptation to stick my hand into the fire once again.
Perhaps it was the stunning visuals that kept me going – or the threat of £70 in the hole – but for whatever reason, I just couldn’t put this game down. It was rough going sometimes. I found myself on the verge of quitting altogether on multiple occasions, followed promptly by an adjustment of posture and a quietly muttered ‘one more try’ through gritted teeth. I pushed through the pain, taking advantage of any and all means I had at my disposal to make life easier for myself. I summoned co-operators to help wherever and whenever I could. I used walkthroughs and strategy guides for boss fights I couldn’t figure out myself. I grinded hundreds of thousands of souls from the Storm Beasts at the Altar of Storms to help me through the last leg of the game.
Slowly, I found my attitude to the game had changed. Before I knew it, “I just want to finish this one game to say I did it and I’ll never need to play another Soulsborne again” changed to “if I get Dark Souls Remastered for the Switch, I can scratch the itch when it’s my fiance’s turn to play the PS5.” If I wasn’t working or eating, I’d be inching myself closer and closer to False King Allant on the PS5 or I’d be navigating through the labyrinthine complex of Lordran on Switch. Eventually, I beat Demon’s Souls on the PS5. It was exhilarating. I was proud of myself. And I was beyond excited to finally focus all of my attention on Dark Souls – already, the obsession was beginning to take hold.
Many others have already done a much better job than I ever could at explaining why Dark Souls is so good – and that’s a subject matter far from the focus of this blog – so I’m going to try and avoid fanboying too hard here. But suffice to say, one playthrough was not enough. I found myself obsessed with the series. It occupied my time and my thoughts for weeks, exciting and inspiring me. And with both Demon’s Souls and Dark Souls under my belt, it was inevitable that I’d give Bloodborne another go – and that, my friends, is where all of this finally relates back to miniatures.
Bloodborne is a gothic horror setting, pulling heavily from classical influences such as Bram Stoker and H.P. Lovecraft. Although the game takes you to all manner of esoteric locations, it’s set primarily in the city of Yarnham. Yarnham is a sprawling, dizzyingly vertical cityscape of towering gothic cathedrals and myriad winding pathways, punctuated by sheer drops fenced off with wrought iron fences and gates. The denizens of Yarnham are afflicted by a curse that has them transforming into Beasts, their minds twisted such that they perceive outsiders as the beasts that they themselves are becoming. Hunters stalk the streets at night, putting down those who are too far gone with oversized saw cleavers and flintlock pistols in their off hand.
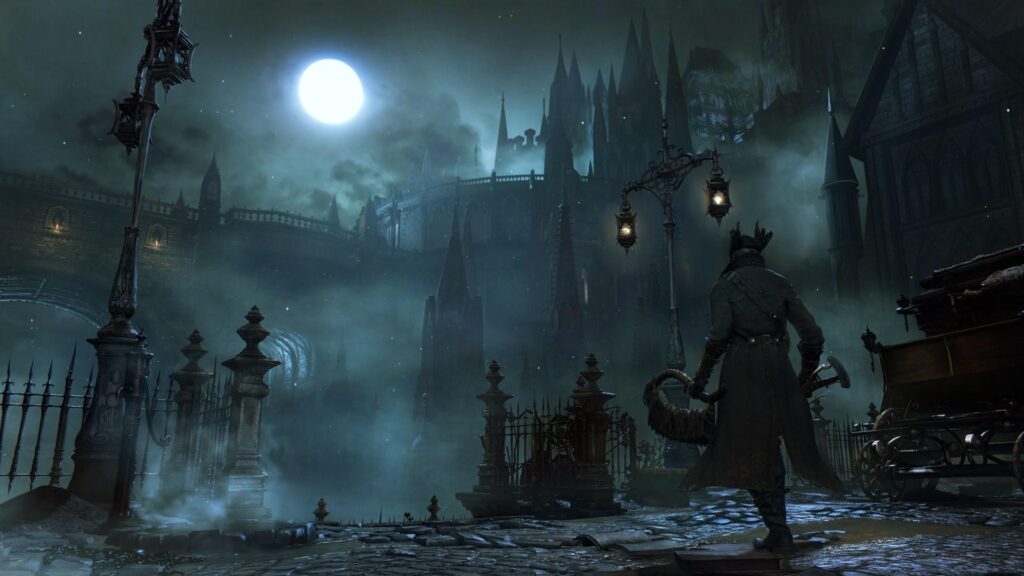
The experience put me instantly in mind of Mordheim. The gothic horror atmosphere, leather garbed (Witch) Hunters, hideously deformed beasts and – above all – the verticality of the city itself. Yarnham was a great setting to explore in a video game, but throughout my whole playthrough I couldn’t help but think it would make for an awesome tabletop experience. No sooner than I put the gamepad down, my thoughts turned to my own gothic cityscape.
In my original post about Mordheim, I said that my plan for terrain was largely focussed around a set of nice looking card terrain that I’d recently backed on Kickstarter. This was perhaps good for getting something together quickly2, but it’s never going to look as nice or feel as aesthetically consistent with the miniatures as something more substantial and hand painted. In the time since my original plans for Mordheim were set out, I had built and painted a full set Gothic City terrain – but this was designed and laid out with wargaming in mind rather than skirmish. The buildings were built tall and wide, designed to block line of sight to entire units and monstrous creatures, leaving substantial channels of open space for vehicles. It wasn’t suited to needs of skirmish gaming – that is, narrow pathways for individual miniatures to traverse and, of course, verticality.
Bloodborne provided a lot of inspiration as to how I could repurpose my Gothic City for skirmish games. In Yarnham, you find yourself entering buildings on the ground level and exiting into a new street three floors up. Bell towers are scaled and rooftops traversed to reach otherwise cordoned off areas. Ladders and one-way gates are kicked down and opened to create shortcuts to these areas. Now, as I looked at my flat board with assorted ruins, I could see a whole world of new possibilities. Not a simple case of placing down some hills, or rickety bridges between the ruins, but adding sheer verticality to the game board itself.
In a nutshell, my plan was to create riser blocks that would fit underneath my Tablescapes tiles, using plasticard embossed with brickwork patterns to hide the unsightly risers and the edges of the tiles behind and make everything look more natural. This way, I could create vertical sections on the game board, allowing for anything from channels running through the cityscape to a ‘stepped’ design built up with areas accessible from the floors of the ruins.
As I planned to conceal the risers with plasticard facades, I had a number of options for what my risers could consist of. I considered everything from MDF wood to corkboard, or even having little pillars designed and 3D printed that would clip into the space for the where compression clips bind the tiles together. Eventually, I settled on XPS Foam for a number of reasons. The first reason was that getting a large number of sheets cut to size will inevitably result in some inconsistency. As the risers would have to fit in a very rigid space, they needed to be easy enough for me to trim any excess off myself with whatever tools I had on hand. The second was that I wanted as many options for customisation as I could manage with as little work as possible. Using XPS foam, I could attach small pins to the backs of my facades, and push those into the foam to fit on however many sides I needed – thus saving me from having to make specific kinds of risers such as edge pieces, corners, individual squares, etc. For example, with only 4 riser blocks and 8 facades, I could switch between running a straight 1’x4′ raised section across the board in one game and clustering four together in the centre like a podium the next. I also considered sinking magnets into the foam to hold the facades in place, but using pins seemed like a more forgiving solution. Cuts of XPS foam are imperfect, so none of the risers were going to be exactly 12″x12″ with perfectly flat edges – they would all be different in subtle little ways. I didn’t want to have to worry about lining the riser up just right under the tile for the magnets to get appropriate contact, and I know from past experience with magnetically attached scenery that glue can fail and pieces can fall out. The pins approach has its own drawbacks – I’d have to make sure I line up the facade right every time, and I’d presumably have to fill the pin holes after a certain amount of use should the riser start getting a bit loose, but I felt like the benefits outweighed the concessions here.
After shopping around for a while – feeling utterly dismayed by how seemingly difficult it was to get 12″x12″ bricks of styrofoam – I eventually settled on 4D Modelshop as my foam vendor of choice. The main reason for this decision was availability of foam in just about the sizes I needed. They did grey XPS foam bricks at 1 inch (ish), 2 inch (ish) and 3 inch (ish) heights in blocks of just over 12 inches by just under 12 inches. This was genuinely as close to 12 inch square blocks as I was going to find, and considering there’s a few millimetres tolerances on these – almost always on the larger side – this seemed about as good as I was going to get. I could always use a hot wire to cut an oversized edge to exactly 12 inches, meaning I could guarantee at least two edges would be exactly the right size. There was obviously something of an upper limit for how much foam I could buy here – the cost in both cash and storage requirements can explode once you get into realm of 432 cubic inch bricks – so I opted for 4 tiles each of 1″ and 3″ and 8 tiles of 2″. This would allow me to cover a whole 4’x4′ space worth of raised tiles if I needed to, with a generous number of possible combinations. Crucially, all of this would come in a box small enough to fit into my attic.
For the facades, I found myself once again struggling somewhat to find sheets of plasticard wide enough to cover the full 12″ tile. Eventually, I stumbled upon a company known as South Eastern Finecast3, a venerable model company that produces primarily model kits for locomotives and old timey vehicles. One rather wonderful product line of theirs is a fairly extensive “range of vacuum-formed brick sheets for scratchbuilders and kitbashers” – of particular interest to me was that they were produced in sheets of 14″ by 9″, a major departure from the far more common A4 sized sheets which were just a little too short for my needs. I found six sheets of a nice stone wall pattern available from a shop called Peter’s Spares Model Railway, which was – fortunately for me – just enough to fit my needs.
I’ve never in my life wanted a paper guillotine more than when trying to cut those facades to size. I tried using a straight edge and a sharp X-Acto Knife, but there were inevitable slips and imperfect angles in the cutting process. My process for hot wiring the foam risers to size – sitting one edge flat and pressing two tiles to either side and using this to run the hot wire across – was similarly imprecise, but at least the risers weren’t supposed to be on show. If I ever find myself needing to do something like this again, I’m just going to fork out for a Proxxon and a nice paper guillotine and be done with it.
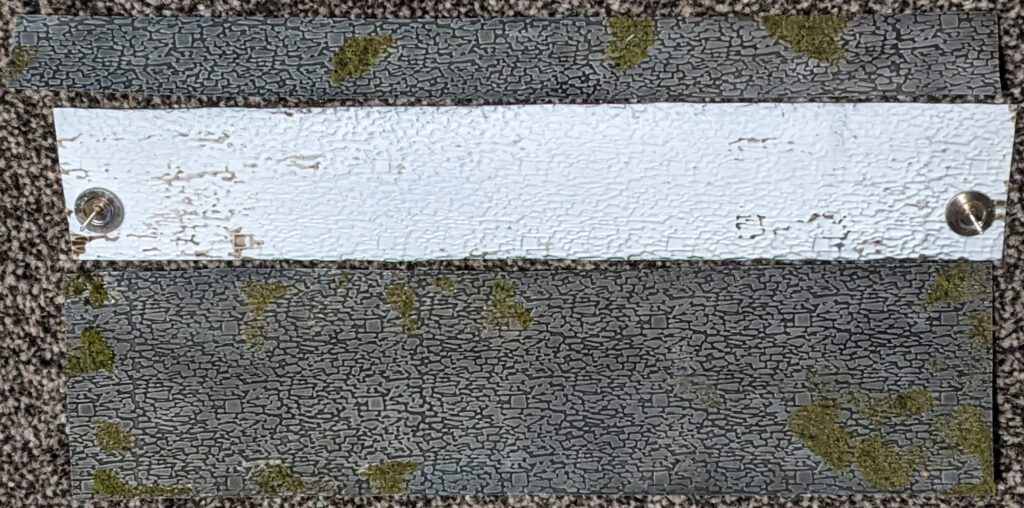
The rest of this process was more familiar to me, although immensely tedious. I sprayed the fronts of each of the facades with Hycote Grey Primer, splashed Agrax Earthshade over the lot of them and set about drybrushing with a large, round tipped brush – first Heavy Bluegrey, then Khaki, as is my way. This went.. okay, but not great. The embossed plasticard was certainly textured, but the detailing was quite shallow. The wash didn’t settle as well as I’d hoped and the drybrushing didn’t quite catch the edges like it does on a nice piece of plastic terrain or a Secret Weapon Tablescapes tile. It was hard, arduous work that took a huge number of passes to build up enough colour and and it unsurprisingly took a long time to get through it all. Even then, there were a number of imperfections in the drybrushing by the end, but I employed my age old tactic of gluing some some rough patterns of flock to represent moss and weed growth between and over some of the bricks to cover over some of the worst of it. Regardless of these issues, I’m pretty happy with the final outcome and they l ook the part. To finish the facades off, I purchased some 16x20mm upholstery nails and glued one to either end of the facade, a centimetre in from the top and side edges. This would allow for enough space to account for a slightly undersized riser and enough overlap to account for the edge of the tile sitting on top. I went for upholstery nails here because I needed something with a wide, flat head and a low profile to allow a good bond to the facade without too much of a gap between the foam and the plasticard. The nails themselves are long and sturdy enough to hold the facade into the foam, even if it’s a few millimetres shy of the tile.
With both the foam cut to size and the facades painted and attachable, the board itself was just about ready to get vertical. Something still chipped away at me though. Tablescapes, much like Games Workshop’s older Realm of Battle boards, occasionally suffer from not being completely flat – it can make putting large terrain pieces over them a bit of a nuisance. The Rolling Fields set is particularly bad for this, with lots of little hills and valleys – but the Forgotten City tiles are mostly flat. Mostly. Across the various tiles, there are bits of moulded debris, fallen pillars and big chunky bits of rubble. Most of this can be worked around, if you’re willing to turn a tile 90 degrees to get something to fit – all except for the two quarter-circle tiles. Those tiles are the bane of my existence – you can see in the original post about my Gothic City terrain that they’re positioned out of the way, with no meaningful terrain sitting on them. This is fine when you’re setting up a table for a wargame – you need those open spaces for big miniatures to make their way through – but it’s a bit of a headache on a densely packed skirmish board. This becomes a full on migraine when you’re limited further by raising and lowering sections of the board. I’d need to do something about this.
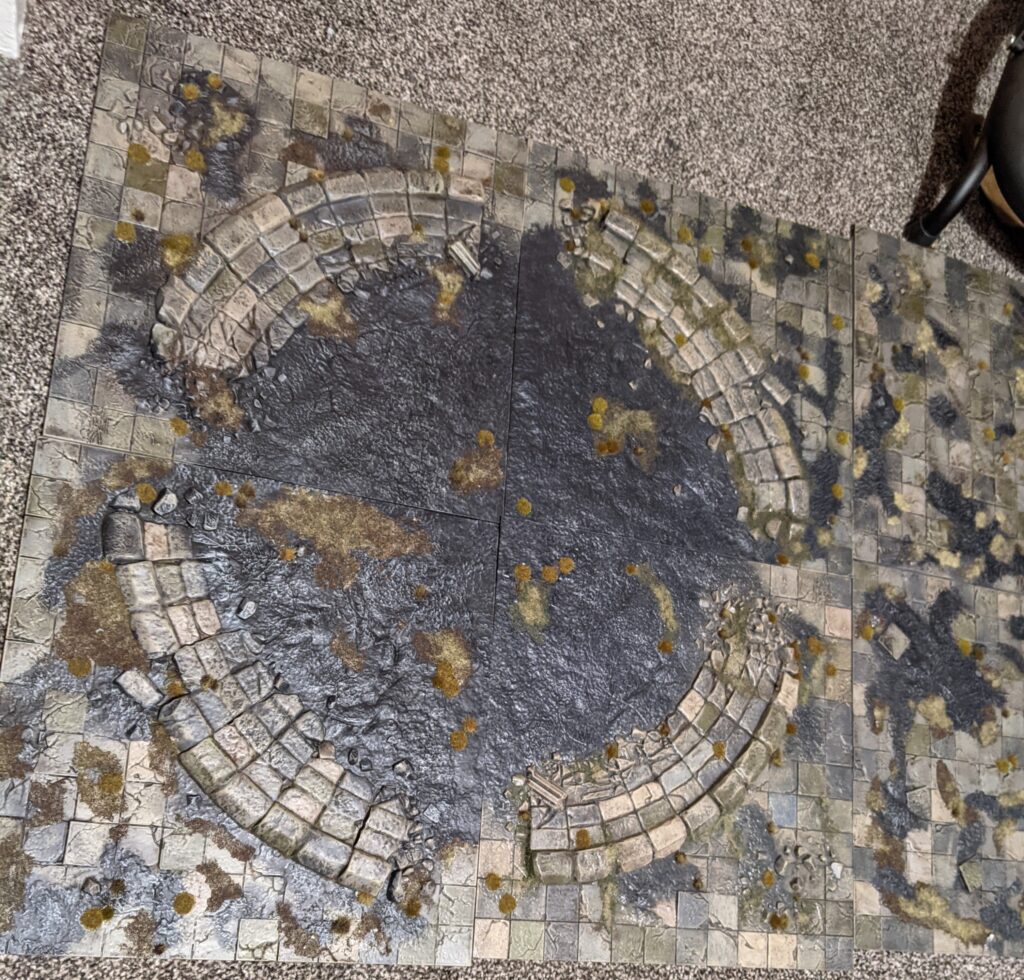
For a time, there was a shop on eBay parting out Tablescapes tiles like a bitz shop, but sadly they appear to be either gone or long out of stock; a sad but inevitable outcome of Tablescapes going out of production. After a little bit of scouring however, I managed to find that Wayland Games stocked a single box of Forgotten City Tablescape tiles – a four tile ‘Display Board’ set. This kit contained not only two perfectly flat tiles to replace my problem tiles with, but also a further two of these quarter circle tiles, enabling me to set up a full circle like the long devastated remains of a stone circle or coliseum. As an added bonus, it also contained parts to create a little plastic display border around up to 4 tiles, complete with a space for a name plate. I don’t know if this will ever actually see any use, but it’s a nice thing to have when you’re as invested in this product as I am by this point4. A day or two later, my display board arrived and I quickly painted up the 4 additional tiles over an evening or two. I primed them Hycote Grey, painted over the various dirt scatterings with Black and picked out a random assortment of tiles with Heavy Grey, Cold Grey, Stonewall Grey and Heavy Bluegrey. I washed the whole thing with Agrax Earthshade, then lightly drybrushed the dirt sections with Heavy Bluegrey and the stone tiles with Khaki. Finally, the whole thing was covered in Vallejo Polyurethane Matt Varnish by hand5. After the varnish had completely cured, the final step was to glue a veritable nursery of tufts, flock and static grass to the tiles. For this, I used a 2:1:1 mixture of wood glue, tap water and matt varnish. The matt varnish is added to the glue to reduce any visible sheen should the flock rub off with use, while the tap water helped thin the glue to a spreadable consistency. With this final step complete, the tiles were finished. I really want to believe that this is last time I find myself painting more of these discontinued gaming tiles, but the cynic in me is doubtful.
Okay, the playing surface is pretty much ready, so what’s missing? Well, a couple of things. Aesthetically speaking, to really capture the vibe of Yarnham, we’re going to want a bunch of wrought iron fences to cordon off the sheer edges of the raised sections. And practically speaking, we’re going to need a way to traverse all of this verticality – I’m talking bridges and ladders.
The wrought iron fences thing was tricky. I didn’t want to have to scratch build the amount of fences I’d need for this project – and I really didn’t want to have to paint (or pay for) that amount of Sigmarite Mausoleums either. I can’t deny the gates and fences in that kit look the business, but there’s just so much extraneous detail to paint on those things. I just wanted to spray something silver, mess it up with Typhus Corrosion and drybrush it – not spend hours picking out flowers, skulls and parchment. Once again, I found myself on the hunt for an alternative product, and eventually I stumbled on an MDF ‘Gothic Fence’ kit by World War Gaming. I have something of a tendency to avoid MDF terrain – it often looks flat, boxy and just obviously MDF to my eyes – but in this case, I didn’t have a lot of other options. This kit was inexpensive, uncomplicated and it looked the part. As an added bonus, the description even told me the dimensions of the whole thing, and frankly, I was impressed by how much gothic fence your £7 gets you. I ordered three of the kits, and got to work as soon they arrived.

After punching the pieces out and cleaning up the edges, the first thing I did was take some super glue and put together all of the little stone post pieces. This was by some margin the most time consuming step, as it involved putting four interlocking sides together and slipping a top down. The pieces fit together snugly, but not snug enough to stay together without glue. After a bit of experimentation, I found the fastest way to assemble this was to dry fit it together, then put a blob of super glue into each of the bottom corners and spray it with accelerant. Once assembled, I was mostly content with how these looked – but the tops irritated me due to the visibility of the tabbed joins to the body of the pillar. To rectify this and give them a little more of a 3D look and feel, I spread Vallejo Rough Pumice texture paint over the tops of each of them, hoping this would look like, well, pumice. It turned out alright – certainly an improvement – but I think this is the last time I use that particular texture paint. Vallejo Rough Grey Pumice has a weird tendency to shrink more than the other texture paints, and it dries kind of clear and glossy in places – although thankfully, I applied this texture before priming. Painting the stone posts was as simple as priming them with Hycote Grey, washing with Agrax Earthshade and drybrushing them Khaki. A quick tip when washing these is to leave them to dry upside down; any excess wash will gather below the overhang of the top piece, which is where shadows would naturally be the darkest.
For the fences, I kept these separate for painting and spread the same Rough Pumice texture paint over tops of the little bases, avoiding any of the holes where the fences join where possible. I primed these in Hycote Grey and – in an attempt to save some time – brushed them with Secret Weapon Black Weathering Powder. Instead of drybrushing with a paint, I simply took an old, clean drybrush to the pieces and wiped the powder from the surface into the recesses, creating a shaded/drybrushed looking black/grey rubble like on the boards in a single pass. The fences themselves I sprayed with Hycote Black spraypaint, followed by a pass of GW Leadbelcher spray. After this had dried, I covered them with Vallejo Rust Texture (similar to Typhus Corrosion, but a little less nice and a whole lot cheaper) to darken them right down and add a bit of grit and texture (making them look slightly less flat and MDF-like). I then took some Vallejo Rust Oxide weathering powders and splashed it all across the surface, getting it in the gaps between fences and settling in recesses. This turned out a little bright for my tastes, so I tempered it down by sealing it with a bit of Agrax Earthshade. Finally, I took my drybrush and drybrushed the fences with Army Painter Plate Mail before gluing them down to their little bases and pushing the gates into the gate posts. One massive set of Gothic Fences, finished!
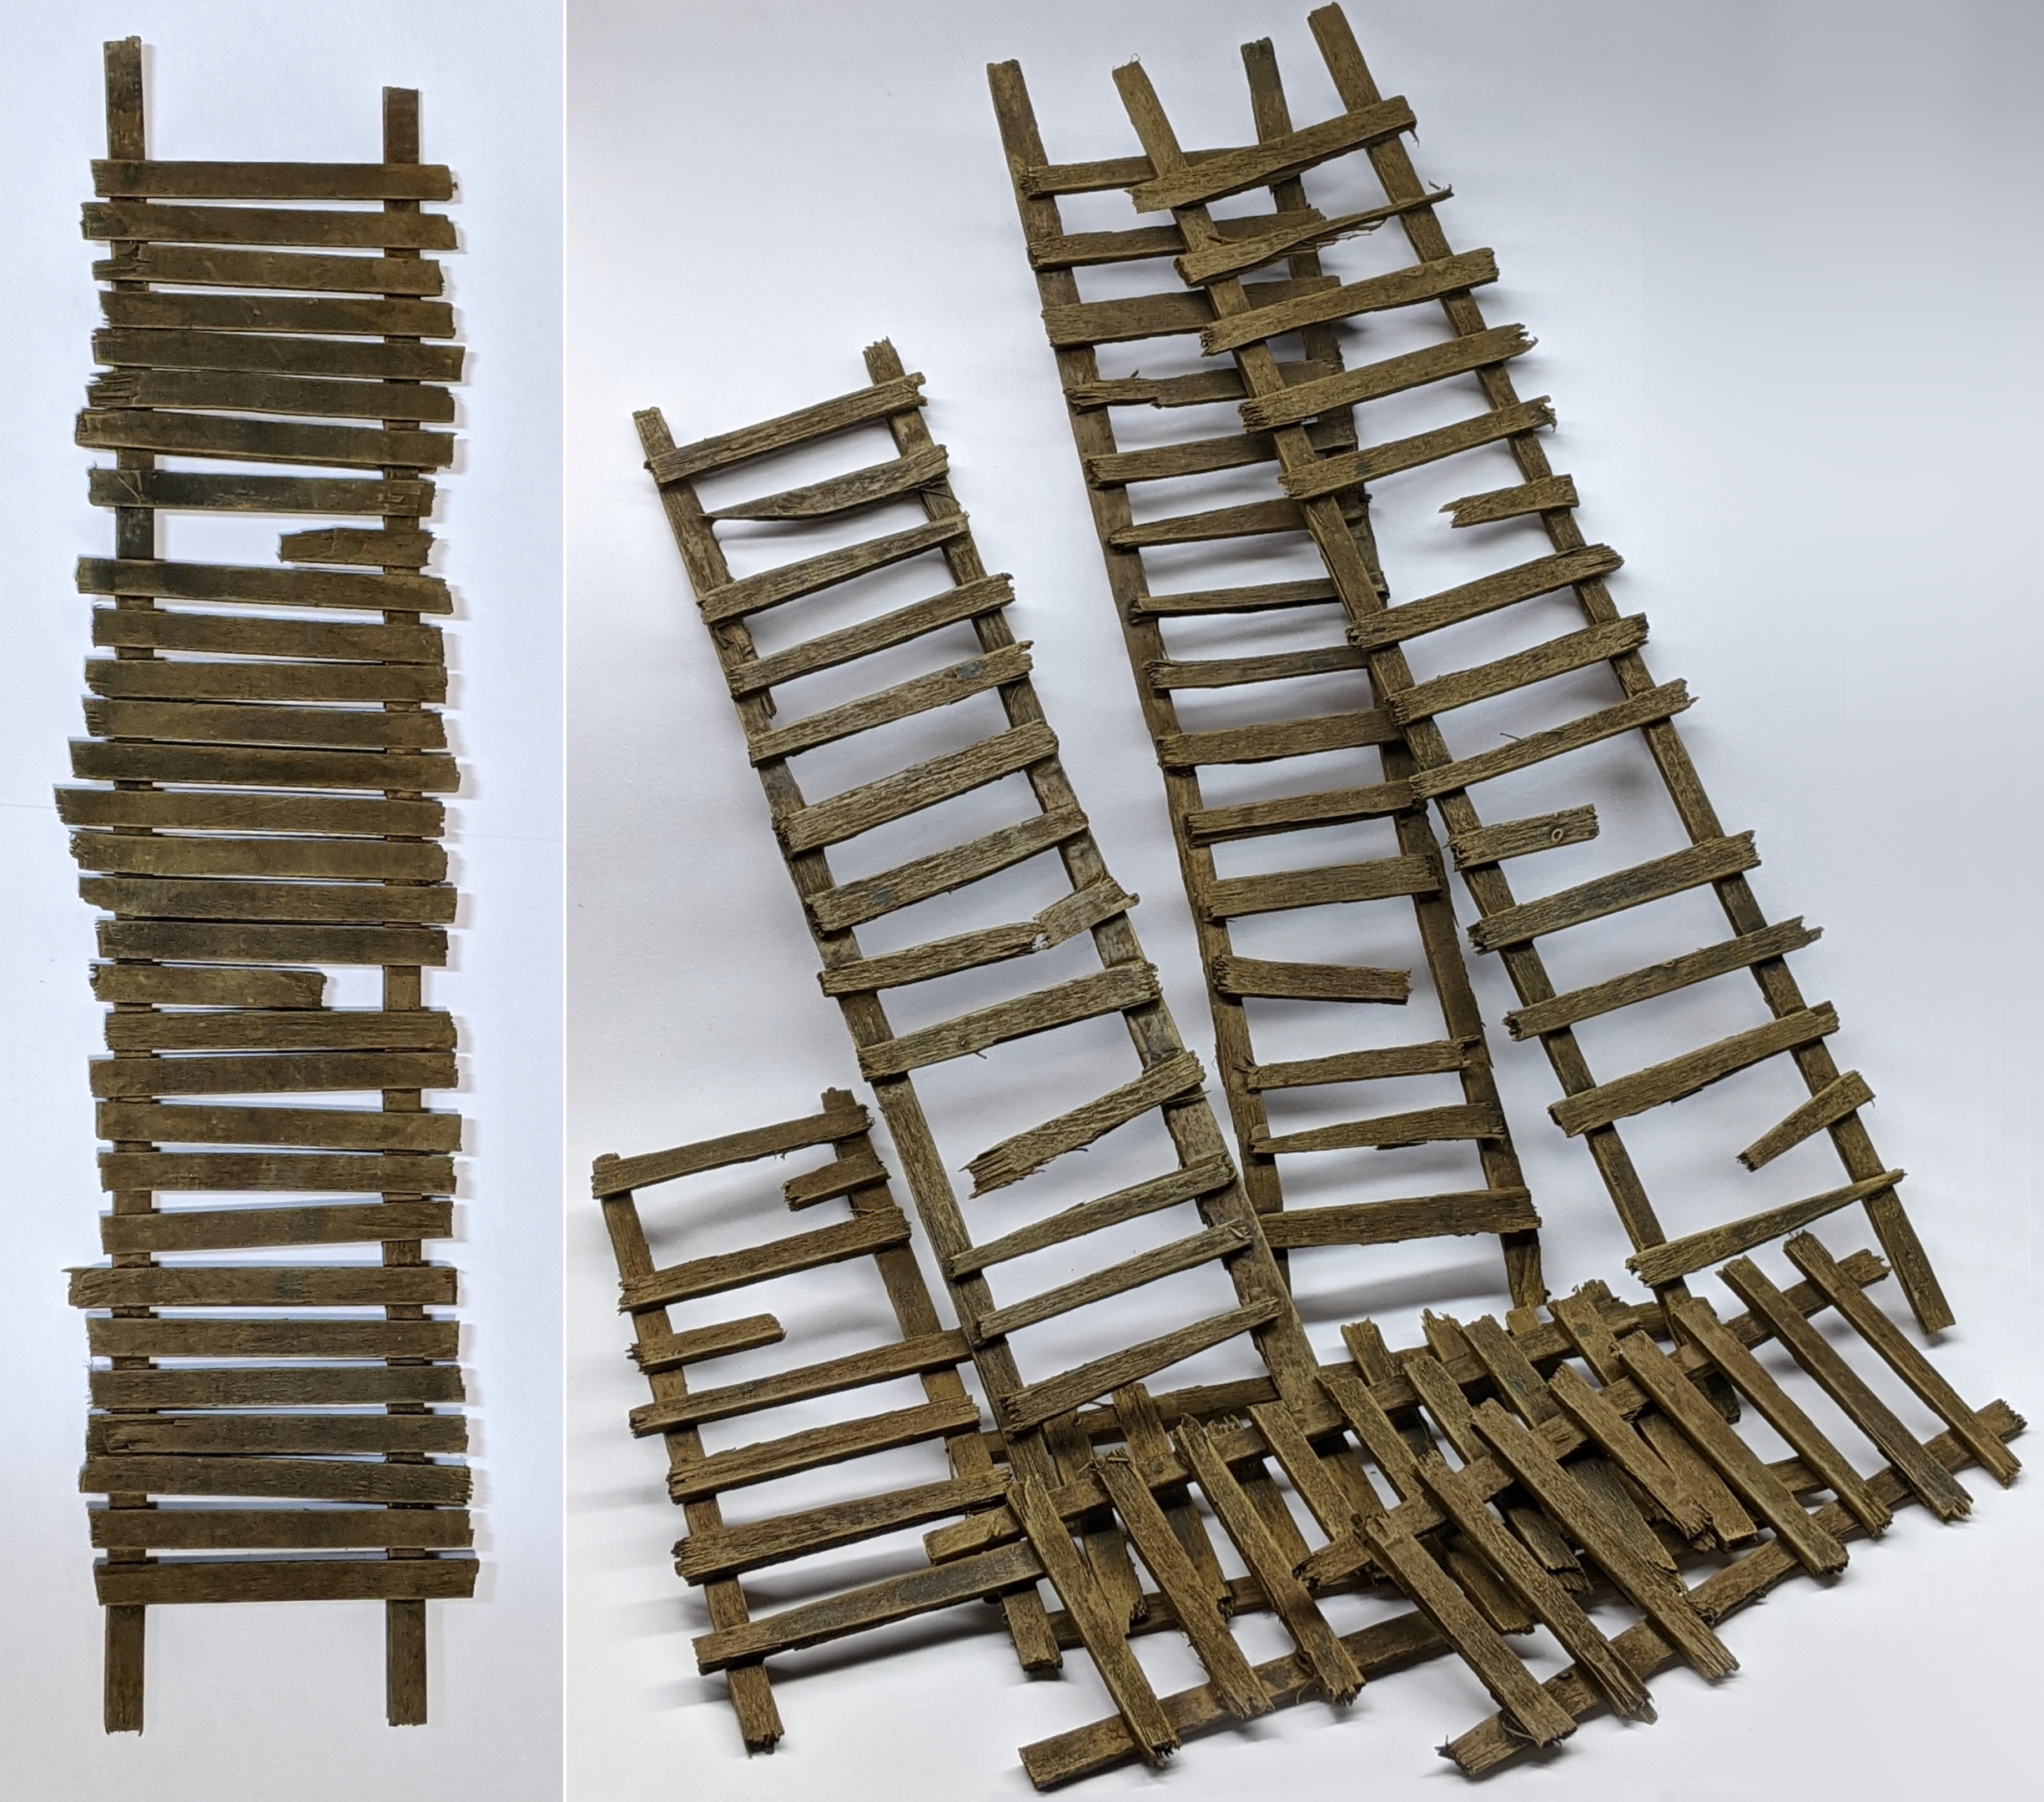
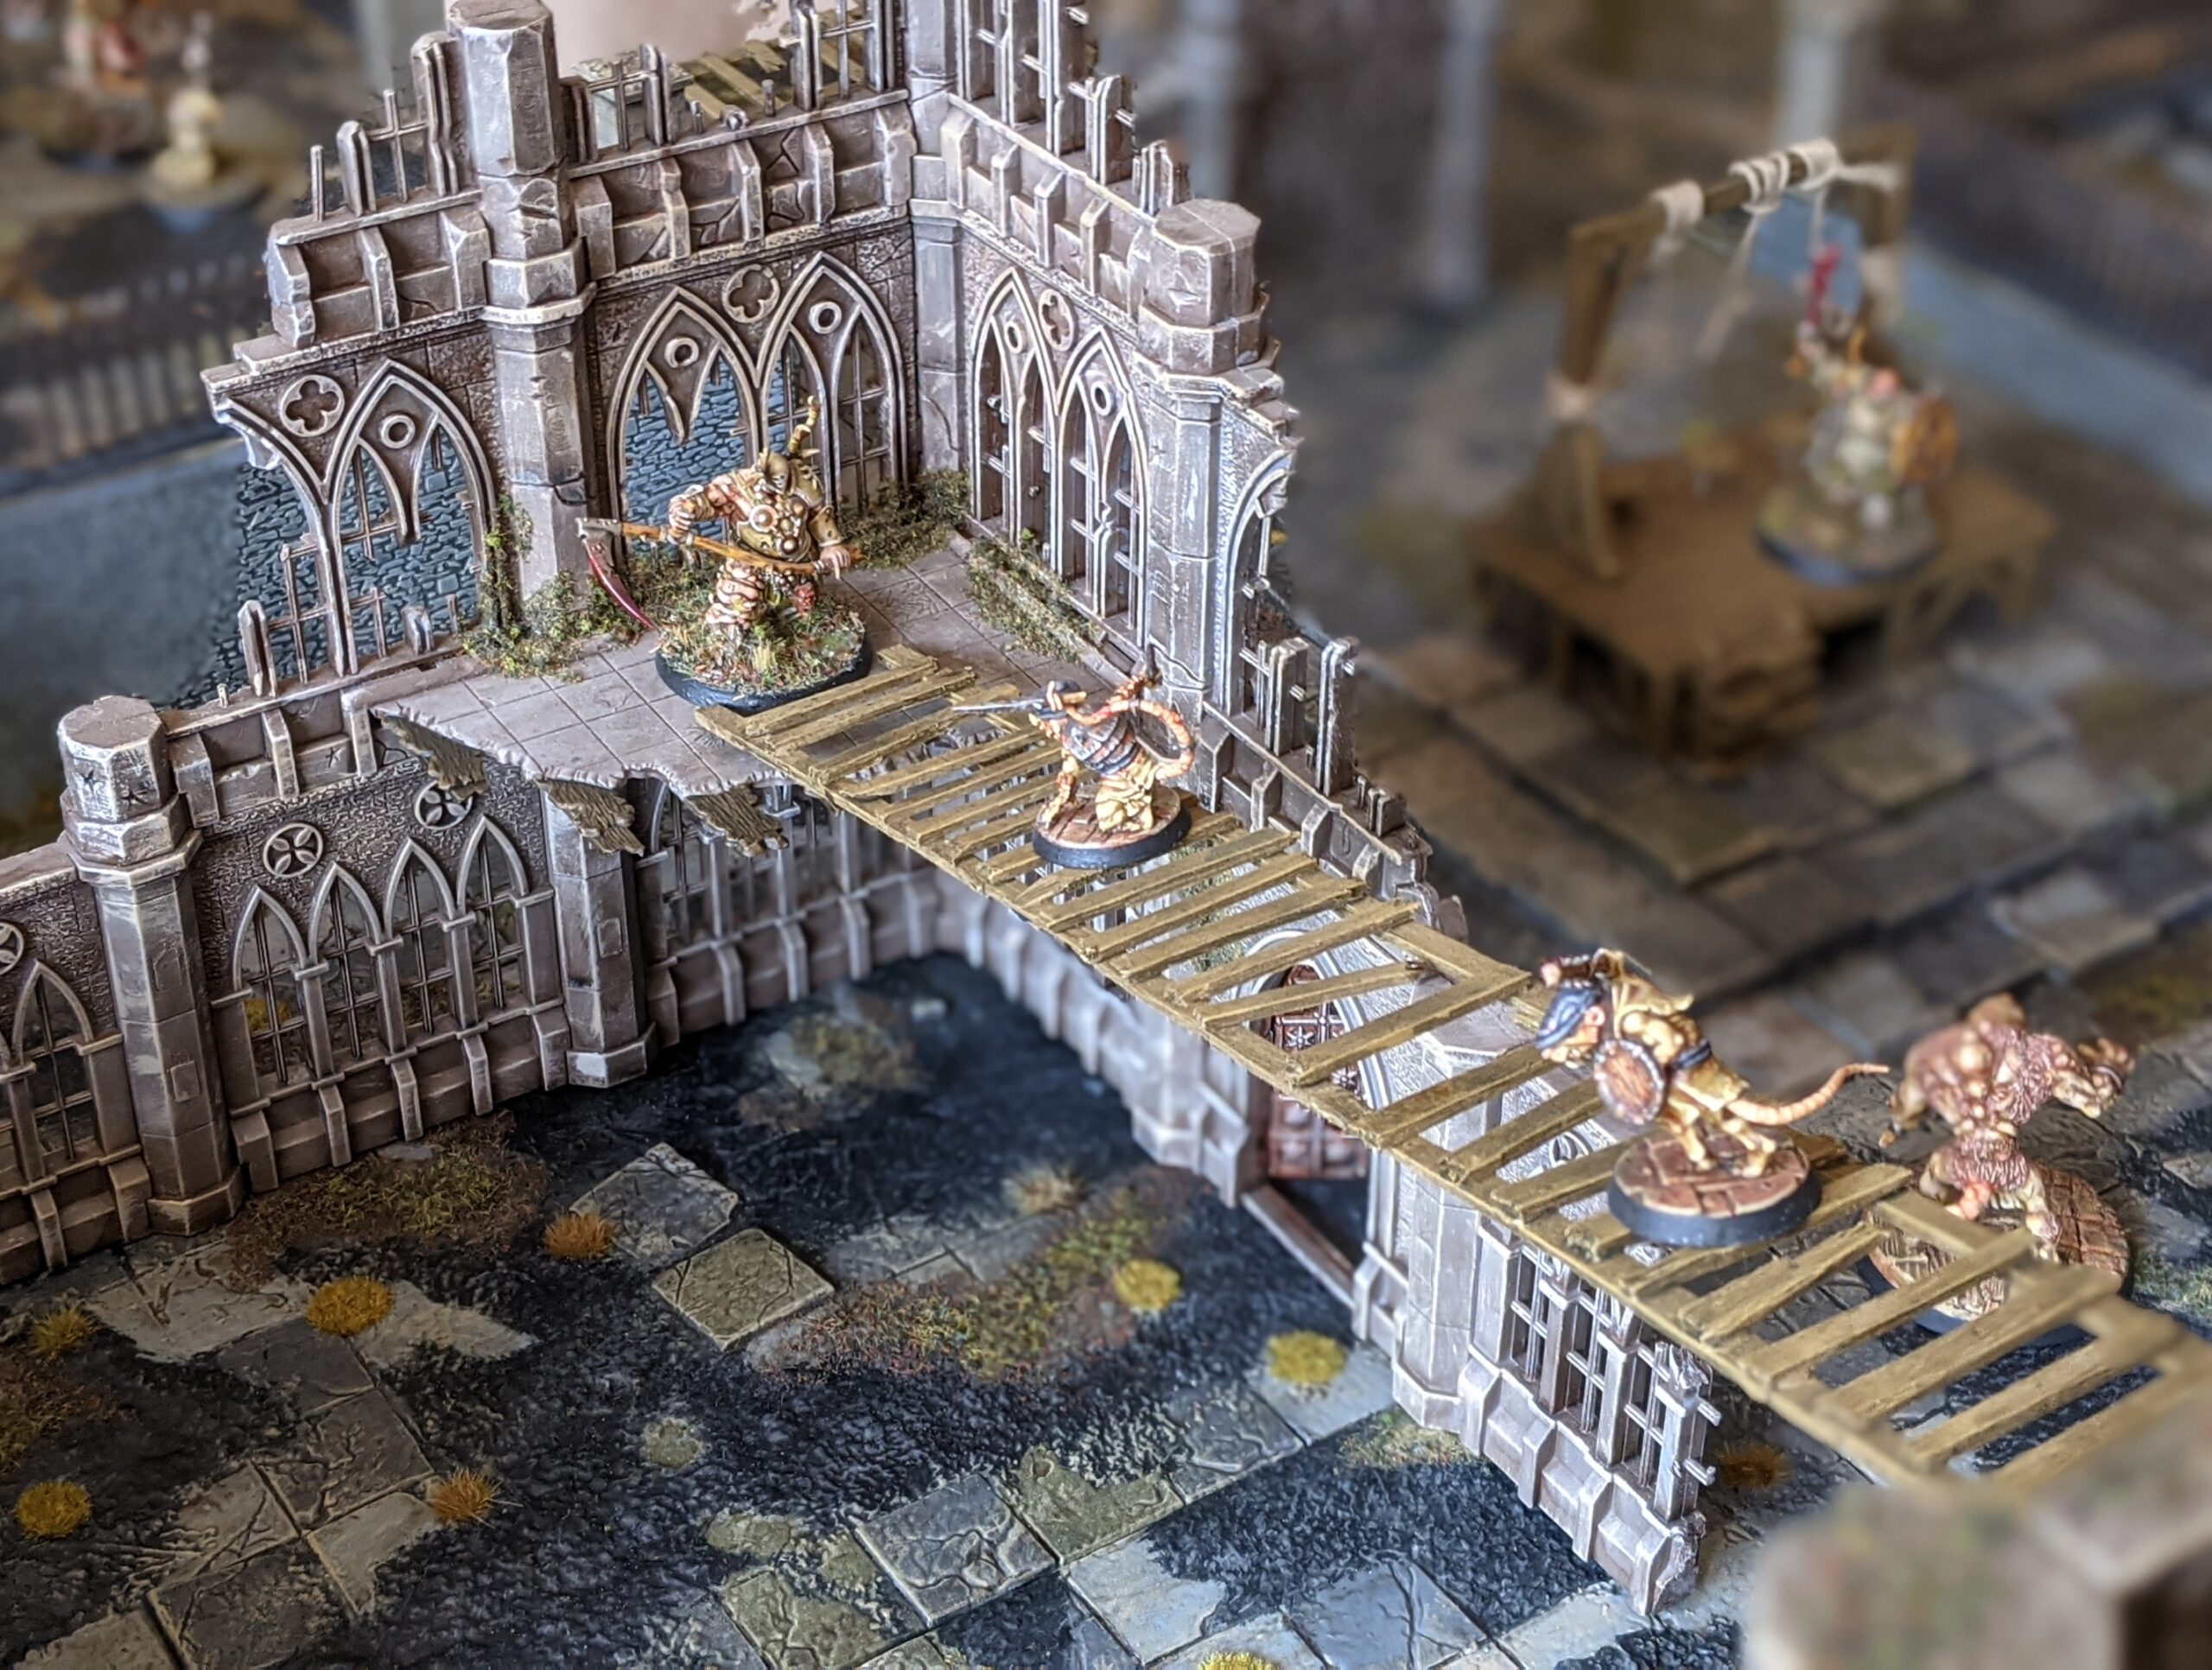
Finally, we have the fences and ladders. This lot were largely made from a mountain of popsicle sticks ordered from eBay. The process of creating these was so simple that I felt a bit like a child playing at crafts making them. The bridges were built to cover a full 12″ tile gap if need be, and were done by snapping off the rounded edges of each end of a popsicle stick for each side, laying them in two parallel lines of three sticks and super gluing a further three sticks over the joins in either side. I flipped the bridges over and reinforced the join on the other side, then continued gluing popsicle sticks across to fill in each of the sections. Occasionally, I’d snap a popsicle stick in half and glue one down one side to create a bit of wear on the rickety makeshift wooden bridge. The ladders were similarly crafted, although a little thinner and more delicately than the bridges. For those, I broke a popsicle stick right right down the middle lengthways to make each of the rungs thinner and a bit more to scale. As these wouldn’t need to bear the weight of one or more metal miniatures on top of them, I didn’t bother reinforcing the backside of the joins with anything more complex than a blob of super glue. The bridges and ladders were painted in the exact same way – I spray painted them with some Krylon Camouflage Khaki and doused them in a thick coat of Vallejo Sepia ink to darken it down and shade the recesses. To finish, I drybrushed the whole thing with Khaki to pick out the edges. Dead simple, no drama, looks the part.
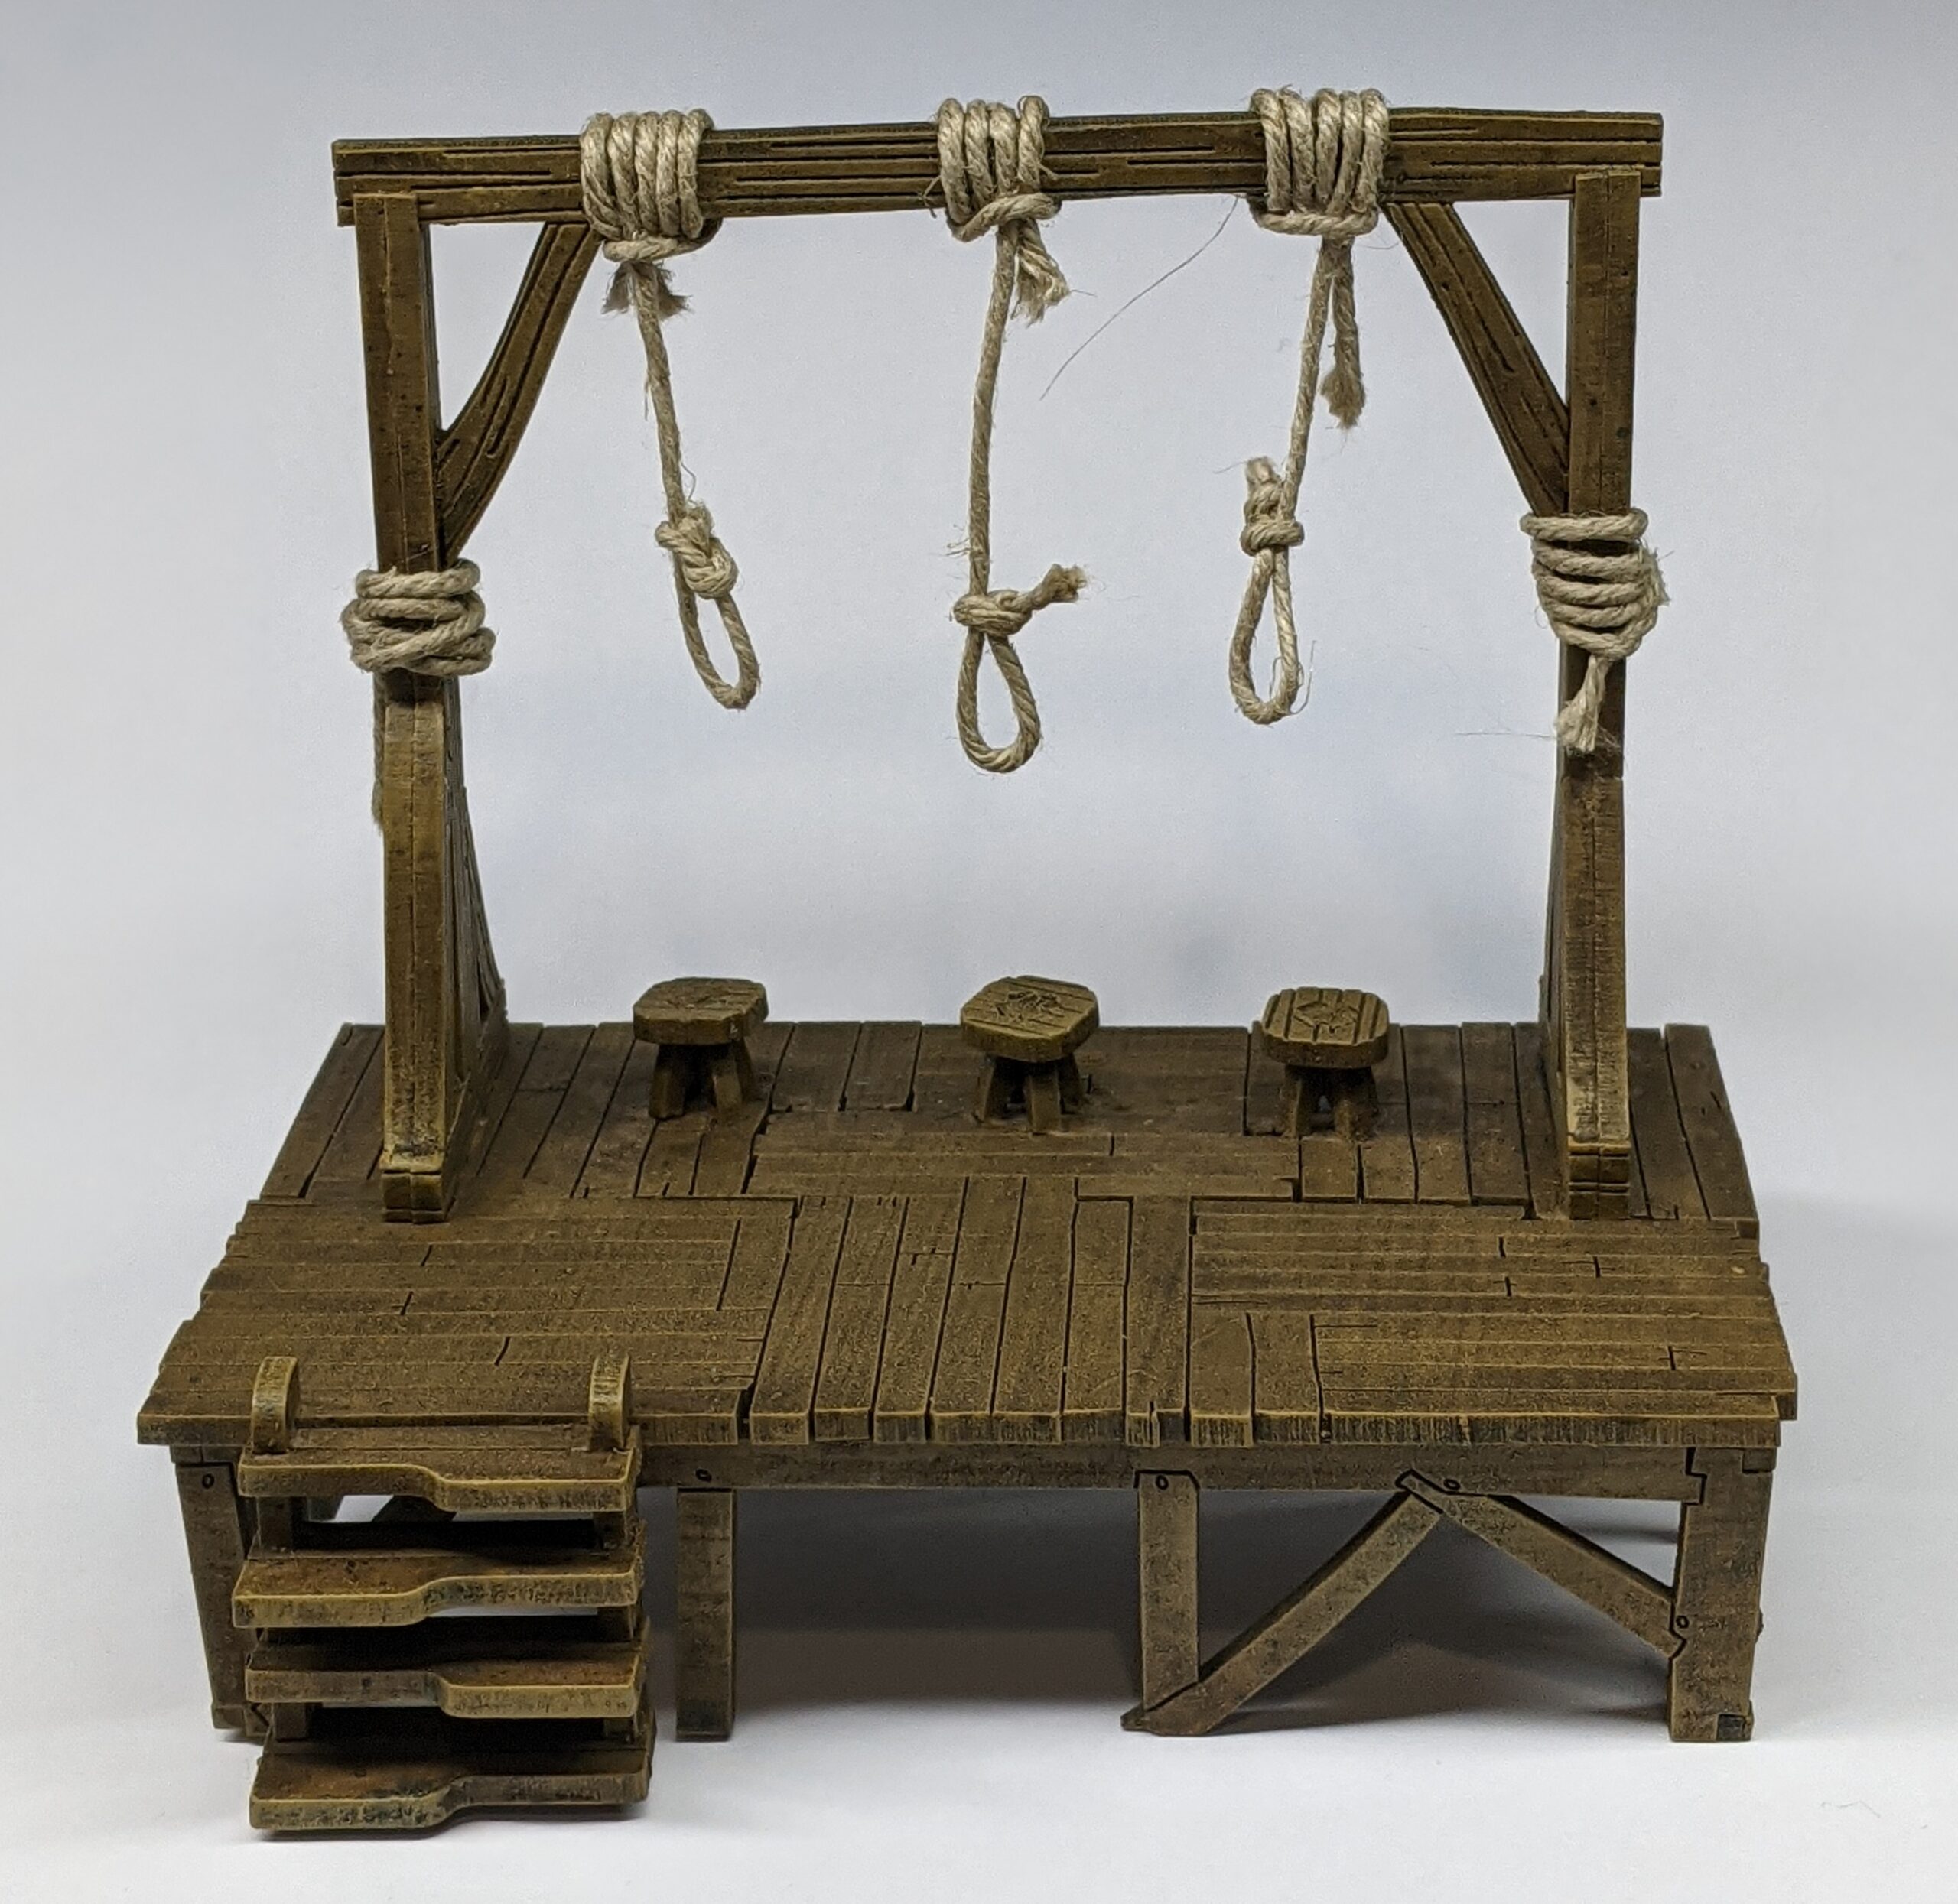
While I was in a gothic fantasy frame of mind, I picked up a little MDF Gallows set 4Ground. These are kind of sold as pre-painted because they’re already wood, I guess, but I decided to paint them like the rest of my wood for consistency. Sepia ink, khaki drybrush. The kit includes a nice length of twine for making the nooses, which I thought was a nice touch, and helps break up the monotony of the wood.
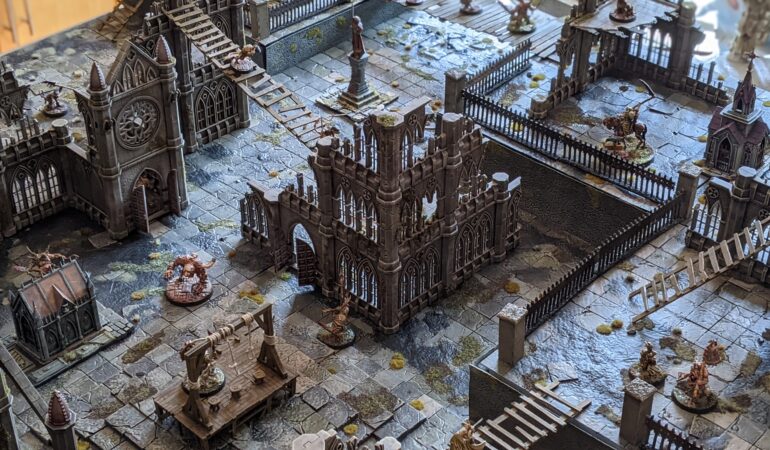
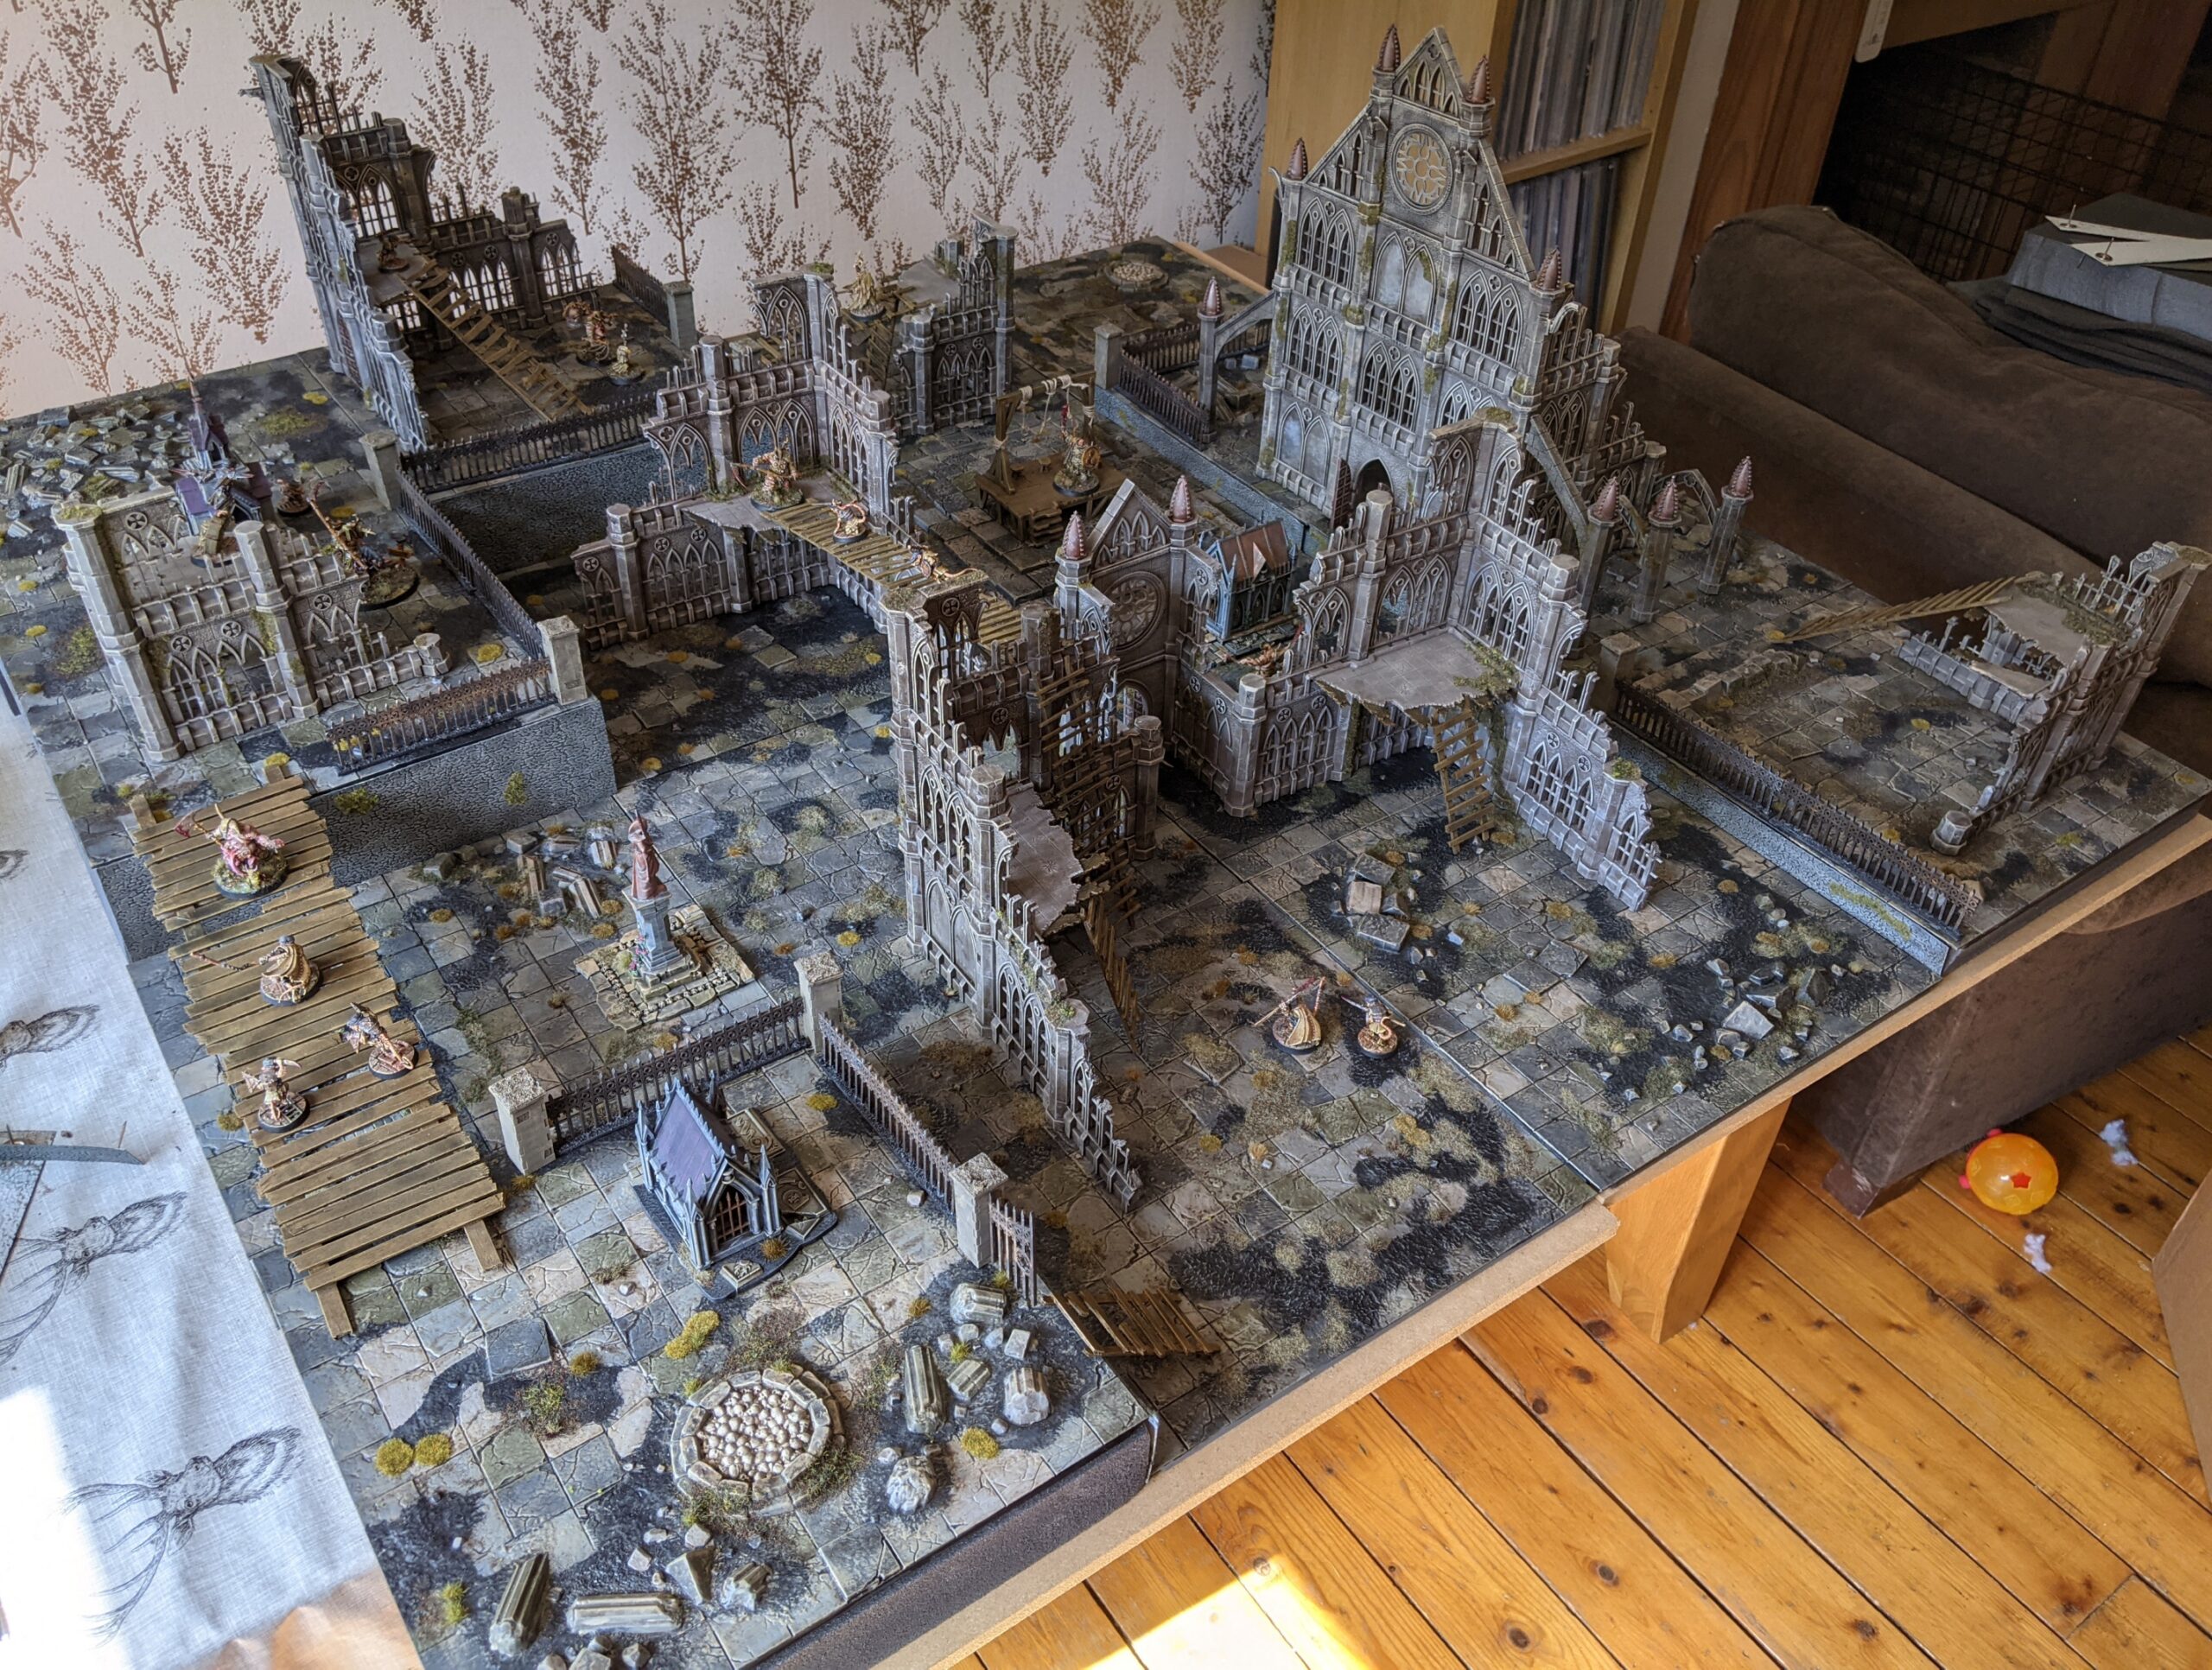
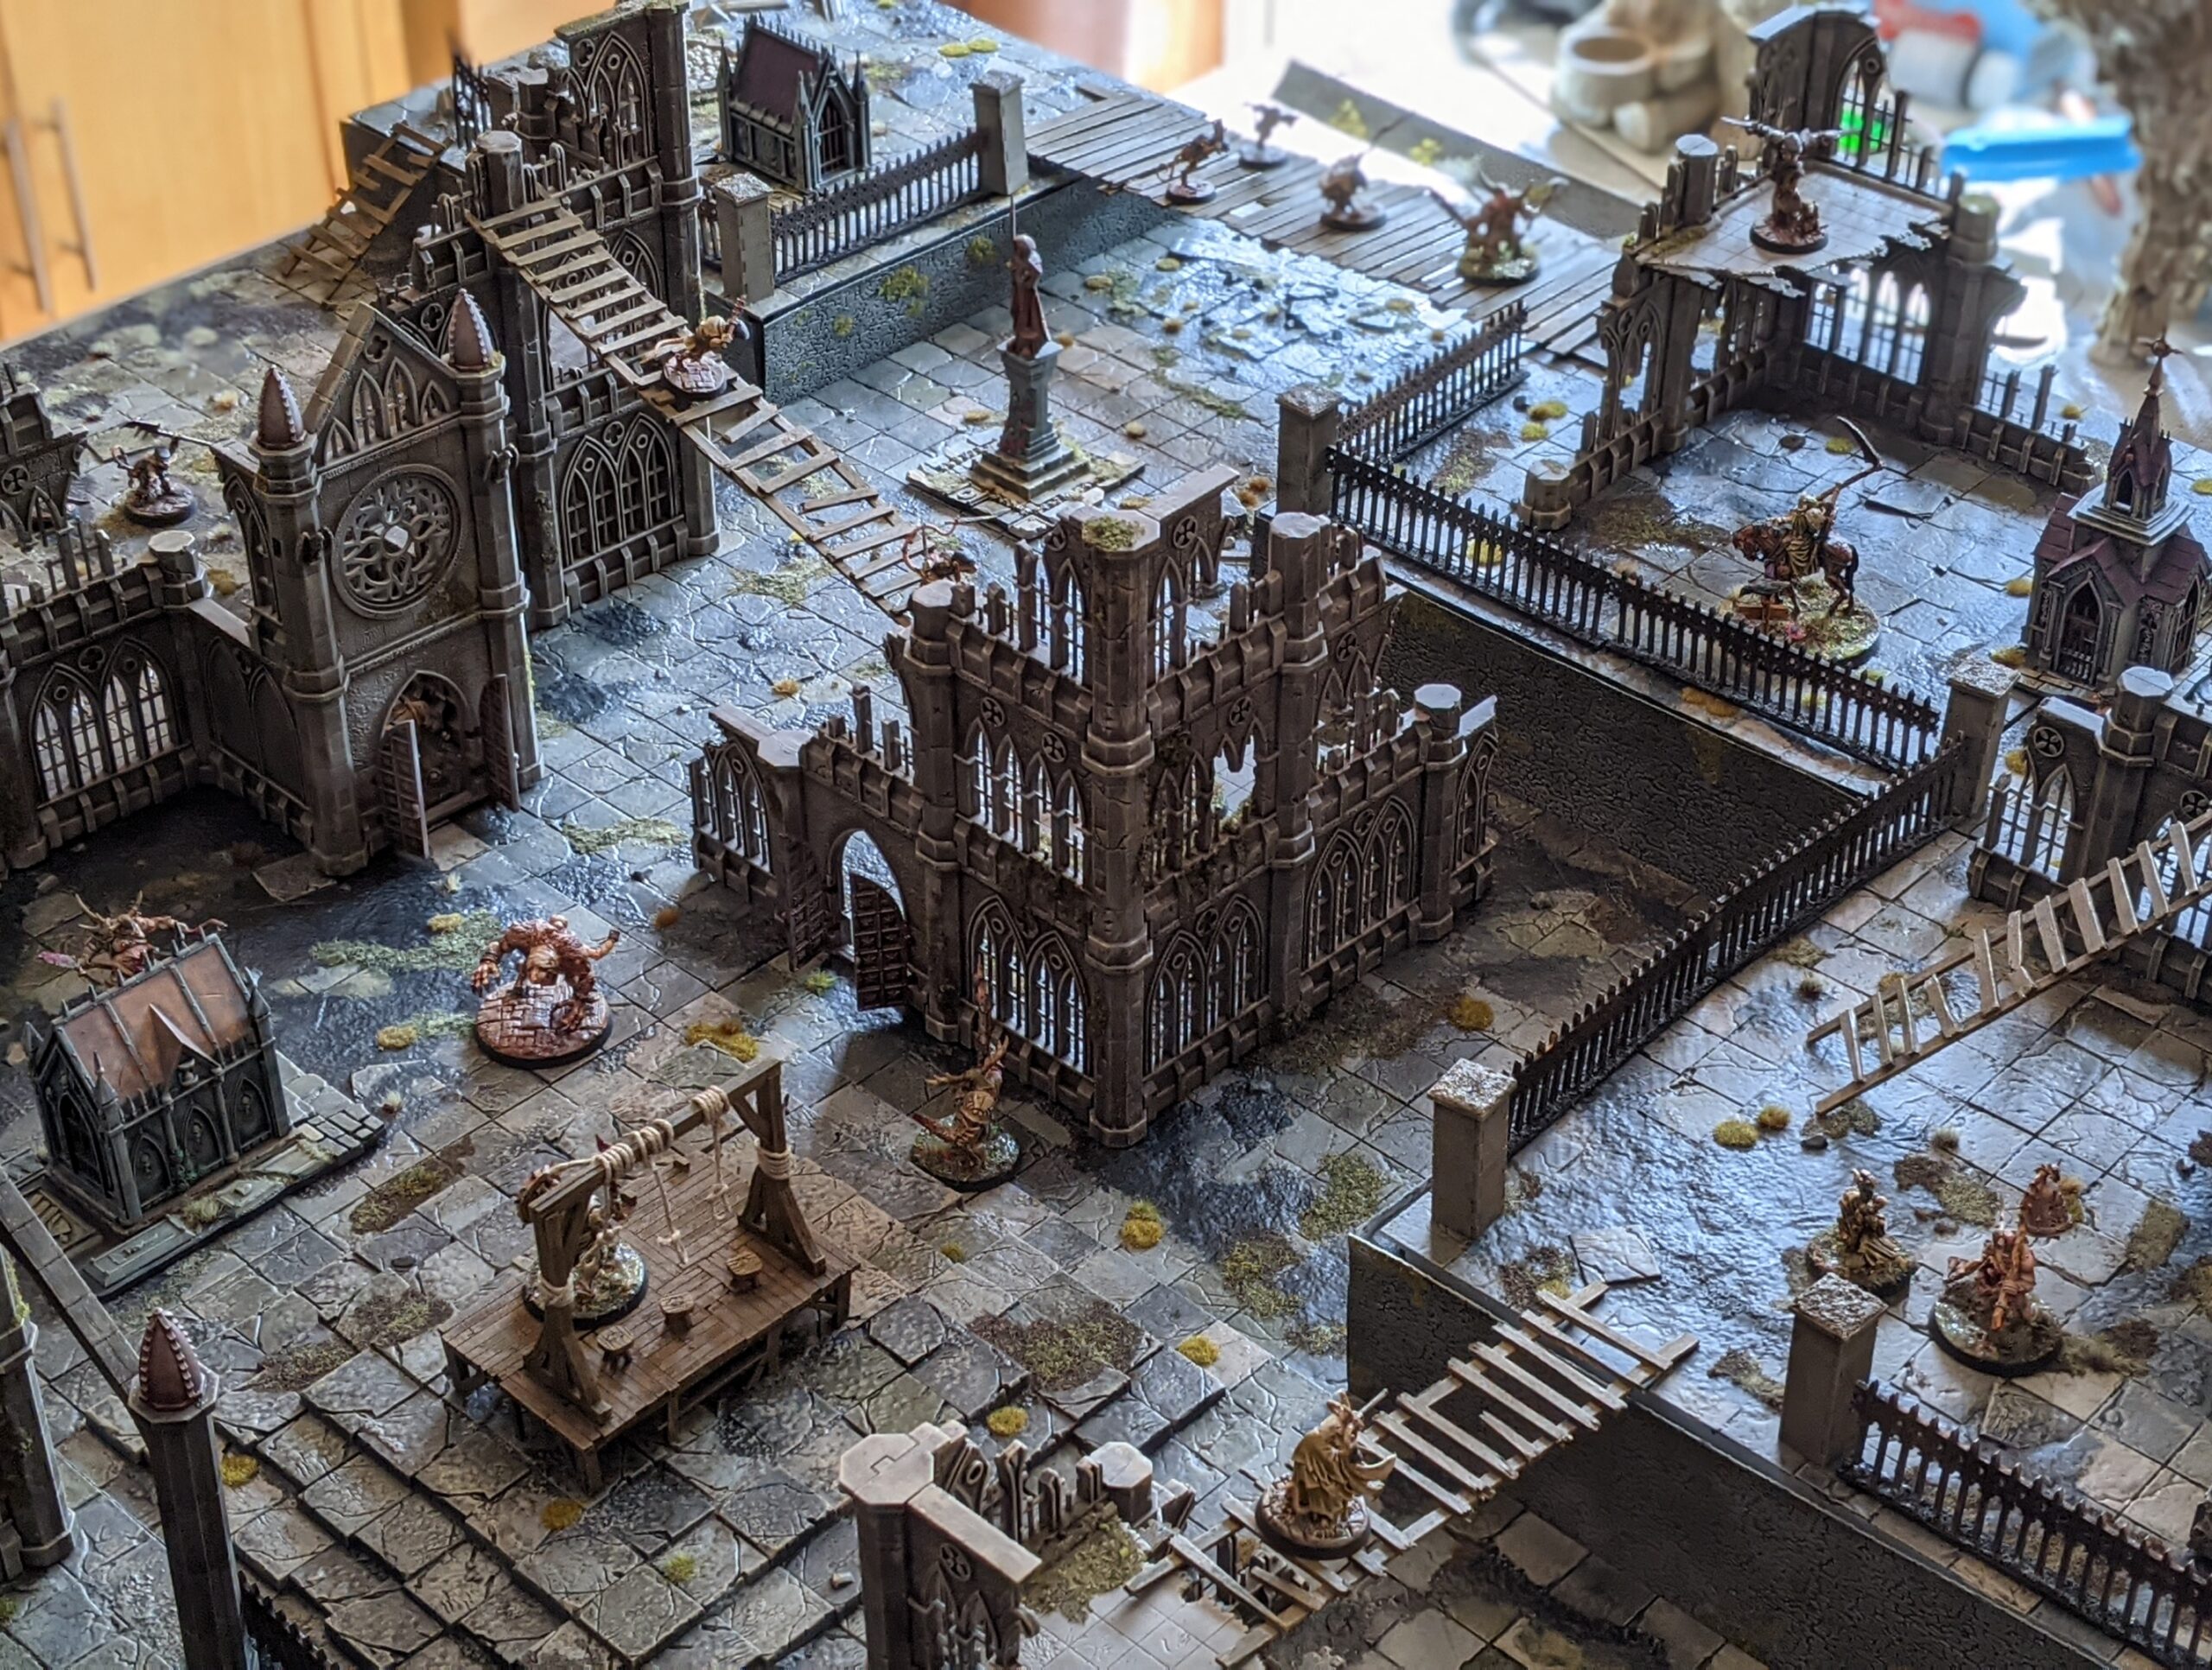
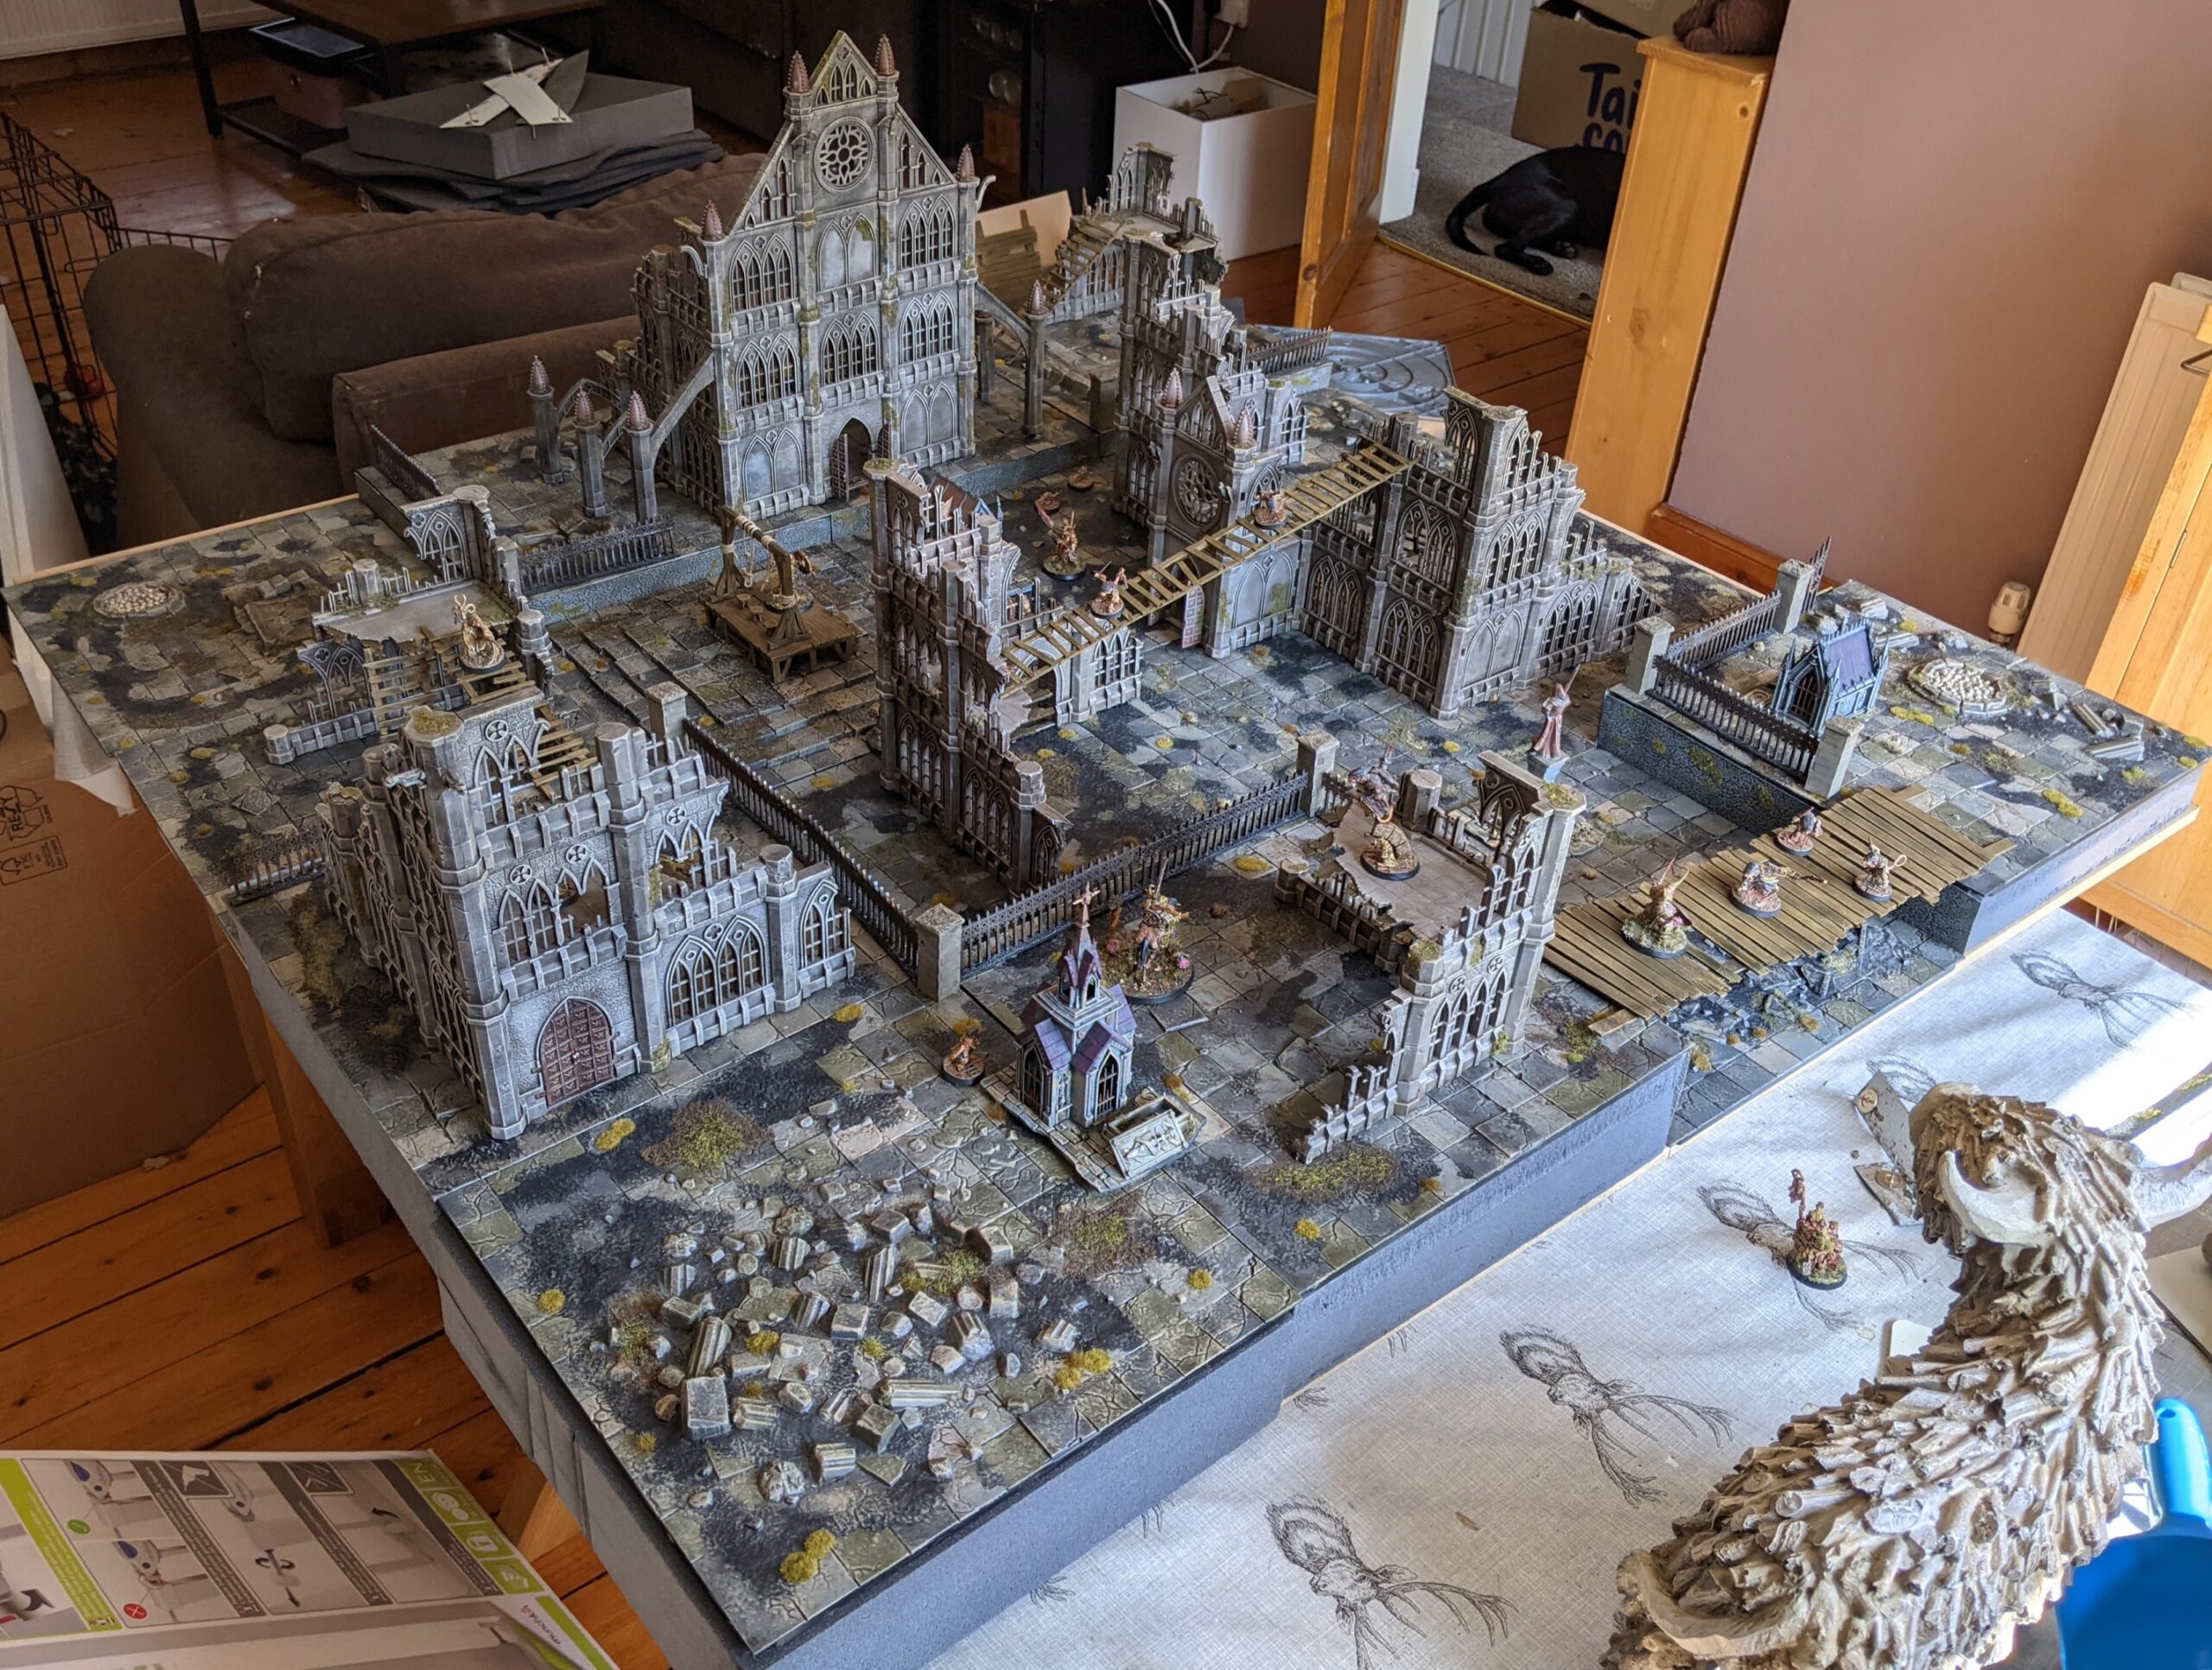
And with that final touch, my Yarnham-inspired take on Mordheim was finished and ready to go. I’m pretty thrilled with not just how it looks, but the amount of possibilities it provides to experiment and try new things. As I set the board up for the first time to take photos, my mind was abuzz with all sorts of fun ideas for this setup. I could definitely see running my Rolling Fields River tiles along the side or the middle and using this as a sewer board, for one example. But I also noted a few areas for improvement. I think my upholstery-pins-into-foam idea works for the most part, but it’s far from perfect. It can be a bit fiddly to get it attached at the right angle and the right level of tension – and every time that it’s pushed into the foam, it gets a little bit looser. I’ll definitely need to add some blue tack to fill some of the holes in the future, and I’m now starting to consider that glueing at least some of the facades down with a hot glue gun would improve both look and setup time. Additionally, leaving the backs of the facades as exposed white plasticard was probably a mistake, as this is very noticeable when the edges aren’t perfectly flush with the tiles. At some point, I’m going to have to spray the backs of them with black primer, in the hopes that this will look a little less jarring. I might also look into stocking up on some fantasy scatter terrain – wooden crates and barrels and whatnot – just to fill some of the open space on the board.
All of the above being said, none of this is especially game breaking or difficult to fix, and I’m incredibly happy with how the board turned out. It’s a bit of a pain to set up, but that’s the unfortunate tradeoff for anything with this level of modularity – and an hour or two of preparation in the morning is a small price to pay for a full day of engrossing, immersive gaming, isn’t it?
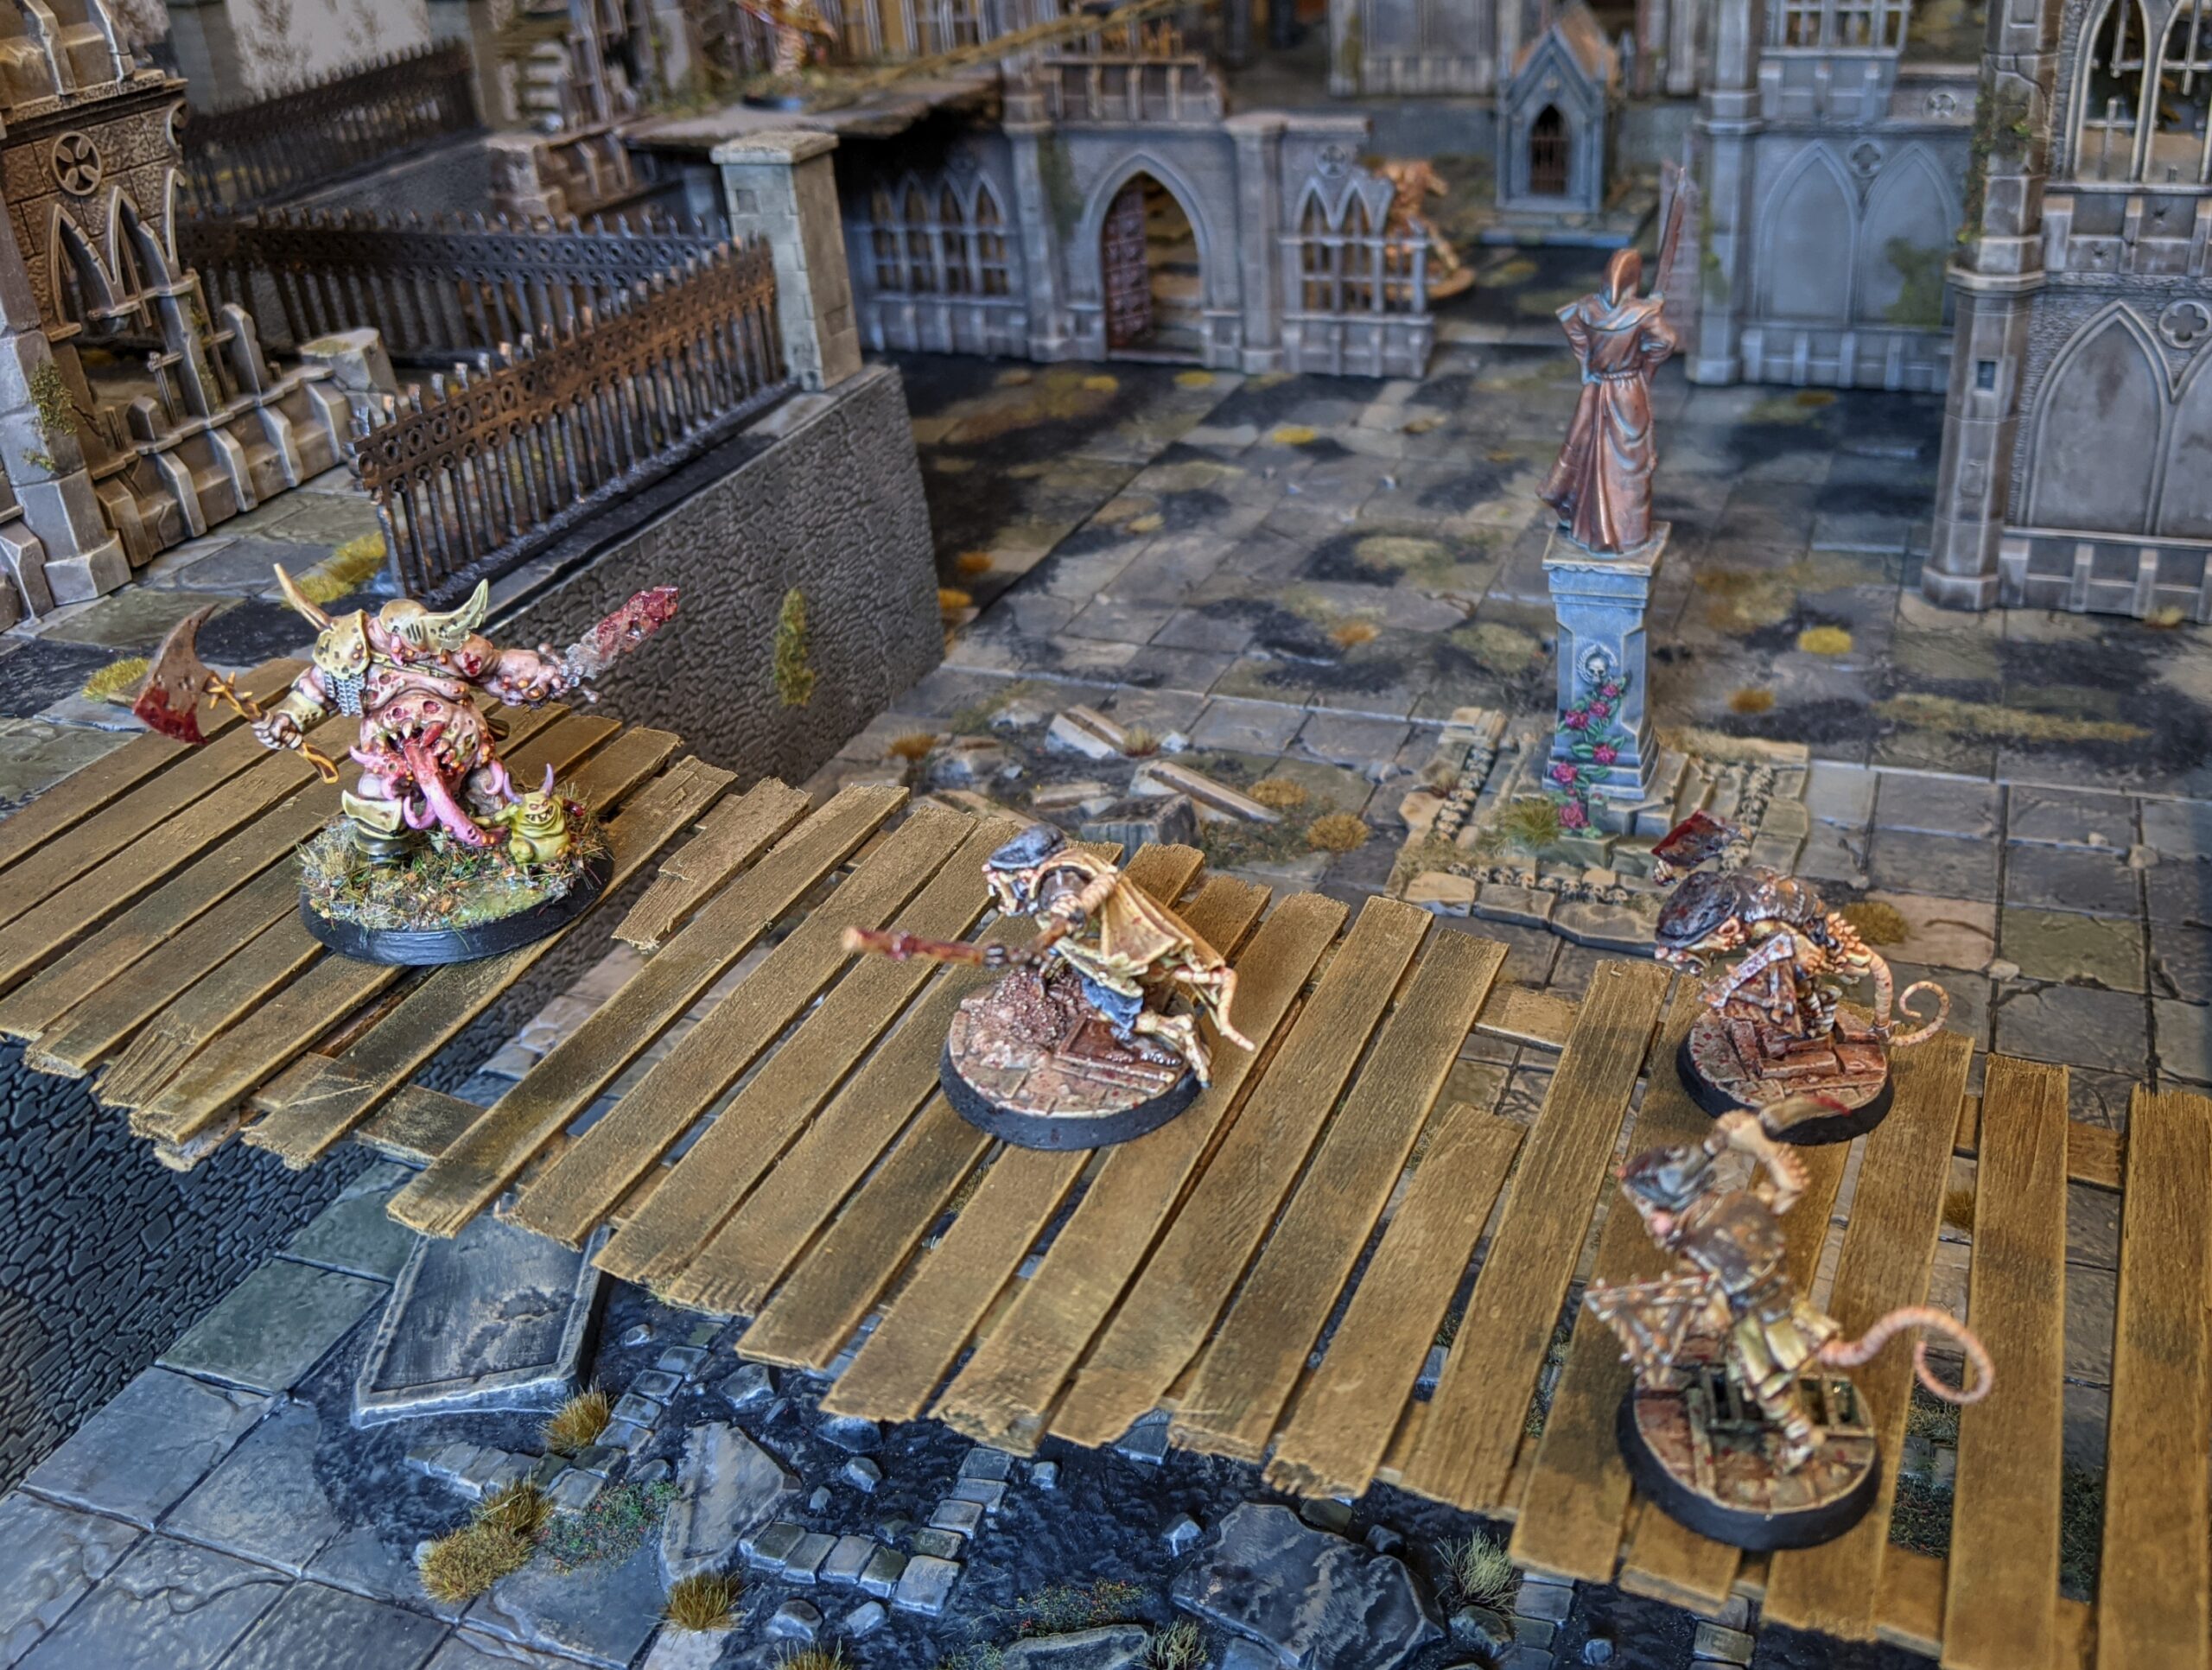
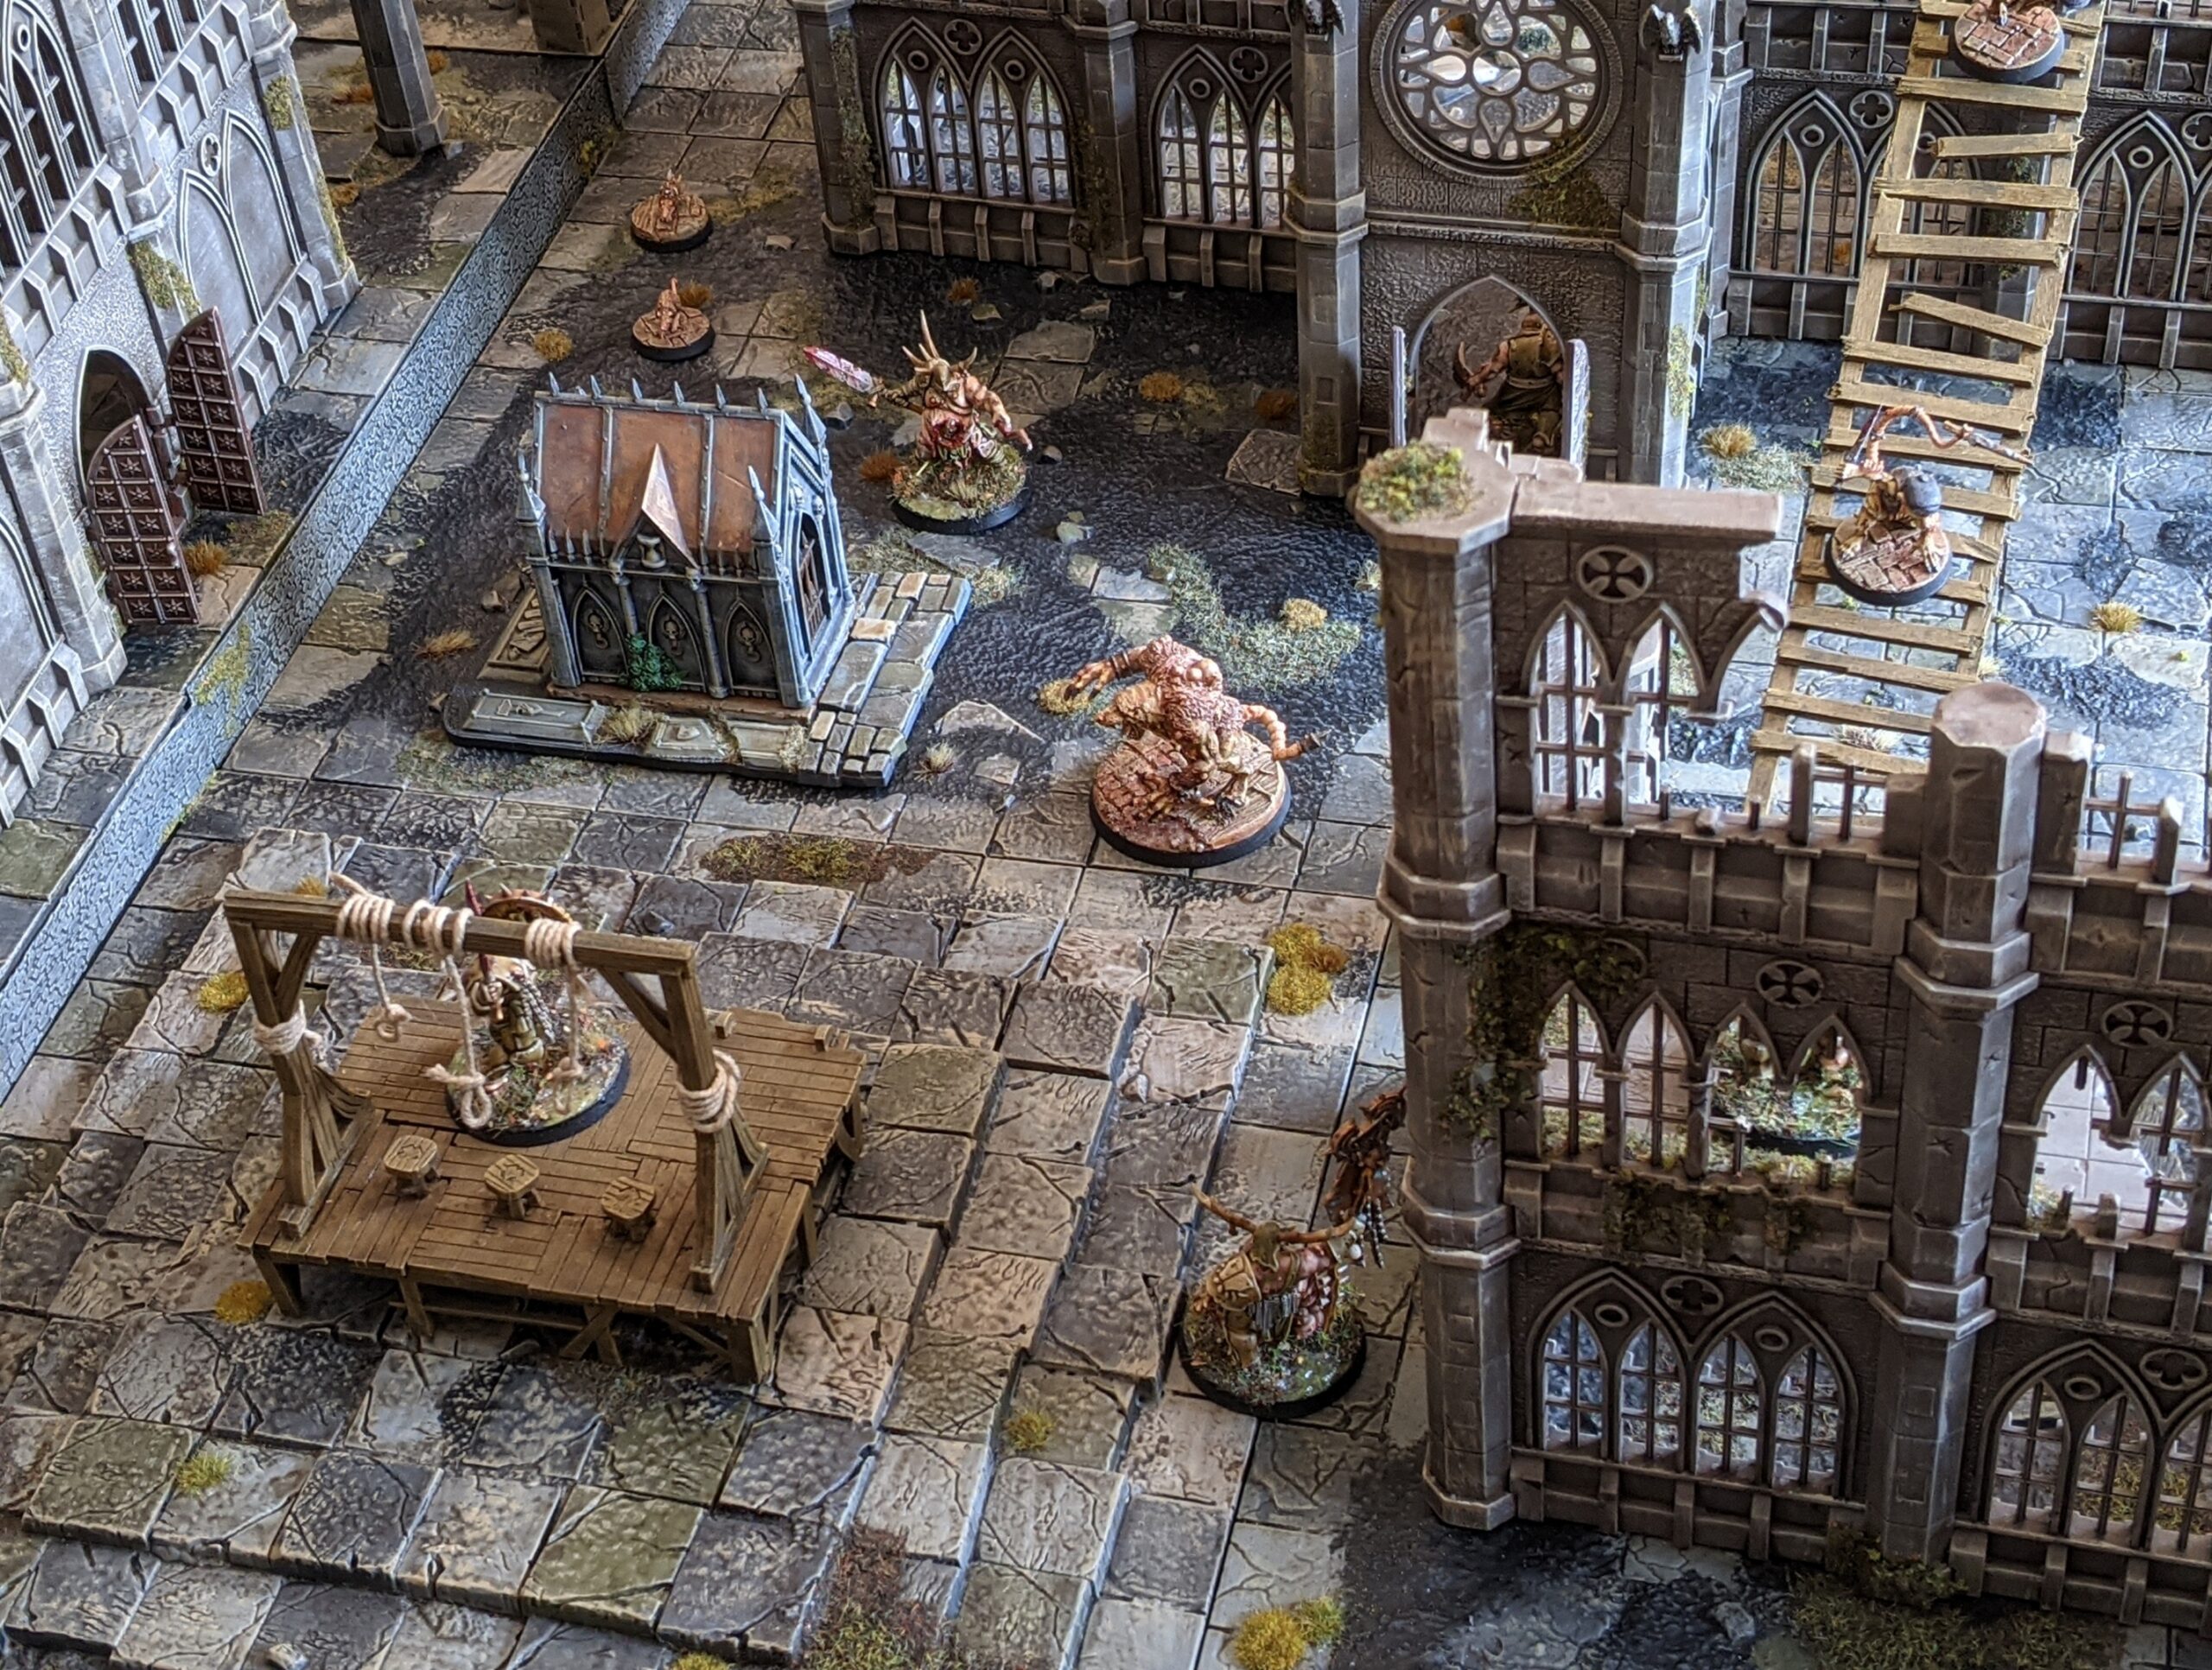
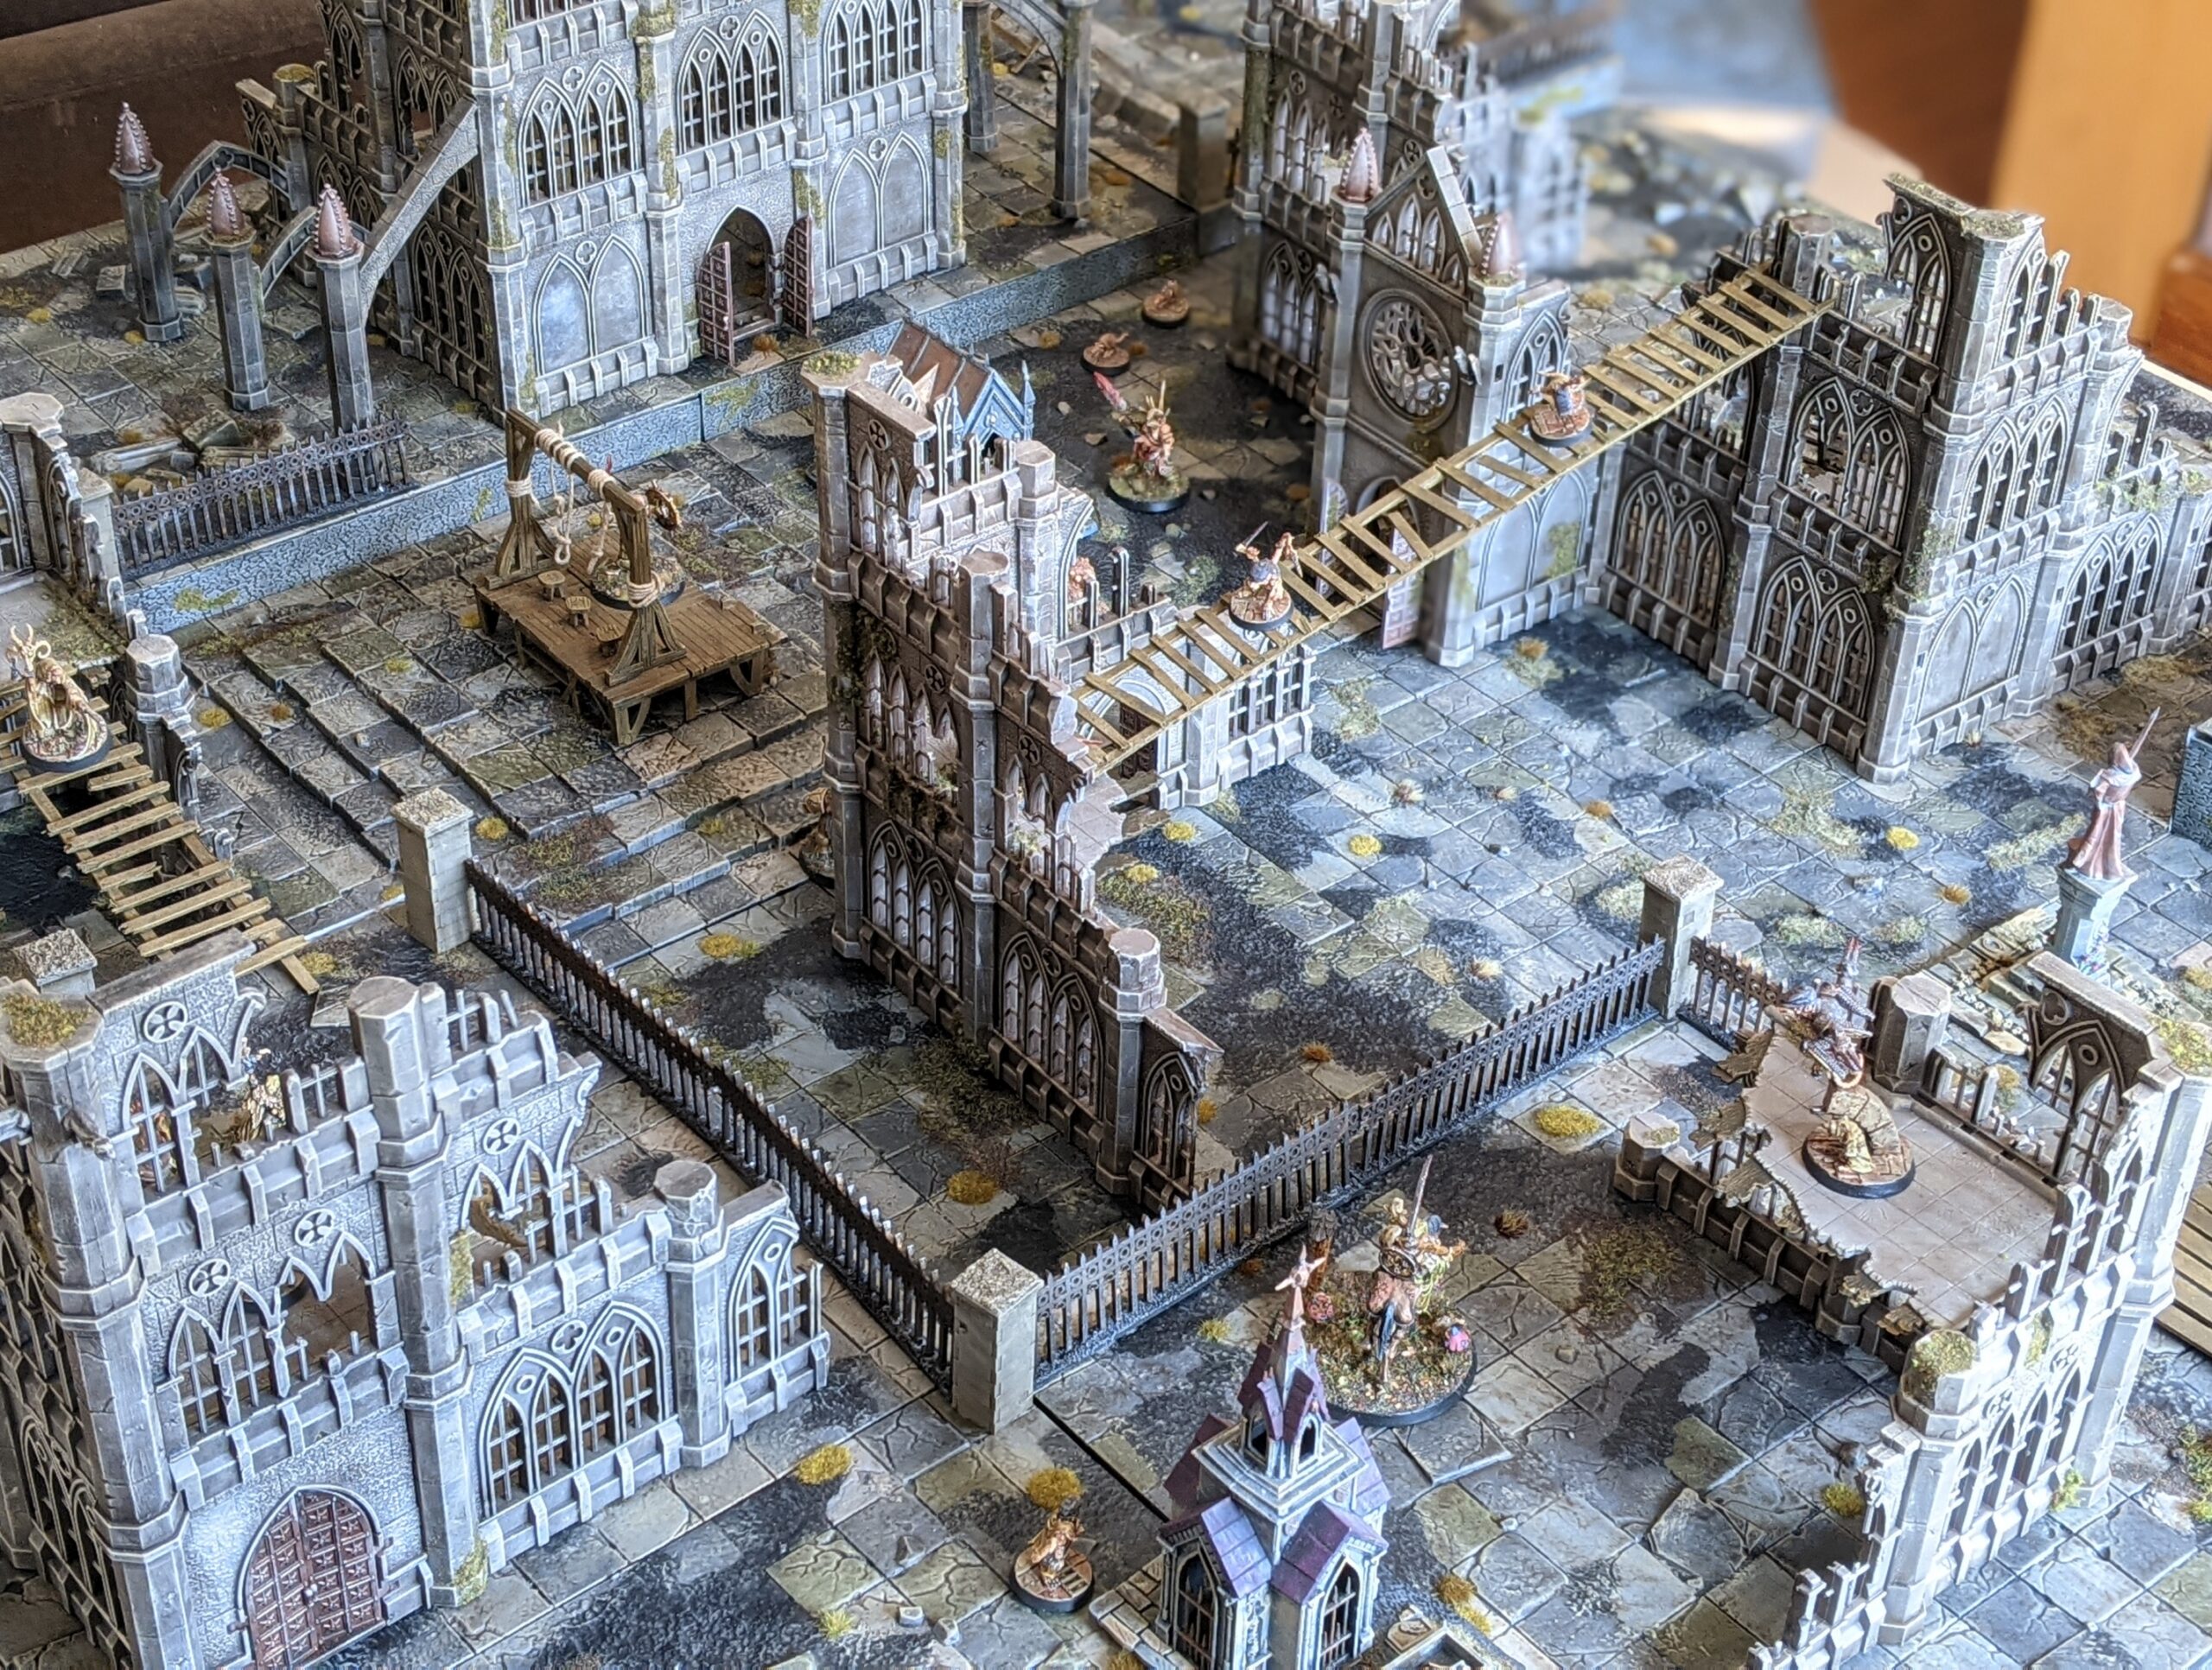
Alright, you’ve been patient enough – here’s some of the photos of the board in action, with my Maggotkin of Nurgle and Squeaky Blinders doing battle across the cityscape for scale.


Phew, that was a bit of a mammoth post! It’s taken me a bit longer than usual to get this one together, but mostly that’s down to waiting for an opportunity to set everything up and take a load of photos. In the meantime, I have not been idle, so it shouldn’t be too long before my next update. I’ve got some exciting new stuff planned for the next few months, so I’ll be looking to tie up some loose ends6 before moving onto the next big thing.
Until then, thanks for reading, and happy wargaming!
1 A passion that I actively encourage, as it creates windows for me to take on some more time consuming hobby projects.
2 Or so I thought. In reality, if you want something that actually looks like the experience advertised on the boxes and Kickstarter, then you need to sit down with a marker and colour the edges of the card yourself. If you’ve got a lot of this terrain, this can take hours upon hours and is immensely tedious. I got through edging my Ruined Monastery and two of my Village Ruins kits before giving up – and it’s sat unfinished on my top shelf ever since.
3 No, not that kind of finecast. Oh, and by the way, I love these old school ‘mail order but online’ websites. They’re inconvenient if you actually need to buy anything, but they sure bring back feelings of nostalgia.
4 With the addition of this display board pack, I now have 16 Rolling Fields tiles and 20 Forgotten City tiles. If I use these together, that’s enough tiles to make a 9’x4′ playing surface (or a 7’x5′ with change).
5 I don’t actually recommend doing this – the combination of a flat surface, the relatively poor ‘grip’ of wash and drybrushed paint and the harshness of applying wet varnish with a brush has a tendency to loosen up some of the top layers and spread them around. On one hand, this creates a semi-opaque dusty looking effect over the tiles, but it also undoes some of your paint work in the process. These tiles were some of my earliest experiences in painting and varnishing miniatures however, and I feel beholden to stick with my original process for the sake of consistency. For anyone else, I’d recommend applying varnish exclusively with an airbrush or rattle can.
6 Oooooh loose ends? What could that entail? It could be anything, anything at all… No, you’re right, it’s just more Sisters. It’s always more Sisters.