

Come ye, faithful servant of the Emperor to the concluding chapter in The Emperor Protects – a series of posts following the growth of my Adepta Sororitas Order Minoris, the Order of the Dying Light.
Okay, so, to call this the ‘concluding’ chapter is maybe kind of disingenuous. I actually have a bloody lot of additional Sororitas models still left to get through – including (but not limited to) 24x more Battle Sisters/Dominions (with various armaments), 8x Celestians (including Simulacrum and Superior), 5x Seraphim and an assortment of Cherubs. That’s.. I mean, tanks aside that’s pretty much this whole army all over again – and that’s just what I’ve got sitting around assembled or in boxes1. Still, it’s nice to have an initial goal to shoot for and 2000 points seems like a nice place to stop and catch my breath for a while. With lockdown (hopefully) winding down in the relatively near future, it would be nice to play a few games with what I’ve got already – and figure out what I do and don’t like.
But we’re getting ahead of ourselves here. In Part Four, we reached the heady heights of 1500 points. We’re on the home stretch now, so it’s important to have a little look over what’s missing. In fact, one glaring omission stuck out at me – my Sisters of Battle army was entirely devoid of flamers! Such heresy could not be tolerated, so the first of my reinforcements arrived in the form of another Retributor Squad, this time toting Heavy Flamers.
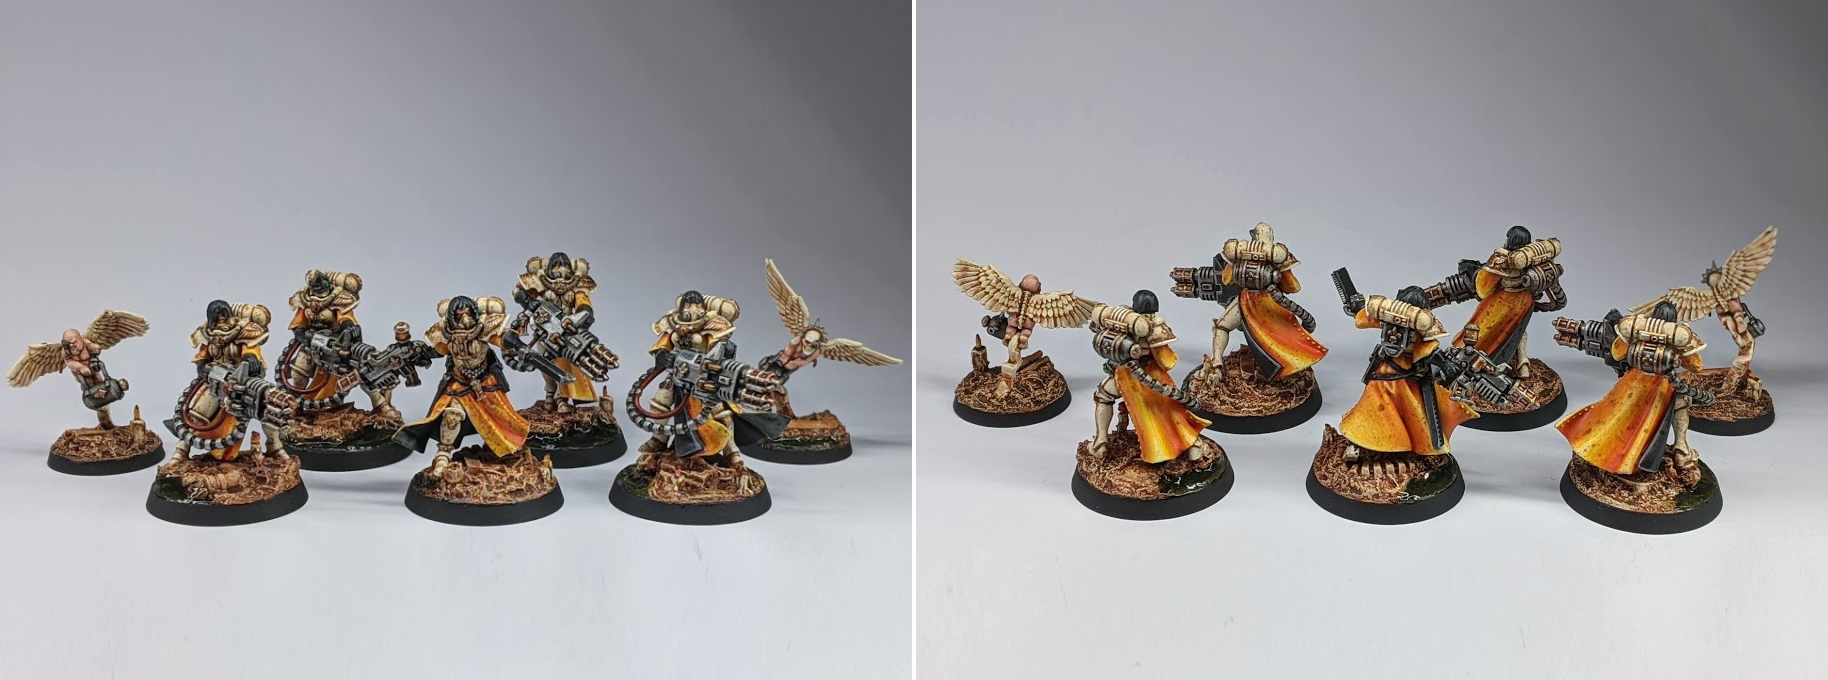
From a build perspective, these were similar to the Multi-Melta arrmed Retributor Squad that came before them, although with a little more variety in pose (as two of the bodies came from a Battle Sisters box). I also used respirator heads sourced from both the Retributors and Battle Sisters boxes to ensure a unique head for each miniature (and one helmeted for maximum variation). For the Sister Superior, I angled her chainsword a little lower as if she’s pointing in a direction for the Retributors to charge or fire. In this pose – and next to her lumbering, heavy weapon toting squadmates – she looked rather animated to my eyes, so I felt justified in giving her a respirator head from the Seraphim kit. The unhelmeted Seraphim heads have a bit of motion to the hair that can look a bit off on stationary minis, but in this case I think it works.
Paint wise, there’s not a lot left to say here. Unlike the Multi-Meltas, I gave the heavy flamers a simpler ‘all-metal’ casing look like I use on bolter weapons. There wasn’t any sensible place to stop and start painting black casing without extending it to the weapon grips – and I really wanted to avoid any black-next-to-black with the gloves. To compensate, I picked out a few of the details and piping on the gun with brass and a red gemstone paint for the gas feed.
As these would be the last Sororitas infantry I paint for a little while, I took a moment or two to reflect on whether my painting process for these miniatures had evolved over the months. Back when I started started this army, I remember lamenting the amount of time that each of these miniatures took to paint (to what I’d like to think is a ‘nice gaming miniatures’ standard), even when painted as a batch. Something I had planned on streamlining along the way was how much time I wasted washing, layering, pin washing, tidying up and edge highlighting the power armour – it seemed a lot of steps for something that ultimately comes off as a grubby white. Unfortunately, after some amount of experimentation, I found that trying to cut out the layering stage – by going straight to pin washing the armour – took a lot of effort and concentration without actually saving any time. There’s a lot of crevices on these models, many of which are obscured or hard to reach and many a few applications of wash to reach the appropriate level of contrast. It takes just as much time – and a great deal more concentration and effort – to pick all this out with the kind of accuracy you need to save yourself cleaning it up afterward anyway. As if that wasn’t bad enough, there’s a lot of other details to basecoat – the orange and black robes, black gloves and pouches, various metallics – that if you’re painting with any sort of speed, you will make a mess around and that will need tidying up.
In short, the biggest take away I’ve gotten from painting this scheme several times is that the biggest time saver isn’t in skipping steps – but worrying a little less about cleanliness at the early stages. On miniatures this small and detail dense, it’s really easy to get both paint and wash in the wrong place and cleaning this up more or less means painting the whole area again anyway. You might as well embrace the chaos (not that Chaos, heretic) and fight the urge to clean up your mistakes until you’re not just going to immediately make more.
As with any miniatures, the more you paint, the more you learn about the miniatures themselves and the faster the whole process becomes. You learn what’s most beneficial to spend time on and what’s going to get washed out by later steps anyway, but you also learn how much is fun to do in any one sitting and when to take breaks. I found with Battle Sisters – which seem to take an awful long time to paint – it’s worth splitting the job into three or four sittings. Get your base coats and washes done, and then walk away. Layer, pin wash, tidy and edge highlight the power armour, then walk away. The rest – the orange tabards, black leathers, metallics and bases – can then be tackled at your leisure in one or two sittings depending on how many models you’ve got on your plate and how much free time you’ve got. Painting the white armour is probably the least rewarding step – it’s so time consuming and it’s right in the middle of the process. When I really couldn’t face painting the armour, I found it helpful to do something a little more mindless like slapping down the basecoats on the next squad in the queue. When I could, I’d take a half hour out of my lunch break and lay down another step in the base coating process – I’d paint all the tabards orange, or I’d paint all the weapons silver, and so on – which helped me get a leg up on my next big session. Ultimately, there’s no silver bullet for these miniatures – they’re busy, they’re kind of small and fiddly and there’s a lot of them. You just need to keep the momentum rolling and your enthusiasm high2, however you can.
Alright, so we’ve gotten four heavy flamers into the army. That’s okay, but this is a Sisters of Battle army – we can do better. Behold, the Immolator! BURNING GLORY!
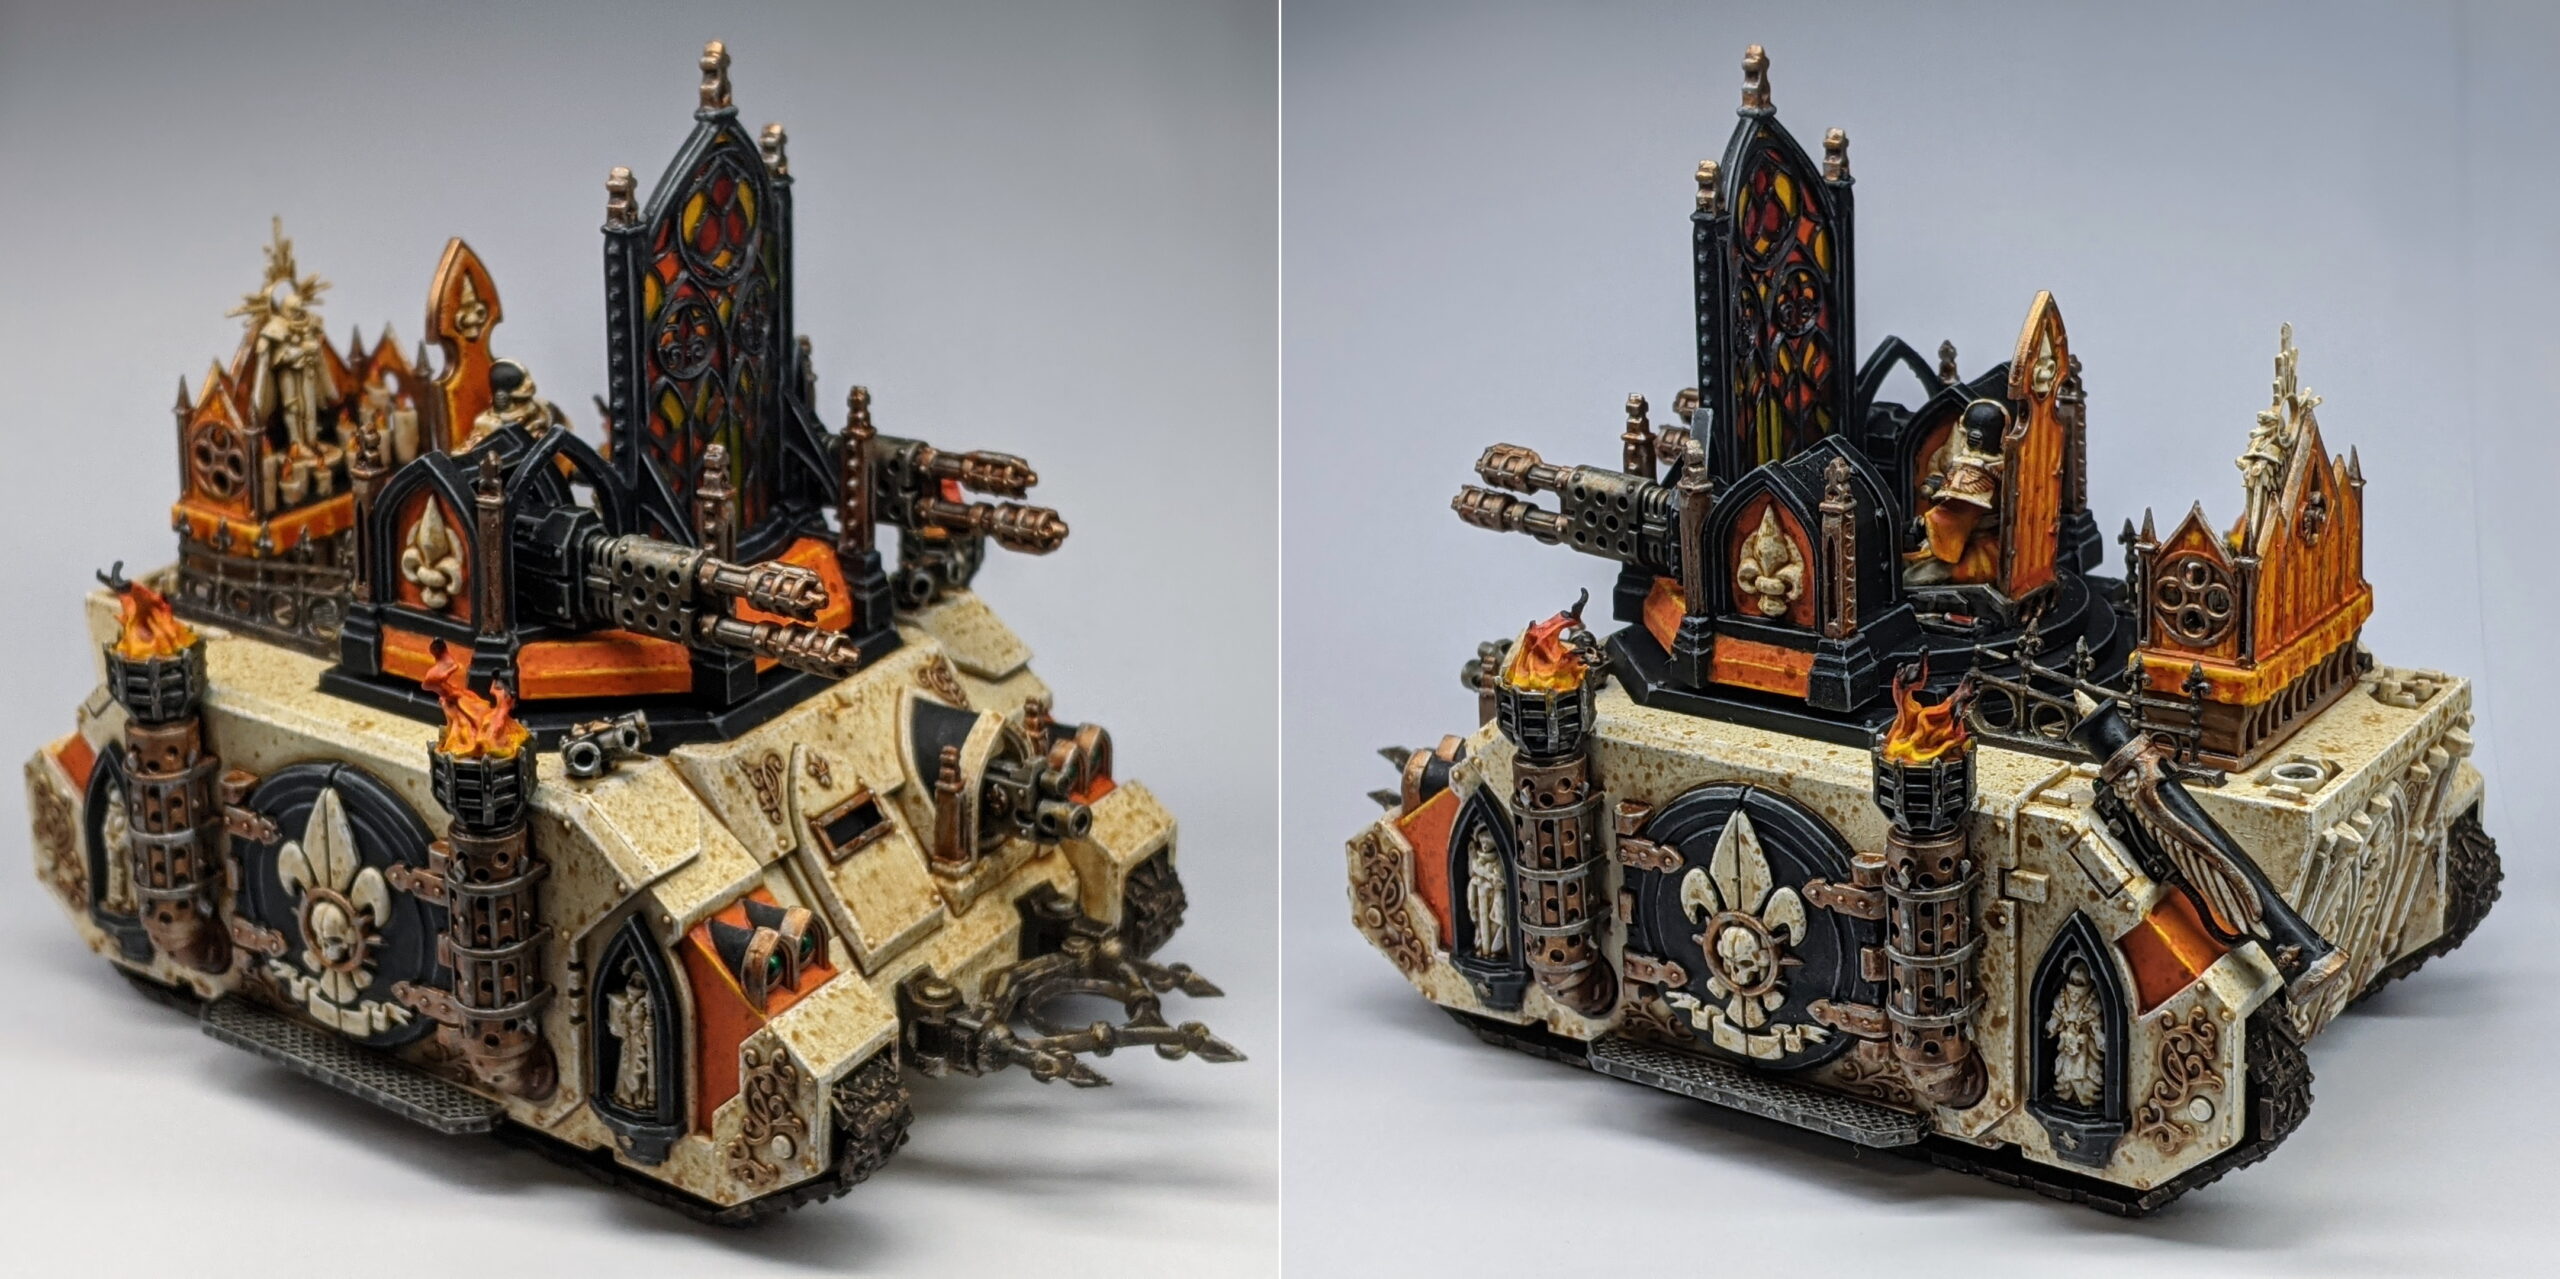
Even with the additional range afforded to Heavy Flamers by both 9th Edition and Retributor Squad rules, Battle Sisters often have a tough time getting close enough to cleanse the heretic in the holy flames of the God Emperor. This calls for a transport – and the Immolator is purpose built for this exact scenario.
As far as build goes, this was close enough to the Exorcis, with a few subtle differences. The Immolator comes with a detachable turret – you can glue this in place or leave it off for transport purposes. I decided not to glue mine, although the fit is very stiff and I’m not sure how comfortable I would be with removing the turret again now that the miniature is finished. Unlike with the Exorcist, the gunner is not detachable from the turret, but if you leave the stained glass window off for painting, she’s fairly easy to reach with a brush. And oh boy, you are definitely going to want to paint the stained glass window separately; the window is a single solid piece of transparent plastic (with a pair of hard grey plastic pillars that glue into the front), allowing you to tint the stained glass sections instead of painting them and get a cool effect.
I was in two minds about this. As you can see from my own finished model, transparency effects like these don’t quite have the same visual style as hand painted plastic. Some people find this jarring, like using static grass or unpainted rocks on bases. There’s also the small matter of actually priming and painting the frame of this thing, avoiding getting any opaque paint on the glass; you save time having to make your glass look like glass with paint, but the whole process is rather unforgiving. Despite my misgivings, I decided to go with tinting the transparent glass. It’s too cool an opportunity otherwise, and it’s not like my army doesn’t have its fair share of transparent or candy effects throughout – everything from the water effects on the bases to my use of gemstone paints for lenses, tubing and syringes.

As you might expect – being based on the same Deimos Rhino chassis – the vast majority of the Immolator painted up pretty much exactly as the Exorcist before it. There were a few colour choices to make here and there with regards to the Immolator turret – by far the most interesting of which was the stained glass.
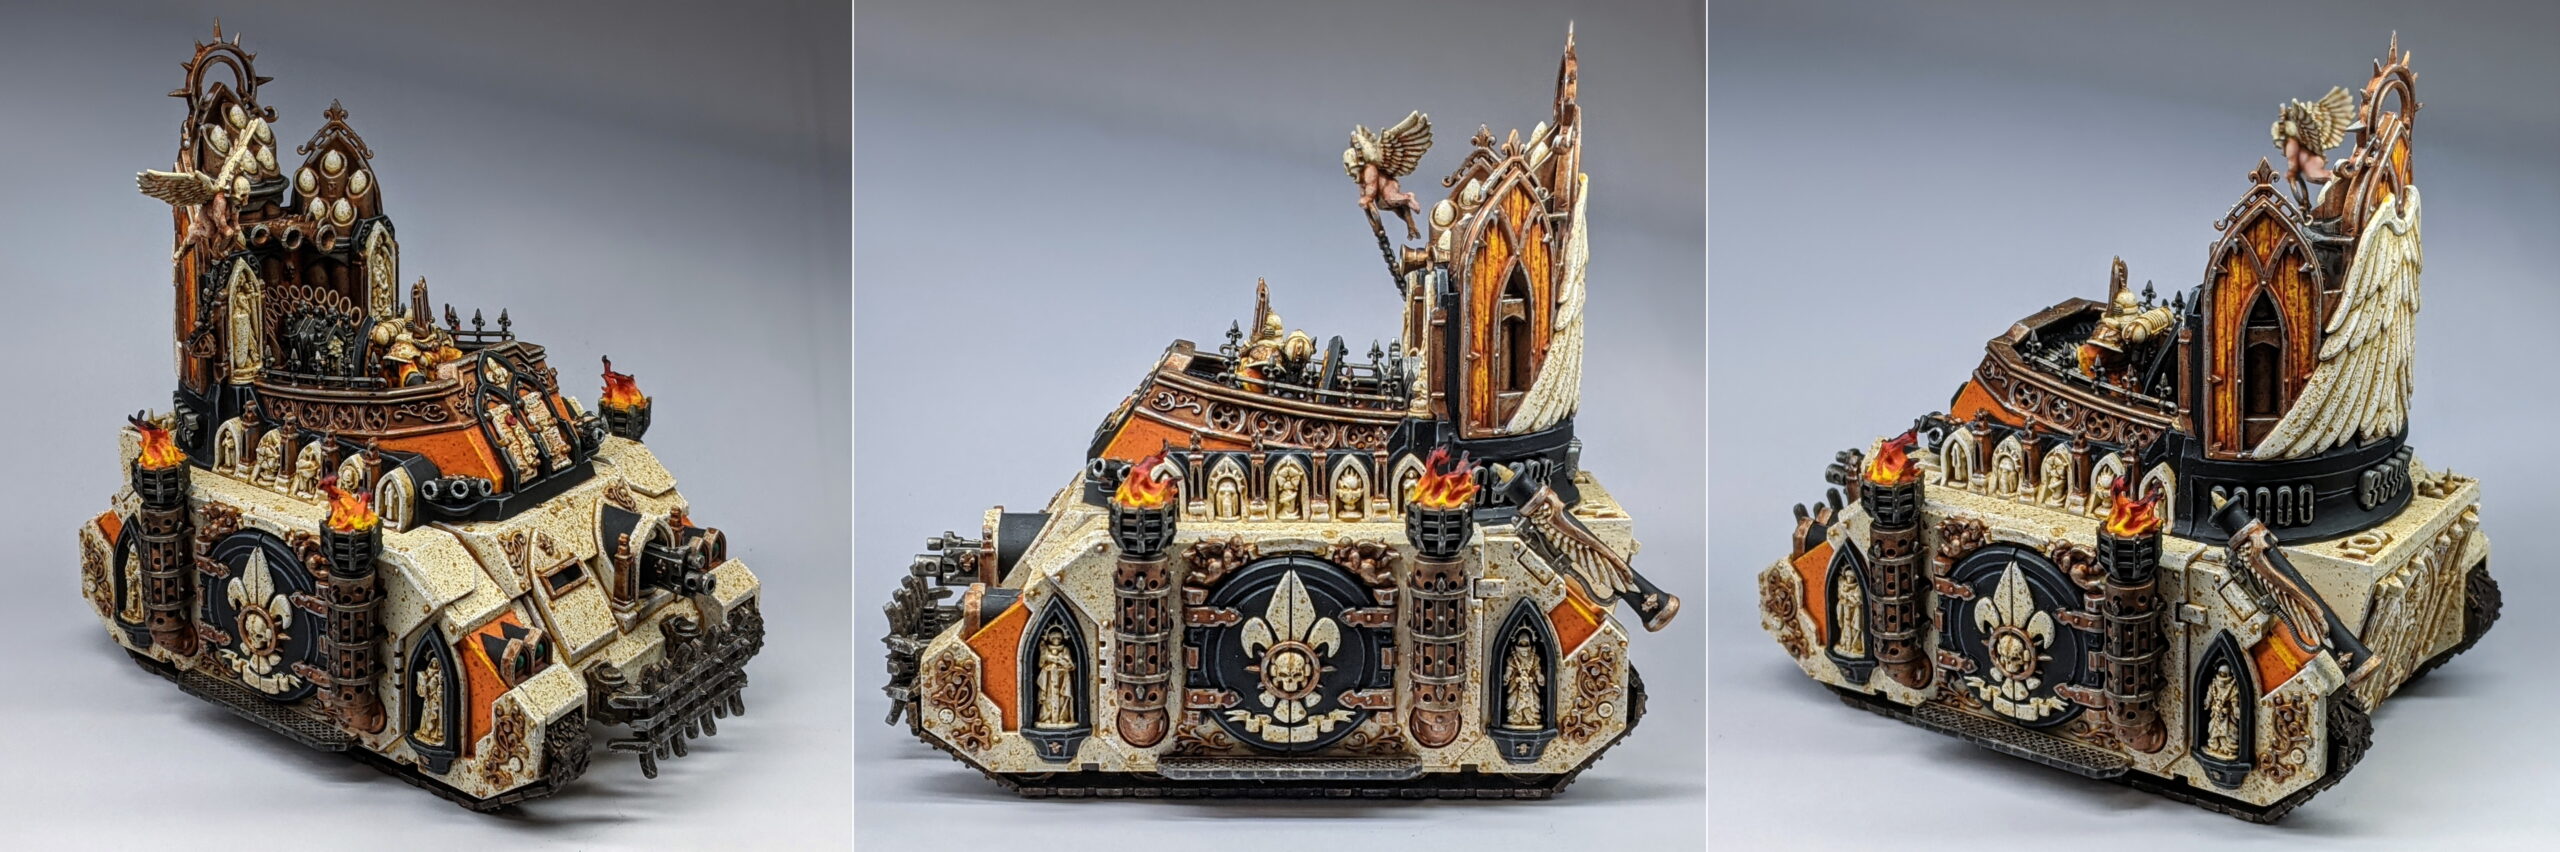
First and foremost, I cracked out a bottle of Vallejo Surface Primer and carefully brushed black primer over the exterior frame and left the primer over night to cure before proceeding3 – and then the fun began. I decided to stick with red, yellow and orange as my three colours for the stained glass. Not very imaginative, I know, but I figured I’d only get one shot at this and I had to be sure that it would gel with the rest of my colour scheme. To tint the windows, I used Spiritstone Red gemstone paint as my base for both the reds and oranges and some Yellow Vallejo Game Ink for the yellows. I painted these as thin and smoothly as my patience would allow on both sides of the window – 2 layers of Spiritstone Red and 3 layers of Yellow Ink. Then, I used Carroberg Crimson like a glaze over the Spiritstone Red for the panels I wanted to be red and a combination of Yellow Ink and Bloodletter Red for the orange panels. Wherever possible, I tried to ensure that no two adjacent panels were the same colour. When all of that had finally dried, I painted over all of my panels with a bit of Gloss varnish to restore opacity and glossiness. It sounds so simple, writing it down like this, but the experience was incredibly frustrating. It took some experimentation to ensure the red and the orange looked suitably different from one another, and getting any sort of even consistency in the texture was a nightmare. To make matters worse, I managed to contaminate my gloss varnish slightly, leading to a loss of opacity on some of the panes – this required very careful scratching away of paint, sweating profusely as I tried so hard not to damage the underlying plastic. I didn’t quite get away with it unscathed, but close enough for a battle tank, I reckon.
Next, with the steadiest hand I could muster, I picked out the framing in between the stained glass section with Vallejo Model Color Black. This took a while, and the best tip I have for anyone else attempting to do this is to hold your stained glass piece in front of a light as often as possible – many times I thought I was finished picking out the outlines, only to discover I had missed a spot. Having paint on the other side of the window or simply the light lost in the refraction of the chunky glass framing will often make a clear transparent section look no different to your black4 paint right next to it, so check often and triple check before you glue the window down to the Immolator tank.
When I was happy enough with the coverage of paint on the interior framing, I got a little bit of Heavy Bluegrey on the tip of my brush and picked out the most exposed edges of the interior and exterior framing with the side of the bristles. After a very careful application of matt varnish to the frame, I called it a day on the window and attached it to the Immolator turret. Just make sure you’re finished with any weathering or varnish steps on the tank before you stick your stained glass window down, or you might end up ruining all your hard work.
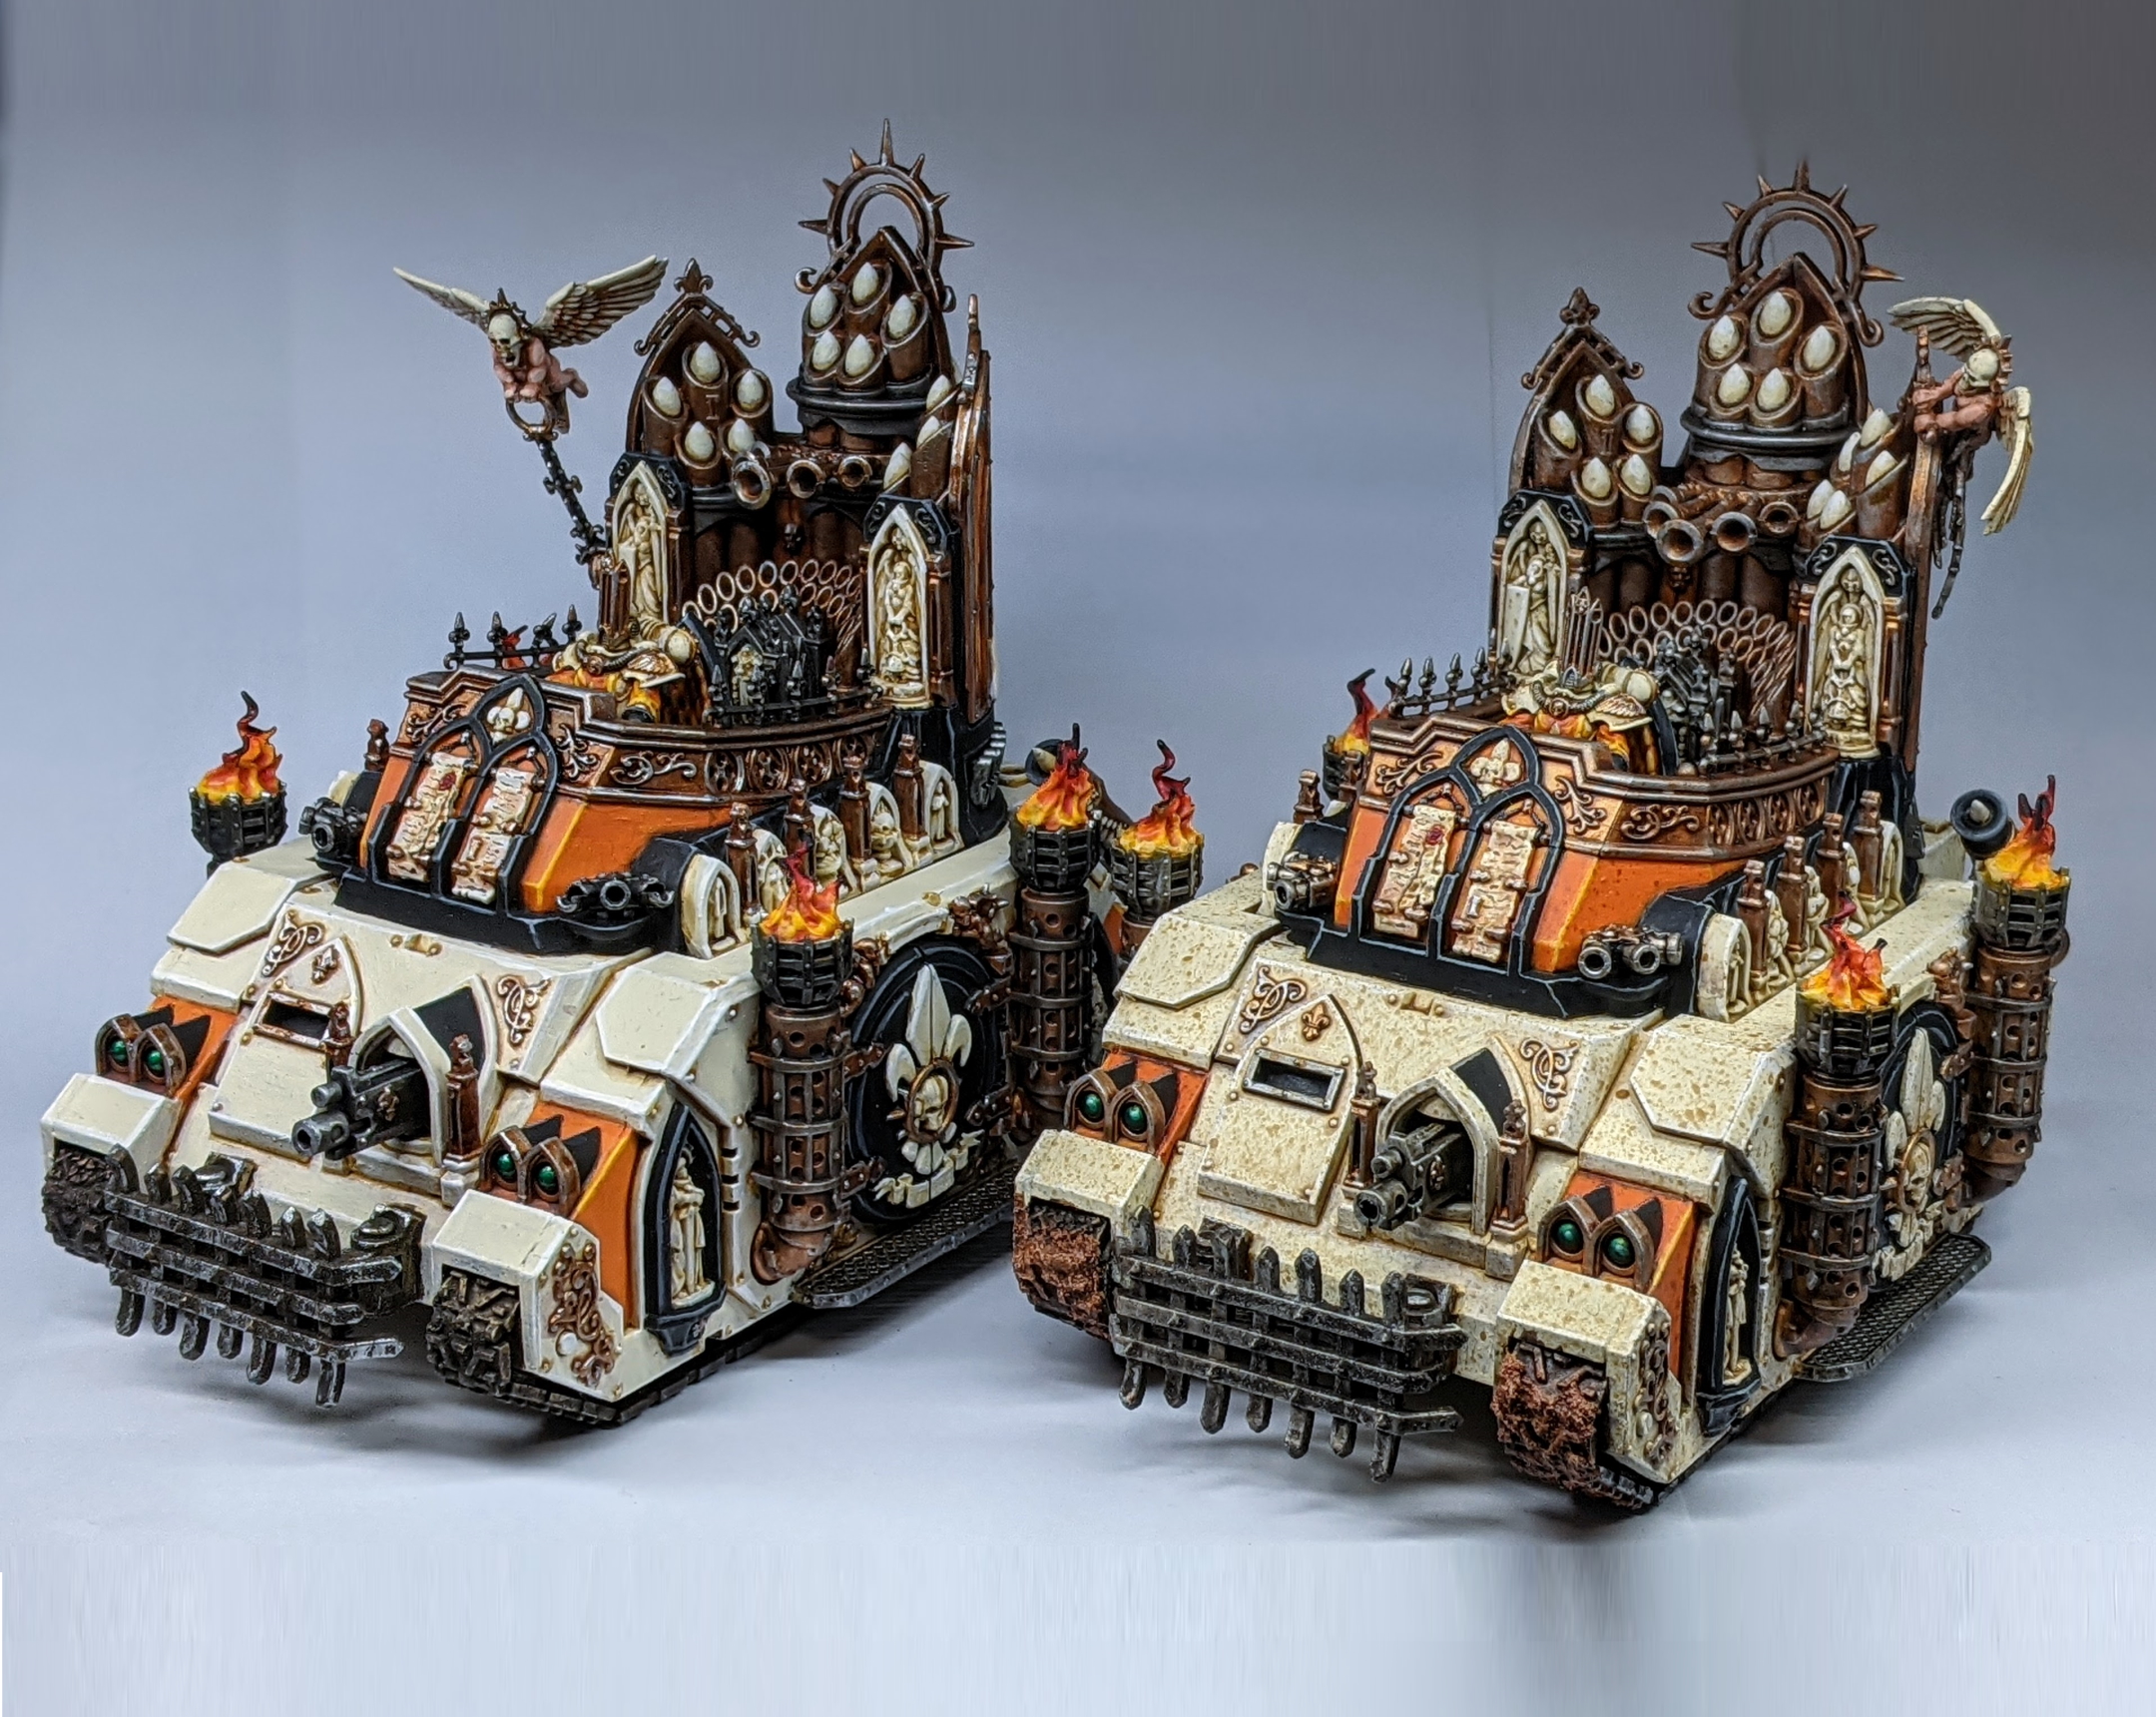
Speaking of hard work, here’s another Exorcist. I literally just painted one of these in Part Four, and my experience painting this second tank was largely the same. There were a couple of minor differences here – I used the other cherub on this time and I didn’t bother putting any texture paint on the treads like on the last (because I didn’t muck up the assembly this time).
On a related note, take a look at this nifty little comparison of a battle worn Exorcist next to one fresh off the assembly line.
Okay, I don’t really have a whole lot else to say about this model, so how about an army list now that the whole army is finished? This is my full, 2000 points of Adepta Sororitas – the Order of the Dying Light.
Detachment 1 – Batallion, The Order of the Dying Light
HQ:
- Celestine, the Living Saint
- 2x Geminae Superia
- Canoness
- Bolt Pistol, Power Sword
Elites:
- Hospitaller
- Imagifier
- Zephyrim Squad
- Zephyrim Superior with Zephyrim Pennant
- 4x Zephyrim
Troops:
- Battle Sister Squad
- Sister Superior with Bolter and Chainsword
- 2x Battle Sisters with Storm Bolters
- 2x Battle Sisters
- Battle Sister Squad
- Sister Superior with Bolter and Chainsword
- 2x Battle Sisters with Storm Bolters
- 2x Battle Sisters
- Battle Sister Squad
- Sister Superior with Bolter and Chainsword
- 2x Battle Sisters with Storm Bolters
- 2x Battle Sisters
Heavy Support:
- Retributor Squad
- Retributor Superior with Combi-Melta
- Retributor with Simulacrum
- 4x Retributors with Multi-Meltas
- 2x Armorium Cherubs
- Retributor Squad
- Retributor Superior with Combi-Flamer
- 4x Retributors with Heavy Flamers
- 2x Armorium Cherubs
Dedicated Transport:
- Immolator
- Immolation Flamers
- Hunter-Killer Missile
Detachment 2 – Spearhead, The Ember of the Blackened Wick
HQ:
- Missionary
- Bolt Pistol and Shotgun
Elites:
- Repentia Squad
- Repentia Superior
- 8x Sisters Repentia
Heavy Support:
- Exorcist
- Exorcist Missile Launcher
- Hunter-Killer Missile
- Exorcist
- Exorcist Missile Launcher
- Hunter-Killer Missile
- Mortifiers
- Anchorite with 2x Penitent Flails and Heavy Bolters
- Mortifier with 2x Penitent Flails and Heavy Bolters
- 2x Mortifiers with 2x Penitent Buzz-blades and Heavy Bolters
Dedicated Transport:
- Sororitas Rhino
- Hunter-Killer Missile
And what’s a finished army without a nice full army shot to cap it all off?
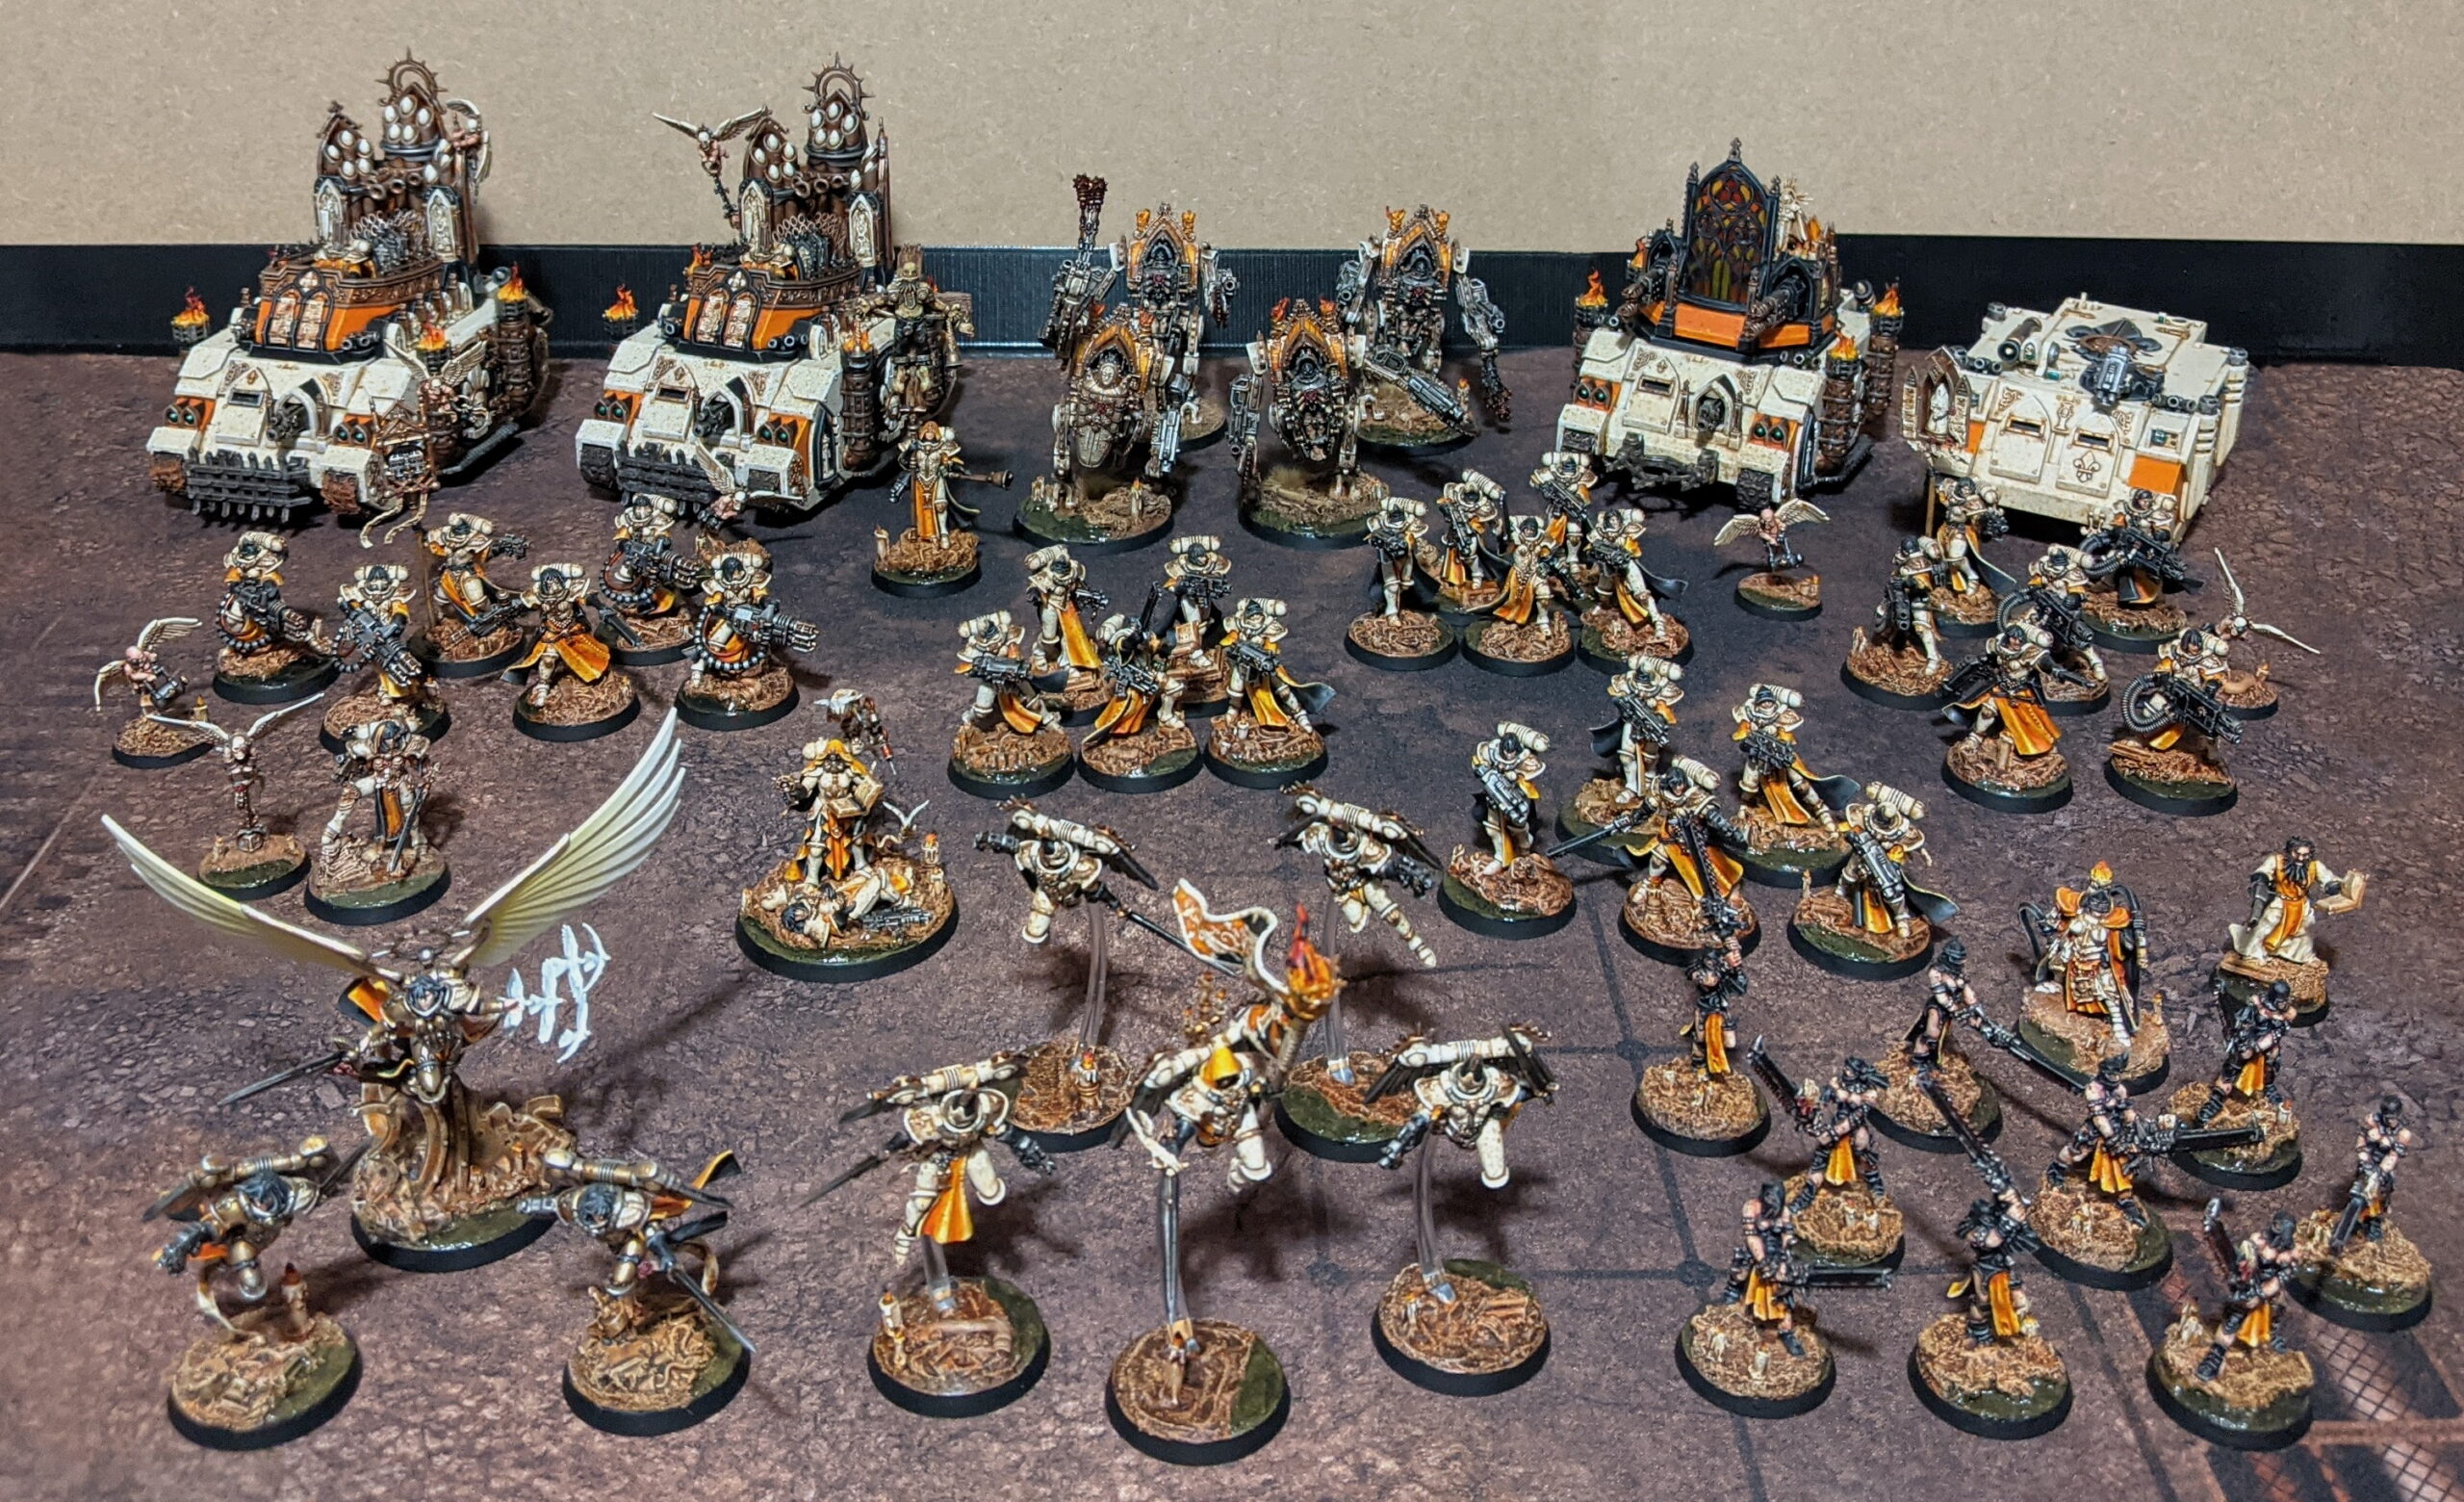
So, here we are – once again at the end of another full scale army project (for the time being, at least). I know I say this every time I finish a project, but I really am tremendously proud of what I’ve accomplished with this army. It feels like a coming together of lots of little techniques and aesthetic elements that I’ve learned and employed over my past couple years of hobby. Everything from the orange and ivory scheme to the greenish/grey skin of the Penitents, the toothbrushed spatters and even the water effect on the bases – all of the above made their debut on a past project featured on this blog, and it’s really cool to see it all come together to create new. And on an Adepta Sororitas army, no less!
I’ve said many a time on this blog that I consider myself more of a Middle-earth and Heresy player than anything, but I’m extremely excited to finally have a proper 40K army for 9th Edition that really embraces the elements of the 40K setting that I love the most. It feels good to be moving forward with something modern and period appropriate, with a scheme and aesthetic that feels all my own.
Until next time, thanks for reading and happy wargaming!
1 I’d love to go back and pick up some Arco Flagellants, convert my own Inquisitor and perhaps even the Triumph of Saint Katherine at a later date.
2 I listened to a whole lot of stuff on Audible while painting this army (mostly Heresy audiobooks), but one thing that got me especially hype was the Our Martyred Lady audiodrama. Really got me itching to paint Inquisitor Greyfax though – who would’ve thought Catherine Tate would be such a good fit for Warhammer 40,000?
3 Brush on primer generally has a little less tooth than the kind you get in rattle cans, so it was important that the part of the window that would potentially be getting handled was done ‘right’, lest I have to make infuriating repairs after a game. I can just about believe that I won’t try and pick the model up by the window pane itself in the future, but that’s about as far as my faith in myself extends. I am a clumsy, clumsy oaf of a man.
4 This tip is probably less useful if you’re painting your interior framing in something bright, colourful or metallic – but if you paint it black, trust me on this one.