I wonder if I should stop announcing ‘what’s next’ at the end of my posts. Lately, they’ve been about as accurate as mob of Ork Boyz.
After polishing off my Azog’s Legion miniatures, I had fully intended to get started on my Mirkwood allied detachment for my Iron Hills. I looked out the miniatures, cleaned up, assembled and primed them all. I even got as far as laying down the base coat and wash over the Royal Guard and Cavalry miniatures, and then I.. just sort of lost interest. I started to feel a little burnt out on Middle-earth, having finished 900pts+ of Azogs Legion right after a quick Last Alliance project – supposedly a palette cleanser after a diorama project. It’s been some months – January – since the last time I had painted anything other than Middle-earth – and I felt ready for a change of pace.
I looked over at the Shelf of Shame (tactically positioned just to the left of my display cabinets). Those Mirkwood miniatures might have taken up a number of lines in my TODO List, but there was one big box on the shelf taking up a lot of physical space – my Tablescapes tiles.
Tablescapes are/were a set of 1’x1′ injection-moulded plastic tiles for wargaming, not dissimilar to Games Workshop’s own 2’x2′ Realm of Battle boards. These came in a wide number of themes such as Urban Streets (that aren’t plastered with Aquillas) and the Rolling Fields (that aren’t littered with skulls1), and way back before my first game of Age of Sigmar, I bought a 4’x4′ battlefield worth of Rolling Fields tiles. The last time I had played Warhammer, me and my friends would stick mostly to 1000pts games games on 4’x4′ battlefields, so it didn’t occur to me to go bigger at first. I really liked the idea of playing over something plastic and detailed, that would match the aesthetics of the plastic miniatures themselves. I hadn’t ever played a game on a neoprene mat, and I didn’t see the value in something so flat.
Once I had a couple of games under my belt, I realised that a 4’x4′ surface would not be enough for my 2000pt armies, so I purchased a 2’x4′ ‘Expansion set’ of tiles from Secret Weapon (specifically picked to convert a 4’x’4′ set into a 6’x4′). To make things a little more interesting, I decided mix and match and pick up the Forgotten City set this time, adding a variation and a bit of colour to the board edge of my Rolling Fields.
This 6’x4′ set up would quickly become my bread and butter surface for games of Warhammer 40,000. After a few games of Age of Sigmar, my friends either dusted off their old 40K armies from 3rd Edition or invested in whole new armies. Before long we were all playing 8th edition of Warhammer 40,000, and my decision against painting the board black had paid off. Slowly, my Age of Sigmar terrain cycled out in favour of more 40K oriented pieces, but this board was a constant2.
I’ve got a lot of experience playing on these Tablescapes tiles now, so I’m fully aware of their issues – and there are several. It’s awkward to store, time consuming to set up and disassemble before a game, loud to roll dice over and, at times, can be a difficult to balance miniatures or terrain on at times. Still, I have to say that I love this product. There’s something to be said for the cohesiveness of playing with painted plastic miniatures over a nice set of painted plastic terrain over a painted plastic surface. Everything has a familiar, acrylic visual effect to it, and the tabletop feels even more like an interactive diorama than before.
So I felt a pang of sadness when I’d heard that Secret Weapon Miniatures were discontinuing their Tablescapes line. One of the things I liked about Tablescapes was that all of the tiles were compatible with one another – the size and shapes were the same. The texture of earth sections on Forgotten City was the same as on the Rolling Plains as on the Scrap Yard. Urban City had the same 1″x1″ stone pavings as Forgotten City did. I always liked the idea that if I wanted, I could order myself more Forgotten City tiles to expand out the Temple section of my board, or pick up some Scrap Yard tiles to add a couple of interesting scatter terrain bits to my Rolling Fields. I wasn’t in a hurry to achieve any of this, but I liked having the option.
As fate would have it, not long after I discovered these tiles were getting discontinued, Secret Weapon announced an anniversary sale, with 20% discounts off a number of items – including the Tablescapes line. With most UK suppliers now long out of stock of these tiles, this was my best opportunity to ensure I wasn’t left out in the cold. I ordered another 8 tiles of Forgotten City, such that I could expand my board to an 8’x4′, run two separate 4’x4′ tables or run a more Temple-heavy 6’x4′. I even emailed Secret Weapon asking if they would send me specifically the tiles that I’d been missing from the full 4’x4′ version of the Forgotten City pack (rather than being stuck with 2 sets of the expansion tiles) and they very graciously accommodated me.
And so it was that I came to have a gigantic 12″ x 12″ x 8″ box sitting on my shelf of shame for around half a year. These sorts of “last chance to buy” panic purchases are easy to put off for a long time. They were not planned purchases, or even flavour of the month impulse buys – just bits and pieces that I planned on doing “somewhere down the line.” Well, thus far 2020 has been all about getting through projects I’d planned on getting to ‘some day‘, so this felt like a perfect little distraction from my Elves – a complete change of pace, and another big item off of the backlog. What could go wrong?
Well.. not the painting, at least.

The tiles themselves were easy enough. I’d already done 8 of these before, and I’d kept the technique I used on them alive on several terrain projects since. It was time consuming, but hardly challenging. I jammed on a Horus Heresy audiobook and got grinding.
First, I start with a quick primer coat of Chaos Black out of a can. While the primer cures, I take about six different paints from the shelf with “Grey” in the name. These are Mechanicus Standard Grey, Wolf Grey, Heavy Bluegrey, Heavy Grey, Stonewall Grey and Cold Grey – many of which are closer to blue or green than actual greyscale. I then take a largeish brush (I use a Citadel XL Base brush for this) and – one paint at a time – work my way through a random assortment tiles, columns or debris in the chosen colour. Sometimes, I’d paint two adjacent tiles. Sometimes, I’d go a whole row without that colour. My aim is not to spend too long thinking about it, but trying to be a little random and unpredictable. Once I’d finished all 8 tiles in this way, I moved onto the next colour and repeat the process until I’d used all of my different paints. I’d then take one final pass to fill in the blanks with whatever I had left on my wet palette. The mounds of dirt/earth were left black, and I’d roughly clean them up with black again if I’d gotten paint on them.
Once everything had been base coated, the tiles were doused in Agrax Earthshade wash. It’s more economical to make your own wash out of ink and matte medium here, but Agrax was all that I had to hand at the time. When the wash dried, I took a large brush and drybrushed the surface with Khaki. The combination of a singular wash tone and drybrush not only shades and highlights everything in one fell swoop, unify all the different colours of stones again, making the surface all look like the same material despite subtle tonal variation3. This method is definitely slower than basecoating in a single colour, but it’s super easy, brainless and looks good.
To seal the tiles, I brushed over some Vallejo Polyeurethane Matt Varnish. This stuff has a slightly satin finish, and the process of brushing it on can knock off and move around some of the drybrushing layers, which is not ideal – if I were starting this from scratch, I’d have just blasted it with a can of Dullcote, but this was how I varnished the first 8 tiles, and I wanted the next 8 to match. Besides that, despite years of getting taken apart and put back together, having miniatures and terrain and dice thrown on them, these tiles have never seen so much as a scratch to the paintwork. Why mess with success?
When the varnish had completely cured, my final step was to glue some tufts and flock to the tiles. This has two benefits – the first is that it adds a little texture to the tiles, some visual interest that plays off nicely with the flocks and tufts on the textured bases of miniatures themselves. The second is that it helped smooth out any outstanding rough edges. The tiles were basecoated roughly and quickly – I didn’t want to spend weeks carefully outlining every individual paving stone, I wanted to get them done in an evening. One of the reasons I was able to throw so much paint on the tiles so quickly was that many of my mistakes would be covered up in the wash, with even more covered up by the drybrushing. Whatever rough edges remained would get covered up with flock.
Simple. Easy. And I reclaimed a ton of shelf space. What a cathartic little hobby project, right?
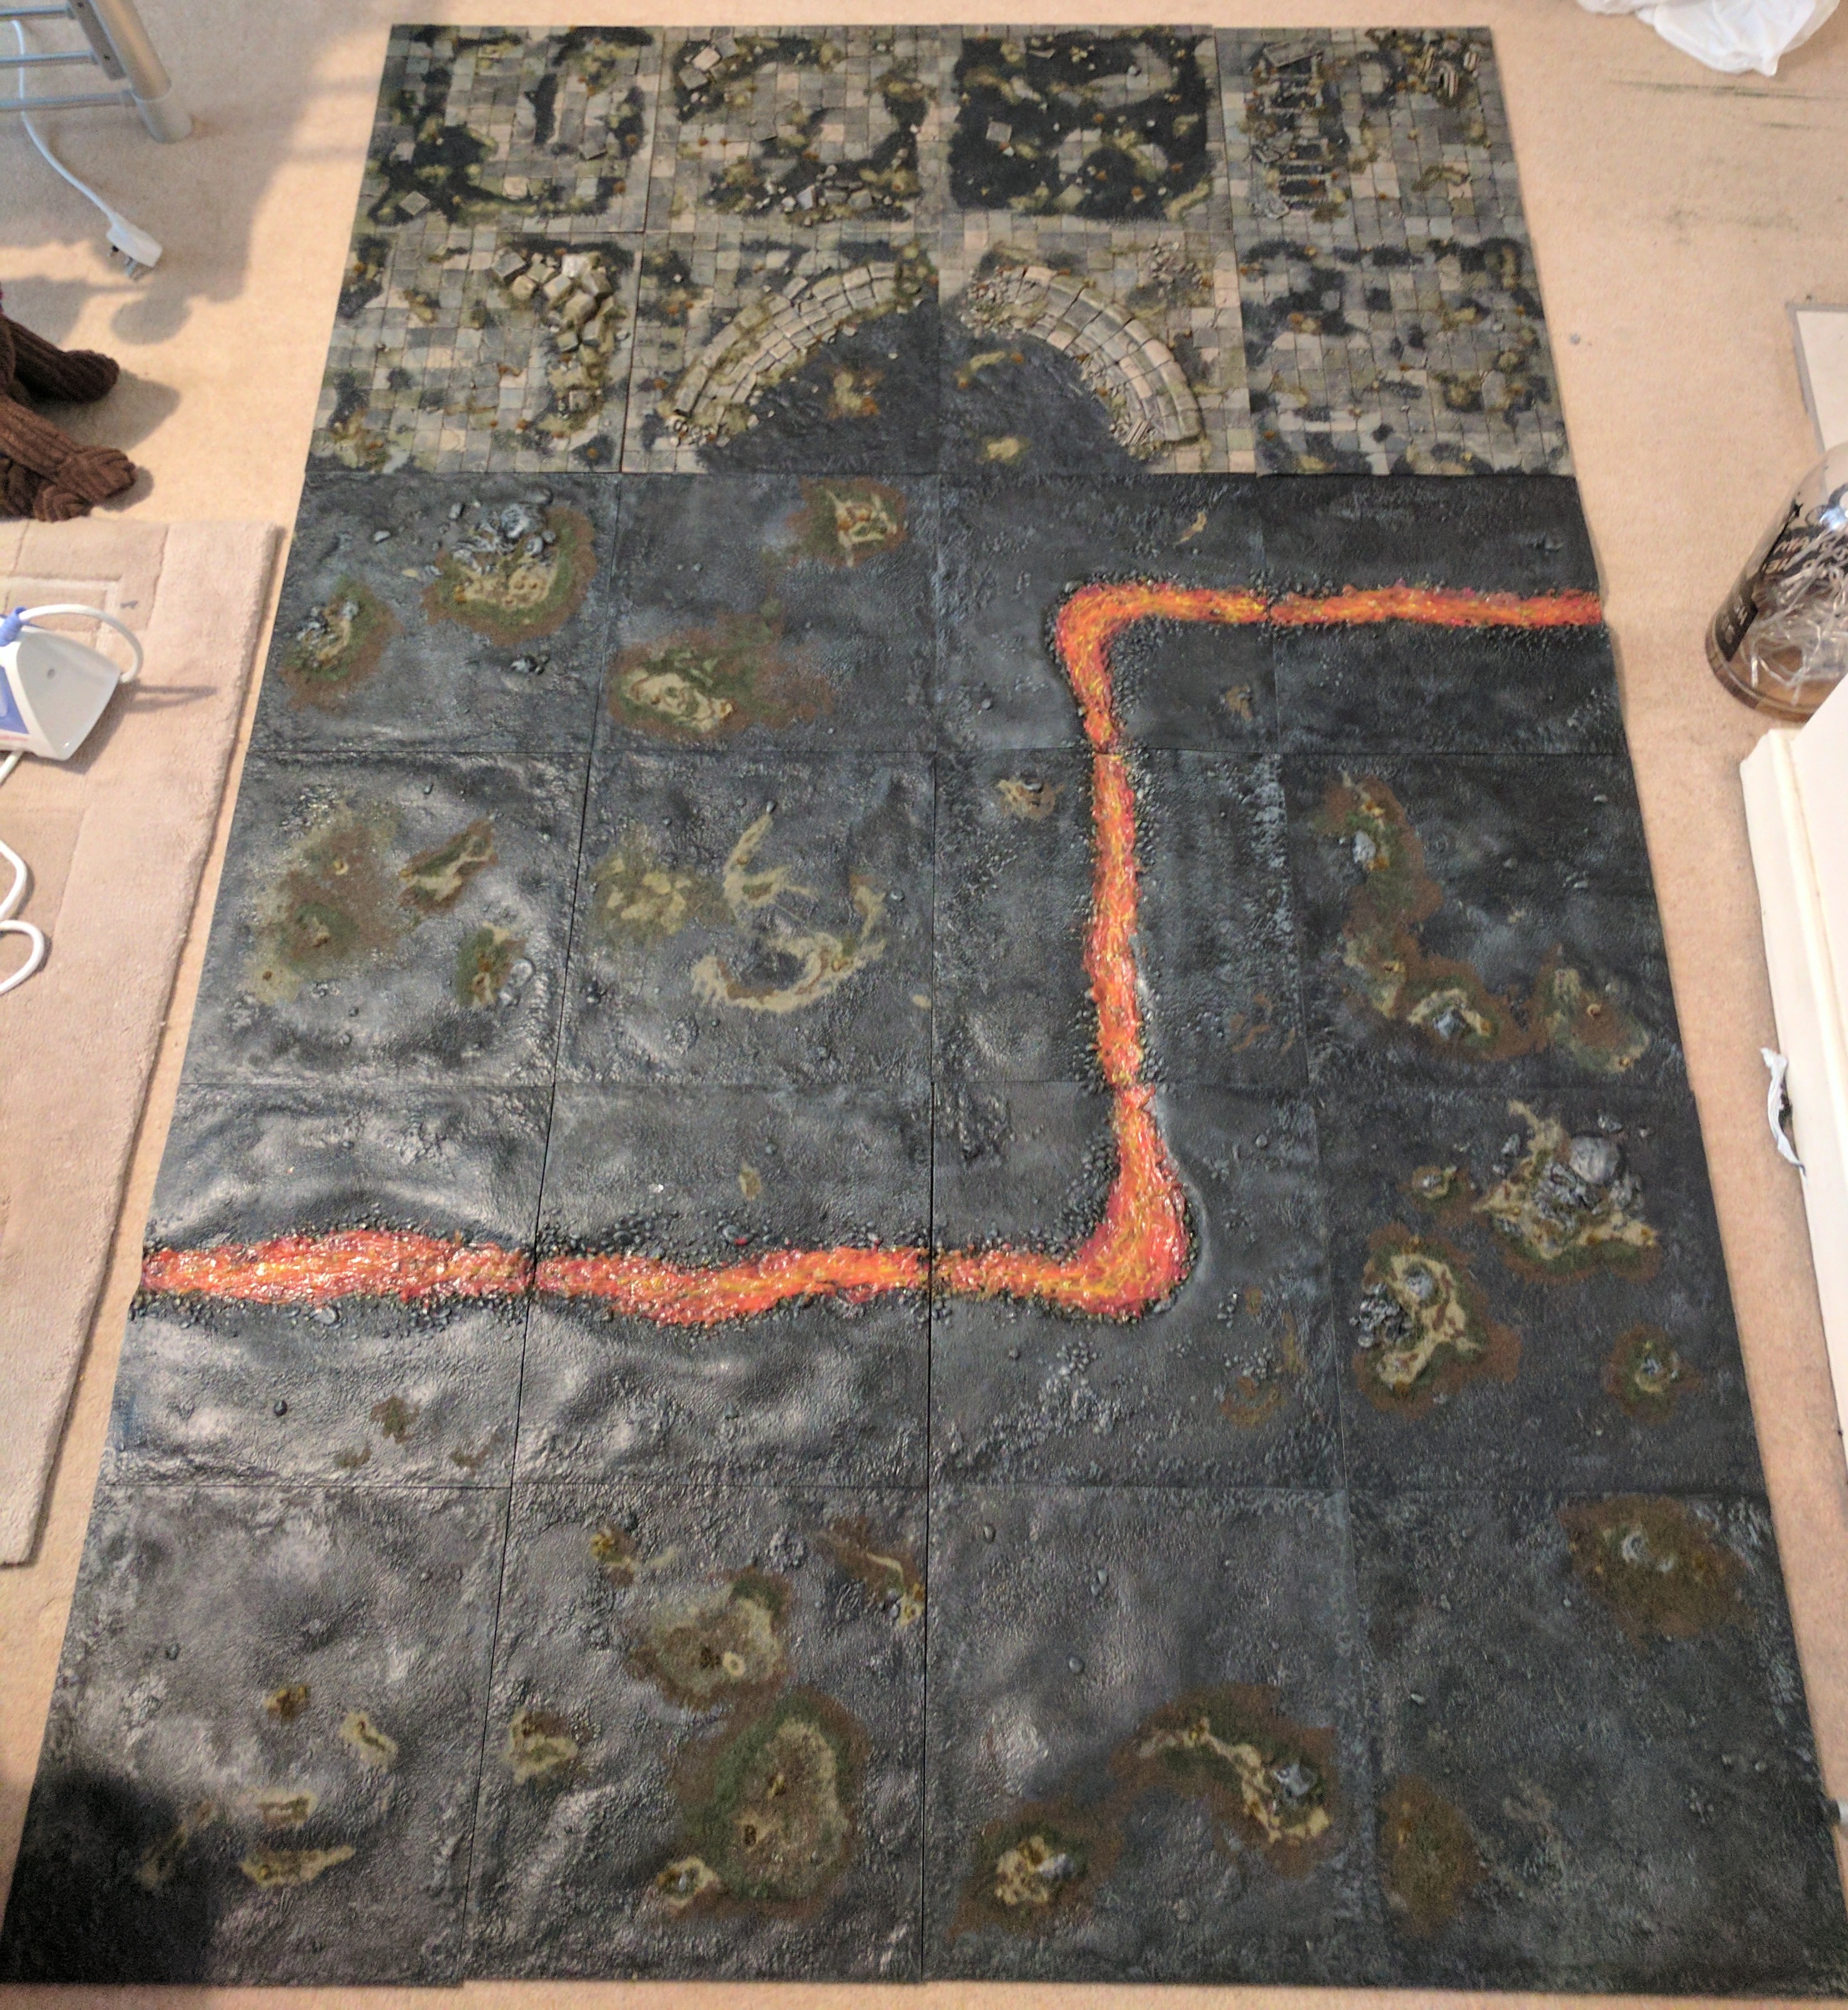
But as is ever the case with me, this little project began to escalate. With my Forgotten City tiles all finished, I pulled out my venerable Rolling Hills tiles and had a long look at them. For a long time, I’d been feeling not great about the river of lava over them. Visually, they weren’t perfect – relics of an age where painting yellow had completely eluded me – but what annoyed me the most was how restrictive they were in terms of gameplay and terrain placement. There’s no real way to play lava other than Dangerous Terrain, and having a strip right across the middle of the map is more than a little frustrating – it’s an unnecessary complication to advancing infantry in an edition of 40K that already favours ranged play. It irked me, and while I was in a terrain-painting mindset, I wanted to do something about it. About then, I remembered that I still had some Solid Water sitting on my shelves.
The plan was to just yank the lava off the tiles and reprime – if I remembered correctly, I made it with Vallejo Water Texture and acrylic paint. I’ve ripped off water texture before, surely it wouldn’t be too difficult, no?
Yes. Maybe it’s how thick the lava was or the fact it was applied in several layers. Maybe it was the acrylic paint mixed throughout or the fact it had been dry for a full two years, but man, that gunk was rock hard. Some failed attempts at peeling 3mms of solid acrylic later, I gave up on trying to remove it. But the water banks were reasonably wide – maybe I could just pour over it, and the lava texture beneath will make it look like it’s moving?

And, yeah, it actually kind of worked out. I base coated over the lava with Mutation Green before drybrushing with Sick and Goblin Green. Finally, I knocked it back down with a wash of Agrax Earthshade. The next step – out of fear the resin would lift the paint from the surface of the water texture as it cured, permanently revealing flashes of orange beneath the surface – was gloss varnishing over the surface.
While my varnish air dried, I mixed up the two part resin in a plastic cup, with a dash of Biel Tan green and a drop of Yellow ink – just enough to tint the resin without taking away any of the waters opacity. I wanted the resin surface to match and blend, to take on the colour of the river itself to it didn’t just look like a glassy surface above a river of slime. In retrospect, I could’ve added a little more colour to the river, but recent experiences with pouring resin have taught me that it’s best to err on the side of caution.
To get the tiles ready for pouring, I sealed up the open ends of the river channels on each tile with masking tape. Having learned a thing or two about masking resin on my Barrels out of Bond diorama, I pretty much just glued the tape to the edge with PVA glue – maybe it was the tape I had used, but the adhesive on masking tape alone was not water tight enough for me to prevent bulging – but it did help keep it in place while the PVA seal dried.
Tiles sealed, I applied one more coat of gloss varnish to be safe, and I mixed up my resin. Having had so much waste with my Barrels diorama, I once again erred on the side of caution and mixed up only half of the resin I had left in the bottle. My tiles were sealed, my flooring protected with copious amounts of cardboard, my resin mixed conservatively. I even picked out a plastic cup and tested it was not cracked with a little water first. I thought I had it all figured out. Finally, a pouring resin operation was going to go smoothly!
Not quite. Unfortunately, the gloss varnish took a lot longer to dry than I expected. Not wanting to pour over sticky varnish and risk lifting the paint, I ended up waiting so long that my pouring resin ended up curing in the cup. Whoops. Good job I was conservative in my volumes – I had just enough resin mix left over to fill the 6 river tiles. Just.
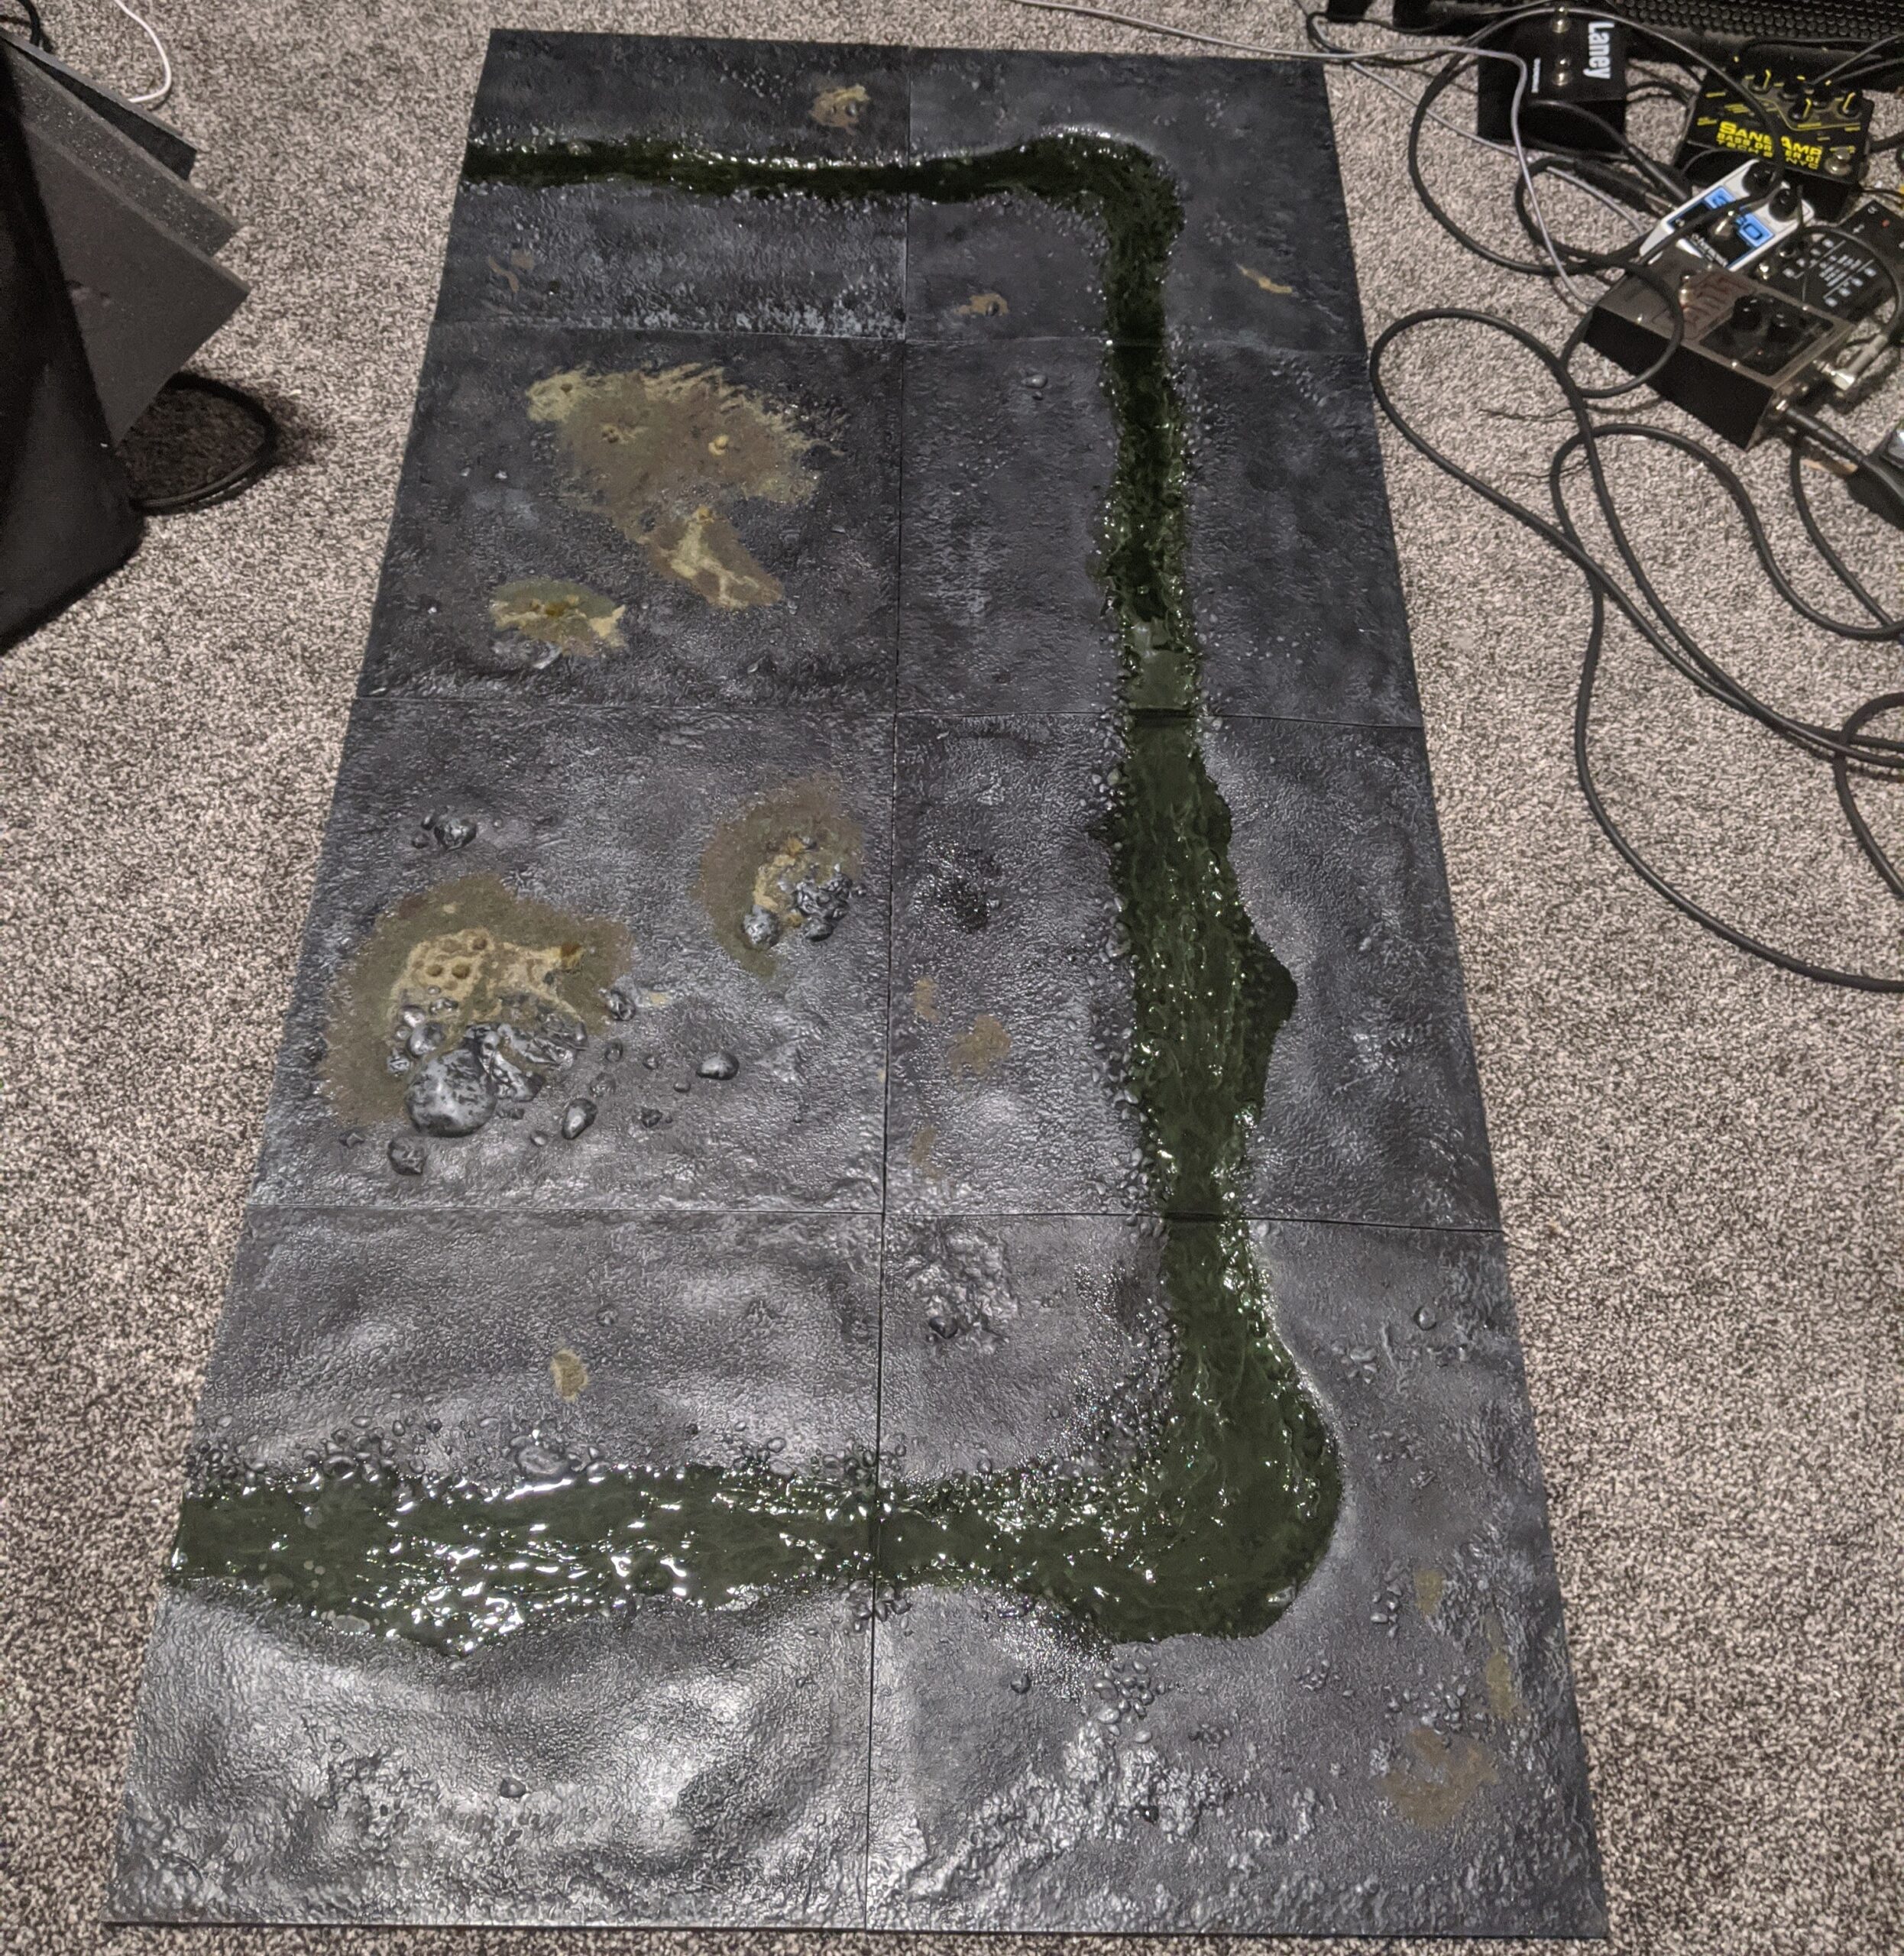
6 stressful resin pours and a good nights sleep later, I had completely refurbished the river stretch on my Rolling Hills tiles, and I was happy. But I was not content.
Something about painting those Forgotten City had awoken something in me. I wanted something more. I wanted some cool terrain to place over them. For the longest time, I thought that this was going to be Games Workshops Dominion of Sigmar range. When Dominion of Sigmar was first announced, I didn’t think much of it. It felt boring to me. Uninspired. But after encountering it in the wild a couple months ago, I was impressed by it’s usefulness as a line of sight blocker and overall playability. I thought it might match the aesthetic of the Forgotten City tiles nicely, and I’d planned to pick some up at some point in the future. The more I worked on these tiles however, the more I knew I wanted to satisfy a long held desire of mine to build a city fight board. Games Workshop themselves do an incredible looking modular city ruins kit for Warhammer 40,000 that even features a similar pillar design to those strewn around on my Forgotten City tiles.
I was enamoured with the concept. I could see the city in my minds eye – it looked awesome. But there were two key issues:
- Holy moly Games Workshop terrain is expensive. You get what you pay for, of course – the Sector Imperialis stuff looks incredible. It’s modular, stacking, and is absolutely littered with details. It’s resplendent. But, then again..
- It’s way too busy for terrain. There’s so much going on – metallic trim, little generators and other little details. This would be fine for a ruin at a time, but I wasn’t going to spend weeks of my life building and painting a table full of the stuff. I wanted something a little simpler, that would come together quickly – especially for a spur of the moment project like this. Momentum was everything.
So, that ruled out Sector Imperialis. Still, I couldn’t shake the idea of a Gothic city fight board, so I went hunting for 3rd party ruins – something in hard plastic, that would be durable, and would match the pillared aesthetic of my Forgotten City tiles. Something that would look good on the tabletop, but durable enough for casual play and achievable within a weekend of hobby. Eventually, I happened upon Pegasus Hobbies.
Pegasus Hobbies is an American company that manufacture a wide range of different kits, including scale vehicle kits as well as wargaming terrain. The kit that captured my imagination was their Gothic Ruins set. This kit is available in the UK around the £22-25 price mark, and comes with two large, two-story corner ruins and a piece of plastic flooring on the 1nd floor. They’re a good height, useful for blocking line of sight to Imperial Guard-scale walkers and tanks and just detailed enough to look good after a quick drybrush, but not so busy you’ll spend forever laying down the base coats. Aesthetically, they’re not quite as perfect a match for my tiles as Sector Imperialis was, but the capture the vibe nicely and – should I ever wish to expand my city with one or two Sector Imperialis buildings for variety – would blend in nicely. They have a similar look and feel to the ye olde corner ruins from the Warhammer 40,000 3rd Edition box set.
Better yet, there are a couple of other Gothic Building sets in this range. These are Small Set #1, Small Set #2 and Large Set. These are distinct from the Ruins in that they are complete buildings – not (yet) ruined. Unlike the corner ruins, which are formed of 2 large ruined wall sections, the Gothic Buildings are modular. These come in the box in smaller wall, window or door sections which snap together to build a certain style of building – but there’s nothing to stop you from building whatever you want with them. Best of all, the Gothic Ruins are completely compatible with these kits. Each ruin wall is the equivalent of 3-4 modular wall sections, albeit ruined. Both Small Sets contain a number of generic single and double wall or window sections, along with a few feature pieces such as small arches, windows, slopes or spires unique to their respective kit. The Large Set contains purely the generic pieces – wall, window and door sections – although in greater quantity and at a more competitive price – especially useful for adding height to your buildings – though I’d recommend sticking to Small Set #1 and #2 as initial purchases for their unique options.
This was exciting to put together. The possibilities were endless. You could build anything from a tiny square room with a door to a massive 6 story cathedral with arches, doors, windows and ruined corners. You could build facades, corner pieces or even fully enclosed buildings if you wanted.
These kits are not perfect, however. One major limitation is that was that the only flooring pieces available were in the Gothic Ruins kits, meaning you’d need to add your own flooring if you wanted anything larger than a couple inches in a corner of a single floor for each of your buildings. There is no ceiling pieces either, though this is less of an issue when you’re building ruins like I am. It’s easy enough to build your own out of popsicle sticks and plasticard, but that’s not really why you buy a plastic kit, is it?
Another mild inconvenience is that in order to support the modular nature of the kits, the columns are dotted with little rectangular holes. This is the way it is because the kit has to support walls, arches, or gargoyles just about everywhere to keep it fully modular. It does come with a number of frames of little plastic filler blocks designed to go into the holes, but they neither leave a perfect finish nor is there ever quite enough of them. From my initial purchases of 4x sets of the Gothic Ruins (these make great standalone corner ruins on their own, but are equally useful as ruined tops of buildings), 1x Large Set, 2x Small Set #1 and 1x Small Set #2. By the time I’d built my buildings (enough to densely cover a 4×4 table with a good variety of 2, 3 and 4 story buildings), I had a good amount of wall sections left over – but too few filler blocks to completely fill my exposed pillar holes. This isn’t the end of the world, as you can achieve similar results with a bit of green stuff, but it would have been nice to have enough blocks in the kit to cover every hole without using all of the supplied gargoyles and torches.
So, what did I make? Well, as noted above, I ordered about 8 kits all in all (totalling somewhere around the £200 mark), and managed to put together:
- 3x 2-story Corner Ruins
- 2x 3-story Corner Ruins with door
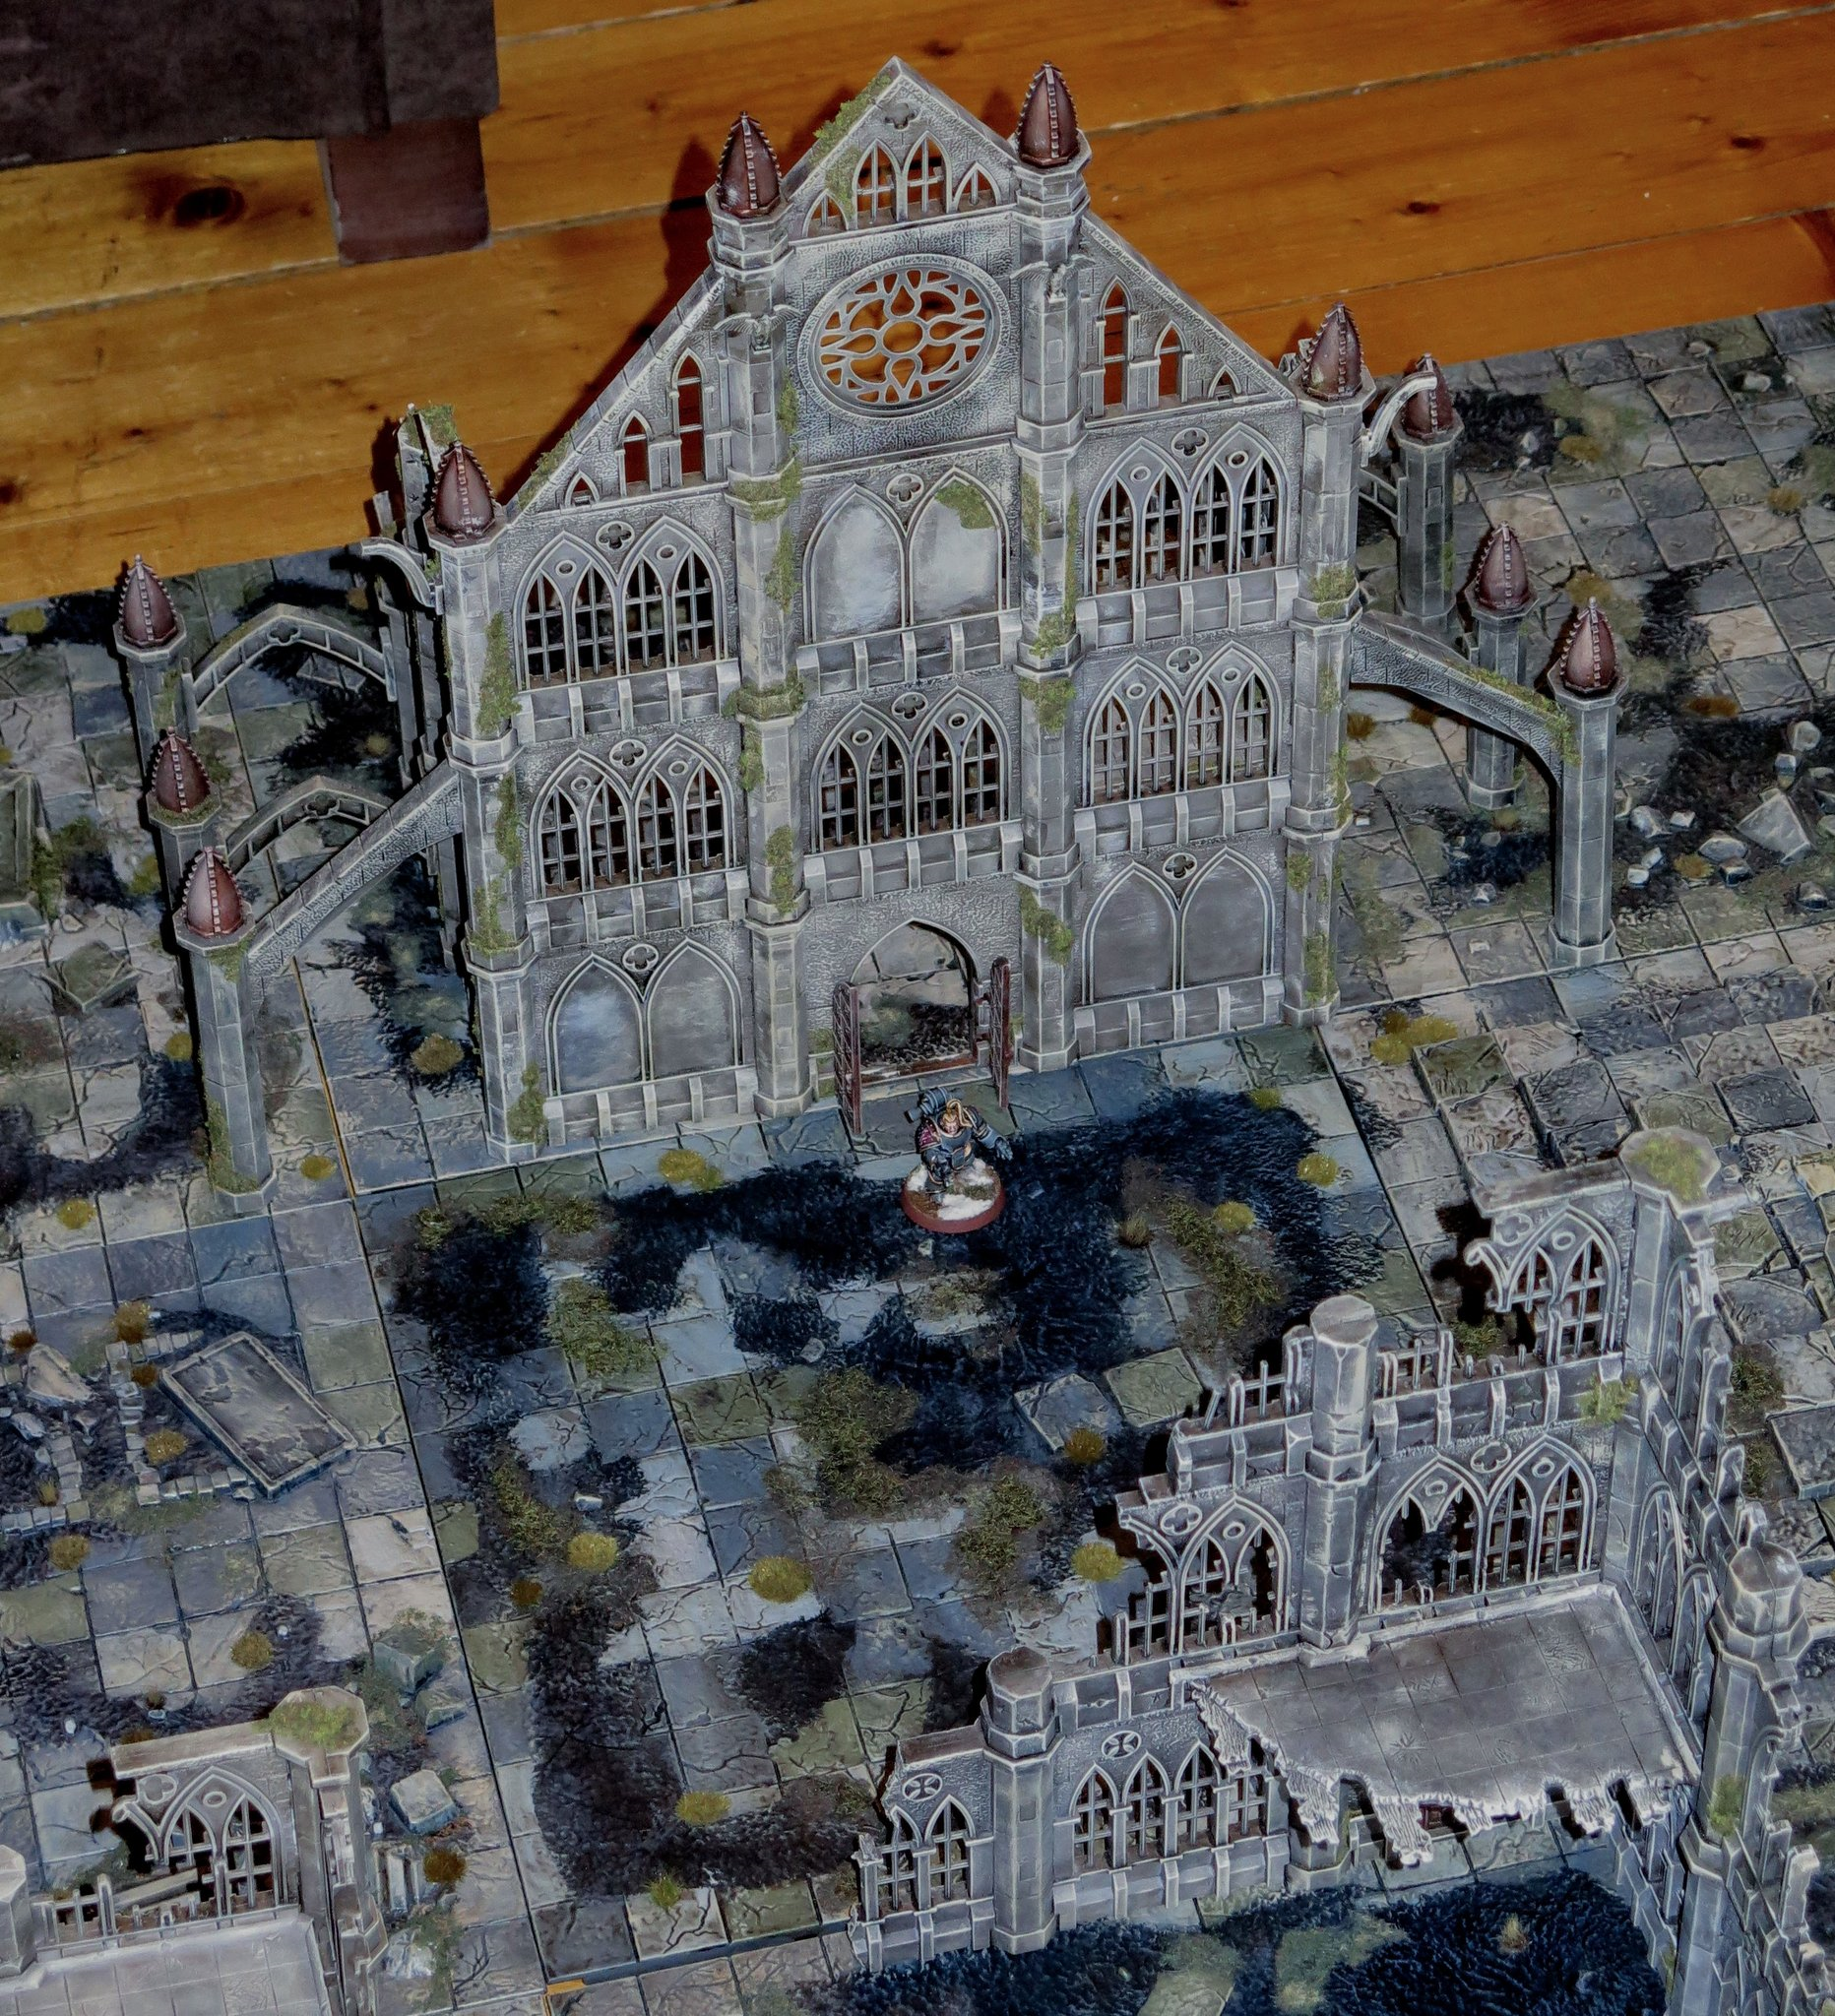
- 1x 4-story Cathedral ruins with arches
- 1x 3-story double width Manufactorum with arches
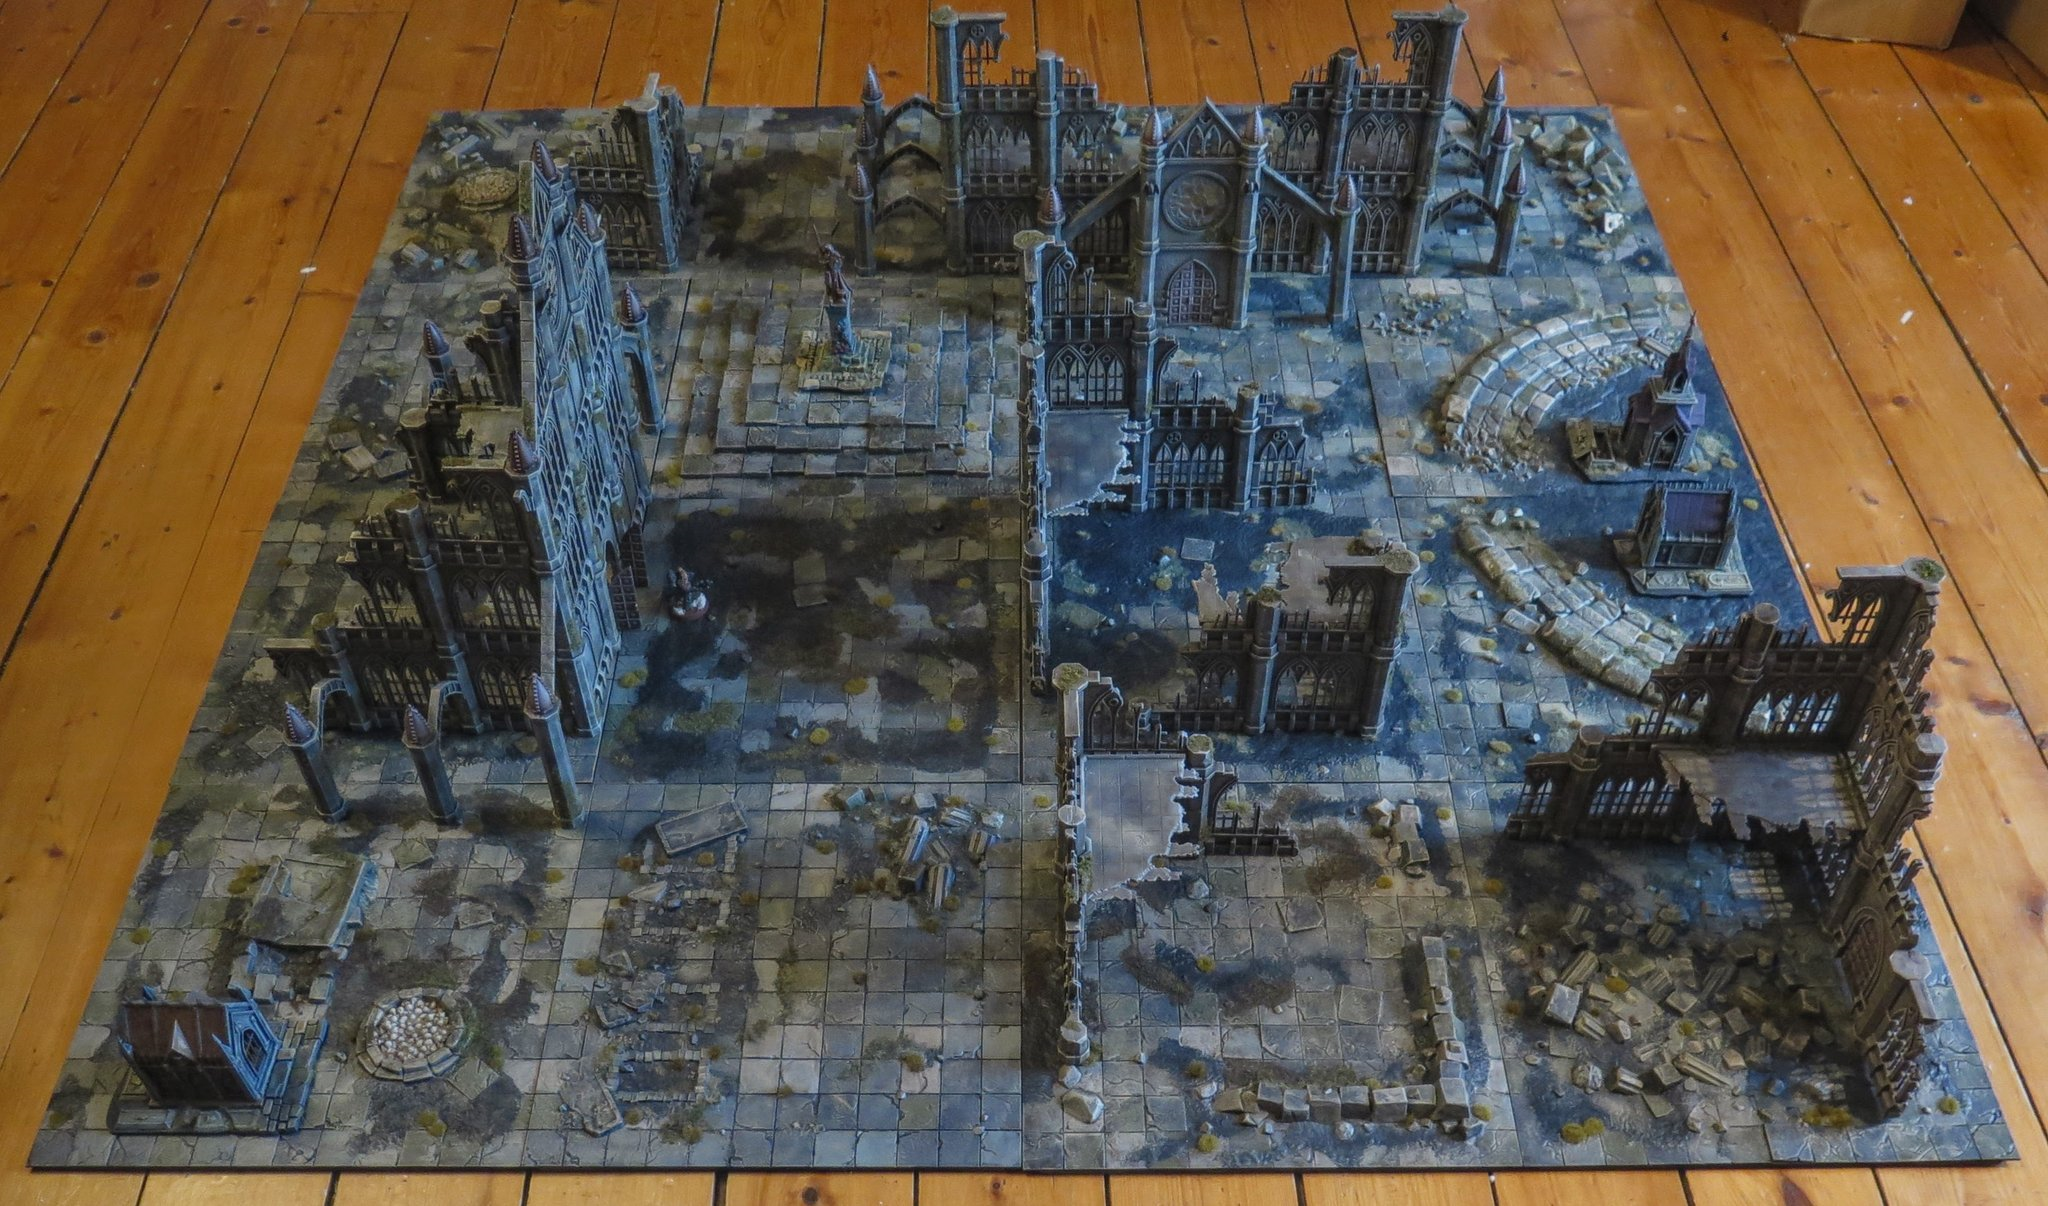
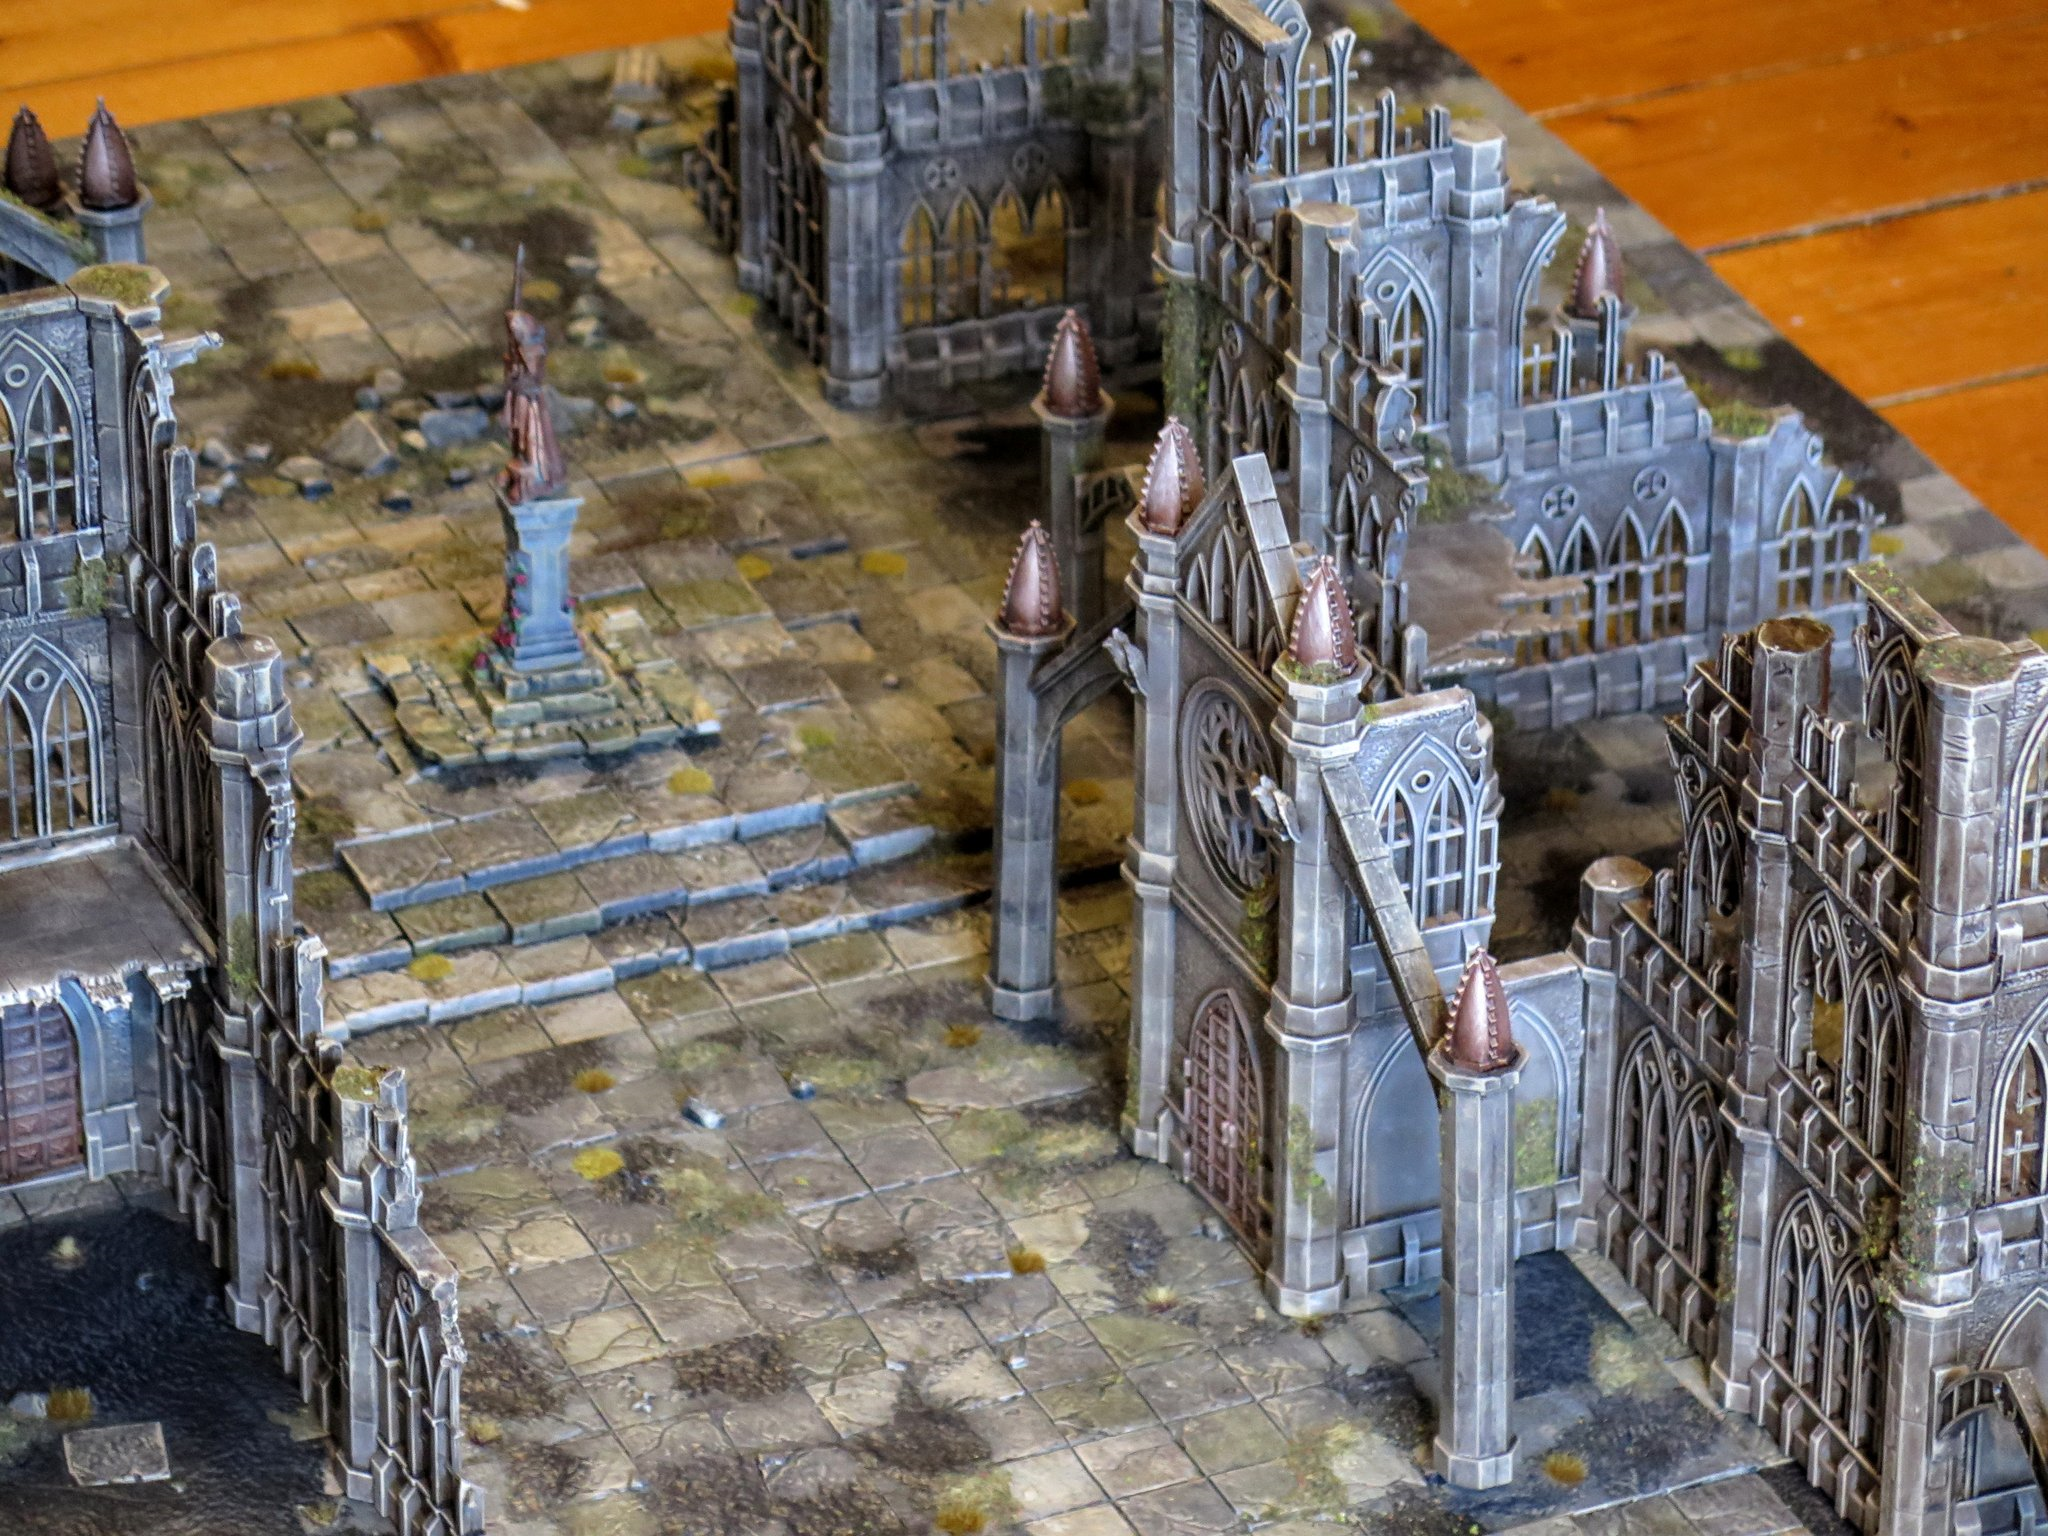
That’s 7 individual terrain pieces all told, varying in size from corner ruins large enough to conceal a Predator tank all the way to the Cathedral ruins large enough to hide Knight behind. The Manufactorum has a massive foot print, at roughly 24″ from side arch to side arch and 12″ deep. The Cathedral is an eye watering 18″ tall. On my 4’x4′ Forgotten City section of board, there’s enough cover for a 1500pts game of Warhammer 40,000 without the need for a single piece of scatter terrain – with just enough space between the buildings to manoeuvre most vehicles you’d have at that size of game4.
The build process was simple and intuitive – each individual wall section requires very little assembly, other than gluing half a pillar down – although the walls are snap fit, so you don’t necessarily need to glue them. There were a good few mould lines to clean up, which I did for the most part, but I wasn’t as thorough as I could’ve been – some of these were either not very visible, or I could cover up with flock later. After gluing these pieces together, putting my buildings together was a bit like playing with a child’s construction toy. Wall pieces slotted together either linearly or at a right angle, and wall sections could be stacked on top of each other. Beyond that, you could do whatever you wanted.
I didn’t want to be constrained by any individual kit, so I constructed all of my wall pieces in a single go and had at it like a pile of Duplo. I figured the best way to approach the kit would be to build a couple of feature buildings first, then take stock of what I had left over and figure out how to fill out the board from there.
Compared to some of the more ambitious uses of this kit I’ve seen online, my designs were pretty simple. Everything ended up as either a corner, or as a facade with a couple of tapered sides for support. I considered building enclosed ruins, but I was concerned with much tabletop space these would consume, and the added difficulty of balancing all four walls on the uneven surface of my moulded plastic tiles.
The Manufactorum came together because I wanted a building with a protruding entrance, like the one pictured on the box for the Large Set – it became as wide as it did because I wanted to use the Gothic Ruins over the corners. The Cathedral, on the other hand, I built because I wanted something really tall – an obvious focal point of height that would help lend a sense of scale to the varied sized ruins on the board. Most buildings that utilised the Gothic Ruins were at least three complete wall sections tall, and so I made the Cathedral one wall section taller than the rest.
Many of the buildings needed to taper off at the edges like the corner ruins did. It looked a little unnatural to have ruined edges up top and, suddenly, a completely flat edge where the building stops. This was fairly simple to achieve – I took a spare window piece and snapped it in the middle using a pair of old clippers. This took a bit of force, and was harder still on the solid wall sections, but once it was separated it was easy to clip and snap further pieces towards the top to taper the edges a little. This helped integrate the immaculate buildings with the corner ruins kit. In hindsight, it probably would’ve been good for me to snip a few holes in the undamaged window sections to help blend them further with the Ruins kit, but I only just thought of that there. Hopefully my opponents don’t notice the bizarrely untouched front of the cathedral compared to it’s devastated sides, ha!
When I felt content with the footprint and layout of my city and that my buildings were as I wanted them, I broke out the poly cement again and glued everything into place. There was some temptation to simply paint each wall section separate, and use the kit as a fully modular scenery building toolbox. Unfortunately, this has a couple of issues – the first was how long it took to assemble each building. Setup for a game of 40K takes long enough without adding building assembly into the mix. The second was I suppose some lessons I’ve learned from painting vehicle interiors – painting moving, flesh or interlocking parts separately can lead to paint gumming up the joints, and becoming difficult to take apart – or even worse, scraping off during use. It just wasn’t worth it. In the end, I decided to glue the vast majority together – though I left the arches off of the buildings for easy storage (as these were loose yet stable enough and quick to plug in), as well as allowing the Manufactorum to come apart into three distinct sections – the entrance, left and right wings – again, for ease of storage.
With that, my buildings were ready to paint.
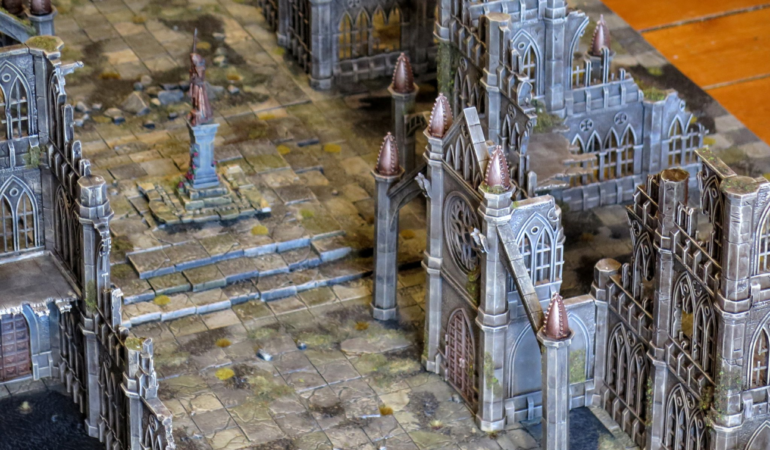
Unlike the tiled flooring, there was no way I was going to hand paint all of those walls and window sections in different shades of grey. This might have been doable task had I one or two buildings (or indeed, if I had an airbrush yet5), but with a table full of buildings ahead of me, I felt I had to cut some corners for the sake of my own sanity. Instead, I broke out a brand new can of Hycote Grey Primer to base and prime in one fell swoop. In hindsight, this might have been a touch too light and perhaps would have benefited from a black undercoat first, but it was the best I could do on short notice. I covered every inch of the ruins in primer and allowed it to dry. To break up the grey, I picked out the spire turrets and doors in Hammered Copper. Now it was time for a wash.
After the tiles, I was running pretty low on Agrax Earthshade, and supply drop was not likely to arrive for a couple weeks yet. Out of needs/must, I concocted a mug full of something that would go a little further – it was a mixture of grey and brown contrast paints that I had sitting around doing very little otherwise (I wasn’t enamoured with either), a big squirt of black and brown Vallejo inks and a few mls of tap water to dilute it. It’s no alternative to Agrax Earthshade – it’s not even as good as a proper homemade wash – but it worked great in a pinch. I wasn’t overly worried about staining or tide marks, because I knew these ruins were going to get extensively drybrushed anyway. Besides that, I wanted it to stain a little – the grey was very light, so anything that would knock that down a little way welcome. It was quick, cheap and it got the job done. I slathered my ruins in the stuff, let it collect for a minute or so, dealt with the most excessive pooling and let dry off for a couple hours. When it had dried, I hit the grey of the ruins hard with a drybrush of Khaki. As the base colour of the ruins was that much brighter than the tiles, it needed an equally brighter highlight, so I hit it again with a drybrush of 50:50 Khaki and Elfic Flesh for good measure. To finish off the paint job, the metallics were drybrushed with a 50:50 mix of Hammer Copper and Shining Silver.
I took everything outside to empty a can of Munitorum Satin Varnish over them, followed by a light dusting of Testors Dullcote to take the sheen off. The last step was flocking. For a convincing moss effect, I made a blend using a few different types of flock6 and shook them together in an empty container. The end result is a flock blend with a mixture of sizes and colours, giving a nice middling tone with a bit of depth. I strategically applied some PVA wood glue in patches over the surface of the ruins, taking the opportunity to conceal any heavy handed drybrushing or tide marks still visible. With that, my ruined city was complete.

This has been a style of gaming board that I’ve wanted to build and play on for a long time – pretty much since the release of Codex: Cityfight almost 20 years ago – and it’s something I’m not even sure that I’d have ever gotten around to had I not decided to paint the rest of my Forgotten City tiles on a whim. Sometimes, procrastination is a good thing. Although only a 4’x4′ table on the tiles, I’m pretty sure that I could just as easily run a 6’x4′ with this same amount of buildings on a neoprene mat if I really wanted. Besides that, with my Rolling Fields tiles now sporting a much less extreme water feature, I could quite believable run this table with a city outskirts or industrial sector flanking it – now either as a 6’x4′ or even an 8’x’4′! Just in time for the 40K table size to change in 9th edition.
So, seeing as I never learn, what’s next on the hobby table? Well.. It’s complicated. My Mirkwood expansion to my Iron Hills remains in a state of limbo – the miniatures have been boxed and put back upon the shelf of shame until such a time as I can muster the excitement to paint them again. With my Azog’s Legion still in good shape for whatever single-army Middle-earth tournament comes next, and the Scouring of Stirlingshire not happening for at least another 4-5 months (assuming it’s not delayed by COVID), there’s not any pressing need to get back to them any time soon – giving me a wider berth to sink my teeth into something new.
One of the advantages of going with generic “Gothic Ruins” rather than 40K “Imperial Ruins” for this cityfight board is that it’s not necessarily confined to being used in Warhammer 40,000 exclusively. Lots of games and battles can be fought in the ruins of a temple city, after all. Still, even as I type this, in my heart, I know that these ruins are for games of The Horus Heresy and Warhammer 40,000. Building and painting this board had me thinking a lot about 40K again.. and then there’s that pesky new edition on the horizon. It’s the perfect storm, and I am not entirely immune to the temptations of hype; before I knew it, I had several boxes Adepta Sororitas on their way to me. On the upside, I did manage to finally clear Celestine and my Canoness from my backlog, so that’s something. I’ll have more for you on that later, but you can always check my Twitter for progress updates.
Of course, I’m also hearing whispers that ForgeWorld might be open for business again sooner rather than later – so perhaps The Legions of Mount Gundabad Part 2 is not that far off, after all.
Or maybe I’ll just do something daft like start a Necron army out of nowhere. WHO EVEN KNOWS ANY MORE?
Until next time, thanks for reading and happy wargaming!
1 Although, admittedly, the Forgotten City tiles do have a cover of skull filled wells. Go figure.
2 I would eventually branch out into the world of Neoprene mats – first for something a little more portable, but later just for variation. I started out with a snow mat for a complete contrast, but eventually picked up mats for forests, muddy battlefields, cobbled city and ship interiors. For convenience, however, I’d just leave these Tablescapes tiles along with my 40K terrain round at my friends’ apartment, and we’d take them out whenever I went round to play. It was something of a ritual to book end our games – chatting while we setup up the 6×4 grid and placed terrain, and again while we tore it down at the end.
3 This ancient and venerable technique I picked up from none other than the legendary Duncan Rhodes, on his guide to painting a Baleful Realmgate. This was one of the first scenery pieces I ever painted, way back when I was just getting into Age of Sigmar. As I don’t use Citadel paints and have a tendency towards heavy-handedness, my tones of grey have a lot more colour variance and my final outcome looked a lot more Khaki than his Realmgate – but I loved how it looked regardless, and it’s been a my staple technique for painting terrain ever since.
4 A Fellblade, for example, might struggle. Wow, that post is old now, huh?
5 Yeah, I finally bought an airbrush. It’s fun, but it’s also not super easy to use either. More on that later.
6 I don’t remember the exact mixture, but it was mostly Gale Force 9 Dark Connifer Blend, Meadow Blend, Summer Flock Blend and Marsh Blend. Yeah, I like those Gale Force 9 Hobby Rounds.