Hallelujah, praise the Omnissiah – as of the 17th of June, the Forges of Mars have reopened once more! This means – despite the confusing 40K metaphor – that I have finally been able to order the last couple of bits and bobs for my Azog’s Legion army.
My apologies for how uncharacteristically long this post has taken me (and the highly likely delay to the next). My partner and I recently adopted a puppy, so hobby has taken a bit of a backseat to tossing squeaky toys and picking up poop as of late. I’m hoping the dust will settle and I can get back to pumping out miniatures again shortly.
In the meantime, you might have noticed the site (and my social media accounts) has a brand new logo. I’ve been feeling for some time now that it’s time to ditch the generic “Horus Heresy novel” logo and try something a little more personal. I toyed with a few ideas, but inspiration eventually came to me from my Twitter/Instagram handle – Plastic Cracked. The ‘Cracked’ pseudonym might have originated from a place of necessity1 more than anything, but the more I thought on it, it felt more imaginative and less played out than ‘Plastic Crack’. It made me think about the countless bloodshot late nights spent frantically painting or writing, just trying to get the current project ‘done’ and onto the next big thing. It was exactly what I wanted from a name change – a little less generic, a little more ‘me’.
Within moments of coming to the decision to change the name of the blog, an idea for a logo began to solidify in my mind’s eye – and with it, the name of an artist who could make it happen. I reached out to the talented Dan Crombie, better known as Wolf Mask – an artist whose work has been pretty much synonymous with my experiences with the independent music scene in Scotland. I spent the best part of my 20s in loud basements, listening to punk rock and hardcore bands and – more often than not – surrounded by flyers for upcoming gigs and t-shirts from local bands featuring the art of Wolf Mask. His cartoonish style strikes an unlikely but endearing balance between grim and friendly – to my mind evoking a similar sort of feel to the intense 90’s Nicktoons that I grew up with, such as Ren & Stimpy or Rocko’s Modern Life. This was exactly the direction my mind went to when I thought ‘Plastic Cracked’, and precisely what made him the perfect professional for the job. What better way to pull a little more of my life and personality into my blog than with an artist who evokes the same kind of nostalgia for me as the art of Warhammer?
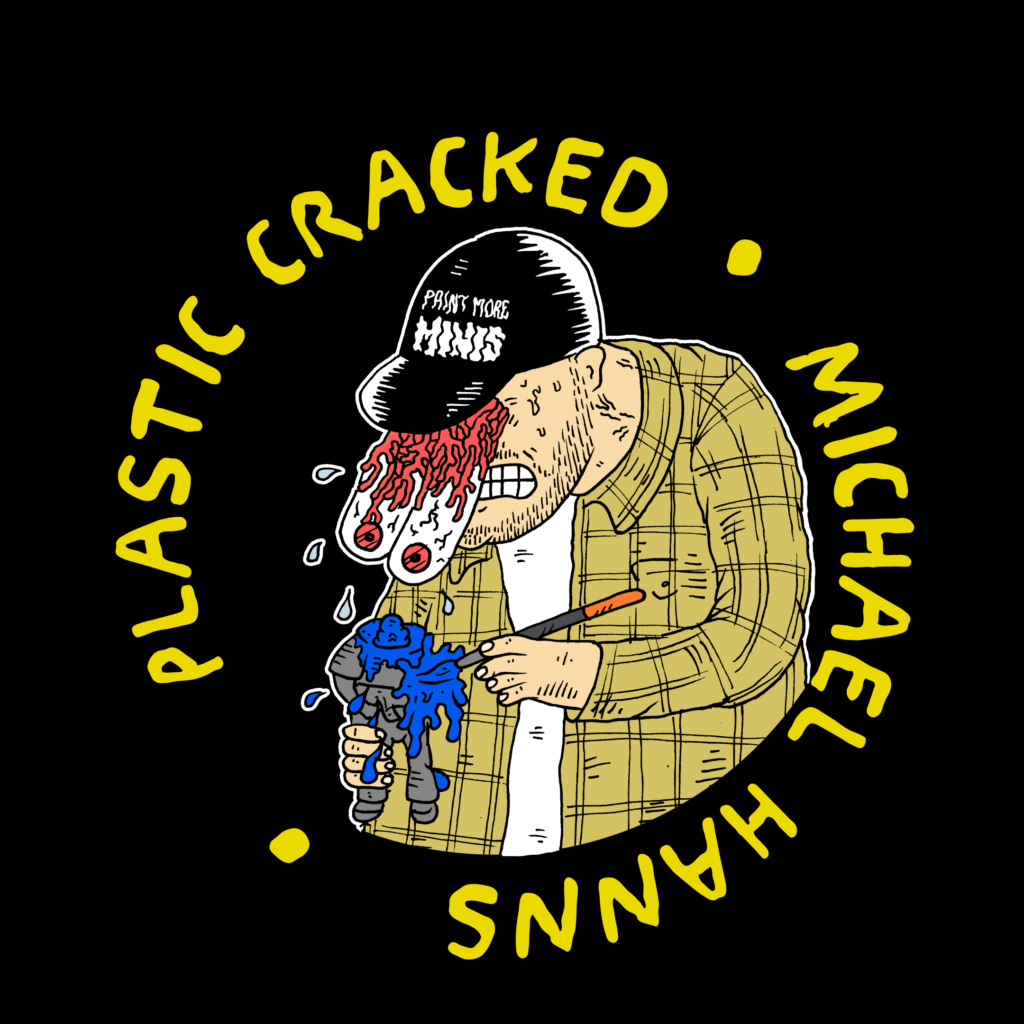
In case you missed it right at the top of this page, here’s the new logo in all it’s full size glory right here. I have to say, I am absolutely thrilled with how it came out. On top of that, Dan was really great to work with – his communication throughout the process was extremely helpful, and really went the extra mile to make sure that I was happy with every little detail. Beyond an eerie personal likeness, he captured a ton of important little personal details – from the red tip on the end of my Raphael 8404 to my Miniac Paint More Minis snapback. Importantly, he took special care make sure the “Space Knight” was both large and recognisable enough to be identifiable even in a small form factor and generic enough to not infringe on copyright. And I just think he absolutely nailed the crazy/obsessed/cracked aesthetic, from the manic hunched posture to the tiny beads of sweat running down my neck – it just looks great. Besides all that, he charged an extremely fair rate for the commission and without any awkward legal mumbo jumbo to sift through either. If you’re ever in need of getting some professional art commissioned, check him out. He’s bloody brilliant.
But enough about the life and times of Michael Hanns, let’s get back to the real reason you’re here – pretty pictures of miniatures!
In Part One of The Legions of Mount Gundabad, I managed to finish off the vast majority of the army – a full warband each of Orcs and Goblins (plus Captains for each and an Orc Banner), both loadouts of Gundabad Trolls, a couple Ogres, a dismounted Azog and three Gundabad Berserkers with two handed picks. That’s pretty much an army as-is, but there were still a couple of important gaps in the collection left to fill.
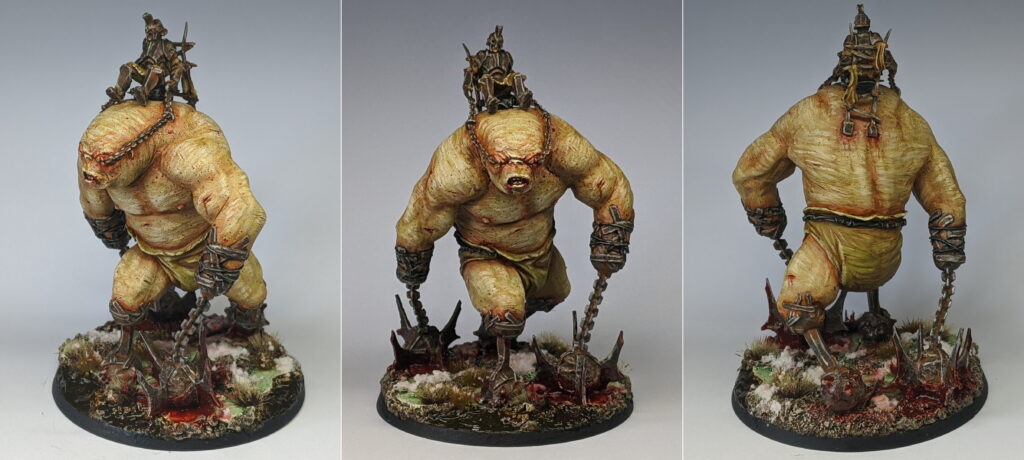
The first (and arguably most glaring) omission is the horrific Troll Brute.
This, right here, is among the most grim/dark miniatures that Games Workshop have ever produced. It’s so utterly bleak that I almost find it hard to accept that the design actually came out of New Line/Weta and not some long lost Mordheim concept from John Blanche. If there was ever any doubt that Azog’s Legion was an army suited to Blanchitsu, the Troll Brute would crush it beneath it’s rusty, prosthetic heel. Needless to say. this miniature became a must-have the moment I decided to paint this army in a Blanchitsu style – it’s a real centrepiece for the aesthetic.
Whether due to inhumane living conditions or maybe just being a different ‘breed’ of Troll altogether, the Troll Brute is portrayed in the Battle of Five Armies as having a pale, albino white hide in contrast to the navy blue of the regular Gundabad Trolls. I wanted to try and capture this difference somehow – perhaps by pushing for a paler overall tone of skin than my previous Trolls. One way that I thought I could achieve this, perhaps, was by breaking out my shiny new airbrush.
I have to admit, since finally purchasing an airbrush at the start of June, I haven’t gotten as much airbrushing done as I’d have liked. Shortly after acquiring my Iwata Eclipse, I decided that I was going to run it through it’s paces with a brand new army – perhaps my first actual 40K army2 in years. The sensible part of my brain screamed at me to pick something airbrush friendly (maybe Tyranids or Dark Eldar), but in the end I just couldn’t quite bring myself not to do Adepta Sororitas. What can I say? I’m a sucker for that grim/dark religious questing aesthetic. The only downside is that while the new plastic miniature range is both beautiful and faithful to their classic aesthetic, they’re also massively airbrush unfriendly – at least for a beginner. There’s so much going on with those miniatures that the airbrush feels mostly irrelevant for everything but priming and laying down the first base colour. Not the greatest showcase project for my shiny new toy.
I haven’t been entirely idle, mind you. I base coated an Honoured Imperium statue for my Cities of Death board. I laid down the base coats on my Canoness test mini with the airbrush, and put myself through an excruciating learning process trying to get a cool glowing blend on the wings of my Saint Celestine3. When my new miniatures finally arrived, I laid down the base coats on 10 Battle Sisters with the airbrush and experimented with a nifty little blend on the tabards. It was at this point that it became clear to me how much brushwork would be required on top of everything, and suddenly, my new project was seeming very daunting indeed.
Thankfully, right around this point my ForgeWorld order finally arrived. Hooray – back to the comforting familiarity of an already existing army!
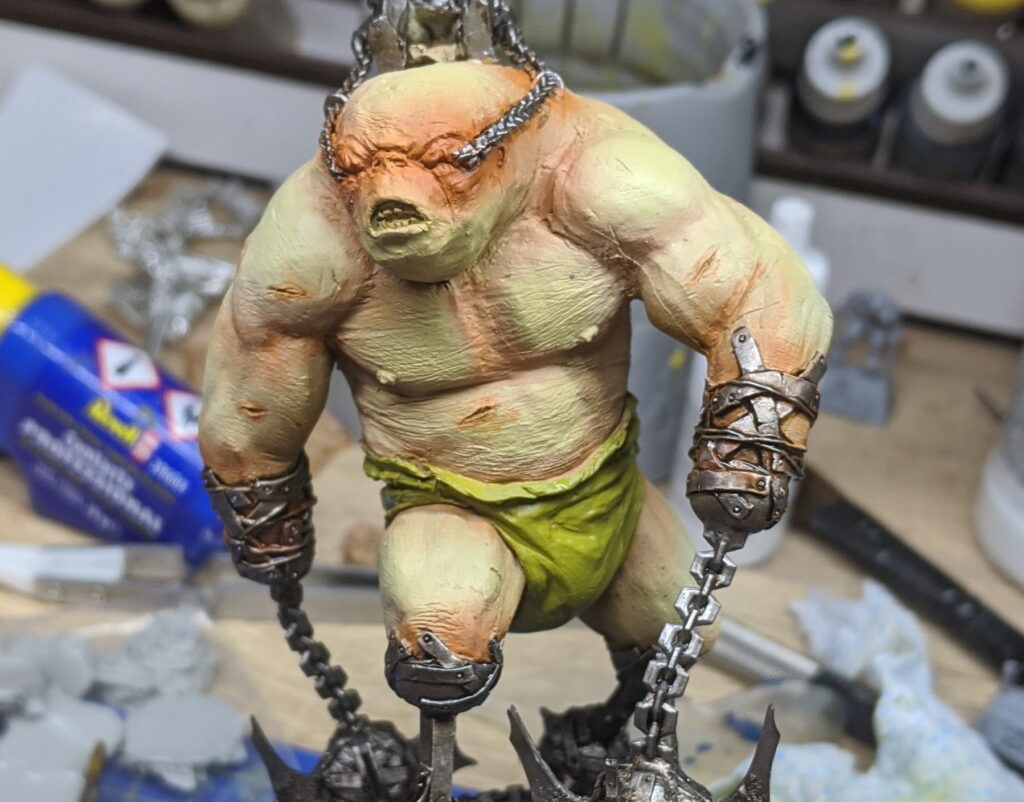
Turns out, the Troll Brute was the perfect model to get a little airbrush practice in on. His round, chunky volumes make it easy to figure out where to put the highlights and where to put the shading, and the sheer size of the lad is fairly forgiving for my unpractised hand. I started out with a quick coat of Badger Stynylrez Grey to prime, followed by a couple thin coats of VG Dead Flesh all over. After that, I blocked out the other base colours wherever I felt that I could get them down safely – VG Camouflage Green on the loincloth, AP Gun Metal on the prosthetic limbs, chains and Orc ‘pilot’.
From there, I wanted to build up some highlights and shading into the flesh, so I mixed some Elfic Flesh into the Dead Flesh and sprayed that onto all the raised areas on the skin. I did a few passes of this, mixing in a little more Elfic Flesh each time before finishing with pure Elfic Flesh on the most exposed areas – the top of his head, shoulders, etc. For the shading, I dripped some Fuegan Orange wash straight into the cup of my airbrush and did my best to ‘undershade’ areas, spraying a thin coat into every nook and cranny that would cast a shadow. Interestingly (but not necessarily unexpectedly), this wash behaved a little bit like a paint, and coloured the Dead Flesh pretty easily – the first pass resembling a pink, fleshy tone while subsequent passes would definitely come out darker and more, well, orange. I tried to put a quick, feint pass in between muscle bulges, and some more focused, repeated passes into any folds (such as under the pectorals) or recessed areas (such as under the loincloth). I also made sure to make a quick pass towards the end of his amputated limbs, around his eyes, under his chains and any other areas where he’s had metal grafted on – just to make it look extra sore and inflamed.
Given my mixed experiences on prior miniatures, I was pretty pleased with how quick and painless I found airbrushing these basecoats, and how much the addition of this new tool brought to the process. But now it was time to get back to basics and whip out the ol’ hairy brush.
First things first, washes. The metallics were given a healthy coat of Agrax Earthshade to shade them and dull down the sheen. While this was drying, the Camo Green loincloth was washed with Fuegan Orange, and the Trolls flesh was washed with Seraphim Sepia, cut with a little Lahmian Medium; this would help bring out all the nice surface texture on the cloth and skin. I gave the model a little time to dry, and once the metallics were nice and dry, I hit them with an all over coat of Typhus Corrosion, followed by a targeted wash of watered down Ryza Rust into the recesses. Washes down, now onto the layering and highlighting.
I started with the metallics. On a big model like this, I find it helps build momentum to get some easy wins under my belt, and this was the only step that didn’t involve layering in some way. I did a very light drybrush over the surface with AP Gun Metal, just to help pick out some of the texture added by Typhus Corrosion, then went through the process of picking out all the raised edges with AP Shining Silver. Next up were the greens. Standard affair for my Azog’s Legion army – layering over the wash with VG Camouflage Green, highlighting with Dead Flesh and picking out the finest edges with a Dead Flesh/Elfic Flesh mix. As a final touch, I pin washed in a few of the recesses with Fuegan Orange just to help push the contrast a little.
The last ‘easy win’ were the blacks. Not a lot of straps on this particular miniature, just a couple of fine cords around the metallics on the prosthetic arms and around the waist. This was a simple case of basecoat in black and a couple thin highlights with a little white mixed in, with a little more white on the most raised edges such as knots or crossed wires.
Finally, it was time for the flesh. The airbrushed basecoat was all well and good, but the smooth effect of the airbrush didn’t quite line up with the hand painted, textured aesthetic of this army. Instead, I treated it more like a really good zenithal undercoat, guiding where I put my additional layers and highlights. I started building layers of feathered thin lines of Dead Flesh mixed with Elfic Flesh, building up to pure Elfic Flesh with each successive layer before blending everything back together with an all over wash of 50:50 Seraphim Sepia/Lahmian Medium. I repeated this process until I was happy that I had built up enough contrast and texture, with a smooth transition between layers. As a final step, I went over the body and pin washed in a little Fuegan Orange into the cuts and deep recesses of the body, around the eyes and towards the end of the amputated limbs – to help push the contrast a little further.
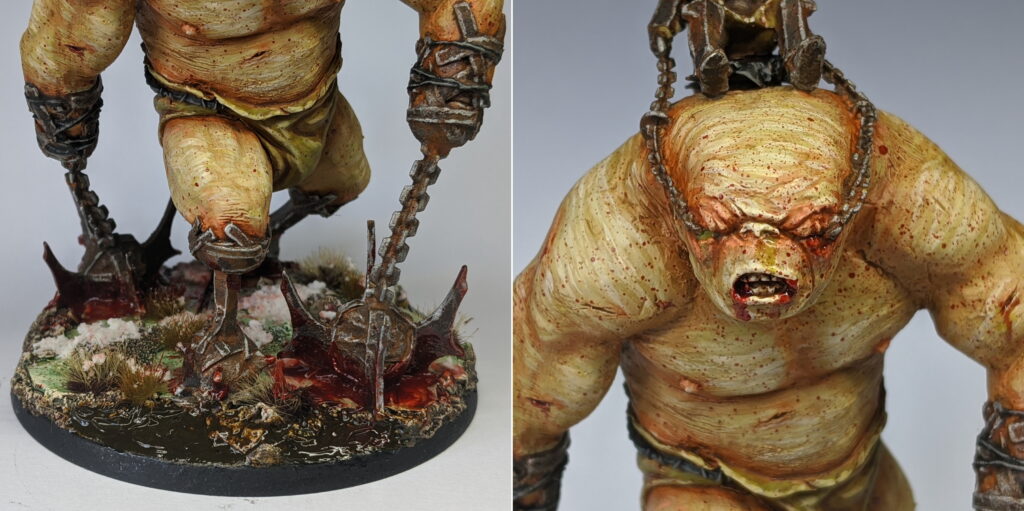
The base, as per usual, was an all over coat of Heavy Brown for the mud, with the tiles on top painted Elfic Flesh, glazed with Waywatcher Green and washed with Biel Tan Green. The whole base was then drybrushed with Elfic Flesh, then the mud washed with Agrax Earthshade. I painted the base rim black and took my Brute outside to seal with Testor’s Dullcote.
And finally, those last gratifying steps. The water effect was applied by mixing Vallejo Water Texture with a little Vallejo Sepia Ink and slopped onto the deepest areas of the mud on the base. I then glued some Army Painter Wasteland Tuft and Highland Tuft in a few choice locations on the base, and spread some Citadel Valhallan Blizzard for the snow.
For the blood effects, I mixed some Blood for the Blood God with Water Texture to create the thicker pools of blood dripping from the Brute’s morningstars. Then, I took my trusty old toothbrush, dipped it in water, flicked most of it off, dipped it in the lid of my pot of Blood for the Blood God and flicked it onto the front of the miniature for blood spatter effect. The final touch was to paint a little Blood for the Blood God dripping out of some of the Brute’s open cuts and wounds, as well as a little in one of his eye sockets, and a bit of Nurgle’s Rot in the other (and a little out of a nostril for good measure). Poor guy.
The Troll Brute was probably the single biggest omission from the army, but something else felt a little thin on the ground to me – the Gundabad Berserkers.
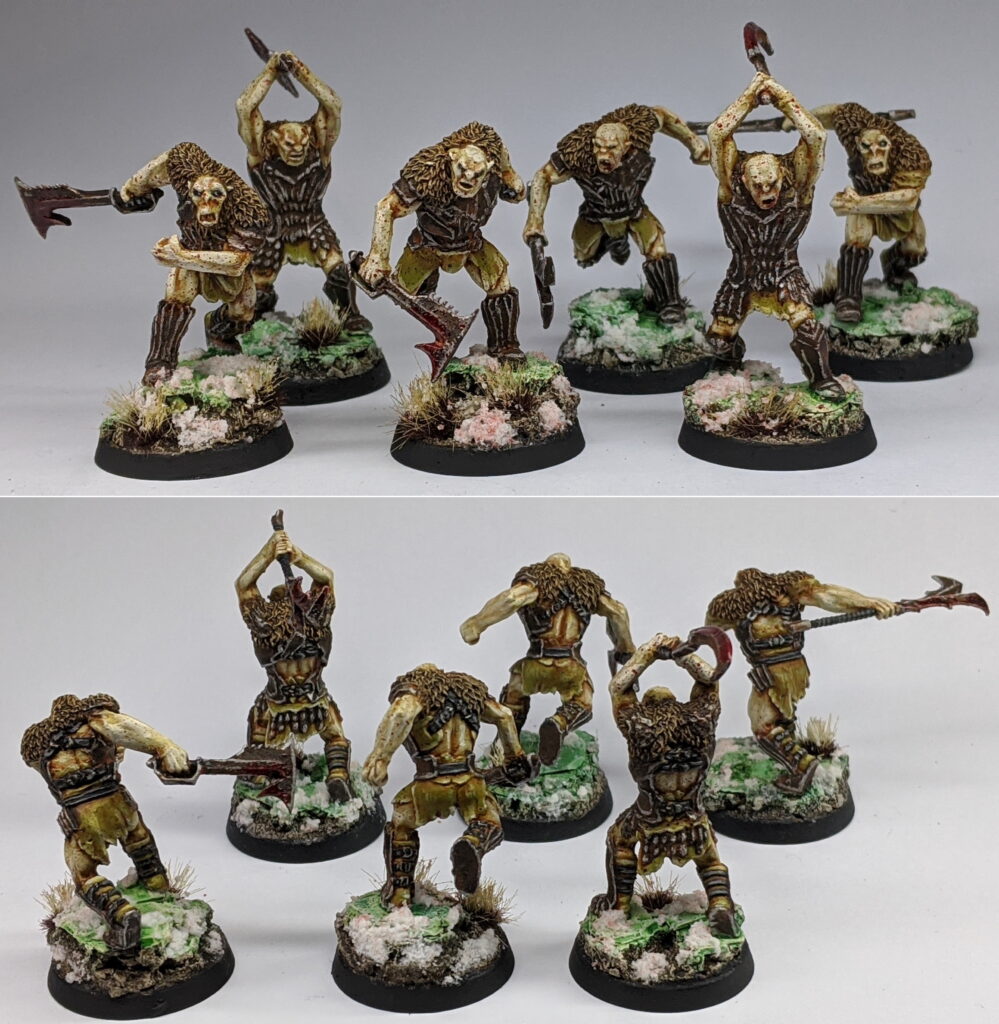
When I bought the bulk of this army used, it came with a grand total of three Gundabad Berserkers. I didn’t think much of it; they were cool enough models, but in army filled with big Warg-mounted Heroes, armoured Orc/Goblin infantry and Trolls big enough to dwarf even the Balrog, they’re kind of easy to forget about. Still, I had them, so I painted them along with the rest of the army. Now, here I was with 12 Goblin Mercenaries, 12 Orc Warriors and.. 3 Gundabad Berserkers. They’re elite, but not that elite – so I picked up another 3 to bulk their number up to a more respectable 6.
As I was building these miniatures from scratch, I had my pick of weapon loadout, so I decided to go for for one handed weapons this time around. Model variety was a powerful motivator here, but I also didn’t really like the idea of these elite scout units running ahead of the army fighting unsupported with the 2-handed -1 penalty to Duel rolls. Hopefully the addition of three single handed weapon Berserkers can help even the odds a bit there. Additionally, those 2-handed picks snap an awful lot – the battle axes just felt a lot more robust, which is worth considering for a butter fingers like me.
If you want to read about how I painted these guys, I covered that on the first three in Part 1.
For a while, I thought that this was going to be the extent of the army – the army felt ‘complete’ with the addition of the Troll Brute, and rounding out my Berserkers to a respectable, playable number. I wasn’t especially interested in converting up a Troll Catapault or pilfering some Giant Bats from Warhammer Fantasy – and frankly, I was running short on space on the display board, anyway.
Still, I couldn’t quite shake the feeling I was snubbing Bolg.
I had initially written Bolg off for a couple of reasons. The first is that there’s a bit of an incentive not to bring Bolg in the Azog’s Legion army list if you’re already bringing Azog – only one of two can benefit from the Master of Battle army bonus. Given the centrepiece of this army was to be my armoured Azog on White Warg conversion, adding Bolg to the list felt a little unnecessary. The other reason was that stupid Fell Warg.
For those unfamiliar with the miniature, the mounted version of Bolg is really.. something. There’s nothing wrong with the sculpt of Bolg himself, on foot, and on wargback(?). In fact, there’s a lot to love about him; Finecast or otherwise, his likeness is spot on, the cast is every bit as crisp as the armoured Azog from ForgeWorld, he features the same horrendous loincloth made from stitched together faces and there’s generous amount of thigh on display5. The problem lies squarely at the feet of his Fell Warg mount.
There’s a lot of issues with this particular Fell Warg. Some take issue with the head – it shares resemblance with the plastic Fell Warg kits, but whether down to a different sculptor or a misguided attempt to make it look more ferocious, it comes off a little goofy. Personally, I kind of like it – there’s a quality to it that reminds me of hand sculpted miniatures from the 90s, and Games Workshop’s monotone dark brown paint job isn’t doing it any favours. Another issue with Mounted Bolg is that it, bizarrely, comes on a large oval base. Genuinely, I cannot think of a single other miniature in the Middle-earth range that comes on an oval base6 – and for good reason. Oval bases complicate movement, it’s awkward for calculating control zones and it just looks weird when the rest of the army are on circular bases. Weird choice.
We’re circling the drain here – the real problem with Bolg’s Fell Warg is that he is a long, long man – a big contributing reason to his very unusual base size. There’s obviously a little more to it than that – the pose itself is a little weird. In almost every instance, Fell Wargs are posed with an arched back, either stalking or sprinting. There’s a non-zero chance that the reason for that was specifically to make these Wargs fit on 40mm round bases, but hey, it works. Bolg’s mount goes a different direction – he’s stretched out, head extended and parallel with the ground. His tail is out straight. His front legs look as if they’re stationary, or perhaps walking slowly.. but then you’ve got both of his hind legs off the ground suggesting it’s.. sprinting? Again, weird choice. And then they go and make things even worse by making his body way too long.
I’m not kidding about the length of this lad; if you hold Bolg’s Warg up to the supposed ‘alpha’ White Warg, he’s a good 4mm or so longer from thigh to shoulder. You can see it at a glance on the item photo on the Games Workshop webstore – everything is (more or less) where it should be, but there’s a solid few millimetres of excessive waist that just don’t need to be there.
I wasn’t for having this – and for the second time for this project, I set about converting a Warg-mounted character.

As far as conversions go, this was reasonably straightforward. It took about 4 hours all told to go from sprue to assembled miniature, including cleanup, resin warp correction, base building and conversion. To correct the length, I dry fit the model first to get a clear idea of how much I was removing from either side, then I sawed off a 3mm section on either side of the Wargs body. The section I removed came from the waist, just past the hip as this area seemed the most obviously ill-proportioned. I glued either half together and rejoined the hip to the body. Despite the conversion, this wasn’t really any harder than gluing the head onto the body, as both sides needed a little green stuff fur sculpted to cover the seams.
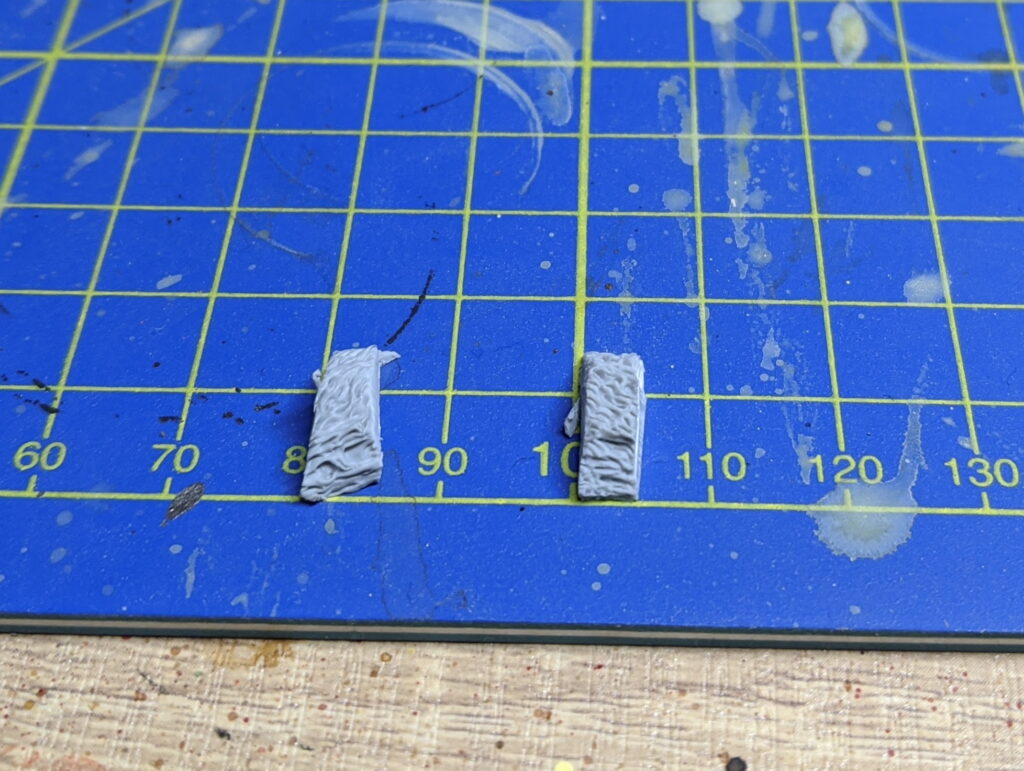
In an effort to make his weird half-run/half-walk read a little more natural, I built his base as a descending set of steps to help support his rear legs without the weird sculpted grass. I couldn’t just glue the miniature on from here though – both of his rear paws were still pointing back as if he was mid sprint. To correct this, I chopped the rear right leg at the knee and ankle and – with the help of a little green stuff – reposed the leg to a more usual standing position. I left the left paw pointing backwards, as this was the furthest back leg so it made sense that it would be getting brought forwards.
Happy that my mounted Bolg looked pretty good, I moved onto painting next.
Being both the only other named character and most likely the Leader of any army I bring him with, I wanted my Bolg to stand out a little bit from the rest of the army in the same manner as my Azog.
It’s entirely by accident that it worked out this way, but due to me painting my Azog conversion many months before I got around to painting the rest of this army – months before I even knew that I would take them in a Blanchitsu-inspired direction – my Azog stands apart from the rest of the army. His skin is a warm, albino white instead of a sickly yellow while his armour is a smooth and oily black metallic in contrast to the warm rust textures of his legions. The miniature remains tied to the rest of the force with a shared basing scheme is the same, and I even repainted his loincloth to match the desaturated green of the rest of the army – but the miniature stands out on the tabletop, making him look unique and important.
It’s a cool effect that I’ve come to really enjoy, so it made sense that Bolg would receive the same treatment.
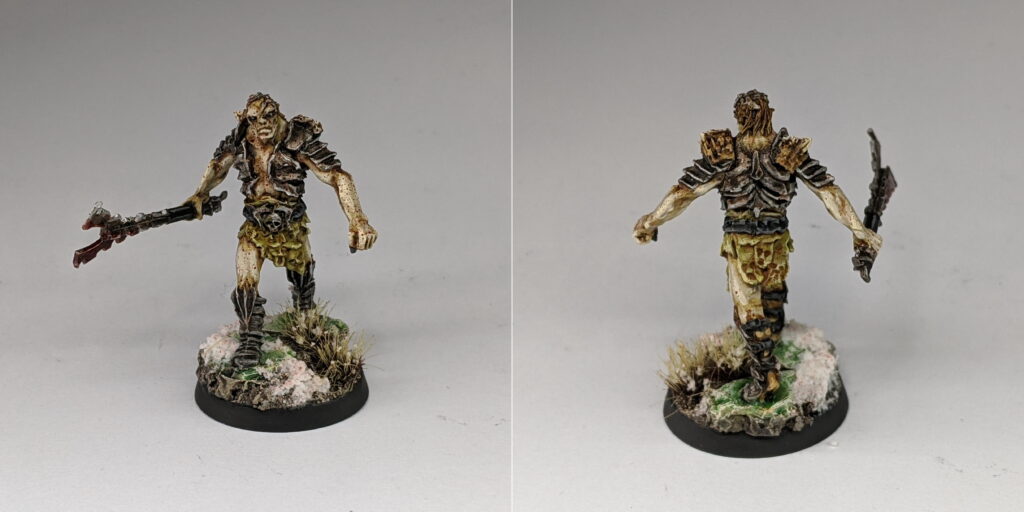
Saying that, I didn’t diverge too far on Bolg in the end – his skin being a bit of a pale greyish tone in the movies anyway. I painted his exposed flesh with Model Color Medium Grey – a warm grey tone that’s a bit like a desaturated Khaki. This isn’t a million miles form Dead Flesh used on the rest of the army, but it’s a little more grey and a little less green. I washed this with Reikland Fleshshade, layered with Medium Grey and highlighted with Medium Grey/Elfic Flesh. The end effect was a slightly different hue to the rest of the army, but still had that unwholesome ‘Blanchitsu’ vibe that comes from shading a cold, desaturated colour with a warm. I really like how it turned out, and I’ll be keeping that one in the toolbox for later. His armour – that weird sort of spiky metal waistcoat with shoulder pads – was a classic case of AP Gun Metal, shaded with Agrax Earthshade and highlighted with AP Shining Silver. Due to the sheer number of subtle raised edges on the armour, this ended up reading a little bright when I was finished so I did some pin washes with Agrax Earthshade gloss to darken everything back down.
A little green, a little black, the usual basing and that’s all there was to Bolg, really. Onto the Warg!

As stated earlier, one of the reasons I didn’t much care for the Warg part of this miniature was how often it gets painted in a boring flat brown. This is of course completely unfair of me – Bolg’s Fell Warg is brown in the movies, it doesn’t exactly give you a lot to work with. Thankfully, my army isn’t exactly what you’d call movie-accurate, so I had a little more leeway here.
Instead of a straight brown, I wanted to paint my Fell Warg a bit of a gradient, like a natural brown wolf – a dark brown, almost black stripe across the top, fading to a darker brown, into a chestnut brown and a creamy brown underbelly. I started by blocking out the colours – VM Medium Grey on the underside and legs, VG Leather Brown on the bottom half of, VG Heavy Brown on the topside and a little VM Black wet blended into the Heavy Brown cross the top. Next, I started doing some careful drybrushing – I started at the bottom, brushing VG Elfic Flesh mixed into VM Medium Grey across the bottom, adding a little Leather Brown to it as I drybrushed further up and a little black as I reached the top. Finally, I applied some washes. The legs and underside were washed with 60:40 Lahmian Medium and Seraphim Sepia, with pure Seraphim Sepia used on the sides and Agrax Earthshade for the darkest areas. I tried to be reasonably sparing with this wash – enough to shade the recesses, but not enough to flood the surface. This helped not only to shade the fur and push the contrast, but also helped smooth out the transitions between the brown tones. Applying it after drybrushing also helped smooth out some of the ‘dusty’ effect caused by the drybrushing. The wash did darken the legs a little much, however, so I brought them back up with a little careful layering and highlighting of VM Medium Grey and VG Elfic Flesh – and that was the fur done!
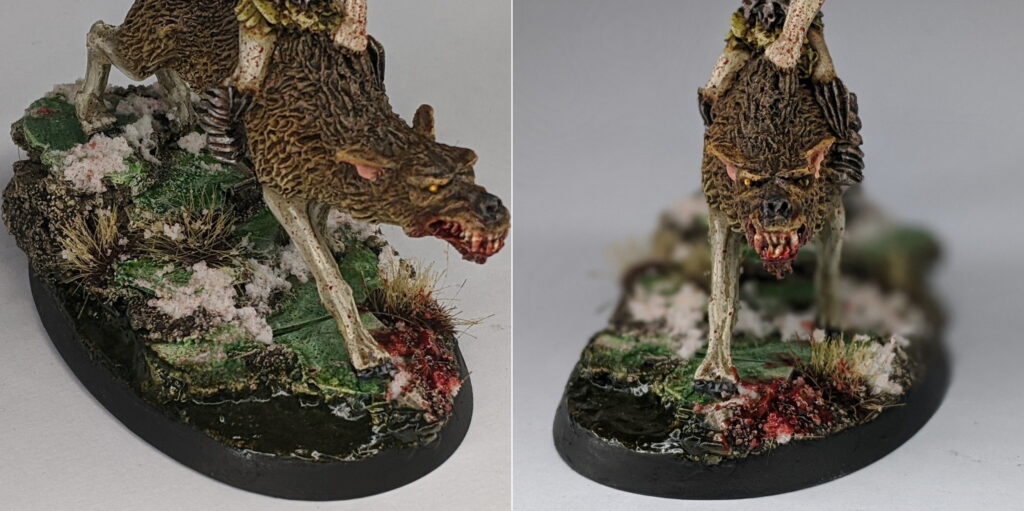
All that was left to do on the Fell Warg was his face. For that, I blocked out his teeth in Elfic Flesh, washed with Seraphim Sepia and picked out the individual teeth again with Elfic Flesh. His eyes I painted using VG Moon Yellow, washed with a little Cassandora Yellow around the edges and a tiny little slit of black for the pupil. The inside of his ears were painted with VG Rosy Flesh, shaded with Reikland Fleshshade and edged with Rosy Flesh. His nose I glazed over with a little watered down black.
Dullcote, tufts, snow, blood effects. You know the score by now – and my final piece for this army was completed. You know what that means – time for an updated family photo!
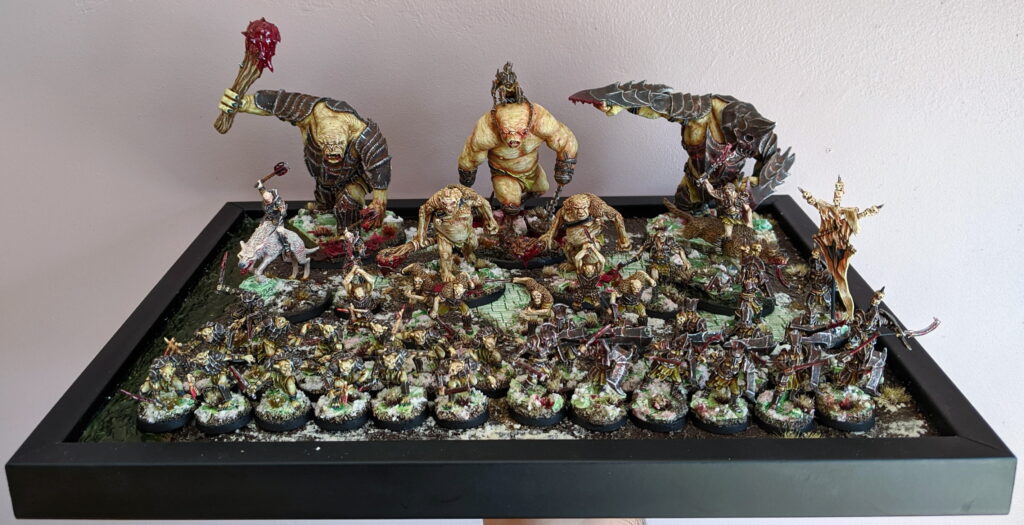
And so finally ends my hobby journey with Azog’s Legion. After spending over a year in my pile of shame following an impulsive 2nd hand purchase, I’m both thrilled and relieved to finally call them finished. But despite the immensely slow start, they’ve been one of the most consistently rewarding projects I’ve done for Middle-earth to date – it’s been good fun painting something a little ‘different’ for the setting, and really exciting to see just how well my Blanchitsu-inspired scheme that I developed for my Mordheim gang translated to a Middle-earth project. And, of course, it didn’t hurt one bit that the Azog’s Legion range is home to some of the most elaborate and exciting sculpts available for Middle-earth SBG.
With one half of my Scouring of Stirlingshire forces now done and dusted (and then some), I’m starting to feel like I’ve got some of my Middle-earth mojo back again – perhaps I’ll finally make a start on those Mirkwood Elves after all!
Until next time, thanks for reading, and happy wargaming!
1 This blog originated before the social media did, and to the surprise of absolutely no-one, the handle Plastic Crack was taken already on just about every social media platform imaginable.
2 As opposed to my Space Wolves, which are a Heresy army with some units for playing in 40K.
3 And to be fair, I think I largely succeeded.. after about 8 hours of painting, including having to strip the model back to bare plastic halfway through.
4 Okay, I used a hairy brush to clean up the overspray on the metallic bits. But this is 95% airbrush.
5 Wait, what?
6 I Googled it. The Dragon and the Mumak both use oval bases. But literally no other Cavalry model in the game is on an oval, dammit!
