With Blackstone Fortress finally done and dusted, it’s time to make some headway on another of my long-dormant 30th Birthday Gifts. In addition to Treebeard – who I immediately set about converting and painting – I received another Warhammer-related birthday gift from my lovely fiance in the form of the Barrels out of Bond kit from The Hobbit.
The thing is, Treebeard was an easy miniature to get stuck into immediately. I could field him in conventional games of Middle-earth SBG, and being a single miniature he made for a reasonably quick turnaround. Barrels Out of Bond was a bigger undertaking – 14 character miniatures with no immediate gaming application. I didn’t own any Mirkwood Rangers, Tauriel or Hunter Orcs. If I wanted to play the scenario, I’d have to commit to not only building and painting these 14 Heroes, but a whole load of Warrior minis from armies I didn’t yet play – not the easiest sell when you’re currently knee deep in painting for another narrative scenario as it is. As with Blackstone Fortress, I let the sheer intimidating scope of such a project slide in favour of a number of smaller, more immediately achievable goals.
Taking a page out of Thorin Oakenshield’s book, I never forgave and I never forgot. Barrels out of Bond would be in the back of my mind as I chipped away at my Iron Hills, converted my Mordheim gang, and even as I made my way through Blackstone Fortress. Over time, I formulated a strategy – instead of slogging my way through two armies worth of Elves and Orcs (at least at first), I would build a diorama out of these miniatures. Months passed and the concept solidified in my minds eye; I could picture the landscape, the recessed holes for bases to sit flush1, the flowing river, the additional miniatures I would need to set the scene. It all began to take shape, and I started to get excited. I even managed to sneak the new plastic Legolas & Tauriel into my Christmas wish list ahead of the project.
Eventually, pre-planning would become full-on project planning. I started working on scale drawings for the display over my lunch hours. As the aim was to display this in my new home2, I wanted to mount this diorama on a good looking plinth for extra wow factor, so started working out exactly how much space I would need for the display. At the bare minimum, it would need to hold a river long and wide enough to fit 14x 25mm bases, plus some forest with enough space for the necessary trees, Legolas, Tauriel, one or more Mirkwood Rangers, and at least a couple Hunter Orcs. This process had a lot of back and forth – I would plan out a basic layout and would adjust it based on what plinths I could find that seemed suitable. After a while, I settled on an overall size of 400mm x 200mm – after stumbling upon this particular plinth. 200mm was just long enough to fit the miniatures I wanted over the right sort of terrain, and long enough to give a good impression of a river. To get a realistic idea of scale and what I could actually fit onto the space, I mapped everything out in paint.net using a conversion of 1mm = 1 pixel.
Behold, my crude computer art skills!
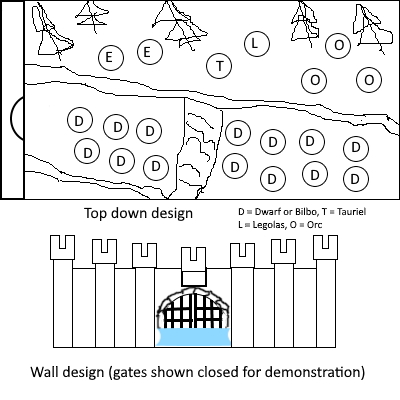
From the plans, it became clear that this was – by some measure – my most ambitious project to date. While I’m not entirely new to the world of display boards, there would be far more work involved in scratch building the landscape, rivers and painting of these miniatures than anything I’d attempted previously. To add a little extra pressure, I decided I wanted to not only display it in my own home, but also to enter it into Golden Daemon 2020 as well.3 I’d better get started then, eh?
Alright, so, you’re going to have to forgive me for the jumbled nature that these posts are going to take – on a project like this, there’s just so many moving parts that while I generally have intentions of portioning out areas of work to complete sequentially, the reality is that there’s a lot of back and forth. Some of this is practical – I don’t want to finalise the bases on any miniatures until my diorama is ready in case they don’t match, for example. Some of it, however, is just for sanity reasons – working on the terrain is a nice break from the miniatures, and vice versa. But either way, step one is ordering materials.
As I mentioned earlier, one of the first purchases for the project was the plinth. I ordered this particular plinth from ‘The Rugged Company’, who had it built, painted and shipped to me within a week – pretty good service overall, with polite and prompt correspondence to boot. While I was sorting this out, I also ordered a multipack of plasticard in various thicknesses. This was partly for constructing the keep section of the board, but also to create a smooth and firm surface to attach the foam terrain to. This would allow me to work on the display in isolation from the plinth – with my track record, it’s never a good idea to risk getting any paint over that nice, black lacquer finish!
Speaking of the foam terrain, searching for XPS foam on Amazon brought me to one of their resellers – a UK-based company called ‘BluefoamUK‘ who sell.. well, Blue Foam. Fee delivery and reasonable pricing helped get my attention, but what really sealed the deal was the product – 4x blocks of 200m x 200mm x 75mm foam. That was pretty much perfect for my needs, as it would cover my 400mm x 200mm base entirely without having to cut any of the edges to size manually. I’d imagine 75mm would be deep enough for my needs, but it’s always good to have a back up plan in case I stuffed it up first time. It is my first time doing something like this, after all.
The last material I needed for scratch building was some rectangular styrene tubes – these would be used to construct the gates of the keep. I settled on a 3-pack of Evergreen Styrene Rectangular Tubes in 3.2mm x 6.3mm – the smallest size available, which was just about perfect for my needs.
The star of the show was always going to be the river and the foliage, so I’d need to make some good looking water and forestry. For the water, I picked up a box of Solid Water from Deluxe Materials. A little bit of internet research led me to believe this was one of the better resin water kits available, so I was eager to give that a bash given my mixed experiences with Woodland Scenics Deep Pour. As for the rest of the basing materials, I picked these up from a wide variety of sources – War World Scenics and Serious Play on eBay provided slate, seafoam trees, smaller scatter rocks, bark chippings and teeny-tiny twig bits for the forestry, while Model Scenery Supplies provided creeping vines and sturdy, premium trees from Woodland Scenics4. Combined with my already reasonably extensive collection of flocks, scatters, tufts and static grass products, I was pretty confident I could create a good looking woodland scene!
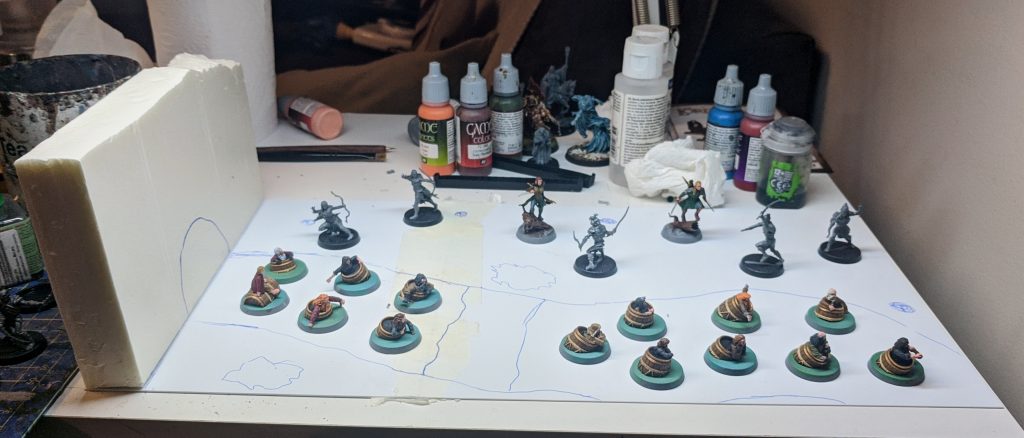
With materials either on-hand or on the way, I begin by physically planning things. I assembled my 400mm x 200mm surface out of a couple of sheets of 1mm plasticard, started placing bases and sketched out a rough plan for the terrain around them. I found a leftover piece of foam board that I had used for the hills on my MKII Display Board that was the right height and width for the keep walls and placed this to get a rough idea of height.
At this point, many of the materials I needed to continue working on the board itself had yet to arrive, so I started working on painting the miniatures themselves. That said, I’m planning on covering all of those in Part Three of this series, so let’s just kind of gloss over that for now, shall we?
After a short while, my XPS foam and rectangular styrene tubes arrived, allowing me to start planning out my layout in three dimensions – as well as get a start on the keep section. As with before on the plasticard, I placed my miniatures and sketched out my rough plan for the terrain – this time also drawing across the sides to convey depth. Then I started cutting the keep.
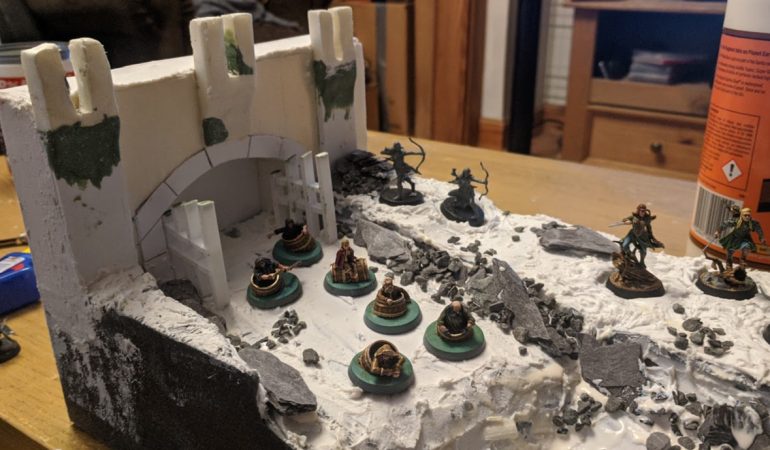
I tried to keep the design of my keep as close to the design in the Desolation of Smaug as I could, taken from repeated viewings and freeze frames from this particularly handy YouTube video. First, I sketched out the squared archway and cut it out using an X-Acto blade, sanding down the insides with a piece of sandpaper to smooth out the edges. Once I was content with that the arch was large and symmetrical enough, I built the stone trim using plasticard, cut to size and glued the pieces down using wood glue. After this was fully dried, I cut away any uneven excess with my X-Acto knife and filed down both edges until they were smooth and flush using an emery board. I made my first blunder here and put 5 stones across the top of the arch instead of 6 – not the end of the world by any stretch, but an annoying detail in retrospect.
For the gate, I spaced eight5 vertical sections of rectangular tubing evenly across the width of the gate arch, with two touching the edges of the archway and two touching in the centre. Holding these eight tubes down on the top of the gate with one hand, I then laid down two further sections horizontally, intersecting these four posts towards the centre of the gate. When I was happy with the spacing of my lattice, I traced the outline of the archway across the top of the tubing as well as where the various tubes intersected.
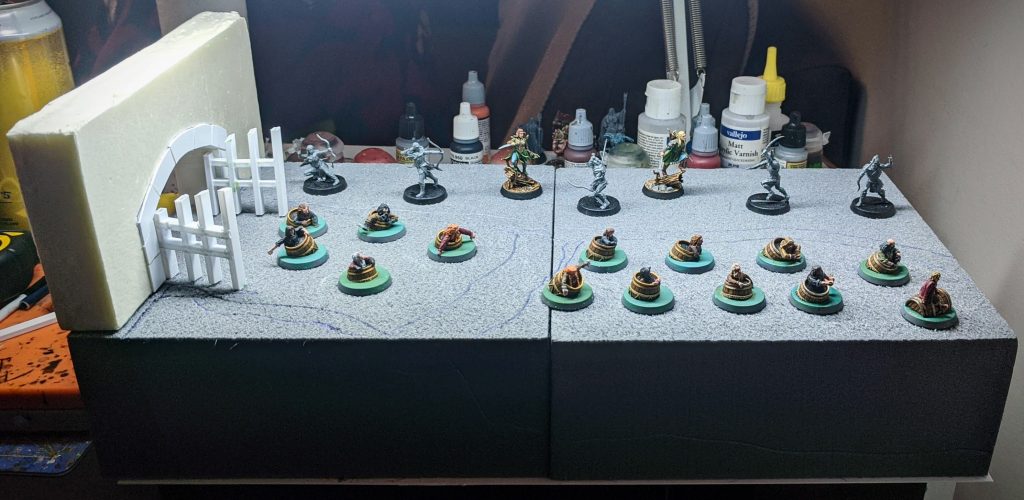
In the film, these posts and intersecting rails were arranged such that they the rails ran behind the slightly protruding posts, and this informed how I assembled my model. I took my hobby saw and carefully cut around sections on the horizontal rails where the vertical posts intersected, using my X-Acto knife to cleanly remove all but the rear side of the intersections. This creates a groove such that the posts can sit in, protruding by the thickness of the plasticard (around 1mm). The intersecting pieces were then glued together using plastic glue and left to dry completely until the bond was rock solid. At this point, I filled any slight gaps where the rails and posts met with homemade filler6 and cut/filed the tops of gate until symmetrical, flush in the archway and angled to a point.
The final detail on the keep were the sort of square tuning fork looking columns that protrude across the front of the wall. These are evenly spaced, and – looking at the freeze frames – I figured I’d need one above the gate and another at either side of the opening. The columns aren’t overly deep – they seemed roughly the size of a chimney on the end of a cottage – and are mostly straight, rectangular columns with the exception of a curved slope bridging the main column to the protruding U shape at the top.
I started with the one above the gate – this seemed like it would be the simplest, as this did not require the added body of a column beneath it. I don’t think it really went all that badly either, for a first attempt. I started with a rectangular column of foam, sanded down evenly on either side, and used a hot wire tool to cut out a section between the prongs at the top. Then, I tried to free hand the curved slope with the hot wire tool somewhat successfully, followed by a little sanding and filing to square up the prongs and smooth out the curve. So far so good.
The following two columns.. did not go quite so well. At first, I attempted making these columns in the same fashion as the shorter one, using the hot wire to shave all the way down the shaft of the column and sorting out the inconsistencies with sandpaper. Unfortunately, this resulted in the columns becoming too thin in places, with the curved slopes massively inconsistent to each other. Several ruined pieces of foam later, I decided to make just the top part – as on the first piece – and join them to a column made from layers of pieces of 1mm plasticard, cut sanded and filed to a consistent size and shape. This went better, but I still had issues trying to keep the curves consistent and the U-tips square. A number of failed attempts later, I decided to remedy this by smoothing out my U-tips with plaster filler (more on that shortly) and adjusting the sloped curve with green stuff and a paint brush as a rolling pin. This, again, went better – though I confess I still found myself making adjustments and fixing mistakes long into the painting process.
Some imperfections (some of which I’m hoping to hide a little using trees and/or creeping vines) aside, the I think that the columns largely worked, and the keep section was (mostly) done and dusted.
For the landscape, there was nothing for it but to break out the ol’ hot wire cutter and start hacking away. I chopped away at the biggest recesses first, carving out the stepped river before taking off a couple layers on the river bank (so as not to have a completely flat surface). Finally, I also cut a nice square chunk into the back of the terrain by the river for the keep to sit in, nicely recessed into the landscape. I glued the keep into the recess using some wood glue, and a piece of 1mm plasticard flush with the back. This not only gave the piece a satisfyingly smooth back piece, but also sealed off the back of the gate.
Now comes the fun part – filler!
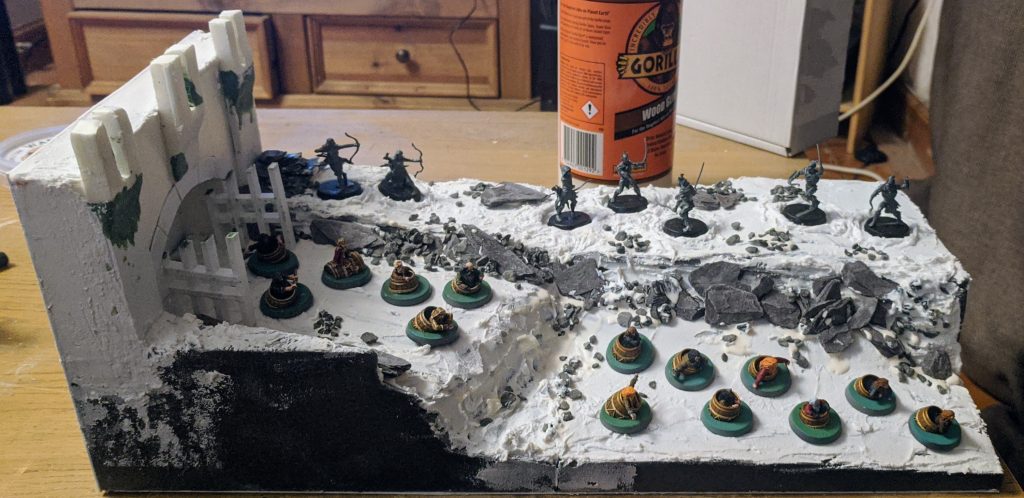
I cracked open a nice fresh tub of Ronseal Ready-Mixed Smooth Finish Filler and started spreading it everywhere. Across the top of the landscape, the sides of the diorama and all over the keep itself. This served a whole number of purposes. Across the sides and walls of the keep, it would serve to fill up any gaps in joints and other similar imperfections while providing a nice, easily sandable surface, increasing the consistency of the edges. On the landscape, it provides a nice, earthy for my riverbed and a porous surface for Texture Paint to bind nicely to. Finally, it just really helped ruggedize everything – the filler would dry rock hard, and thus would be less prone to compression and denting than the XPS foam at the centre. After everything had fully cured, I took some sandpaper and sanded down all of the flat surfaces – this was easiest on the sides and top of the keep, but I had to switch to an emery board to get at some of the harder to reach surfaces. Now was time for the final touches before priming.
First things first, I made the embankment by gluing down a number of large pieces of slate along either side of the river, followed by a light scattering of smaller rocks and debris to fill up the gaps in the larger pieces. Additionally, I wanted recessed slots for the various miniatures to sit in, with a raised lip to help conceal the black base rims. I had planned earlier for Legolas, Tauriel, 3 Hunter Orcs and 2 Mirkwood Rangers fighting in the forest. As my intention was to closely model the scene from the movie, I had Hunter Orcs coming in from the far edge – suggesting that there are more out of frame – with Legolas and Tauriel up in the thick of it and a pair of Mirkwood Rangers playing catchup and firing arrows across the scene. The original plan had Legolas and Tauriel fighting side by side, but my rather astute fiance pointed out that Tauriel was often further yet ahead – so I adjusted my plan accordingly.
With everyone set up where I needed them7, I replaced the actual miniatures with a set of empty 25mm bases and started laying down a ring of filler a few millimetres high around them. I did my best to lay this down as close to the base as possible without making it too tight, running the risk of the bases not fitting again. What I didn’t bother doing was smoothing out the area around these rings – that seemed like a job for the layer of texture paint that would go over the filler once the diorama was primed. I didn’t make any filler rings for the barrels in the water – my plan at this point was still to leave rings in the resin, though this did change later on the down the line.
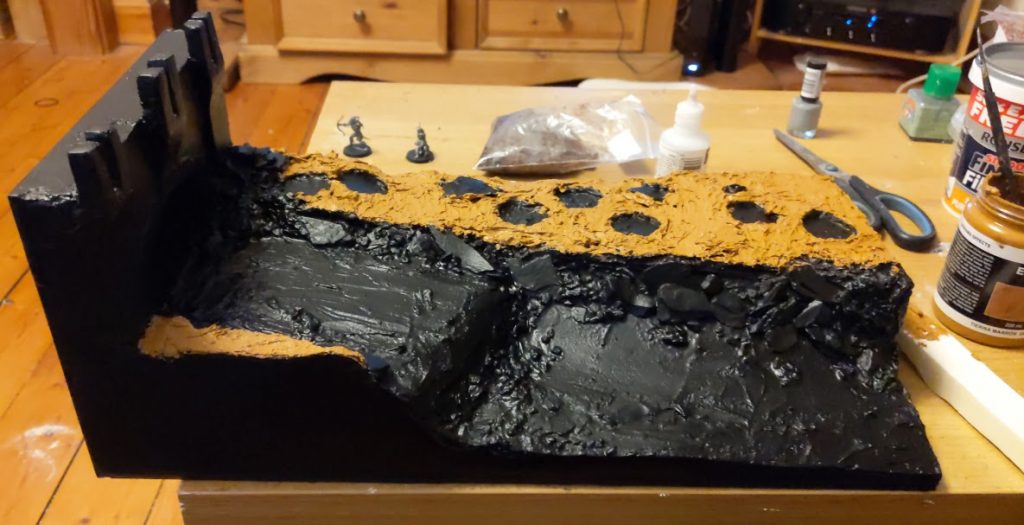
Finally, it was just about time to prime. As there were still a few areas of exposed foam, I mixed up a 60:40 mixture of water and PVA glue and spread that sticky mess everywhere8. This had the benefit of not only sealing in my foam and adding a little extra durability to the piece, but it also provides an extra (slightly more shock absorbent) layer helping keep all that stone and slate in place. When the glue mixture has cured, I took the diorama outside and primed every inch of it with a can of Chaos Black primer. One thick coat of Vallejo Earth Texture over the topsoil later, and the diorama was ready to paint.
And that wraps up Part One of my Barrels out of Bond Diorama series. Keep your eyes peeled for Part Two, where I’m going to cover painting, flocking and finishing this behemoth of foam and plaster.
Until then, thanks for reading and happy wargaming!
1 Inspired in-part by my resin Balin’s Tomb diorama from the ye olde Battle-Games in Middle-Earth partworks series.
2 It’s important to me that all my house guests understand what a massive dork I am, of course.
3 Not out of any wild notions of winning anything though, I just want to be able to say I did more than anything.
4 These 60mm trees turned out to be way too small for my 28mm miniatures – go figure. Instead, I ordered a number of 80mm and 100mm trees from The Model Tree Shop, which worked out a lot better.
5 This, I confess, is also inaccurate to the design of the film – each gate has five posts, not four. Due to the size of my styrene tubing however, ten posts wouldn’t have looked as good as eight.
6 This is made using Tamiya Extra Thin Cement with bits of cut up plastic sprue dissolved in the bottle. It works as both plastic glue but has a little extra body for filling holes and – though prone to stringiness – doesn’t shrink like liquid green stuff.
7 Note the sliding Mirkwood Ranger in the back was placed on a very slight incline in the terrain – this was planned the moment I saw that particular pose and it’s upwardly angled bow. I’m proud of that little detail.
8 A handy little thing about painting dioramas is that you’ve generally got some miniatures to be getting on with while you’re stuck waiting for things to dry. It sure beats literally waiting for paint to dry.
