
Welcome back to Part Six of Vermintide, the series following the rapid expansion of my Skaven army, Clan Haanz. In the last few updates, I’ve been focussing on reinforcements for each of the Greater Clans. Moulder, Skryre, Eshin and Verminus have all seen their ranks swell as I work to prepare the army for use in 8th Edition and 9th Age. In Part Six, I’m going to be focussing on everybody’s favourite smelly rats – Clan Pestilens.
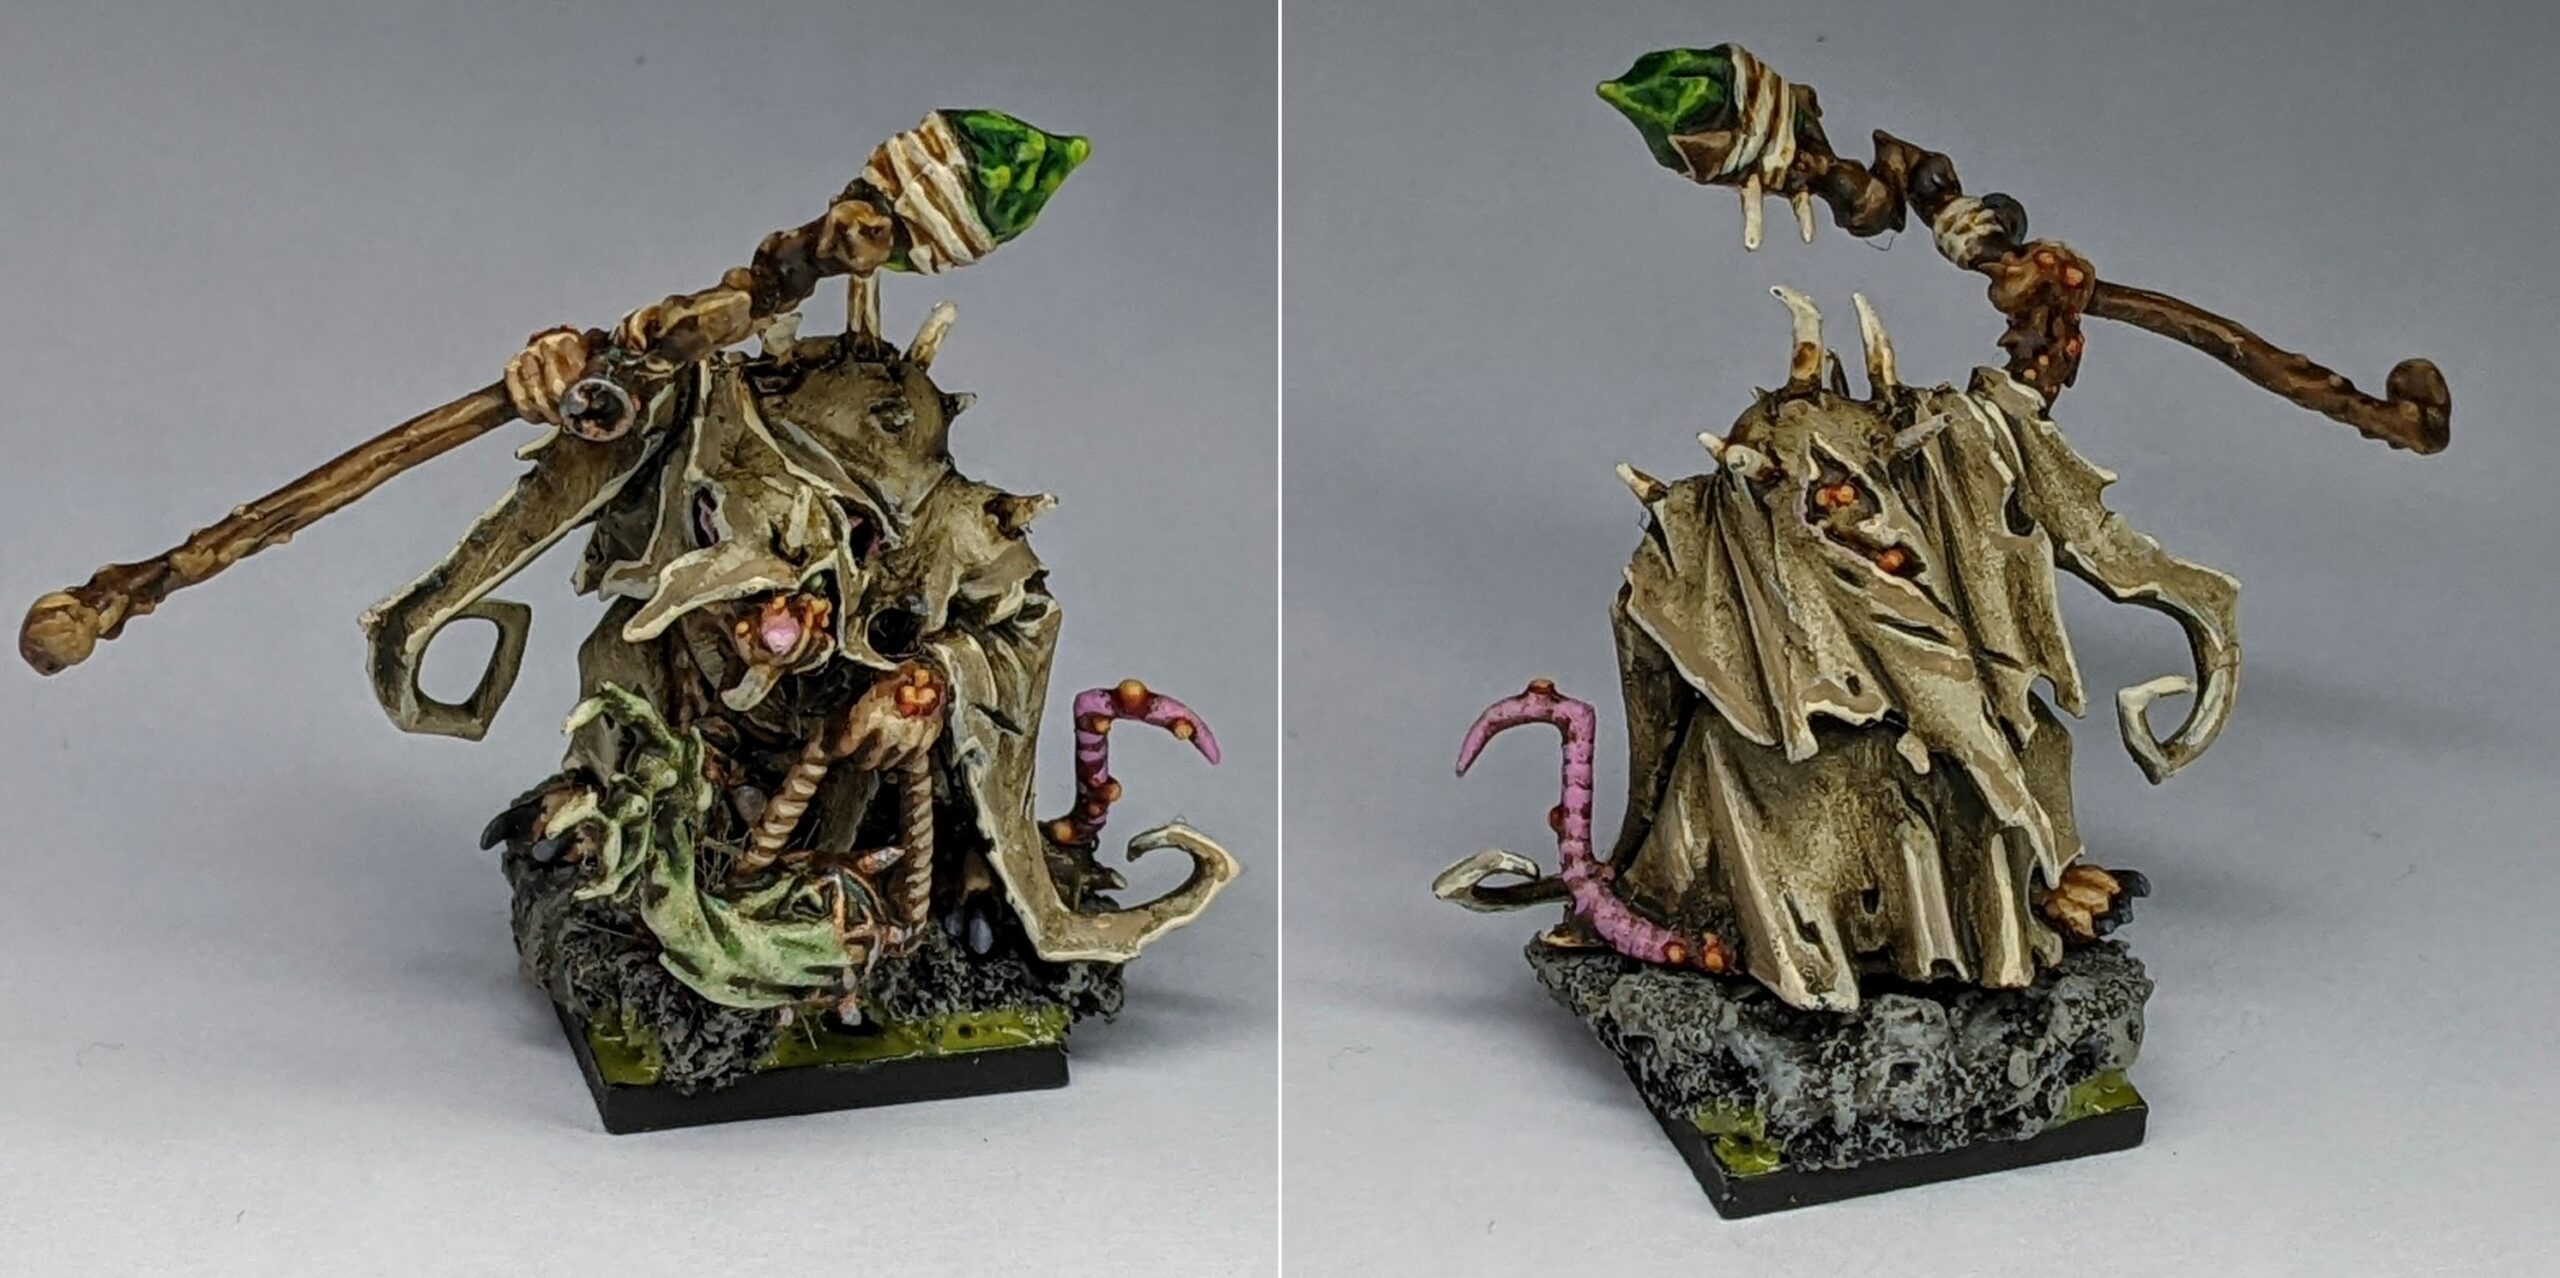
So, where am I with Clan Pestilens? Well, thus far I’ve painted Lord Skrolk, 30 Plague Monks and 10 Plague Censer Bearers – a pretty decent start, if I say so myself. As far as 6th Edition WHFB is concerned, I don’t anticipate that I’ll ever need more than 30 Monks or 10 Censers (unless I was planning a pure Clan Pestilens army), so let’s take a look at 8th Edition and T9A to figure out what’s missing there.
The 7th Edition (and still, sadly, the ‘current’) Skaven army book introduced a couple of new units to the Pestilens sub faction – those being the Plague Furnace (an alternative Screaming Bell build config for Plague Priests) and the Plagueclaw Catapult. I’ll be blunt – I just don’t care about Catapult at all. I just find it so massively underwhelming. It comes from the same kit as the Warp Lightning Cannon, and shares the exact same crew – Clanrats, not Plague Monks – and besides giving the army a ‘stone thrower’ equivalent, the unit just feels altogether unnecessary to me. Maybe it just feels a bit much like Pestilens are infringing on Clan Skryre territory for my liking. Both the rules and the model are fine, I guess, but in pretty much all instances I’d just rather have another Warp Lightning Cannon. Maybe I’ll want to paint one further down the line, but for now, it’s a hard pass.
So, that leaves the Plague Furnace. As with the Catapult, I found myself really wanting to write this thing off as a lazy alternative build to get people to buy the Screaming Bell twice. Despite these initial misgivings however, I found it growing on me. From a rules perspective, it serves a very different and actually kinda interesting purpose. From a miniature perspective, well, there’s a bit more to it than the Catapult. The Furnace shares the same frame and archway as the Screaming Bell, but that’s about where the similarities end. While the Screaming Bell features a Grey Seer riding on top of the Bell itself, the Plague Priest stands on the front platform. Where the Bell is crewed by a Rat Ogre, the Furnace is operated by a crew of actual Plague Monks. It’s maybe not a completely different unit, but it feels a lot less lazy to me than the Plagueclaw did. Besides, now that I’ve moved into 8th Edition WHFB territory, I was really feeling the absence of the ‘modern style’ Screaming Bell kit in my collection.
Of course, this wouldn’t be PLASTIC CRACKED if I wasn’t going to immediately overthink and obsess over this decision. If I built the Plague Furnace, this platform/warmachine/whatever you want to call it – on it’s 60x100mm base – would completely dwarf my modest 40x60mm 6th Edition Screaming Bell. This didn’t sit well with me. The Screaming Bell – the chariot of Grey Seers and perhaps the single most iconic piece of Skaven wargear – should be the centrepiece miniature of the army, not some Hero level characters mount. It started making me twitchy. I turned a number of possible solutions around in my head – would I just have to knuckle down and paint both? What about magnetising it? After all, I surely wouldn’t ever bring both a Screaming Bell and a Plague Furnace in a single list anyway. I failed to make a decision after sleeping on it, decided I’d just get cracking on some more Plague Monks in the meantime – another 20 in total, to match the Stormvermin’s unit strength of 50.
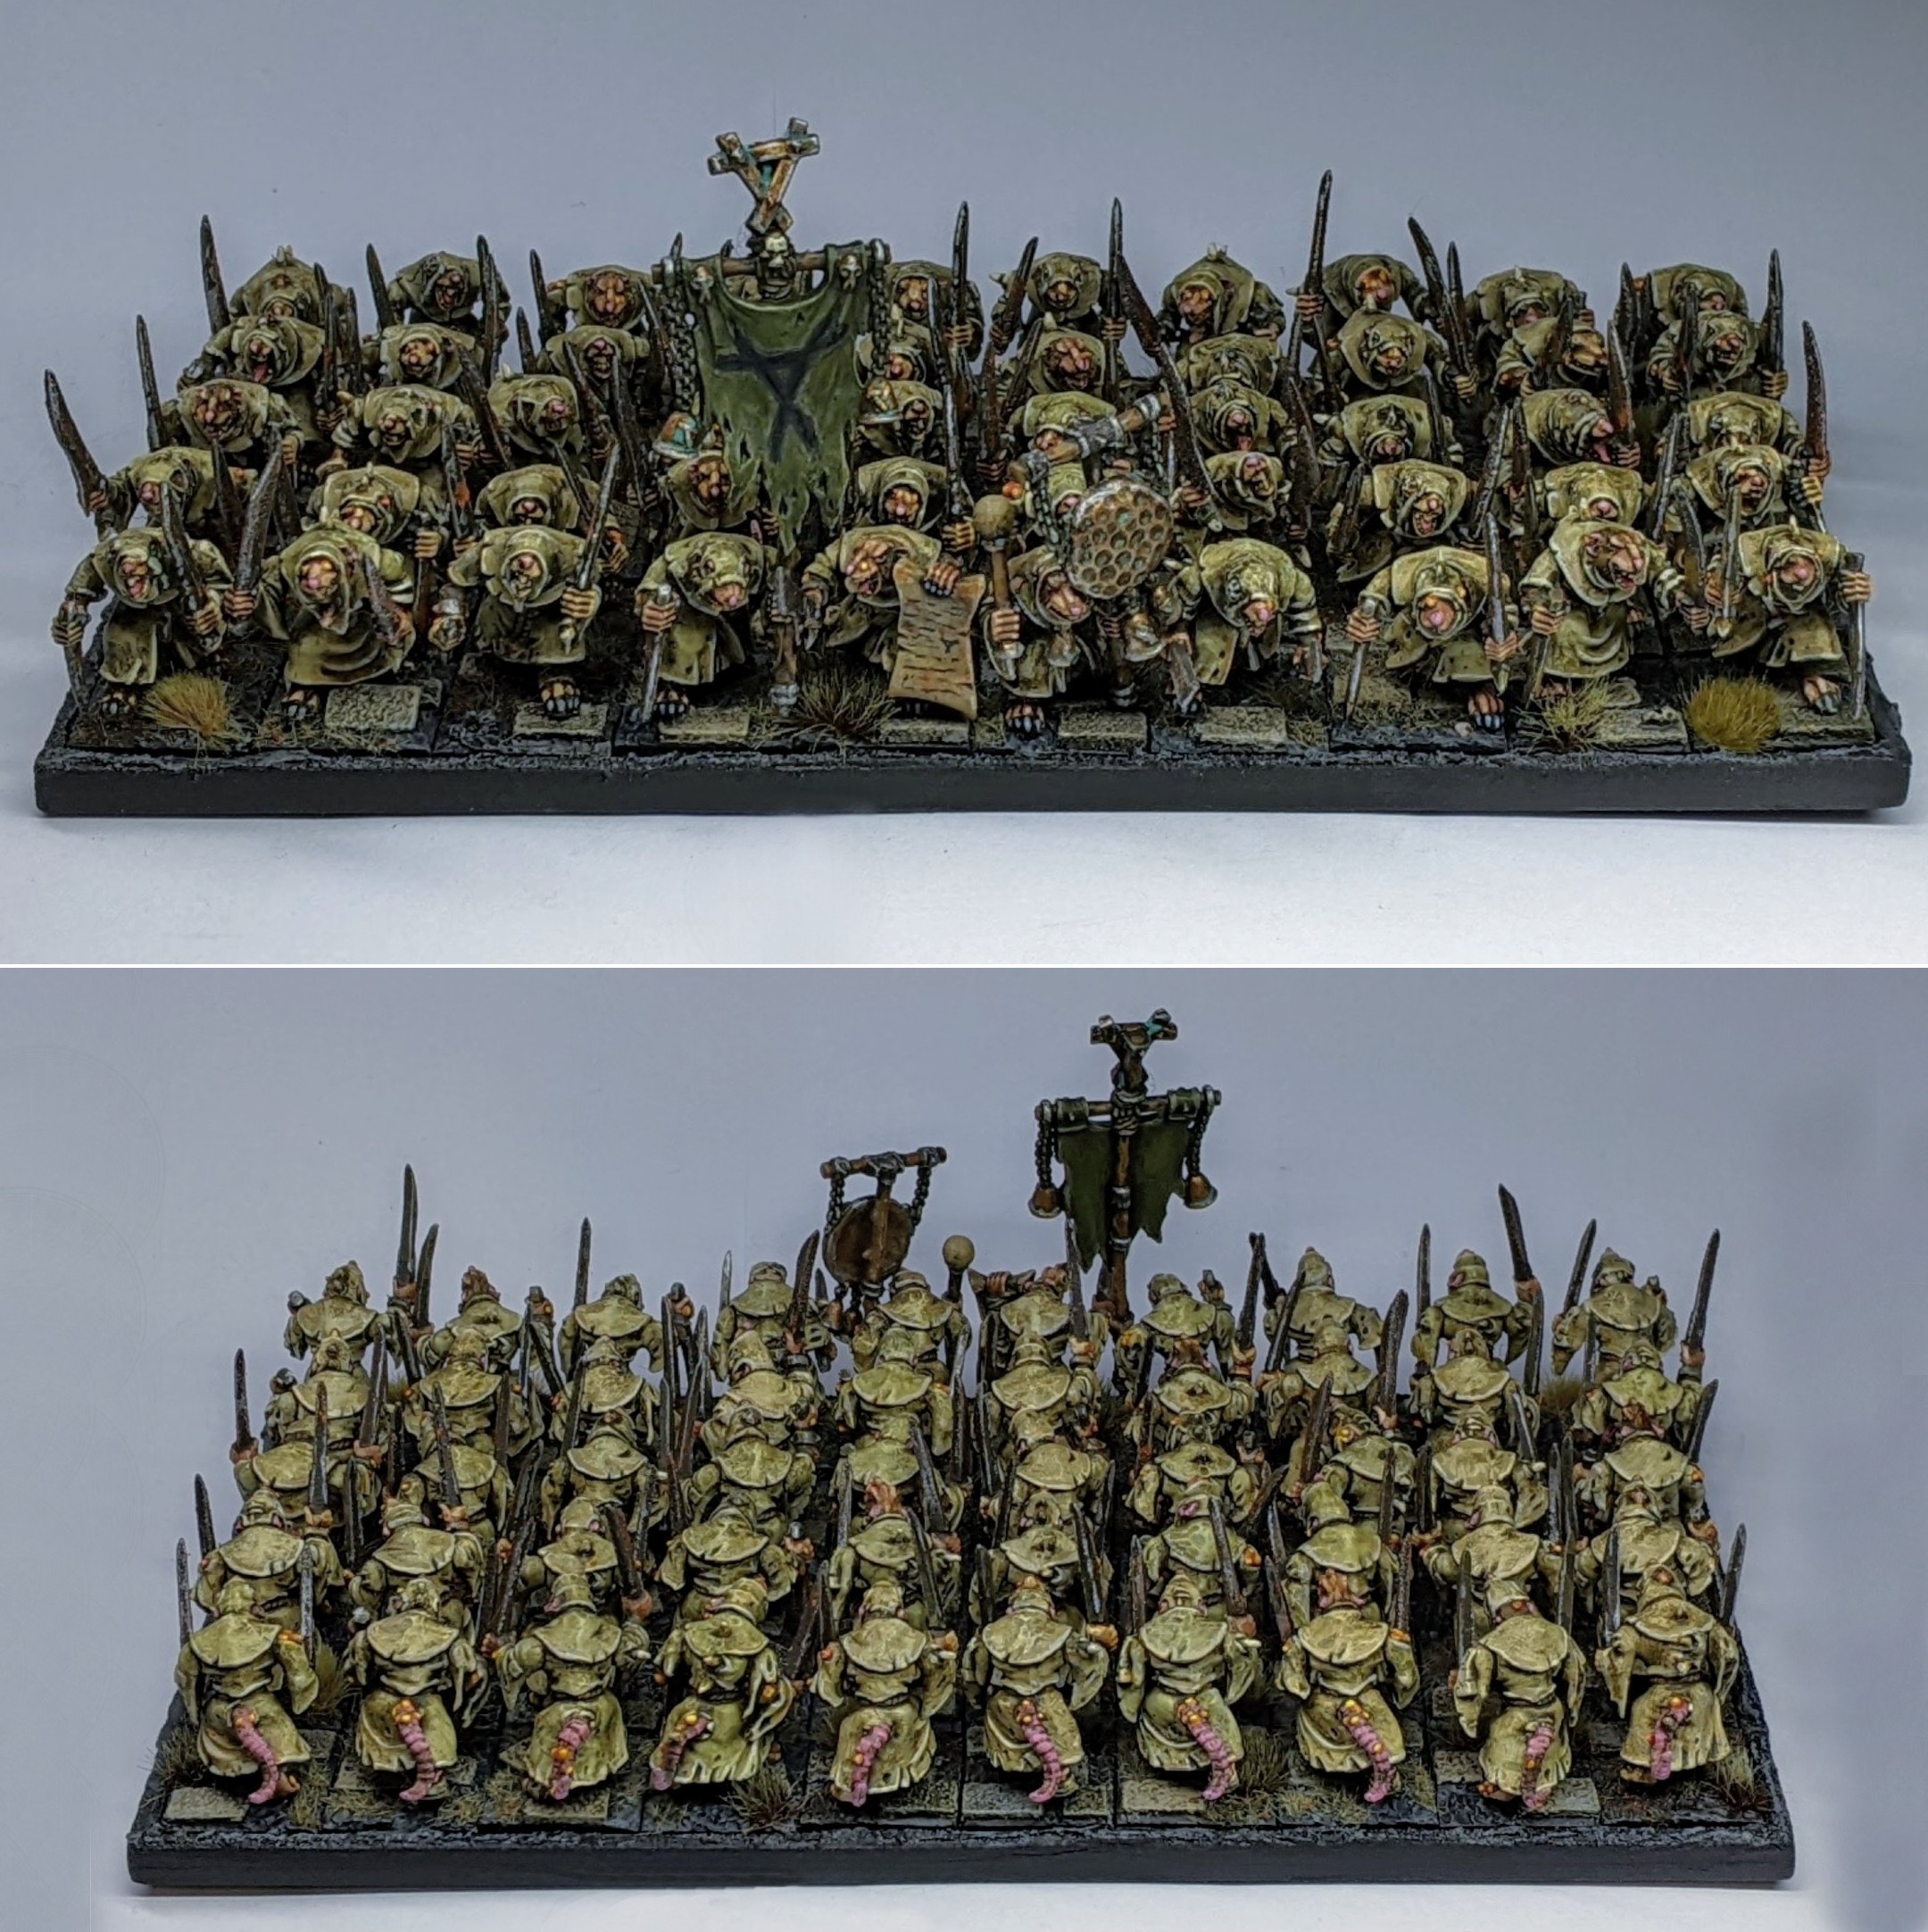
Not much has changed in my approach to painting Plague Monks, although this time around I knew enough to streamline the process a little. Instead of slapping on the Streaking Grime with a brush, I shot the enamel wash onto my basecoated minis through the airbrush. Better yet, now that I knew what I was aiming for, I was able to blast my way through the cotton bud cleanup phase twice as quickly as my first batch. I went through the usual process of painting the skin, tongues, ears, noses, eyes, blades, highlighting the robes and picking out the pustules. I’d honestly expected these to take a lot longer than they did – 20 models and all – but I’m pleased to report that I cranked these out over a single weekend. All the while mulling over my Plague Furnace dilemma.
With the Plague Monks out of the way, I had to turn my attention back to the Plague Furnace. While working my way through the base coats, I decided to settle on purchasing a second Screaming Bell kit – I managed to find one of these on eBay without the Plague Priest or Grey Seer for around £20 – and magnetising the kit to allow me to field both options. It’d annoy me too much not to have one of the modern Screaming Bells for games of 8th and T9A, but who wants to paint essentially the same miniature twice? I’ll only be able to display one of these configurations at a time, obviously, but that’s such a minor issue when I have a 6th Edition Screaming Bell already.
Okay, great. Glad we’ve got that sorted, then. So, how did I magnetise the kit and why did I need to buy a second kit to accomplish this?

Magnetising a Screaming Bell / Plague Furnace kit is a process that’s pretty widely documented on the internet, but honestly, every one of those guides seemed a little bit daunting to me. I’d read tales about sculpting custom crew areas, magnetising chains, changing the angle of the pendulum to match the bell and all sorts of either and wonderful approaches to magnetisation. Much of the complexity in these approaches however stems from working around the limitations of a single kit. Both both the Bell and the Furnace share a select few key ‘bottleneck’ pieces that aren’t especially suited to magnetisation. With two sets of these bits however, it can be as simple as magnetising the Incense Burner and the Priest; the Bell and the Pendulum; the Rat Ogre and the Plague Monk crew. Your mileage may vary here, but it felt worth it for me to spend £20 on a mostly intact 2nd bell kit and keep the task simple – this was about saving time and avoiding duplication of effort after all. Besides, if I ever do find myself in desperate need to run both a Screaming Bell and a Plague Furnace down the line, I’ll still have the rest of the kit in my bitz box waiting for me – and as an added bonus, it’ll be a lot quicker to get painted without the bell, burner, Grey Seer or Rat Ogre to paint.
So, what exactly did I do to achieve my ‘simpler’ approach to magnetisation? Well, first and foremost I built up the core of the structure – the sides, the floor panels, the wheels, the spikes. The only parts I left off were either sides of the arches, the front platform and the rear crew platform. After a bit of dry fitting, I put a 2x1mm N52 magnet1 into the centre of the front platform, one into the centre of the incense burner stand and the bottom of the Plague Priest. Once I was happy that both the burner and the Priest had good strong flush contact with the platform, I glued it in place at the front of the Bell/Furnace.
Next up, I magnetised the Bell and Plague Pendulum pieces themselves. To achieve this, I assembled both the Bell and the Pendulum in full, each with their respective cog/wheel/axel/whatever you want to call it pieces (23 and 24 in the instructions) glued to either side of the Bell/Pendulum at the angle indicated by the little nub and cutaway. When this was dry (remember plastic glue takes a while to set completely), I snipped off the protruding pegs and drilled into the remaining stump – replacing the peg with a 4mm magnet flush with the wheel instead. I then took out my knife and cut away at the holes at the top of the arches (where the pegs had been designed to insert into) until it was big enough to hold another magnet, stuffed the inside with a bit of green stuff and super glued a magnet in place. Once this had set, I glued the arches into the Screaming Bell structure with super glue. While the super glue was setting, I put the pendulum piece in between the magnets to ensure it dried as tight and flush as possible.
A very minor point here, but I think it’s a good idea to keep all of the magnets polarities facing the same direction on both the pendulum/bell pieces and the archway itself. Given the distance and/or obstruction between each other, this isn’t going to make a whole lot of difference, but it seemed like a good idea for the long term health of the model to have all of the magnets ‘pulling’ each other instead of pushing. That, and I think the magnets will hold everything together better if none of them are working against each other.

Now we’ve got the majority of the Screaming Bell / Plague Furnace magnetised. The Incense Burner and Bell can be hot swapped for a Plague Priest and Pendulum, so the only loose end left to tie up is the crew.
Now, the crew was a little trickier. Both the Plague Monks and the Rat Ogre share the same reversible platform, with different little holes to match the pegs on the underside of the Monks and the Ogre. Thanks to my second kit worth of bitz however, I didn’t need to worry about putting magnets into these – I could simply glue them to their own little platform. That’s one problem solved. The next challenge was how I was going to connect their chains to handle of the bell/pendulum. I could simply assemble as intended and attach the loop at the ends of their chains to their relevant piece. Sounds good in theory, but I can barely get through painting a Chaos Terminator without snapping off the spiky bits – I don’t fancy the chances of that thin little plastic chain surviving my clumsy mitts while attached to two comparatively heavy chunks of plastic. Instead, I took a cue from The Chattering Horde and turned the chain loop into a hook, snipping off a little section at the bottom and allowing it to clip onto the bell or pendulum. This worked great, but the weight of the pendulum kept lifting the platform up and out of place. I wasn’t sold on trying to magnetise the sides of the platform, so instead I made a couple of little clips out of spare bits from an unused incense burner piece to help keep the platform in place. The platform just slides in underneath, the chain clips onto the bell and the two hold each other in place.
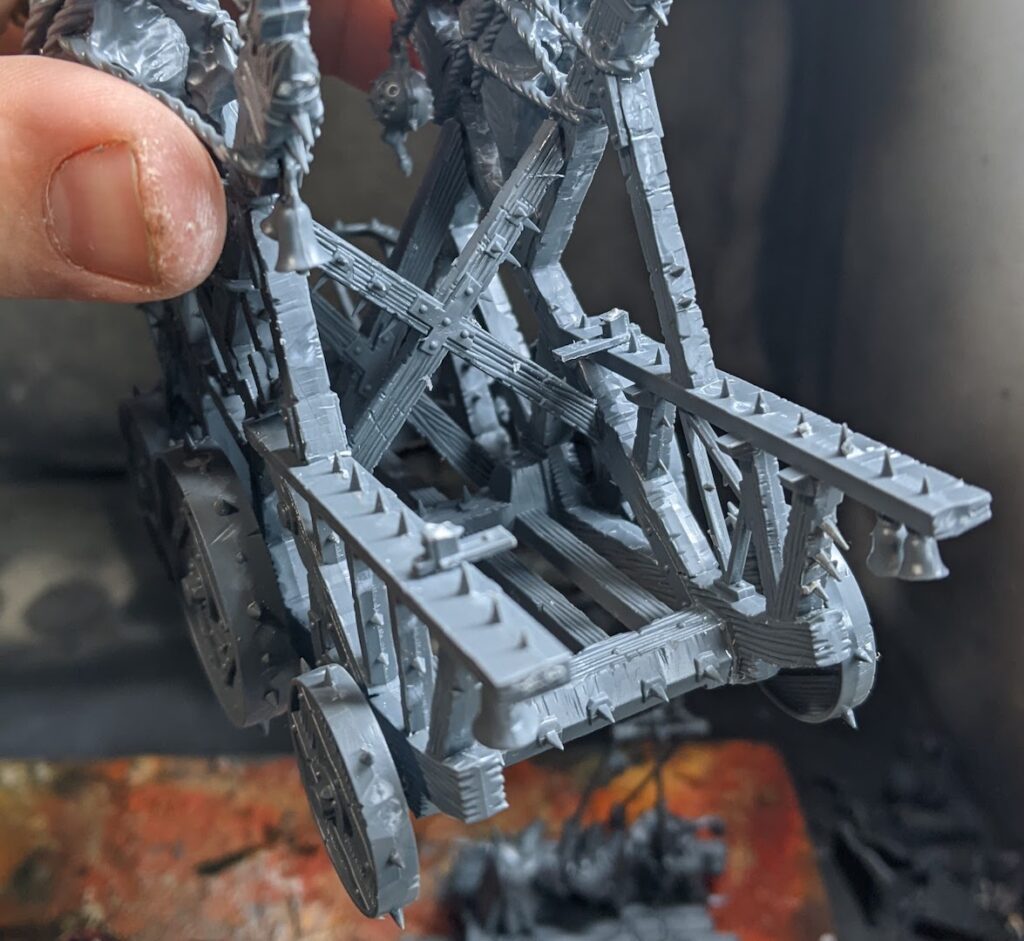
That’s pretty much all there is to it. The Rat Ogre or Plague Monk crew are glued to a platform, which slides in and out of the back of the Bell/Furnace. The Bell or Pendulum itself is magnetised between the arches and held at the right angle by the crew’s clip-on chain. Finally, the Incense Burner or Plague Priest at the front is magnetised in the centre of the front platform. It’s easy enough to swap around, the components make for convenient subassemblies to paint and it all feels reasonably robust for the most part. Best of all, when it’s all together, you wouldn’t even know that it’s been magnetised. I call that a success – and a fun problem to solve, to boot!
Moving on from the assembly, and onto the painting – I actually had a lot more fun painting this thing than I expected. I started from a few zenithally airbrushed layers of Charred Brown, Beasty Brown and Leather Brown, then drybrushed all of the wood grain with a 50:50 mix of Leather Brown and Elfic Flesh. Once I had all the edges and wood grain picked out this way, I started picking out the metallics. This was probably the most time consuming step of the process, thanks to the plethora of little spikes, rivets and plates of metal scattered all around the frame of the Furnace. Most of this was done in Plate Mail Metal, but a few areas such as the hanging bells were painted in Brassy Brass. Finally, the whole thing frame was doused in a mixture of Agrax Earthshade and Seraphim Sepia to give it a dark, grungy wood colour.
This all looked a little dark and samey, so I started introducing a little colour back to the frame by dotting little bits of rust around the metals. Watered down Ryza Rust for the grey metals, and Nihilakh Oxide for the brass colours. After a little tidy up with Plate Mail Metal and Brassy Brass, I picked out the edges of the plates, spikes and bells with Shining Silver to add a little bit of contrast.
Working my way up, I started working on the great lump of warpstone and the ropes holding it in place. I basecoated the warpstone in Sick Green, then took out my small drybrush and started picking out the ropes with Khaki, followed by a little Elfic Flesh. This took the ropes to a slightly uncomfortable brightness, so I knocked it back with a very carefully applied a layer of Seraphim Sepia over the rope, typing it all together and shading the recesses.
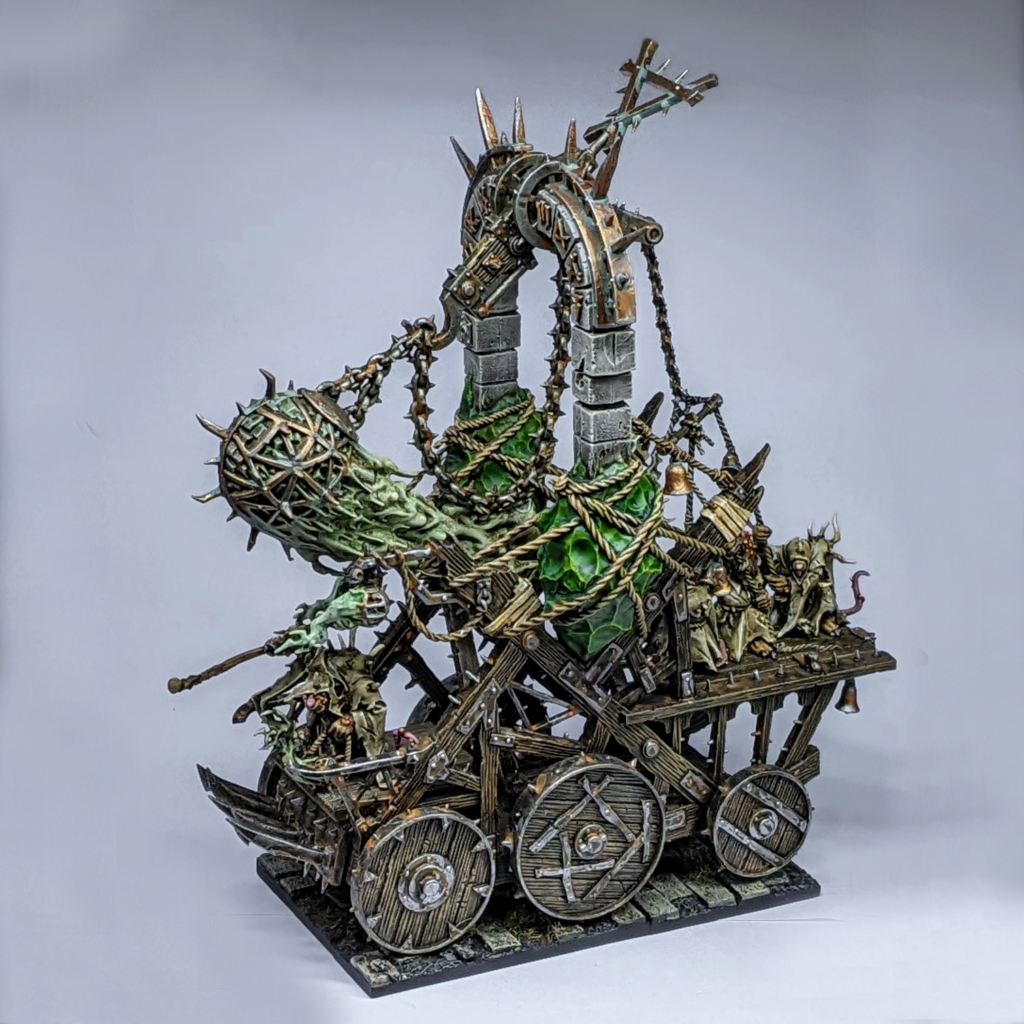
As a consequence of drybrushing the ropes, my warpstone now had a considerable amount of white picking out the sharpest, protruding edges. Instead of taking out the Sick Green and tidying up the area, however, I instead applied a little Yellow Ink across the whole surface of the warpstone. This gave it a pleasant limey tinge, while also transforming the white ‘mess’ into intentional yellow highlighting. To tie it all together, I applied two successive washes of Biel Tan Green over the warpstone, careful not to get any over my freshly painted ropes. The wash sank nicely into the ink-slick pits of the warpstone, giving it some smooth seamless shading with some nice depth with very little effort.
The final area to paint on the Bell/Furnace itself was the stone arch, which I basecoated in Stonewall Grey, washed with Agrax Earthshade, drybrushed Stonewall Grey again followed by a final drybrush of Khaki. The metallic symbols on the arch were all picked out with Brassy Brass as below, with a very restrained pin wash of Agrax Earthshade around the edges and a little Shining Gold over the surface of the lettering.

The rest of the Furnace was pretty much all stuff that we’ve seen before. The Plague Priest and Plague Monks were painted using my Streaking Grime recipe, while the Rat Ogre and Grey Seer were painted in my usual schemes for these models. The incense burners and Plague Furnace smoke effects I basecoated in Elfic Flesh, drybrushed with white and then applied some very watered down Biel Tan Green wash over it, letting it sink into the crevices a bit. This took a couple of coats to give it the right amount of tint and coverage, applying a little more towards the source (it’s vapour, not fire). For the Furnace, I finished with a little bit of thinned down Streaking Grime pushed around the surface to leverage the streaky, wispy looking finish of the enamel wash.
Oh yeah, I also knocked together a little base with a magnet in it for the Plague Priest to sit on. The gravel was applied around his cloak, which helps keep him in place at the right angle. This allows me to field the Plague Priest with or without his Plague Furnace, and Lord Skrolk can be reserved as a named character. Bonus!
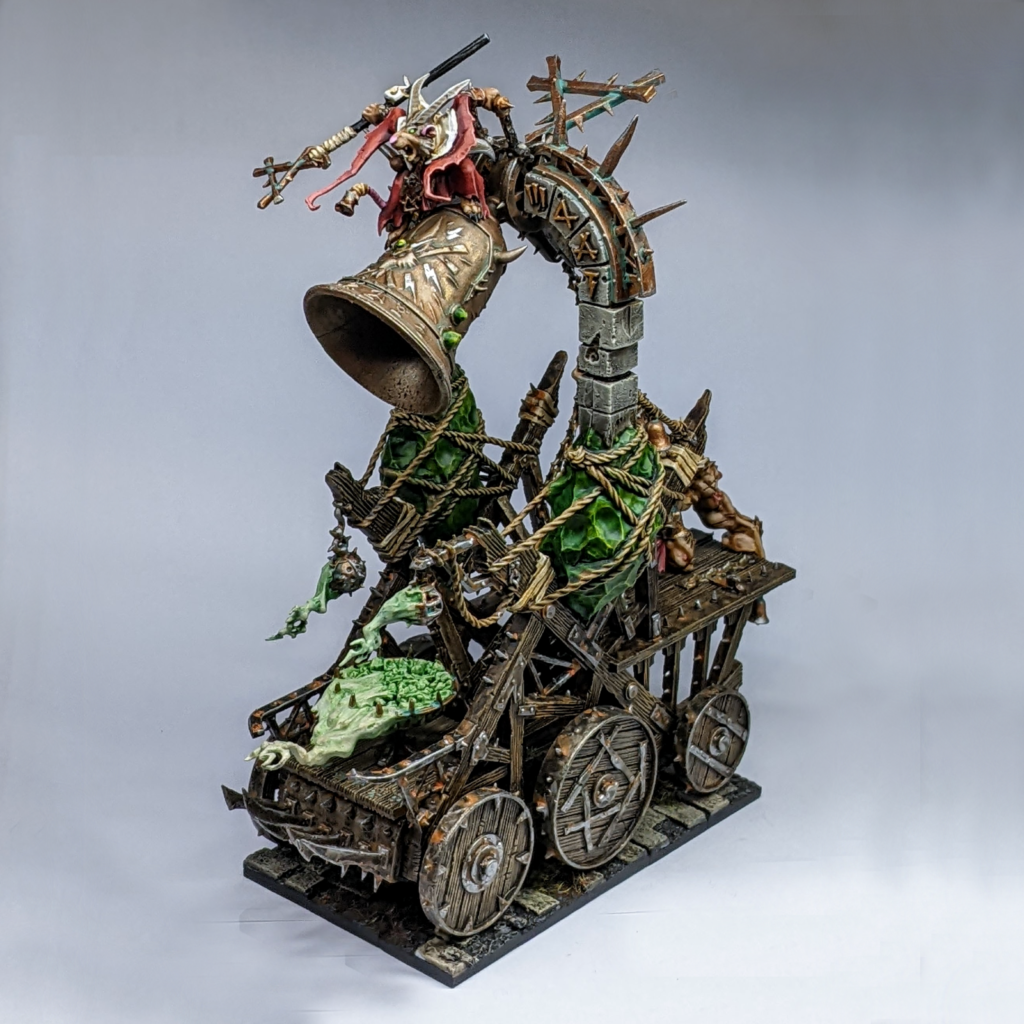
I had a lot of fun with this kit, both in terms of figuring out how to magnetise it – what works, what doesn’t and what lengths I was willing to go to – and with how quick and satisfying the paint job turned out. It’s a great looking model, and reminds me in no small way of the Doomwheel – a little busy and not something I’d want to tackle without subassemblies – but which makes for a very interesting, three dimensional piece. I’m really glad to have the Plague Furnace available to my burgeoning Clan Pestilens contingent, and it feels really good to finally have a modern Screaming Bell available to the army for games of 8th Edition as well.

With each of the Greater Clans fleshed out and just about every single unit in the 7th edition army book represented2 – the only thing left to do is knock out a few of the Skaven End Times models. In total, those are Thanquol on Boneripper MK2, Stormfiends and the plastic Verminlords. While I’m not especially interested in the plastic Verminlord models (my Warpgnaw would make a far cooler proxy than any of those), I can’t quite shake the feeling that calling this army ‘complete’ without the End Times Thanquol would be cheating myself. Maybe I’ve been listening to too much Gotrek and Felix while painting this army, but I love that spiteful little loser – how could I not add his latest incarnation to my army?
And thus, my grand plans to call this the final entry of Vermintide for now are scuppered. Try as I might, I just can’t seem to quit these furry little gits. Ah well. Better keep your eyes peeled for the seventh and hopefully final3 chapter of Vermintide – The End Times!
Until then, thanks for reading and happy wargaming!
1 When you’re working with magnets with as small a diameter is 1mm, you really need that extra pull strength to keep things stable. N52 minimum.
2 The only exceptions to this being character mounts, a small handful of named characters, the derpy little metal Verminlord, Night Runners and the Plagueclaw Catapult. Most of which I just can’t get excited enough about to bother painting.
3 Potential retrospective chapter not withstanding.