Hello wargamers, and welcome back to part two of Makin’ Bacon – a mini-series of posts following the growth of my Ulix Turner crew for Malifaux. In part one, I discussed how I found myself taking on yet another game system, my first impressions of Wyrd’s plastic kits, my personal approach to basing the Bayou and, of course, how I went about painting the Ulix Turner Core Set kit. For this next instalment, I’m going to talk about the expansion boxes that I used to fill out my crew to 50 Soulstones and beyond.
Cards on the table, I put virtually no thought into the purchases I made for this crew from a rules perspective. I had a brief play about with Wyrd’s rather excellent Crew Builder app to figure out just how much stuff I needed to purchase, but much of the decision making was based on what I thought looked the coolest and what I thought I could do justice to. Of course, high up on that list was The Sow – a grim as heck three headed momma pig, packaged with three sassy little Piglets. As is often my modus operandi, I decided to kick Phase 2 off with the little ones first.
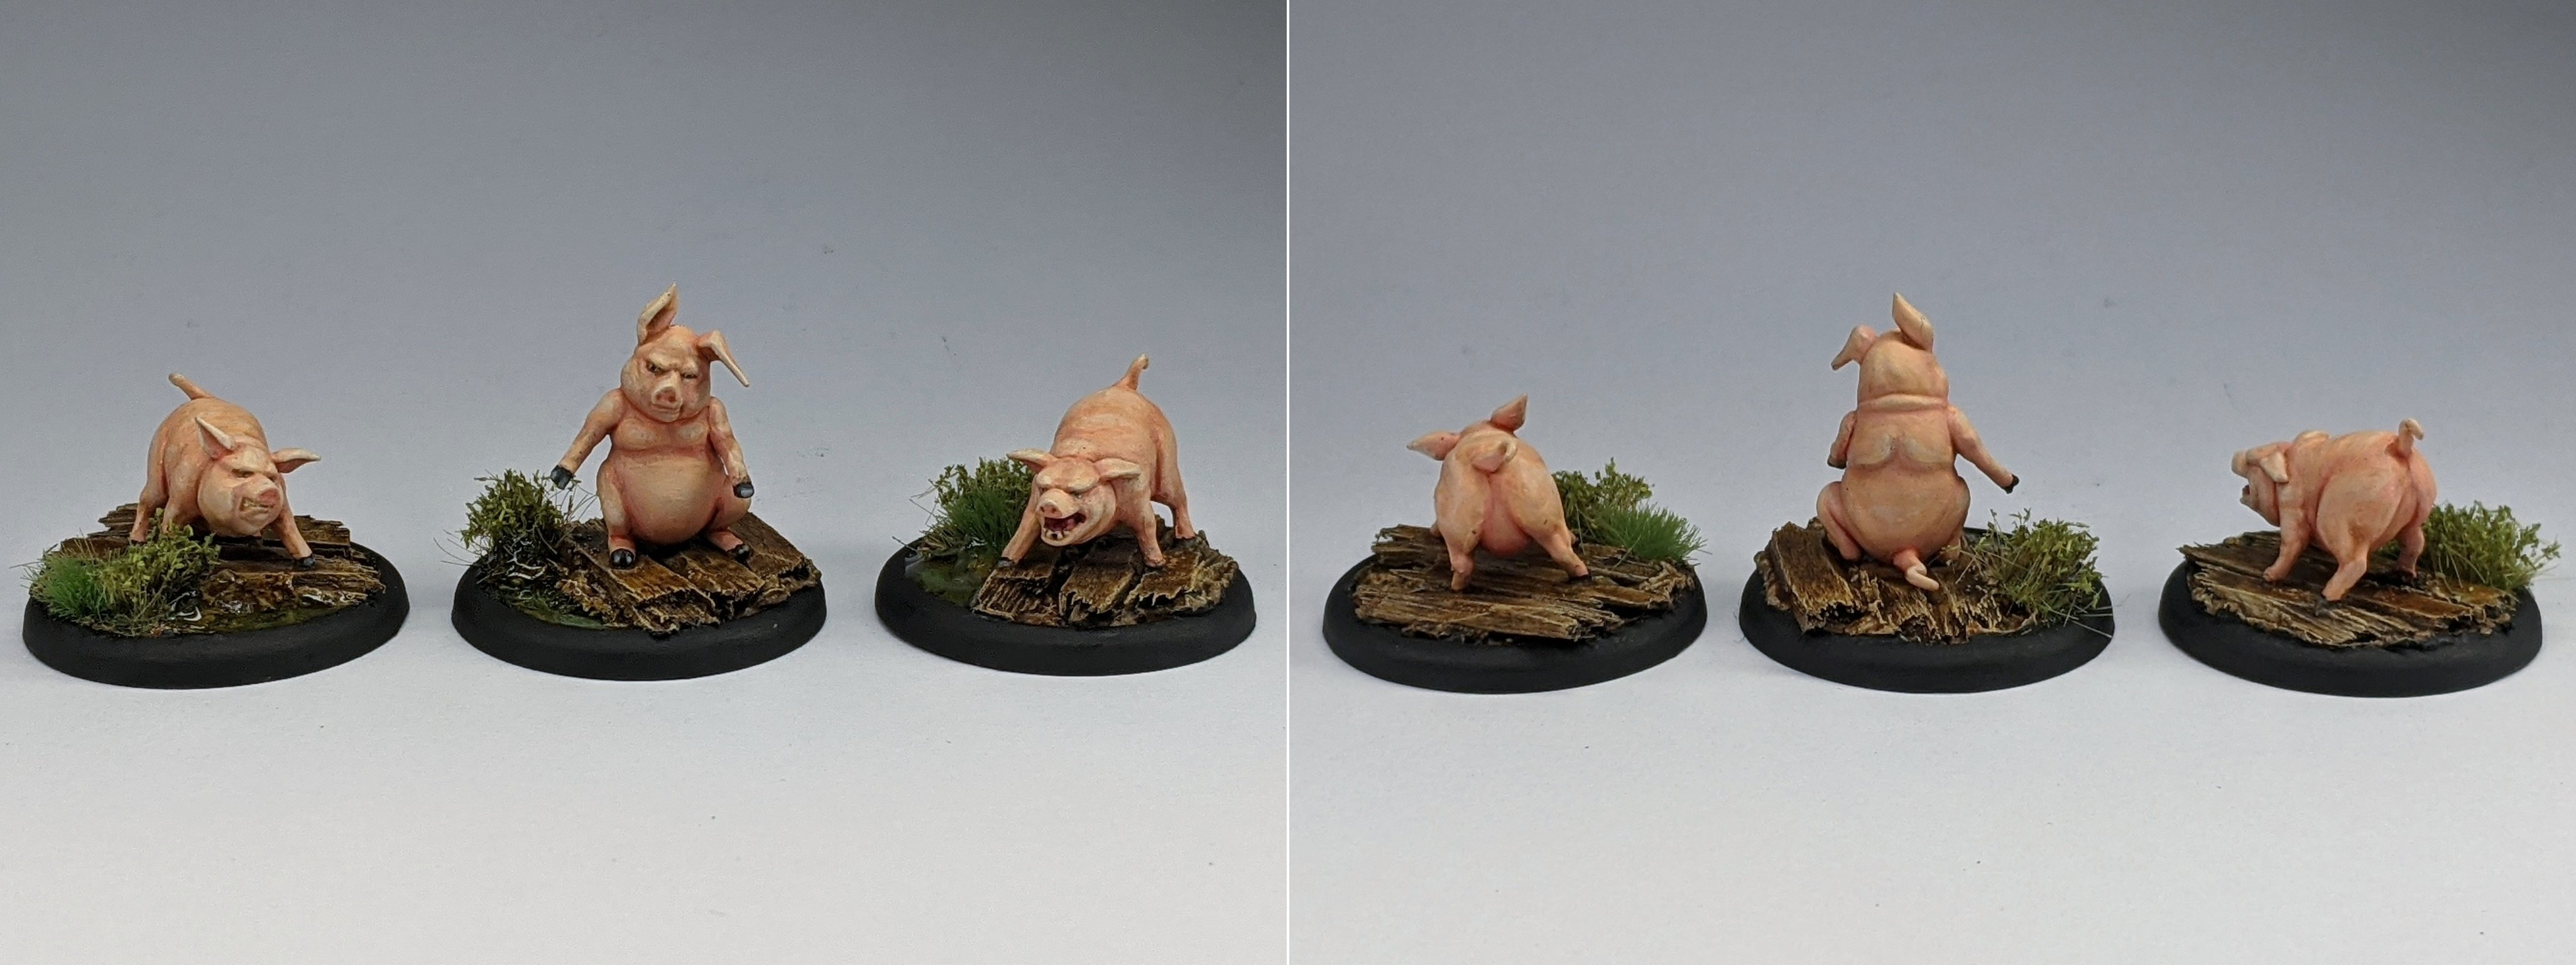
First impressions – man, these little guys sure are smol. You don’t expect literal babies to make for massive miniatures, but I must admit to being a bit taken aback by the size of these. Despite their diminutive stature, these teeny porkers are positively dripping with character. I’m particularly fond of the little guy in the centre, sitting back on his hind legs, indifferent to – and perhaps even a little bored by – the carnage unfolding around him.
The airbrush seemed a little overkill on such small targets, so I opted instead for the old faithful method of successively smaller, lighter layers of flesh tones – Rosy Flesh, Pale Flesh and Elfic Flesh – shaded and blended together with an all over wash of thinned-down Reikland Fleshshade. I repeated this process a couple of times before smoothing out the finish with couple thin glazes of Elfic Flesh; I applied these glazes across the largest expanses such as the pot bellies and butt cheeks. This process was completely painless, surprisingly fast and extremely gratifying – the diminutive size of these miniatures combined with their clean, uncluttered volumes made this whole process quick and easy, leaving me with a handful of trivial tasks. These included painting the bases, picking out the hooves, putting a little glaze of Reikland Fleshshade inside the ears, a drop of Gold Yellow in the eyes with a pair of miniscule black slits for pupils. Varnish, tufts, water effects and we’re three minis down in less than an evening. Onto the next miniature – the Sow herself.
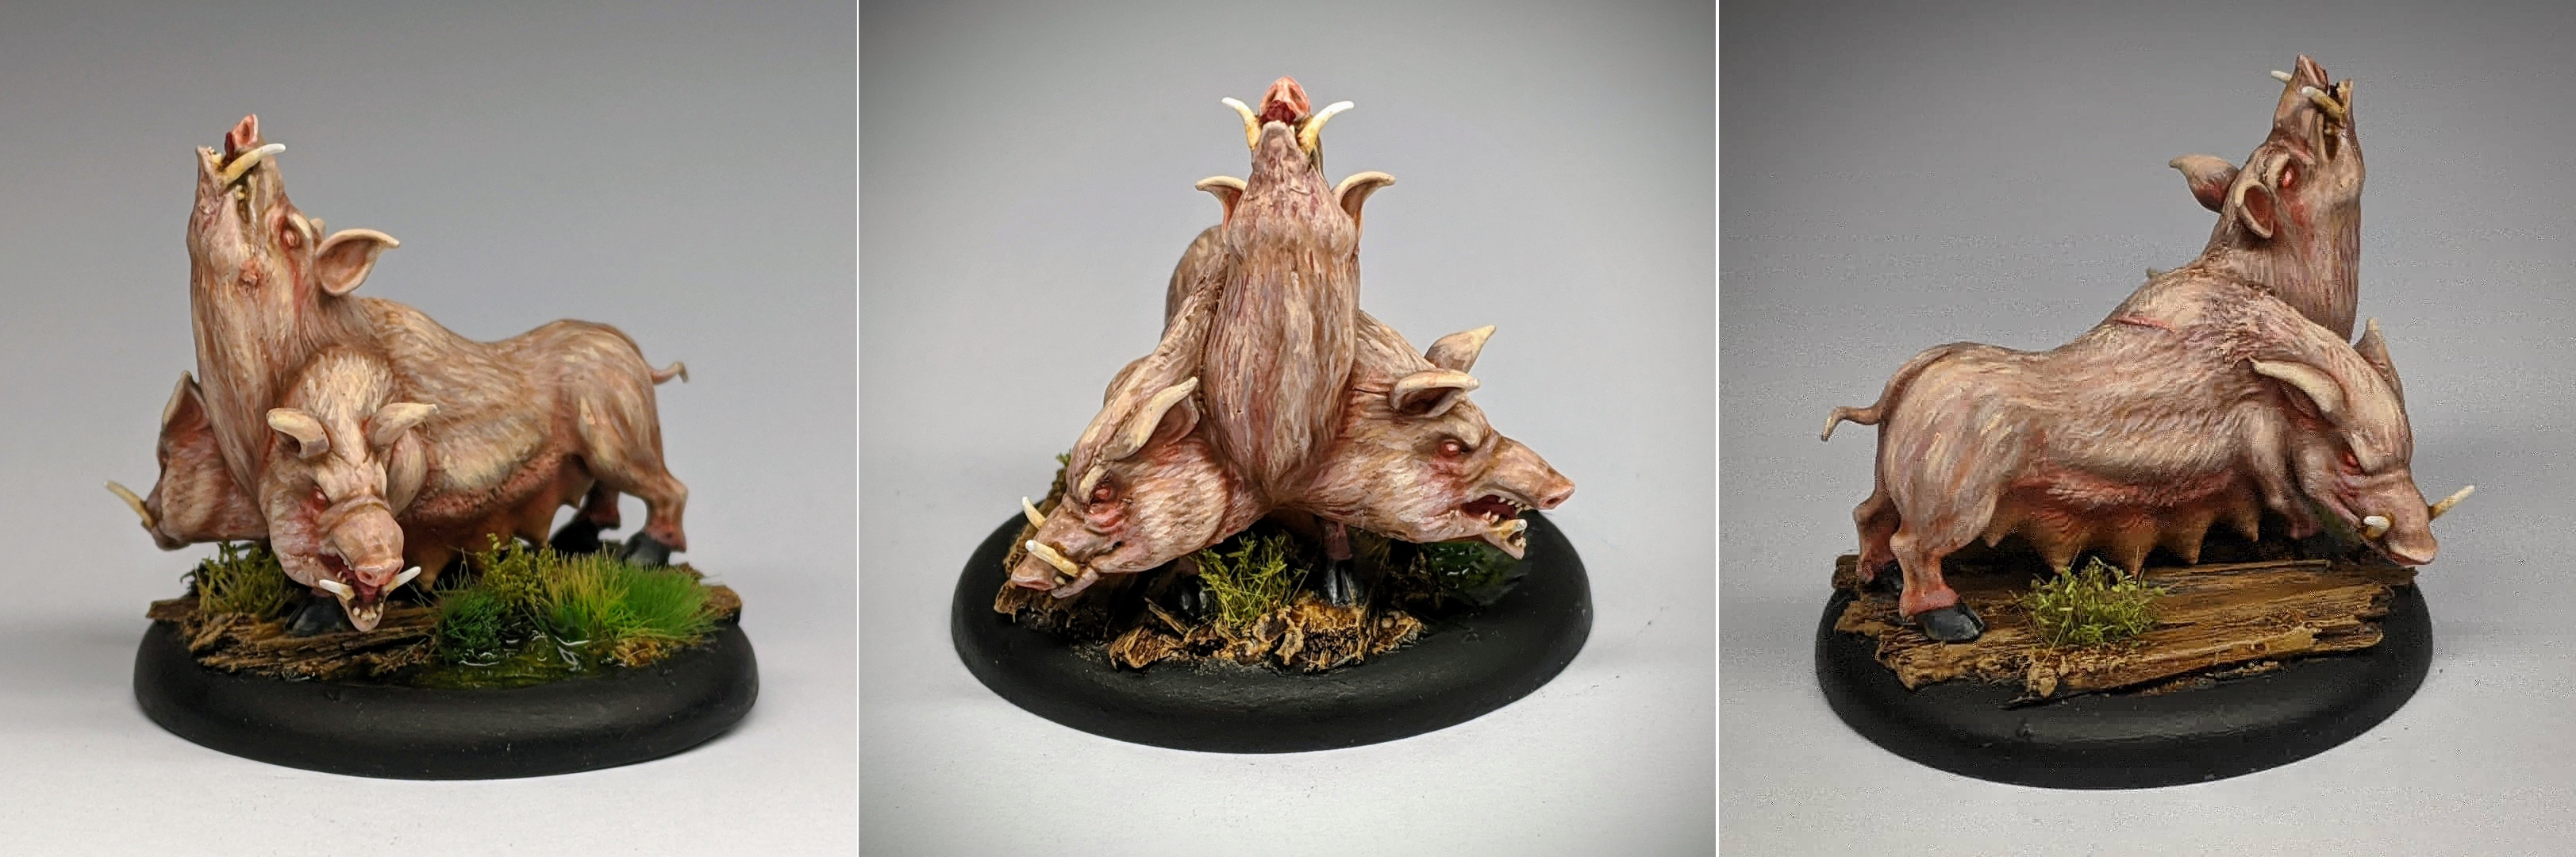
Hot damn, this miniature is morbid. The Sow has a couple of things in common with Old Major – namely pose (for one of her heads, at least) and base size – but the similarities end there. This miniature has a much darker, more severe tone than the proud, somewhat comical tone of Old Major. There’s a few reasons for this; her tusks are a little more realistically proportioned, she has a rougher more textured surface compared to Old Major’s smooth volumes – and of course there’s the small matter of her three heads. From the moment I saw this miniature, I knew that I wanted to take a more grim approach to this one than the somewhat more wholesome piggies before her. My secret weapon here was a new colour on my paint rack – Vallejo Game Heavy Warmgrey.
Heavy Warmgrey is a desaturated, greyish pink that – for lack of a less contrived description – looks a little bit like the colour my Old Major miniature would end up were he slaughtered and left on the side of the road for 24 hours. In other words, the perfect base colour for an unhealthy and overworked mutant sow. As a bonus, it’s also got terrific coverage and opacity, which came in handy as I decided to base coat this one by hand. Forsaking the airbrush had less to do with practicality this time, but more to do with the aesthetic I wanted to capture. In contrast to the smooth volumes and creamy blends of Old Major, I wanted harsher, sketchier vibe for the Sow – only a good old fashioned hairy brush would do here.
To finish off my basecoats, I applied a thin coat of Cadmium Skin – a rich, saturated ‘pale skin’ colour – over the mammary glands with a little dot of Pale Flesh for the teets. After a quick wash of Reikland Fleshshade over the entire model, I was ready to begin highlighting the fur.
The first step was to build up my base coat again with Heavy Warmgrey – this time applying the layer with a series of short, thin strokes following the grain of the fur texture on the surface of the model. After the first pass, this just about restored the fur back to the original colour, leaving traces of the washed tone in both the deepest recesses and in a series of thin slashes across the body of the fur. I then added a little Elfic Flesh to my Heavy Warmgrey and repeated the process to build a little more variance in the surface texture, this time receding a little further from the recesses to build up a bit of a highlight. I repeated this process for two further passes, each time getting a bit lighter and retreating further to the most raised areas. When this was finished, I mixed up a (roughly) 2:1:2 concoction of Reikland Fleshshade, Druchii Violet and Lahmian Medium and washed the entirety of the fur, leaving the mammary glands untouched this time. The purpose of this wash was threefold – it knocks back the brightness of the fur, allowing me make another pass of scratchy highlights and create more subtle texture; the wash settles nicely into the crevices of the fur, accentuating the natural grain of the miniature; and finally the slight addition of Druchii Violet into the mix knocked back some of the added warmth from the Elfic Flesh and Reikland Fleshshade. After one final pass of textured highlights, and the fur was finished.
Next, I grabbed a pot of Bloodletter Glaze. I started adding a little depth to the miniature by applying some very thin glazes into the various crevices – where the various necks meet, under the legs and around the under belly where the fur meets the mammary glands. This helped provide a more gentle transition between the two – the light red glaze tone blending nicely into the darker reddish tones of the Reikland Fleshshade wash. At this point, I noticed that the muted tones left by the wash combined with the Bloodletter Glaze – used for shading elsewhere on the fur – created a reasonably convincing illusion of shadow cast over her underbelly. Content with my happy little accident, I decided not to bother adding anything further to the mammary glands less I ruin the illusion I’d inadvertently stumbled upon.
Speaking of happy accidents, while highlighting the fur I noticed two little imperfections in the green stuff that I used to fill the (considerable) seams left from the Sow’s assembly. These took a little while to spot, the reason for this being that both of them looked so convincingly like an intentional part of the miniature. Rather to cut them off, forcing me to re-prime the area and build back up my layers of texture, I decided to leave them as subtle little visual features. The imperfections in question resembled a small scar on the Sow’s back and a pimple of the centre head’s left cheek. These were simple enough to paint – a little Bloodletter Glaze over the raised area and the job was done.
The final use I had for Bloodletter Glaze on this miniature was on the eyes. On the official artwork for The Sow, the old girl is depicted as having these dark rings around her eyes, trailing down as if stained from tears (or perhaps just general eye gunk). I really liked this effect, so I used a little Bloodletter Red to outline the eyes and dragged it down for a grim, stained effect – more subtly on the left and right heads, but very prominently on the centre. I’m pretty happy with how it turned out.
This left a few final details to pick out – tusks, hooves, and eyes, all of which are pretty self explanatory. Another miniature in the bag!
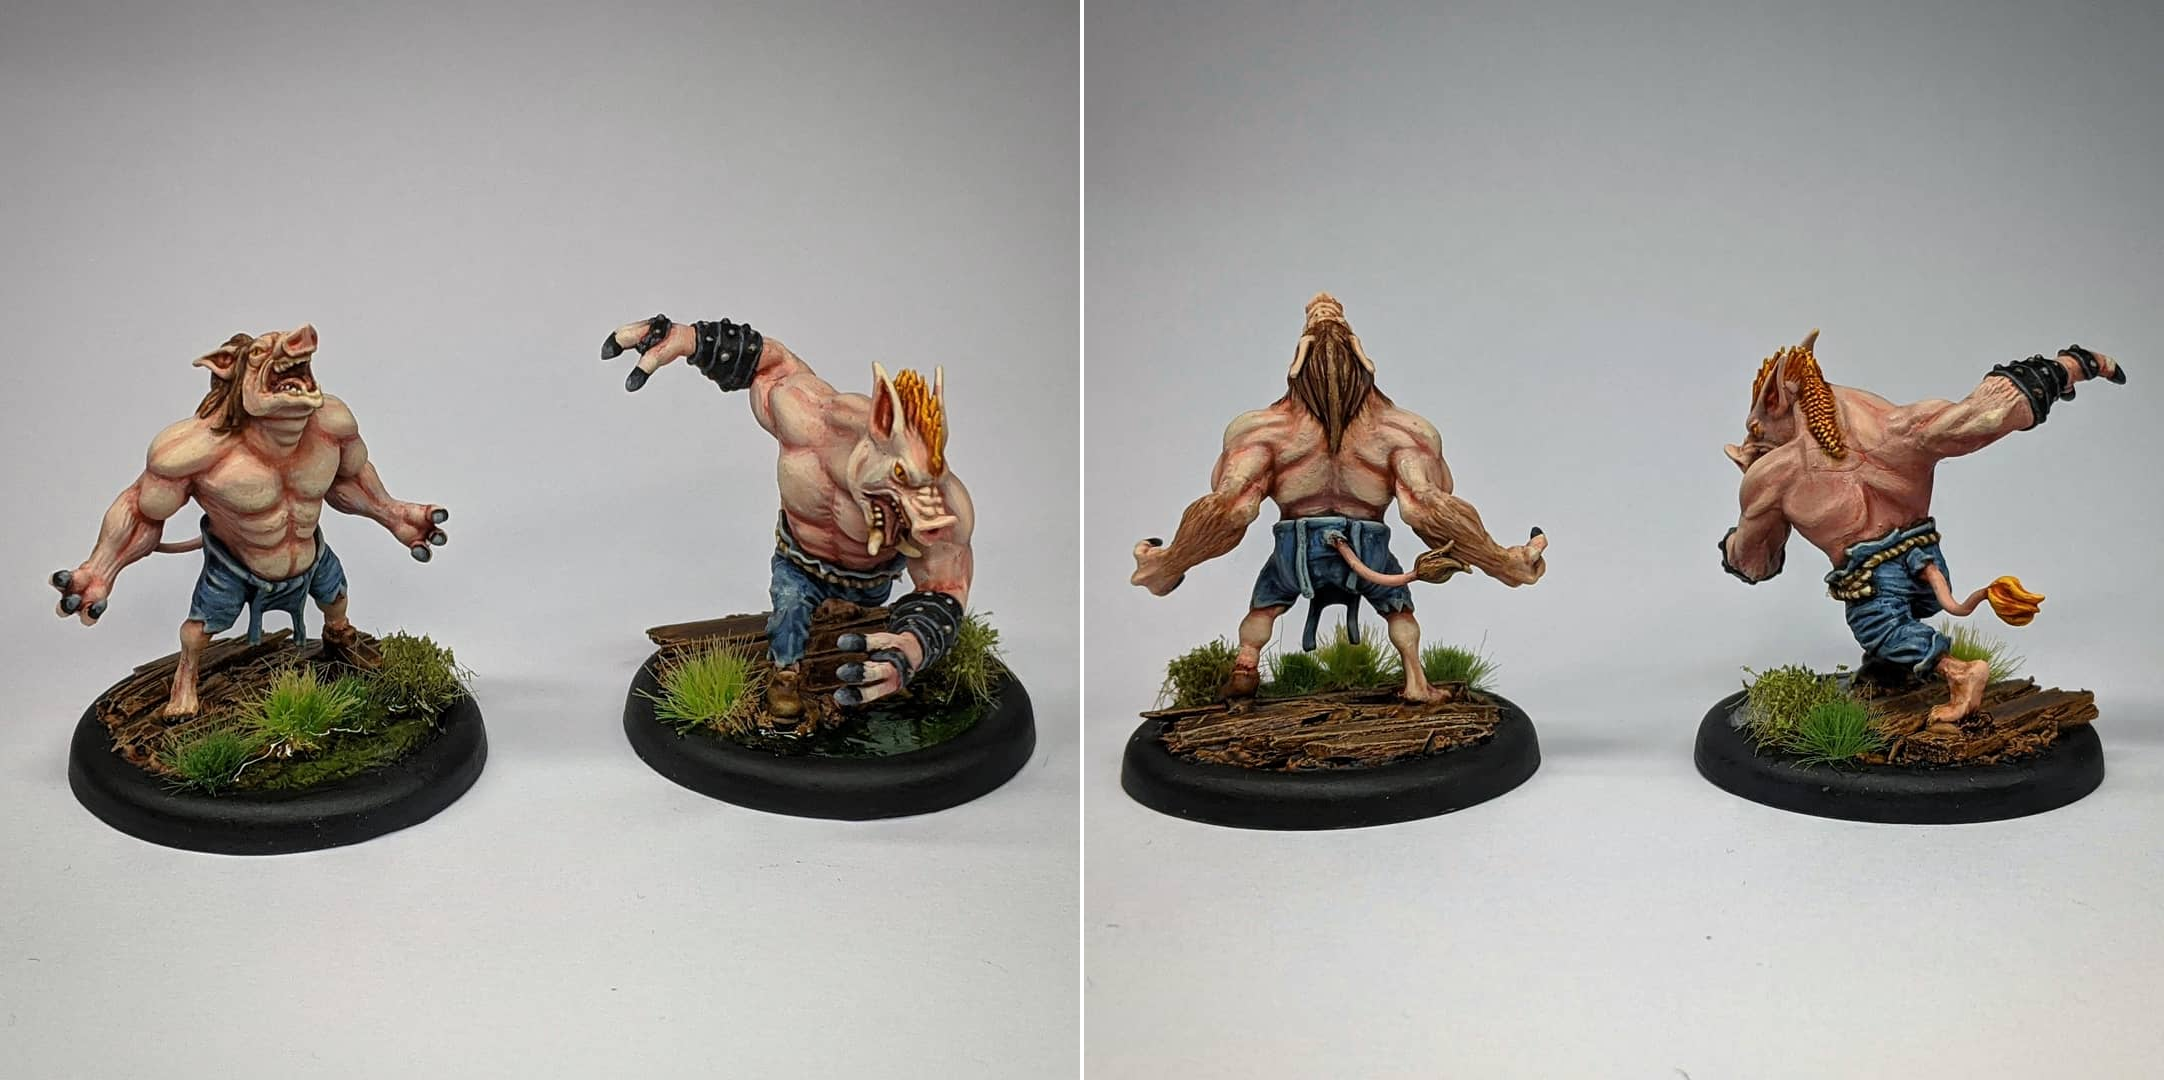
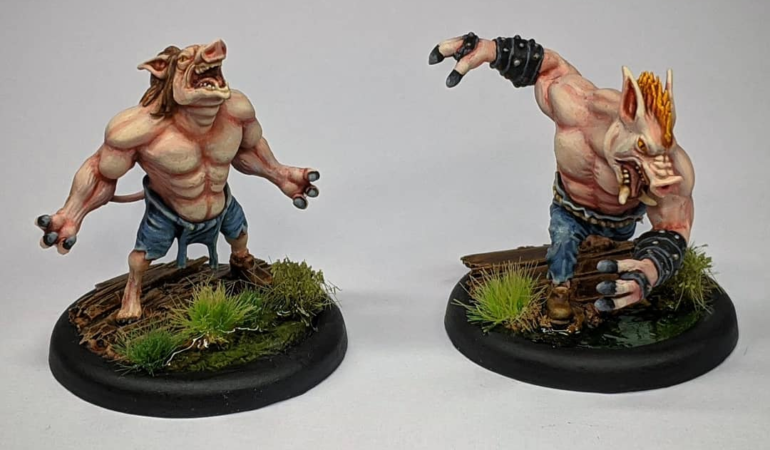
These next two miniatures – the Swine Cursed – were two of my most anticipated sculpts for this project. I just loved the idea of lycanthropic pigs, and the overall visual design and posing for these miniatures looked utterly immense. Yet, when I finally got them out of the box, I must admit to being a little deflated at first – they were a good bit smaller than I had expected.
The moment I began to put paint on these models, however, all of my concerns about size just seemed to melt away. These miniatures were just an absolute delight to paint from start to finish. Not so large as to be a chore to paint, yet not so small as to be fiddley. Less plain than the beasts I’d been painting prior, yet uncluttered from any extraneous detail. Just the right amount of harsh edges, smooth volumes and different textures to play with. A sense of motion and drama to the pose without creating any hard to reach areas. Just.. perfect.
As with Ulix in Part One, these Gremlin Lycanthropes are not green. In fact, a major contributing factor towards painting Ulix in albino colours instead of his usual green was that I wanted to paint these particular miniatures in a more traditional piggy colour without alienating that their Gremlin origins. Holding the end result in my hands, I wholeheartedly stand that decision.
For the base coats, I decided to break out the airbrush again. As with Old Major, these Swine Cursed were blessed with nice smooth volumes that were crying out to be airbrushed – but morseo than Old Major, their chunky musculature was incredibly forgiving to cast zenithal highlights upon. I started from a grey primer undercoat and applied a nice, opaque coat of Rosy Flesh over all of the skin, following up with a wide zenithal over most of the skin with Pale Flesh. For the final highlight, I switched to Elfic Flesh, turned down the PSI a little bit on my compressor and carefully picked out the top of the shoulders, the front of the face and the tops of any exposed areas such as the pectoral muscles. I took special care to ensure that each area was sprayed at a rigidly fixed angle this time, as these highlights were narrower and more precise than the first zenithal. Aside from lighting the miniature realistically, my other intention here was to draw the eye to a single focal point – namely the face of the miniature – so I made a second pass over the face and shoulders to increase the intensity of the lighting there1. Conversely, I wanted to accentuate the shadows on this miniature, so I switched my paint out for Bloodletter Glaze, and very carefully airglazed (that’s a technical term) some additional shading to the underside of the miniature, targeting areas at the exact opposite angle that I applied my highlights from.
With the airbrushing work complete, it was time to put on the final highlights with a hairy brush. I pulled out my trusty Raphael 8404 Size 1 and applied some Bloodletter Glaze into the hard recesses, such as between the pectoral muscles, the wrinkles on the nose and so on. On the other end of the lighting spectrum, I used a little Elfic Flesh to edge highlight the starkest edges on and around the face and very carefully glazed in a few extra layers of Elfic Flesh around the raised areas of musculature that would be the most exposed to light. The reason for doing this was that while the airbrush was able to provide me with a nice smooth transition that became brighter towards the top and front of the miniature – leaving me with shaded areas underneath the arms and pectoral muscles, for example – it provided indiscriminate coverage to the more subtle bumps and raised areas such as bicep muscles and the shallow recessed areas between them. By glazing in further very thin layers of my lightest highlight onto the most raised areas, I introduced greater definition to the musculature without undoing the nice smooth transitions that I had already achieved with the airbrush.
For the jeans (and dungarees), I laid down a base coat in Vallejo Steel Grey, highlighted roughly with a Steel Grey/Elfic Flesh mix and washed with some Drakenhof Nightshade before getting another a more precise highlight with Steel Grey/Elfic Flesh. Simple as that, but I’m happy with how convincingly they turned out like denim. I wish I could say I employed some sort of crazy, clever or at least intentional technique to achieve that, but I pretty much just lucked out with colour choice2 and a really great sculpt.
The rest of the miniature was pretty much paint by numbers, using my same old tried and tested approach to painting orange, brown and black.
I’m extremely proud of how well these Swine Cursed miniatures turned out, and of course the main reason for this is the flesh. This process of using the airbrush and glazing to paint miniatures as if lit from a fixed, singular light source is still very new to me, so it’s extremely gratifying that it turned out so well on these two. I learned a lot from painting Old Major in this manner, and I was able to take those lessons learned and implement them to the best of my ability on this pair of (slightly more forgiving) miniatures. I don’t feel like I’m quite ready to implement this technique across an entire miniature yet, let alone a busier or more diminutive sculpt than this one. But for now I’m really enjoying being able to pick up my Swine Cursed and look at it from all different angles, every new perspective offering differently lit volumes, each shaded and highlighted relevant to itself. It’s a brave new world.
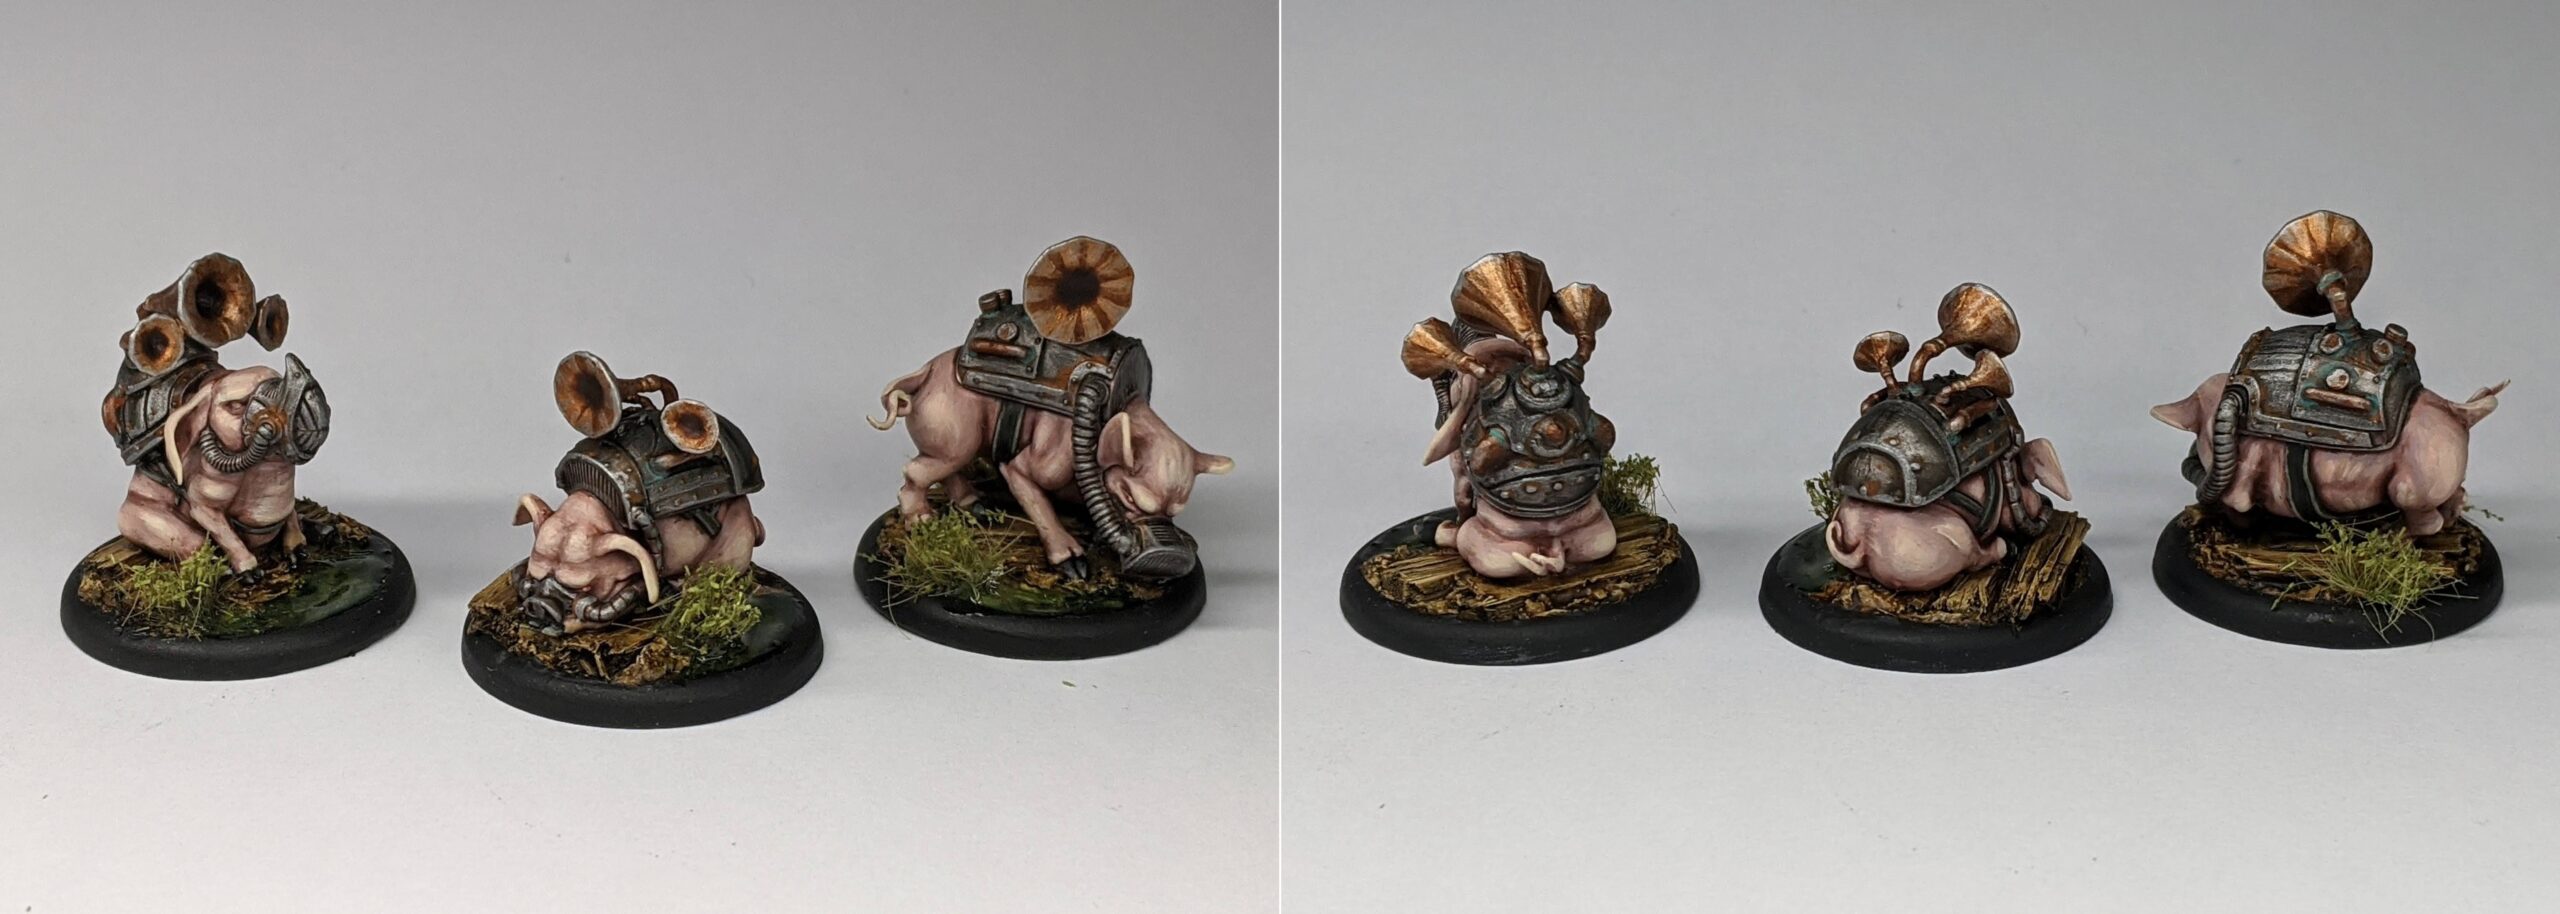
Last, but not least, we have the Squealers. These were the last miniatures to be completed for the simple reason that they were just recently released. I’m going to sound like a broken record here, but I just adore these little guys. There’s a nice variation in poses and all three are dripping with attitude and character. This is saying nothing of the simultaneously absurd and imposing amplification kits they have strapped to their back which is somehow as equally reminiscent of Andrew Ryan and Bane as it is Dr Neo Cortex and something Dick King Smith would’ve written about.
I tell you what though, there sure were a lot of tiny bits in this plastic kit. Finally, on a brand new3 kit, it would appear I have come to experience the ‘dozens of tiny, fiddley little bits’ plastic kits that Wyrd Games are so infamous for. I’d love to quote exactly how many pieces these also actually pretty small minis came in.. but sadly, I wasn’t quite petty enough to take count while I assembled them. Suffice to say, it was a fair few. In spite of that, I wouldn’t exactly call them ‘difficult’ to put together – I was able to do so without looking up the instructions online, which is a far cry more than I can say for the plastic Battle Sisters from Games Workshop that I’ve been assembling since4.
Due to the somewhat more busy nature of these miniatures (not to mention their surprisingly small stature), I decided to forgo the airbrush once again and paint these entirely by hand. I started out with a quick coat of Grey Primer, then applied Vallejo Model Color Silver to the backpacks, Bright Bronze to the gramophones, Hammered Copper to the various piping and once again opted for Heavy Warmgrey as the base colour for the pigs themselves. My main motivation for reusing Heavy Warmgrey was that – displayed alongside the rest of the crew – I felt like The Sow was looking a little bit.. out of sorts. While none of my pigs looked entirely the same – Old Major was considerably more ‘pink’ than the others, the Piglets a rich peach tone and the Swine Cursed a pale fleshtone – they were all at least united by a similar sort of aesthetic. Smooth skin – either airbrushed or small enough that it didn’t matter. The Sow on the other hand stood alone with not only her sketchy, hand-painted aesthetic but her unique, greyish pink hue. I suppose I figured that were I to paint the Squealers in a similar sort of colour, then she would have at least one thing in common with the others. It didn’t hurt that the Squealers – equipped with their dystopian vox casters – already looked a little bit menacing in their own right either.
Of course, the other reason for painting the Squealers a purplish pink was because the Squealers kind of look a little bit like the pig equivalent of Noise Marines and the Heresy player in me couldn’t help making a subtle Emperor’s Children reference.
Not too much to say about the paint job on these guys other than that – I knocked them out surprisingly quickly. The flesh was much the same as painting the piglets, where I’d quickly throw on a layer of my base colour, followed by smaller more targeted layer with a bit of Elfic Flesh mixed in, wash all over and repeat. This time, I mixed a little Druchii Violet into the wash, making for a roughly 1:1:1 mixture of Reikland Fleshshade, Druchii Violet and Lahmian Medium.
When the flesh was finished, I started working on a few small but fiddley details – the straps were painted black with a tiny bit of Leather Brown mixed in and highlighted by adding a little Elfic Flesh to this mix. The hooves were painted with just Black and Elfic Flesh – two quick passes of highlights then a pin wash of Nuln Oil towards the recess.
The last step was painting the big ol’ contraption on top. The the silvers were washed with Nuln Oil and the coppers/bronzes with Reikland Fleshshade. The sharpest edges were picked out with Shining Silver. For the smoother bronze highlights such as long the flat edges of the gramophones, I made a 2:1 mix of Shining Silver and Bright Bronze. As a final touch, I put a little Nihilakh Oxide into the recesses of the copper piping and a few drops of watered down Ryza Rust over the silver rivets just to add a little touch of colour to the metallics – and that was me finished.
With the completion of the Squealers, so too was my Ulix Turner Malifaux Crew finished in it’s entirety (for now, at least). Here is the finished family photo below:
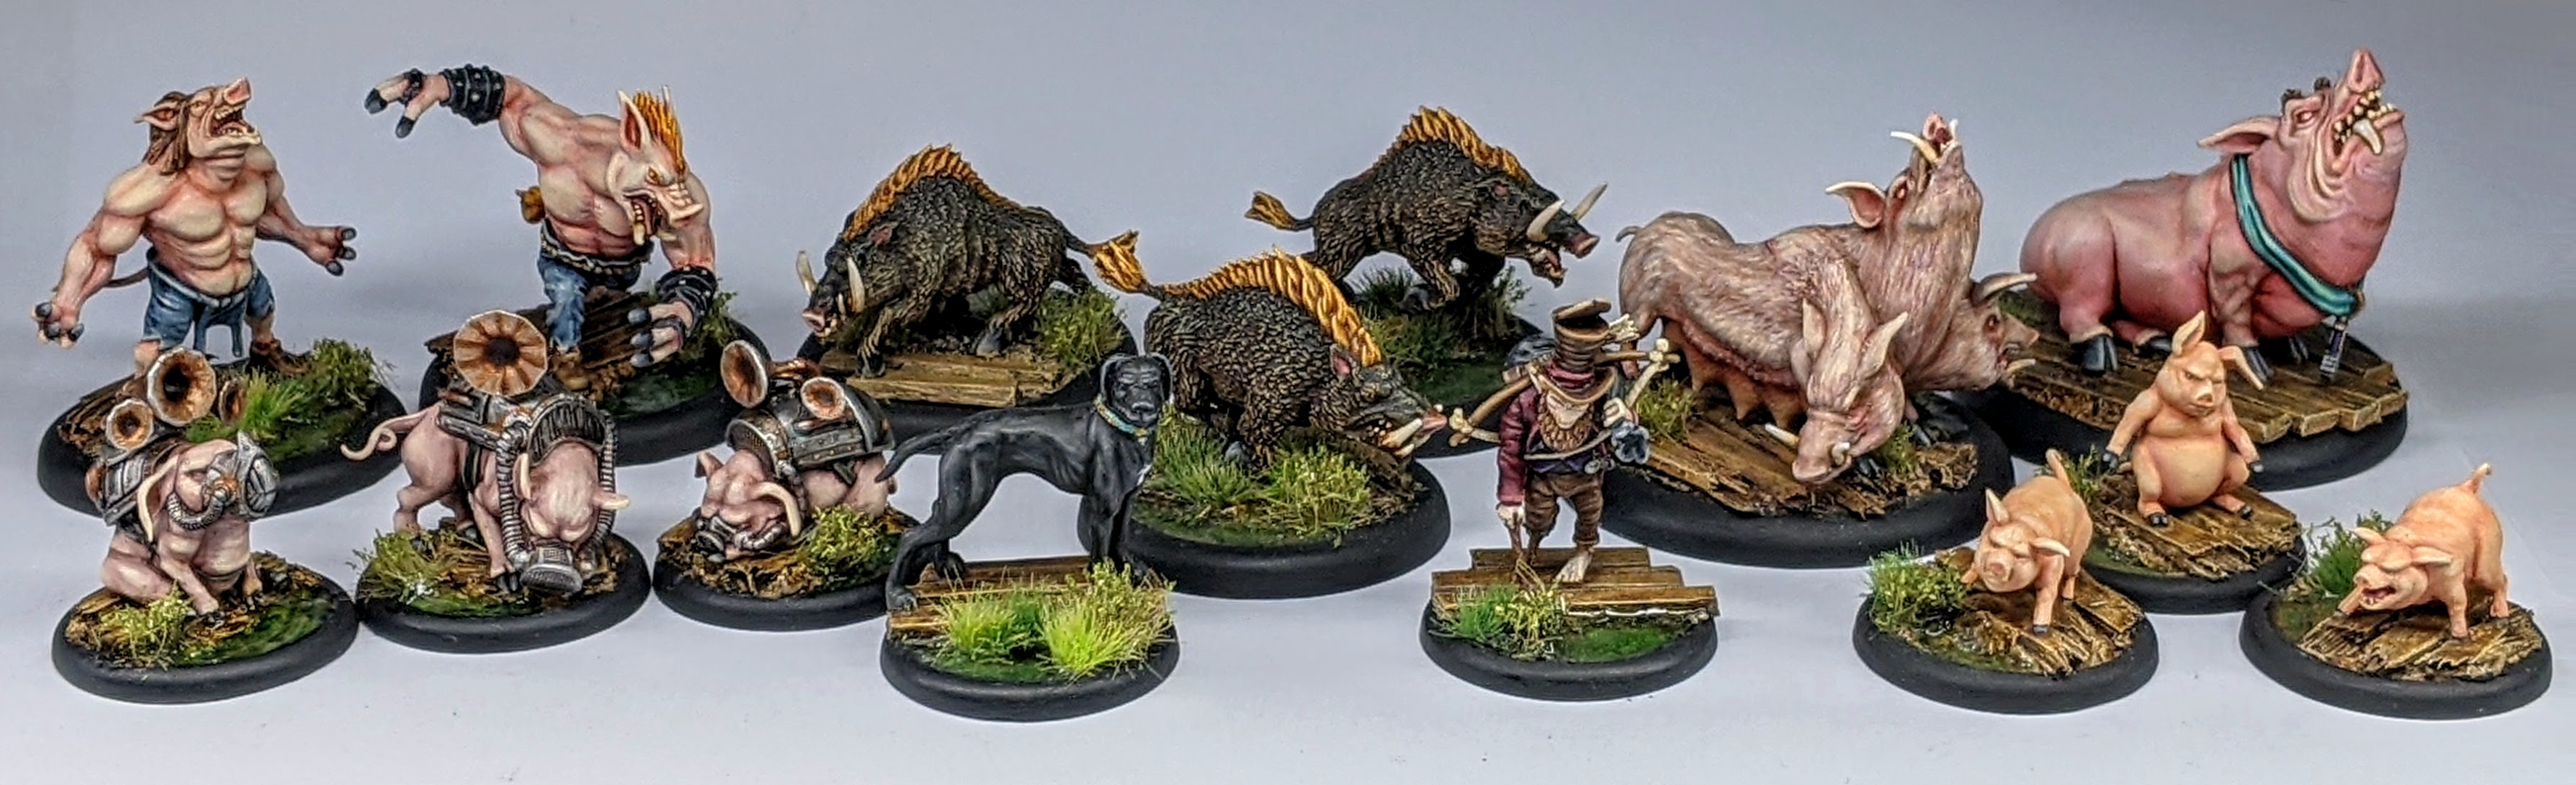
Well, that was a fun little diversion! I’ve said it a ton of times in these last couple of blog posts, but I enjoyed every minute of painting this little rag tag gang of Pigs, Gremlins and Gremlin/Pigs (and a dog). The miniatures were fun and characterful, but above all else they were a such an antidote to immediate burn out I felt when I started painting my Sisters of Battle army. Wyrd Miniature’s have a pretty extensive catalogue, so it’s safe to say that not every one of their miniatures will be as ‘clean’ and free of clutter as this team of hogs, but I am definitely looking forward to my next return to Malifaux. I already have my next crew lined up, but more on that at a later date.
In the meantime, it’s about time that I got back to my long suffering Sisters of Battle army. This is going to be a big one, so expect a good few entries in that series. I’ve already got a 2000 points army planned out, but I’m aiming to paint them in thematic, self contained chunks, lest I end up taking 6 months before my next post on this blog.
Until then, thanks for reading, and happy wargaming!
1 Perhaps even more true of airbrushing than it is of painting with a brush, any one layer of paint is never truly opaque, so often times you can increase the brightness or intensity of any highlight simply by painting a second coat of the same colour – increasing the opacity and thus hiding more of the colour underneath.
2 Steel Grey was, as it turns out, about the perfect mid-tone for a pair of worn in jeans. Likewise, as warm off-white of Elfic Flesh is the perfect colour for worn-in and distressed denim, the inky blue of Drakenhof Nightshade works well equally for those fresh, unworn areas that are still full of blue dye.
3 That is to say that the M3E version of Squealers were released on October 23rd 2020. I am being massively unfair here as I’m sure that this particular release was an older sprue reboxed for 3rd edition (with the new box art and 3rd edition tarot cards and all), rather than a paragon of modern Wyrd plastics.
4 Yes – it is happening. It’s FINALLY HAPPENING!