It’s been a long, long time coming, but finally – a full year after the much anticipated release of Adepta Sororitas for Warhammer 40,000 – I have began to make some real headway on my own Order Minoris, the Order of the Dying Light.
In all honesty, I have been anticipating this project with equal parts excitement and dread. Building and painting a Sisters of Battle army has been something of a dream project of mine for nearly two decades. As a tubby little pre-teen nerd down my local Games Workshop on a Sunday, I was infatuated with the idea of the Sororitas. Back in the halcyon days of Mars Delights, Maynards Sours and 3rd Edition Warhammer 40,000, the Sisters of Battle were what you might call an ‘inaccessible’ army – at least for a 12 year old kid. With a relatively concise army list – limited to what was printed in the 3rd Edition rulebook and later Chapter Approved – and a range of miniatures consisting entirely of the expensive and difficult to work with pewter material – Sisters of Battle were always off the cards for a youngster such as I. But that of course only made the army more alluring – it was the miniatures equivalent of ordering off the so called “secret menu” at McDonalds. I never did play a Sororitas army, instead bouncing from Space Wolves to World Eaters to Tyranids (not to mention the Eldar, Dark Eldar and Night Lords projects that never quite made it onto the tabletop) before moving on to Warhammer Fantasy for the rest of my childhood time in the hobby.
When I re-entered the hobby a few months ahead of the new release of Warhammer 40,000 8th edition, I found that much had changed at Games Workshop in our time apart. Warhammer Fantasy had been replaced by something called ‘Age of Sigmar’ following a wave of outlandish plastic miniatures known as ‘the End Times’. Something similar was happening in Warhammer 40,000 – an expansion/event known as Gathering Storm had advanced the plot forward somewhat, heralding the return of the Primarch Roboute Guilliman. Alongside Guilliman emerged an Arch Magos of the Mechanicus known as Belisarius Cawl, whose innovations – including the divisive Primaris Space Marines – would forever change the landscape of the Adeptus Astartes and Warhammer 40,000 itself.
I don’t want to dwell too long on Primaris Space Marines here – and I’d really like not to alienate anyone who loves or hates them with this blog post – but personally I have always found them to be a tough pill to swallow. I imagine that were I just getting into this hobby – or Warhammer 40,000 itself – without the baggage of 20 years of nostalgia, I might have an easier time embracing them. But for me personally, the appeal of Adeptus Astartes has always been in the history of the faction – more importantly, how iconic so much of their panoply of war has become over the years. The Tactical Squad with a special weapon and heavy weapon. Assault Squads with bulky jump packs and chains words. The ubiquitous Rhino chassis and it’s myriad forms such as Razorback and Predator. Scout companies. Indomitus pattern Terminator armour with it’s bulldog helmet. The beautifully boxy Castraferrum Dreadnought. I could go on.
I started out in 8th Edition playing Chaos Space Marines – thanks to a cache of old miniatures that I found in my mum’s attic – but as my Heresy-era Space Wolves army grew arms and legs, I found them to be more and more of an unwelcome distraction – particularly as the repurposed Space Wolves performed far better on the tabletop. The final nail in the coffin came when I started my Iron Warriors army for Heresy – no-one needs three Space Marine armies – so I sold them off to fund a Warhound Titan. And so Space Wolves became my main army in 40K, but the longer 8th edition went on, the more that I couldn’t quite shake this horrible feeling like the Space Marines that I knew and loved were slowly getting phased out. Primaris Marines were introduced to 40K in waves, almost as if to allow time for Space Marine collectors to collect and paint the new range one step at a time. They couldn’t quite stand on their own as an army unto themselves yet, but to me they always felt like a whole new army with a brand new aesthetic. The thing is, there’s just too many other great factions, too many other games and systems to spend my whole life endlessly painting a revolving door of new Space Marine miniatures. I like to finish an army and be done with it, move onto the next big project and returning to the old for a new unit here and there – not gradually replacing the same army with entirely new units that fill the same roles ‘better’. It left a bitter taste in my mouth, to feel like my main army was getting replaced by something wholly new yet entirely the same.
But it wasn’t the end of the world. My Horus Heresy Space Wolves were just that – an army for the Horus Heresy, a system whose entire appeal is centred around nostalgia and reverence for the original material. My army wasn’t really going anywhere, because it never belonged in Warhammer 40,000 in the first place, not really. I needed to get me a real Warhammer 40,000 army – not an army repurposed from Heresy-era Marines or Age of Sigmar Daemons, but an army set firmly in the Warhammer 40,000 universe. One that played to the strengths of the setting – the grim darkness of the far future, humanity’s doomed and misguided worship of the entombed Emperor as a God. There was nothing else for it. Finally, it was time to make a start on my Adepta Sororitas.
This is, much like my Azog’s Legion for Middle-earth SBG, a project that has sat on my shelf for a long time. How long, you might ask? Well, even before the first wave of releases, I placed an order for Celestine, Cannoness Veridyan and the old metal Repentia back at the end of October 2019. My thinking then was that I could at least make a start on some of the units that I knew I wanted for this army while I waited patiently for the rest to release. Of course, that didn’t pan out. First I was sidetracked by a Daemons of the Ruinstorm project and a Mordheim gang, before I finally bit the bullet and started working on my copy of Blackstone Fortress. This established a pattern for much of 2020, as I found myself alternating between quick one-off projects such as new terrain and crossing off some of the larger projects that had been languishing on my backlog for almost a year. Not long after finishing off my first Malifaux warband, it occurred to me that my Sororitas had become such a project. It was time to make a change, and – as ever – that began with a test miniature. This time, it would be my Canoness Veridyan miniature.
Astute followers of my social media will perhaps have noticed that some of the miniatures featured in this blog post are not actually all that recent – my first test miniature dating as far back as June 7th. In truth, both my Canoness and Saint Celestine minis were painted during an intermission in my Azog’s Legion project when I briefly ran out of miniatures1 and had to wait for ForgeWorld to re-open to complete my collection. I even got as far as assembling and base coating my first 10 Battle Sisters featured here, though abandoned those miniatures the second my Troll Brute arrived, so as to finish off my Azog’s Legion army and blog series. These Sisters languished on my window sill for another 4 months before I worked back up the nerve to re-open this can of worms. Regardless, it makes more sense to discuss them in the order of Canoness, Battle Sisters and Celestine, so please, humour me here.
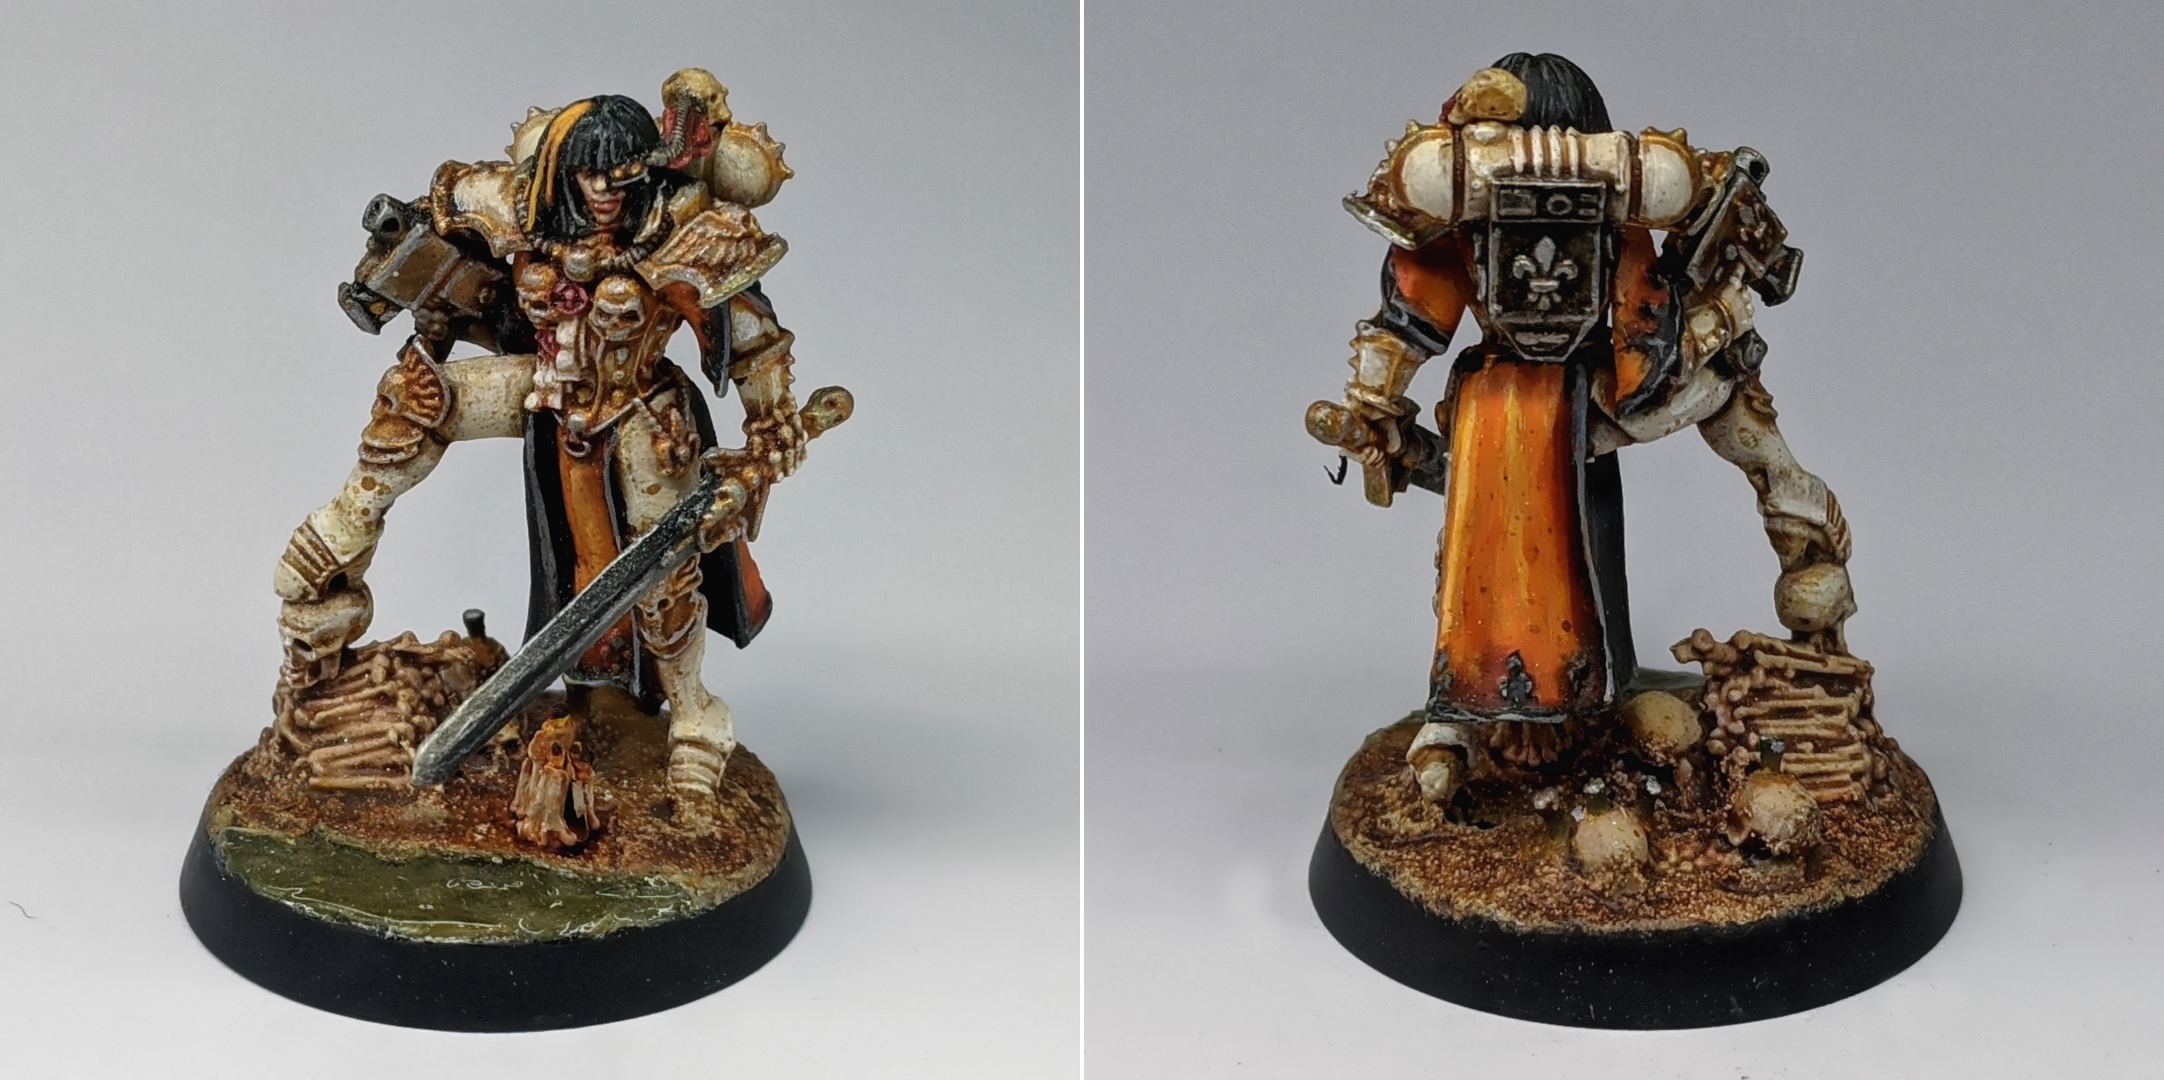
When I decided to start a Sisters of Battle army, I knew that I absolutely had to feature Canoness Veridyan. This miniature is modelled on the iconic John Blanche art first featured on the 2nd edition Sisters of Battle codex, art which absolutely epitomises the way that I see Sisters of Battle to this day. In this piece, Veridyan stands against a backdrop of classic Blanche-esque muddy warm tones, hunched and stiff yet still towering over the onlooker thanks an over the top power stance with her heel upon an absurdly tall pile of bones. Her black power armour evokes the latex suit of a dominatrix and her dismissive gaze is flanked by an outrageous bob that would make even Lady Gaga wince. Behind her intimidating form lurks a congregation of lumpy, hunched old men in a variety of outfits ranging from simple friar’s robes to full ceremonial cassocks complete with ostentatious headgear. It doesn’t come off as heroic so much as sinister, yet there lies the charm of the Ecclesiarchy. A little less on the nose than the frenzied violence of Khorne worshippers, there’s a level of believability to the corruption and hypocrisy of the followers of the God Emperor. A kind of innate grubbiness that, in it’s subtlety, feels more realistic – and thus more chilling – than that of any Death Guard miniature. It’s that grubbiness that I wanted to capture with this army – and if I couldn’t capture it on Canoness Veridyan, then it wasn’t going to work elsewhere.
From the outset, I knew that I wanted this army to be an ivory/white2, set upon a sort of grubby post-apocalyptic landscape that John Blanche would have conjured up. I wanted the bases to have a water effect on them (an easy way to create visual interest, and it’s become my calling card of sorts) and, damn it, I wanted some orange on there as well. I realise that this is a scheme that I’ve already done before (and recently to boot), but it’s not something I’ve done for Warhammer 40,000 yet and I wanted to see what else I could do with the scheme. I applied these colours as a basecoat – Elfic Flesh for the white/ivory and Fiery Orange for the orange – and concluded that the best trim colour would be Bright Bronze – warm enough to compliment the orange and deep enough to not get washed out with the ivory. Seeing these colours together, black seemed the obvious choice for skirt linings, visors and classic Sororitas bob cuts. For the skin, my standard affair Rosy/Pale flesh. Finally, I used AP Gun Metal as a base colour for the various metallics. On this particular miniature, I painted the bolt pistol with golden casing – a classic representation of the old ‘master crafted’ firearm – but for the rest of the army I opted for the more mundane ‘bare metal’ look for my boltguns. Some of this was down to sheer laziness, but I was also a little concerned about overloading the miniature with the colour black (which would’ve been my next choice).
Next, I threw on a few washes. Reikland Fleshshade over the bronze and skin, Nuln Oil over the silvers, Fuegan Orange into the recesses of the orange and Seraphim Sepia over the Elfic Flesh armour. When this was dry, I layered up the armour again with Elfic Flesh and picked out the sharpest edges with White. The skin was layered with Rosy Flesh, highlighted with Pale Flesh, the finest points picked out with Elfic Flesh and finished with a tiny glaze of Bloodletter Red over the bottom lip. The orange was highlighted over a few successive layers of Gold Yellow followed by Bad Moon Yellow. I layered the Bronze with Bright Bronze again and picked out the edges with Shining Silver before pin washing some of the sloppier areas with Reikland Fleshshade Gloss – I always Dullcote my miniatures afterward, so the Gloss washes are mostly handy for cleaning up finnicky metallics with lots of little recessed detail.
I wanted my power weapons to look fancier than a flat silver with a wash and an edge highlight, but I didn’t really want to introduce another high visibility colour to my colour scheme either. So instead of going for a luminescent matte colour, I put a little bit of Black ink into some Nuln Oil Gloss and carefully glazed a quartered ‘power sword’ effect into the blade, finishing with an edge highlight of silver. This accentuated the reflective properties of the metallic silver underneath and helped the sword stand out a little against the matt pastels and sepia tones of the rest of the miniature without introducing a whole other colour to the mix. Note that some of this sheen was taken away after I varnished the miniature, but this was remedied with a coat of gloss varnish to the blade.
Next, I painted the base. This was done by painting the whole thing Elfic Flesh and then applying 3 layers of washes – Fuegan Orange, Reikland Fleshshade and Seraphim Sepia. This created a warm, muddy sort of colour for the base. I drybrushed the surface texture with a little Leather Brown/Elfic Flesh mix just to pick out some of the edges again, and also picked out the skulls/bones and candles on top with a little more Elfic Flesh to make them stand out a little better against the earth. The water area was Vallejo Heavy Grey washed with Athonian Camoshade and (after varnishing), covered with a thin coat of Vallejo Water Texture mixed with a tiny bit of Athonian Camoshade.
This left a few little details here and there. Purity Seals, which I painted Heavy Red, edged with Heavy Red/Elfic Flesh and washed with Carroburg Crimson. The exposed wiring I painted silver and washed with Nuln Oil like the other metallics, and finished with a little top coat of Spiritstone Red. I also threw one more coat of Seraphim Sepia over the skull attached to Veridyan’s backpack so as to differentiate it a little from the ivory of the power plant itself.
The final touch to this colour scheme that really gives it that ‘grubby’ aesthetic was achieved by taking an old toothbrush, dipping it into some Seraphim Sepia, and very lightly flicking it at the miniature from a few inches away. This left a ton of little dots and spots of Sepia, which run a little and dry like little coffee stains, giving them that gritty, grainy look. This works equally well over the orange as it does the ivory, but it’s not the best over metallics and blacks, so I try and brush it off those areas while the wash is still wet. A quick coat of Dullcote and little water texture later, and my first ever Sister of Battle was complete. I was pretty pleased with how well it turned out and how closely I managed to reproduce the image that was in my minds eye. Spurred on by success, I moved onto the next task – my first unit of Battle Sisters.
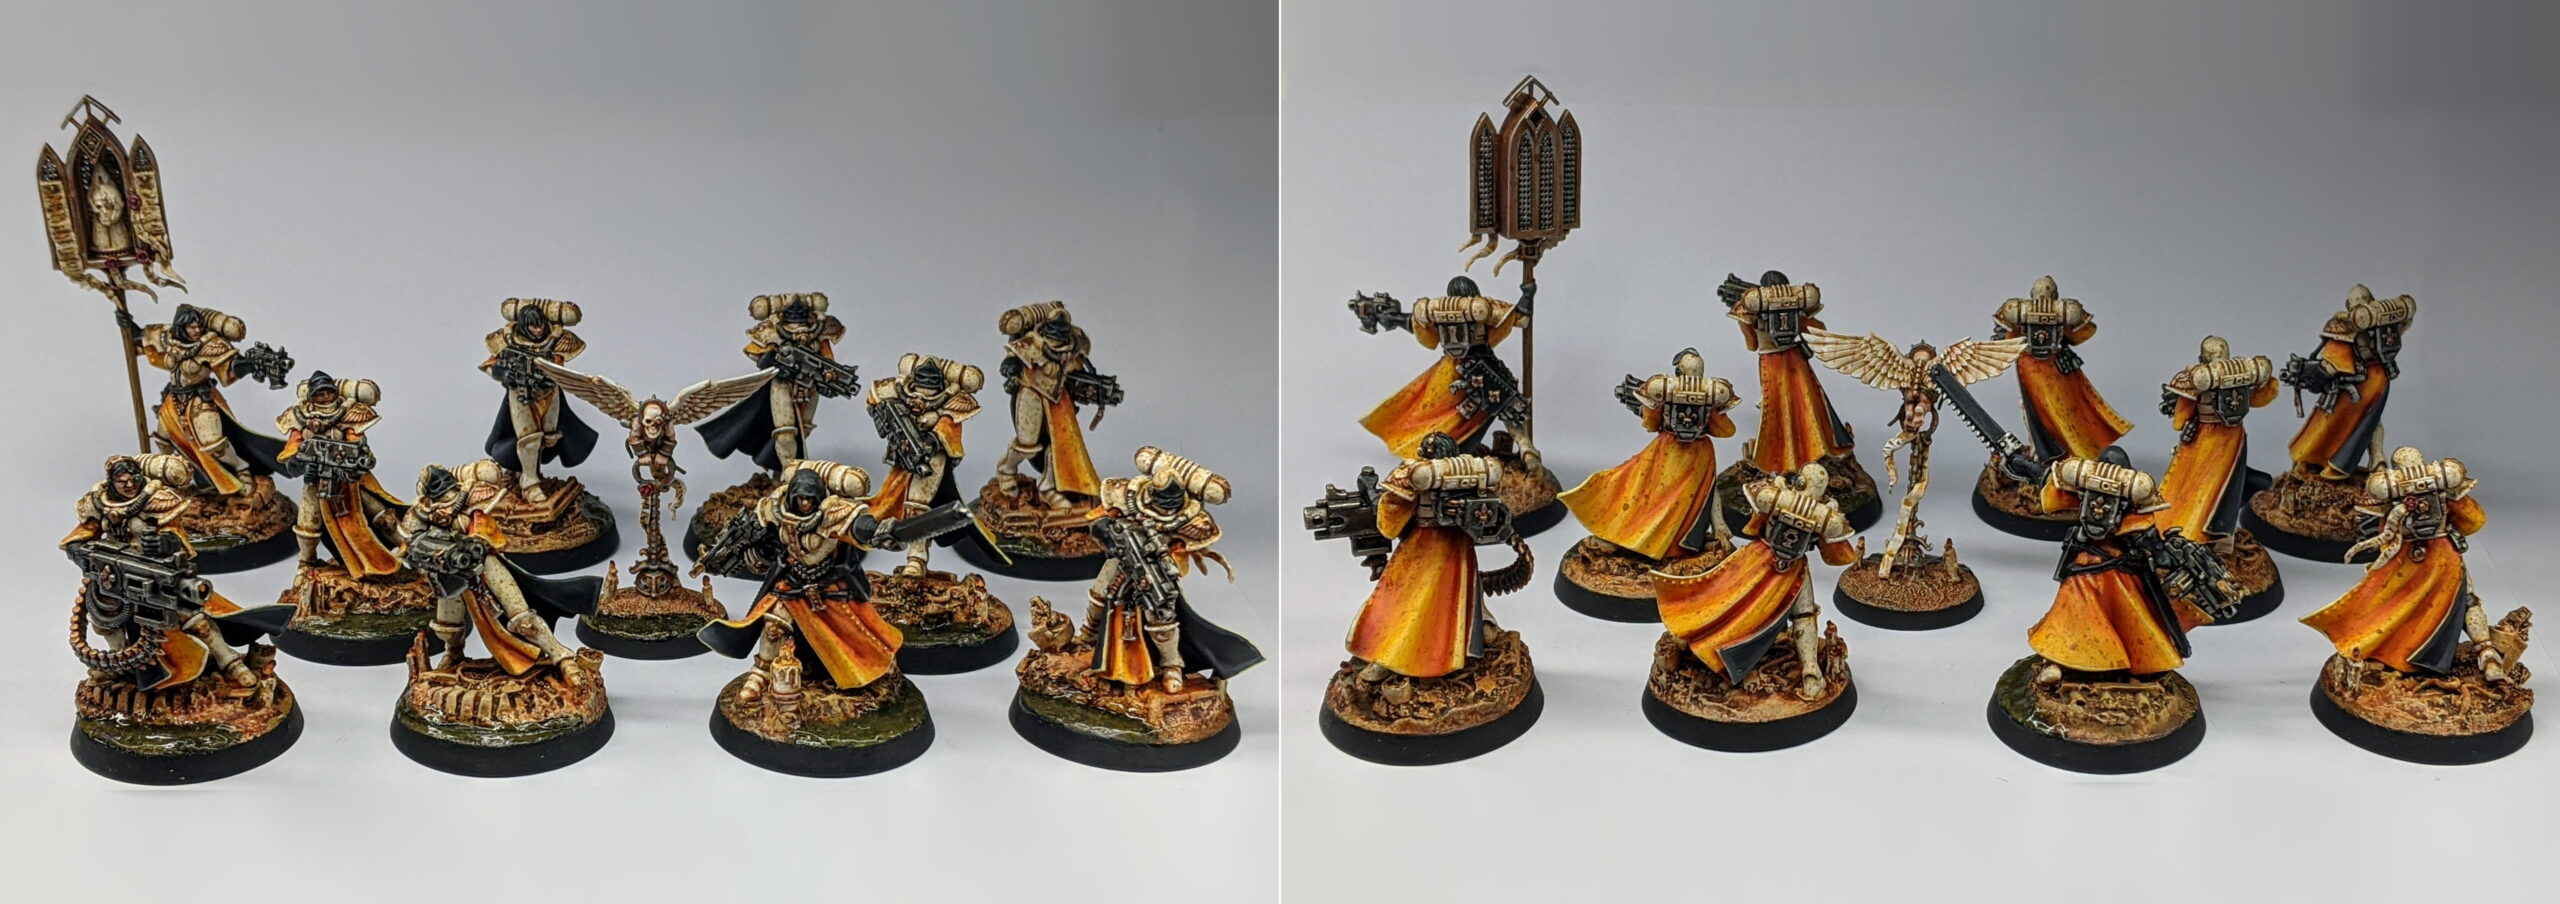
On a miniature by miniature basis, these weren’t any different to Canoness Veridyan at all, really. The same colours were used, and more or less the same techniques. I did make some attempts to streamline the painting process, however most of these attempts went.. very poorly.
One of the first things I tried was to crack out the old airbrush to lay down the base coats. During assembly, I made a point to leave off the bases so as to make things a bit easier for painting the linings of the skirts and tabards. I primed them with Stynylrez Grey, followed by an all over coat of Elfic Flesh. I then did my best to pick out the cloth with Firey Orange as best I could, followed by a few thin layers of Gold Yellow on the most protruding areas to get a nice diffused lighting effect. So far so good – now here’s where I make a bunch of mistakes.
The first thing I did after I switched back to the old horse hair brush was clean up my overspray on the armour with some Elfic Flesh. After this was tidied up, I picked out all of the other details – hair, visors, gloves, straps and pouches in Model Color Black, metallic weapons and grenades with Metal Color Silver, Aquila’s and other details in Bright Bronze and skin in Rosy Flesh. All of this fiddley detail was a little messy, and so I found myself having to tidy up the armour a second time. First mistake.
Then I started applying washes. The silvers were washed with Nuln Oil and the bronze in Reikland Fleshshade. I applied some Fuegan Orange to the recesses of the cloth and Seraphim Sepia all over the armour – this was my second mistake. First of all, the Fuegan Orange is a very rich and pigmented wash and looked super jarring next to the subtle airbrushed glow. I ended up layering so much yellow and orange to smooth this over that the extra time spent trying to create a nice fade with the airbrush felt entirely pointless. Worse yet, applying an all over wash of Seraphim Sepia over the Elfic Flesh armour just resulted in me layering over most of it again with yet another coat of Elfic Flesh. This was time consuming over 10 miniatures, especially ones as fiddley as these and I can’t help but think it would’ve been faster just to pin wash the relevant areas and tidy up afterward instead.
Eventually, I pushed these miniatures all the way to the finish line. The armour was layered and highlighted in places with White, the metallics edge highlighted with Shining Silver, the black colours highlighted with a little black and white mix. They were finally ready to attach to their bases.
Ah, the bases. Let’s talk about the bases. For this army, I wanted to add a little something extra – so I ordered a whole bunch of Kromlech Urban Rubble Basing Kits. These basing kits contain a few assorted resin cast pieces of – you guessed it – urban rubble for bases. This wasn’t my first time using this kit – you may remember it from the bases of my Iron Warriors army3 I like this kit for a few reasons. The first is that it gives me more flexibility in how and where I utilize the resin detail – where I put and whether I combine it with sand, grit, cork and/or texture paste. Secondly, I attack them to any plastic bases I already own – I generally really hate using prefab cast resin bases because so often these are solid, one-piece bases that leave no room for gluing magnets underneath and grip to uneven terrain poorly. Finally, Kromlech has some of the best resin in the business, and it’s honestly a joy to cut and clean up their stuff – not that there’s anything really to clean up at all on these bits in the first place.
As the bases were unattached for painting, I decided to go ahead and assemble these separately on an evening where I was too busy to properly sit down and paint some miniatures – and by doing so, unwittingly made my third mistake. Due to the nature of rubble, these bases are not exactly even surfaces – it helps to do a little planning for which miniature will fit best on which base, what is the best rotation for this piece of rubble, which bases will need some adjustments and so on. By assembling these bases separately, I had left it a complete gamble as to whether my miniatures would actually fit on these. In the end, some of the bases would have to be prized apart and reshuffled to make space for the various leg positions of my Sisters. It worked out in the end, but it probably would’ve went faster if I didn’t spend the time assembling them separately. Derp.
Alright. Sisters are painted and attached to their bases. Nothing else can go wrong now, right?
Yeah, about that…
After the nightmare that was the great base reshuffle, without thinking I went ahead and glued each of the Sisters to their matching base, without painting the base first. My basing technique was pretty simple on my Sisters – prime white, throw on three washes, tidy up with a drybrush – but even so, it was a real pain to get in under the skirting and tabards in order to get at every bit of white showing through. Why didn’t I just snap them off and reglue them afterwards, I hear you ask? Well, I just didn’t think of it at the time. Not until a week or so after finishing the models did I realise that I had completely forgot to paint the lining of their skirting black. That’s right, I left the inside of all the skirting the same orange colour as the exterior, even going as far as to highlight the orange where appropriate – only to realise that it was supposed to be black. At this point, models were snapped off their bases, the lining repainted, hand varnished, reattached and the ensuing break in the paint around the foot/base joint tidied up to fix it. Mistakes four and five.
At least the cherub was relatively effortless and by the book. Feeling ambitious, I tried to paint a sort of ‘weeping’ effect on his wings to grimdark things up a notch, but it was a little over the top. I tried dialling it back by layering over some of the feathers and I’m honestly pretty happy with how the ‘obscured’ weeping effect turned out, all told. Wish I’d done something different with the base though – the texture paint on there alone looks kind of barren next to the rest of the unit.
So overall, I’d say this unit was a bit of a nightmare to paint. Some of it’s down to the miniatures – beautiful though the sculpts are, there’s a lot of fiddley detail, tiny little volumes and really awkward to get at areas on these miniatures. A good deal more of this was down to my own ineptitude and mistakes however. On the upside, none of this really affected the end result of the miniature – just wasted a whole lot of time. I’ll be taking the lessons learned on these Sisters to heart, and hopefully the rest of the army goes a little smoother. Considering I’ve got another 60 of these miniatures left to paint between the Battle Sisters, Retributors and Celestians, for my sanities sake, it had better.
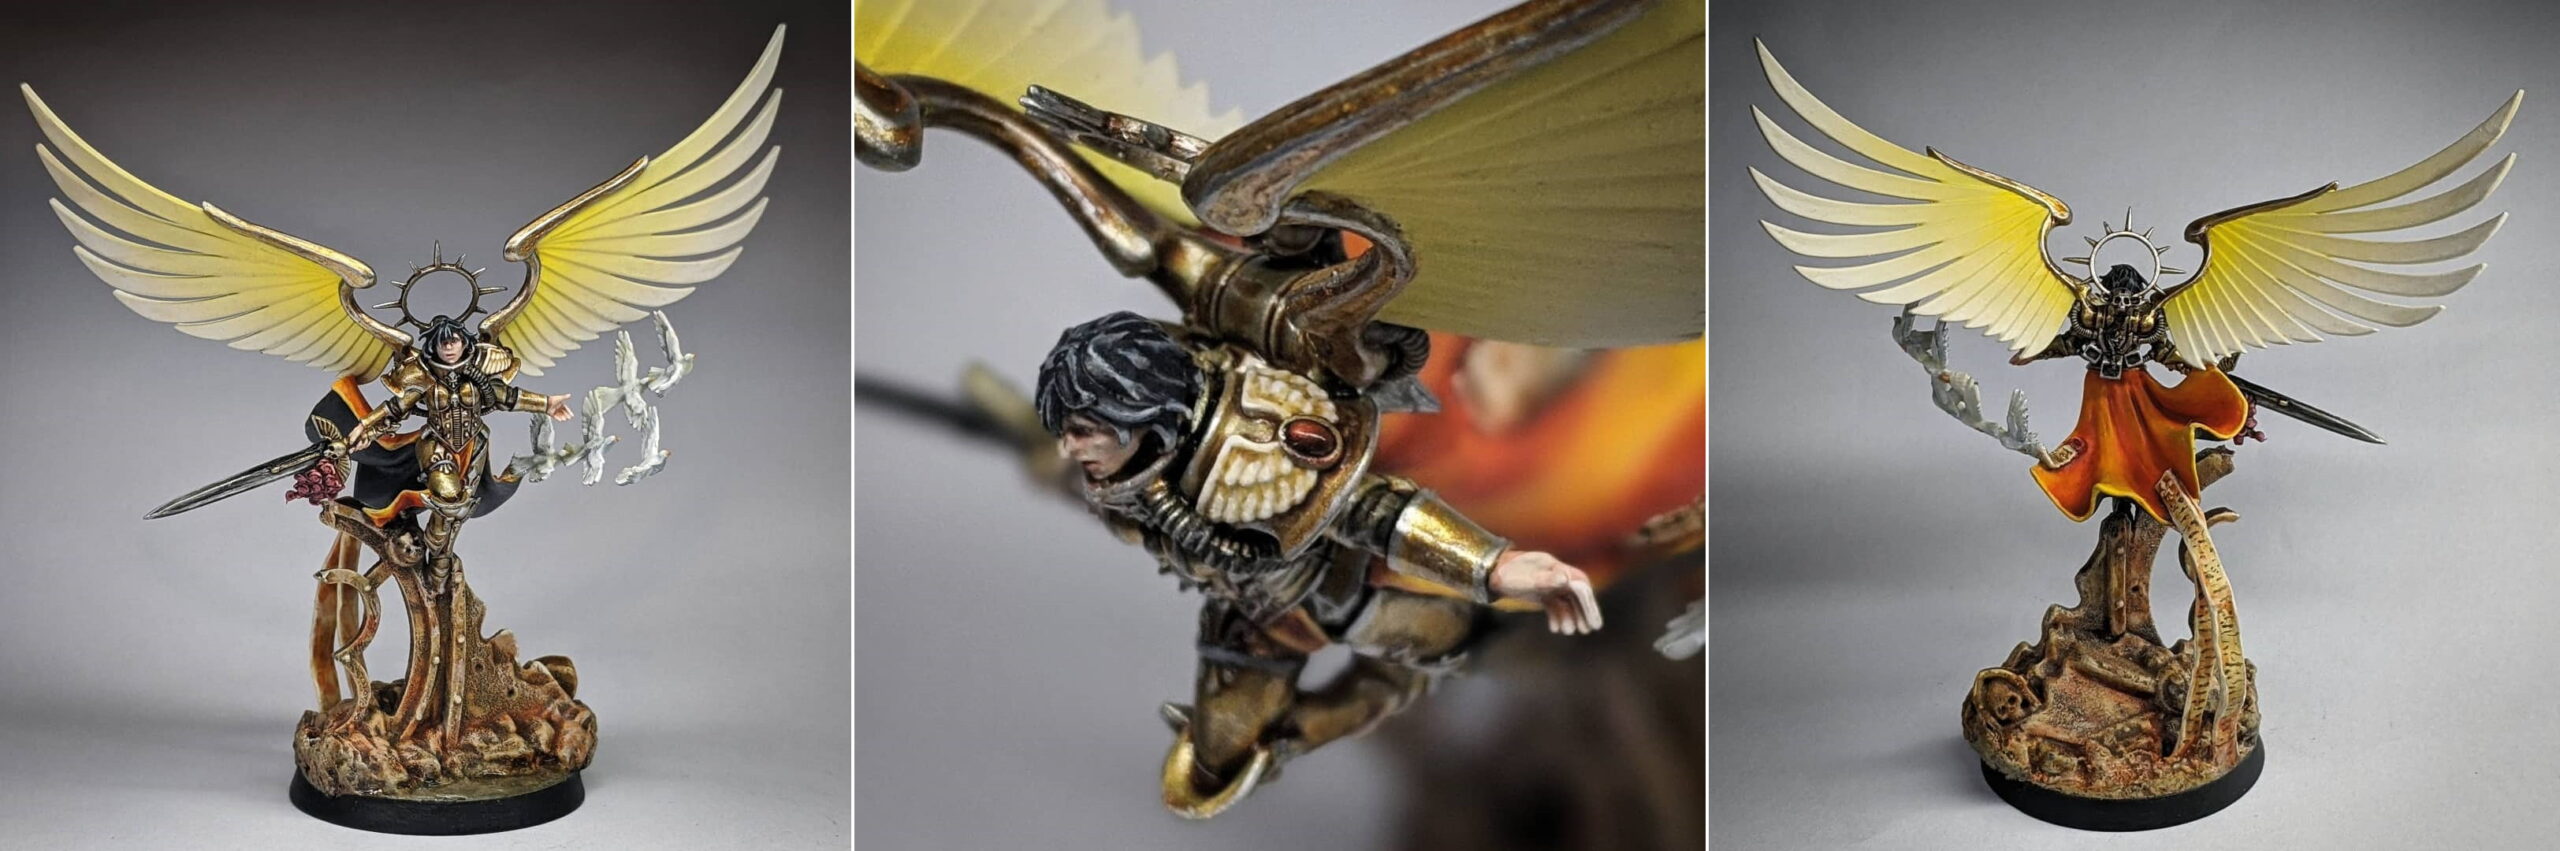
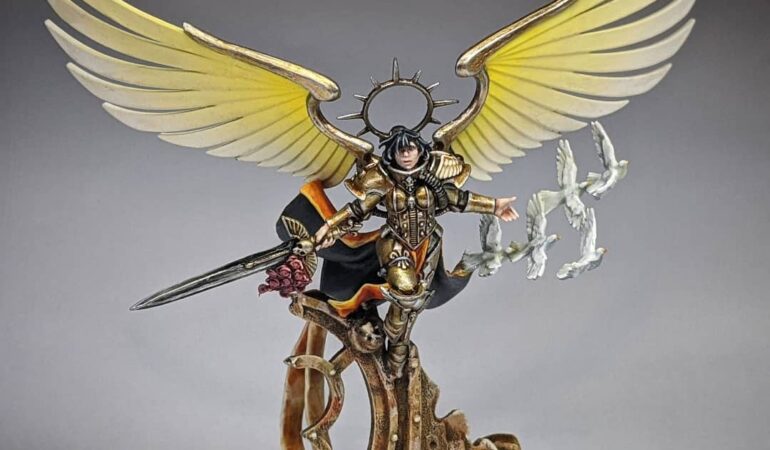
Speaking of nightmares to paint, let’s talk about Celestine, the Living Saint.
I’m really pleased how this miniature turned out in the end – the diffused effect on the wings, the clean shiny metallics and vastly more stable base converted from the Honoured Imperium set – but this was a stressful miniature to paint. See, some time ago – back when I first decided to pull the trigger on Adepta Sororitas – I had not long purchased a shiny new Iwata Eclipse airbrush setup. Excited with my new purchase, I figured I ought to start a brand new army project to really put it through it’s paces – the timing was ideal, as I needed a new army for Warhammer 40,000 anyway. I deliberated for a while on whether to do Dark Eldar or Tyranids – two ideal armies for airbrushing – but in the end, I couldn’t quite bring myself to do a new army for 40K and it not be Adepta Sororitas. Of course, this just about entirely defeated the purpose of the airbrush (at least for a beginner) – just another reason why this project ended up dead on arrival for so long.
But there was always Celestine. That big, awesome named character – the original plastic Sister of Battle – with a nice wide wingspan that was absolutely calling out for an airbrushed paint job. This miniature could have been a joy to paint, all things considered, had I not made one crucial error – fully assembling the body and wings.
I’m going to try not to focus so hard on the negatives of painting this miniature as I did my Battle Sisters, but this mistake can not be overstated. I am a passionate hater of sub-assemblies, and this has proved.. problematic for me on many occasion, but none so much as this miniature. So, what’s the issue? Well, if you’re going to airbrush a miniature, you sort of need to get it done as the first step. Airbrushing can messy, and almost always creates a little bit of overspray – not ideal if it gets over a finished section of the miniature. On the other hand, the downside to getting your airbrushing finished first is that you have to be incredibly careful painting the rest of the miniature that you don’t get paint anywhere on the airbrushed area. No overflowing washes, no accidentally catching the tip of your brush as you remove it from a hard to reach area. Any little mistake that you can’t immediately fix and you’ll either have to spend a long time hoping and praying you can recreate that gradient with glazing or strip the model and start again. I spent the entire process of painting this miniature with my teeth gritted and my buttocks clenched, the vast majority of which could been avoided had I not insisted on gluing on the wings at assembly. Derp.
But hey, let’s talk about a positive aspect of assembly. One issue I have with Celestine is that – small and light though the bulk of the miniature is – she is largely supported by a few very long and very flimsy purity seals. As such, the miniature has a tendency to bounce like a bobblehead on the base in a fashion not dissimilar to the Mortarch miniatures for Age of Sigmar. I hate it. The good news is, I’m far from the first person to hate precariously balanced miniatures, and many wargamers before me have found creative solutions to this problem – one example of this that I’ve seen a few times is supporting Akhelion Morrsarr Guard on bits of Azyrite Ruins.
Lucky for me, I had recently purchased the old Honoured Imperium terrain set to get my hands on a bigger, more Imperial themed statue for my cityfight board, and this came with a single piece of scatter terrain that was perfect for the job. A little snipping, a little tidying up the edges with texture paint and you’ve got yourself an excellent little supporting scenic base that’s going to make painting and playing with the miniature a thousand times easier. It also has the effect of making the miniature look bulkier and more impressive, which is nice.
Assembled miniature in hand, I primed the Living Saint with Stynylrez White and got to work getting a nice gradient down on the wings and oh boy did I suck at that.
Let’s break the illusion that I painted this miniature after the Battle Sisters again and remind ourselves that in reality, I painted this miniature way back in June. This was before my first real success base coating my Troll Brute or I when started yielding positive results on my Malifaux miniatures. In fact, this was my first time airbrushing ever – and I had no idea what I was doing. How much do I thin my paints first with the airbrush thinner? How many repetitions do I do to build up the gradient before adding more of another colour? What PSI do I set my compressor to? How do I set my compressors PSI? Oh god it’s coming out so thick it’s dripping off the wings and I’m tearing the partially dried layers off of the miniature with my paint brush trying to absorb the excess. I spent most of that first night trying (and failing) to airbrush a simple gradient on the wings, eventually culminating with Celestine in a cup of Biostrip 20. That’s the first time I’d had to strip a miniature since Tauriel, and even that was just the face. What a mess.
I got there on the second attempt though, content that my wings were a smooth(ish), symmetrical(ish) gradient with enough yellow and off-white to convey the warm angelic light that I was aiming for. Then I thought maybe a pin wash in the recesses between the ‘feathers’ would look even better.. It didn’t. I ruined the wings and had to start all over again. Good times.
But hey, it was good practice. I learned a lot from first experiences with airbrushing, but it sure felt like a trial by fire. The reward for my perseverance – my suffering – was a cool little effect that I would absolutely not have been able to achieve by hand – and a very intimidating base coat step ahead of me.
I am really, very much not a tidy base coater. I’m not even all that tidy with my edge highlights most of the time. Besides when painting individual miniatures, I very rarely have the patience for two thin coats. I throw on my base coats as quickly as I possibly can and tidy up a little bit once I’ve gotten all of the colours down4. This meant getting the gold paint all over the armour – especially around the spine of the wings – without getting anything on the wings themselves was both challenging and very stressful for me, and the wash was maybe even a little worse. It took about three times as long as normal to base coat and wash the miniature, but I’m proud to say I made it through without any major incident. I was far from being completely out of the woods here, but it was a relief to be through the worst of it.
The next few steps were my favourite of the entire miniature as Celestine slowly came together one colour at a time. First of all, I painted the base – this would be the messiest step so it made sense to get it out of the way. I applied a couple thick coats of Typhus Corrosion to the flat areas to give it a little more texture, then base coated the whole thing in Elfic Flesh. This was washed with a patchwork of Fuegan Orange, Seraphim Sepia and Reikland Fleshshade with a few layers of Elfic Flesh drybrushed in between to achieve that muddy and desaturated tone. I painted the purity seals in a similar sort of matter but kept it a little lighter than the base itself and scrawled some squiggly line text onto them to finish. Then it was onto Celestine herself.
Her tabard and skirting, her face and hair, the doves, the roses and the metallics on her sword and armour all came together without too much trouble at all. The area I had the most fun painting however was the Aquila on her left pauldron, which I painted in Elfic Flesh, washed with Seraphim Sepia and finished by picking out each individual feather on the wings with Elfic Flesh and a little White for the tips. Nothing about this process was new or interesting, but the Aquilla itself was seemingly perfectly sized – small enough to be quick to paint, yet not so small as to be fiddley – that it was just incredibly satisfying to paint. Similarly for the gem in the centre – I painted this Gun Metal and highlighted with a little Shining Silver before applying two thin coats of Spiritstone Red. After this had dried, I very carefully glazed two or three thin coats of Nuln Oil Gloss around the bottom half of the gemstone to shade it. One more little dot of silver and a final, thin coat of Spiritstone Red and the gemstone was complete.
It has always been my intention that my Sororitas army, on the whole, would not look conventionally beautiful. I wanted them to look grimy, gritty and worn out from a millennia of standing against the worst witchcraft, heresy and mutation that the galaxy has set against the Imperium. My colour scheme is intended to represent the dying light from a flickering wax candle – something ancient and reverent, yet flagging and somewhat diminished. For Celestine however, arguably the centrepiece of my army, I wanted the exact opposite. I wanted the Living Saint to look pristine and resplendent, a shining beacon of the Emperor’s light. Taking some advice from hobby legend Barrie Watkins – a man who really knows how to paint gold – I refrained from my usual catch all approach of taking the finished miniature outside to spray with Dullcote on this one. Instead, I very carefully applied brush on matte varnish to the wings, face and tabards and gloss varnish to all of the metallics. This meant that – unlike the rest of the army – the natural reflectiveness of the metallic paint was allowed to shine through instead of getting choked out by the matte varnish, helping further stand Celestine apart from her peers. As ever, once the varnish was down, I applied a little Water Texture to the base and Celestine was finished.
And with Celestine finished, that about wraps up my first instalment of The Emperor Protects. As you might have gleamed from much of this post, my painting process for this Sororitas army hasn’t exactly kicked off without a hitch, but I am overall very pleased with how they’re turning out regardless. The colour scheme is near enough exactly what I had in my mind’s eye and – I believe – achieves a nice balance between gritty and eye catching. With any luck, in future I’ll be able to streamline things a little as I get more comfortable with what I can achieve with the airbrush and figure out what other corners I can cut in the process with this scheme and models.
Until next time, thanks for reading and happy wargaming!
1 By which I mean that I ran out of Azog’s Legion miniatures. Although once I prided myself on not having an extensive pile of shame, at no point in the history of my time in the hobby – save for just after finishing Silver Tower but just prior to starting up with Age of Sigmar – have I ever been entirely without a miniature to paint. Such mastery of self control is beyond me.
2 Aside from the obvious angelic connotations, white is just one of the easiest colours to intentionally grub up. I suspect this was the reason for the pre-Heresy livery of the Death Guard being prominently a warm off-white.
3 Until now, the majority of these kits I’d paid for using the codes from €40 Kromlech Gift Card plaques I’d won a few times as a prize for Best Painted Army at Age of Sigmar tournaments. Of course, I am now a semi-regular consumer of their basing kits and candles and other bits and greebles, so I guess marketing works.
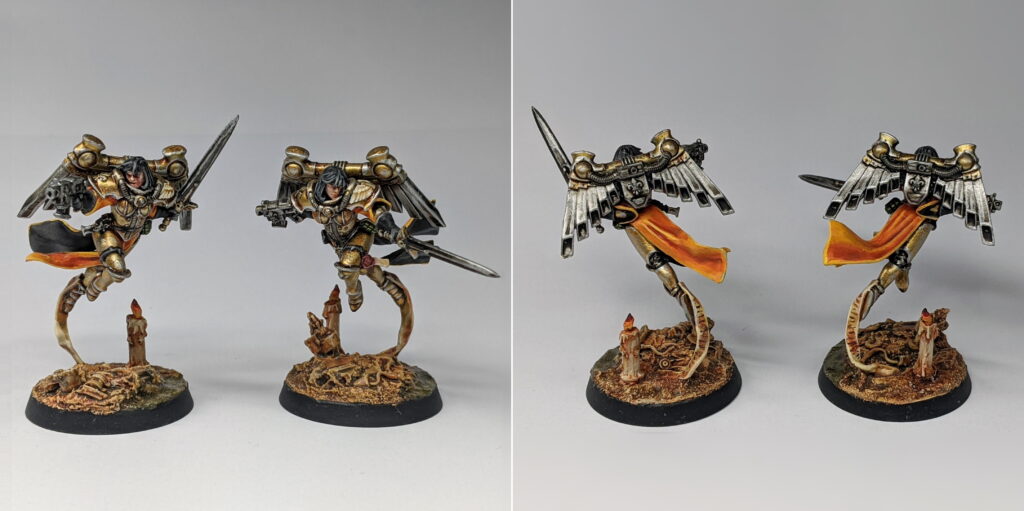
4 Maybe not a perfect example as the miniatures at the fore are ones I’ve already gone back and done the ‘tidy up’ step over, but here’s a little shot of some Sisters I’ve recently airbrushed and base coated. Potential spoilers for future blog entries ahead!
This is an absolutely beautiful color scheme! I have been pondering repainting my Sisters army, and seeing these pictures has convinced me to get started using these colors. Thanks for including the colors that you used as well as the processes and issues that you had. It should hopefully help me do not too bad of a job.