
Okay, so I blame COVID-19 for this one.
Until last month, I had never so much as entertained the notion of participating in any Star Wars related miniature games. X-Wing didn’t have a lot to offer me, featuring pre-painted miniatures with little to no terrain and centring mainly around dogfighting1. When Legion first came on the scene, I was disinterested – the recent Disney trilogy had kind of torpedoed any interest I had in Star Wars and the miniatures seemed kind of cheap and basic. A few of my local friends tried to gauge a little interest in it from me, to which my canned response was always: “I hate Star Wars.” It was never going to happen.
Until it did.
Last month, my wife and I finally succumbed to the dreaded coronavirus. We are both fine now, but this disease absolutely floored us for a little over a week. After a couple of days, I was kind of expecting things to ease up a little and maybe I could get a little painting done in the evenings – no such luck. We had no energy to do anything – I couldn’t even bring myself to play video games, let alone paint miniatures. Instead, we mostly sat around watching TV. With nothing else to watch, we decided to watch the new Disney+ show Obi Wan Kenobi with very low expectations, and to our surprise, we actually rather enjoyed it. Energised, we decided to finally give The Book of Boba Fett a shot. This was a show we’d previously passed on due to generally unfavourable reviews, but after being made aware that there’s a few plot-critical episodes of The Mandalorian shoehorned into the latter half, we pushed through and binged that as well. Afterwards, we kind of just decided to go the whole nine yards and binge all nine of the Star Wars movies in canonical order.
Maybe it was the fever, but I found myself getting really invested in the Battle of Naboo. Out came the phone, as I found myself trying to figure out exactly how many Battle Droids I’d need to paint for a small game of Legion. I nearly escaped the gravitational pull when I learned that a good value Battleforce box was due in just a couple months (by which point I would have probably talked myself out of it), but then we got onto Episode 4 – A New Hope.

Good lord, with all of the inconsistent Star Wars material we have these days, sometimes it’s really easy to forget just how good that original trilogy really is. I barely made it through the opening crawl before the idea of Separatists was completely dismissed – suddenly, everything was clear. I couldn’t go on living without a Galactic Empire army. Before I knew it, I had the Star Wars Legion Core Box in my cart – it had become an inevitability.
So, before I go on to start talking about painting this set, let’s talk about the miniatures themselves – because the experience is very different to what I’m used to. For one, the miniatures don’t come on sprues2. Instead, the miniatures arrive already cut from their sprues/casting gates with the full parts for each miniature individually bagged. I appreciate being able to skip the step of searching for the pieces on a sprue and clipping the relevant parts off for each miniature, but part of me wonders how much this drives up the cost of each unit – maybe they’ve got a machine doing the sorting, but I think it’s far more likely that they’ve got a line of factory workers sorting out the bits and filling each little baggy up for production. Given that Legion has it’s roots with Fantasy Flight – who previously had a lot of success with their pre-painted Star Wars miniatures game X-Wing – I assume this is an attempt to try and reduce complexity and time between bringing the box home and playing the first game. This is further reinforced by the neat little movement widgets in the box and the fact that Imperials and Rebels have different colour plastic bases – making them easy to distinguish without painting. Furthermore, assembly of legion models is a mostly painless affair, with a lot of the miniatures being kind of ‘push fit’ builds. It’s a weird halfway design, however, as while the push fit minis fit together nice and snug without glue, more complex models in the box such as the Speeder Bikes require3 super gluing the riders to their bikes. There’s no slotta bases here either, so every miniature requires at least a little super glue to stick them to their base.
At this point, you might be wondering why I’m saying ‘super glue’ instead of ‘poly cement’ or ‘plastic glue’. Legion minis are plastic, aren’t they? Well.. yes, kind of, but also not really. The vast majority of infantry miniatures in the Legion range are a kind of soft plastic, very similar to the ‘restic’ material used by Mantic in their Terrain Crate line of D&D scatter terrain. For all intents and purposes, it’s far more akin to working with resin than it is working with plastic – the miniatures arrive bagged instead of on sprue, you use boiling water to reset or straighten any warped pieces and you assemble them with super glue. To make things even more confusing, this box set is not entirely devoid of hard plastic – vehicles such as the AT-RT or the Speeder Bikes in the box set come as hard plastic, presumably because the softer restic material is less ideal for non-organic pieces that need to be flat or straight. That’s not the confusing bit, however – what’s really confusing to me is that these hard plastic pieces all come partially assembled. The kit will still require you to put together a few pieces, but the main hulls of vehicle models come pre-assembled. In the case of Speeder Bikes, the Bike itself comes mostly preassembled despite the engine/seat/etc being clearly two separate pieces of plastic – but requires the user to glue on the gun, pedals, Scout Trooper rider and so on. Again, I can kind of understand where they’re coming from here – they’re trying to reduce time to tabletop – but I still find this approach incredibly novel.
Overall, I’ll eat my hat and say that I’m generally quite happy with the quality of the Star Wars Legion miniatures. I haven’t spent a lot of time looking over the full range of factions (not helped by Fantasy Flight/Atomic Mass/Asmodee’s shocking lack of range showcase content on their websites), but as far as Empire goes, the level of detail is exactly what you’d want from a miniature of this scale – the detail is clear and crisp and absolutely nothing is missing from the Stormtroopers, Speeder Bikes or Vader, the minis are all dynamically but sensibly posed and no extraneous clutter has been added. I was a little concerned there would be warpage or air bubbles given my experience with resin, but I experienced nothing of the sort here. Additionally, I think this softer plastic will be quite hard wearing – it takes paint well and I don’t expect any of the issues with chipping I have with resin. I’ll be genuinely surprised if I manage to break or damage any of them in standard use. Nothing is perfect however, and my main complaint with the material is that it’s much more awkward to clean up and remove mould lines from – they don’t scrape off as easy as on hard plastic and it’s not hard to wind up damaging the miniature when trying to slice these off. I also kind of wish they’d went the same way that CMON did with A Song of Ice and Fire and used hard plastic for the melee weapons. Vader’s lightsaber in particular was a little frustrating to straighten and I can see myself having issues with it warping and losing it’s shape over time from handling.
Right, so that’s how I’ve ended up with these miniatures and what I think about them. So, how did I paint them? I’m glad you asked, dear reader – the answer is in the worst way imaginable.
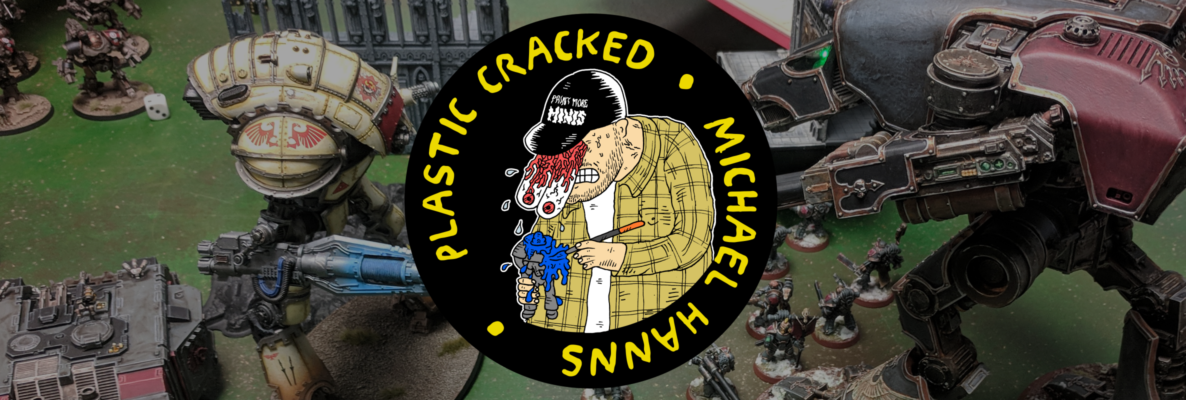
There are a wide assortment of Stormtrooper painting guides available on the internet, presumably due to the stigma of painting white and the near universal appeal of the iconic design of the Galactic Empire. Instead of following any of these tried and tested guides, I decided to try something new in an effort to save myself some time. While I’m happy with the end result that I achieved, it didn’t actually save me any time and frankly I think I would’ve been happier with the outcome following the Duncan Rhodes method instead. For posterity however, here’s how I did my Stormtroopers:
First of all, I primed the lot of them with white primer. I’ve been getting increasingly jaded with the experience of priming using an airbrush lately, so I opted for a rattle can this time. My white rattle can primer of choice is Hycote White Primer. The nozzle is very responsive, never clogs, gets an even and consistent coverage and – perhaps most importantly – it’s very cheap at £7 a can with free Amazon Prime delivery. That free next-day delivery in particular is a godsend in a time when most rattle cans require expensive courier delivery from hobby stores.
Once primed, I decided to go straight into the Big Experiment – I coated all of the minis with a thin coat of Gloss Varnish with my airbrush, then washed the minis using Nuln Oil Gloss. The theory here was that the combo of a gloss varnish surface and a gloss wash would reduce surface tension and pull the vast majority of the wash to the recesses, giving me an instant smooth blackline and leaving me with glossy shiny white – just like the plasteel of the Stormtroopers armour. Unfortunately, the results of this technique were close, but no cigar. Don’t get me wrong, the gloss method absolutely results in less staining across the surfaces – I demonstrated this to myself later by putting regular Nuln Oil directly over the primer, resulting in a decidedly more ‘grey’ looking miniature. Still, the gloss wash did what wash always does and still made its way away from the crevices in a few cases, pooling in wider nooks and leaving big sticky tide marks around the ankles. Either way, the models would need some layering to tidy them up afterwards – exactly the step I was trying to skip – and worse still, the base colour that I was painting over was still just white, rather than a bright grey or something. I found that my off-white colours like Ghost Grey didn’t really match up with the base colour, so I ended up breaking the cardinal rule of mini painting and simply layering the Stormtroopers with straight-up White paint.
Anyone who’s ever painted white minis before will tell you that this is a terrible idea, mainly because it doesn’t leave you anywhere to go – you can’t highlight any brighter than white. Honestly though, despite flying in the face of conventional wisdom, it kind of all worked out. These miniatures are small enough that I’m not sure how much patience I would have had for edge highlighting them in the first place. The flat white colour went on reasonably smoothly as the surface was already mostly white and the wash a stark, almost blackline shade in the recesses. The end result was high contrast with darker shadows than you might see on other Stormtroopers, but honestly, it kind of works. Content, I went and filled in the black undersuits and detailing with Black and highlighted with Mechanicus Standard Grey, painted the weapons Gun Metal Silver and washed with Nuln Oil. All that remained were the odd details like backpacks (also painted Gun Metal Silver and washed with Nuln Oil), lenses and the Squad Leaders ochre pauldron, all of which flew by in a jiffy after the white was finished.

I finished up by doing the bases – once again trying something new. I applied a AK interactive Desert Sand over the bases nice and thick, painted the base rims black and varnished the minis with matt varnish through my airbrush. As a finishing touch, I dusted over the surface with Vallejo Light Ocre pigment powders to give the surface an nice matt, sandy finish and add a little depth to the sand texture paste. I then mixed a little of the pigment powder with water and painted it around the boots of the models to make them look like they’d been walking in the sand for some time. I’m really chuffed with how this technique turned out – it works great with the style of these miniatures and their paint job and it was dead quick and easy.
I’ll admit, my method painting Stormtroopers is a little bit unconventional and probably ill-advised – but I will say that this high contrast approach really pops at arms length on the tabletop. I’m really happy with how the minis look as a squad and, honestly, it’s hard to argue with how quickly I managed to churn these out. I think I received the Core Set in the mail on a Friday and I had Vader and my first pair of Stormtrooper squads painted by the Sunday, which is pretty good going by my standards. Furthermore, there’s nothing especially taxing or stressful about painting Stormtroopers either – the squads aren’t absurdly large, and the vast majority of time is spent layering the white on the armour. Once you’ve pushed past that step, it’s as simple as picking out a few details in black, a few grey highlights here and there and a few deliberate washes. That’s fortunate, because I have the feeling I’m going to be painting a lot more of these Stormtrooper models in the future.
This ‘flat white’ method painting Stormtroopers as I’m calling it is maybe a little less suited to painting Scout Troopers, however, of which I had two of these in the Core Box to paint on the Speeder Bikes. The added difficulty here is that the white areas on most of the standard Stormtroopers are just flat panels without too much nuance, while there’s a fair bit of texture in the armour on the Scout Troopers. These guys have white canvas boots and white leather pouches too. Rather than attempt to re-evaluate my method and try a more traditional approach with an off-white or very light grey on these, I decided to be obtuse and just really dig my heels by using the same technique as before, with some targeted washes and mild glazing of Nuln Oil in places and thin, translucent layers of white to retain some of the texture. This went about as well as you might expect – I think I just about pulled it off, but I’m not in a hurry to paint a bunch more Scout Troopers.
The Speeder Bikes themselves, however, were an absolute doddle. I used Dark Fleshtone as the main shade of brown for the Speeders and Leather Brown for the pouch at the back, adding a little Elfic Flesh into the base colour to make the highlight colour and washing with Reikland Fleshade and Seraphim Sepia respectively. A little red and blue for the buttons on the bike controls and they were done in a flash. The only other thing I’d add about the bikes were that I painted the base coat and wash stages of the bike and the Scout Trooper as sub assemblies, then glued them together once the messy washing phase was finished – this is my favourite way of painting in subassemblies, as it means everything gets colour and shading everywhere but I still get the control of holding onto a complete miniature for layering and painting.

The last Imperial miniature in the Core Set to paint was Darth Vader himself. I’m really chuffed with how this miniature turned out, but it was an uphill battle getting here. Vader has a lot of black to paint. This in and of itself would not normally intimidate me, but the problem is that these black tones are across a wide variety of different textures and surfaces – smooth black cloak, black padded undersuit and gloves, black shiny plasteel helmet. That’s a lot of variation on one model, made all the more complicated by the fact they all have to read as the same colour.
So, how did I do it? With varying levels of contrast in the highlights, mostly. Vaders cloak is a kind of cotton black, and the folds are reasonably loose on the model – so I tried to keep the highlights relatively subdued and focused no making them as smooth as I possibly could. Other the other hand, his helmet or life support system are made of a glossy black plasteel, so I tried to incorporate as much high contrast specular highlights as I could. The helmet and mask in particular have a lot of edge highlights around the corners which are highlighted in pure white, which serve not only to draw the eye to his face but also give the appearance of being much more reflective than the cloak or his gloves.
Speaking of the face, I also made a conscious decision to give his helmet red lenses instead of black. This is a slight deviation from Vader’s canon appearance, but I do think it helps make the face ‘pop’ a little more on the miniature and adds a little visual interest.
Speaking of his lightsaber, that was pretty fun to paint. I basecoated it in Vallejo Heavy Red, then built up highlights with Bloody Red and Orange Fire, eventually painting the centre line as finely as I could with White with a tiny bit of Orange Fire mixed in. I wasn’t sure if I was going to paint this effect, as it kind of only really works at a single angle, but I figured it would be easy enough to undo if I didn’t like it. In the end, I decided it was kind of worth locking the mini in at one display angle for the effect. I painted the back of the lightsaber in the exact same fashion, though the exact position is a little higher than directly opposite so that it looks better on the tabletop and in pictures.
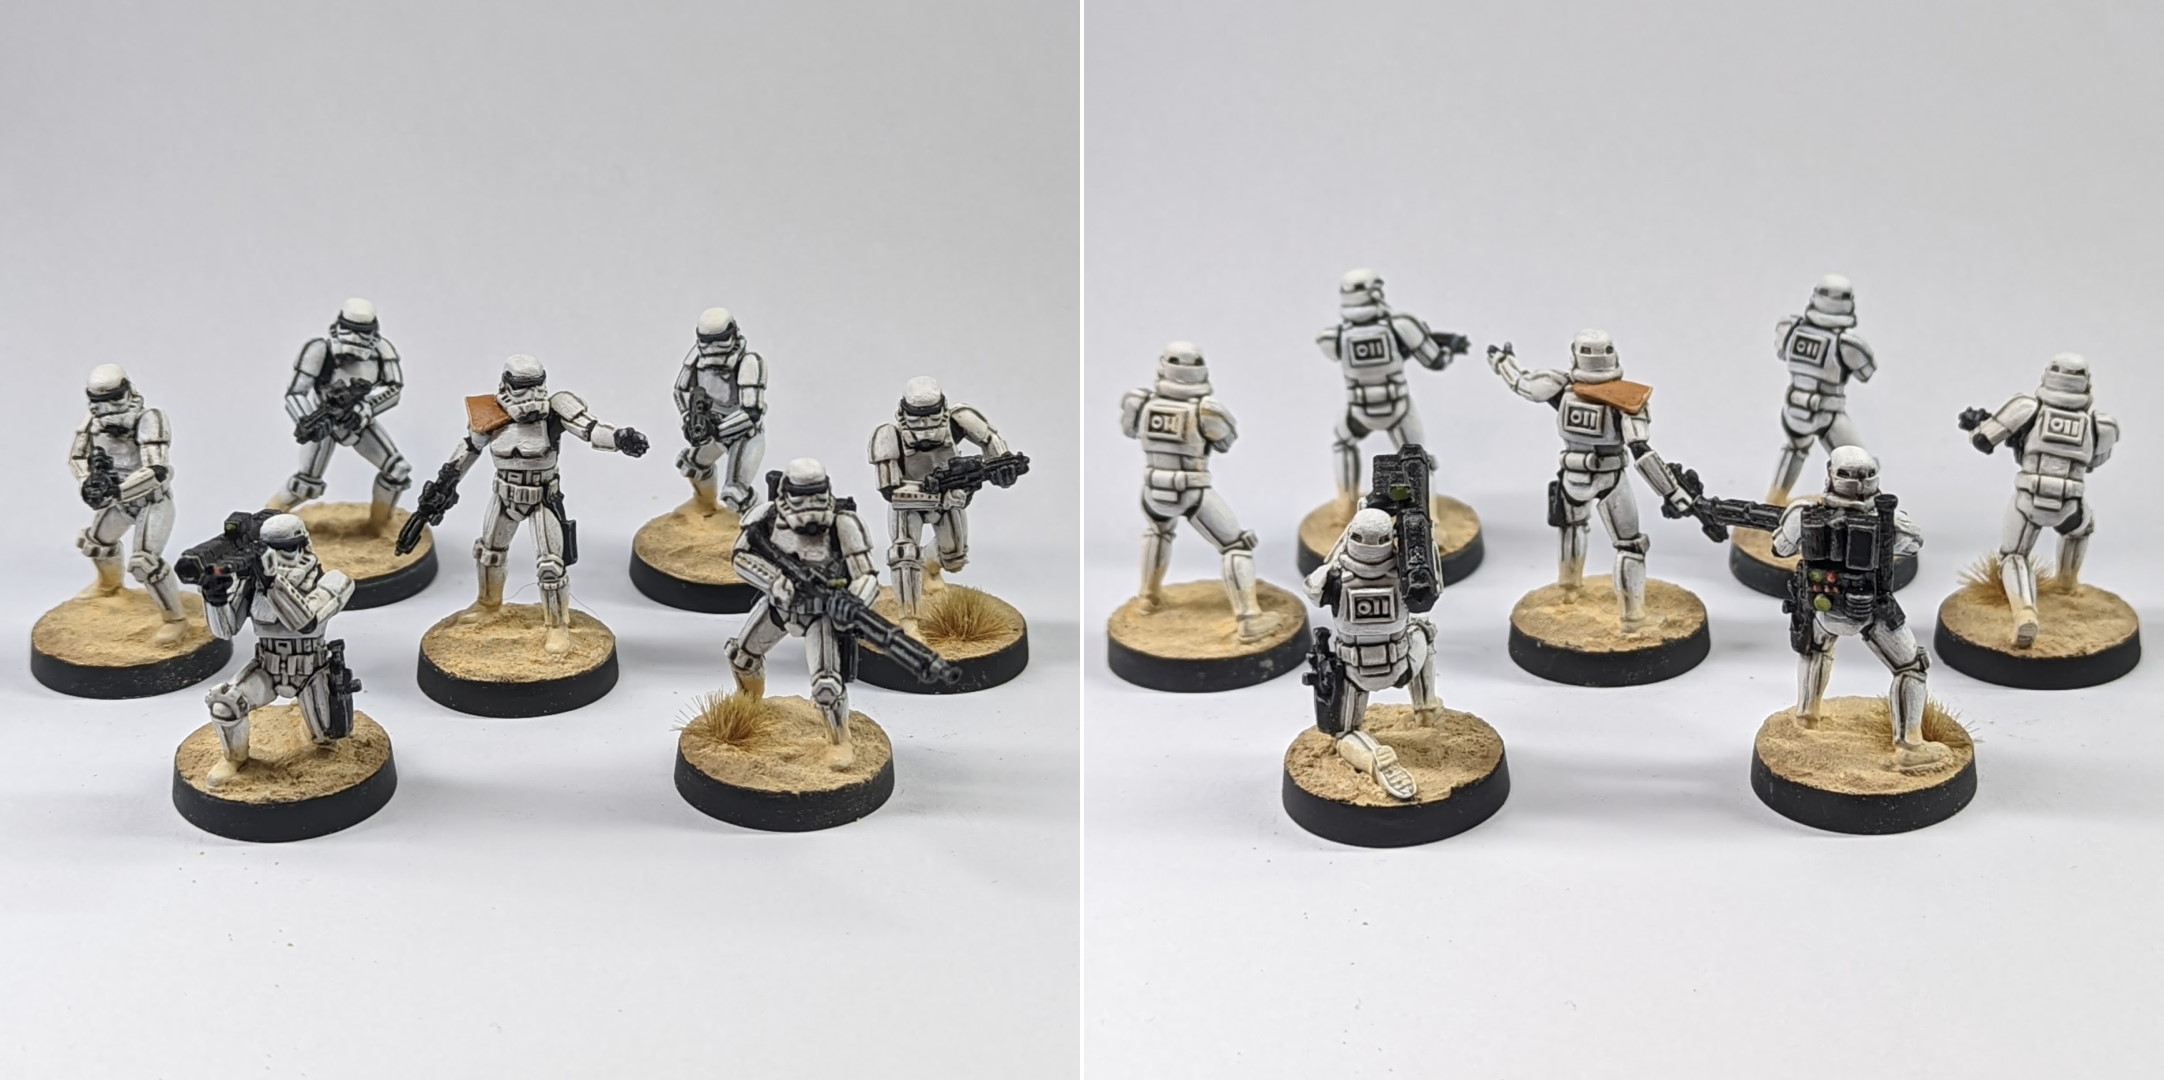
While I have no plans to paint the Rebels in the core set – I’m giving those away to a friend in hopes that he’ll join in on the fun – I did quickly knock up the barricades. I opted to paint these in a classic space grey and as quick and painlessly as possible. I primed these in Stynylrez Grey, washed with Streaking Grime and wiped away most of it with a little white spirits. After this, I followed up with heavy drybrushes of Stonewall Grey followed by Khaki, then sponged on a bit of Black, Typhus Corrosion and Shining Silver. The final touches were a little green for the displays on the backs of some of the barricades and a little red for the buttons. Quick and easy, and they look great! I’ll be talking about my plans for Legion terrain in a future post, but these barricades will make a nice little thematic – and very useable – addition to the table for now.
So, that about covers this first chapter of Now I Am The Master. Despite my vehement declarations to my friends that I will never buy into Star Wars Legion, I’m now a total convert. The minis are fun to paint, the game system seems really fun and I’m really enjoying the scale of the armies in play – it feels more like army painting than skirmish painting, but with significantly smaller squad sizes and simple, uncluttered miniatures. As much as I’m sure that everyone – myself included – was expecting a bunch of Heresy 2.0 related content here, I’m super excited to see where this Galactic Empire project goes.
Until then, thanks for reading and happy wargaming!
1 I really don’t like dogfighting. Don’t get me wrong, it’s aesthetically appealing – I love watching jet and star fighters duke it out in movies and I really like the aesthetic of most flyers – but something about perpetual motion and limited turning arcs has never gelled well with me in any sort of tabletop or video gaming.
2 This is true for a lot of the earlier miniatures. I have since learned that some modern Legion minis (perhaps produced since Atomic Mass took over production from Fantasy Flight) come packaged on hard plastic sprues.
3 You can just about get away without gluing the Speeders, but one of the Scout Troopers is only attached to the model by a single handlebar, which doesn’t quite have a snug enough fit to hold the weight of the rest of the rider.