Welcome back to Part Two of Now I Am The Master, following the expansion of my Galactic Empire army for Legion.
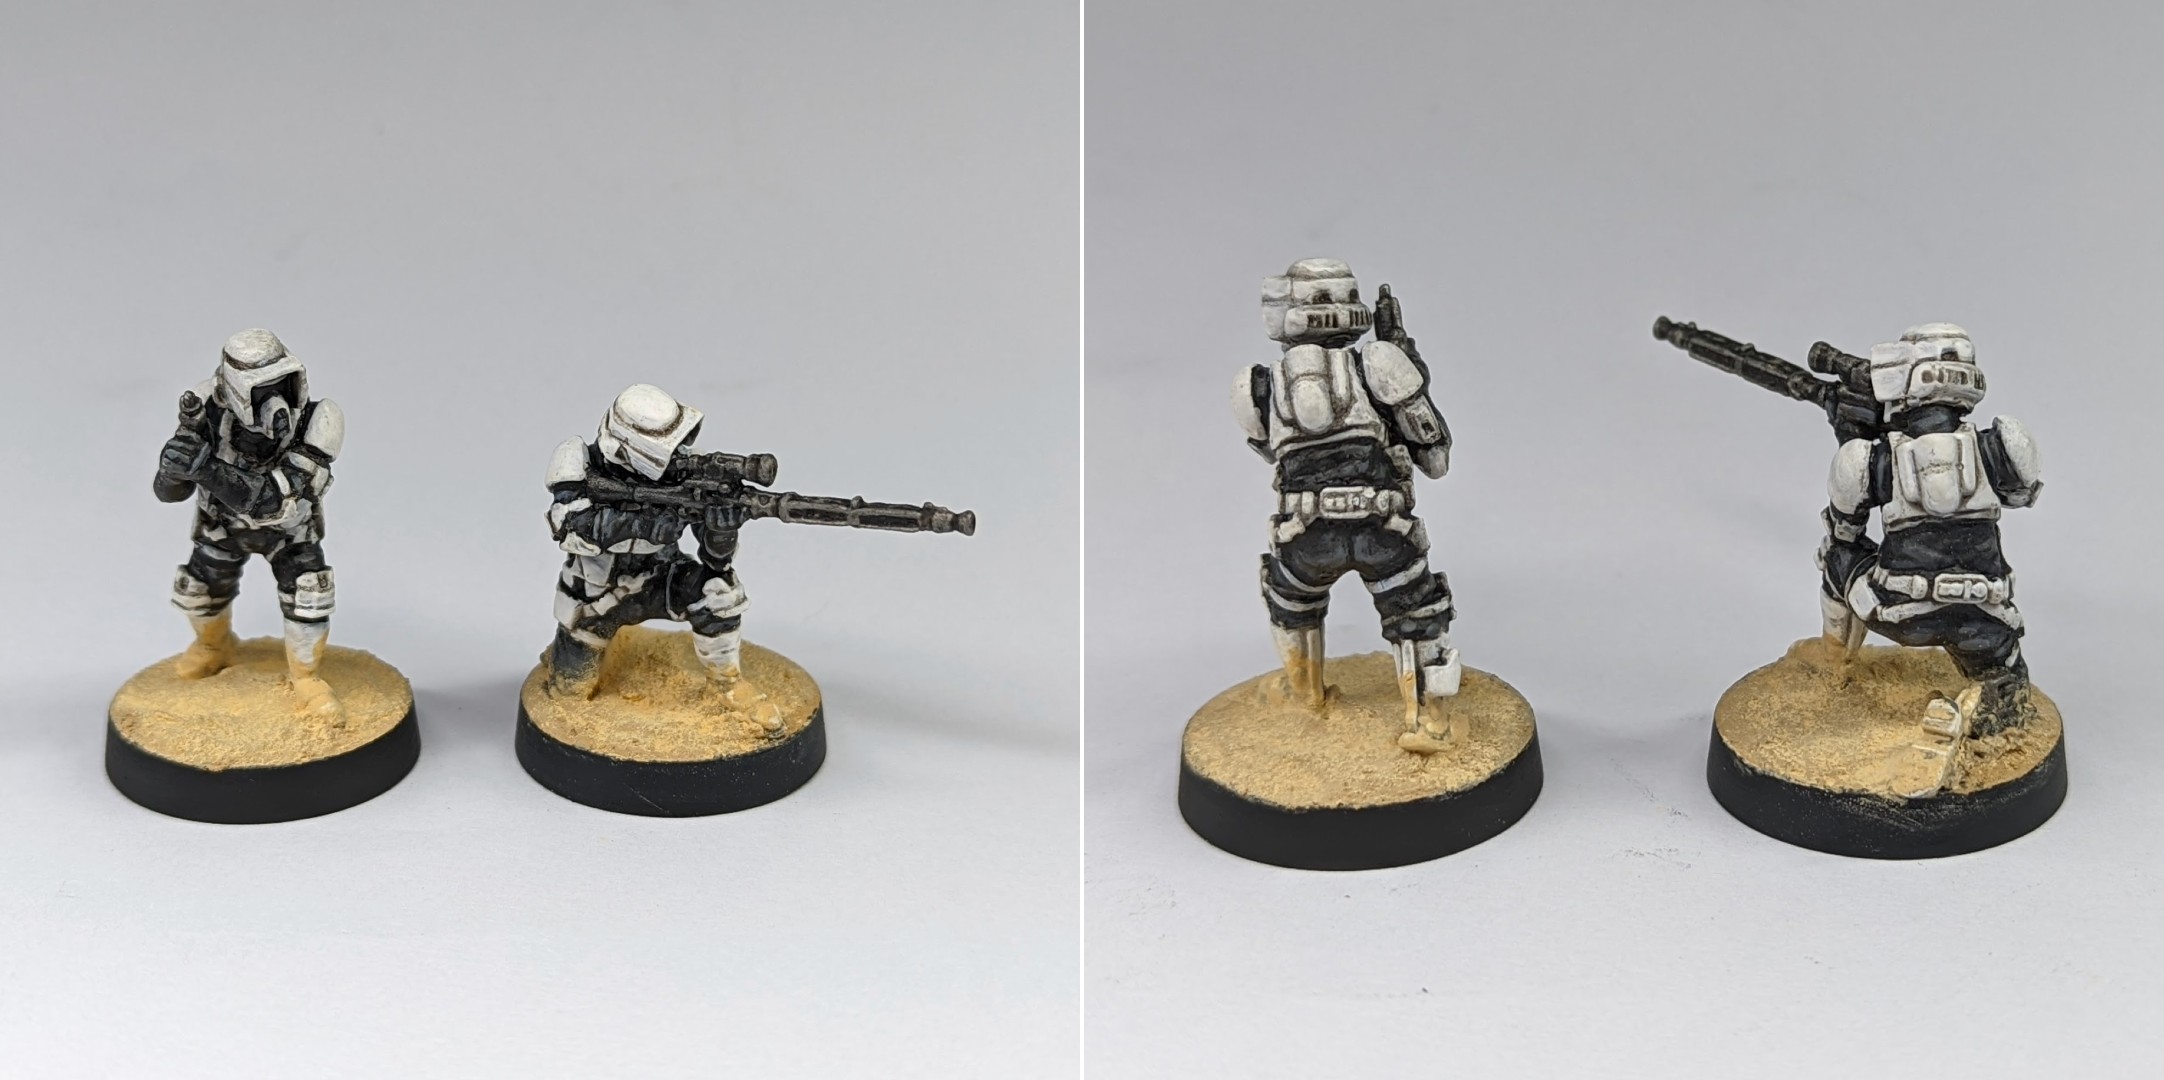
In Part One, I set about building and painting the Imperial contents of my core set – Vader, Stormtroopers, Speeder Bikes and some Barricades. Today, I’m going to be expanding out with an aim to reach a solid 800 points Standard army list. Let’s get the boring bit out of the way – the first thing I need to add for a legal 800 points list is another Corps squad, so I opted to pick up a third unit of Stormtroopers.

Nothing flashy here, no upgrade expansions or anything like that yet. Just another bog standard squad of Stormtroopers. Aside from Mercenaries, Galactic Empire have three distinct options for their Corps – Stormtroopers, Snowtroopers and Shore Troopers. Maybe I’m just being obtuse but I feel like I need to rule Snowtroopers out on the basis that they might look a little weird on my desert basing scheme. Shoretroopers, on the other hand, would look right at home – but ehhhhh, I dunno, I’m not entirely sold on how they look just yet. Variation is nice, but I feel like you can’t go too far wrong with three units of classic Stormtroopers. I still quite like painting these, as they’re fairly low stress and quick to knock out a squad.
This time around, I thought I’d see if I couldn’t save myself a step and forgo the whole gloss varnish/gloss wash thing. After all, I’m just going to layer white over it anyway, why bother trying to keep the surfaces clean? This time I went straight to picking out the black and metal details and finished with an all over wash of regular Nuln Oil. Now, I’ll admit, it’s nice to skip the faff of setting up the airbrush, glossing the minis, cleaning it, etc but what I think I learned here is that there is still a benefit to this step – less Nuln Oil staining the surface translates to less layers of white needed to build up that opacity again. I don’t think the end result is any worse off for it, mind you.
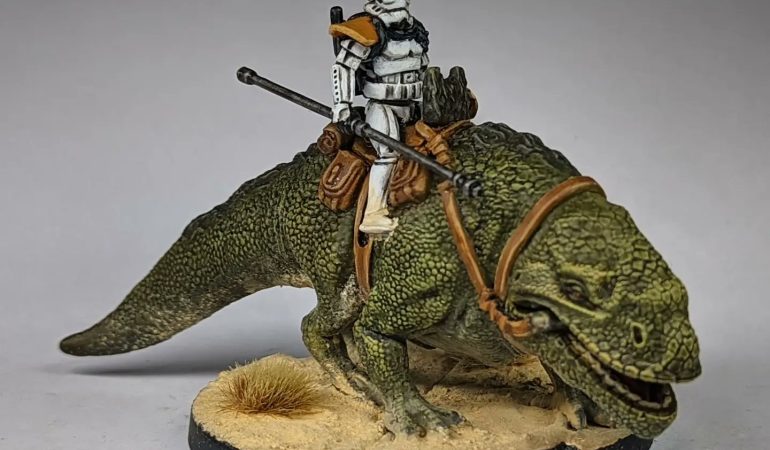
Alright, so that’s me now got a legal army – Vader, 3x squads of Stormtroopers and a pair of Speeder Bikes. Now it’s time to start filling out some of the more interesting slots – starting with a Dewback Rider.
I didn’t want to get too overwhelmed with new miniatures from the onset, but the one Unit Expansion that I purchased alongside my Core Set was a Dewback Rider. They’re just a really cool looking unit, they fit the Tatooine basing scheme and add a flash of green to an army that’s otherwise very monochromatic.
Better yet, it’s also a really easy miniature to paint. For the lizard itself, I base coated the scales in Vallejo Heavy Green, drybrushed it with Goblin Green, then again with Dead Flesh. For the fur/hair/mane/whatever you want to call it I base coated with Heavy Charcoal and drybrushed very lightly with a little Dead Flesh. Once this was dry, I washed the whole lizard – mane and all – with a mix of Biel Tan green and Reikland Fleshshade – and that was that. The leather straps and saddlebags were done with Leather Brown and a little Elfic Flesh for the highlights and washed with Reikland Fleshshade. The tongue I picked out in Heavy Red and the teeth with Elfic Flesh, then washed with Seraphim Sepia wash and layering it all back up again in the base colours. Dead quick and dead easy, thanks in no small part to some nice, crispy detail on the miniature itself – the scales responded really well to drybrushing and washes, while the harness was pretty painless to edge highlight.

The Stormtrooper rider was pretty unremarkable by comparison. I painted him the exact same way that I’d painted any Squad Leader Stormtrooper before him. The only thing of note I’d like to point out is that the kit comes with four weapon options – and you can assemble two of these on separate torsos and swap them out as you like in game. I opted for the loadouts that I thought looked the coolest – the no upgrade shock prod and the big gun – and I will say it’s kind of cool that the peg design of the mini means you can swap out the torsos without having to install any magnets or anything. Still, there’s two more weapon options that I couldn’t build from the kit – and I’m honestly quite happy to have a reason to build and paint a 2nd one of these down the line.
So, around about now I’m sitting at 550ish points with my basic Troops filled out, a bit of speed and some close range punch. How about some long ranged firepower?
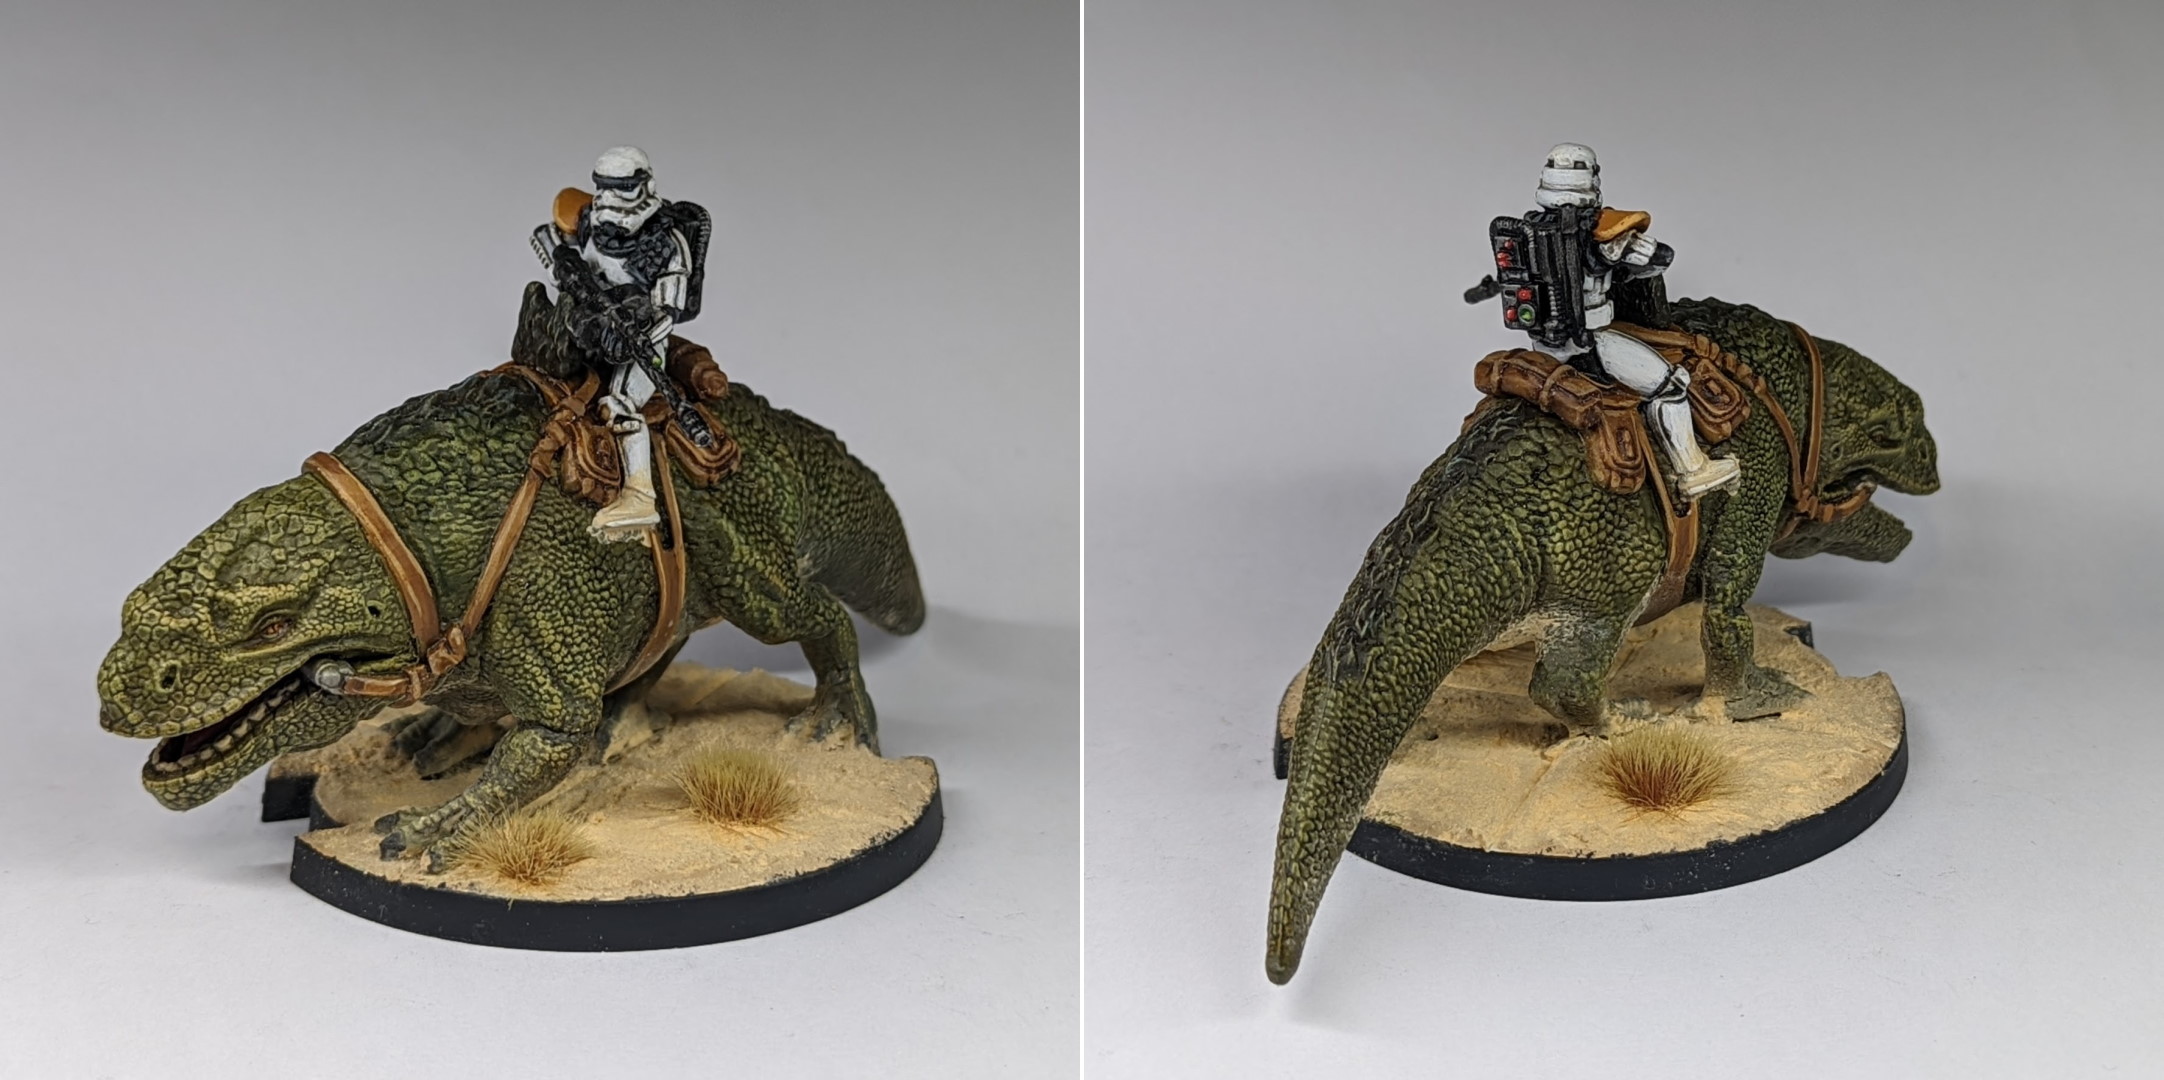
What I’ve learned from my very light research on the game itself is that the main issue that cripples most beginner Legion lists is having too few Activations – and one common tool for rectifying this is a Scout Sniper Strike Team. Coming in at 48 points, they’re a cheap way to get another unit on the board. While Scouts tend to die to a stiff breeze (or so I hear), the long range of a Sniper Team helps keep them alive and relevant in the game for longer. This proved another welcome reprieve from painting larger units of Stormtroopers – and while Scouts on foot remain a little more finnicky to paint than the basic Stormtroopers, they are a little less annoying to get at than the Speeder Bike variants.
That being said, I of course couldn’t resist just painting up the rest of the box, could I? It seemed a bit wasteful to paint just two of the Scout Troopers from a box of seven, particularly when the kit so graciously comes with two unit cards for fielding both types of squad. The day may yet come where I cut that corner, but it is not this day1!

Okay, so that’s a Commander, three Corps, a Special Forces and two Support units. It’s time to break out the big guns – who could possibly resist building and painting an AT-ST walker?
This was yet another funny hybrid pre-assembled kit. The main chassis arrived as a single piece with even the fiddly bits like wires, cabling and railings already attached – only the legs and waist and whatnot needed some assembly. I don’t know if maybe the main hull of these vehicles maybe clip together or something and that’s why these pieces arrive pre-assembled, but hey, I’m not complaining. All in all, I found this AT-ST kit to be pretty good – there’s plenty of detail and the legs are actually quite posable. The pre-assembly on the main chassis was also really quite the time saver, as I hate having to cut and glue things like the hand rails along the top of the model.
There are a few negatives I have to say about the kit however, so let’s get them over with. The first thing that I noticed is that there’s a lot of ugly mould lines on this thing – not just standard seams either, but those horrible circular little injection seams that you so often see on children’s toys. It’s not a great look on a model kit. This pales in comparison, however, to my biggest gripe with the kit – the mispacks. Holy moly, I couldn’t believe my eyes when halfway through the process of cleaning up the plastic pieces in the kit I discovered that it had two left ‘upper thigh’ pieces, rather than one for the left leg and one for the right. This was no small issue either – it rendered the entire kit unusable. I requested replacement parts from Asmodee and after 48 hours passed with no response2, I simply arranged to return the kit and ordered a second one – only to find the second kit also had a mispacked part as well! Just my luck, huh? Third time’s a charm however, so eventually I had a complete AT-ST kit in hand – time to set about assembling it in earnest.
Assembling the AT-ST was pretty simple, although as with any posable walker, a third hand would have been useful when attempting to dry fit all of the parts together. I wanted my walker to look a little more dynamic than simply standing stationary, so I went for a fairly simple ‘stepping forward’ pose. The pieces all went together reasonably well and there were no gaps to fill or anything like that – just pose, glue and go.
Painting this behemoth was a bit of a departure for me. On the face of it, it’s not a terribly complicated colour model to paint – it’s grey. There’s a few cables that you could paint, a few weapons, but honestly if you look carefully at the AT-ST’s in movies like Return of the Jedi or Rogue One, they’re just kind of one big amorphous flat grey. So, how do you make that interesting to look at?
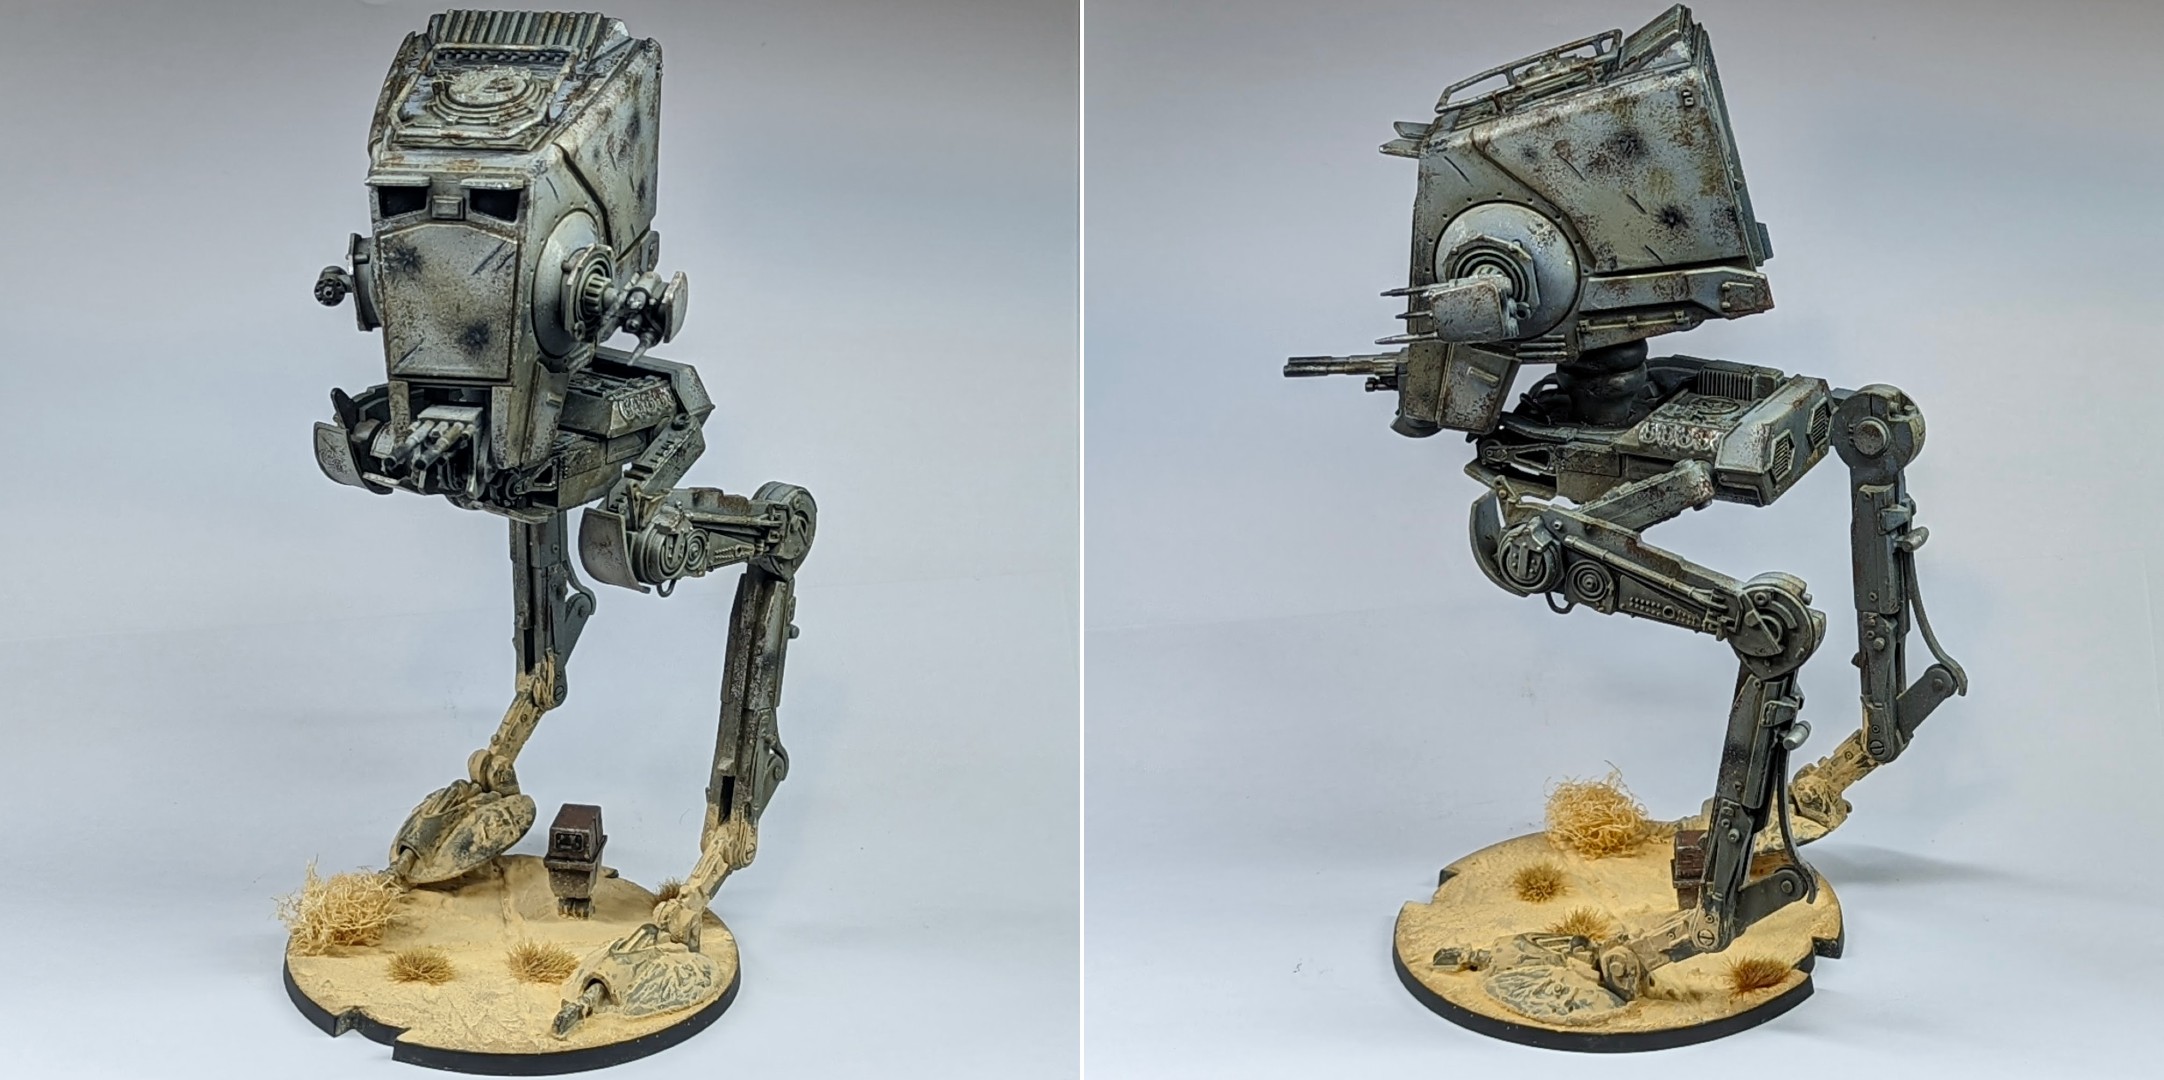
My solution here was to crack out the airbrush. After priming the mini in Stynylrez Grey, I started building up gradients across the surfaces – blueish Sombre Grey towards the back and undersides, building up layers of Cold Grey and highlighting the surfaces with Stonewall Grey. This seemed to do the trick, and I was pretty pleased with the smooth colour gradients that I’d blocked into the surface.
Afraid of losing these gradients under a big heavy wash, I then took to pin washing the model using pre-thinned Streaking Grime. I set about filling in the crevices and right angles with Streaking Grime, using some white spirits and a cotton bud afterwards to clean up the edges where things got a little sloppy. The end result looked pretty decent, but the model still lacked pop. To remedy this, I leaned on the old reliable technique of drybrushing around the edges with Khaki to pick out the edges of the grey. This results in a dusty, worn kind of look – ideal for my desert basing. Now it was time to go heavy on the weathering.
To weather the AT-ST, I dipped a bit of torn sponge in black paint, brown paint and Typhus Corrosion, dabbed it off on a paper towel until most of it was off, then set about dabbing the sponge all over the hull. Mostly, I’d focus around the edges, but I’d make sure to leave a little texture over the flat surfaces as well. Once this had dried, I repeated the process with Gun Metal and Shining Silver around where I had applied the black/brown paint – once again, trying to focus on the edges – to give the appearance of paint chipping. The final touch was some scrapes and blaster scorch marks. For the scrapes, I simply painted two fine lines – one silver, and one black line just above it for a simple 3D effect. The scorch marks I made made with short, close up bursts of Charcoal through the airbrush, then tried to hand paint in the ‘spiky’ bits going out and finishing with a little dot of silver in the middle. This worked okay, but it probably would have looked better sponging on the blast fade than airbrushing it.
That’s kind of all there was to it – for such a large, centrepiece miniature, it didn’t actually require a lot of work to make it look presentable. I will say that a lot of the work I did to airbrush volumes onto the miniature was somewhat lost in the weathering stage, which is a pretty common pitfall of mine when I try to airbrush base coats. I need to learn to trust that the following steps are going to dial back the highlights and push them a little further than I think it needs, rather than playing it safe in fear of messing up the model at an early stage.
With the mini finished, it was time finish up with the base. My first instinct here was to do pretty much the same thing as on every other miniature – AK Interactive Desert Sand, a few Army Painter Mountain Tufts and a good dusting with Light Ochre Vallejo Pigments. Only, when I finished applying the pigments, the base looked kind of.. empty.
I shouldn’t have been so surprised. This approach to basing has worked well for models like Stormtroopers, Speeder Bikes and even Dewbacks, but there’s a lot of empty space on the AT-ST’s base. I felt like it just needed a little something extra. Figuring it could use a little something Star Warsy on the base, I decided to use a 3D printed Gonk Droid that I managed to find on eBay for a couple quid. The Droid received a quick and simple paint job job – a brown chassis with silver legs, followed by a drybrush and some sponge weathering. As one final little touch to the base, I pulled apart a dry, natural loofah and rolled the mesh up into a ball – a very quick and easy way to make tumbleweeds. You could airbrush this if you like, but I thought the natural colour was close enough, so I gave it a light dusting with my ochre pigment powder and called it a day.
With the AT-ST finished, that takes the army to a little under 800 points, leaving me just enough points to add a few upgrade cards to my units. I couldn’t tell you if it’s a good or bad list, but it’s a decent core to build on and tweak.
I’ve got to say, I’m really enjoying painting for Star Wars Legion – far moreso than I expected. Some of this is likely down to new army syndrome. It’s always exciting to start something new, and I’m now in that sweet spot where I’ve got something playable and I can work on adding flavour and upgrades as I see fit. Expect to see more from my Galactic Empire soon – I’m eyeing up some Royal Guard and some Death Troopers next to help break up the sea of white and grey.
Until then, thanks for reading and happy wargaming!
1 Whoops, wrong franchise!
2 After about a week I received a response saying the replacement parts were on their way to me and would be arriving in around six weeks. Yikes.