Well, would you look at that. After eight full months of painting pretty much nothing but Warhammer 40,0001, I’m here to make good on my promise to return to Malifaux – although maybe not in the way that I had planned all those months ago.
With the UK lockdown restrictions easing off, I’ve been very fortunate to get some games in at my local gaming club. Prior to lockdown, myself and a couple others decided to get into Malifaux, my crew of choice being one Ulix Turner and his merry band of pigs. At the time, I didn’t really know all that much about how Malifaux played – let alone the crew I’d just bought into – so I pretty much just painted whatever I thought looked cool at the time. I usually find that after a few games I get a bit of a feel for what works, what doesn’t and what’s missing – and that’s exactly what happened here.
So, what have I learned? Well, Ulix Turners play style is an interesting hybrid of summoning, growing and commanding lesser minions. There are a few named models within his keywords, all of which fulfil a specialised role of sorts – whether it’s tanking, buffing, healing, summoning, or commanding other models – but the bulk of his crew consists of four different categories of Pig. In ascending order of power, those are Piglets, Squealers, Wild Boars and War Pigs. Other miniatures such as Slop Haulers, Hog Whisperers or The Sow can summon Piglets to the board (up to a maximum of four), while Ulix himself has the ability to upgrade any pig up by one or two orders of magnitude (depending on the availability of cards in your hand).
Right away, there were two elements to my crew that I needed to correct – first of all, I had no War Pigs to upgrade to, and secondly, I was short a single piglet.
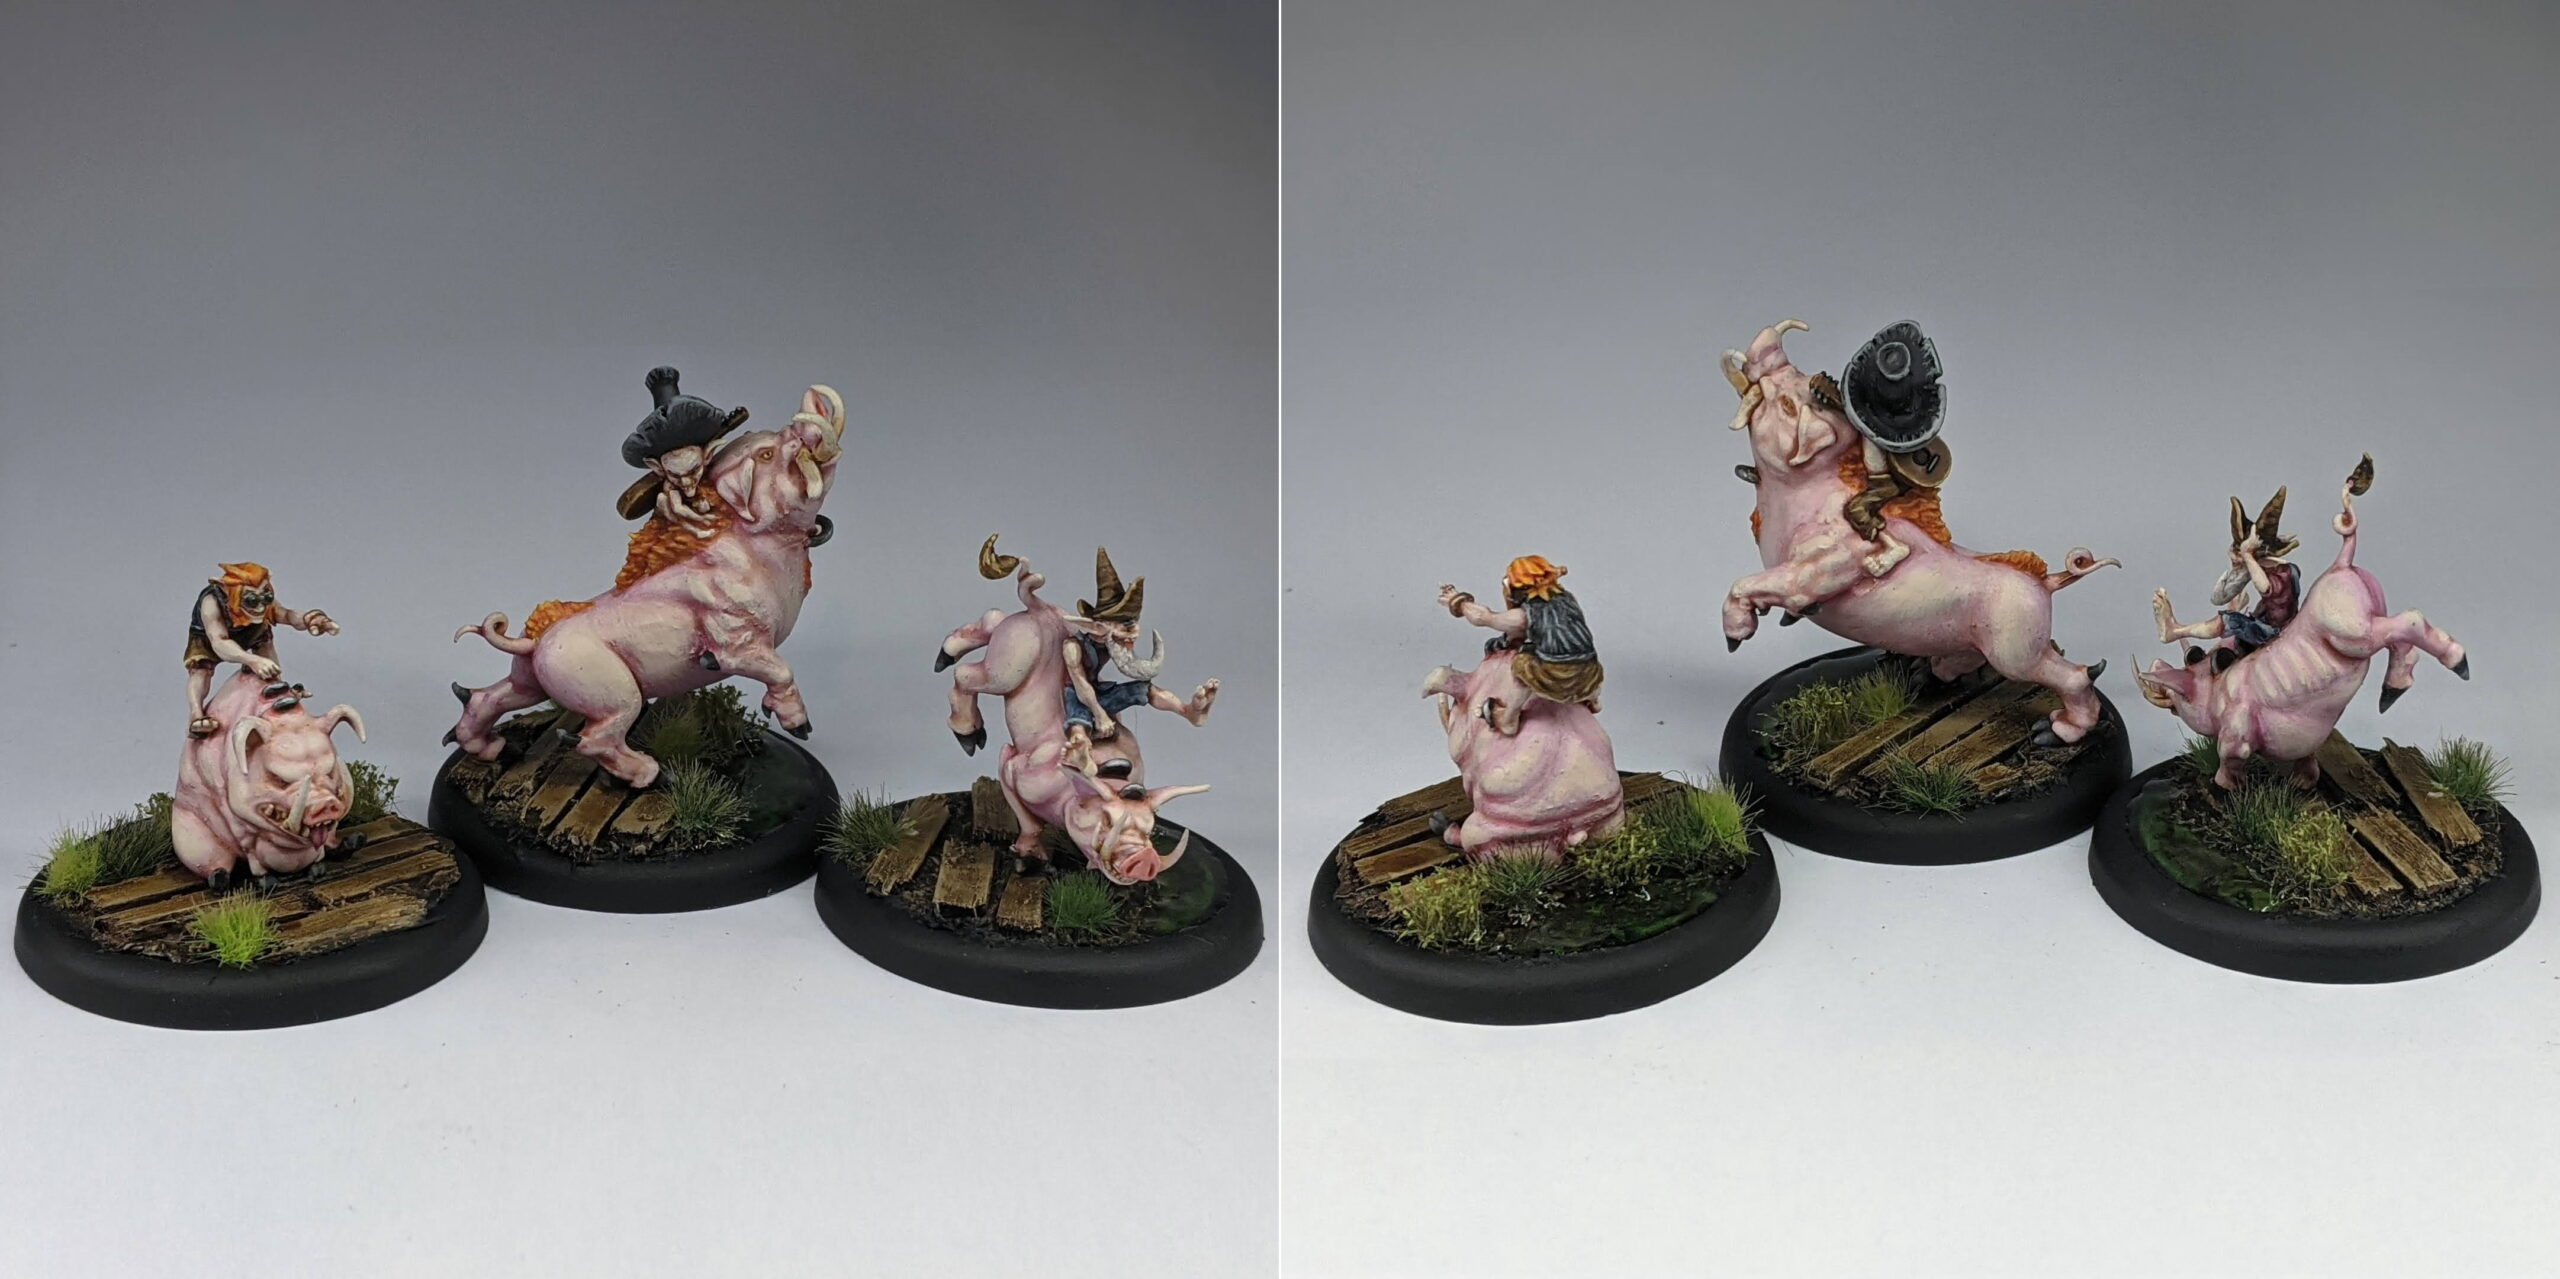
War Pigs never made it into my original crew for one simple reason – they featured Gremlin riders. When I was first getting started with this project, I wasn’t really sold on the whole Gremlin/Bayou aesthetic yet – I just wanted to focus on the pigs themselves. When push came to shove, the pigs with the riders got axed in favour of Noise Marine Pigs and Werepigs. All well and good for a first pass, but War Pigs fill an essential role as the muscle in a Ulix Turner list; it’s about time I painted a few.
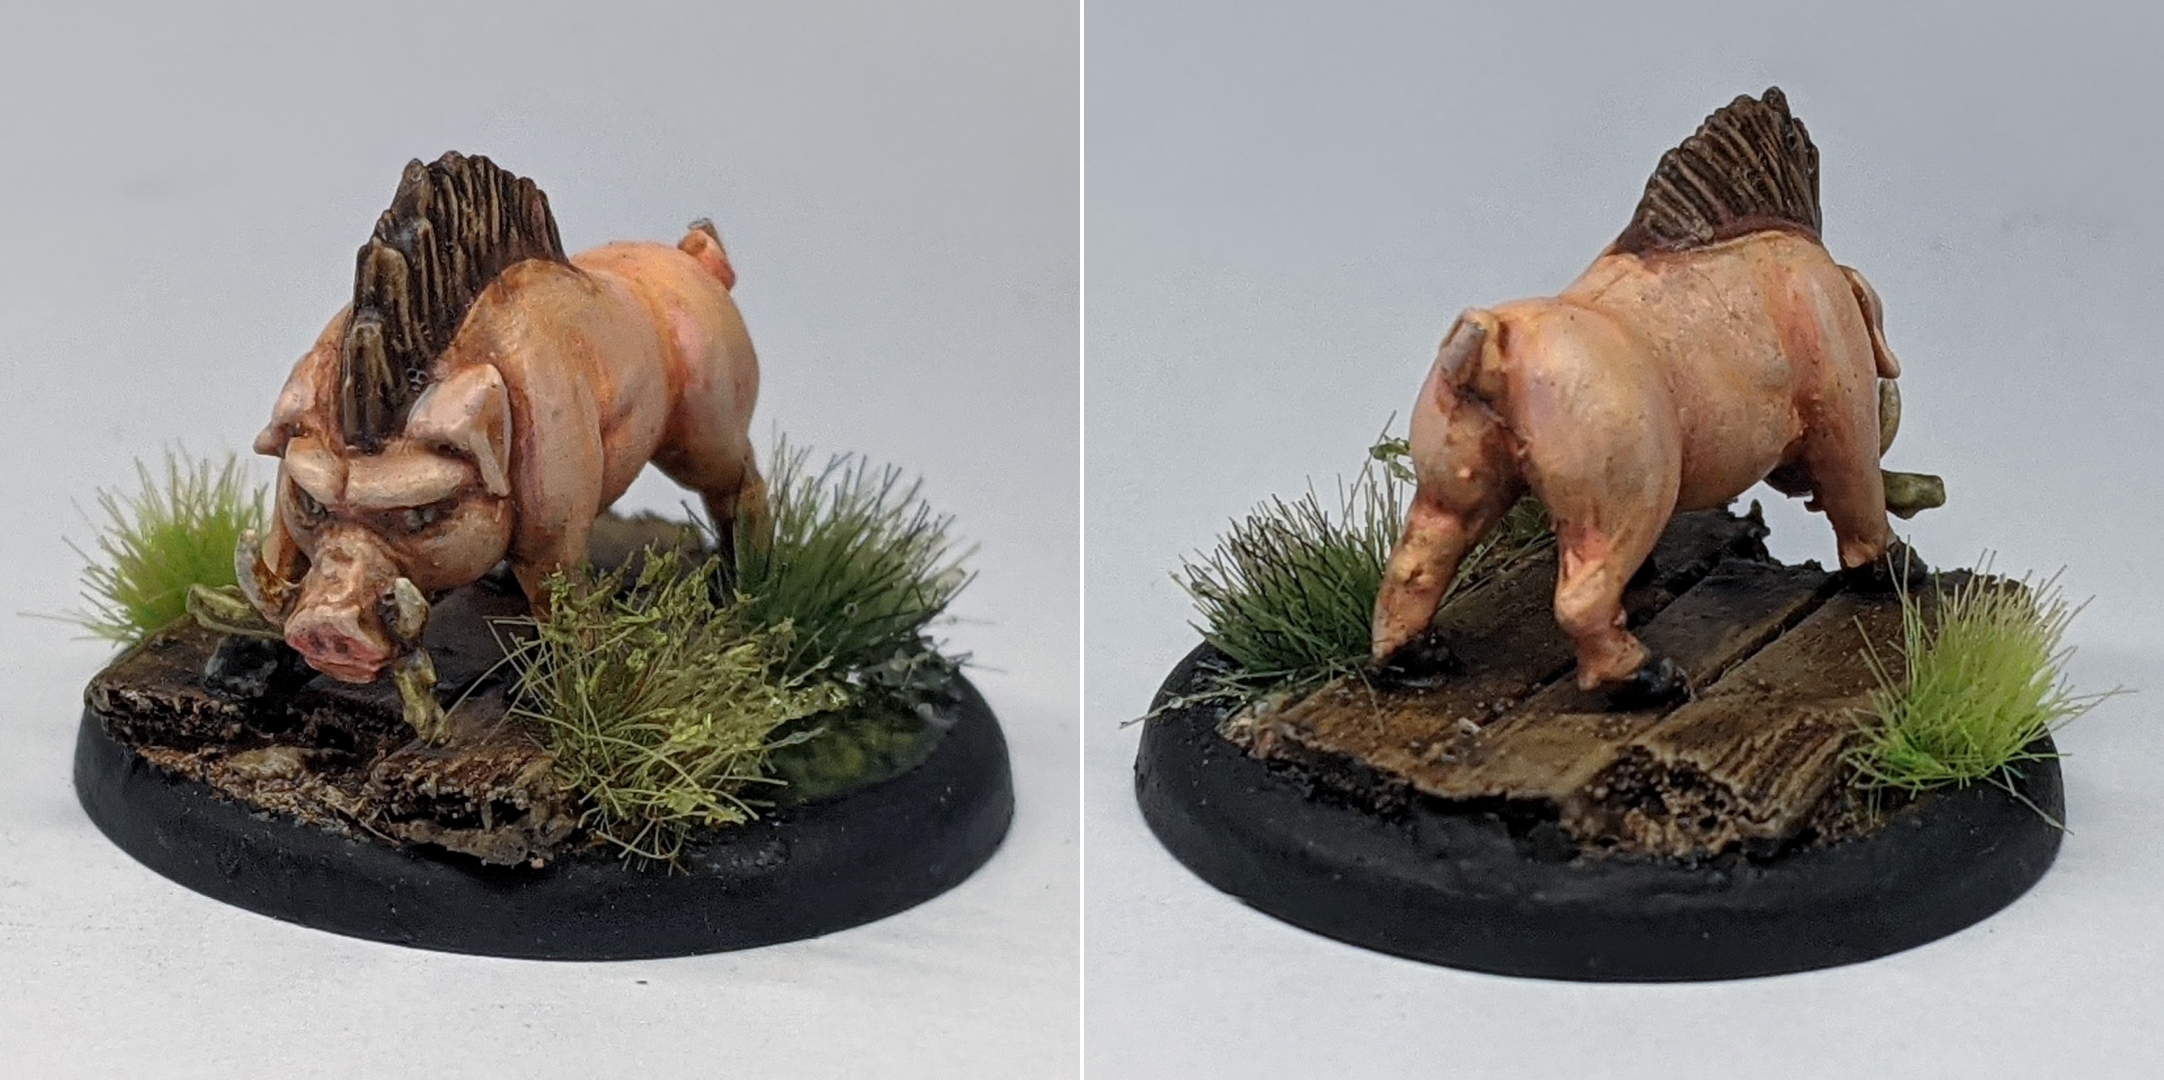
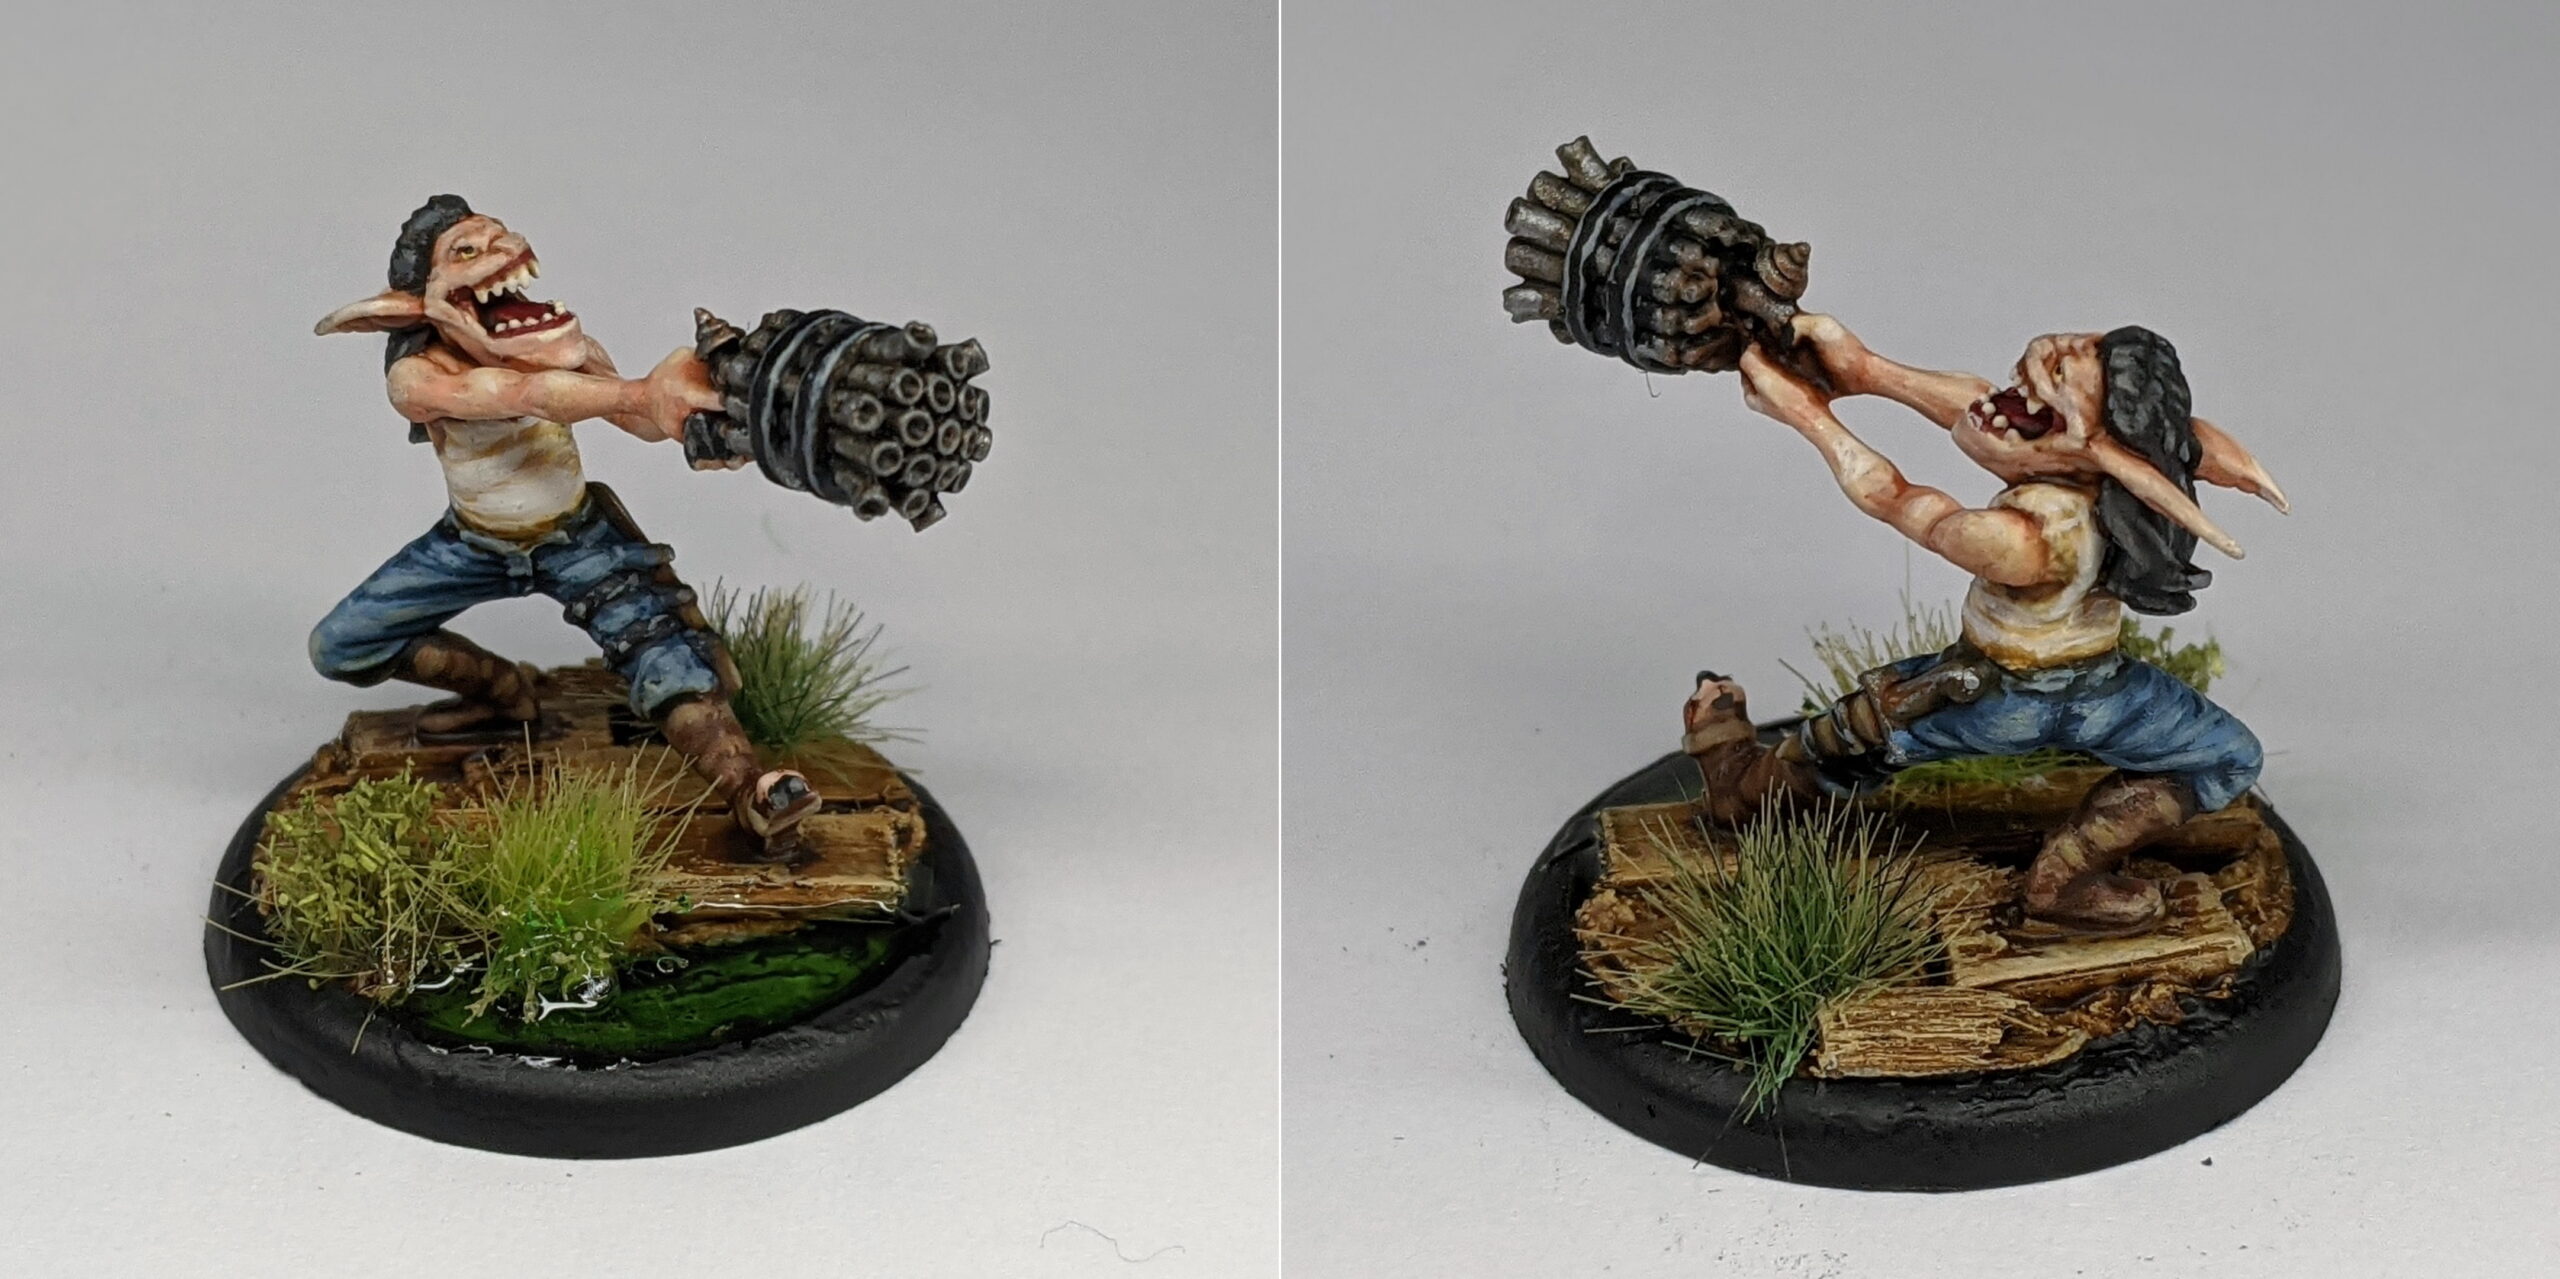
Let’s get the bad out of the way first – I have some very mixed feelings about this kit. Cracking into the War Pigs box, the first thing I noticed was the kit comprises of two newer War Pig sculpts packaged with an older model – this is immediately apparent by differences in the design and colour of the sprue. First impressions here – yeah, a little janky that they reused the War Pig from 2nd Edition, but plastic moulds are expensive and Wyrd aren’t exactly Games Workshop; I’m alright with a little sprue recycling. At least, I would be if the other two War Pigs weren’t completely disproportionate in scale next to the first one. Both of these new miniatures – which, to be fair, are lovely sculpts with nice, crisp details – are considerably, jarringly smaller than the original War Pig. In particularly, the War Pig that’s seated looks a way too small on that massive 50mm base. The original War Pig, on the other hand, has the appropriate girth for a 9 Soulstone Minion – although the quality of the kit is notably worse in some regards. The pig itself looks great, but the gremlin riders legs and one of his hands – which are cast directly onto the War Pigs back – are not as crisp and defined as I’d like them to be. All in all, the kit is kind of a mess, which is somewhat disappointing given how utterly essential the miniatures contained are.
I have to admit though, they were good fun to paint.
For the majority2 of the pigs in my crew, I start painting their skin from a zenithally highlighted base coat – this gives me a smooth gradient over the miniature to build up highlights or shade down from. To achieve this, I first airbrush the base colour over the skin. Next, I mix a little Pale Flesh into the base colour and gently airbrush a layer over the miniature, keeping my airbrush in a fixed position pointing 45 degrees down and turning the miniature, taking care to hit primarily the face, shoulders and upper body and avoid the recesses. I repeat this process a few times, gradually increasing the amount of Pale Flesh in my airbrush cup and applying smaller layers, further away from the recesses. The idea here is that the airbrush can give a nice, gentle gradient in a far shorter time period than I can achieve with a brush. Once the base gradient is down, I can go in with a brush and glaze in greater contrast over the various protrusions on the miniature, allowing for various sections to have different levels of highlighting while the miniature overall appears ‘lit’ from a single light source. For each of the different types of pigs that I’ve painted so far, I switched up the base colour I mix into Pale Flesh. This not only helped to bring a little colour variation to the crew, but also has the added benefit of making it easier to visually distinguish the different types of Minion on the tabletop. So far, I’d used different ratios of Rosy Flesh, Cadmium Skin and Squid Pink for this, so I opted to try something different altogether on the War Pigs and used Warlord Purple.
My first thought after laying down the base coat of Warlord Purple was ‘yikes’ – I immediately started to doubt my colour choice. The colour was so stark and vibrant and – problematically – looked nothing like skin. I had to reassure myself that this colour was only really going to show up as a mid-tone shadow before I pressed on. By the time I’d applied my third or fourth pass of zenithal highlights (with a ratio that was more Pale Flesh than Warlord Purple at this point) however, I was vindicated – the colour looked somewhere between Old Major and my Squealers, which was not a bad place to be for this unit. I put the airbrush down, and started to apply thin glazes of 40:10:50 Pale Flesh/Warlord Purple/Lahmian Medium over the various protrusions in the skin. After building up a few layers of highlights this way, I started to mix a little Elfic Flesh into each pass to push the contrast a little further. I applied one or two more layers this way to various protrusions across the body (barrel chests, thighs, fat folds, etc), then another one or two layers over the most raised areas and focal points (such as the face). Occasionally, I would find the layers weren’t quite blending together how I’d like, so I applied a very thin wash of Reikland Fleshshade diluted with Lahmian Medium over the whole body and reassessed. This helped momentously to not only smooth out my blends, but it also helped to bring a little reddish warmth back to the underlying Warlord Purple tone of the skin, which in turn helped to make it look a little more believable as a skin tone. I’m pretty pleased how it turned out in the end, and I think they fit in nicely with the rest of the pigs.
Now, the skin was by far the most complex and involved stage of painting, but everything that followed was, frankly, terrifying. I picked out the hooves with Charcoal and highlighted with a little Elfic Flesh mixed in then shaded the recess with Nuln Oil. I base coated the original War Pigs mane in Fire Orange, very carefully drybrushed with Gold Yellow and picked out some highlights with Elfic Flesh before washing with Cassandora Yellow. The tail of the other War Pig I painted in Earth Brown, drybrushed with Leather Brown and Elfic Flesh before getting washed with Seraphim Sepia. I painted tusks Elfic Flesh, washed with Seraphim Sepia and layered over with Elfic Flesh again. Hoop piercings were done in Gun Metal, washed with Nuln Oil and highlighted with Plate Mail Metal. Finally, the snouts were tinted pink with a very light glaze of Bloodletter Red. The whole time, I was absolutely terrified I was going to get paint over my lovely glazed pink skin and ruin my hours of labour blending skin tones, but I’m pleased to say I made it through without incident.
The riders – the dreaded teeny tiny gremlins – were pretty quick and easy to paint comparatively. The skin was simple – Rosy Flesh, Pale Flesh, Elfic Flesh, then Reikland Fleshshade. For their clothes, I wanted to stick to a fairly limited palette to help keep everything looking unified, but to sell the ramshackle/disorganised vibe of the minis, I tried to switch up what colour I used where. I repeated the ginger mane from one of the War Pigs on one of the Gremlins hair, reused the brown recipe from the other War Pigs tail for a leather tone and repurposed the Charcoal/Elfic Flesh recipe from the hooves for black canvas. For the rider in dungarees, I used the same recipe I’d used for the jeans on my Swine Cursed – Steel Grey, highlighted with a little Elfic Flesh and washed with Drakenhof Nightshade. I also used the Heavy Red/Elfic Flesh/Carroburg Crimson recipe from Ulix Turner’s coat for one of their t-shirts.
Hey, speaking of Ulix Turner – remember my dog Oreo? Well, a day that I’ve been dreading has finally caught up with me – the little rascal got into my hobby room and ran off with one of my miniatures. I’m afraid to say that he did not survive the ordeal.
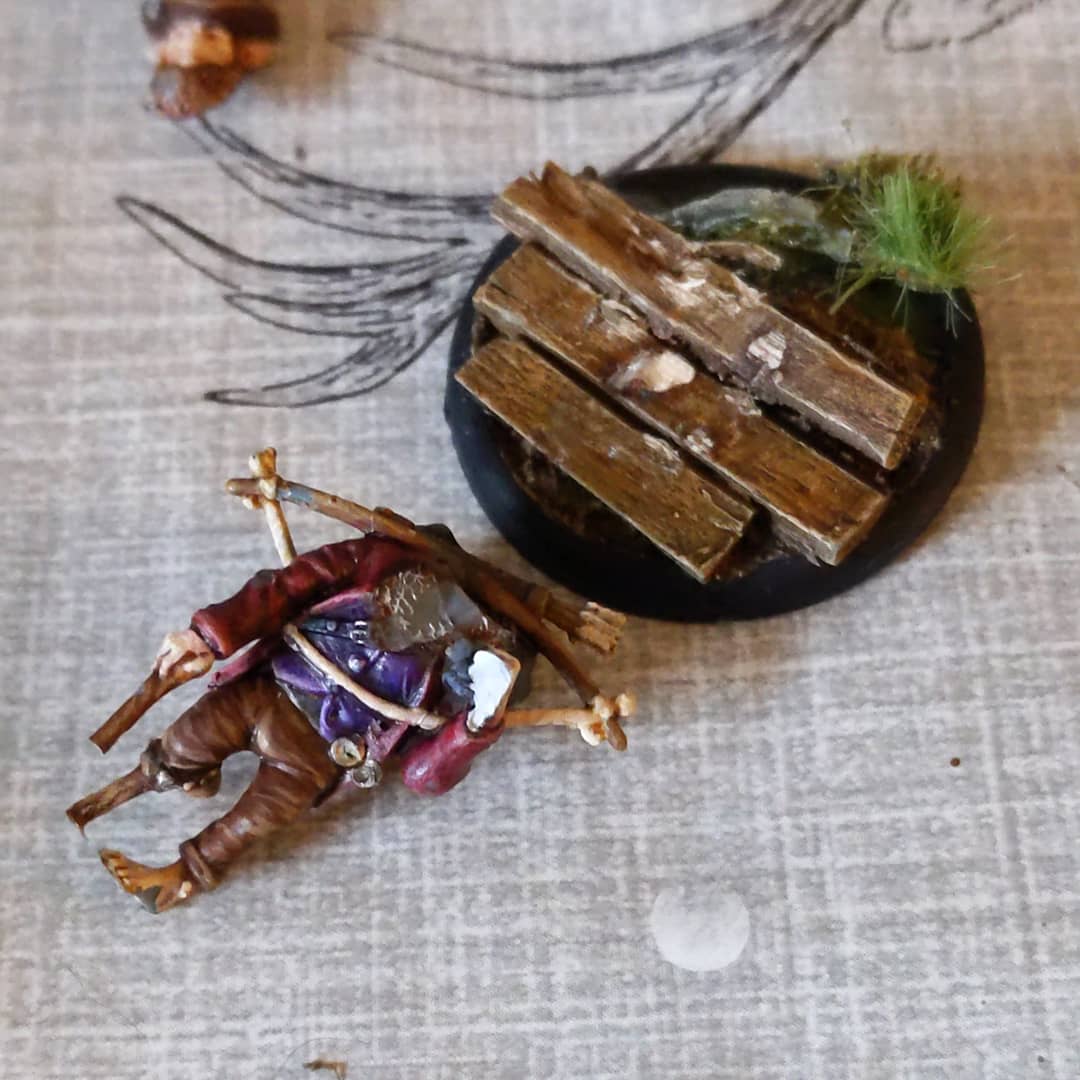
Having one of your miniatures chewed up by a dog is inconvenient at the best of times, but it’s particularly maddening when it’s a painted miniature. To look on the bright side, of all the Malifaux miniatures Oreo could’ve chewed up then Ulix Turner is probably the easiest to repaint. My heart would be in my boots if he’d gotten to Old Major or one of the Swine Cursed.
Of course the downside here is that Wyrd don’t sell individual miniatures – replacing Ulix Turner meant shelling out for another Ulix Turner core box, complete with another Penelope, Old Major and 3 Wild Boars that I have absolutely no use whatsoever for. Oh well, at least I’ve got spares in case of emergencies now, right?
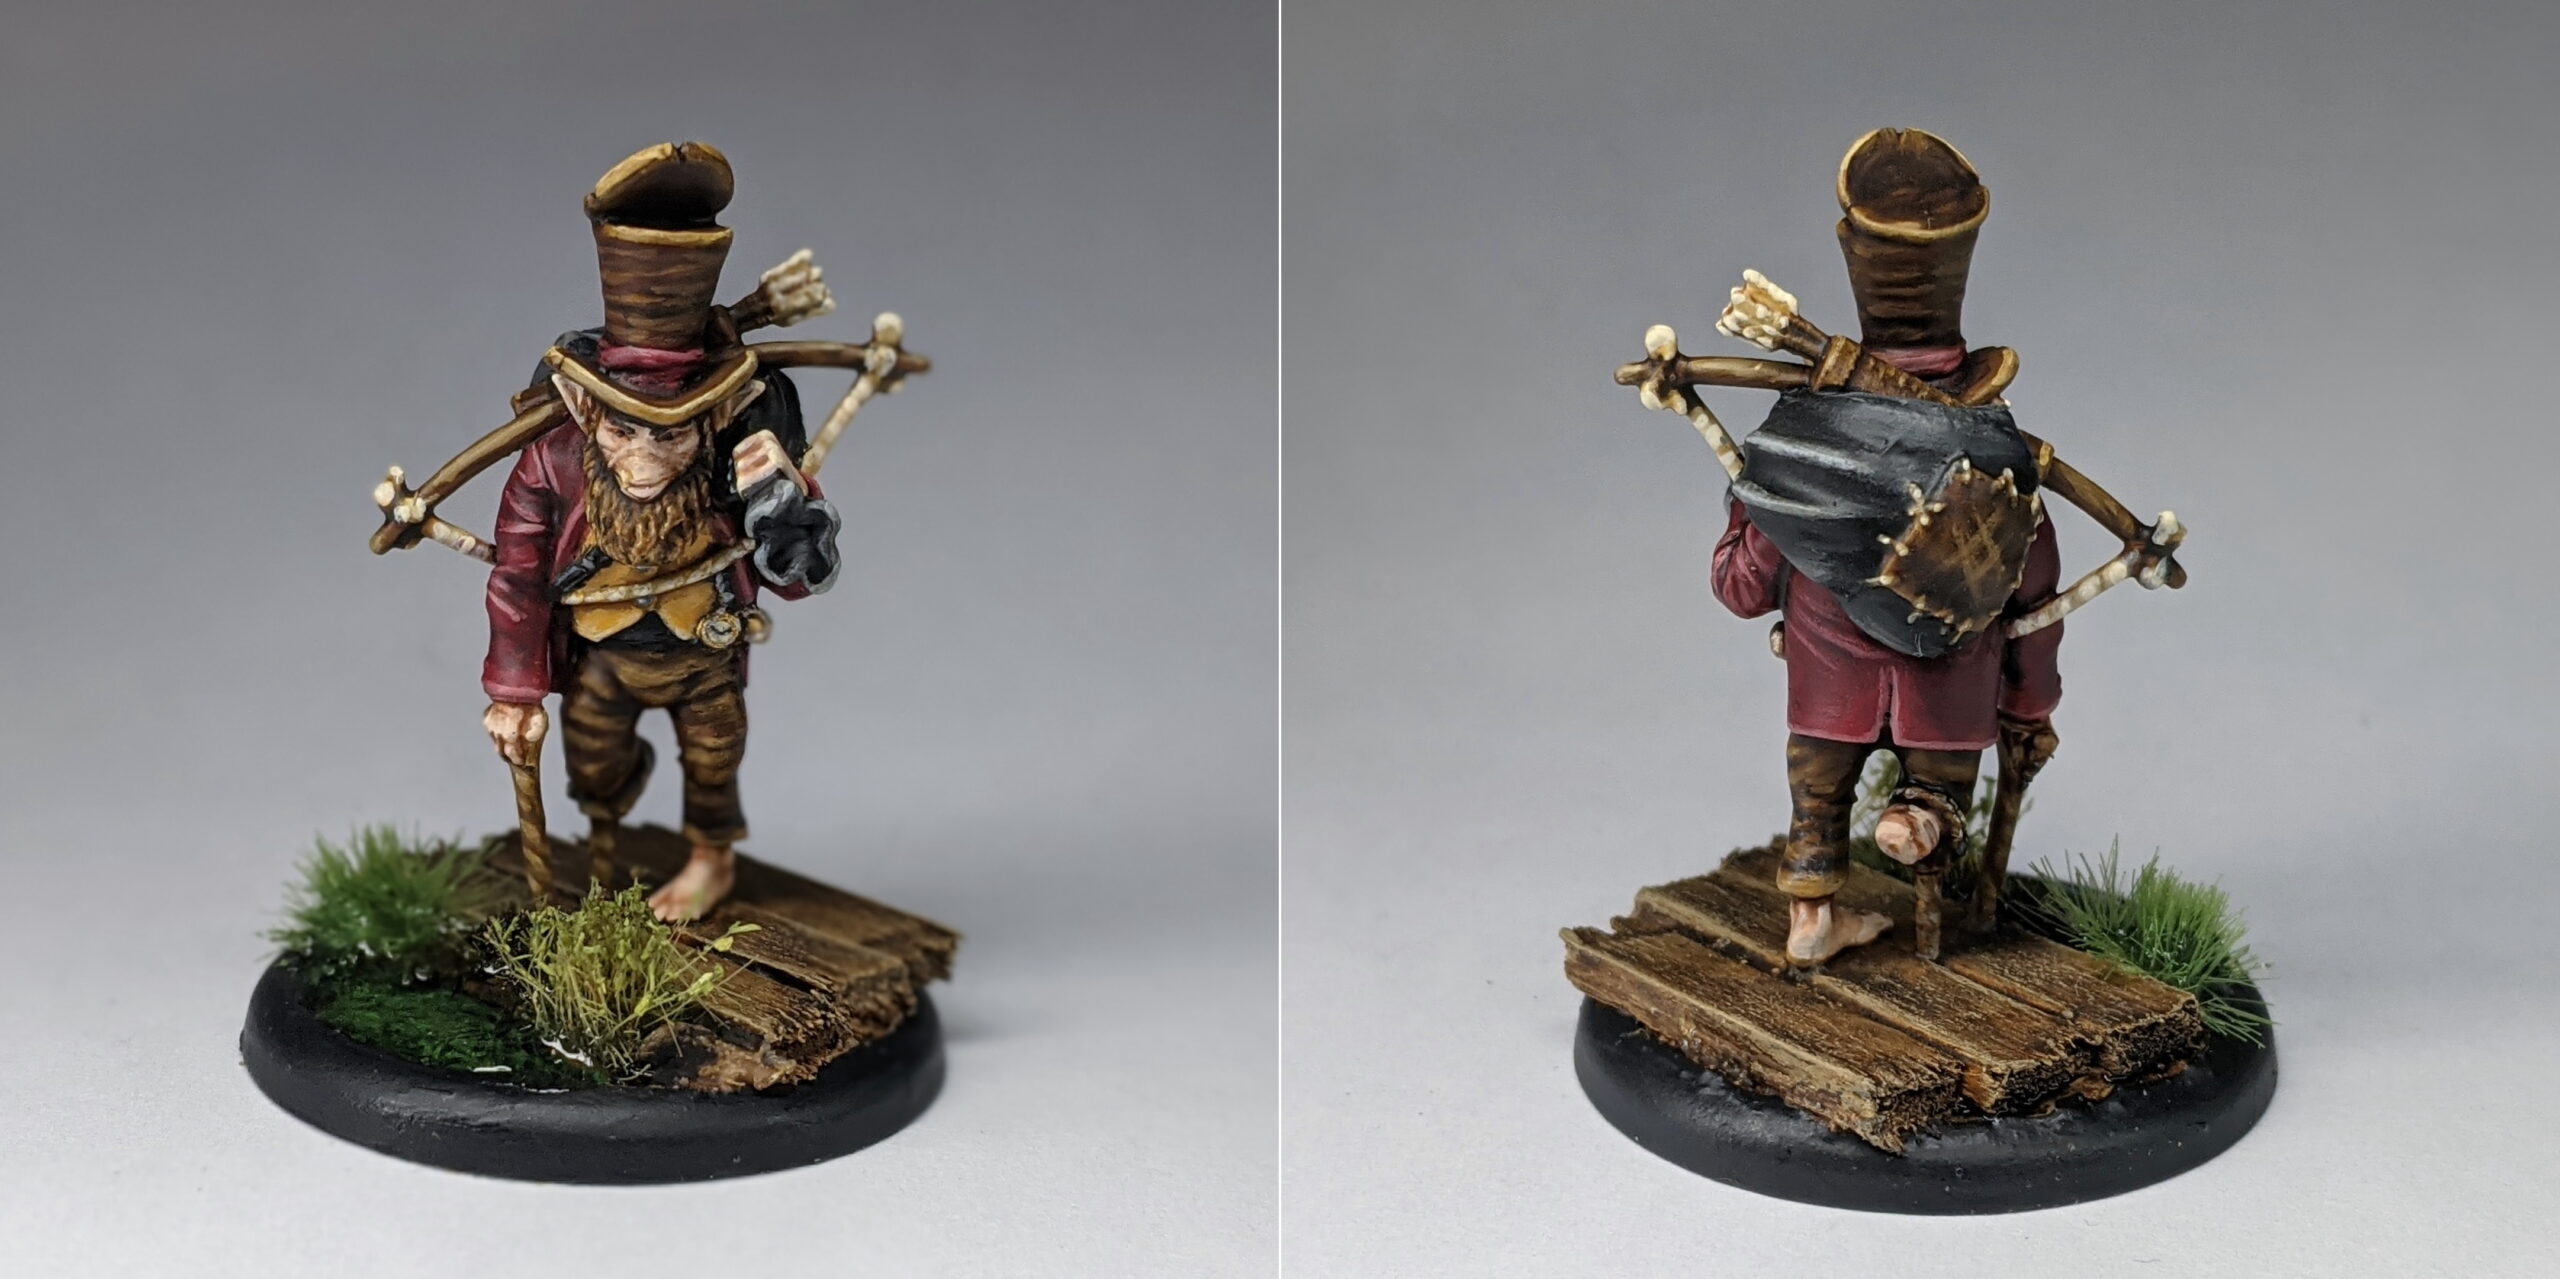
In an attempt to make lemonade out of lemons, I took the opportunity to make a couple of minor changes to my colour scheme for Ulix this time around. On my first Ulix, I kinda just followed the box art, except painting his skin a pale albino colour instead of the bright goblin green of Wyrd’s Gremlins. This worked fine for the most part, except for his purple waistcoat – without the bright green to contrast against, it kind of clashed a bit against the red. This time, I opted for a nice mustard yellow waistcoat instead, using Filthy Brown and highlighting with Elfic Flesh. At worst, it maybe looks a little bit McDonalds, but it’s a definite improvement over the purple. It really helps him pop on the tabletop, which better fits his status as the Crew’s Master.
Okay, repeat miniatures aside, what else do I have to show off? Well, like I said earlier – I’m missing a Piglet. This doesn’t sound like a big game breaker, but there’s a surprising amount of situations that you can find yourself in where three piglets just isn’t enough. The Sow alone can summon up to three in a single turn, while both Swine Cursed and The Sow summon a piglet when they’re killed. There’s nothing more frustrating than knowing you could get another model on the board – perhaps in a mission critical location – but you can’t. Not because the rules don’t permit it, but simply because you don’t have the model for him. This had to be resolved, so I bit the bullet and picked up the Mudlight Whispers box.
Aside from his brown mane (painted the same as the War Pigs tail earlier), the piglet (who I have affectionately dubbed ‘Pumba’) wasn’t any different to paint than the previous three, so I won’t bother re-treading old ground there. But Mudlight Whispers also comes with three Hog Whisperers and a pair of Slop Haulers, which I do have a little more to say about.
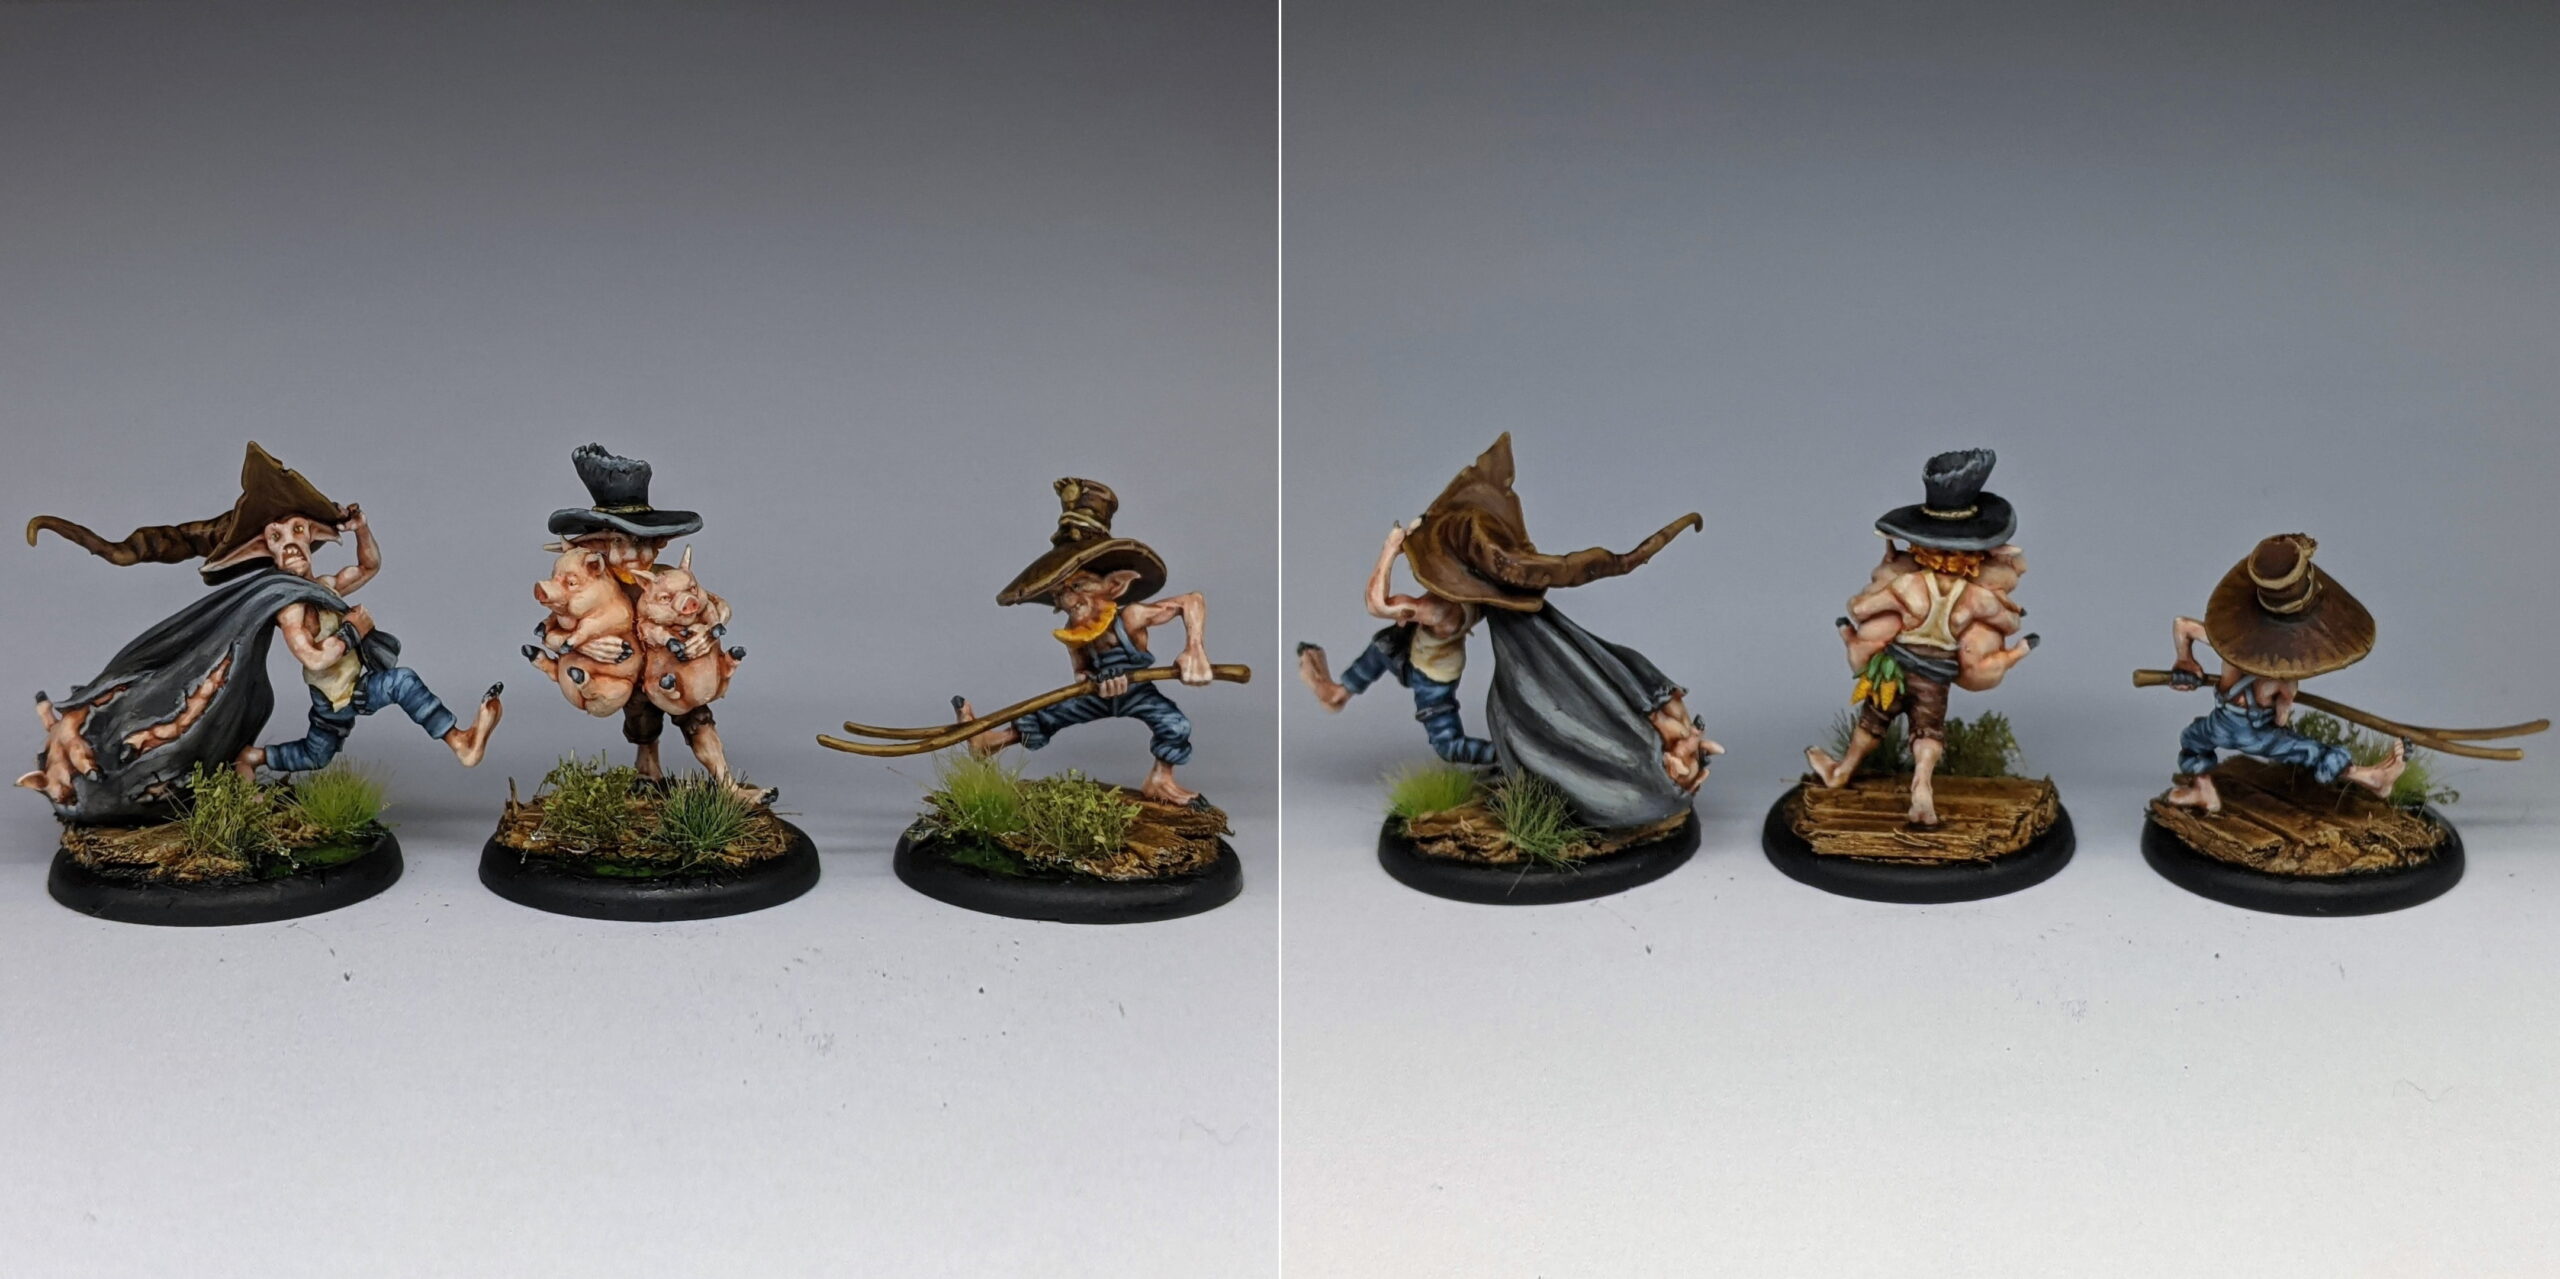
Looking back, I’m not sure why I had such an aversion to adding Gremlins to my crew, because these miniatures are brilliant! Despite their diminutive size, all five of the sculpts are absolutely dripping with charm and character – I’m a particular fan of the Hog Whisperer struggling to carry a pair of very unimpressed looking piglets. The Hog Whisperers were mostly painted using the same techniques as the War Pig riders – denims, brown/black leathers, pale skin, ginger beards and piglets.
For their rather sizeable hats (and this applies to the first War Pig rider earlier as well), I felt like there was a little too much smooth surface area to just paint a flat colour so I tried to remedy this by feathering in from the brim with my edge highlight colour. I built this up over a few layers, using a little more Elfic Flesh each time and reducing the size of the strokes with each pass before finally hitting the whole hat with a wash of Nuln Oil or Seraphim Sepia (for the black and brown ones respectively). And that’s pretty much it, really. Two of the Hog Whisperers have vests on, which I painted using Elfic Flesh and Seraphim Sepia, and one of them has a little corn on the cob which was Gold Yellow and Goblin Green, shaded Seraphim Sepia and layered with the original colour. Easy as pork pie!
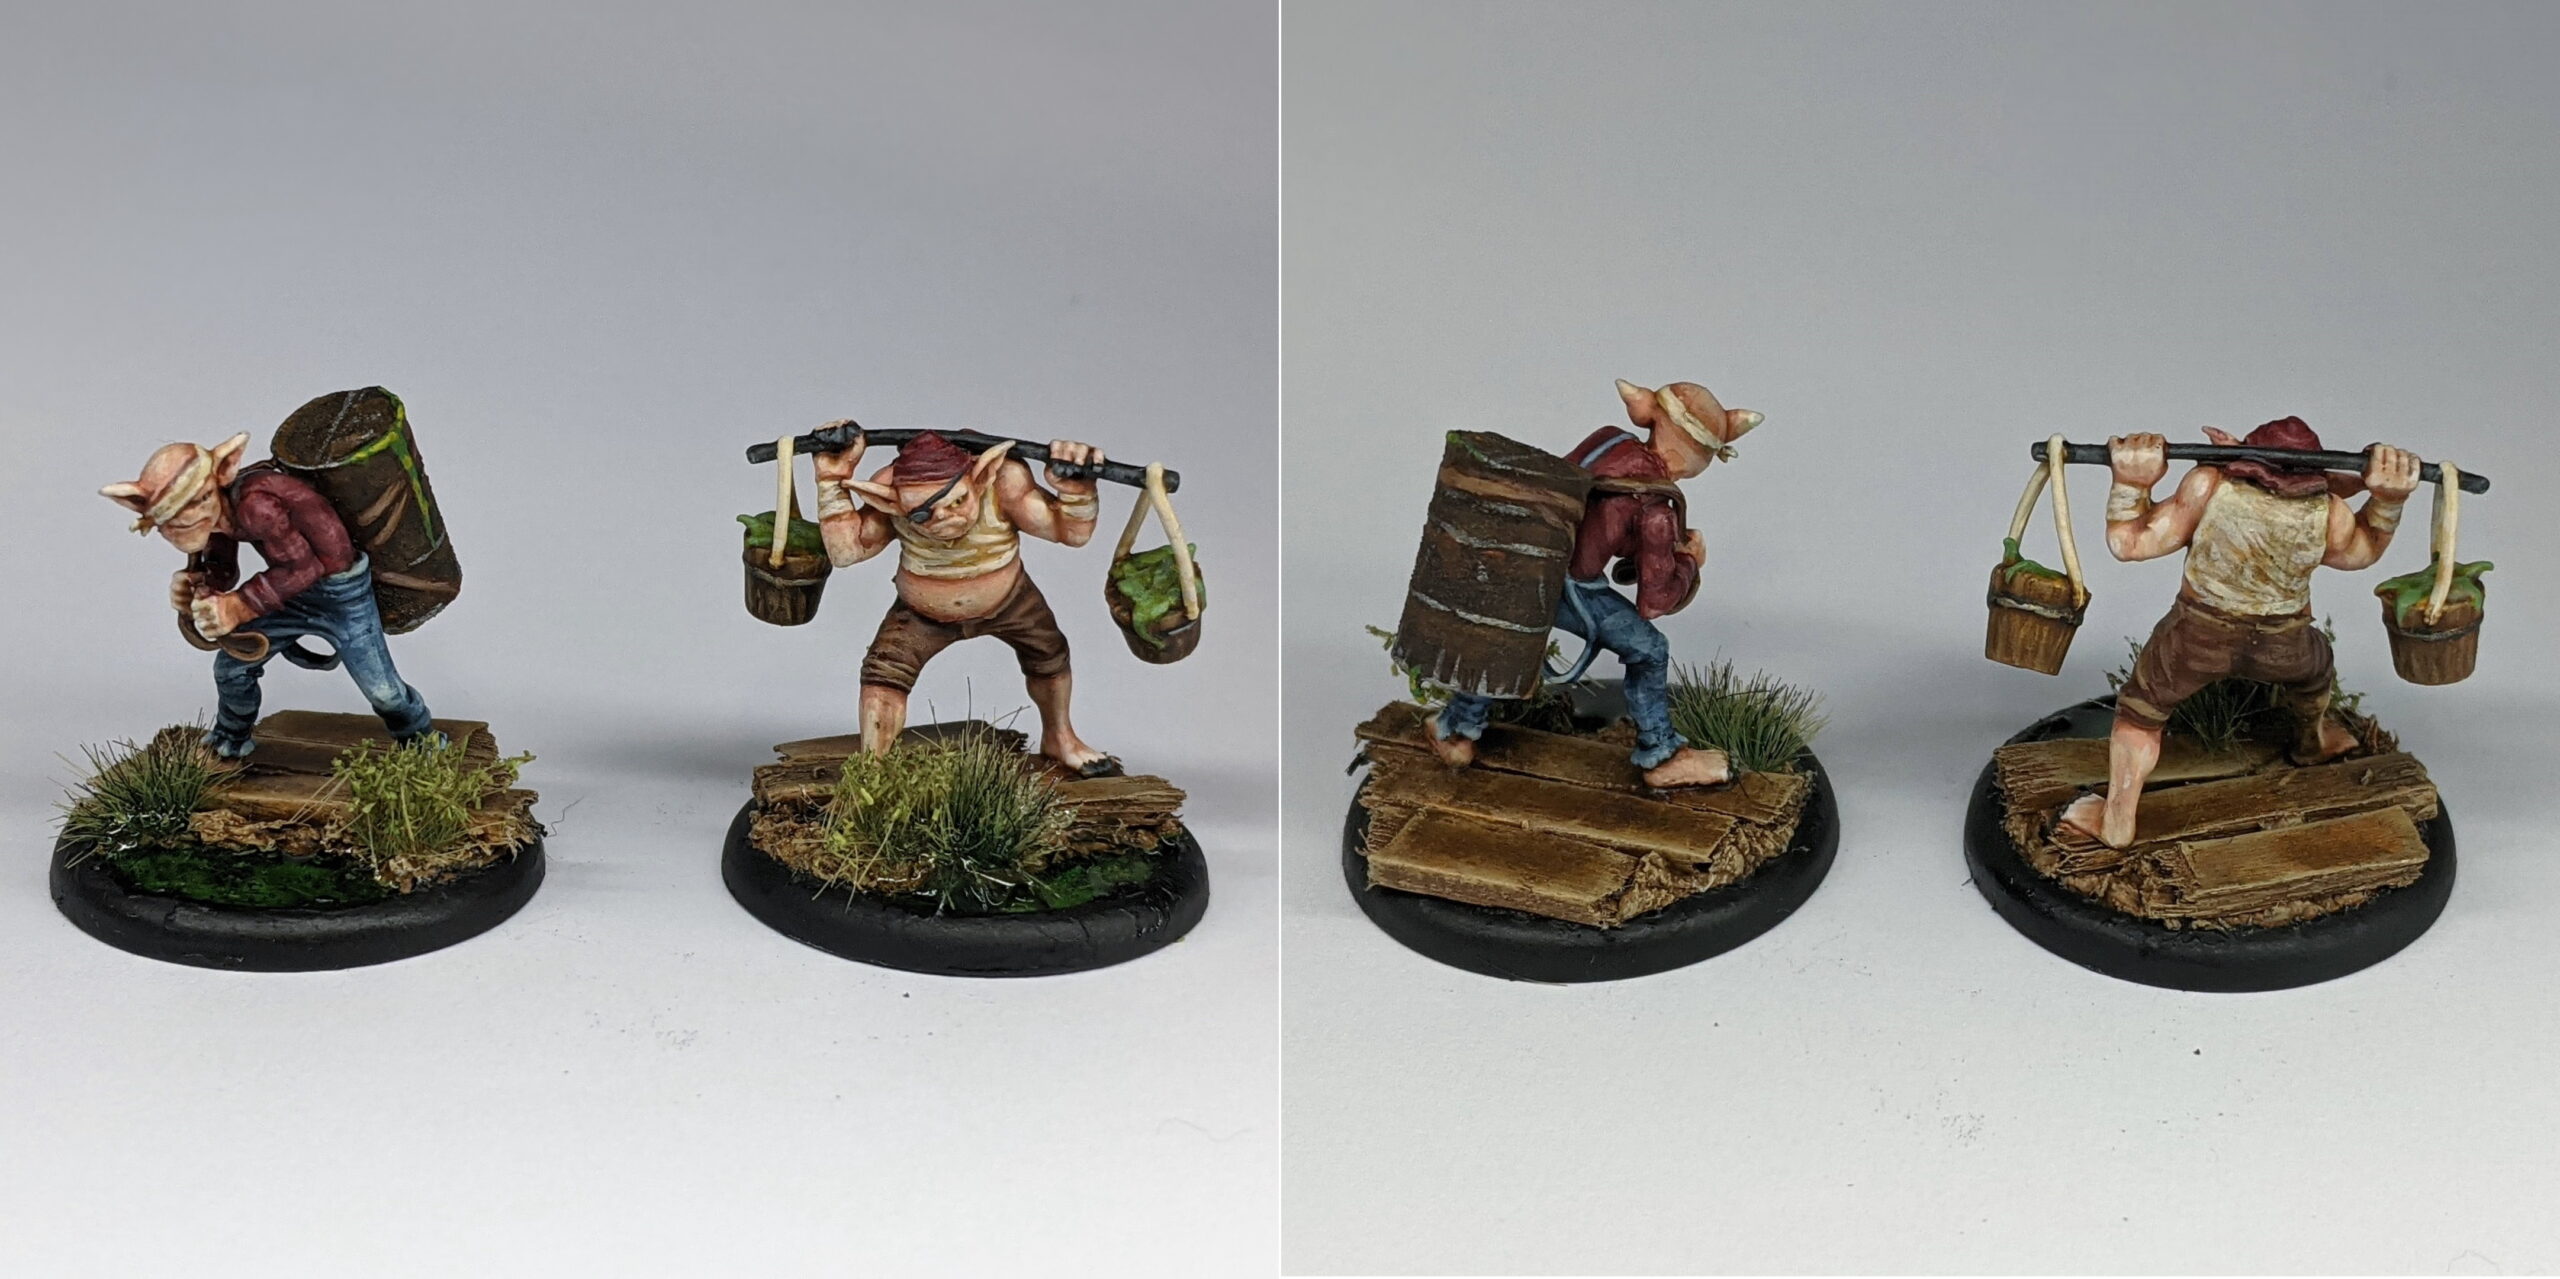
For the Slop Haulers, the only real deviations from the rest of the Gremlins were the slop itself and the big slop tankard. The tankard was a simple case of Gun Metal for a base, washed Agrax Earthshade and given a coat of Typhus Corrosion (carefully avoiding the very delicately sculpted straps). Once dry, I pin washed a little watered down Ryza Rust into the recesses and carefully edge highlighted the edges and trim with Shining Silver, along with a few feathered scratches at the edges. The straps were Dark Fleshtone, highlighted with a bit of Elfic Flesh mixed in and washed with Seraphim Sepia. For the slop itself, I felt like a nice bright green would work best given the colour palette of these miniatures, so I basecoated it in Goblin Green and highlighted it with a little Gold Yellow.
The addition of Slop Haulers, Hog Whisperers and War Pigs meant I had finally completed the PIG and SOOEY keywords in their entirety, leaving me free to check off some VERSATILE options. You can definitely go a little crazy on these – and I will for sure be coming back to paint a few of the more out there options – but one VERSATILE pick stands out among the rest for me. The Infamous Gracie.

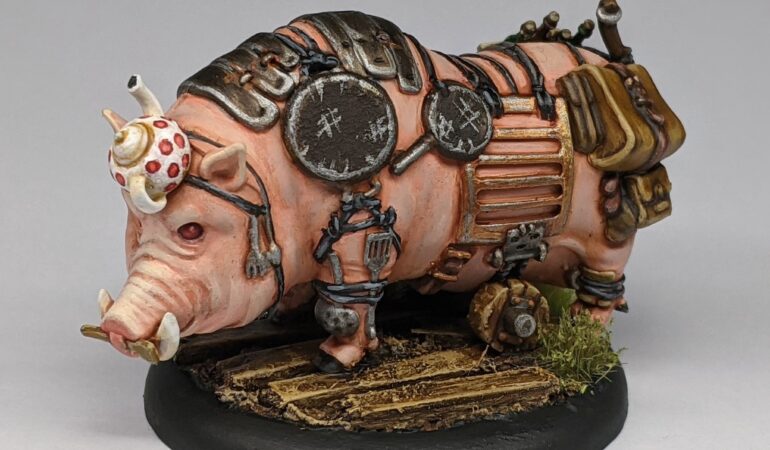
I’m gonna say it right now – I love this miniature. So much. Forget about her excellent utility in game for a minute, and just.. Just look at this miniature. I love everything about her – the ramshackle armour made from cutlery and cookware, her little stabiliser wheels to help bear her enormous, armoured weight. The wooden spoon for a septum piercing. I don’t even care that some of the details aren’t as crisp as they could be3 – she’s got a teapot for a helmet, and that just delights me.
I had originally intended on painting Gracie way back for Part Two of Makin’ Bacon, but I only just discovered that she existed shortly after painting the rest of my crew. While I waited for her to arrive in the mail, I decided to make a start on my Adepta Sororitas and so, me being me, by the time she arrived I had already moved on. And so she languished on my windowsill for a good eight months before I finally found the motivation to paint her – and I’m so glad I did.
I opted to forgo the airbrush for this one – there was just too much clutter on the miniature for it to be any use, and most of the volumes of skin were small and broken up enough that a hairy brush would suffice here. For Gracie, I wanted a nice wholesome skin tone, so I decided to keep it simple with the old reliable combo of Rosy Flesh, Pale Flesh, Elfic Flesh and Reikland Fleshshade. I think it turned out nicely, similar to the Swine Cursed but a little less red (those minis employed a little Bloodletter Glaze for recess and anti-zenithal shading).
The various metal pieces – cutlery, pots and pans and the little armour strips – I base coated in Gun Metal and shaded with Agrax Earthshade. The cast iron bits – such as the pots and pans – I coated in Typhus Corrosion and painted edge highlights and scuff marks over this with Shining Silver. I layered the cutlery and edge highlighted the armour plating across his upper back in Shining Silver, then blended this back down again with another coat of Agrax Earthshade to give an old, beaten look. As a final touch to the metallics, I put a little drop of thinned down Ryza Rust into the recesses of the pans, chain links and other raised areas in the armour. The metal grille on her left was the only thing I painted brass; I did this using Brassy Brass, washed in Reikland Fleshshade, layered with Brassy Brass and highlighted with Shining Silver. The reason I went for brass over silver here was as much for ease of painting as it was aesthetics – washing the metal with Reikland Fleshshade meant that I could wash that whole area with the same colour, making painting the exposed skin between a little less of a headache.
The woods and leathers I painted pretty much the same way – a Dark Fleshtone base, a layer of Earth, a thick edge highlight of Leather Brown and a fine highlight with Elfic Flesh, followed by a nice thick wash of Seraphim Sepia to blend it all together. The wicker picnic basket was Khaki, lightly drybrushed and edge highlighted with Elfic Flesh before washing with a slightly thinned down Seraphim Sepia to bring out the texture.
The string tying everything together was one of the biggest headaches with this model. I had to be careful to basecoat the whole width of the string without getting any on the skin – which, of course, I entirely failed to do, forcing me to clean up the recess with Rosy Flesh, pin wash the recess and try and blend it all back together with Pale Flesh. Once the base coats were down though, highlighting was a doddle – mix a bit of Elfic Flesh into some Black, put a little on the brush tip and gently run the side of the brush across all of the string. Add a little more Elfic Flesh for the knots and other raised areas. Job’s a good ‘un.
Now, of course the best/worst part of painting this miniature was the teapot. I just.. I love that teapot helmet so much, I couldn’t bring myself to just paint it in boring stainless steel. Instead, I took my time and glazed in a beautifully shaded ceramic white.. and ended up pretty much painting over the whole thing as I repeatedly had to correct my mistakes painting those damn polka dots. It’s surprisingly hard to judge the correct size and spacing you need in order to get it to wrap around properly. Still, painful as it was, I’m really happy with how it turned out in the end. I can sleep easy knowing that I did that teapot justice.
Along with Gracie, the Pig Trouble kit comes with her handler – Burt Jebsen, so I figured I might as well get him painted too.
Not a thing left to say about this miniature that hasn’t already been spoken of on the other Gremlins. I did really enjoy painting this miniature though – it’s a fun sculpt with a lot of character. The teeth, in particular, were oddly satisfying to pick out. I guess I don’t have a lot of other miniatures this size with a fully open mouth.
About this point, I thought I was pretty much done and dusted. I patted myself on the back for a job well done, slapped some 0.5mm magnets under the bases and took them out for a couple of games.
With all the pieces in play, the crew was starting to make a little more sense. I had a lot more tools at my disposal now than I had before, and games started to get a little more enjoyable. Once I felt I had reached the point where I (more or less) understood how to play the game, I turned to the internet for a little advice on how to play these guys properly. A little bit of rooting around later, I stumbled upon an episode of a podcast called THIRD FLOOR WARS, which had two experienced tournament players on to do a deep dive on Ulix Turner. I picked up a couple of tricks and tips here and there, but one of the biggest eye openers was an Out of Keyword hire – Big Brain Brinn. This trick with this miniature is that he can help overcome the biggest issue with playing Ulix Turner – which is how card hungry he is. Not only does Big Brain Brinn increase your hand size up to 7, but he also lets you stack your deck somewhat and draw a card upon activating him. This seemed like way too useful a tool to pass up, so I ordered myself a Weird Science box kit and got him painted up to join my crew as well.

This was a fun little miniature to paint, and not too time consuming either. The legs were a case of painting black and highlighting with a little Stonewall Grey mixed in, followed by a wash of Nuln Oil. Rinse and repeat for a few passes and you’ll have all the creases in his trouser legs picked out appropriately. My approach to his white lab coat was similar, only using Ghost Grey for the base coat, Dead White for the highlights and thinning the Nuln Oil to 50:50 with Lahmian Medium. The flesh was pretty much was the same as any other – Rosy Flesh, Pale Flesh, Elfic Flesh and Reikland Fleshshade. This was the same for Brinn as it was on his hairless cat, although I did try to push the contrast a little harder on the cat to help distinguish it a little. For the big brain cranium, I added a little Druchii Violet into the Reikland Fleshshade washes and toned down my highlights with a very thin glaze of Bloodletter Red4 in order to achieve that kind of swollen, brainy look. Overall, a fun if unexpected miniature to round out the crew.
Well, four pigs and eleven gremlins later, I’m happy to say my Ulix Turner crew is functionally complete – at least as far as the SOOEY and PIG keywords are concerned. I’ll for sure be going back to take on some more of the Versatile options in the future – the Lucky Emissary, Mechanised Porkchop and Pigapult all come to mind as fun little projects to work on – but this seems like a good place to call it a day for now, at least as far as miniatures are concerned.
So, what’s next for Plastic Cracked? Well, I plan on returning to the Horus Heresy for a brief spell to fill out my Iron Warriors with a few less obnoxious5 options – but before that, we’ve one very special instalment of Makin’ Bacon left. Keep your eyes peeled, as I’m hoping to get this next one out a little quicker than usual.
But until then, thanks for reading and happy wargaming!
1 Yeah, wow, eight months? That’s.. kind of crazy to think about. Crazier still when you think about how many actual games I’ve gotten with them in that time. CRY EMOJI GOES HERE
2 Both the Piglets and the Squealers were painted entirely by hand. Mostly because they were just so small, it didn’t seem worth it to fire up the airbrush.
3 Seriously though, look at the state of that 2.5 mug just behind her right shoulder.
4 Perhaps more so than any other Citadel Glaze, I am going to be in trouble when this one runs out.
5 3x Phosphex Mortars, a pair of Legion Medusas and a Typhon Heavy Siege Tank seemed like a great idea on paper, but it’s really not very fun to play with or against.