Hello and welcome back to a very special fourth instalment of Makin’ Bacon. Today, I’m going to be showcasing my Bayou display board.
The decision to make a display board for this project was made before I’d even finished painting the War Pigs in the last instalment of Makin’ Bacon. After playing one, maybe two games of Malifaux, my friend Ross had the bright idea that it could be fun to sign up for a local tournament. My kneejerk reaction here was to call him mad, but – massively inexperienced or not – it was hard to deny that I’d missed wargaming events these past 18 months or so. Furthermore, I felt really rather proud of my Malifaux miniatures and thought that even if I lost all three of my games, I could probably take a decent run at Best Painted.
Now, if there’s one thing I’ve learned in my time playing Middle-earth, it’s that it’s jolly good fun to make (and not that impractical to transport) a display board for skirmish sized wargames. My head was immediately abuzz with ideas – water features, decking, gnarled trees with hanging moss – the board practically designs itself. Before I knew it, one thing led to the other and…
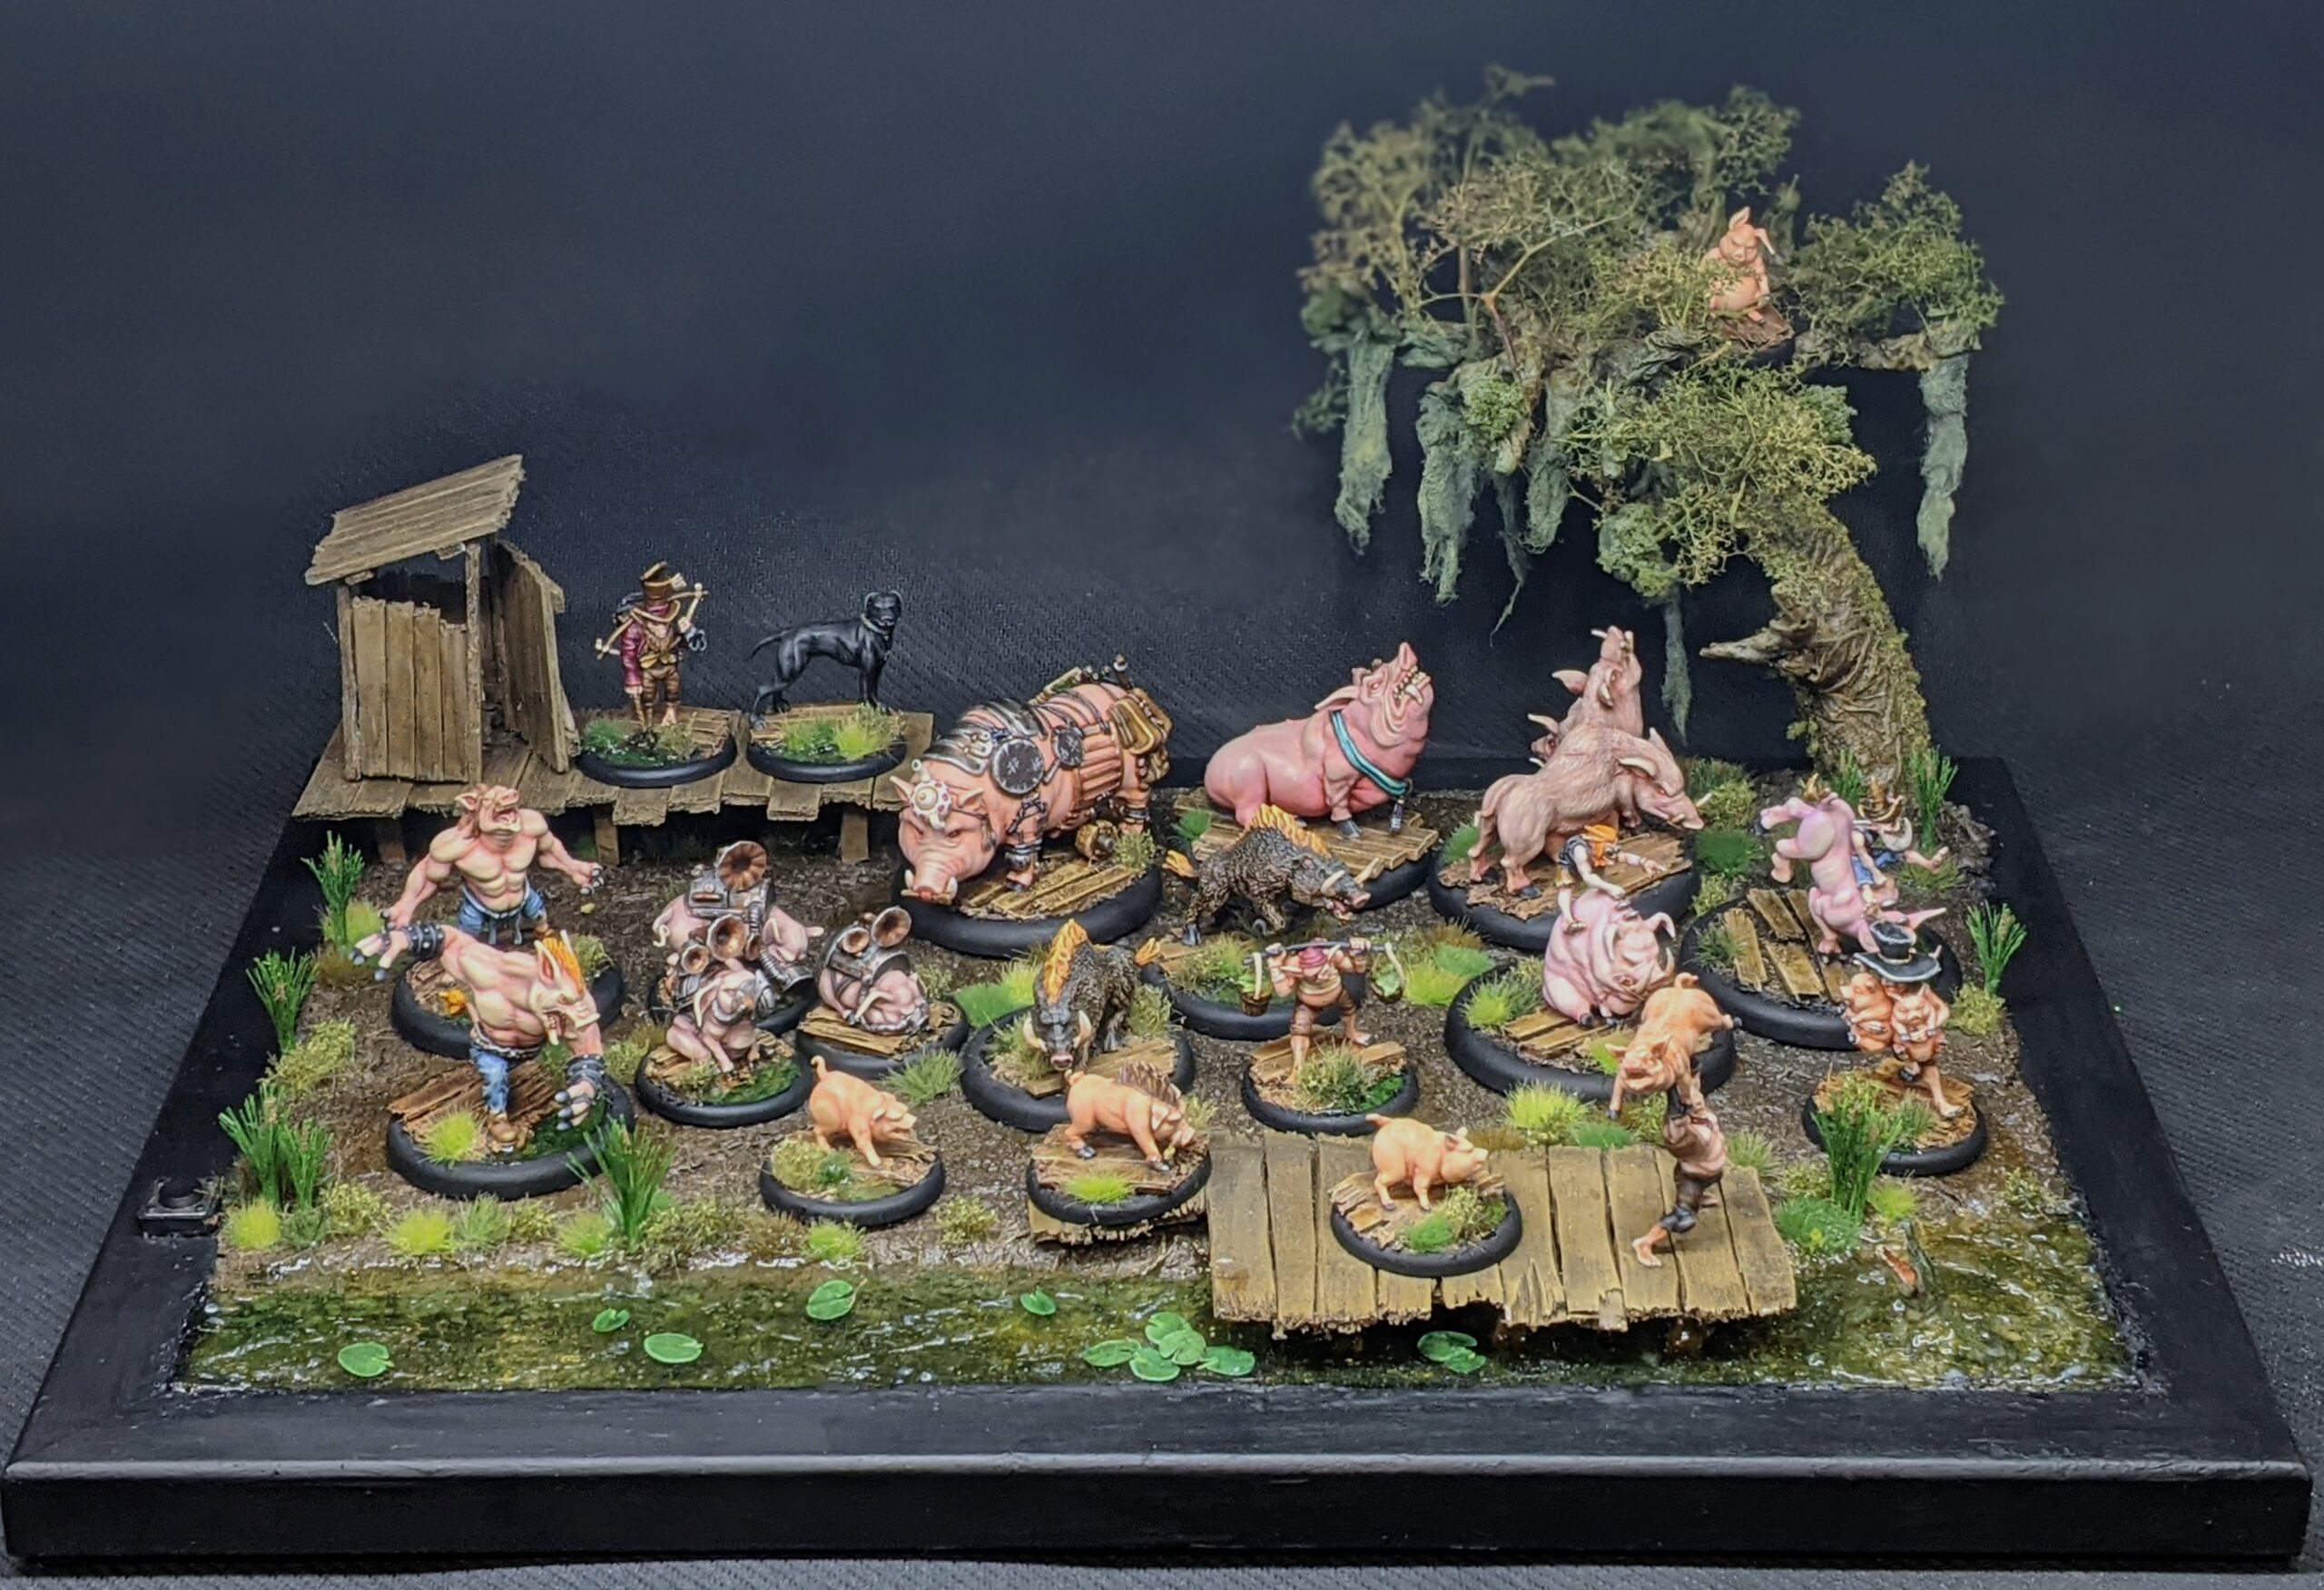
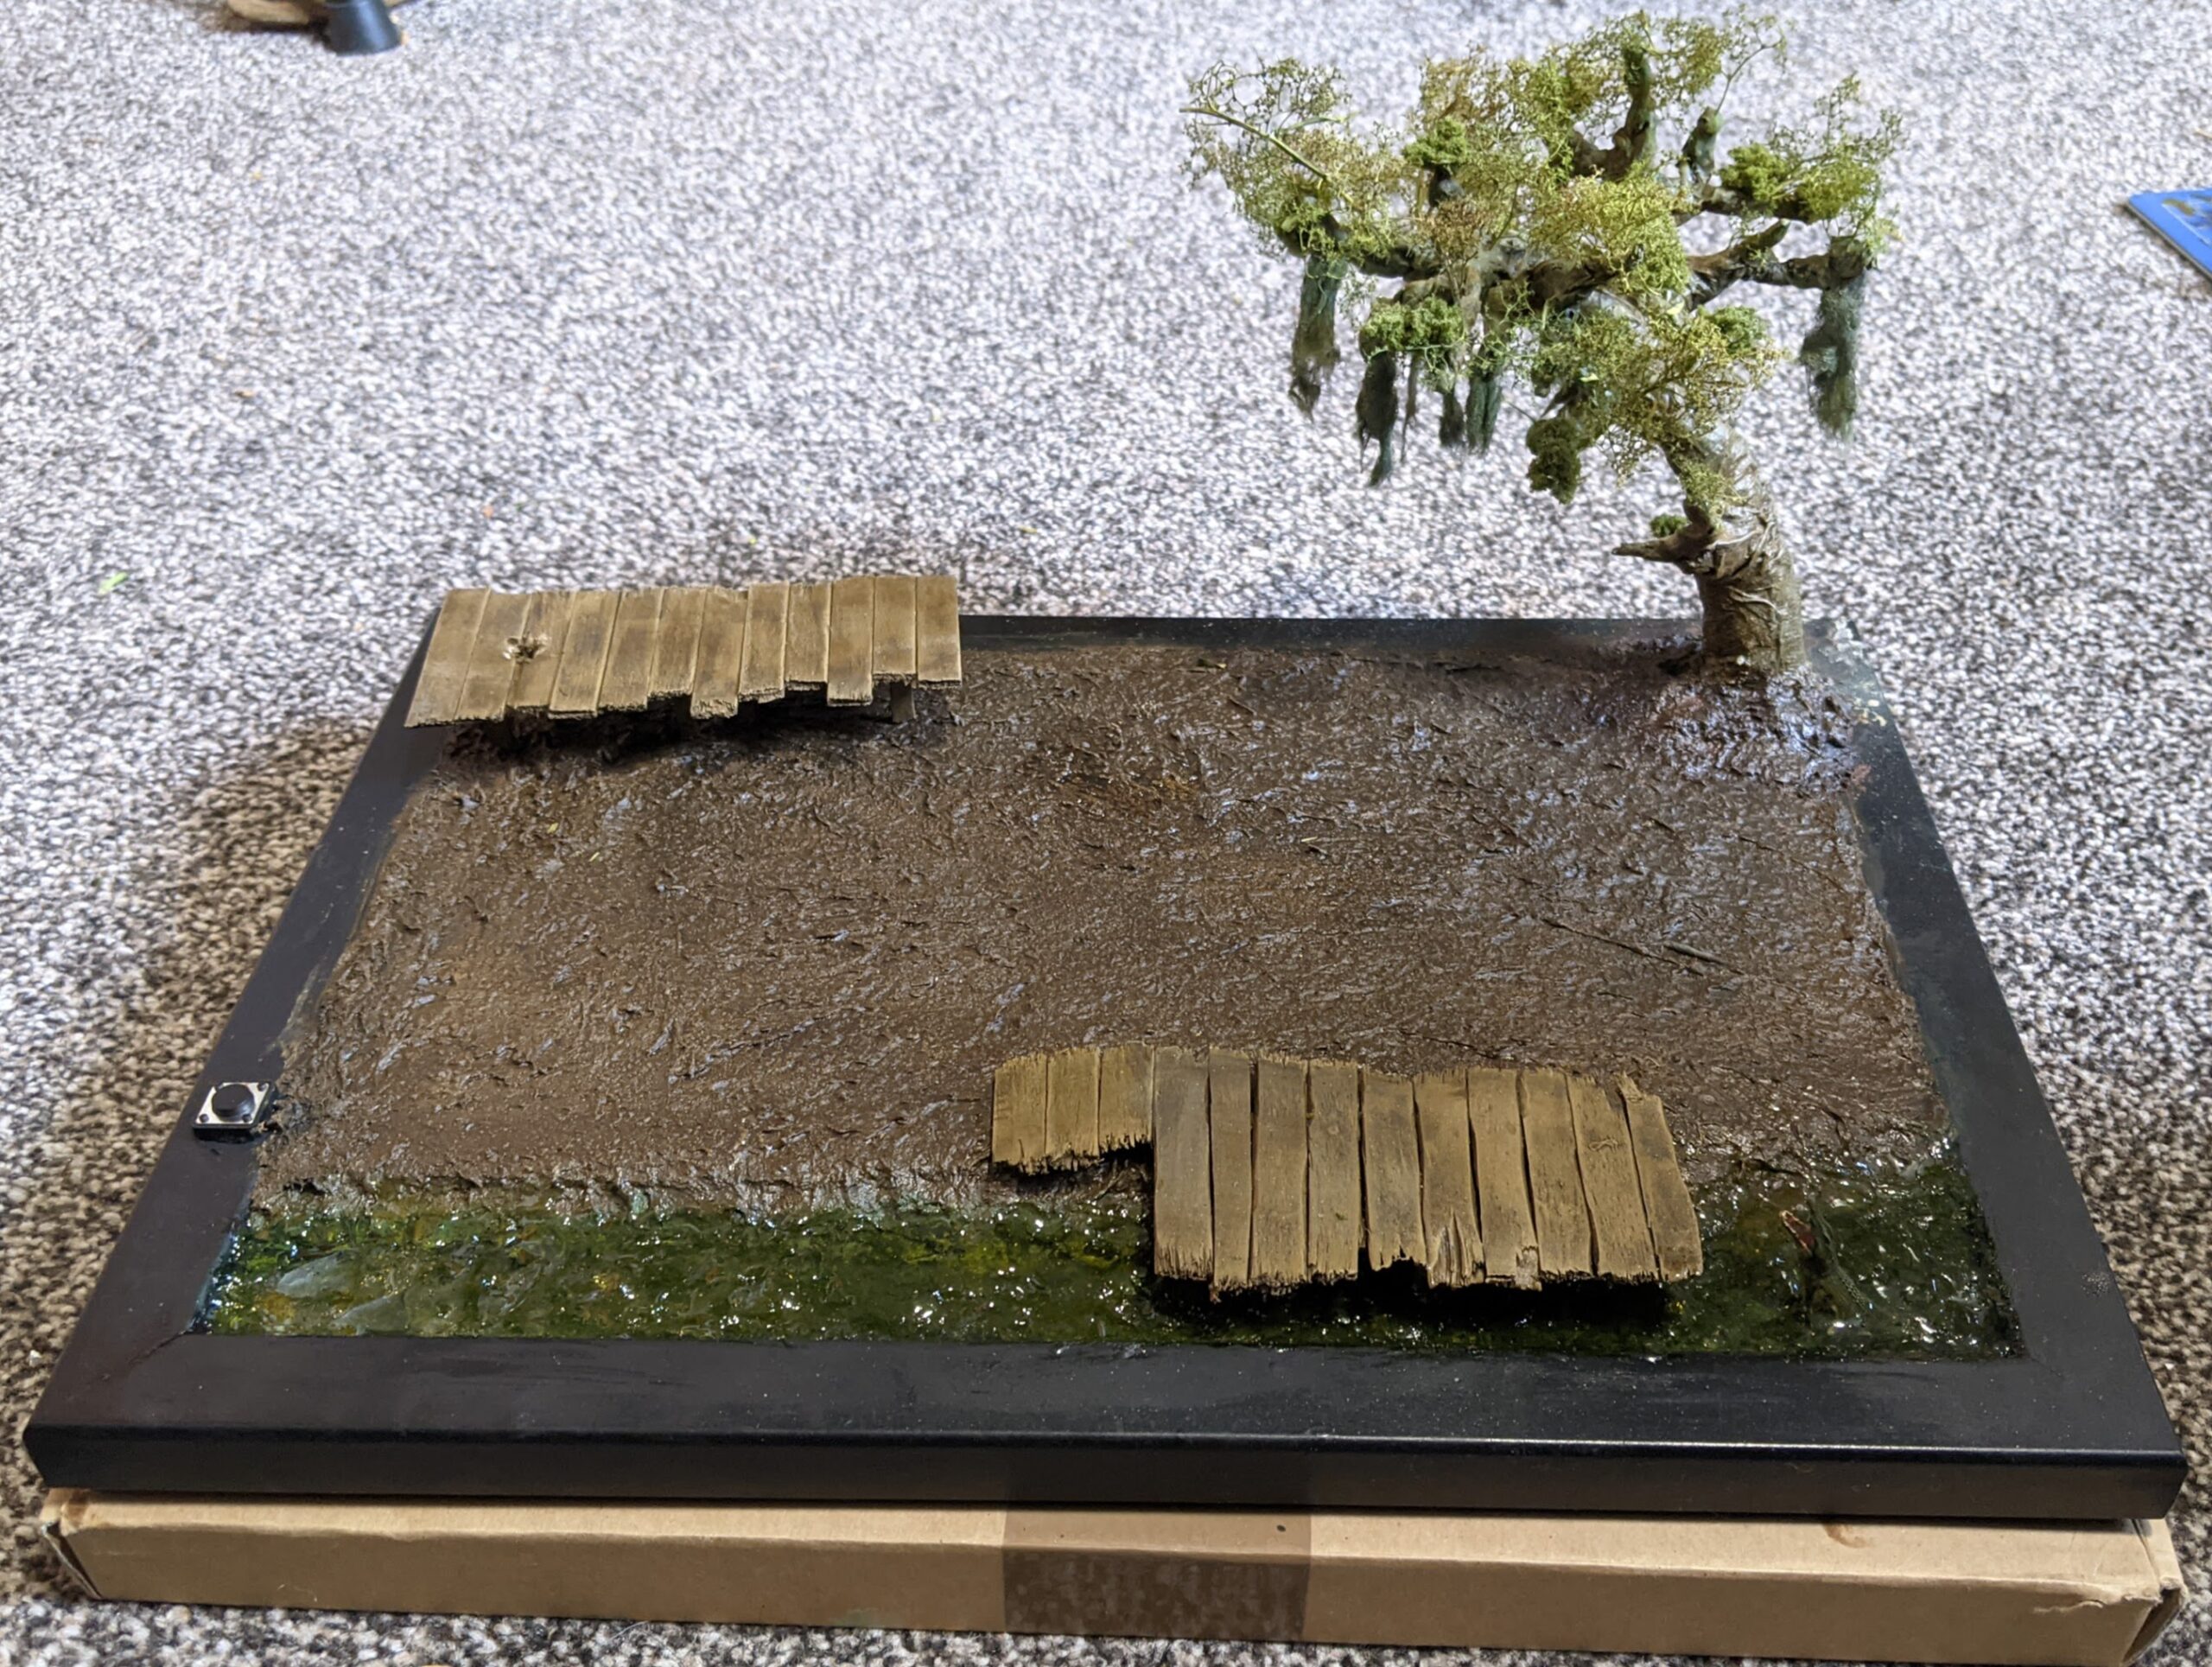
Yep, that’s right – it’s a new display board! Although fairly compact at only 12″ by 8″ – smaller than my previous Middle-earth boards1 – I’ve packed a whole lot of visual features on this one.
My main aim with this display board was to capture the feel of the bayou. That meant mud, green plant life, cattails, a water feature, wooden decking and – of course – a tree with trailing Spanish moss.
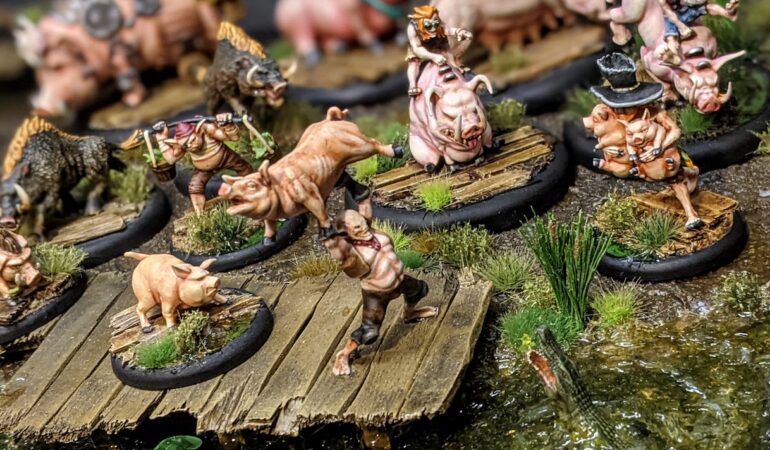
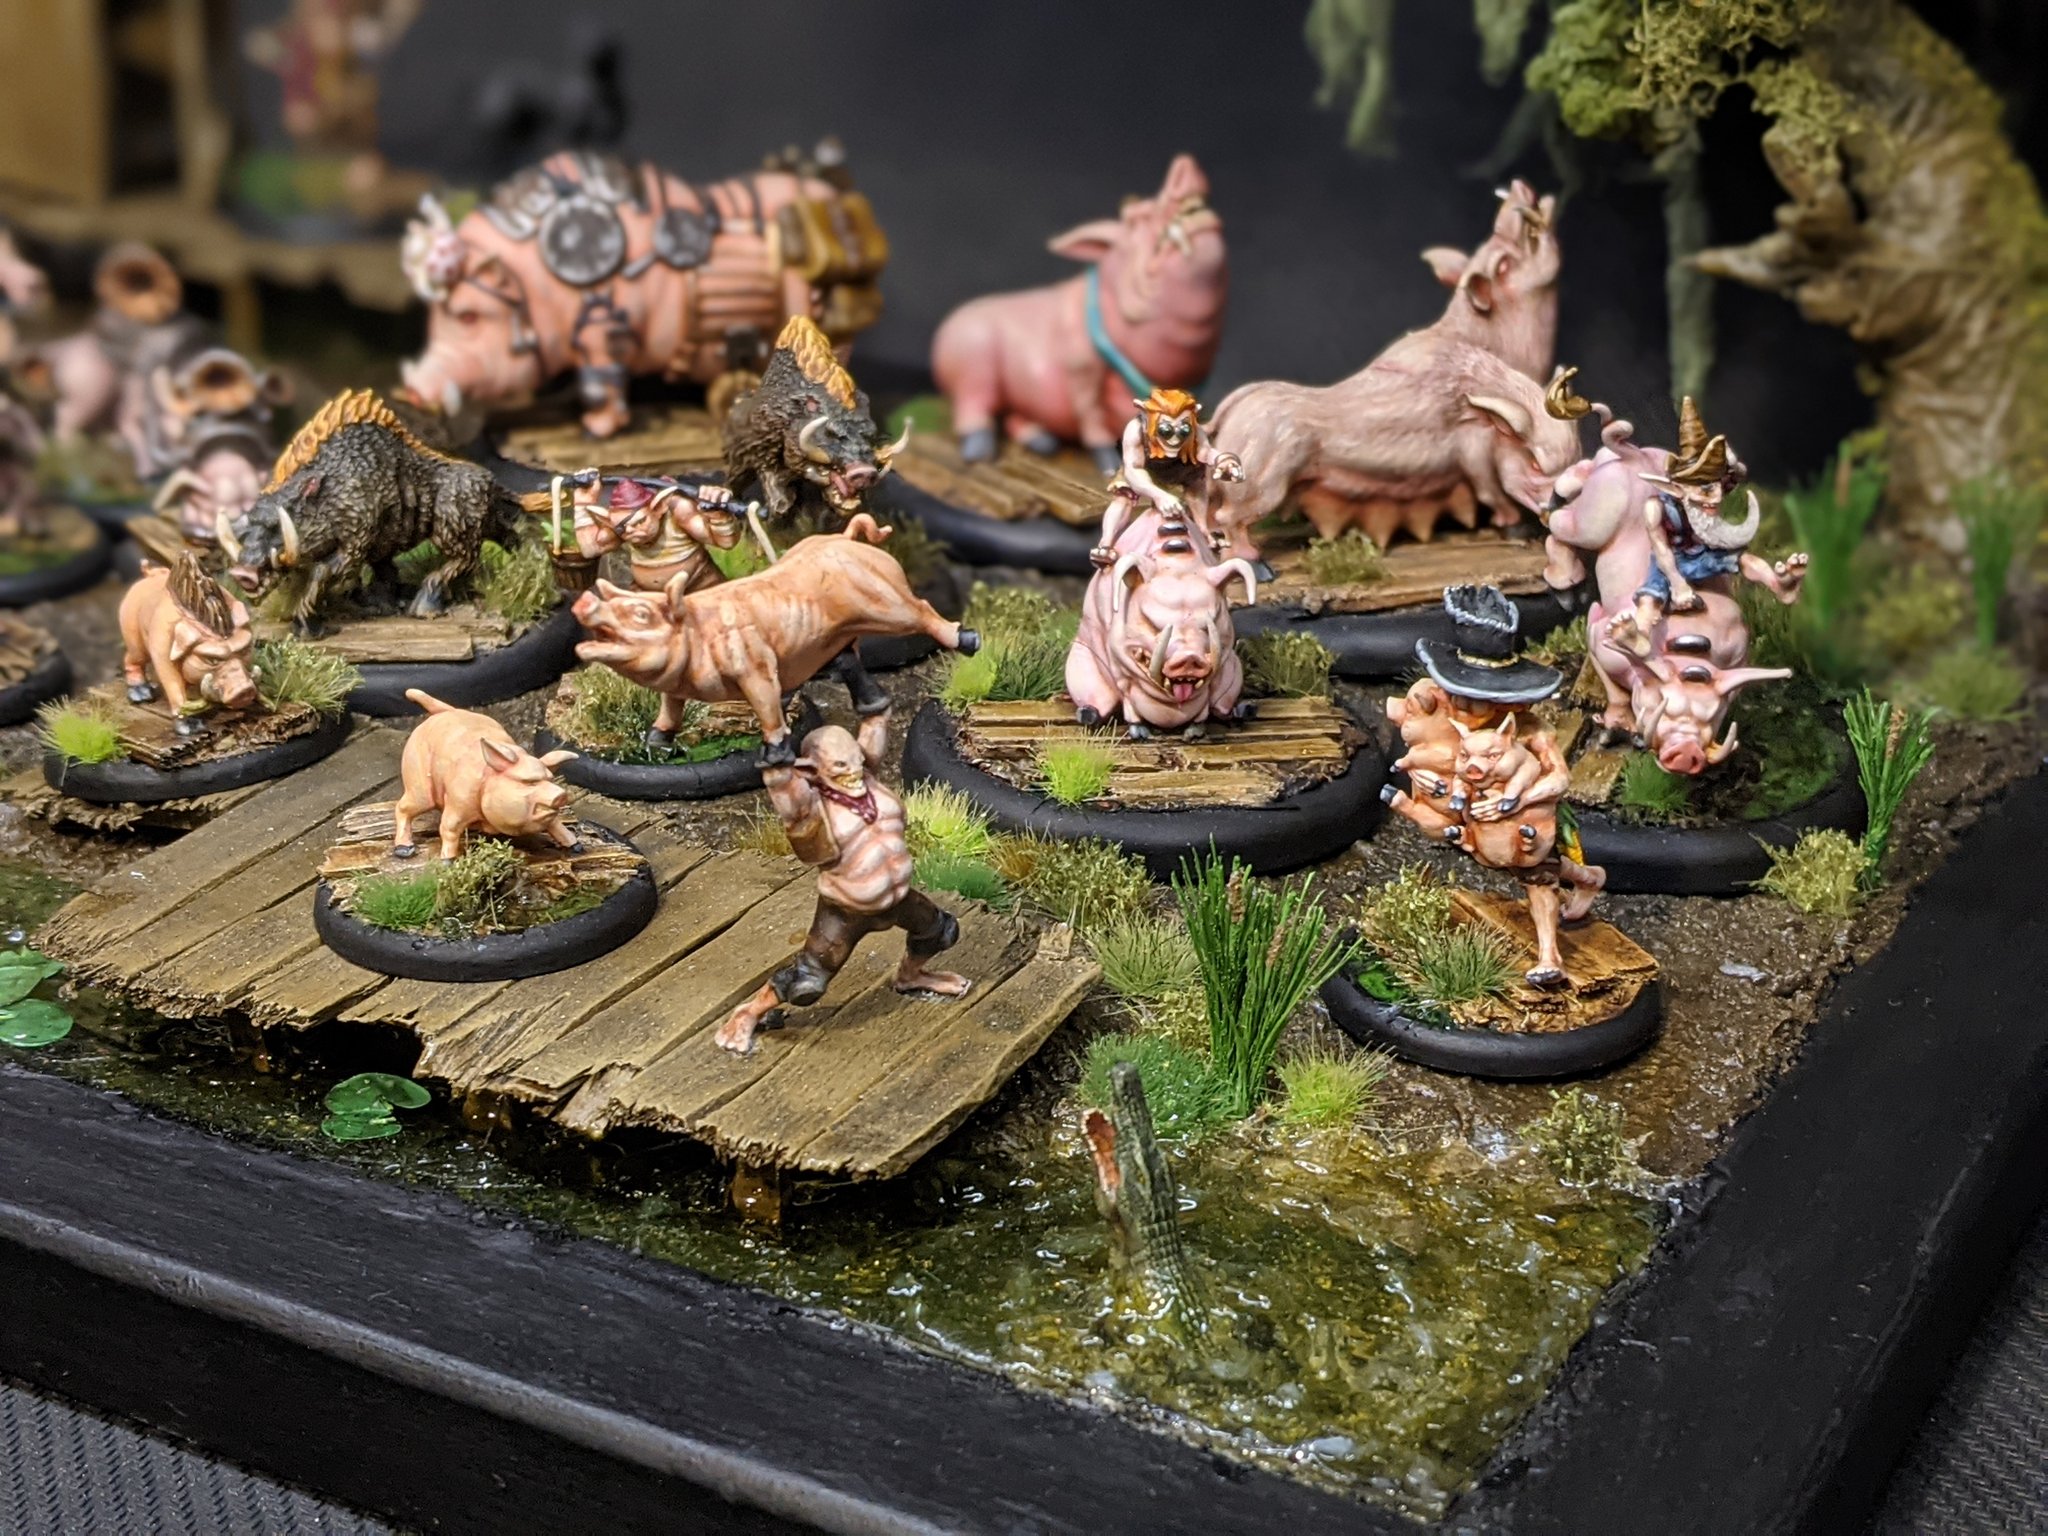
First came the basic land/water layout – I took an 12″x8″ photo frame and filled about 80% of it with a couple of layers of corkboard until the topside was just about flush with the frame. I figured it would be cool to have maybe a snapping gator in the water and – after mentioning this to my friend Callum – he showed up with not only a spare Bayou Gator model, but also a box of 2nd Edition Wrastlers. A passing joke was made that I could use one of the Wrastlers holding a pig aloft on the display board, maybe throwing it to the Gator. I instantly thought that this was brilliant and latched onto the idea. With the right paint job, this Wrastler didn’t require too much work to look like a farm hand – the head was the hardest part. I ordered the cheapest loose Gremlin I could find on eBay, but when that didn’t show up I had to improvise. Thankfully, one of the other Wrastler heads had very little facial decoration, and I was able to shave most of the detail off with an X-Acto Knife to make it look like he wasn’t wearing a mask. It lacked a neck in order to fit perfectly onto the other Wrastlers body, but I disguised this by sculpting on a little neckerchief, which only served to make the model look more like a farm hand.
I didn’t want the Wrastler taking up any of the precious little surface area I had on the board, so I took out my trusty popsicle sticks and went to work scratch building a little dock for him to stand on. This was the same basic process as on my Mordheim bridges – two parallel beams of half width popsicle sticks running along with shaved down popsicle sticks super glued down as rungs. I also made a little half width ramp in this way so it looked like models could walk onto the dock naturally – I thought it might be funny to arrange the piglets walking up there, only to get thrown to appease the snapping gator in the water. Later, when I arranged the miniatures on the board, I noticed that it looked a bit like one of the Swine Cursed was chasing them up there, which tickled me.
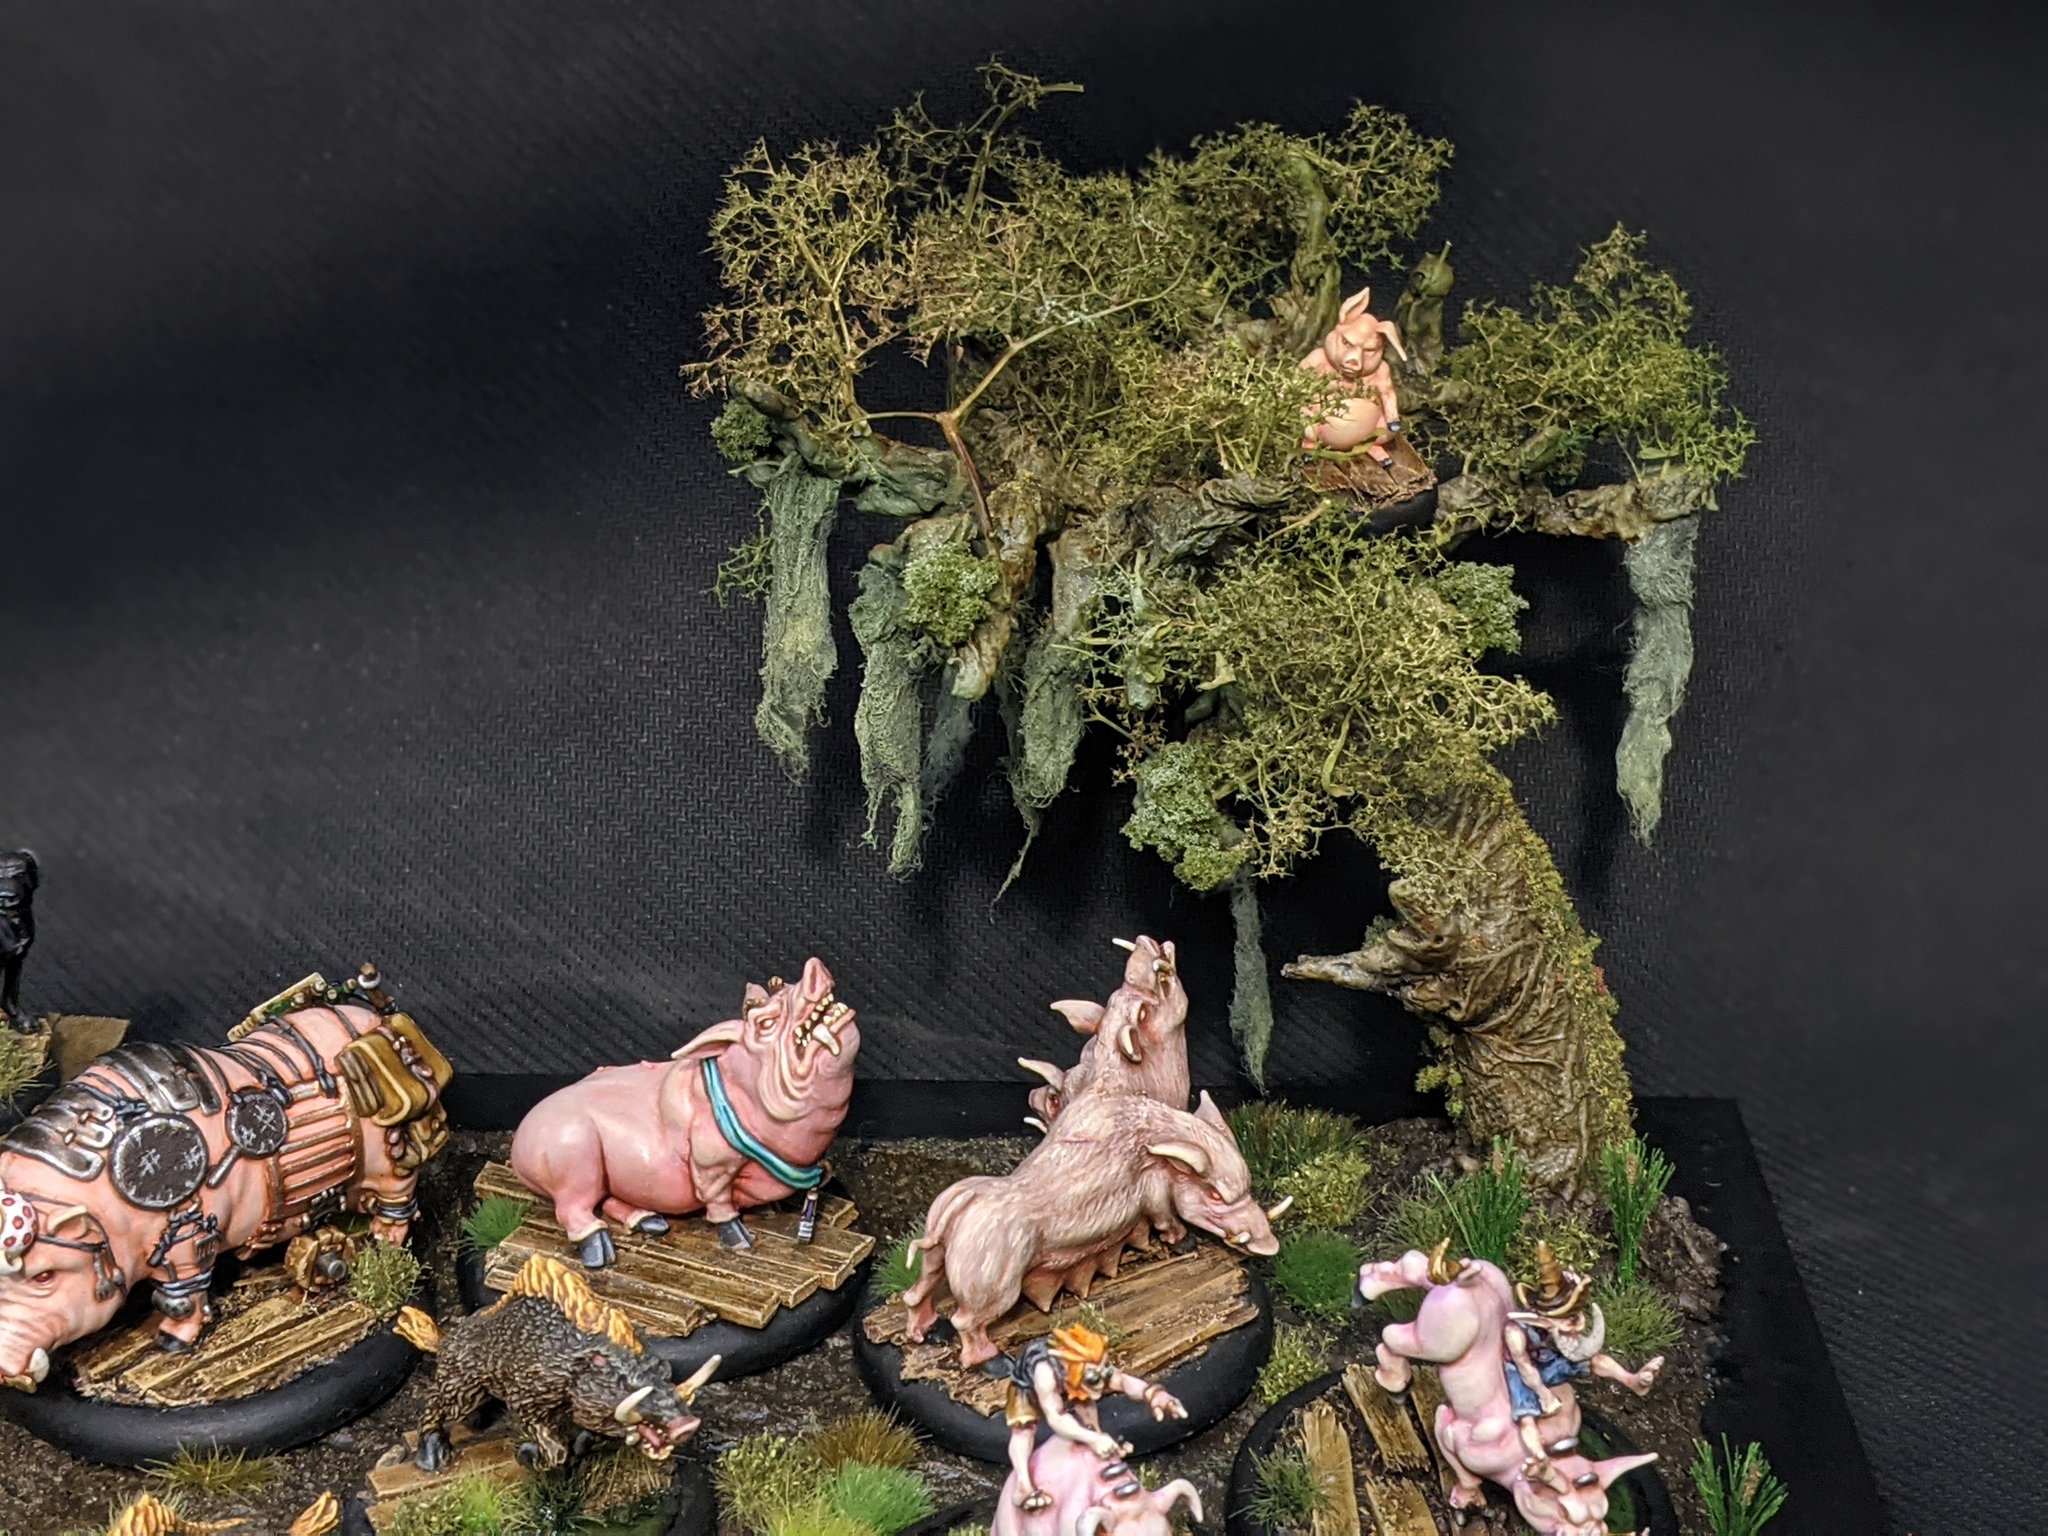
Alright, we’ve got some land, some water and a little bit of decking. So, what else do we need that screams ‘Bayou’? A big gnarly tree with Spanish Moss dangling from it, of course!
I had very specific aims for this tree. Given that I was going to be dangling ‘moss’ from it, it had to overhang on one side enough – but it also had to be tall enough that the dangling moss wouldn’t get in the way or obscure any of the miniatures. I decided that making a wire armature tree from scratch would most likely serve my needs best.
The smart thing to do here would be to order a big bag of cable ties for this job, but I’m not nearly as smart as I am impatient. Without any cable ties lying around, I started assembling the armature from what I did have to hand – paper clips.
A word to the wise here – don’t do this with paper clips. They are nowhere near malleable enough for the job. They’re stiff, brittle and tend to snap when you push them too far. This makes them really difficult to twist together and to get individual pieces branching out in organic shapes instead of straight lines. Like a masochist, I soldiered on until I had a wire armature that seemed of adequate height and density for dangling bits of moss.
Now comes the fun bit – papier-mâché! I grabbed a nice big roll of Plenty2, mixed up some wood glue and water and got to work on dunking and wrapping. This was messy and a little frustrating at points, but good fun. Crude as it was, the papier-mâché was effective at both bulking up the tree armature and introducing a gnarled texture to the whole tree.
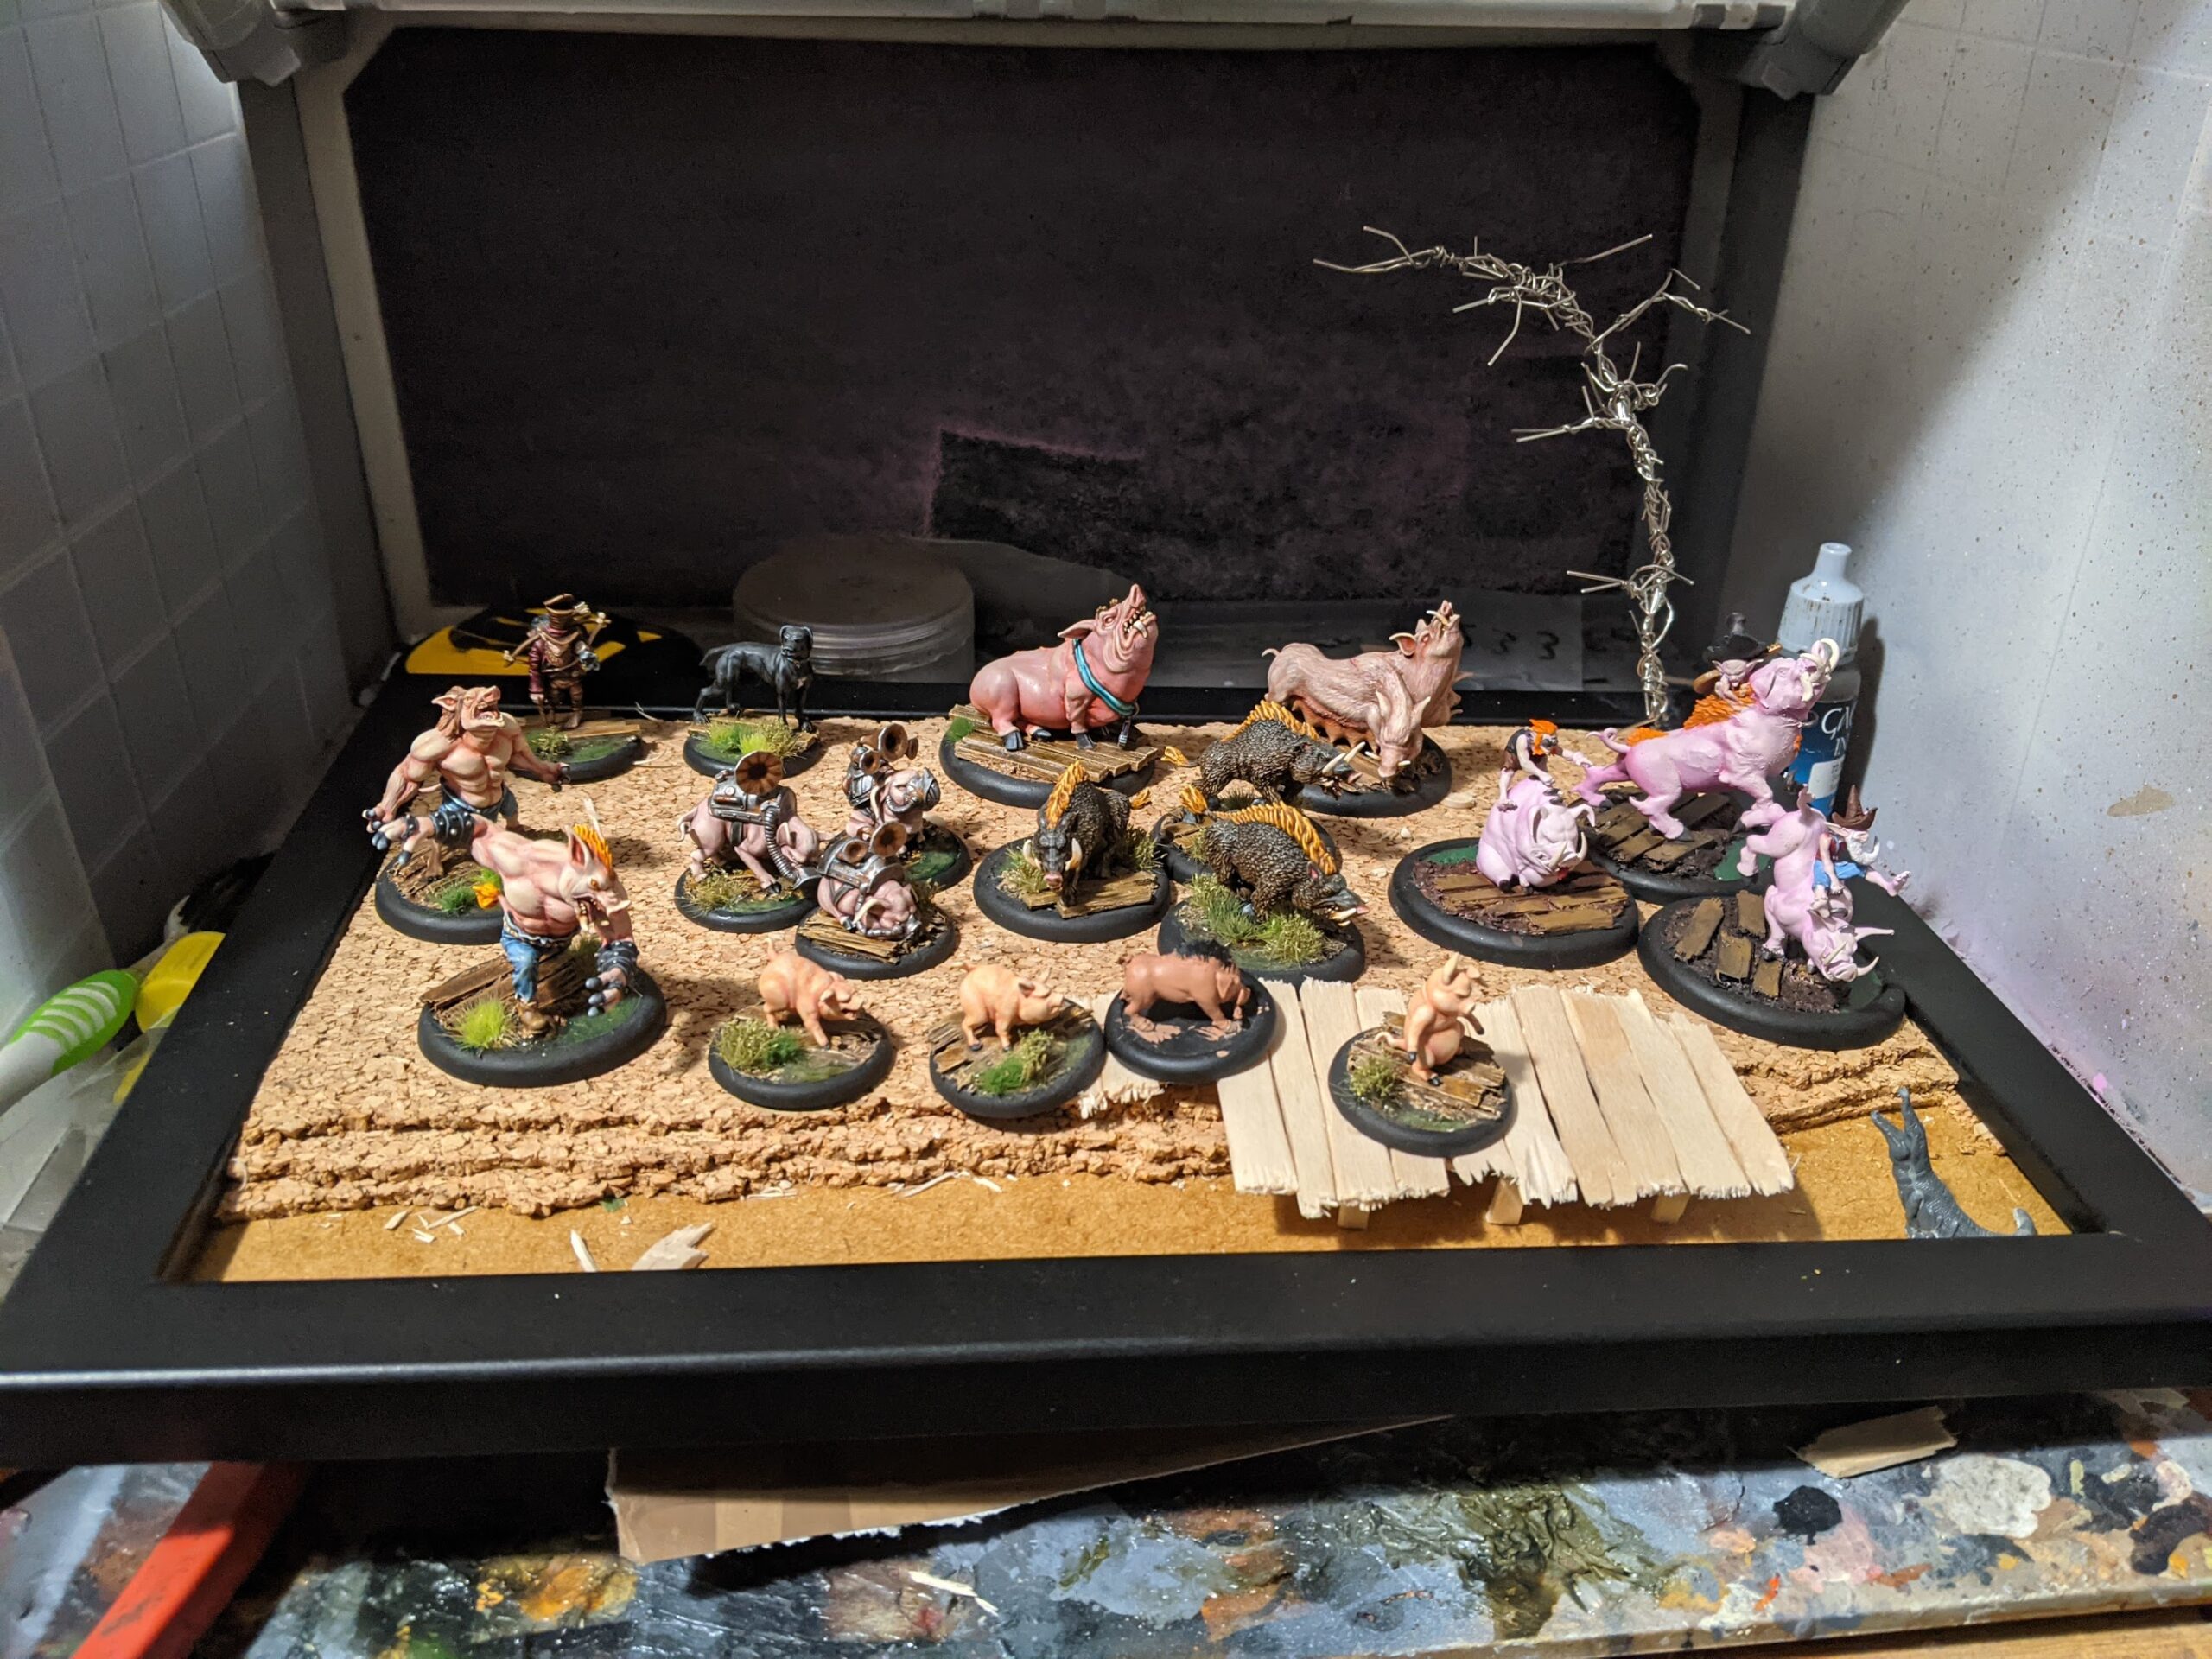
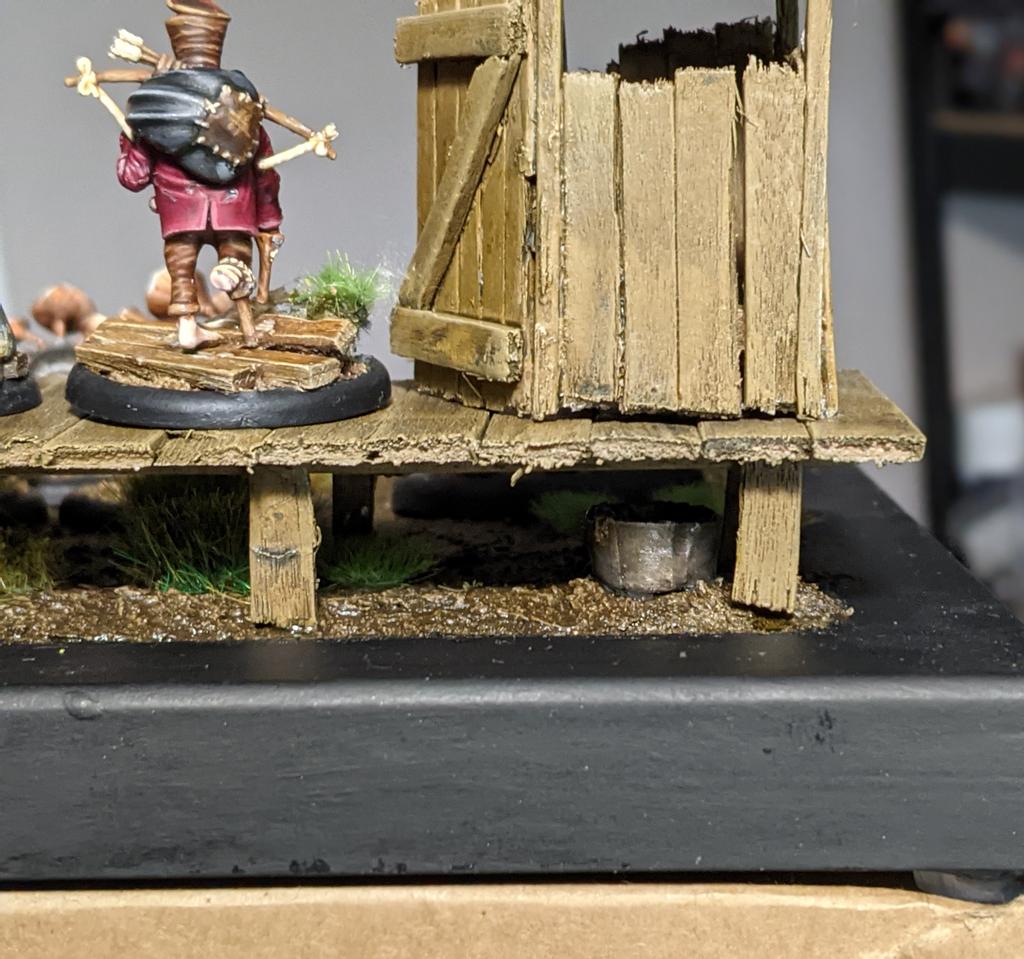
At this point, I arranged my miniatures onto the board and took stock of the situation. The board itself was shaping up nicely, but I couldn’t quite figure out what to do with Ulix and Penelope. The Master and his Totem were, by all rights, the two most important miniatures in the crew – but they’re also among the smallest. I needed something to raise them up behind the sea of pigs. Enter, the outhouse.
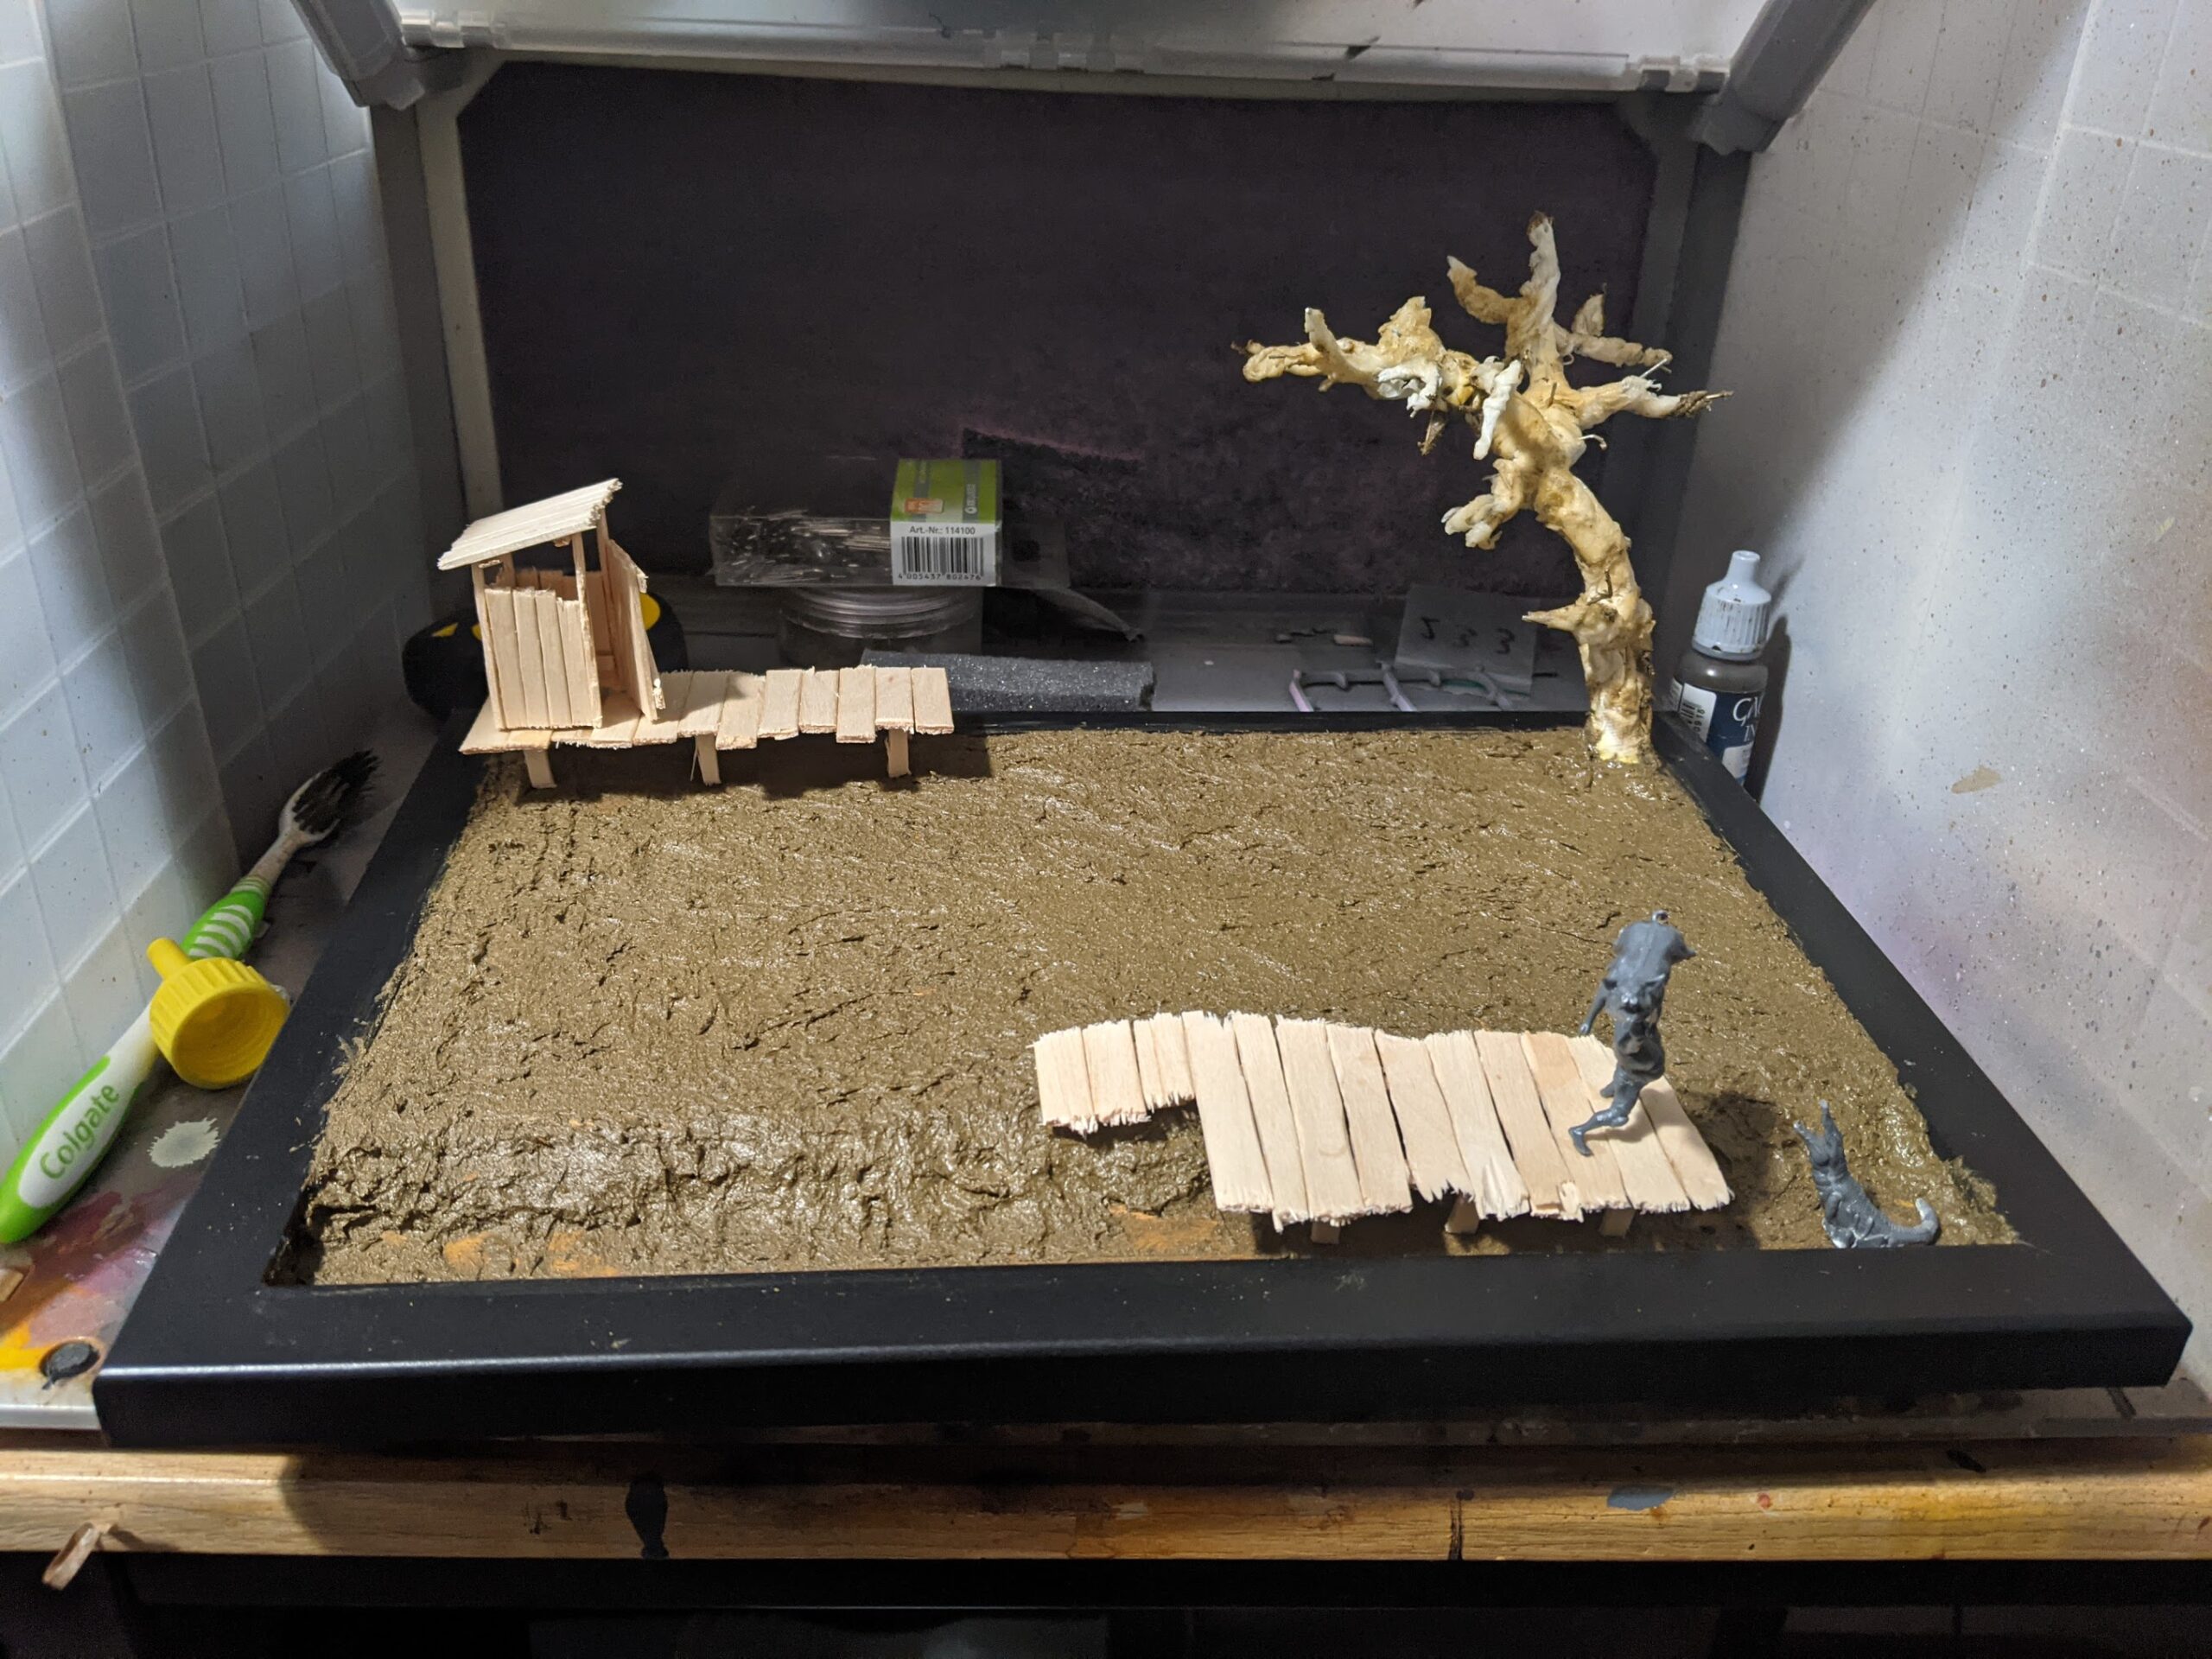
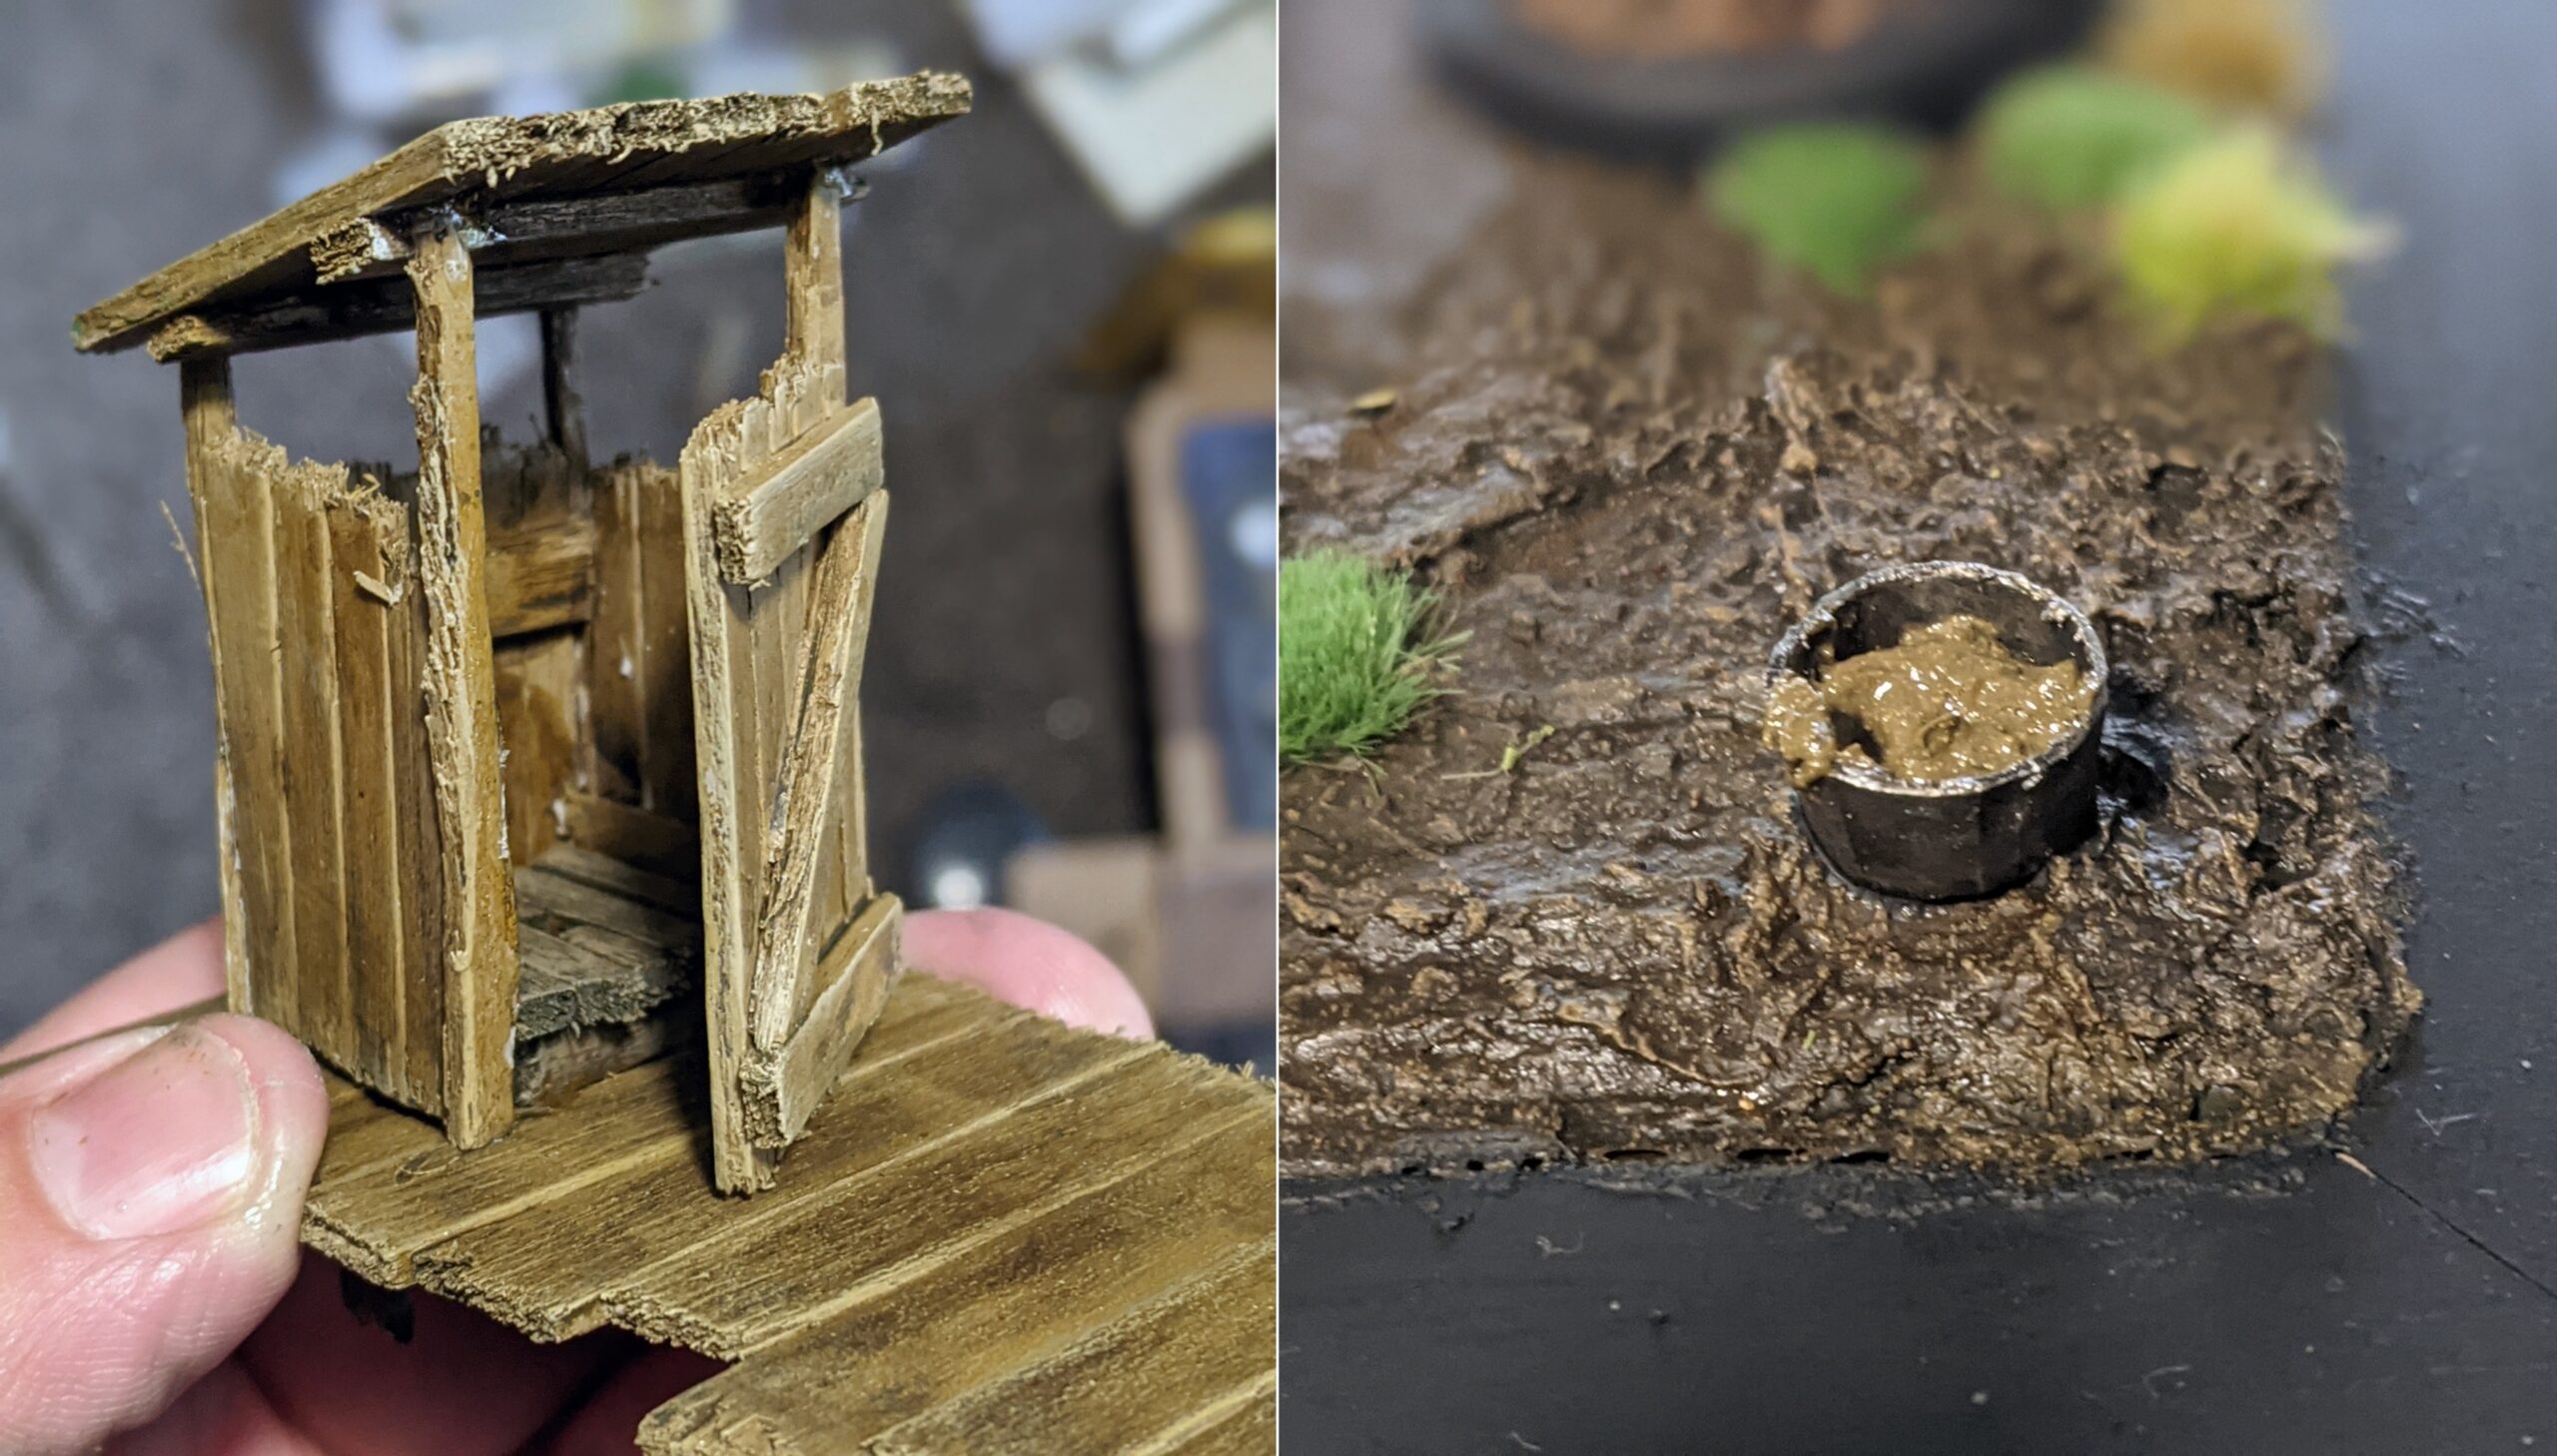
The first step was to construct the outhouse itself. To build this, I took my trusty popsicle sticks and made three walls. These consisted of 4x half-width popsicles secured with a single perpendicular half-width popsicle across the bottom. Next, I made the corner beams out of quarter width popsicles – two at the back, two slightly taller at the front. I glued the three wall sections together with these corner beams, with the joining popsicle running along the bottom for the sides and the top for the back. The roof was constructed similarly to the walls, except with two perpendicular beams placed to fit between the corner posts. Finally, I built a door in a similar fashion to the roof, with a diagonal beam across the middle as a final decorative touch. With the outhouse built, I knew exactly how long the decking would have to be to fit it along with Ulix and Penelope, and constructed it exactly as I did the dock before (with slightly longer legs).
I often find with miniatures, terrain and dioramas that the most enjoyable parts are the little details you don’t notice at first. It’s why I’m such a big fan of painting vehicle interiors – so why not an outhouse interior? You could see in through the top of the outhouse after all.
Once again using half-width popsicle sticks, I made an outhouse toilet seat by cutting 5 sticks long enough to fit snugly inside of the outhouse interior and then built a little square riser to sit underneath with a little overhang. The centre stick I cut in thirds and discarded the centre piece to create the little toilet hole. I glued my toilet seat into the outhouse by attaching it to the little supports at the bottom of either side of the wall and trimmed the protruding riser so that the outhouse would sit neat and flush on the decking again. I was so pleased with how this turned out that I decided to rip off the door and reattach it slightly ajar, just to make it a little more visible at a distance. Before gluing it down, I took out my hand drill and drilled through the top of the decking in the centre of where the outhouse would sit, because apparently I’m a stickler for functional details when it comes to 28mm scale lavatories.
But of course, I wasn’t done there, oh no. After I’d textured the display with Vallejo Mud Texture but before I glued down my little outhouse decking, I made myself a little chamber pot to sit underneath the outhouse long drop – complete with a little mud texture of its own (in a slightly different coloration).
So, we’ve got ourselves a river with a gator, a dock with a Gremlin tossing a pig to said gator, a big gnarly tree and a little decking with an outhouse to bring some prominence to Ulix and Penelope. If you’re thinking that’s more than enough visual features for a display board, then I’d be inclined to agree…
… but what about audio?
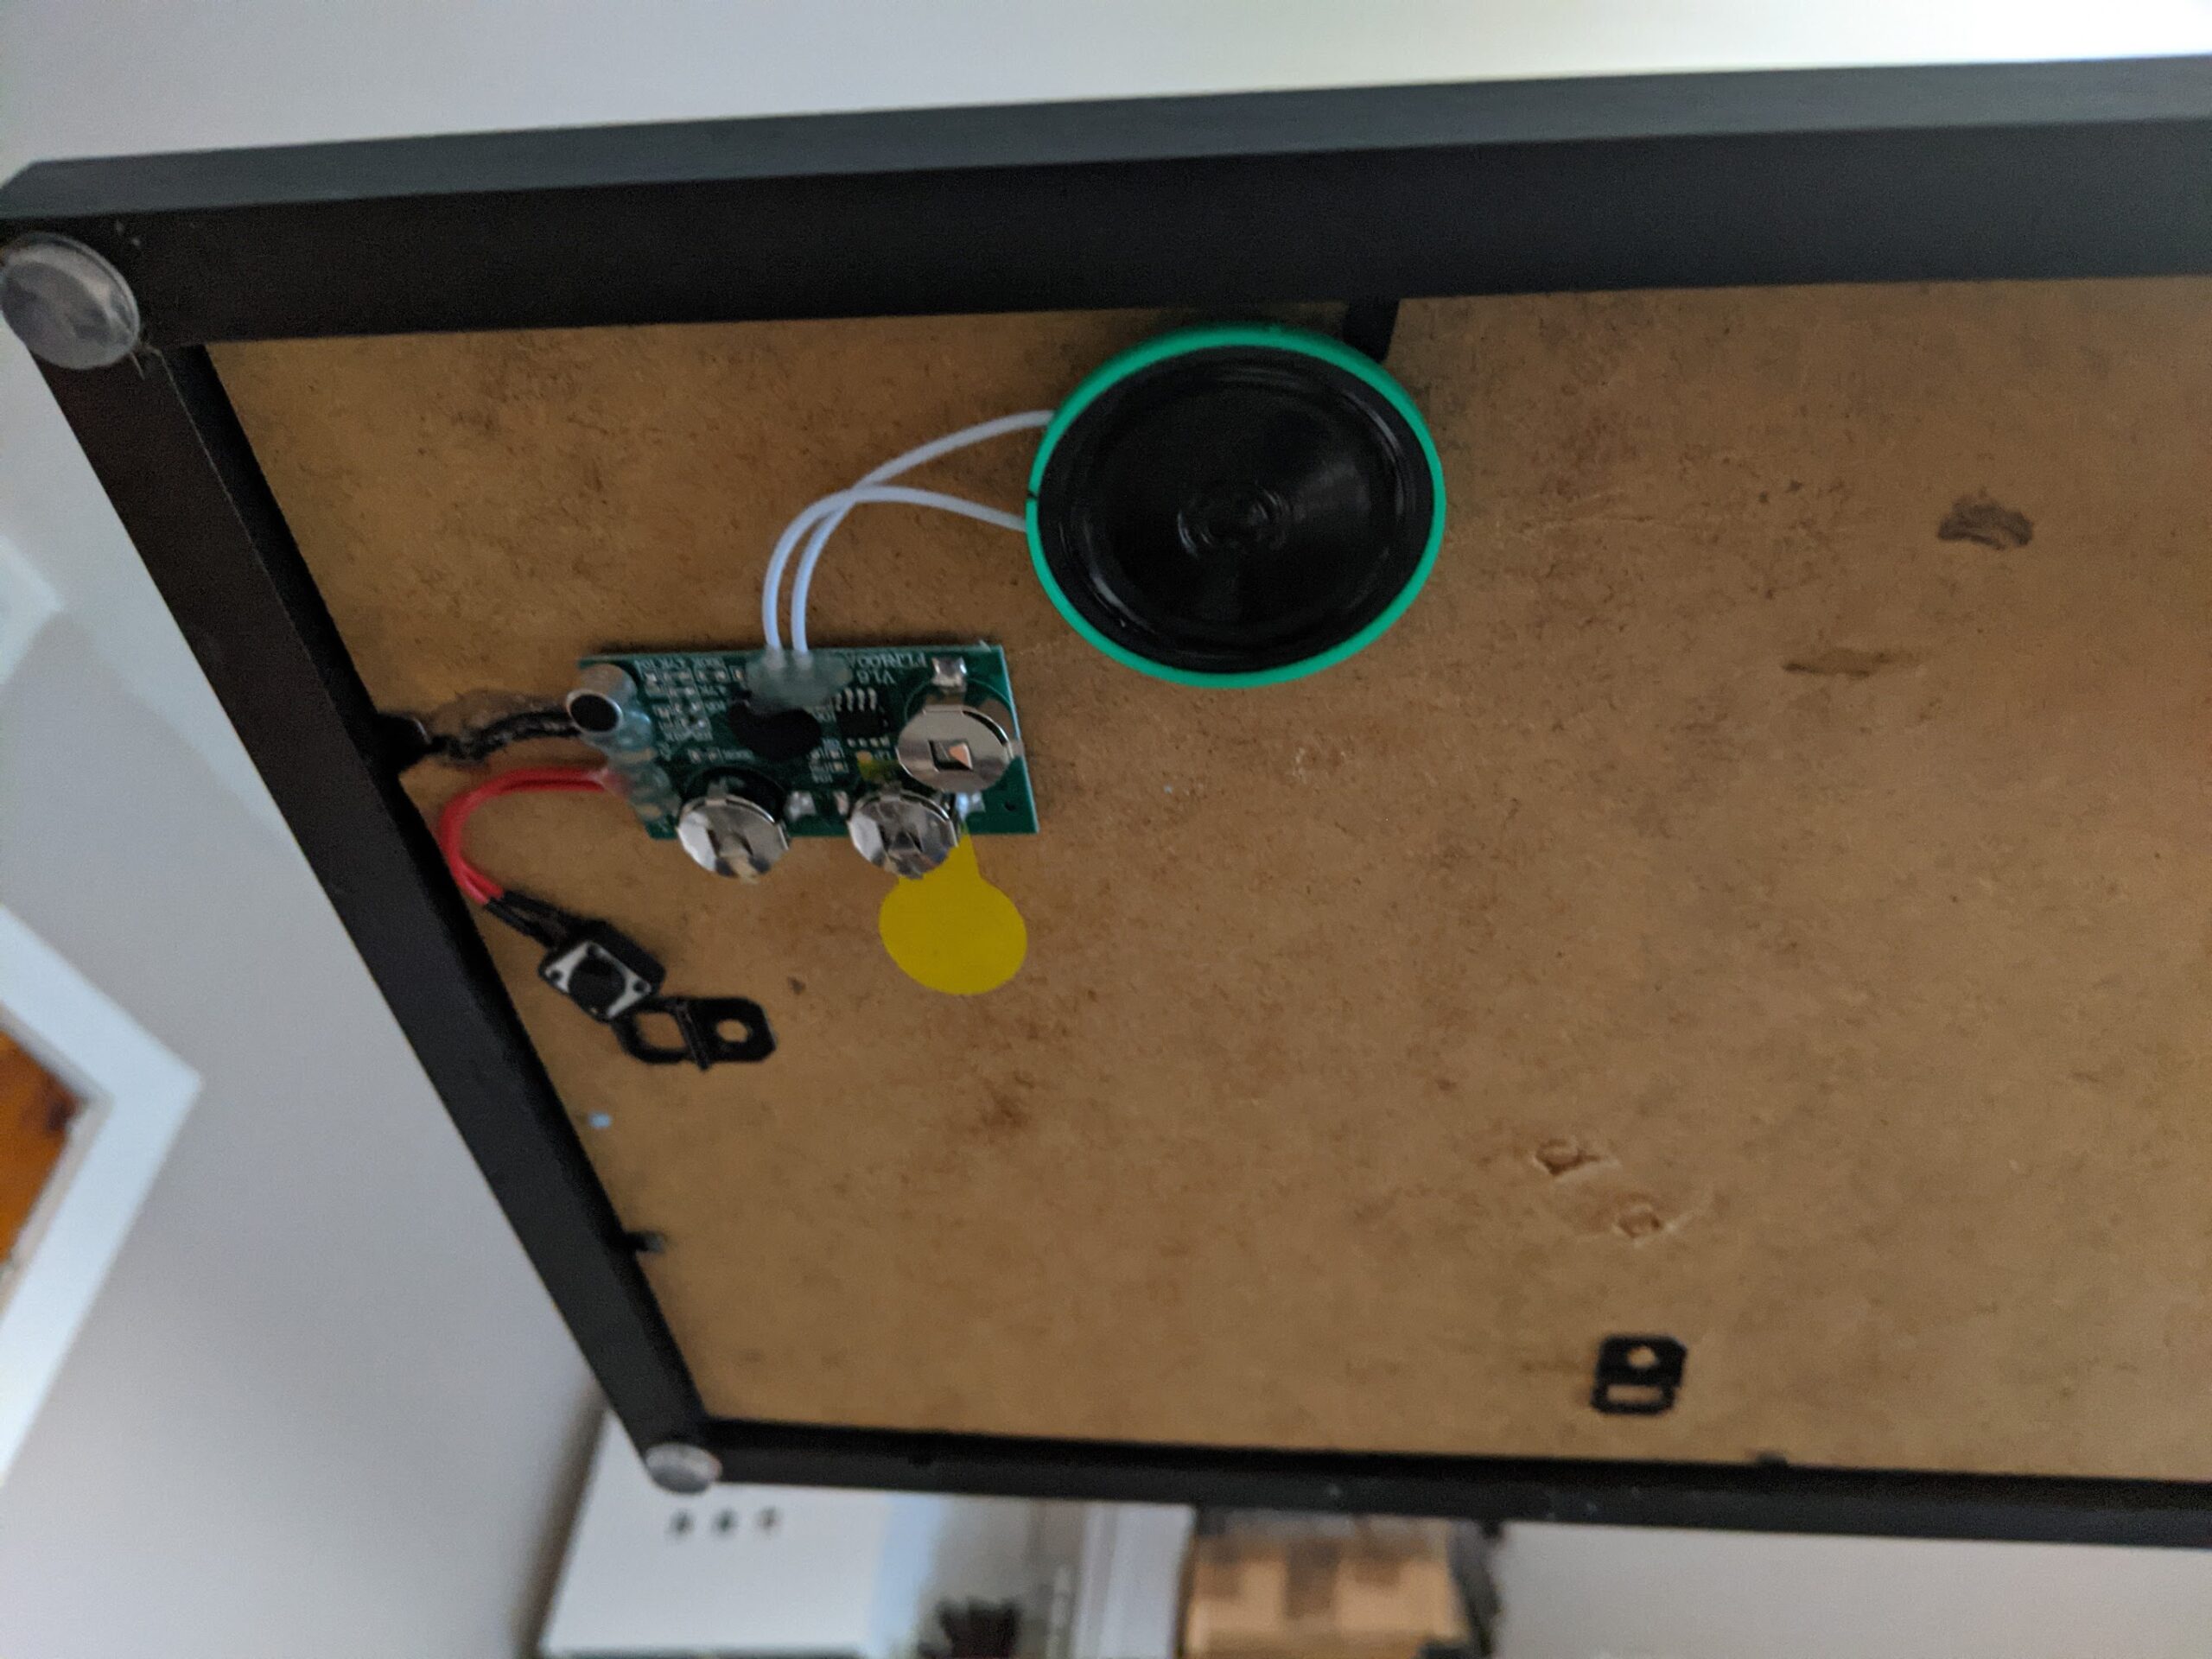
I can’t defend it – this one is entirely a gimmick, but it’s a fun gimmick none the less. I thought it would be cool to add a little electronic audio component, so I hopped over to Amazon and bought this neat little chip intended for use in Greeting Cards. The concept is simple – a little (fairly poor quality) speaker attached to a simple circuit board with a microphone, a button to record and a button to play back. It was easy enough to install – I prized apart my board, cut a little groove for a wire and slipped my ‘play’ button through to the topside and attached the rest underneath the board with blu-tack. The button was super glued in place, and I covered up the exposed wiring with some Vallejo Mud texture. Finally, I stuck some rubber feet on the underside of my board to give the chip a bit of space and allow the audio to escape so it wouldn’t be too muffled. For the audio itself, I super imposed some sounds of pigs grunting over a little banjo music to get to capture that true, authentic sound of the Malifaux Bayou.
It’s such a dumb little addition, but it made me really happy. If you’d like to hear it, check the end of this post for a full video with audio.
With everything built and in place, it was time to get some paint on the board – and in stark contrast to miniature painting, this was probably the quickest and least painful step of the whole process. The wood sections were primed in Krylon Camoflague Khaki, doused in Vallejo Sepia Ink and drybrushed again with Vallejo Khaki. The mud was drybrushed with Leather Brown, Khaki and Elfic Flesh before getting heavily washed with Seraphim Sepia. The tree was base coated with a mix of Seraphim Sepia and Stonewall Grey, drybrushed with Elfic Flesh and washed with a slightly watered down Agrax Earthshade. Somewhere along the way while painting the tree I realised that it wasn’t attached as firmly to the display board as I’d liked, so I attempted to remedy it by super gluing a whole bunch of rubble and debris around it’s roots, and painting over it with mud texture paint. The Gremlin farm hand was painted on a base separate from the display board, pretty much the same way as any of the other Hog Whisperers in Makin’ Bacon Part 3.
For the Bayou water, I kind of just threw down a whole bunch of greens. Vallejo Sick Green, Goblin Green and Mutation Green were painted, drybrushed and washed with Seraphim Sepia and Athonian Camoshade in no particular order to obtain a nice swampy green. I painted the Gator at this stage using the same colours for the back, a bit of Filthy Brown and Elfic Flesh on his underside, some Heavy Red and Rosy Flesh for the mouth and Elfic Flesh and Seraphim Sepia for the teeth.
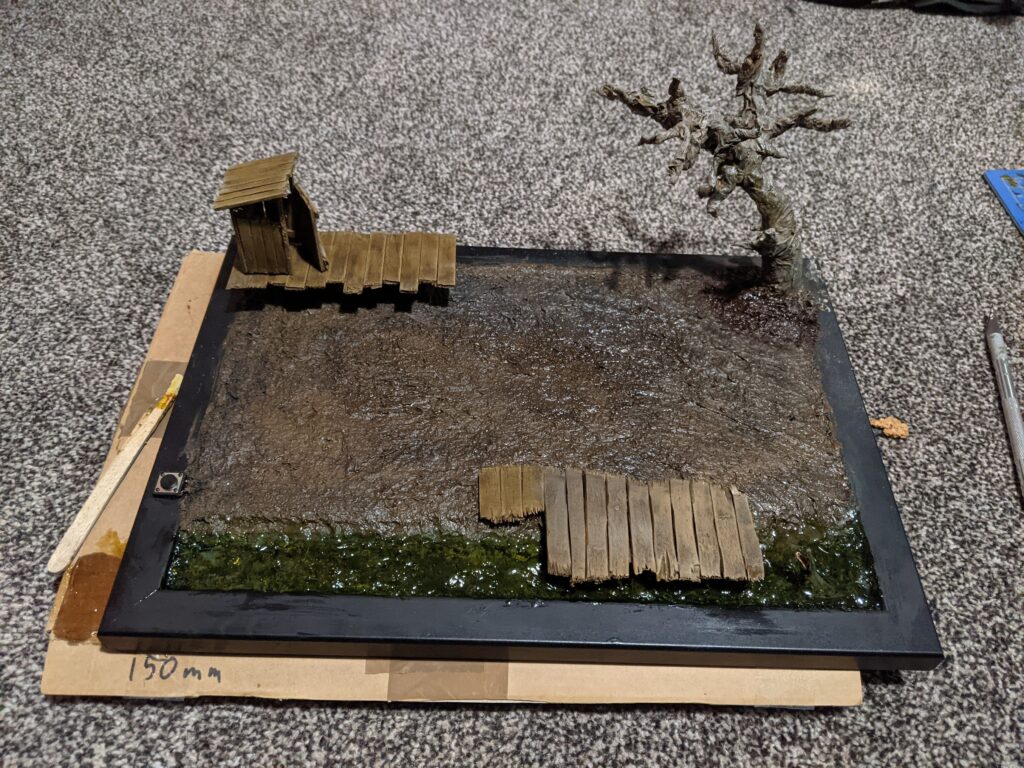
The board was starting to come together at this point, so I glued down my decking and I started to get some of the UV resin into the water feature. Here’s a hot tip that might save you the hours of headaches that it brought me – do not under any circumstances try and mix Citadel washes into UV resin. It does not mix well and only seems to prevent the resin from properly curing. The first layer of resin never properly cured and – after getting sealed over by further layers – ended up leaking out the bottom of my board for weeks until I eventually sealed around the entire inside edges with milliput. Maybe one day I’ll manage a resin pour without a whole load of issues, but it is not this day.
Now time for my favourite bit of any project – gluing a whole bunch of crazy stuff down. I started filling out the tree with a box of WWS Sea Foam Trees that I’ve had in a box since forever. I carefully cut away the sturdiest pieces and glued these onto the branches along with assorted pieces of Woodland Scenics clump foliage. I then took out my airbrush and very lightly sprayed a few coats of Vallejo Air Light Green Chrom over the sea foam and clump foliage, giving everything a more unified tone that looked a bit more alive and, er, swampy. For the hanging moss, I stretched out some cotton balls into long, whispy tendrils before airbrushing them a mixture of Sick Green and Dark Grey – giving them a slightly less saturated, less alive tone than the foliage. Finally, I made a mixture of various greenish flocks and glued this up and around the sides of the tree with PVA glue for moss.
Alright, we’re nearly there now, so how about a spanner in the works?
I mentioned earlier that I had a bit of trouble with the UV resin curing. Every time I tried to correct it, things just seemed to get worse. Air bubbles started to appear, the water would leak and areas collapsed in on themselves. Some of this was due to the dock obscuring the UV light in some areas (making it harder to cure), but most of this was down to my inadvisable use of Athonian Camoshade to tint the resin a little bit causing issues with it curing. I tried putting more layers of UV resin down until the water level had raised as high as the edge of the display board. After a while, the corners started to lift up from the resin warping, and it took prising them all the way up to get under them and supergluing them back down to keep them (just about) in place.
All of this had soured the finish of the water, so once again I turned to our old friend Vallejo Water Texture – I thinly applied little rings of texture emanating from around the gator, spacing them out a little more sparsely toward the left side of the bank until becoming more natural, gentle ripples. This surface texture helped to conceal some of the issues, and the now no longer flush corners looked a little less jarring. I also ordered some model railway Lilly Pads from a company called JTT Scenery Products – with a little Athonian Camoshade shading they fit right in. I placed these strategically along the water to help conceal some of the air bubbles and other mishaps.
The final touch was to glue a whole bunch of tufts down to up the ‘green’ factor of the board. For this, I mostly used Army Painter Swamp, Jungle and Woodland tufts, but I did repurpose a few random tufts here and there that I had left over from my Barrels out of Bond diorama. Of course, nothing says ‘Bayou’ like cattails, so once again I turned to our pals at JTT Scenery Products – seemingly the only scenics company making decent looking HO scale cattails that work out of the box – for the final touch.
Alright, we’ve got ourselves a display board! How about some close up shots of the finished thing?

And of course – as promised – a video of the sound effects in action!
And so we finally arrive at the end – for now – of my Makin’ Bacon series. Despite the various complications and frustrations along the way, I have to say that it was a lot of fun working on this project over the past couple of months. It’s been nice to get away from Warhammer 40,000 for a while3, and scratch build projects like these feel so creative and rewarding to work on. The final product has its fair share of imperfections, but I’m really happy with what I achieved on this Bayou Display Board, from the little details like the hanging moss and the chamber pot to the gimmicky but fun sound effects. This whole Malifaux project has been such a departure, and I’ve enjoyed just about every minute of it.
And even though that Malfaux tournament didn’t even bother having Best Painted competition in the end4, I’m going to enjoy looking at this piece in my display cabinets for a long time, that’s for sure.
As always, thanks for reading and happy wargaming!
1 I chose a slightly smaller frame than I’d used for my Middle-earth projects this time because I wanted it to be able to fit a little more neatly in my cabinets. I figured, hey, it’s a skirmish project – I won’t need as much space.. right?
2 Toilet roll would’ve been preferable here – I found the kitchen roll a bit thick and dense, which made it less malleable and difficult to work with.
3 I don’t know if you’ve noticed, but seven of the last 12 posts have been about my Adepta Sororitas (or Inquisition) – and still there’s more to come!
4 [SALTINESS INTENSIFIES]