
It’s been a while since we’ve heard from the 631st Grand Battalion – in fact, the last appearance of my Iron Warriors on this blog was over two years ago now. I said at the time that I was done expanding this project for a while – and I meant it – but some rumblings in both my local community as well as some rather exciting leaks appearing online have motivated me to paint some reinforcements.
It’s been a fairly intensive few months of painting, with several high effort projects in a row (such as Sisters of Battle, Smaug and my Malifaux crew). Lately, I’ve been feeling like what I really need is some instant gratification. Something simple. Instantly rewarding. Maybe a new unit or two for an older project in need of some TLC. The first1 project to come to mind was my Iron Warriors.
Ever since taking the last Family Photo for my IVth Legion, one gap in the collection has been painfully clear to me – I need a Sicaran Battle Tank. While there’s a reasonable presence here of Rhinos, the Chimera chassis Medusa tanks and even a Spartan chassis Typhon – there’s not even a token showing from arguably the most iconic battle tank of the Heresy era.
With the Sicaran, I had a few options regarding armament – there was the Arcus, the Punisher, the Venator, the Omega or the classic Battle Tank. In the end, I opted for a classic Sicaran Battle Tank with the twin Accelerator Autocannons, and I chose this for a couple of reasons. The first is that the Battle Tank is probably the most well known patterns of Sicaran, and to date I still don’t actually own one. My Space Wolves have a Venator and an Arcus, but no Battle Tank. This seemed as good a time as any to get that tank represented. Another (related) reason for going with the Battle Tank was that – should the situation call for it – I could always use the Arcus turret from my Space Wolves on my Iron Warriors chassis (and vice versa), as I’d painted the gun on my Arcus primarily in black. Two birds, one stone.
My final – and probably most important – reason for going with the Sicaran Battle Tank is that it’s generally considered to be a reliable, good quality heavy support choice. It puts out a good amount of firepower, but it doesn’t just delete units in the way that a Medusa or a Vindicator does. It’s a helpful substitute if you’re looking for a way to ‘tone down’ an army list without making it straight-up bad. Ever since my first attempt at an Iron Warriors army, I’ve been making a conscious effort to make it a bit less of an artillery gunline. My first attempts at army lists for Iron Warriors contained Medusa squadrons, a trio of Phosphex Mortars and a Typhon Siege Tank – at the time, it seemed like the way to go to make an army that played completely differently to my Space Wolves – but it wasn’t much fun to play with or against. I’d known myself how much I hated playing against an army like this, and I didn’t much fancy being the guy on the other end of it. I wanted more options to field were less oppressive or swingy without being toothless – and the Sicaran Battle Tank is the perfect embodiment of this.
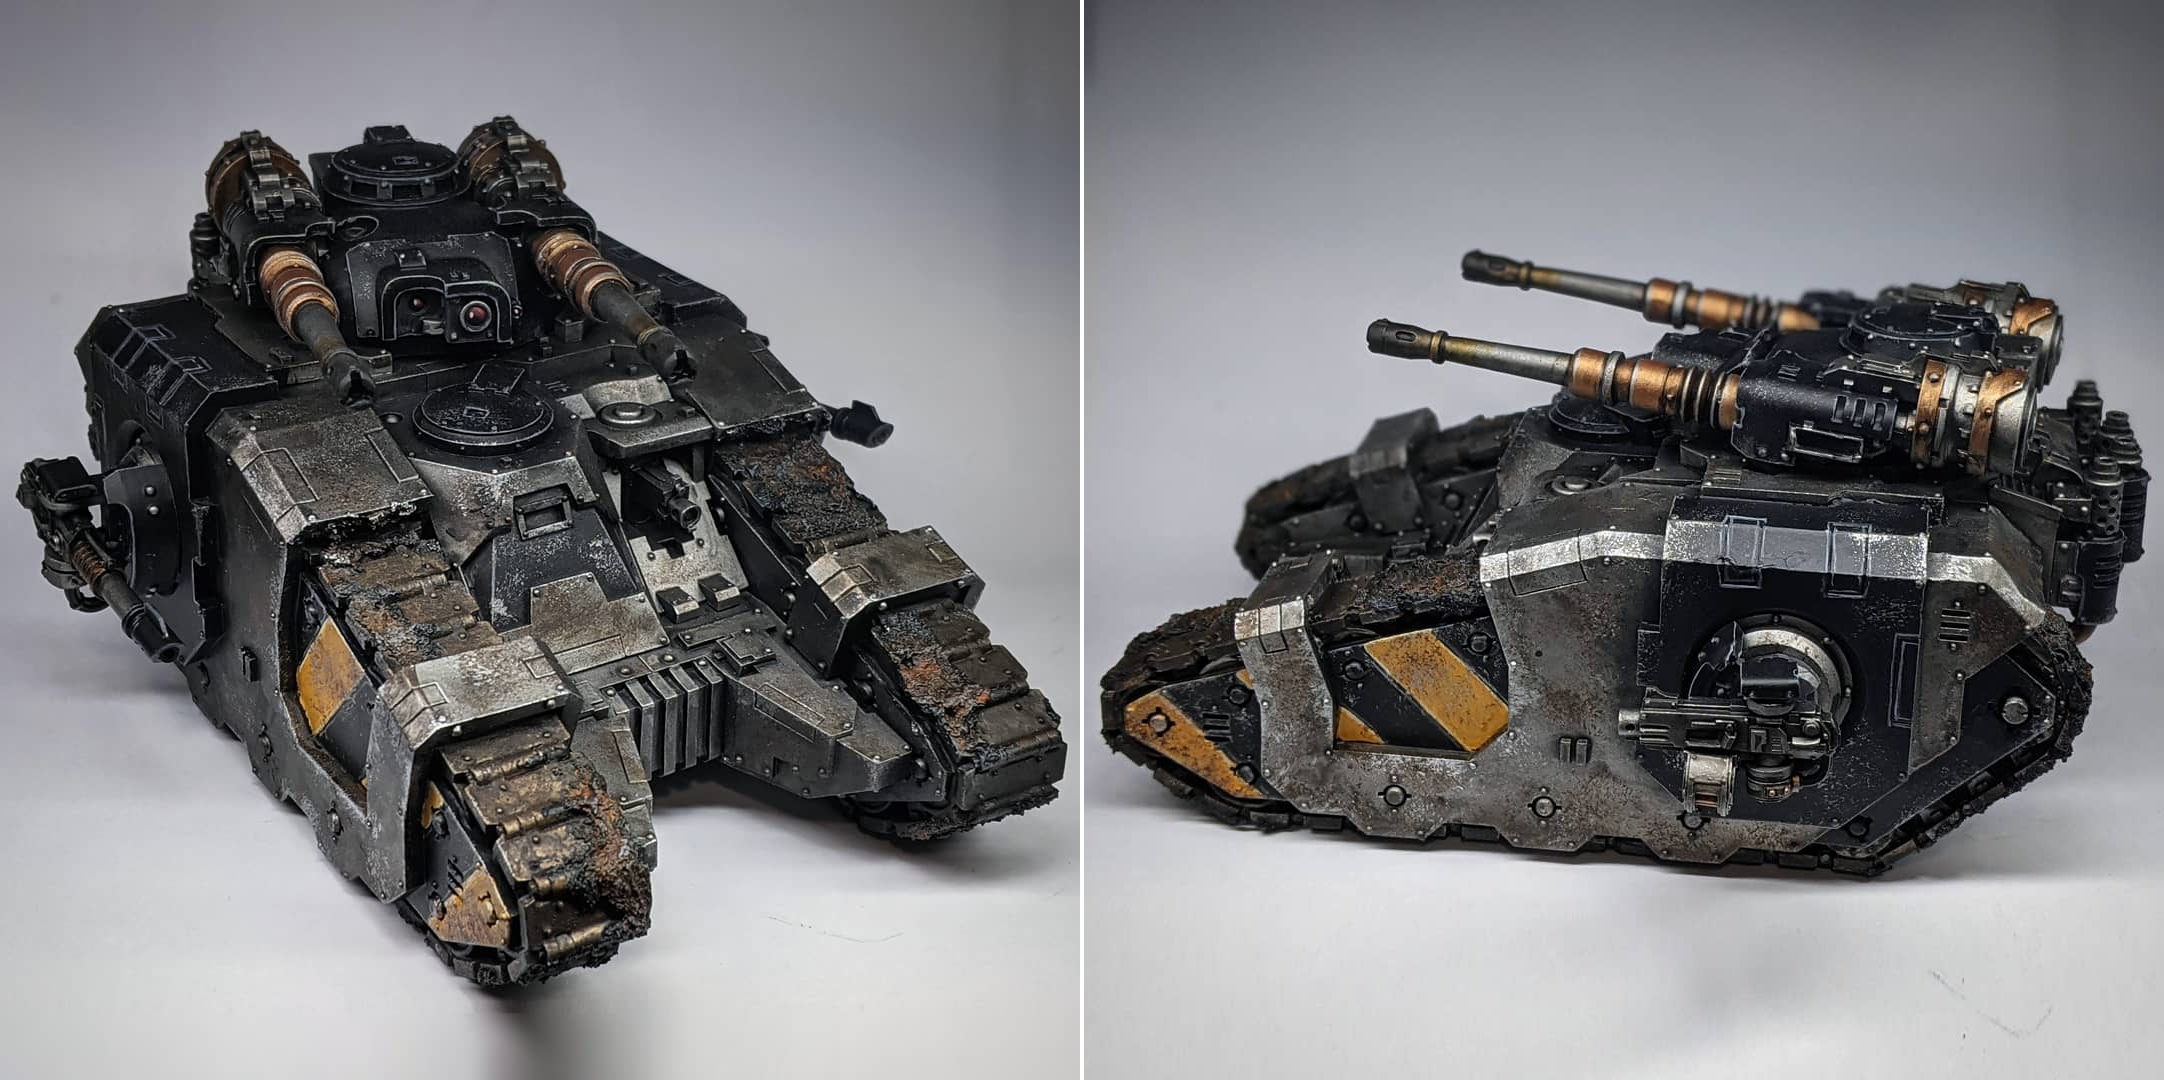
First of all – as far as resin vehicles go, this kit is an absolute dream to put together. Aside from a couple of questionable casting gate locations on the rear of the vehicle, this is about as good as it gets from ForgeWorld. All of the pieces fit together nicely, the tank squares well and there’s not too many gaps to fill. That being said, I failed to notice that the top piece of the hull was a little bit warped this time. This would’ve been an easy fix with a bowl of hot water, but I didn’t even notice until after I had glued the whole thing together. I couldn’t get the thing apart at this point, so I had to settle for smoothing some of the edges with a bit of filing and some green stuff. It’s not the end of the world – the turret does a good job of concealing and distracting from it, and neither side looks especially ‘wrong’ aside from not being perfectly symmetrical.
As with my previous Sicaran tanks, I also magnetised the sponsons guns. Once again, dead easy – simply glue the ‘nub’ and covering to the side of the Sicaran, then drill out a hole big enough for a 6x2mm magnet. As I still had a pair of spare lascannon sponsons from my Space Wolves Sicaran Arcus2, I decided to build Heavy Bolter sponsons this time. I figured if I painted these sponsons in black, I could share the weapon options between both my Iron Warriors and Space Wolves. Options for days!
To paint, the Sicaran was every bit the quick, simple and instantly rewarding project that I’d wanted. For the Vehicles in my Iron Warriors army, I don’t like to go crazy highlighting every edge like I do on my Space Wolves – instead, I prefer to bring depth to the miniature using sponging and weathering techniques.
For the base coat, I primed my Sicaran in black and airbrushed the vast majority of the miniature in Vallejo Metal Color Silver. Once this was dry, I took out a normal sized brush and started basecoating areas in black to kind of break up the metal – the side of the tracks, the main body of the turret, the power plant, sponson guards, etc. Next, I took out a bottle of Nuln Oil and gave all of the metal – tracks included – a generous wash, taking care not to let too much of it pool. Once this was dry, I applied a nice thick coat of Typhus Corrosion to the tracks and the tank was ready for details and weathering.
While I don’t generally highlight the metallic surfaces on my Iron Warriors vehicles, I find that it’s still generally worthwhile edge highlighting the areas that I base coated in black – Typhus Corrosion doesn’t show up well on those, so a quick highlight helps maintain definition around the edges that aren’t caught by the silver sponging. Thankfully, there’s not too much to do here – a little edge highlighting on the turret, power plant and sponson guards and we’re good to go. For the hazard stripes, I use Vallejo Filthy Brown and Black, with a little highlight on the edges of the stripes by mixing a little Elfic Flesh into the base colour. Simple as that. I know some people like to use masking tape to ensure straight lines, I generally just try and eyeball them, using the spacing between rivets and other similar details as guidelines. Most of the time, any wonky lines are tidied up with the edge highlight, and any minor inconsistencies are pretty much unnoticeable after sponge weathering. Vallejo Filthy Brown is an absolutely wonderful colour for this – it’s not too bright and/or saturated, but it still reads well enough as yellow in this scheme. It’s also got absolutely incredible coverage and is surprisingly easy to get a nice even coat over even black. I can’t recommend this colour enough.
Okay, now for the fun part – weathering. This process is very simple and very gratifying – rip up a bit of sponge, dip it into Typhus Corrosion, dab it on a bit of kitchen roll and then dab it over the body of the miniature. When painting vehicles, I pay attention to how the wash layer has settled and try and to place the mud/rust/chipping strategically to break up any blemishes or tide marks. The oilly black finish from the Nuln Oil works with the splotchy brown from the sponged on Typhus Corrosion to create realistic splotchiness and grime over the surface. Once I’m finished with the Typhus Corrosion, I repeat the step using Shining Silver, this time focusing in particular on the edges of the tank where paint would be most likely to get scraped off – it also saves me from having to edge highlight a lot of the metal.
An issue I often have with resin tanks is that the paint has a tendency to scrape off from the corners of the track links on the underside of the miniature. Aside from looking rubbish when you pick up the model, I have this fear that this will make it easier for more paint to peel off, undoing my hard work over time. Fortunately, necessity is the mother of invention. My favourite solution to this problem is to spread a little bit of texture paint over and around the tank tracks. Texture paint tends to dry with a bit of flex to it, making it less likely to scrape off from general wear and tear – it quite literally cushions the vulnerable areas! Aside from the practical benefit, it also lets me bring the armies basing theme to a miniature that otherwise has no base. For my Iron Warriors, this meant spreading a little bit of Vallejo Black Lava over the tracks and the edge of the housing, followed by a light dusting of Rust Oxide pigment, a little Fuegan Orange Wash and a light drybrush of Heavy Bluegrey to pick out the texture.
Finally, I painted the various lenses on the model with Heavy Red, White and Black, varnished the model with Vallejo Polyeurethane Matt Varnish through my airbrush and it was ready for the battlefield!
The next gap in my Iron Warriors army was a complete lack of any jump and/or assault infantry element.
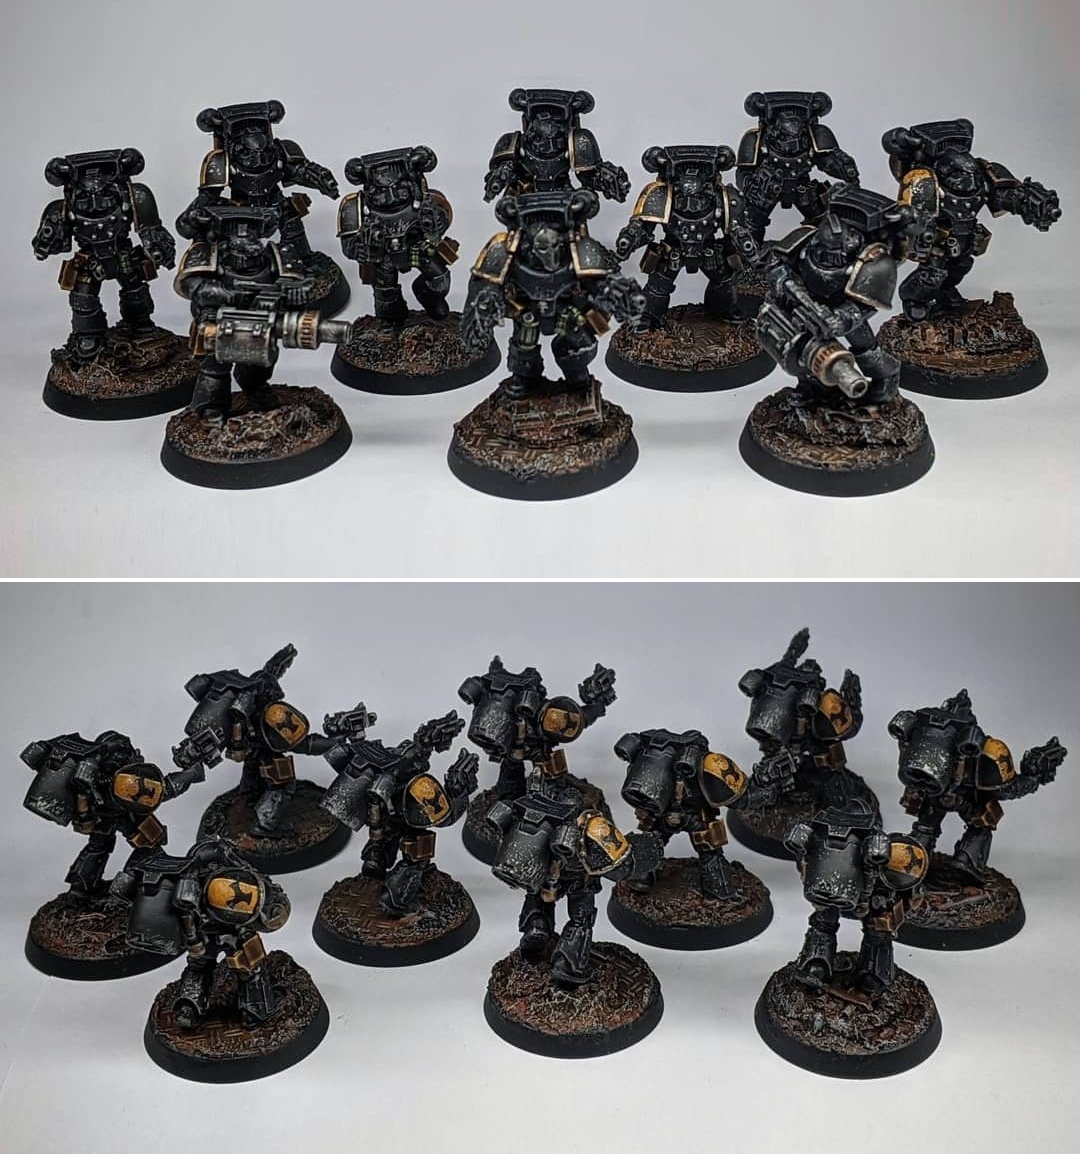
Iron Warriors are often mistakenly thought of as stationary gunline army – an easy mistake to make when 2/3 of their special units are shooting focussed – but I don’t think that’s really the whole picture. Iron Warriors are about sieges, not fortifications. An Assault Squad could certainly find a place in my Iron Warriors army, but it didn’t really feel like what the army really needed. With 40 or so Tactical Marines under my belt, I already had my anvil – what I needed was the hammer. Enter, Legion Destroyers.
This unit felt like the perfect fit for the army on a number of levels. They filled my niche for jump infantry, as well as gave me another fun ‘elite’ unit to play around with that wasn’t just more shooting. Aside from using many of the bits for my Deathsworn3, I’d never actually painted a proper unit of these models – and they’re kinda cool as heck. I love the reinforced armour on these guys, the incredible looking helmets and – of course – the twin pistols. The idea that they’re kind of seen as a dishonourable unit by a number of legions also fits well with the fluff of my force and their mission to eradicate the Loyalist/Terran splinter element of their former Grand Battalion at all costs. It also didn’t hurt that Destroyers were given a buff in the last Heresy FAQ, or that a unit of black armoured Destroyers would look really cool and distinct amongst the rest of the army.
To paint, these miniatures were a little bit more involved than my usual Iron Warriors infantry. For a start, I primed them all in black and followed up by airbrushing Vallejo Game Color Charcoal over most of their armour, leaving a feint shade of black behind in their lower recesses. After picking out the various silver areas – bolt pistols, rad launchers and jump packs – with Army Painter Gun Metal, I washed the entire miniature in Nuln Oil. The resulting colour was pretty much black, but with a little hint of depth – the recesses looked very slightly darker, while the most raised areas were very slightly greyish. Once the wash had dried, I followed up with Brassy Brass, picking out the shoulder pad trim, armour studs and a couple details on the jump packs/rad missile launchers to break up the silver a little. These areas were all (carefully) washed with Reikland Fleshshade.
Moving onto the edge highlighting, I picked out the edges of the black with Heavy Bluegrey and tidied them up with a mix of Heavy Bluegrey and Black. For the silvers on the weapons and jump packs, I picked out some of the raised areas with Army Painter Shining Silver, tidying it up with Vallejo Gun Metal and smoothing out any messiness with a careful application of Nuln Oil. Finally, I layered a little Vallejo Bright Bronze over the shaded Brass areas and highlighted with Shining Silver.
The only remaining details were the shoulder pads and pistol holsters. For the pads, I carefully painted a single, thick vertical stripe in Filthy Brown down the middle of the right pad where the Destroyer markings would be going. After another couple of thin coats, I shaded the recess of where the filthy brown stripe meets the shoulder pad trim with a pin wash of Seraphim Sepia, then highlighted the edge of the yellow stripe with a mix of Filthy Brown and Elfic Flesh. The other pad was receiving the silver IW skull transfer, so I left that as solid black.
Before moving onto the holsters, I took out my Iron Warriors transfer sheet and applied the black Destroyer Squad markings in the centre of the right pad and the Iron Warriors legion badge on the left. To do this, I first painted the pad in gloss varnish, then cut away my decal strip and dipped it in Micro Set until soft enough to slide off the strip and curve around the pad nice and snug. Once the decal was in place, I let it dry before sealing it with a little matt varnish. Doing this three step process of Gloss, MicroSet and Matt helps the decal blend nicely into the pad without looking like it’s a different texture or finish to the rest of the paint.
With the decals set, it was time for some sponge weathering – exactly the same process as on the Sicaran, only with a smaller bit of sponge. I wanted to get this step out of the way before moving onto the holsters as it can be a messy process and I didn’t want to risk getting any metallic paint on the finished leather.
With the sponging out of the way, it was time for the holsters. These were surprisingly quick to paint, consisting of of a base coat of Elfic Flesh, highlighted thickly and messily (covering 60% of the surface) with Leather Brown, edge highlighted a little more neatly with a Leather Brown/Elfic Flesh mix before finally dotting the corners with a bit of Elfic Flesh. I then washed the whole thing with a generous coat of Seraphim Sepia, followed by a more measured wash of Reikland Fleshshade – this gave it a nice warm leather colour and blended the hastily scrawled in highlights together neatly.
I based the miniatures using a combination of of Kromlech Urban Rubble Basing Kit pieces, tread plate embossed plasticard from Green Stuff World and Vallejo Black Lava texture paste. This was drybrushed Heavy Bluegrey, dusted with Rust Oxide weathering pigment, washed with Fuegan Orange and finally lightly drybrushed once again with Heavy Bluegrey. A quick blast of Vallejo Polyurethane Matt Varnish through my airbrush later and my Destroyer Squad was completely finished.
Now, a unit of Destroyers on their own would make a fine standalone addition to any Iron Warriors army – but they’re also a great excuse to finally paint a Moritat consul as well!
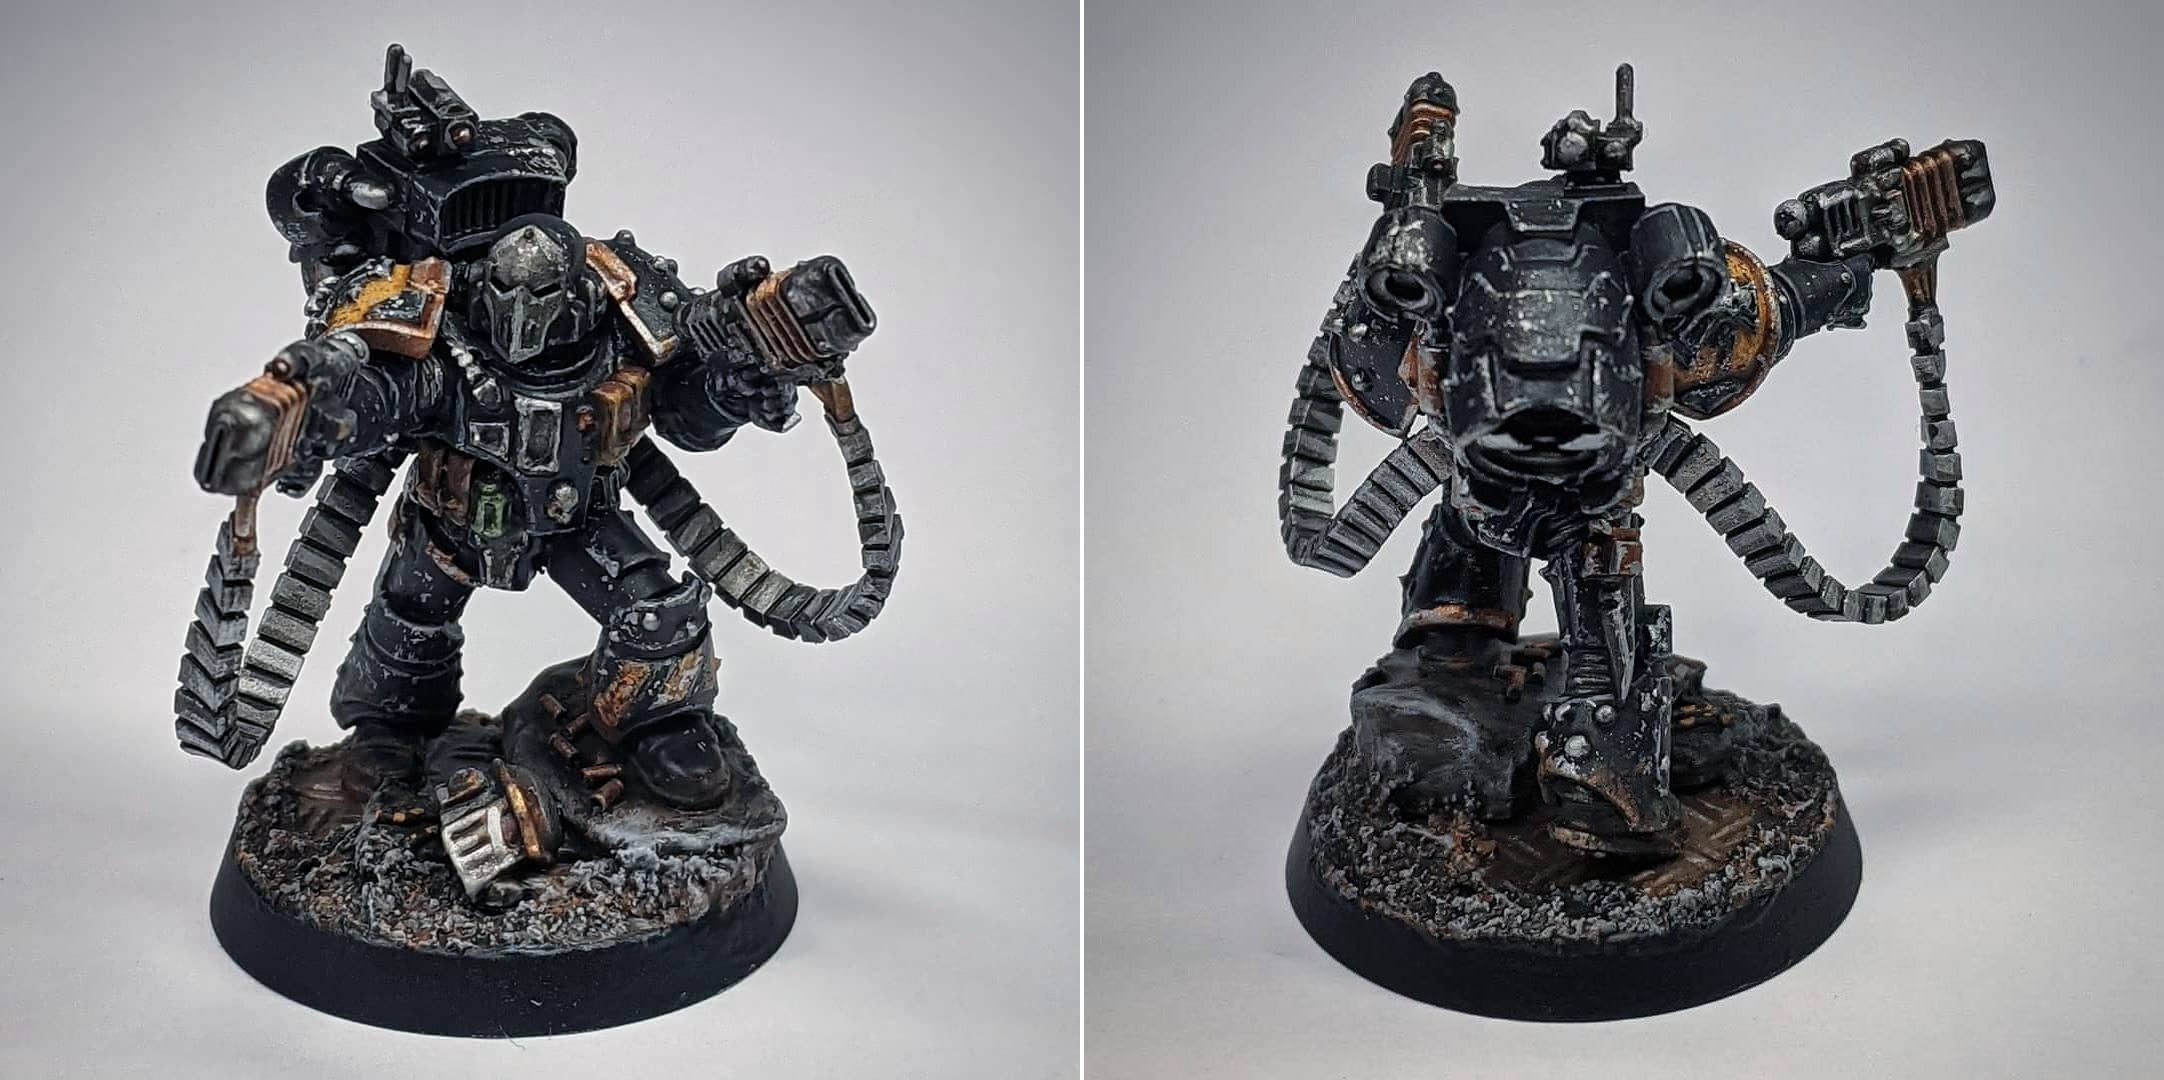
The Moritat is an awesome looking miniature, and one that I’ve wanted to pick up and paint since I first got into the Horus Heresy. Alas, very little about him felt at home with my Space Wolves army – but he fits in just fine with my Iron Warriors Destroyer Squad.
He was a fun little miniature to build, although I nearly ruined him with my indecision over what direction and angle to bend the cabling that attaches his power plant to the Volkite Serpentas. My advice with this guy is to leave the power cables until the end of construction, then super glue each into their slot in the jump pack and bend them from there. It’s an awful lot easier to figure out what you’re doing with the cable when one end is already fixed in place – for too long, I faffed around trying to bend them into the right shape while dry fitting and it just didn’t work.
Because there’s so much to love about his sculpt already, I didn’t bother making too many alterations beyond a simple head swap – replacing the Destroyer head with one of the iron skull masks that I use for all my characters and Sergeants. This wasn’t too difficult, although it’s worth noting that the Moritat’s head comes attached to the body, so it’s not completely trivial either. I managed to replace the original head easily enough, at the cost of damaging the original head; it’s not quite in good enough shape to use as a helmet anymore, although I could probably stick it on a base or something.
Nothing much to say about the paint job of this one – it was a quick and dirty job, from primed to painted in a single evening. I followed pretty much the exact recipe as on the Destroyer Squad, only with a little bit of hazard striping on the left shin and a green glaze over his rad grenade as a spot colour. Simple and gratifying – another tick for the ‘done’ column.
If there’s one thing I’ve learned in the past year, it’s that it’s just about impossible to revisit an older project to add ‘one or two’ new units without discovering a whole bunch of other bits and pieces you’d like to add to the project. I’d originally only intended to come back and paint a Sicaran and single character, and already I found myself adding a Destroyer Squad and a Moritat to the army. Might as well do a Contemptor Dreadnought as well then, eh?
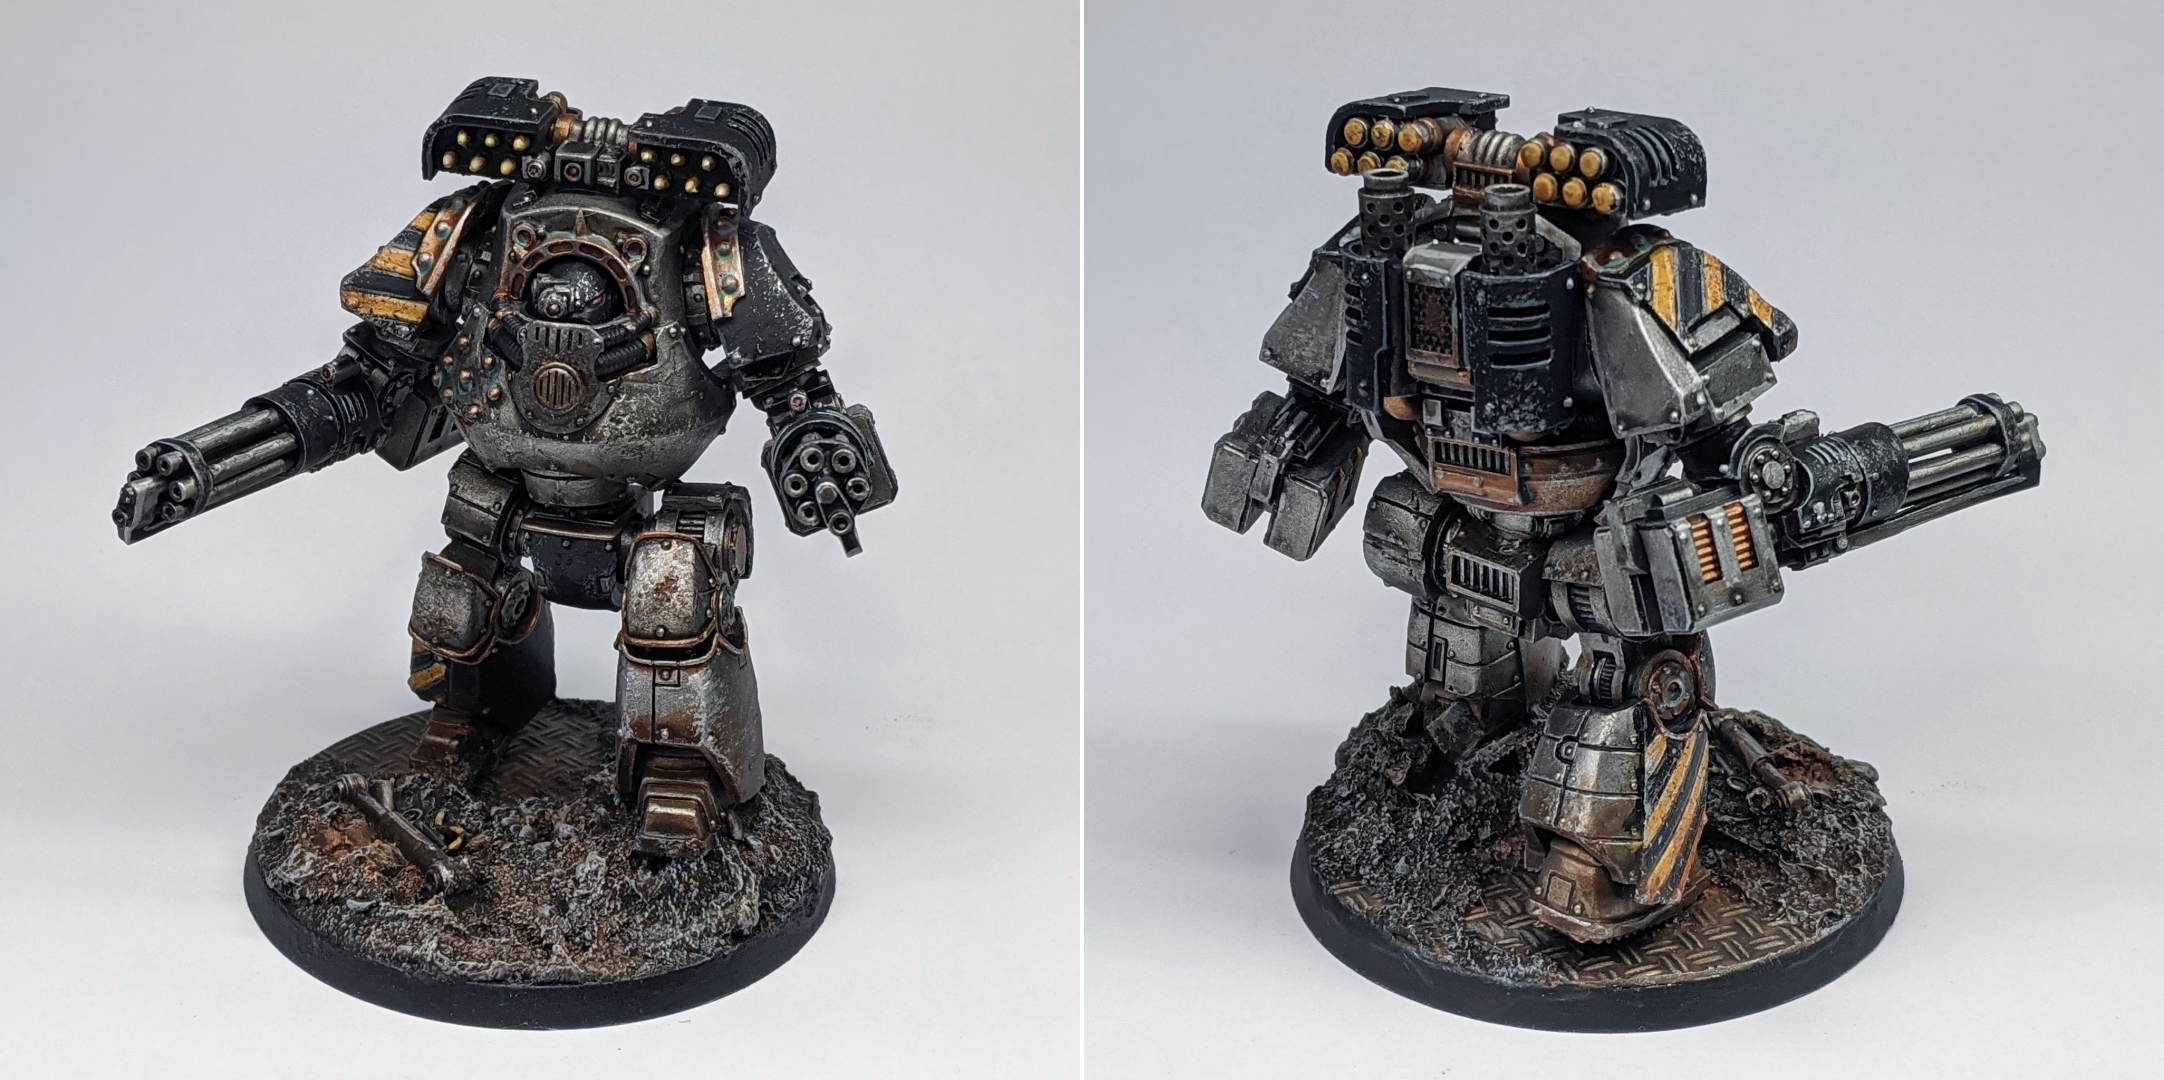
The reason for this brand new Contemptor was simple – my Iron Warriors currently had three Contemptor Dreadnoughts in the army, but all of them were from the underwhelming plastic kit. There were a pair of Khres-Pattern Assault Cannon and Power Fist Contemptors – simple, out of the box minis – and one that I’d converted with a pair of assault cannons to make into a Mortis-Contemptor. Now, plastic Contemptors are okay – especially after you do a little bit of reposing work on them – but they really don’t hold a candle to the real thing. ForgeWorld Contemptors are beautiful and dynamic, with crisp details and a crazy amount of build flexibility. For such a quintessential, bread-and-butter Heresy unit, it was crazy that all I had in this army were the cheap imitations. It was time to remedy that – but how to arm my new Contemptor?
I already had a plastic Mortis-Contemptor doing the job of token anti-air, plus two standard Contemptors in a Talon that can hold up to three. It kind of made sense to me to do a standard Contemptor with both ranged and close combat weapons and use him as a ‘Talon Leader’ of sorts4. From a gaming point of view however, in 9/10 games, I’m probably only ever going to take a single Mortis-Contemptor with a pair of assault cannons. It’s just too useful of an armament – a points efficient tool for taking out all but super-heavy flyers and a solid threat to both infantry and light ground vehicles. It doesn’t need to be walked up the board to make use of it’s weaponry, and it’s not a waste of points if my opponent doesn’t bring any flyers.
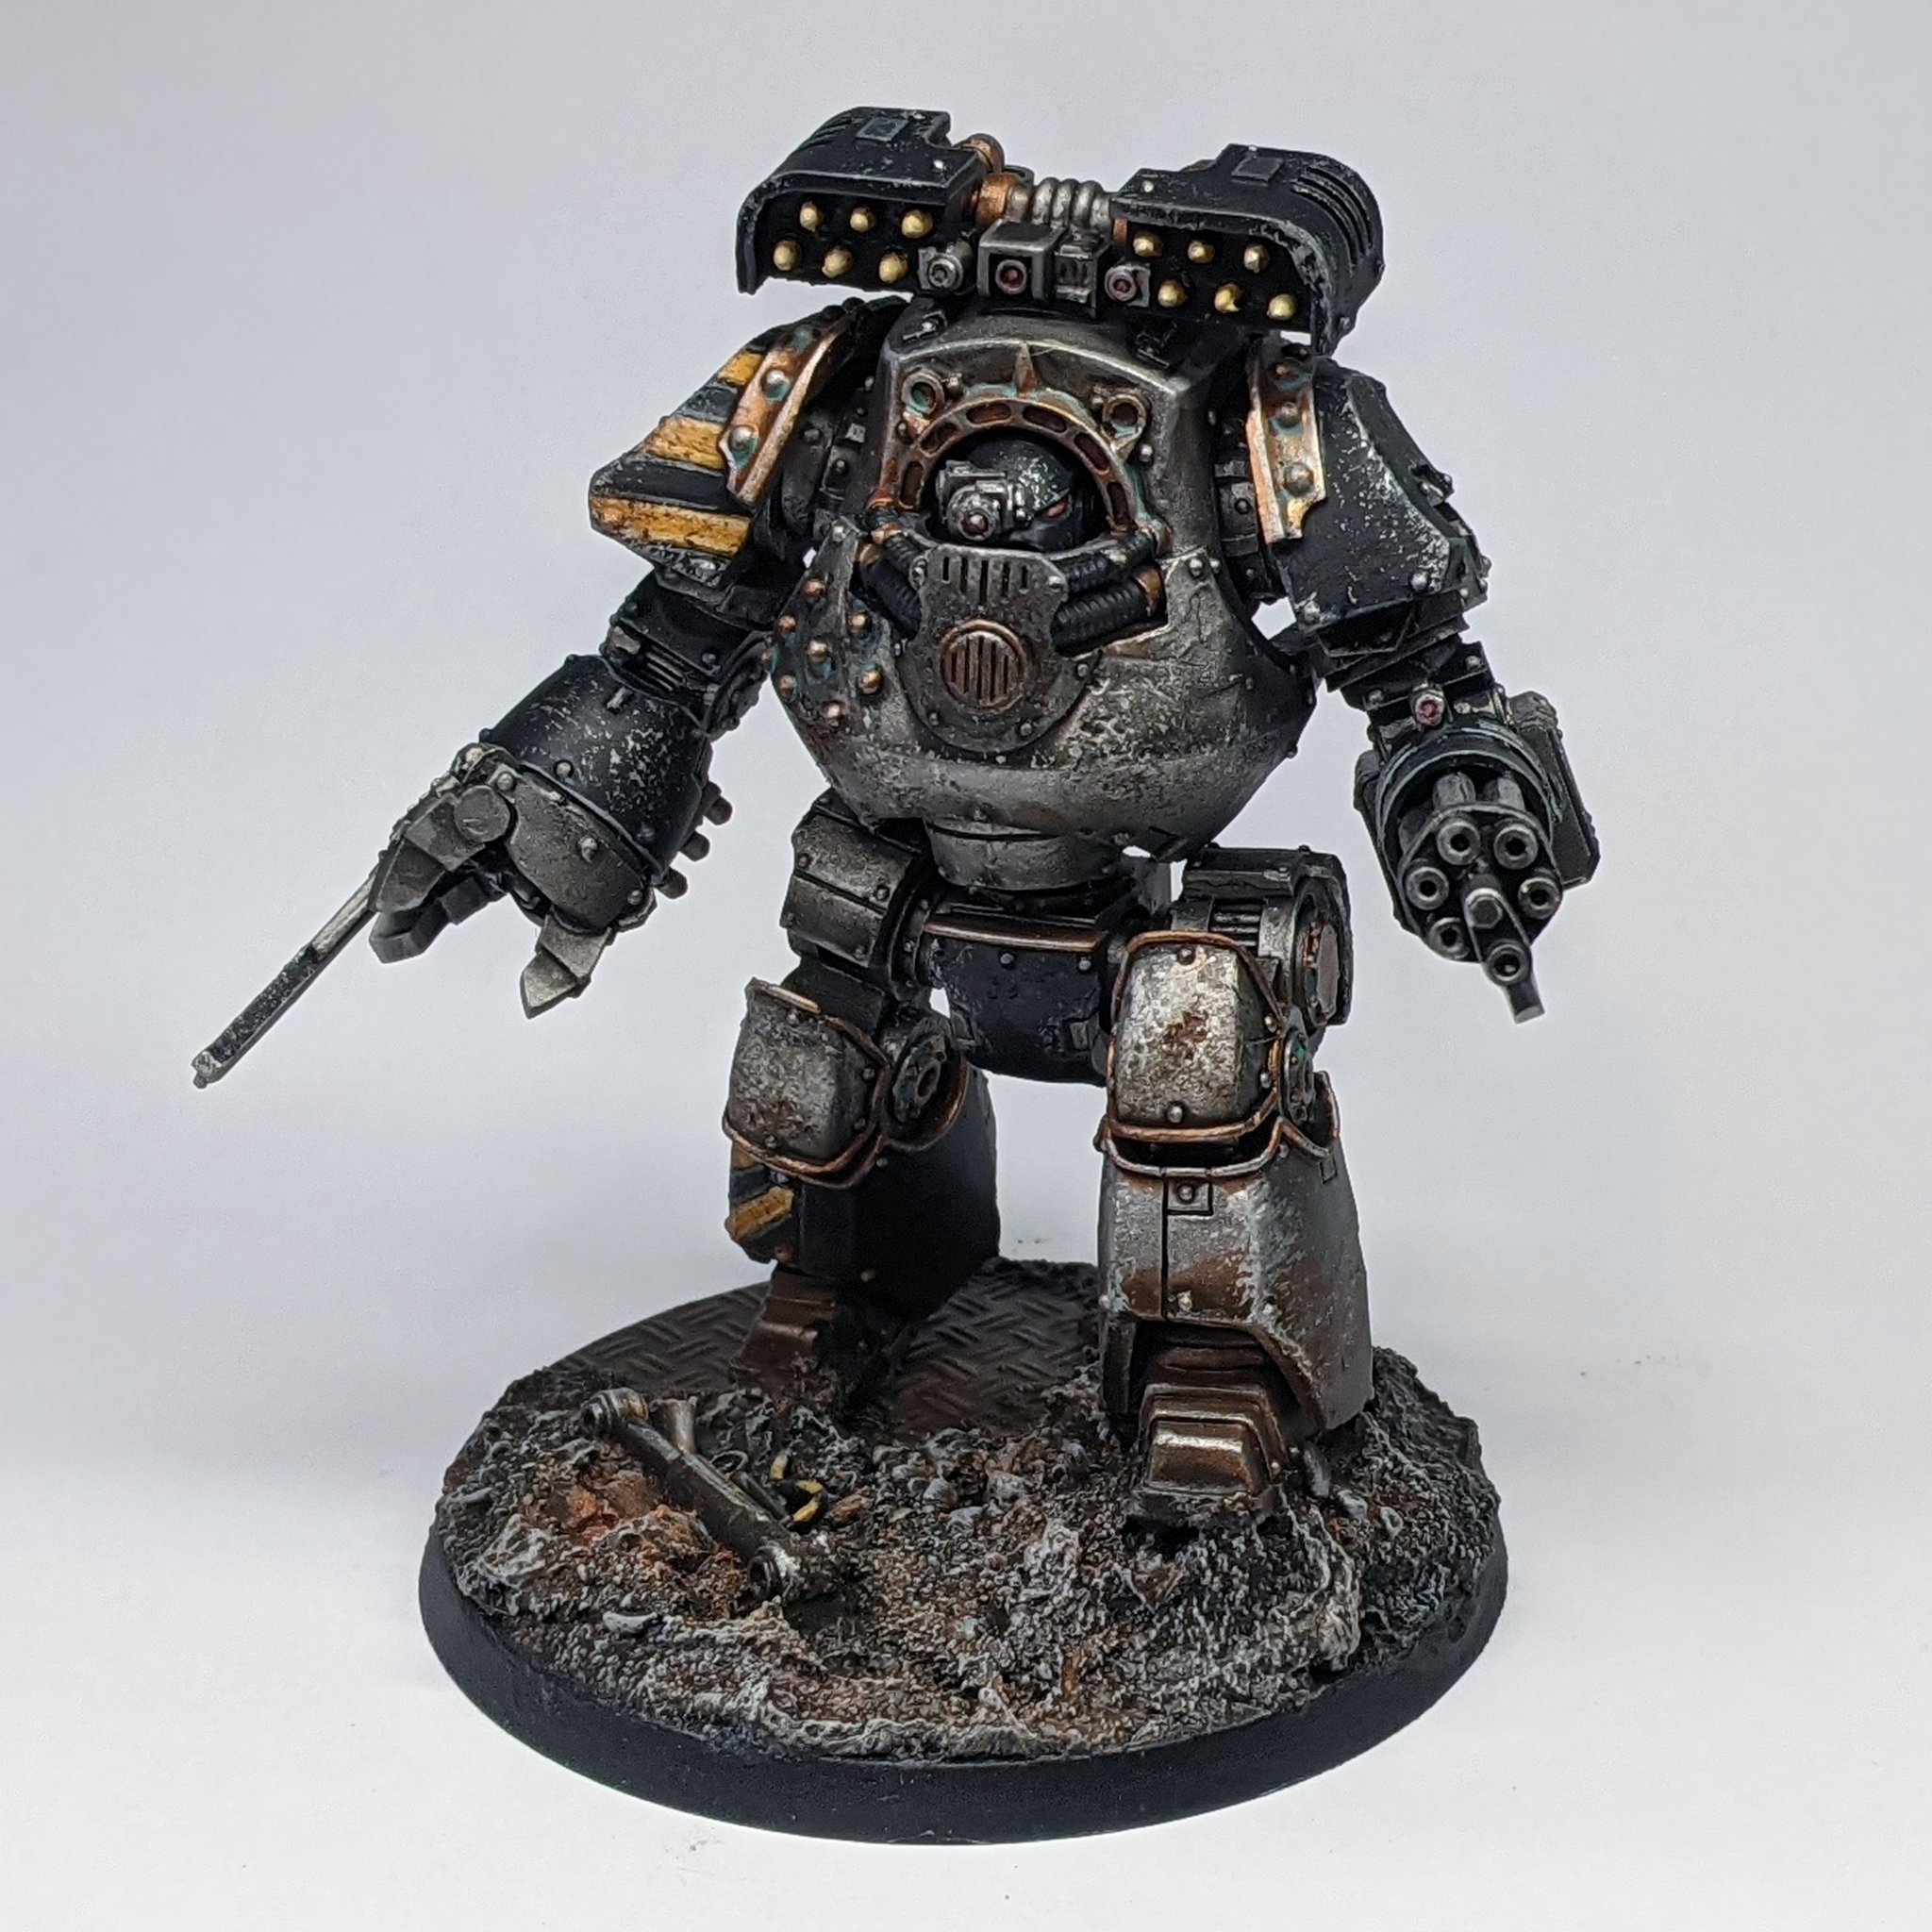
If I was only ever going to bring a single Contemptor in most games of Horus Heresy, then it makes sense that I’d want that Contemptor to be the cool looking ForgeWorld one. Fortunately for me, ForgeWorld Contemptors are super easy to magnetise, so I was able to have my cake and eat it too! In the end, I settled on a pair of Khres-pattern Assault Cannons with an optional Contemptor Chainfist to switch in and out as needed. I also decided to go the extra mile and give this one a Havoc Launcher, for aesthetic reasons. The Contemptor Cyclone Missile Launchers look a good deal like the ones on the backs of Tyrant Siege Terminators, so I thought it felt like a cool nod to the Legions specialist Terminator Squad to give this guy a launcher as well.
For the Contemptor chassis itself, I decided to use the Death Guard Contemptor and make a few alterations. There’s not a lot of work required to make this work as an Iron Warriors Contemptor – scrape away the XIV symbol (or just the X, if you prefer), remove the spikes around the gorget and front exhaust, remove the Death Guard icon from the legs. All fairly simple and easy enough to do with an X-Acto Knife and some files. The result is a Contemptor that’s a little less cluttered and – let’s face it – straight up uglier than the Iron Warriors one, yet maintains some of the industrial looking aesthetics of the IVth Legion.
Oh, and I gave the Contemptor the head that came with the Cyclone Missile Launcher kit. This helped distance it a little further aesthetically from the Death Guard Contemptor, but my main motivation for swapping this was that the Death Guard Contemptor head looked an awful lot like the helmet from MKIII armour – which is quite intentionally absent from my army for fluff reasons. The final loadout choice was what to stick in the Contemptor Chainfist. For this, I decided to go with a Graviton Gun – I kind of associate that weapon with boarding actions (I think because Breachers come with them), and realistically the chainfist is mostly going to see use in Zone Mortalis games.
Nothing really to say about the paint job here, but he was good fun! As with the Mortitat, from primed to painted in a single evening.

The final addition to the army is my Legion Champion. This is either supposed to represent an early-Heresy Legion Champion version of Warsmith Aetius Nox or whatever rising star he wants thrown into harms way (before they pose a threat to his command).
I’ve had this miniature for a long time now – it’s an ‘Event-Only Breacher Space Marine’ – and I’ve always quite fancied it for an early-Heresy Nox. One of the core tenants of my lore for this army is that – until Nox captures and/or slays his former (now Loyalist) commanding officer – Nox is permanently shadowed by a pair of Peturabo’s Iron Circle Domitar, programmed to turn on the Legion Champion should he falter in his mission. I kind of liked the irony that his weapons of choice being a hammer and shield, just as the Iron Sentinels looming over his shoulders in judgement5. It’s been a project I’ve been threatening to get underway for months and months, and with a narrative Zone Mortalis event set in the early days of the Heresy in my near future I finally had an excuse to bring him out and get him fixed up.
The only real downside to this miniature is that he is wearing MKIII artificer armour and not MKIV like the rest of the army – but given that he’s kind of the central character in all of this, I think that’s probably forgivable, right?
Now, although this miniature is intended to represent Nox in the early Heresy (where the aim was still to instate Horus as the new Emperor of Mankind), I thought the prevalence of eagle iconography on this miniature was bordering on gratuitous. To correct this, I made a number of tweaks. I replaced the eagle-head hammer claw with something a little more blunt and utilitarian, scraped away the eagle detailing on the knife-holster at his waist and – crucially – removed the second head on the aquilla on his chest to create something a little more Great Crusade-era appropriate. As a final tweak, I removed his MkIII helmet and replaced it with an Iron Warriors skull mask helmet, but gave it back the plumage from the original to preserve the ostentatious pomp that would be typical of a Legion Champion.
Once again, nothing new to say about the painting on this guy – a fairly by the numbers job, but enjoyable never the less. I’m particularly pleased with how his hazard striped plumage turned out!
And that’s all for the 613th Grand Battalion for now. At this point, I’m pretty happy that my Iron Warriors could be fielded equally effectively as a fun, balanced and narrative army against friends… or as an eye-watering gunline force for when you just can’t get away from the table fast enough. At my most recent calculation, the army is now up to a whopping 7250 points in total.
I said earlier that the longer you work on a project, the more you end up wanting to add to your collection; TODO lists only ever seem to grow, they rarely shrink. I’m happy to draw a line under this army for now, but there’s plenty of bits and pieces I can think of that I’d like to add as time goes on. Outriders are a unit that I love the look of that could very easily find a place in this army (and fill out some of my empty Fast Attack slots), and I could definitely find a place for a Spartan in this army too. Perhaps that’s something to look into if the rumours of a plastic kit prove to be true. I’d also love to come back and add another super heavy tank to this army – a Falchion, or a Glaive perhaps, or maybe even the Tormenter – but I’m getting way ahead of myself here (no change there).
In the meantime, what’s next on the agenda? Well, somewhat unusually for me, I’m currently juggling a few projects. I think I have a couple of fun options in mind for what my next altogether ‘new’ project will be, but before I get started on that I’ve got a whole bunch of reinforcements planned for several projects that I’d like to get through first. Exactly which of these is going to make it on the blog first is as much a mystery to me as anyone else at this point, so keep your eyes peeled for updates soon.
Until then, thanks for reading and happy wargaming!
1 I also considered my Daemons of the Ruinstorm army for this – I could really go for some Heavy Support choices in the army, and I’d love to rely less on the cartoonish GW plastic sculpts. I’ve got a few irons in the fire for this one, but I’m saving it for the next time I feel like I need an easy win.
2 My first Sicaran was a Ventator for my Space Wolves, which I magnetised with lascannon sponsons – these are very useful in Warhammer 40,000, but a complete waste of points for the Horus Heresy. Since I knew I’d have these sponsons spare, I didn’t bother painting the set that came with my Arcus, and painted a pair of storm shields from the Wulfen set as coverings to conceal the magnets on my Venator instead. Thus, I ended up with a spare set of unpainted lascannon sponsons.
3 Hey, speaking of which, I recently went and replaced the 3rd party heads on my Deathsworn conversions – making them now a little less of a needs must conversion and more of a MKIV Armour variant of the existing Deathsworn kit. I also made the pretty radical decision to repaint all of the base rims of both of my Heresy armies in black, which was.. an experience. This doesn’t really have anything else to do with this post other than being Heresy related, but I didn’t feel like it quite deserved it’s own post, so.. here we are, I guess!
4 We’re talking strictly headcanon terms here; there’s no such thing as a Sergeant Dreadnought in Contemptor Talons.
5 Very fittingly – though entirely by accident – this is even represented on the tabletop by Legion Champions (and even Siege Breakers) not having access to a Cortex Controller, meaning they cannot fully control any Iron Circle that they’re attached to in the way that Perturabo or a Warsmith can. It’s really cool when your fluff ends up working in tandem with the rules.