That’s right folks, it’s time for another instalment of the series that just won’t quit. Last time, I knocked out a few units from the 8th Edition Codex ahead of the new releases for 9th. With the new edition of Sororitas well and truly upon us, I could not be more excited to get stuck in to some Celestian Sacresants and Paragon Warsuits.
Which is why, of course, I batch painted 15 Battle Sisters with Boltguns instead.
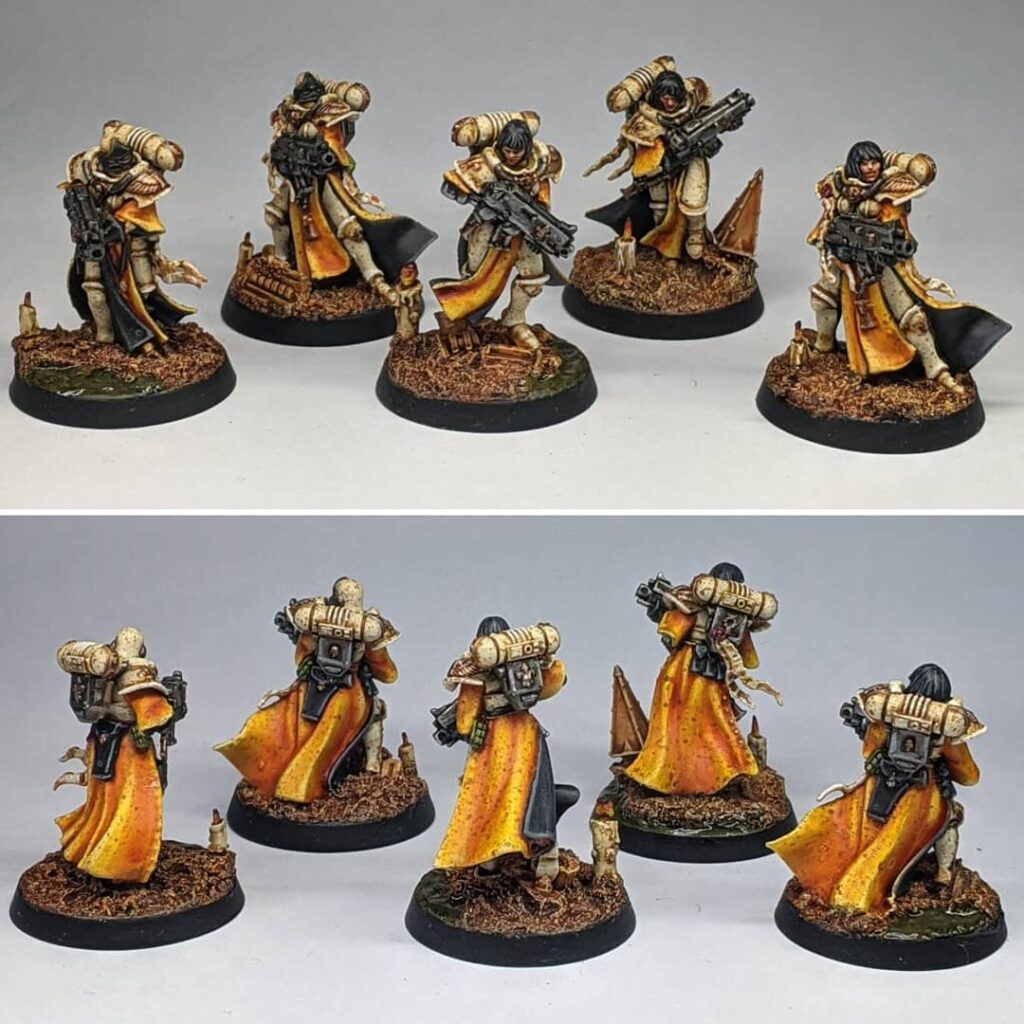
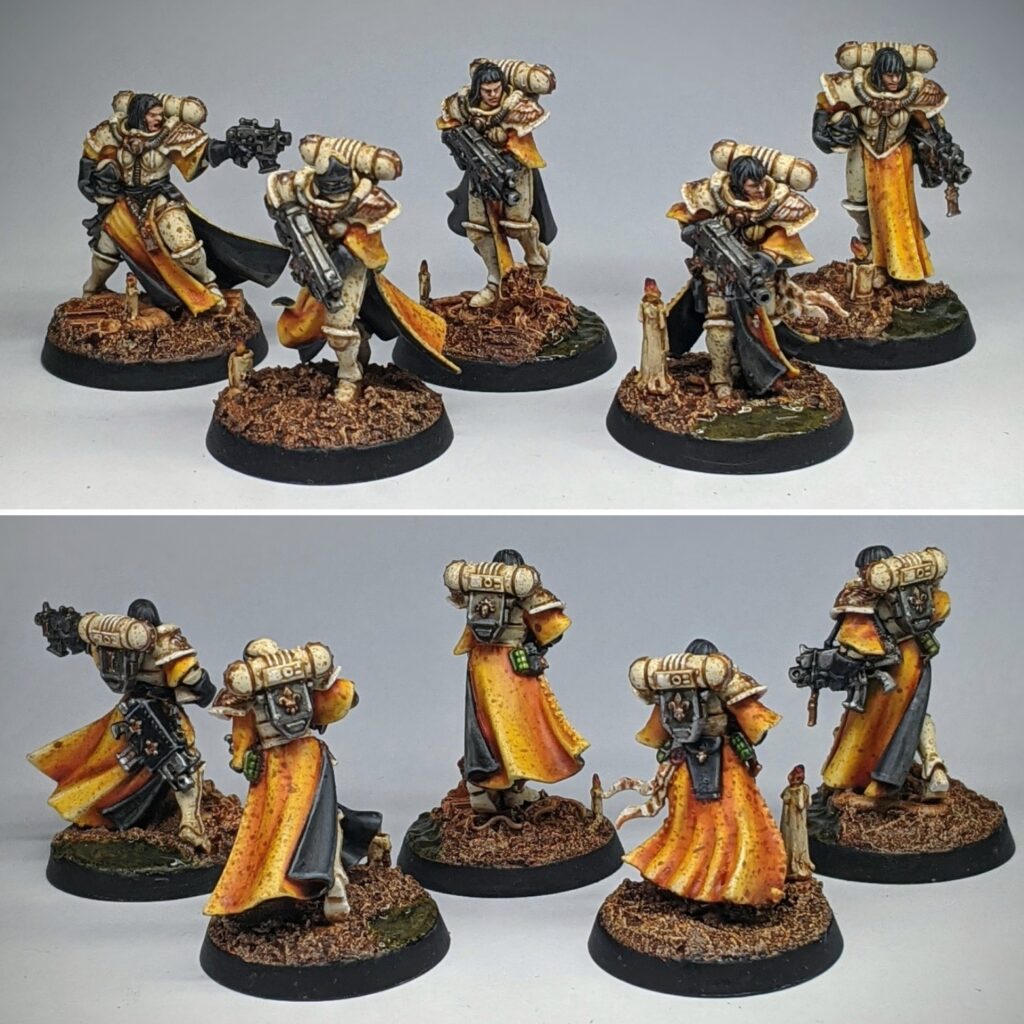
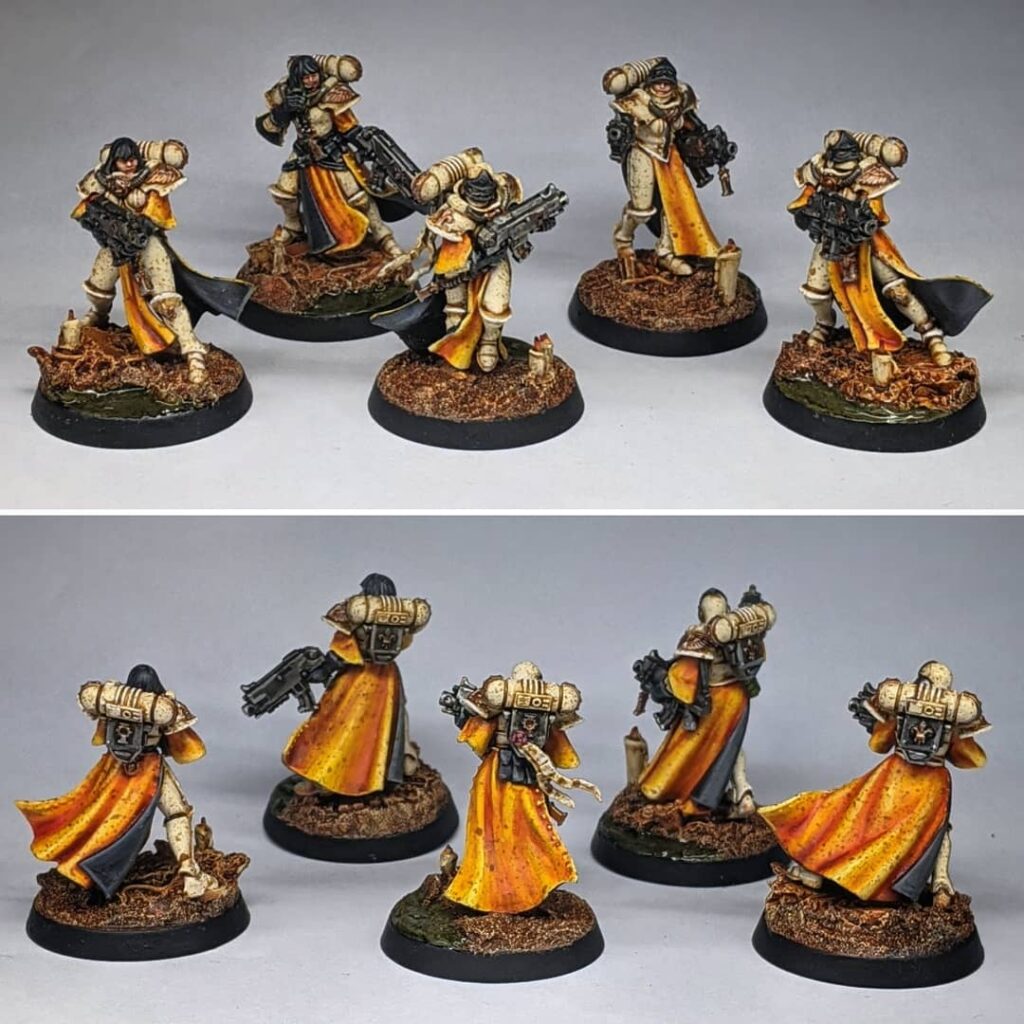
So, why exactly am I painting a big ol’ block of basic troops this far down the line? Well, the 9th Edition Adepta Sororitas Codex released with a bit of a tweak to the Battle Sisters Squad that forms the core of your army. The new rules state that a Battle Sisters Squad can bring a maximum of 1 special weapon per 5 Battle Sisters. Additionally, the maximum unit size of Battle Sisters was boosted all the way to up to a whopping 20 models – with a couple of new stratagems that really benefit this size of unit. Not only did this partially invalidate my army at the time – I only had 6 bolters and 6 storm bolters painted for my Troops – but I now felt actively encouraged to bring at least one big unit of 20. This meant that I’d need to paint a total of 3 more Battle Sisters just to be legal again, or another 15 for a fully fleshed out battleline.
I had mixed feelings about this change. On one hand, I wanted to get onto the cool new miniatures as soon as I could, and this was a definite setback. On the other hand, as it stands I did have an awful lot of unpainted Sisters in my pile of shame already. Following my own Battle Sisters Build Guide meant that I had a total of 8 remaining unpainted Battle Sisters with boltguns awaiting their moment of need1 – but that wasn’t all. Somewhere along the line, I’d also picked up the Battle Sisters from the Battle Sister Army Set as an eBay impulse buy2, and the seller threw in another 10 multipart Battle Sisters to boot. This took me over the 15 Battle Sisters that I needed, and I knew that I’d feel better ridding myself of these minis from the backlog before moving on. All that besides, it’s never a bad thing to have a surplus of basic troop miniatures at your disposal.
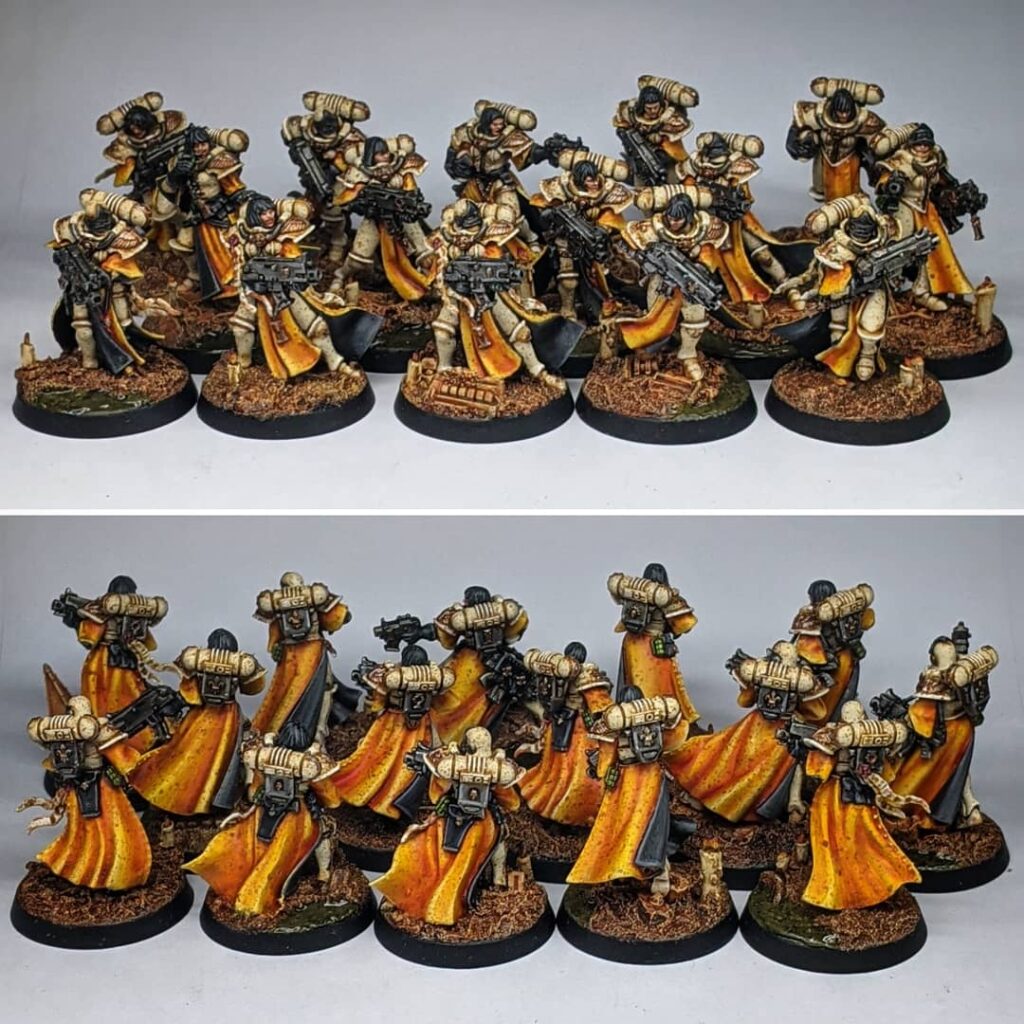
I won’t lie, this unit was an absolute slog from start to finish. Batch painting anything a group of 15 can get tiresome, but batch painting 15 Battle Sisters in a white and orange colour scheme was.. Spiritually exhausting. Yet, in spite of the hustle, I think they turned out great. They stand up to (or even exceed) my last set of Battle Sisters – and the wide assortment of different head, pose and base combinations is really gratifying to behold when they’re all assembled together.
It did kind of tank my drive to paint 10 Celestian Sacresants though. Instead, I moved onto the Dogmata.
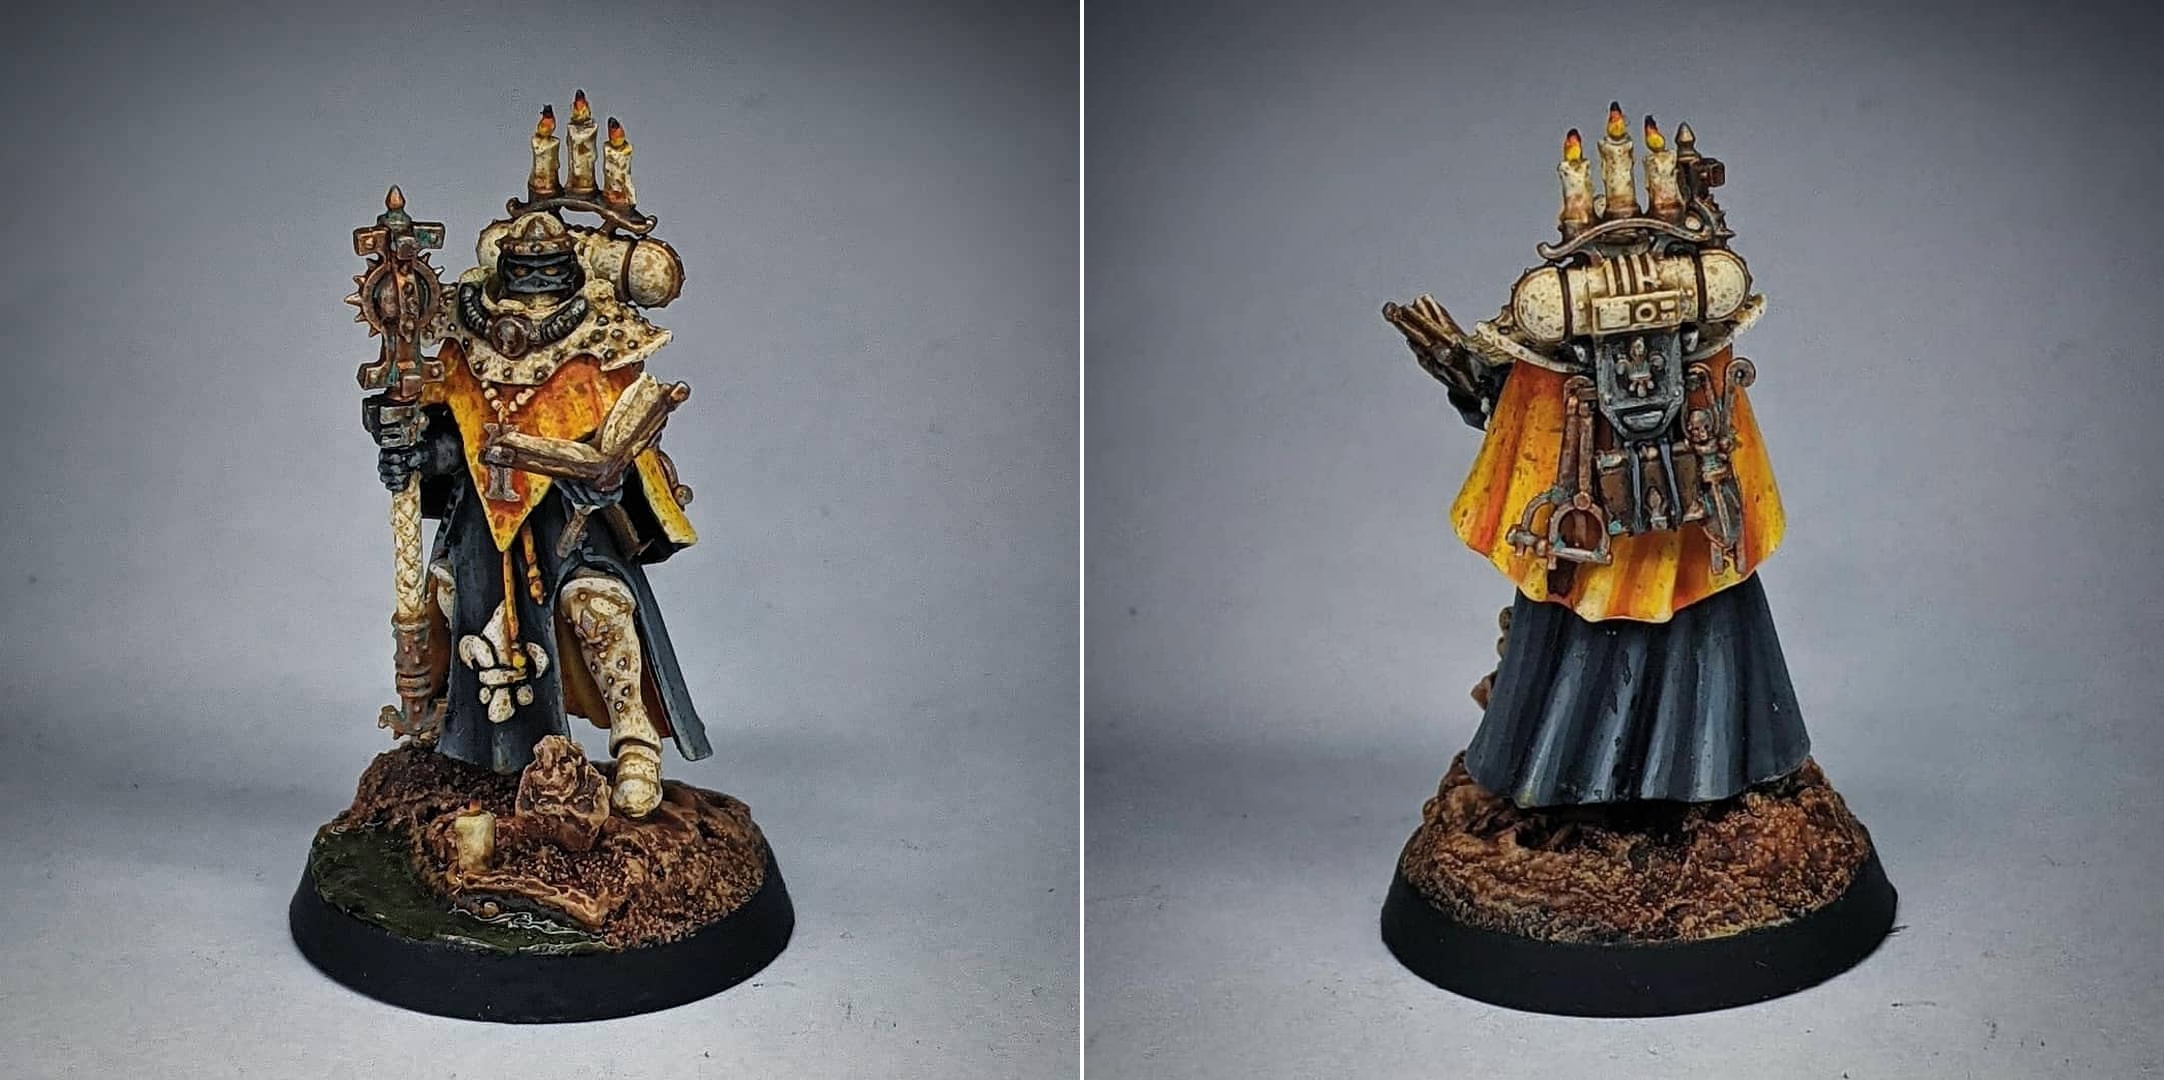
Ah, the Dogmata. When this miniature was first revealed, I couldn’t help but wonder.. Well, what the hell were they thinking? Something about the layers of robes and that weird power stance just really detracted from the overall miniature for me. She looked too much like a Christmas tree, or an 80’s glam rocker.
I considered salvaging what I could from the original model and kitbashing it with another kit (I had the body from a Palatine burning a hole in my bitz box), but I opted for something much simpler in the end. I took her two handed power maul and rotated it 90 degrees to be held upright like a staff. I removed the other hand from the bottom of the shaft, and replaced it with one that’s holding open a book from the Retributor Squad kit (as seen on my Missionary kitbash). It’s a natural fit for the miniature and works well with the pose – she still comes across as an ominous, calculating and watchful presence. I opted for the helmet on this one, mostly due to the unique design.
The Dogmata was a fun, quick little miniature to build and paint – providing some much needed respite after the mammoth task of batch painting 15 Battle Sisters. Reinvigorated and ready to take on a new challenge, I decided that now was the time to try and tackle the Abbess Sanctorum herself, Morvenn Vahl.
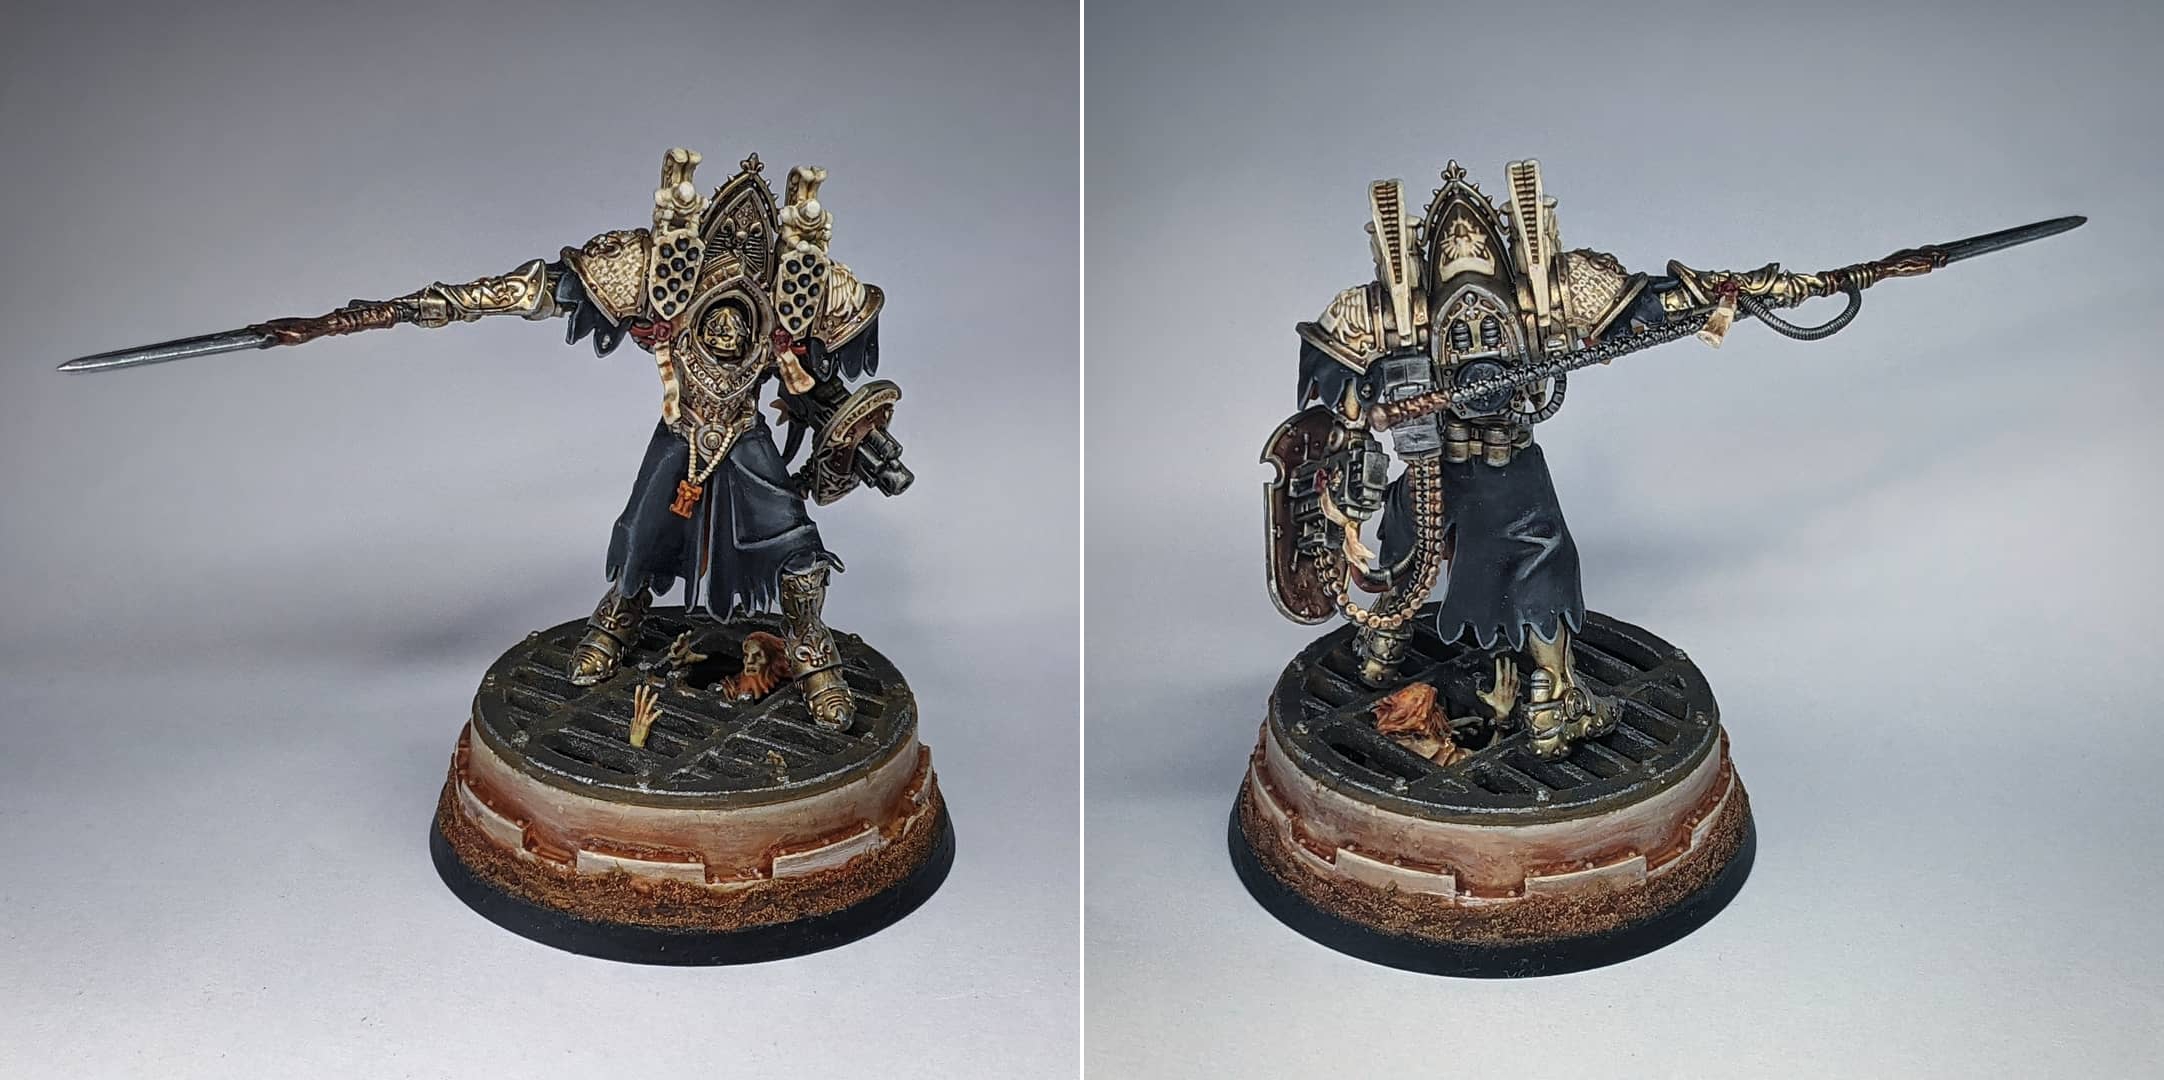
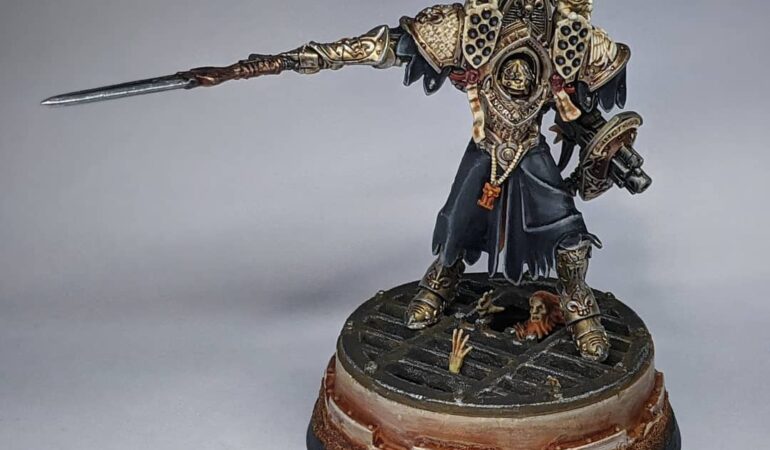
Morvenn Vahl is a big deal. Not only is she the highest authority of the Adepta Sororitas as a whole, but she’s also a High Lord of Terra – a first for the Warhammer 40,000 miniatures range. Resplendent in a suitably ornate Paragon Warsuit and wielding an enormous power spear gifted by the Adeptus Custodes themselves, she kind of fills the niche of a Primarch miniature such as Roboute Guilliman or Mortarion. A special miniature such as this one deserves a special base, don’t you think?
Before we get into that, I want to make one comment about a potentially contentious change that I made to the miniature itself. While I like the design and aesthetic of the Paragon Warsuits overall, I’ve always kind of hated the Matryoshka power-armour-in-power-armour thing that Games Workshop is obsessed with using on Imperial miniatures these days. Centurions, Nemesis Dreadknights, even Invictor Warsuits3 all just kind of rub me the wrong way. But hey, it’s my hobby and my army, so I can convert and reimagine whatever I want to work however I want it to work, right? I decided to leave off the exposed ‘pilot’ arms coming out of Morvenn’s warsuit, and fill the empty socket with a little green stuff. I also attached a single purity seal below her right shoulder (mirroring the one on her left) to fill the empty space and encourage the eye to look elsewhere. I like to think that Morvenn is embedded inside the armour, arms crossed and operating the Paragon Warsuit closer to how Space Marines operate Centurion Warsuits than Nemesis Dreadknights. There’s just no need to expose your arms when the rest of your body is protected by an exoskeleton, is there?
Okay, getting back to the base.
The idea here was that I wanted something that fit well with the themes I’d used in my basing up to this point, only dialled up to 11 – I wanted a base that was almost bordering on diorama. I thought about what I’d done so far – urban rubble, candles, and the unwashed masses. I’d previously placed penitents either under the heel of my canoness or carried around on crucifixes – maybe an escalation of this would be a small crowd begging or worshipping at the feet of the Abbess Sanctorum. For that, I’d need some means of elevating Morvenn herself, as well as the appropriate bodies for the crowd.
Enter a sprue from the old Urban Conquest campaign set from 8th edition. One of the sprues of Scatter Terrain included a little well with an iron grating – large and flat enough for a warsuit to walk comfortably over, but wide enough that you could see through the grating with a little bit of inspection. There was even an additional ‘entrance’ piece that could be assembled open, shut or left off entirely. Best of all, the diameter of the grating was somewhere around the 50-55m margin -this would fit snugly on Morvenn’s 60mm base without any overlap. It took a good bit of cutting to remove the rubble surrounding it, but nothing too difficult; I planned to surround the base with a bit of texture paint, so it didn’t have to be the cleanest or smoothest cutting job ever. After I had finished with the clipping, I filed the base of the grating down with a large flat emery board for just long enough to create enough contact points to securely attach it to the base.
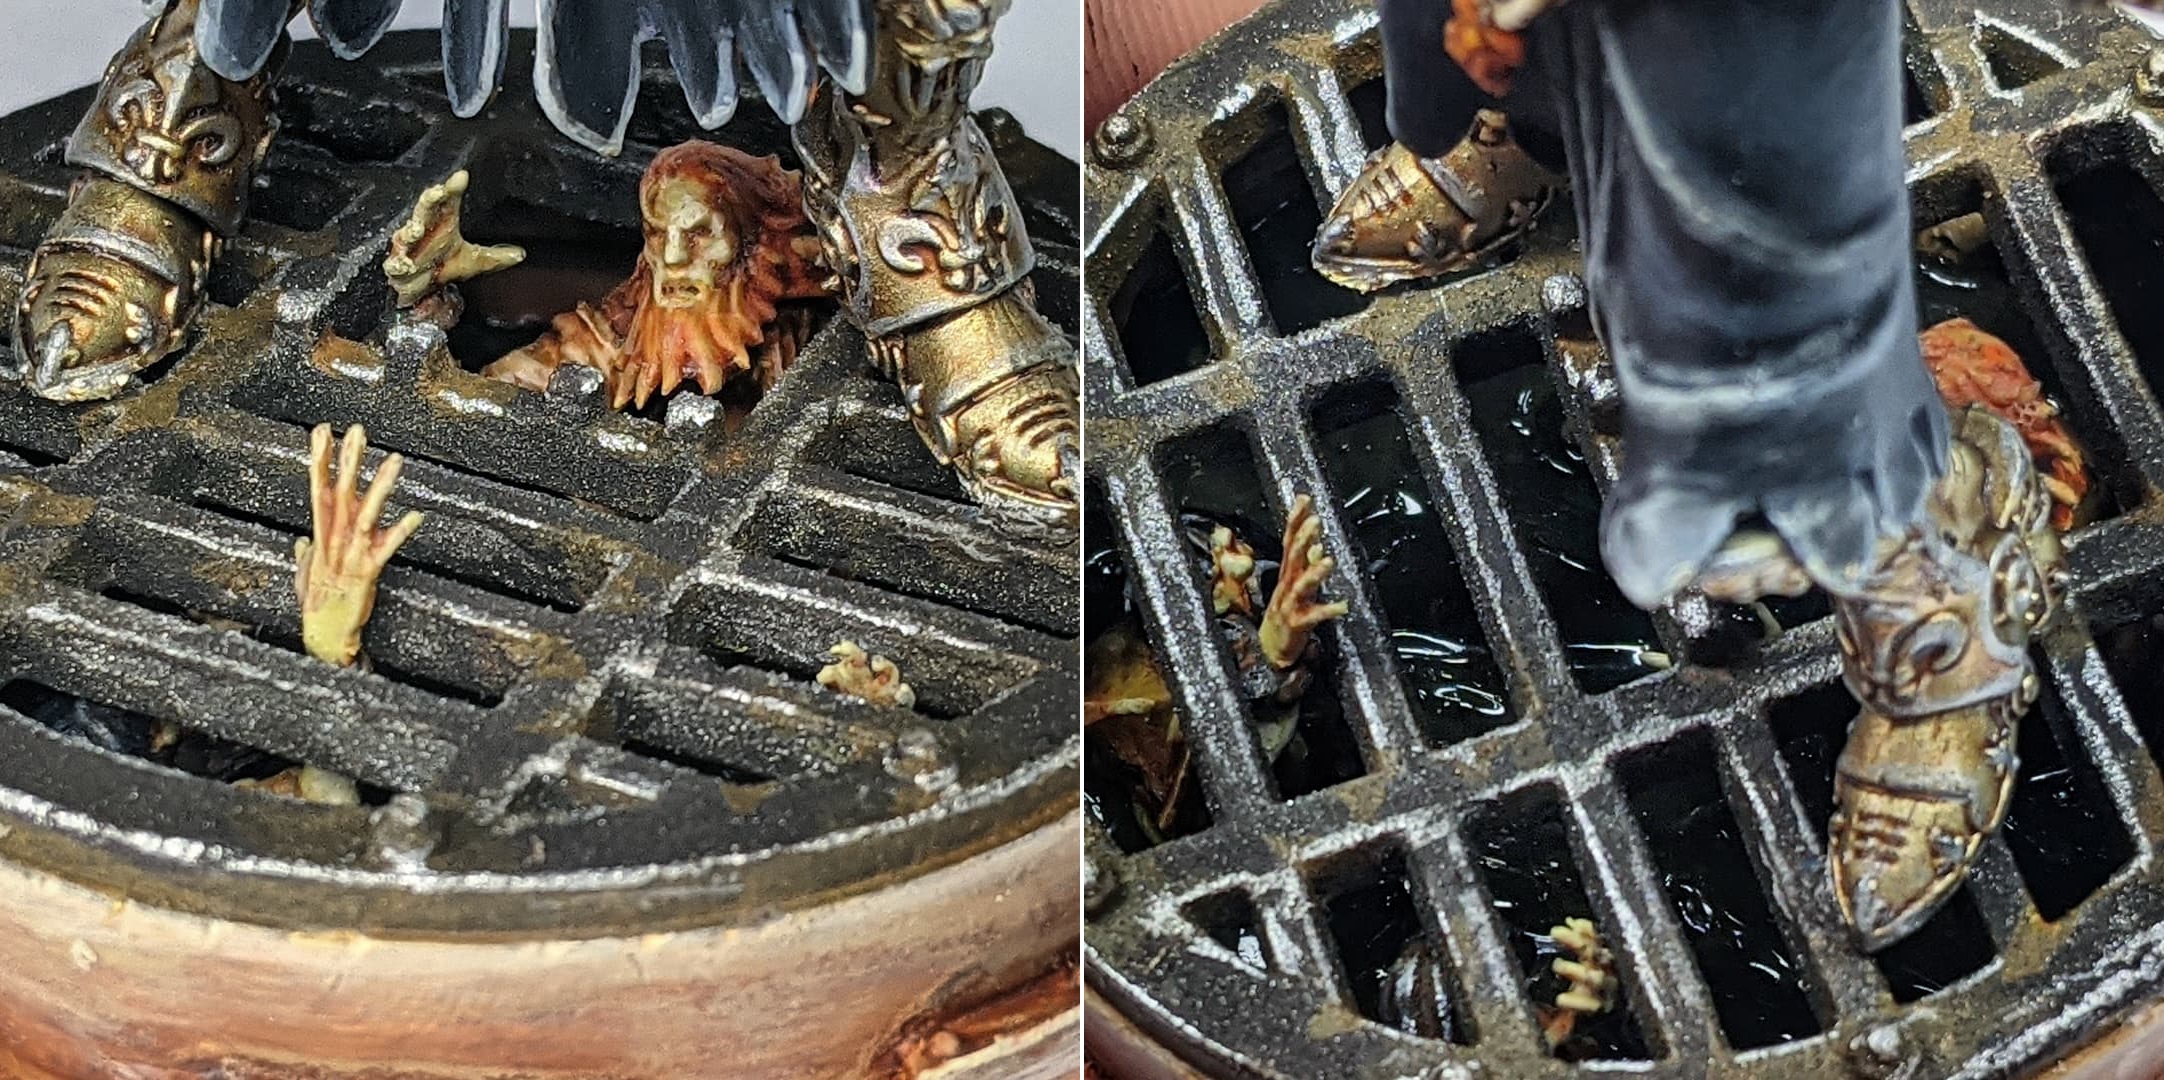
For the penitents themselves, I used Chainrasp bodies with Empire Flagellant heads. I still had plenty of the heads, and I managed to source a sprue of Chainrasps from eBay for buttons thanks to the surplus created by Soul Wars and Mortal Realms magazine. Chainraps were perfect for my purposes here; their hunched bodies and withered arms were a perfect fit – both aesthetically and physically, through the gaps in the sewer grate. It didn’t matter that they didn’t have legs, as I’d be attaching the bodies to the base from the shoulders up (waist at a push). The various chains and bondage adorning them actually worked in my favour for penitents, sewer dwellers or opportunistic escapees. Best of all, there was at least one miniature already posed as if reaching out to touch something and at least one more I could convert similarly with a quick hand swap. A little dry fitting and experimentation with blue tack revealed that I could probably fit about three of them on the base without creating detail overload, so I added third skulking beneath the surface as well.
It took a little bit of trial and error to get the miniatures posed and positioned correctly. There were a lot of factors to consider – where was Morvenn going to stand on the base? How could I make it apparent at a glance (or in a photograph) that there was more going on inside of the base? How do I fit the three penitents such that they’re visible in standard lighting without having to hold a torch to them? Where do they sit and at what angle such that the grating can be attached after painting4 without having to break, bend or reassemble anything? How many penitents can I fit inside the sewer without actually making it too busy?
In the end, I think I managed to reach a decent point of compromise for all of these factors. One of the penitents was positioned underneath the grate opening so that they could protrude a little more, making them more visible at the golden angle for photographs. Another can be seen reaching out, although it’s a little harder to notice at a glance. The third penitent – contained entirely below the grating – is the hardest to see, but I rather enjoy that there’s elements to this miniature that are only visible upon close inspection. Keeping all three of these from being directly below Morvenn’s feet or too far in the shadows did leave an area that seemed a little empty from certain angles, so I threw a couple of skulls in there for good measure. This is, after all, Warhammer 40,000.
Aside from getting them to fit under the grate, the penitents weren’t actually all that difficult to convert up. I assembled the push-fit Chainrasps that I was going to use, sawed them off at the shoulders, clipped off the skull heads and replaced those with heads from the Empire Flagellants kit. There was a bit of green stuff work needed to fill the gaps between the head, body and base, but that was the extent of it. All I had to do then was prime and paint the penitents in the same fashion as I’d done in the past. I could’ve painted the base around the penitents with a super matt black to suggest darkness, but I thought it would be cool to repeat the dirty water effect that’s on the rest of the army here. As it was such a large surface area, I tried to get a splotchy, uneven tone with Mutation Green, Goblin Green, Sick Green and washes Athonian Camoshade and Biel Tan green. I finished with a thick coat of Vallejo Water Textured, mixed with a bit of Athonian Camoshade. Now I was ready to stick down the grating.
The paint job on grating itself quick and painless. Standard Leather Brown/Elfic Flesh base tones, washed with Fuegan Orange for the rim. The metal was Gun Metal, washed Agrax Earthshade, coated liberally with Typhus Corrosion, pin washed in places with watered down Ryza Rust and then edge highlighted with Shining Silver. Once the grating was painted, I super glued it to the base and smeared some Vallejo Earth Texture around the bottom to conceal any imperfections. This was drybrushed with Elfic Flesh and washed with Fuegan Orange. Job’s a good ‘un.
Morvenn herself was a fun miniature to paint – not unlike painting Celestine, but without the airbrushed wings to stress over. I basecoated her armour in Vallejo Metal Color Gold, her shield Hammered Copper and the heavy bolter casings in Brass Brass then applied a thin and deliberate wash of Reikland Fleshshade Gloss – taking care to encourage the wash into any recesses and avoid any staining. The key here was to preserve the smooth base coat of Metal Color Gold and let the wash do all of the heavy lifting. When the wash was dry, I carefully went and highlighted all of Morven’s gold armour with Shining Silver, and finished with a second pass of Reikland Fleshshade Gloss – this helped to hide any mistakes I’d made highlighting and provide greater definition to the areas that needed more shading.
With the gold done, I went after all of the ceramic white. This includes the embossed detail in her shoulder pads, the beads on her rosette, detailing around the heavy bolter and her missile pods with accompanying statuettes. These were base coated in a couple of thin coats of Elfic Flesh, and washed with a some Seraphim Sepia thinned with a little Lahmian Medium. I then layered these areas with Elfic Flesh and edge highlighted with White. For the Rosette itself, I used Fiery Orange, washed with Fuegan Orange and highlighted with Gold Yellow. For the lining of her robes, I made my life a little easier by starting from a Tentacle Pink basecoat – this is a smooth and opaque transition layer that Fiery Orange has a much easier time painting over than black. I didn’t bother shading the orange here, but I did apply several layers of Yellow Gold towards the bottom of the lining to add some definition. The outside of the robes was a lot less fiddly – starting from a Charcoal base coat, I glazed in some subtle highlighting over the protruding areas by adding a little Elfic Flesh to the Charcoal. Each pass, I increased the amount of Elfic Flesh in the mix until it was 3:1 Elfic Flesh to Charcoal for the sharpest edge highlights around the hem of the skirt and the creases.
Next up was the silvers and other white metals. I wanted all of these to look crisp and pristine rather than battered and weather worn, so I base coated the heavy bolter, spear blade, ammo belt and exhausts in Plate Mail Metal, while the spear shaft was painted in Shining Silver. This was followed up by a wash of Nuln Oil Gloss, which I carefully guided towards the recesses, ensuring that it did not pool too much. Thanks to the slick finish of the metallic paint and the smooth flow of the Gloss Wash, this settled neatly into the recesses without too much staining over the surface, giving me nicely defined metallics without any sloppy highlights.
This left a small handful of finishing touches. I painted the wax on the purity seals with Heavy Red, highlighted with Heavy Red/Elfic Flesh and washed with Carroburg Crimson. I left the oath papers blank, but added a few stains with a little bit of Fuegan Orange. Finally, any smooth exposed silver cabling was given a couple thin coats of Spiritstone Red. With that, Morvenn was ready for a coat of varnish!
As with Celestine before her, I didn’t want to kill the sheen of her brilliant metallic gold armour with my usual Matt Varnish, so I opted for an all-over coat of Satin varnish instead. Once this had completely cured, I went over the non-metallic areas – the cloth, the rosette, the ceramic whites – and hand painted these with some Matt Varnish to kill the sheen. When this was completely dry, I attached Morvenn to her base using some CA glue and the miniature was complete. I think she looks great, and I can’t wait to get her on the table alongside her Battle Sisters in the Order of the Dying Light.
Well, that about does it for my 9th Edition Codex reinforcements for now. There’s still plenty that I’d like to add to this army – I want some more Rhinos, Celestine Sacresants, Warsuits and a Castigator along the line – but I’m happier going on now that I’ve now taken care of some of the auto-includes for the 9th edition iteration of the army.
Coming up next, I’m returning for one final instalment in another (much-shorter) series on this blog, before moving onto something altogether new for Plastic Cracked, so keep your eyes peeled for that.
Until then, thanks for reading and happy wargaming!
1 This included my remaining Heavy Bolter, Flamer, Meltagun and Storm Bolter armed Battle Sisters, along with a Simulacrum, a Sister Superior and some Celestians.
2 I’d originally passed on the Army Set because the timing of it’s release wasn’t great and the contents didn’t seem all that useful, and I’d regretted it ever since. That’s a lot of unique poses and heads you can’t get anywhere, which is like gold dust if you’re obsessed with cutting down duplicates.
3 Invictor Warsuits are the least frustrating offenders as at least the pilot is clearly sitting inside a cockpit like it’s a vehicle – the Astartes equivalent of a Sentinel. Power armoured soldiers ‘wearing’ power armour exosuits is just madness.
4 Absolutely no getting away from subassemblies on this one.