
Hello and welcome back for an entirely unexpected third instalment of Desolator of the North. In the first two instalments, I built and painted the mammoth ‘miniature’ alongside a scratch-built scenic base. This time, I’m going to built him a display board with space for an accompanying warband of Goblin Mercenaries.
Truth be told, I hadn’t actually intended on doing this display board at all until a couple of weeks ago. Following the announcement of all these new Stormcast Draconith miniatures for age of Sigmar, I ended up discussing dragon miniatures with friend and author of ListBot JP Ganis. Somewhere along the line we got onto the subject of Smaug, which – in JP’s opinion – deserved a more larger and more interesting display base than the one he came with. This set the gears in motion in my head. As luck would have it, I’d been kind of mulling over the idea of taking Smaug with small warband of 10 Goblin Mercenaries to an 800 point tournament some time in October, and the idea of building a display base for the force was kind of appealing to me.
This display board in particular posed some interesting and unique challenges. I wanted to embed Smaug in the display board itself – his base features a very prominent water feature and the display would look a lot more natural if I could embed this seamlessly within a larger area of water. This requirement was complicated by the fact that Smaug barely fits in my display cabinets as it is. In order to get him to fit, he needs to go in at a specific depth and angle on the shelf so as to prevent any contact between the paint and the metal or glass of the cabinet – with clearances as little as millimetres. The inlay for his base would have to be immutable, and the rest of the display board would have to be designed around it. Oh, and of course, I needed space to display 10 Goblin Mercenaries and a Goblin Mercenary Captain.
Okay, no big deal. Let’s see what we can do.
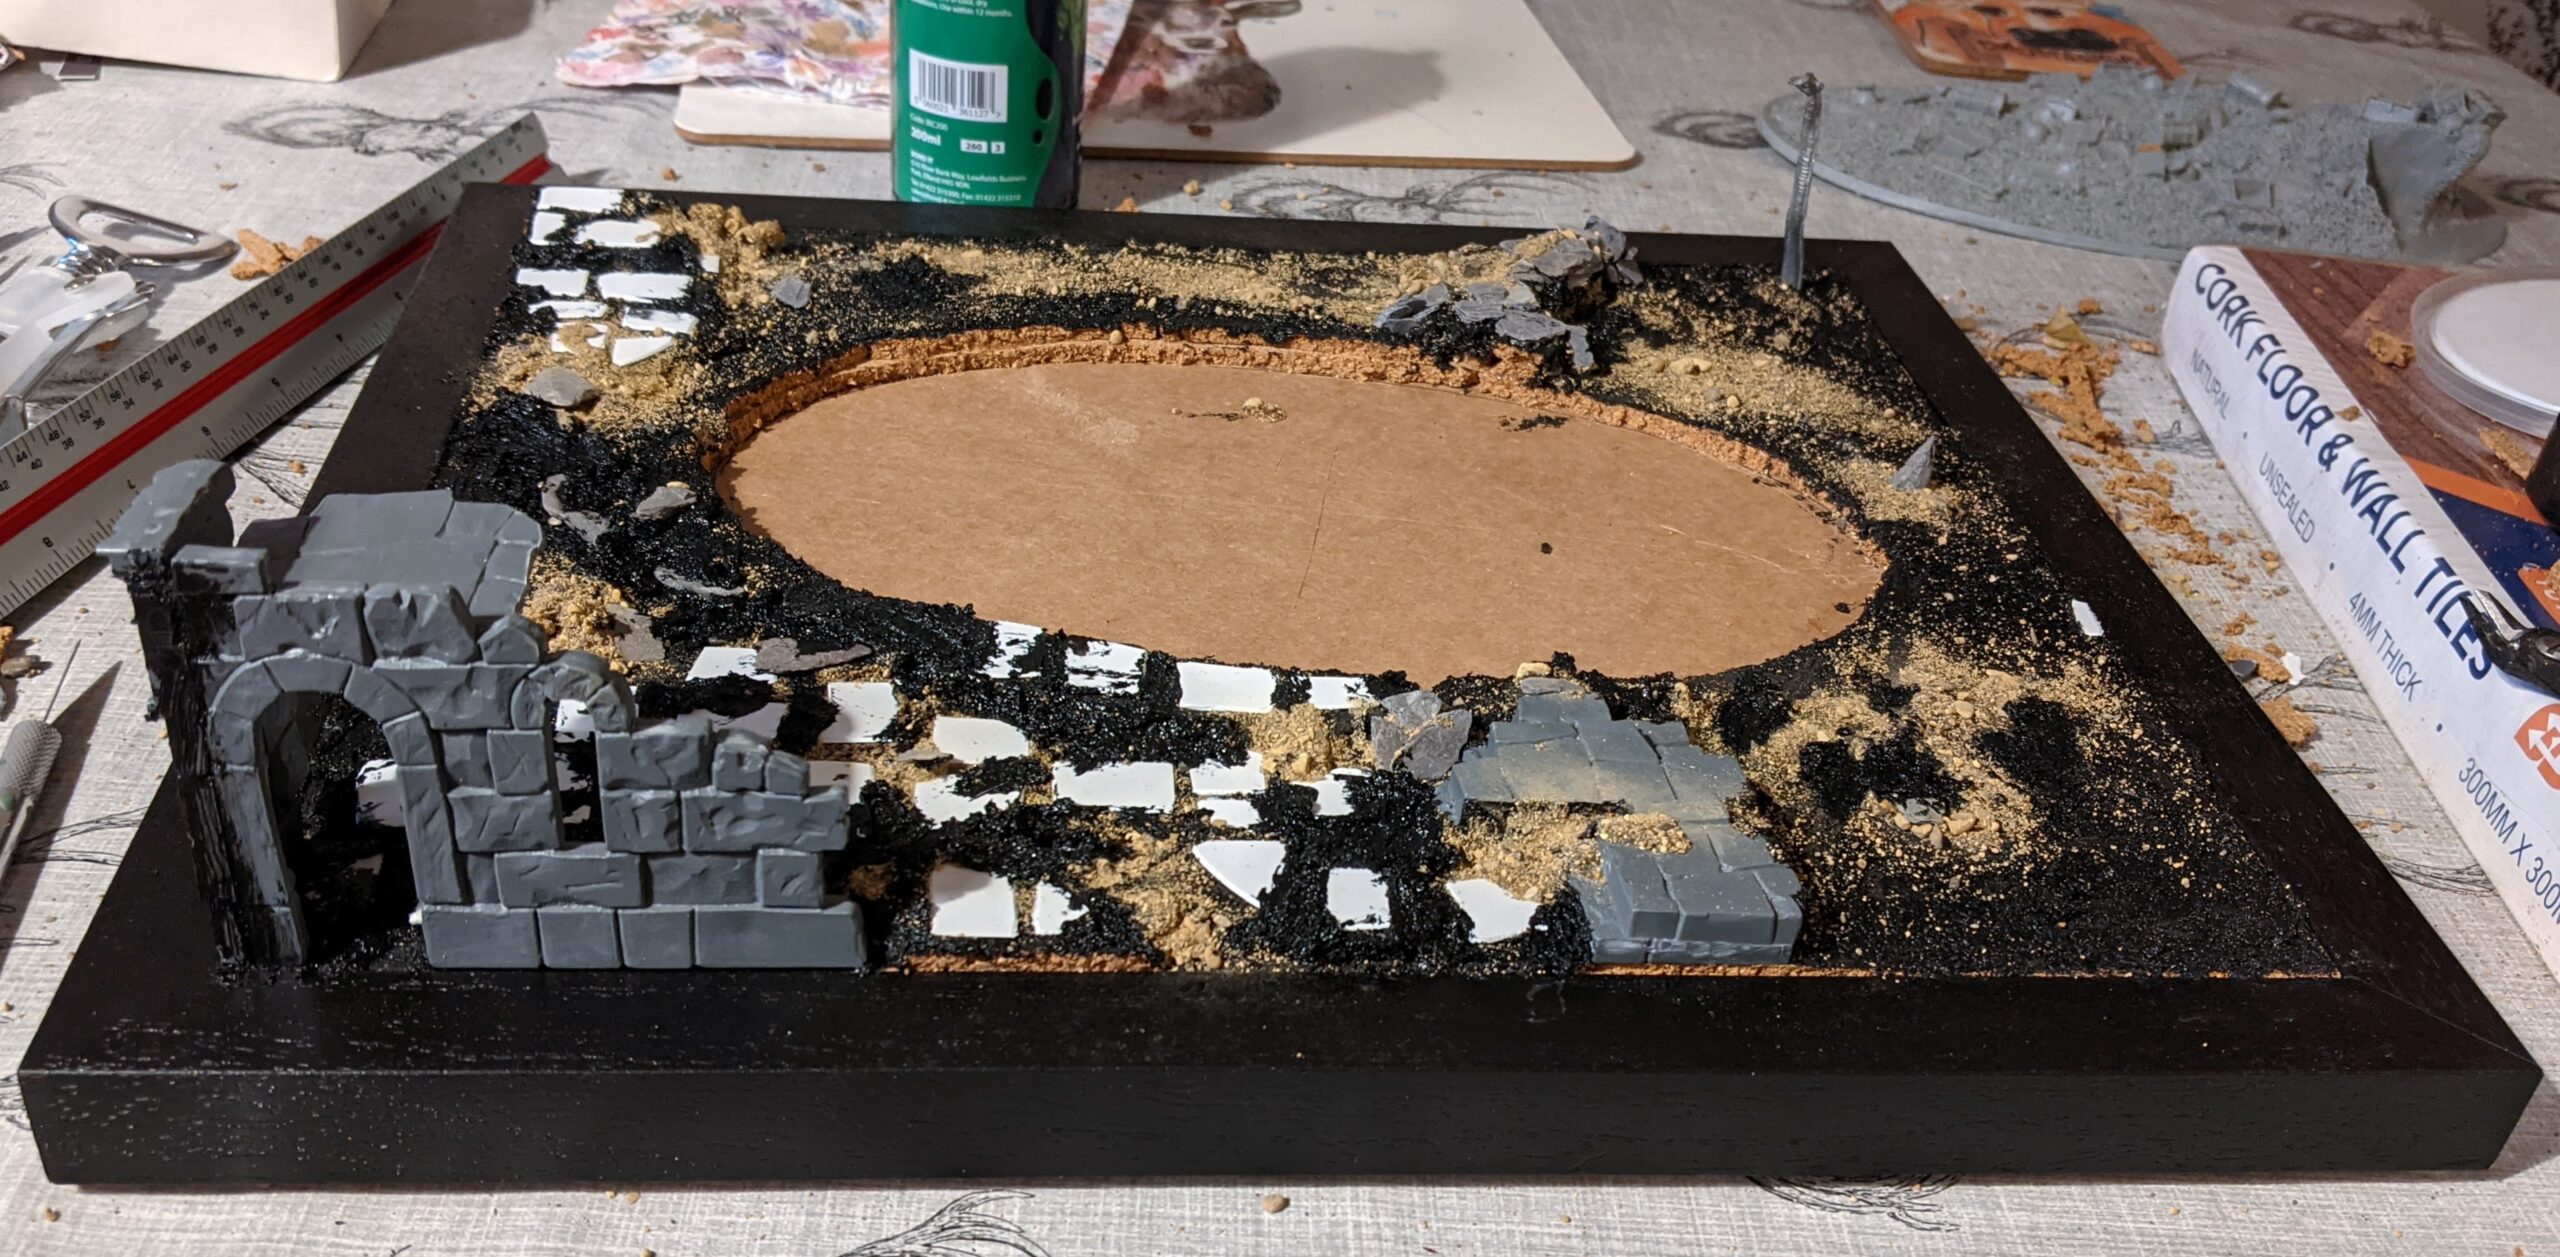
The first decision I had to make here would be the size of the display board. I’ve had a couple attempts at this so far and none of these have quite nailed it yet. My first attempt was sized to be large as possible inside my Detolf cabinets, but I didn’t account for the interior frame that holds up the glass shelves – they still fit, but at a bit of a jaunty angle to get the corners past the frame. For my Malifaux display board, I overshot it the other direction – the board fit, but with a couple inches to spare in both directions that could’ve been used to fit more miniatures. This time, I opted for a 13×11 inch frame – this fits nice and snug between the metal bars of the frame while filling up the full depth of the shelf.
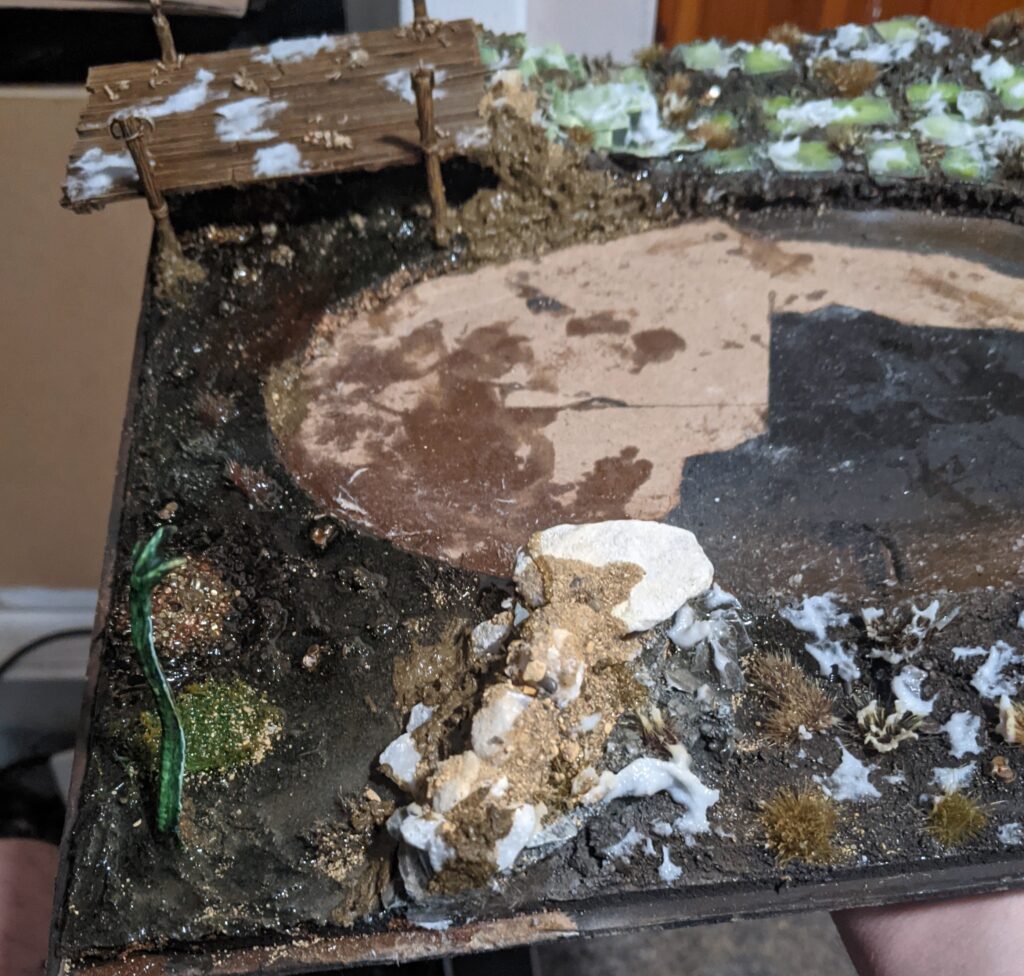
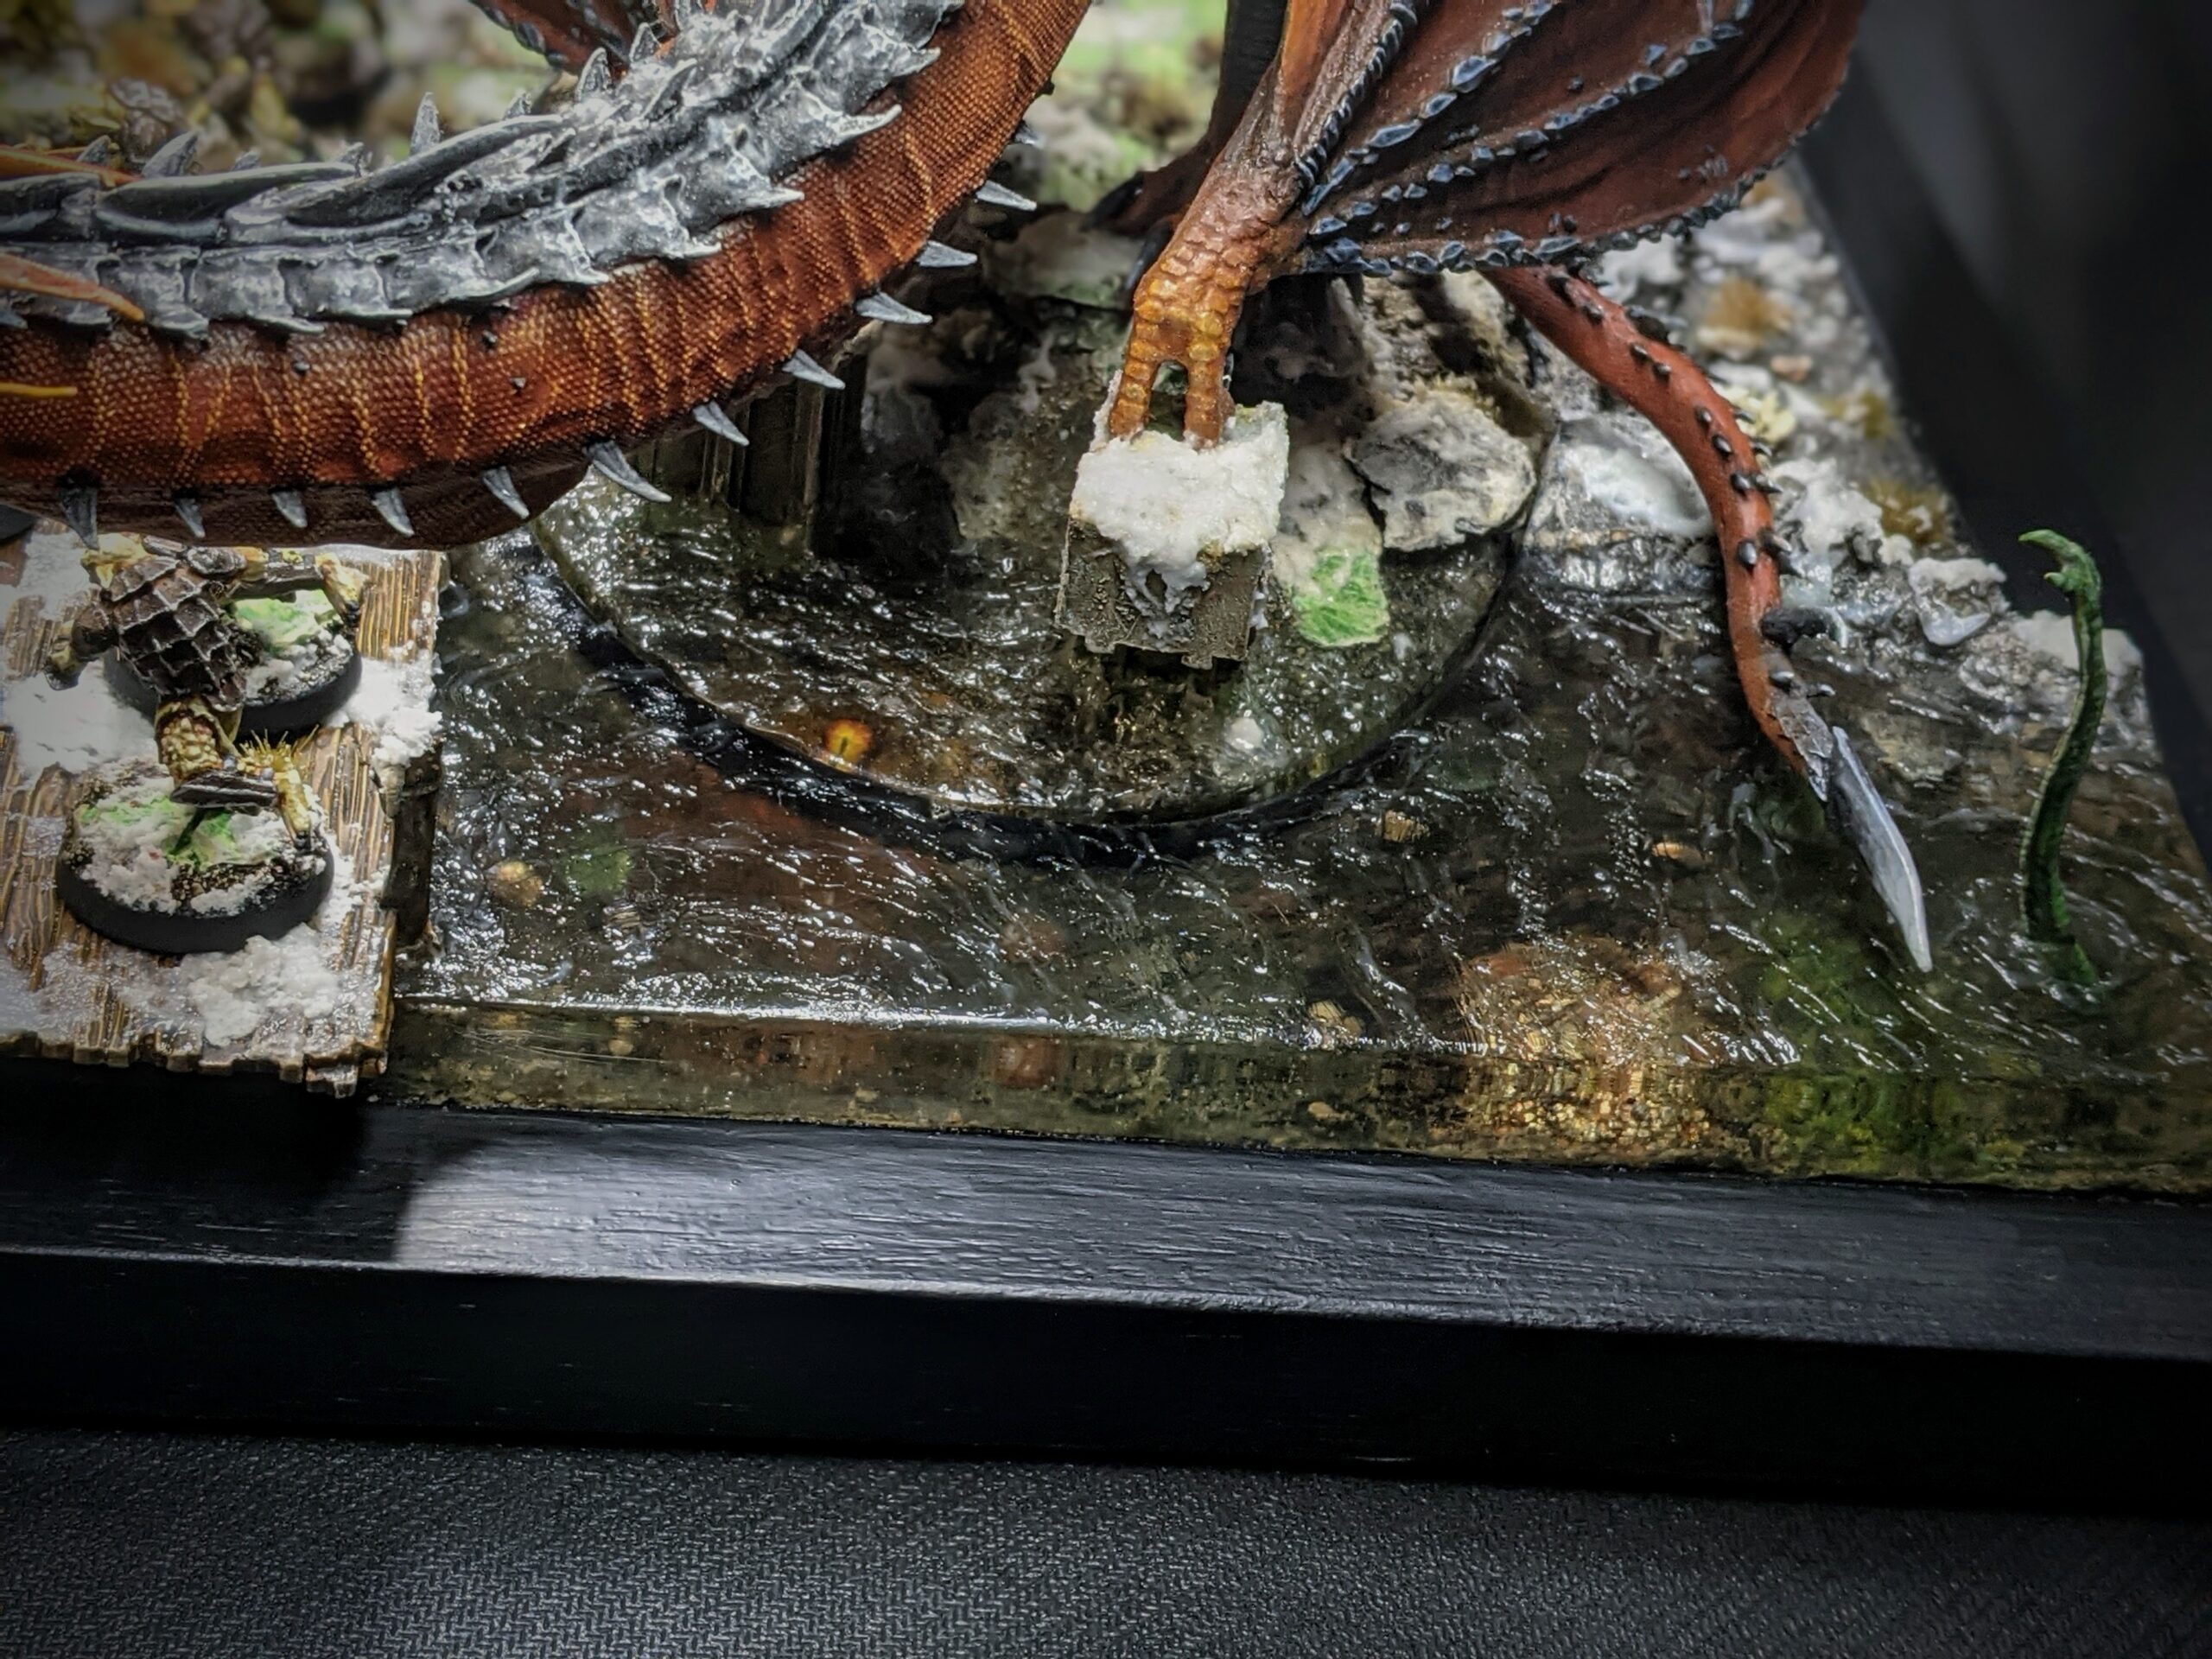
Once I had the frame in my hands, I slipped in into my display cabinet underneath Smaug and drew an outline around his base with a pencil, and then I got to work. A lot of the aesthetic design decisions here were simply following on from the base itself – I knew I had to continue the water element on the base, while the rest of the base was dirt, rubble and ruins. Some of this was a continuation of my Evil/The Hobbit style basing – cork, gravel and plasticard paving stones – although I wanted a few more substantial terrain pieces on the base as well to match the pillars/stairs on Smaug’s base. I rooted through my bitz box and found a few bits of Middle-earth scenery to help fill out the board. I used a corner ruin from the Osgilliath Ruins set to add a little visual interest to the front of the display and a combination of a set of stairs from the same kit and a stretch of wooden scaffolding from the Goblin Town set to create a sort of ‘dock’ area to run over the water feature at the front of the board (giving me a little more space to put my Goblins on the display board). As a final piece of interest, I also added in a metal Watcher in the Water tentacle that I had left over from the pieces I built for my Fellowship of the Ring narrative campaign. I dunno, it was just there in my bitz box and I felt like the water could use a creepy little sea monster.
Once the general layout of the board was finished and the texture paint had dried, I airbrushed the whole thing with Stynylrez Grey Primer and then set about painting it. This was super quick and simple – the dirt and brown earth, I painted in VGC Earth and all of the stone pavings in VGC Elfic Flesh. The stone pavings were then washed with Biel Tan Green and drybrushed with VGC White before the whole thing was drybrushed in Elfic Flesh again. Finally, the dirt above sea level was washed with Agrax Earthshade while the dirt that would be under the water was washed with Athonian Camoshade. Finally, the stones were glazed with a watered down coat of Waywatcher Green to restore a little saturation to them and better match those on Smaug’s base. Some other painting details include the Watcher tentacle, which was painted VMC Intermediate Green and VGC Filthy Brown on the underside before getting a very rough and messy highlight of the base colours with a little Elfic Flesh mixed in. This was then washed with Biel Tan Green and Seraphim Sepia on the respective sections to bring it all together and tidy things up. The grey stone rocks at the back of the board were painted in VGC Heavy Bluegrey, washed with Agrax Earthshade and drybushed with VGC Wolf Grey and VGC Khaki to get a dirty, realistic stone look.
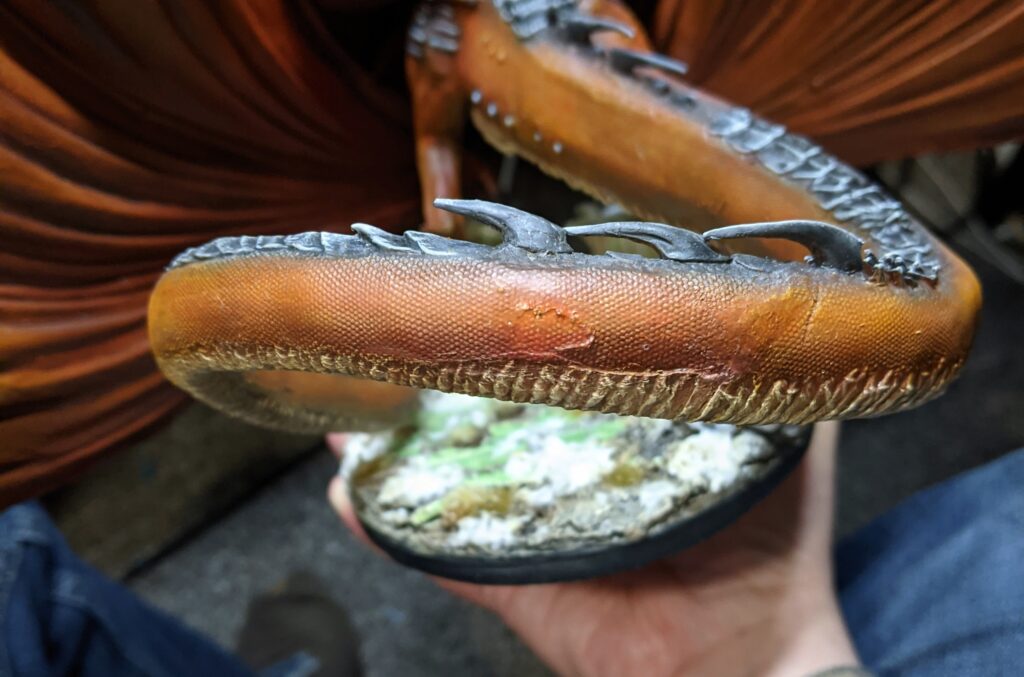
Regarding Smaug himself, one comment that I’ve received from a number of sources was that the ghostly/pale green pillars on his base were maybe a little too bright and striking and detract from the miniature itself. I didn’t want to actively make this worse with the display base, so I decided to go back and add a few more layers of paint to both the ruins on the display board and the pillars on Smaug’s base. This was done by alternating washes of Athonian Camoshade and Fuegan Orange with drybrushes of Khaki and Elfic Flesh, applied over several thin layers. Eventually, this resulted in something that meshed well with the rest of the green slate, but itself look grimier – as if soot and kicked up dirt had caked it. That’s how I’m rationalising it, at least – it explains why the parts of the pillar that are submerged in resin water are still that pale spectral green.
Oh, I also applied a very thin coat of Bloodletter Red Glaze around where the area where the lighting effect from the Palantir on Smaug’s base would meet the display base. This enabled me to give the effect a more natural fade out than his base alone allowed for.

With the painting finished, I next turned to gluing down an assortment of tufts, followed by a layer of snow. As with Smaug’s base itself, I mixed some Valhallan Blizzard into some Vallejo Water Texture to make it go further and give it a bit more of a sparse, wet, partially thawed look rather than a blanket coverage of snow.
As a final additional detail, I decided to add a scattering of gold coins and treasure about the base to represent loose gold coins and treasures dislodged from Smaug’s armour plating on his journey to this location1. To make this, I rolled together a thin sausage of Milliput and left it for a couple hours to partially cure. Once it was soft enough to cut but hard enough to maintain its shape, I cut tiny little discs off from the end with a sharp X-Acto knife to make little coins to scatter around the base. Additionally, I put a couple of piles of treasure under the water, just as something to look at under there. These were primed in white and base coated with Vallejo Glorious Gold, Bright Bronze or Hammered Copper. Finally, they had their edges picked out with Army Painter Shining Silver and finished with a wash of Reikland Fleshshade Gloss.

Finally it was time to add the resin water – and if you’ve read much of this blog in the past, then you know that this is where it all goes wrong.
To date, I’ve dabbled with resin water effects maybe four or five times total – and not once has the experience gone perfectly smoothly. That said, failure can sometimes be the greatest teacher. From each of my past failures, I’ve learned that it’s important that your resin mask be completely watertight, and that you can achieve this by using PVA glue to seal any contact or leak points. I’ve learned that your seal should be rigid, lest it warp and give the edges of your resin a wavy/irregular shape. I’ve learned that if you’re going to be pouring a lot of resin, then you should understand that the surface will sag in the middle and you will need to deal with raised edges in some way. Finally, I’ve learned that clear resin can be sanded, although you will need to finish with a very high grit sand paper to wet sand the surface smooth enough that it won’t appear frosted when you’re done. Polish, or gloss varnish must also be used if you want to restore full opacity to resin water.
Although many of these learning points came up during the process of adding the resin water effects to this project, I managed to encounter a slew of brand new issues and learned a great deal more in the process. The good news is that I believe that this has been my most successful resin pour to date – but it started with disaster.
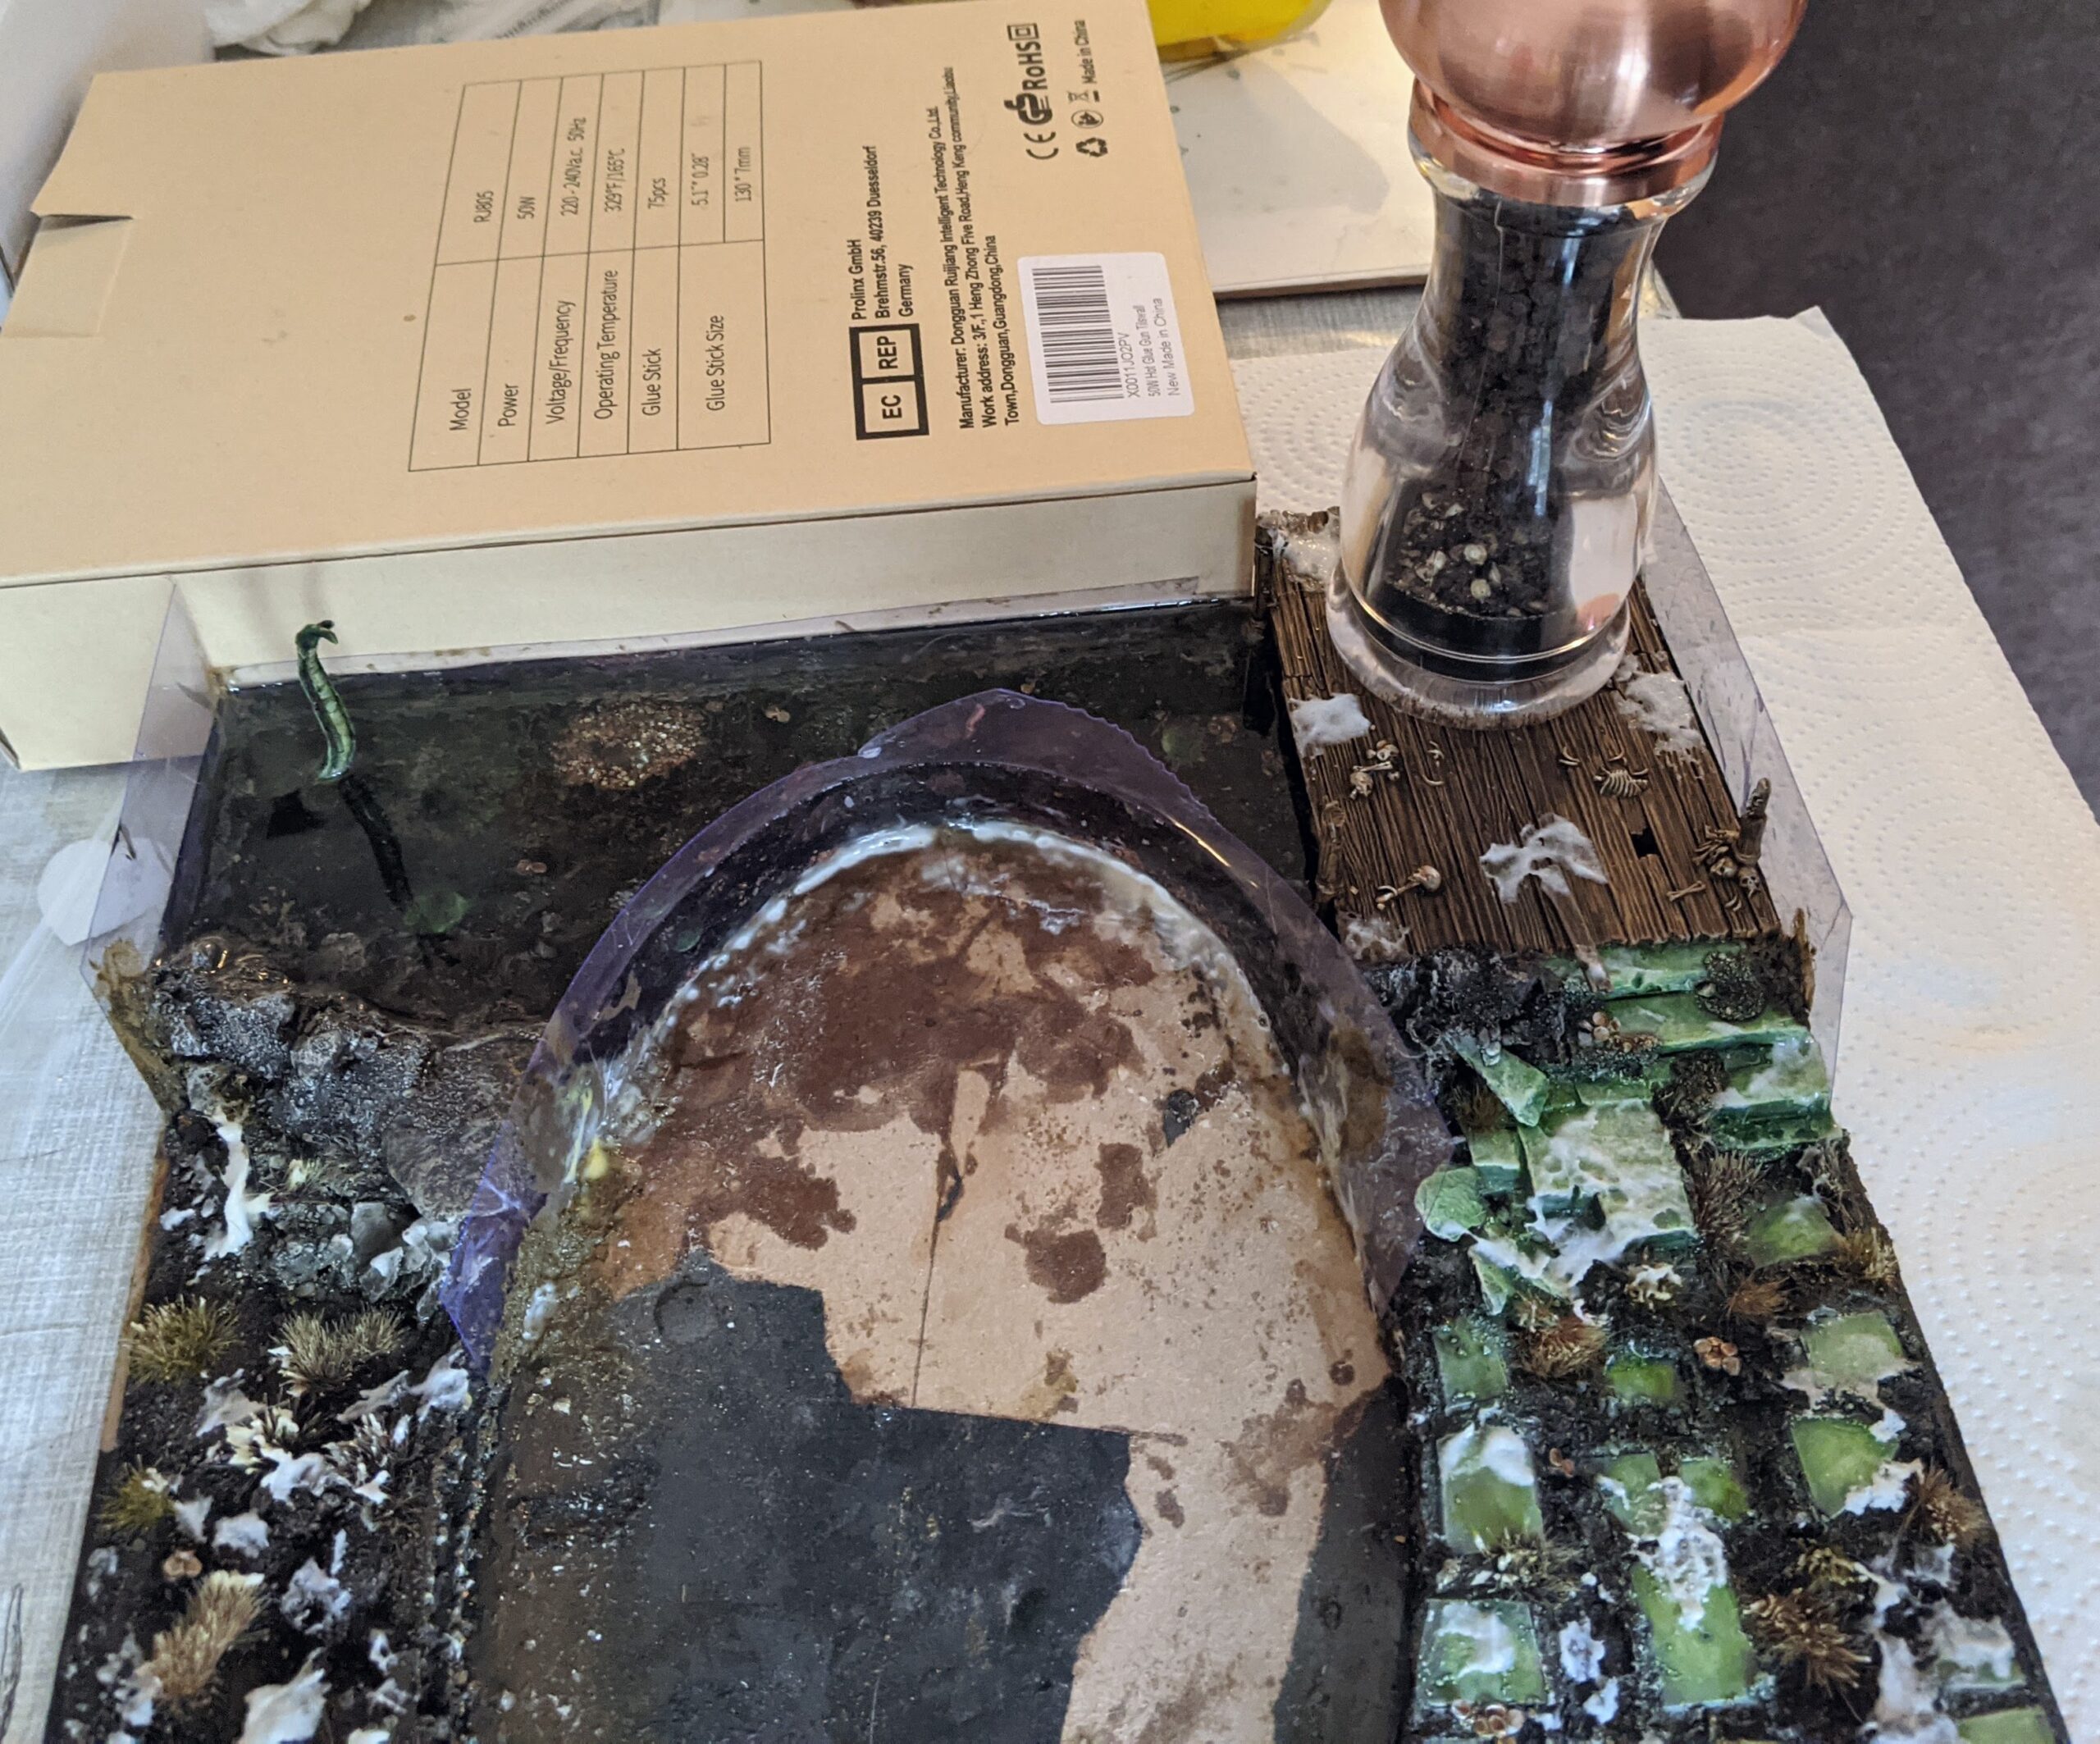
Let’s start with what I did right. I removed the textured area from the frame itself and masked off the area that the resin was going into using 180 micron acetate sheets cut to the correct size and shape. This was flexible enough that I could create a nice curve to mask off the inlay for Smaug’s base, but sturdy enough to retain its shape under pressure. I’d used masking tape for this in the past, but I’ve found that if your resin is any taller than half a centimetre, the weight of the liquid can cause the tape to warp a little bit. I affixed my acetate strips in place using super glue (as I could use accelerator to dry it instantly), and then went over all of the edges with PVA glue to create a water tight seal. So far so good.
I decided to give UV Resin from Green Stuff World another go, believing that I’d learned my lesson from the Bayou display board. It worked on Smaug’s base after all – just don’t try to tint it with Citadel Shades or it won’t cure properly. Okay, great.
Yeah… Maybe not so great after all. Once again, the UV resin didn’t cure properly. There were a couple of reasons for this, the first of which being the dock. This has to be glued in place before the resin was poured, but it also prevented the UV light from getting in at all of the resin. I’d hoped that using clear acetate on the edges would help with this, but alas – it was not enough. Not enough exposure to UV light meant that most of the resin under the dock completely failed to cure, which caused all sorts of problems as water from the other side of the board started to harden and separate. But this was far from my only problem.
After a few experiences with UV resin, I’ve come to believe that it’s just not a very good solution for deep resin pours. The UV lights that I’ve been using – a battery powered torch and a mains powered nail-curing station – seem to only cure a few millimetres of the resin on the surface, which hardens immediately and prevents the liquid resin beneath from hardening. It’s a bit like a sheet of ice forming over a lake, with the rest of the sticky UV resin running freely beneath the surface, creating air bubbles and wreaking all sorts of havoc. It had only worked for Smaug’s base, I believe, because I had originally poured a much shallower first layer followed by a second in an attempt to smooth out a lump in the waters surface – but attempting to cure a single layer over a centimetre deep just wasn’t for happening.
However, my choice of resin wasn’t the only problem with this disastrous first attempt. Although I had done a good job of making my plasticard seal watertight, I’d not done quite so well with the rest of the diorama itself. The little dam of rocks that I’d made on the back side of the display board was not nearly tall enough to get the water level high enough to match Smaug’s base, while my little dock staircase had a ton of gaps that the resin was going to pour straight through after it reached a certain height.
I took note of the shortcomings in my design and did my best to rip the half-cured UV resin from the surface of my display board (while wearing a pair of vinyl gloves, of course). Fortunately for me, as the bottom layer of resin hadn’t cured, this was reasonably easy to do without causing too much damage to the paint job. After ripping it off, I piled up my stones a little higher this time, re-assembled my acetate cordons and made liberal use of texture paint to ensure a perfect seal on either side of the display base. Now, I was ready to try again.
With UV resin off the table, I decided to fall back on Deluxe Materials’ Solid Water resin product – the same product I’d used previously on my Barrels out of Bond diorama. Once again, I set about building a plasticard boundary around the edges of the display board and inside the Smaug base cutaway.
Knowing full well that I couldn’t instantly seal any leaks with a UV torch this time, I decided to make sure that my board really was 100% leak proof – instead of going straight to pouring resin, I decided to pour some tap water into my water section to ensure it really was watertight. It was a good job that I did so, as I discovered a number of leaks this way. Some of it was expected human error – I hadn’t quite gotten perfect contact/seals at the bottom of the plasticard – but I did also learn of a few shortcomings I hadn’t previously considered. Water was leaking underneath the edges of the cork base itself and spilling out of gaps holes at the other end of the diorama. That may not have been an issue with resin, being itself an awful lot more viscous than water, but this time I wasn’t taking any chances. I made two passes at sealing my resin pit, using texture paint to seal off any and all edges where the terrain met plasticard. Finally, I was ready to pour my resin.
This was a terrifying process but – I’m pleased to say – fairly uneventful. In an attempt to curtail the issue where resin water has a tendency to sink towards the middle as it cures, I poured a little more resin onto the surface after it had started to solidify (but not completely harden). Unfortunately, while this did not damage my resin water, it didn’t completely solve the issue either. Ah well, what can you do?
Still, I’d ended up with some decent looking resin water. Maybe my best result yet! How exciting!
So, naturally, I set about ruining it immediately.

As lovely as still water looks – it just wasn’t going to mesh with Smaug’s water base unless I carried over the water texture finish onto the display base. I did this by placing Smaug into the display base extending the ripples on his base onto the display board, doing my best to mesh them naturally with conflicting ripples caused by the tentacle poking out of the water.
Unfortunately, no matter how long I left it, the water texture that I’d applied didn’t seem to want to properly cure, leaving ugly semi-transparent white ripples on the surface of my lovely resin water. This was partially due to the altogether worse new recipe for Vallejo’s Water Texture product (which just doesn’t seem to want to cure clearly as well as the old stuff), but mostly down to me applying it too thick. Unfortunately, there’s no easy way to remove this texture without leaving some nasty residue on the surface of your resin. The only way I could remove it would be to sand it, which meant I’d have to sand down the whole water surface. Wonderful.
Every cloud has a silver lining, however. The rough, sharp edges left from pouring the resin were pretty ugly, and this was a nice opportunity to smoothen out the finish and create something a little more rounded and aesthetically pleasing. That was the upside. The downside was that I’d have to spend hours slowly wet sanding it – starting from 120 grit paper to remove the texture and smoothen out the edges, slowly making my way up through 200, 300, 400, 500.. All the way up to 2500 grit sandpaper to try and smooth out the final scratches2. This took a few hours, but once I finished it up with a layer of gloss varnish followed by a re-application of Water Texture, the end result was damn near perfect.
With the ordeal of the resin water behind me, it was time to make some finishing touches to the miniature. I carefully re-inserted the display base into the picture frame border and repainted the edges with Stynylrez Black Primer to get a nice, consistent and sturdy black finish. Of course, after all the fun I’d had with my Bayou display board, I couldn’t resist the urge to stick another speaker into this one. I did a little sound editing to sync up a bit of music from Smaug’s theme along with a relevant Smaug quote. Scroll down to the end of the post to see a video if you’d like to hear it in action.
It’s almost time for the lovely finished product photos, but first let me tell you about how I managed to ruin this miniature yet again.
Remember when I started this post talking about how careful I was to make sure that the miniature would still fit in my display cabinet after the base was added? Well, I didn’t just stop there. After every step – texture paint, masking the resin area of, remasking the resin-area the second time – I took my display board, put it back in the display cabinet and made sure that everything still fit with Smaug installed on the board. Despite my diligence, something must have shifted and expanded during the resin curing process, because after all of this, Smaug no longer fit on the display base in my cabinet.
Smaug.. no longer.. fit. I grappled with this fact for some time, weighing and measuring how much time and effort had went into this display board vs my fear of ruining a miniature that also took a fair bit of time, effort and stress to paint. Although my primary aim with this board was always to give the miniature a little more oomph at events, I couldn’t fathom working this long and hard on a display piece to not be able to display him at home. In the end, I did what I had to do.
I took Smaug downstairs, boiled a big bowl of water and submerged his tail, bending it just a few more millimetres in. It worked, and he fits now – more comfortably than ever – though he picked up a battle scar to show for the experience.
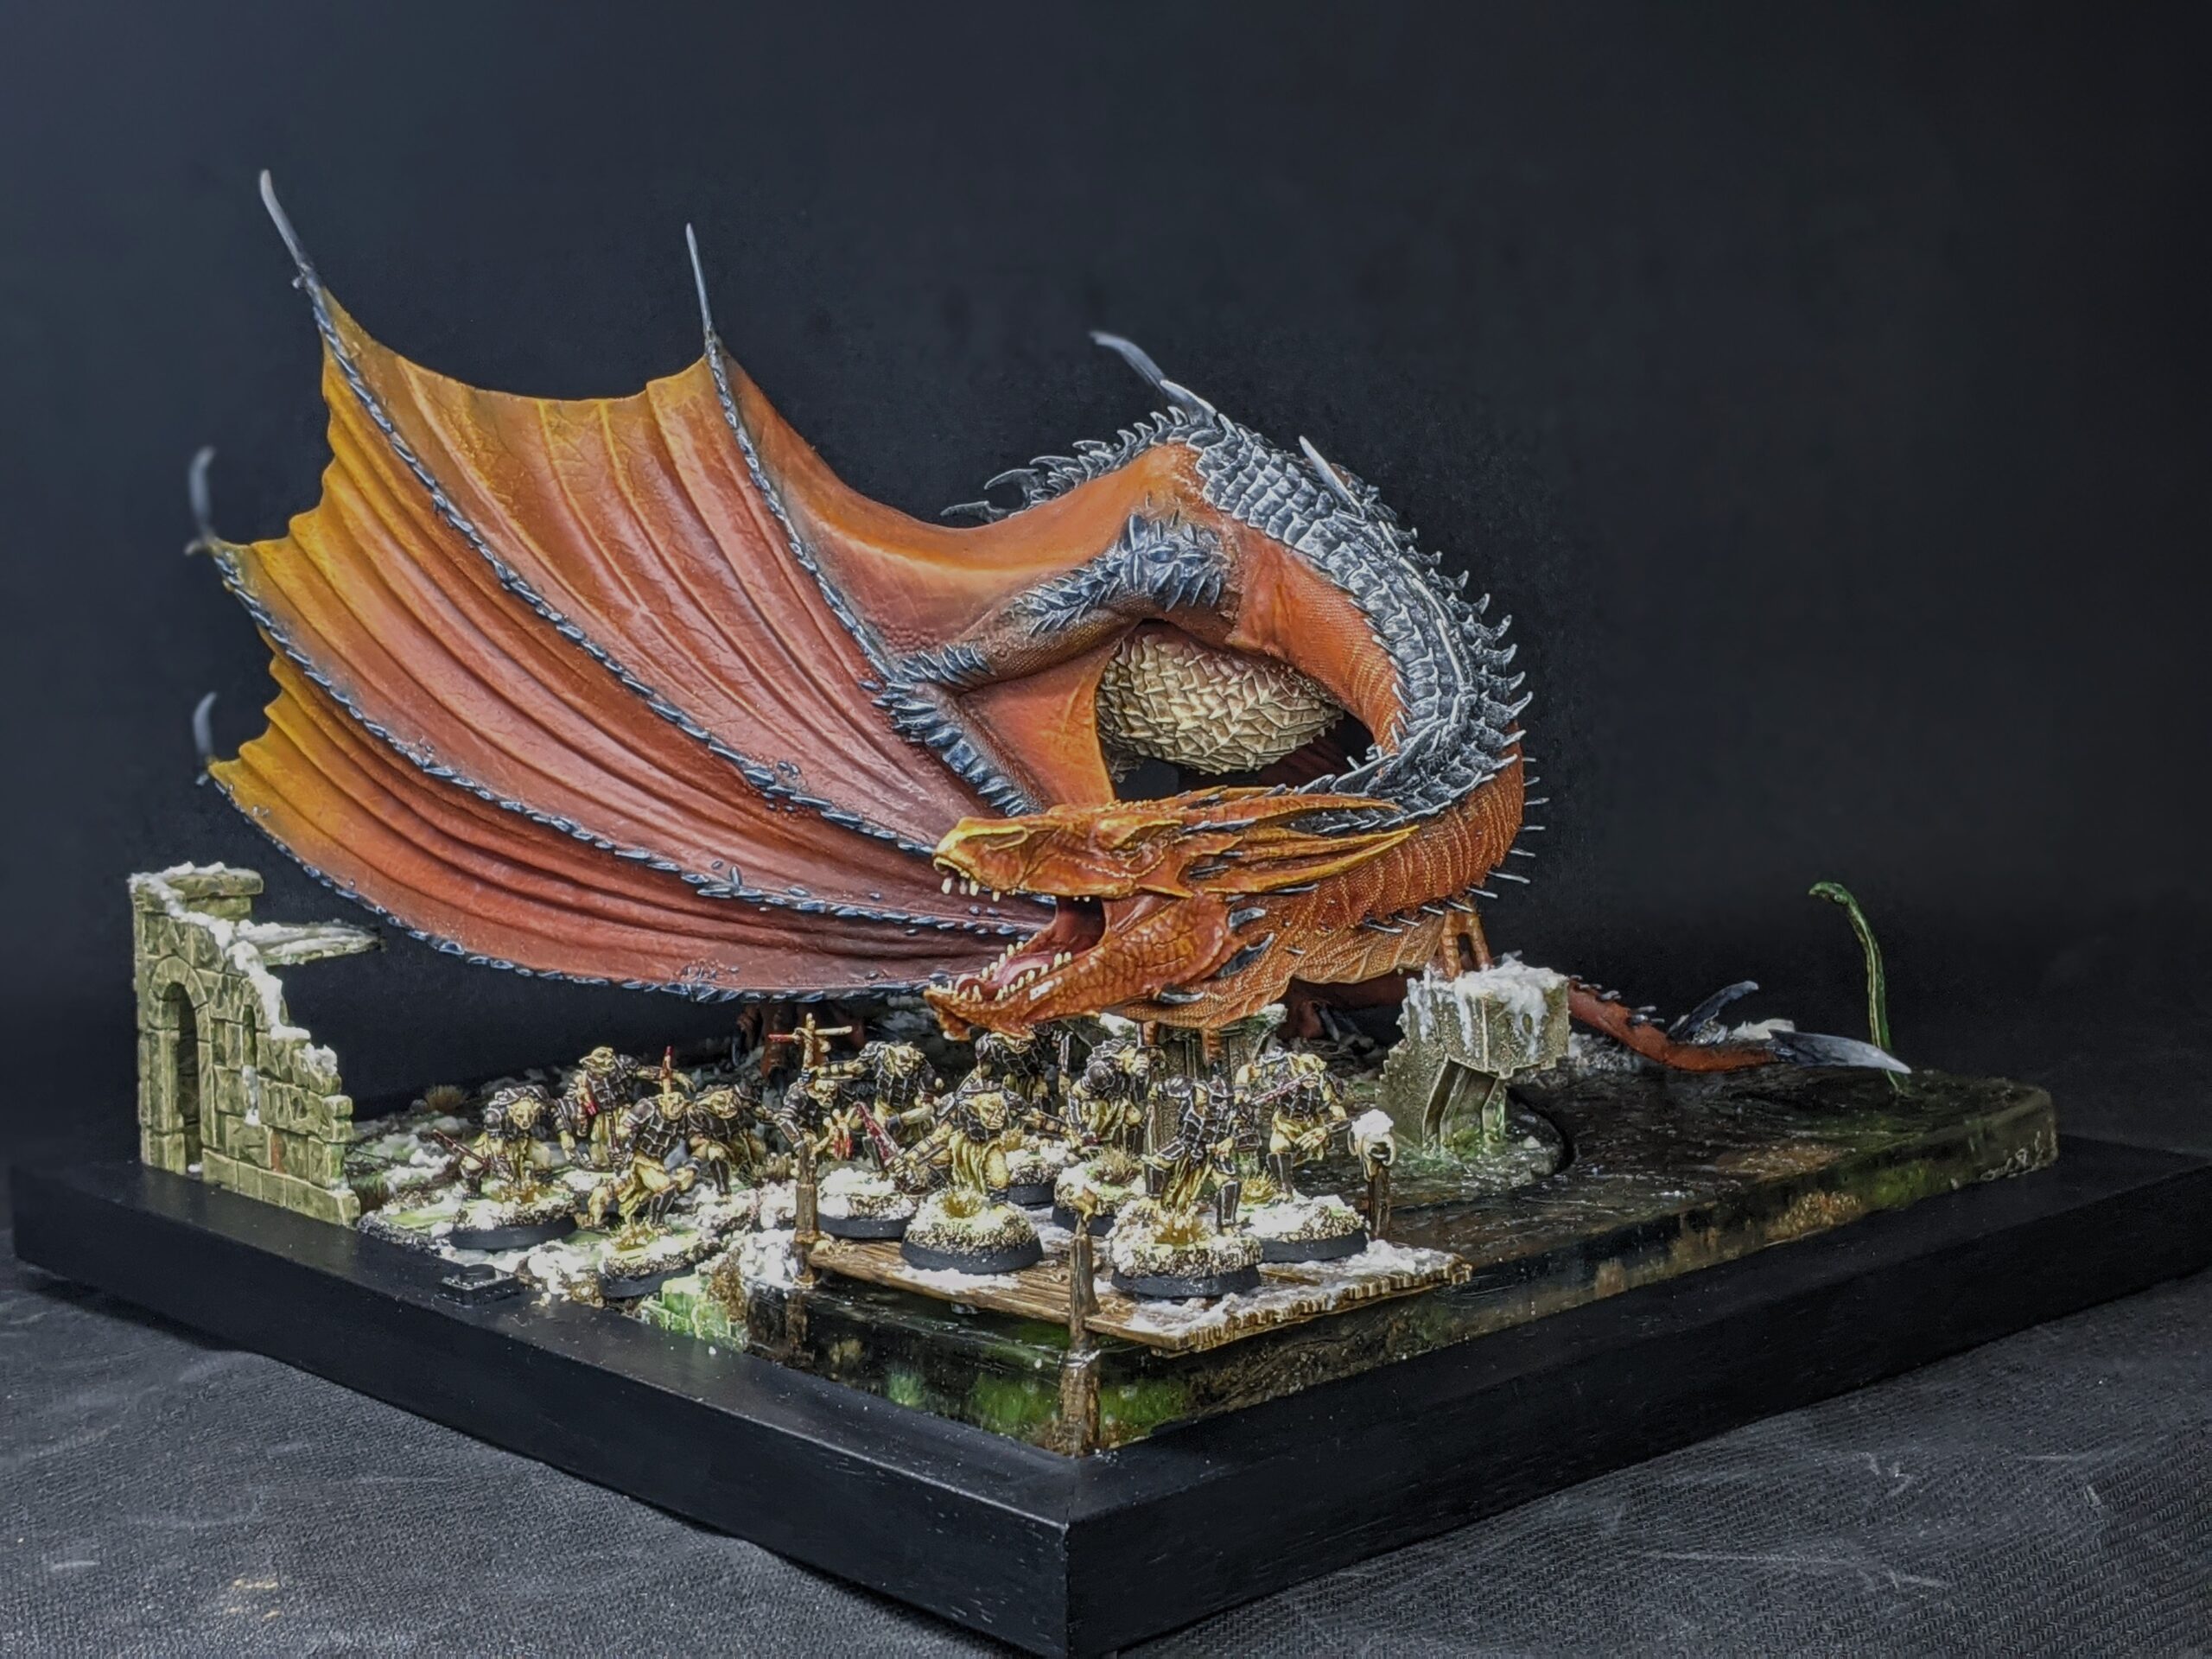
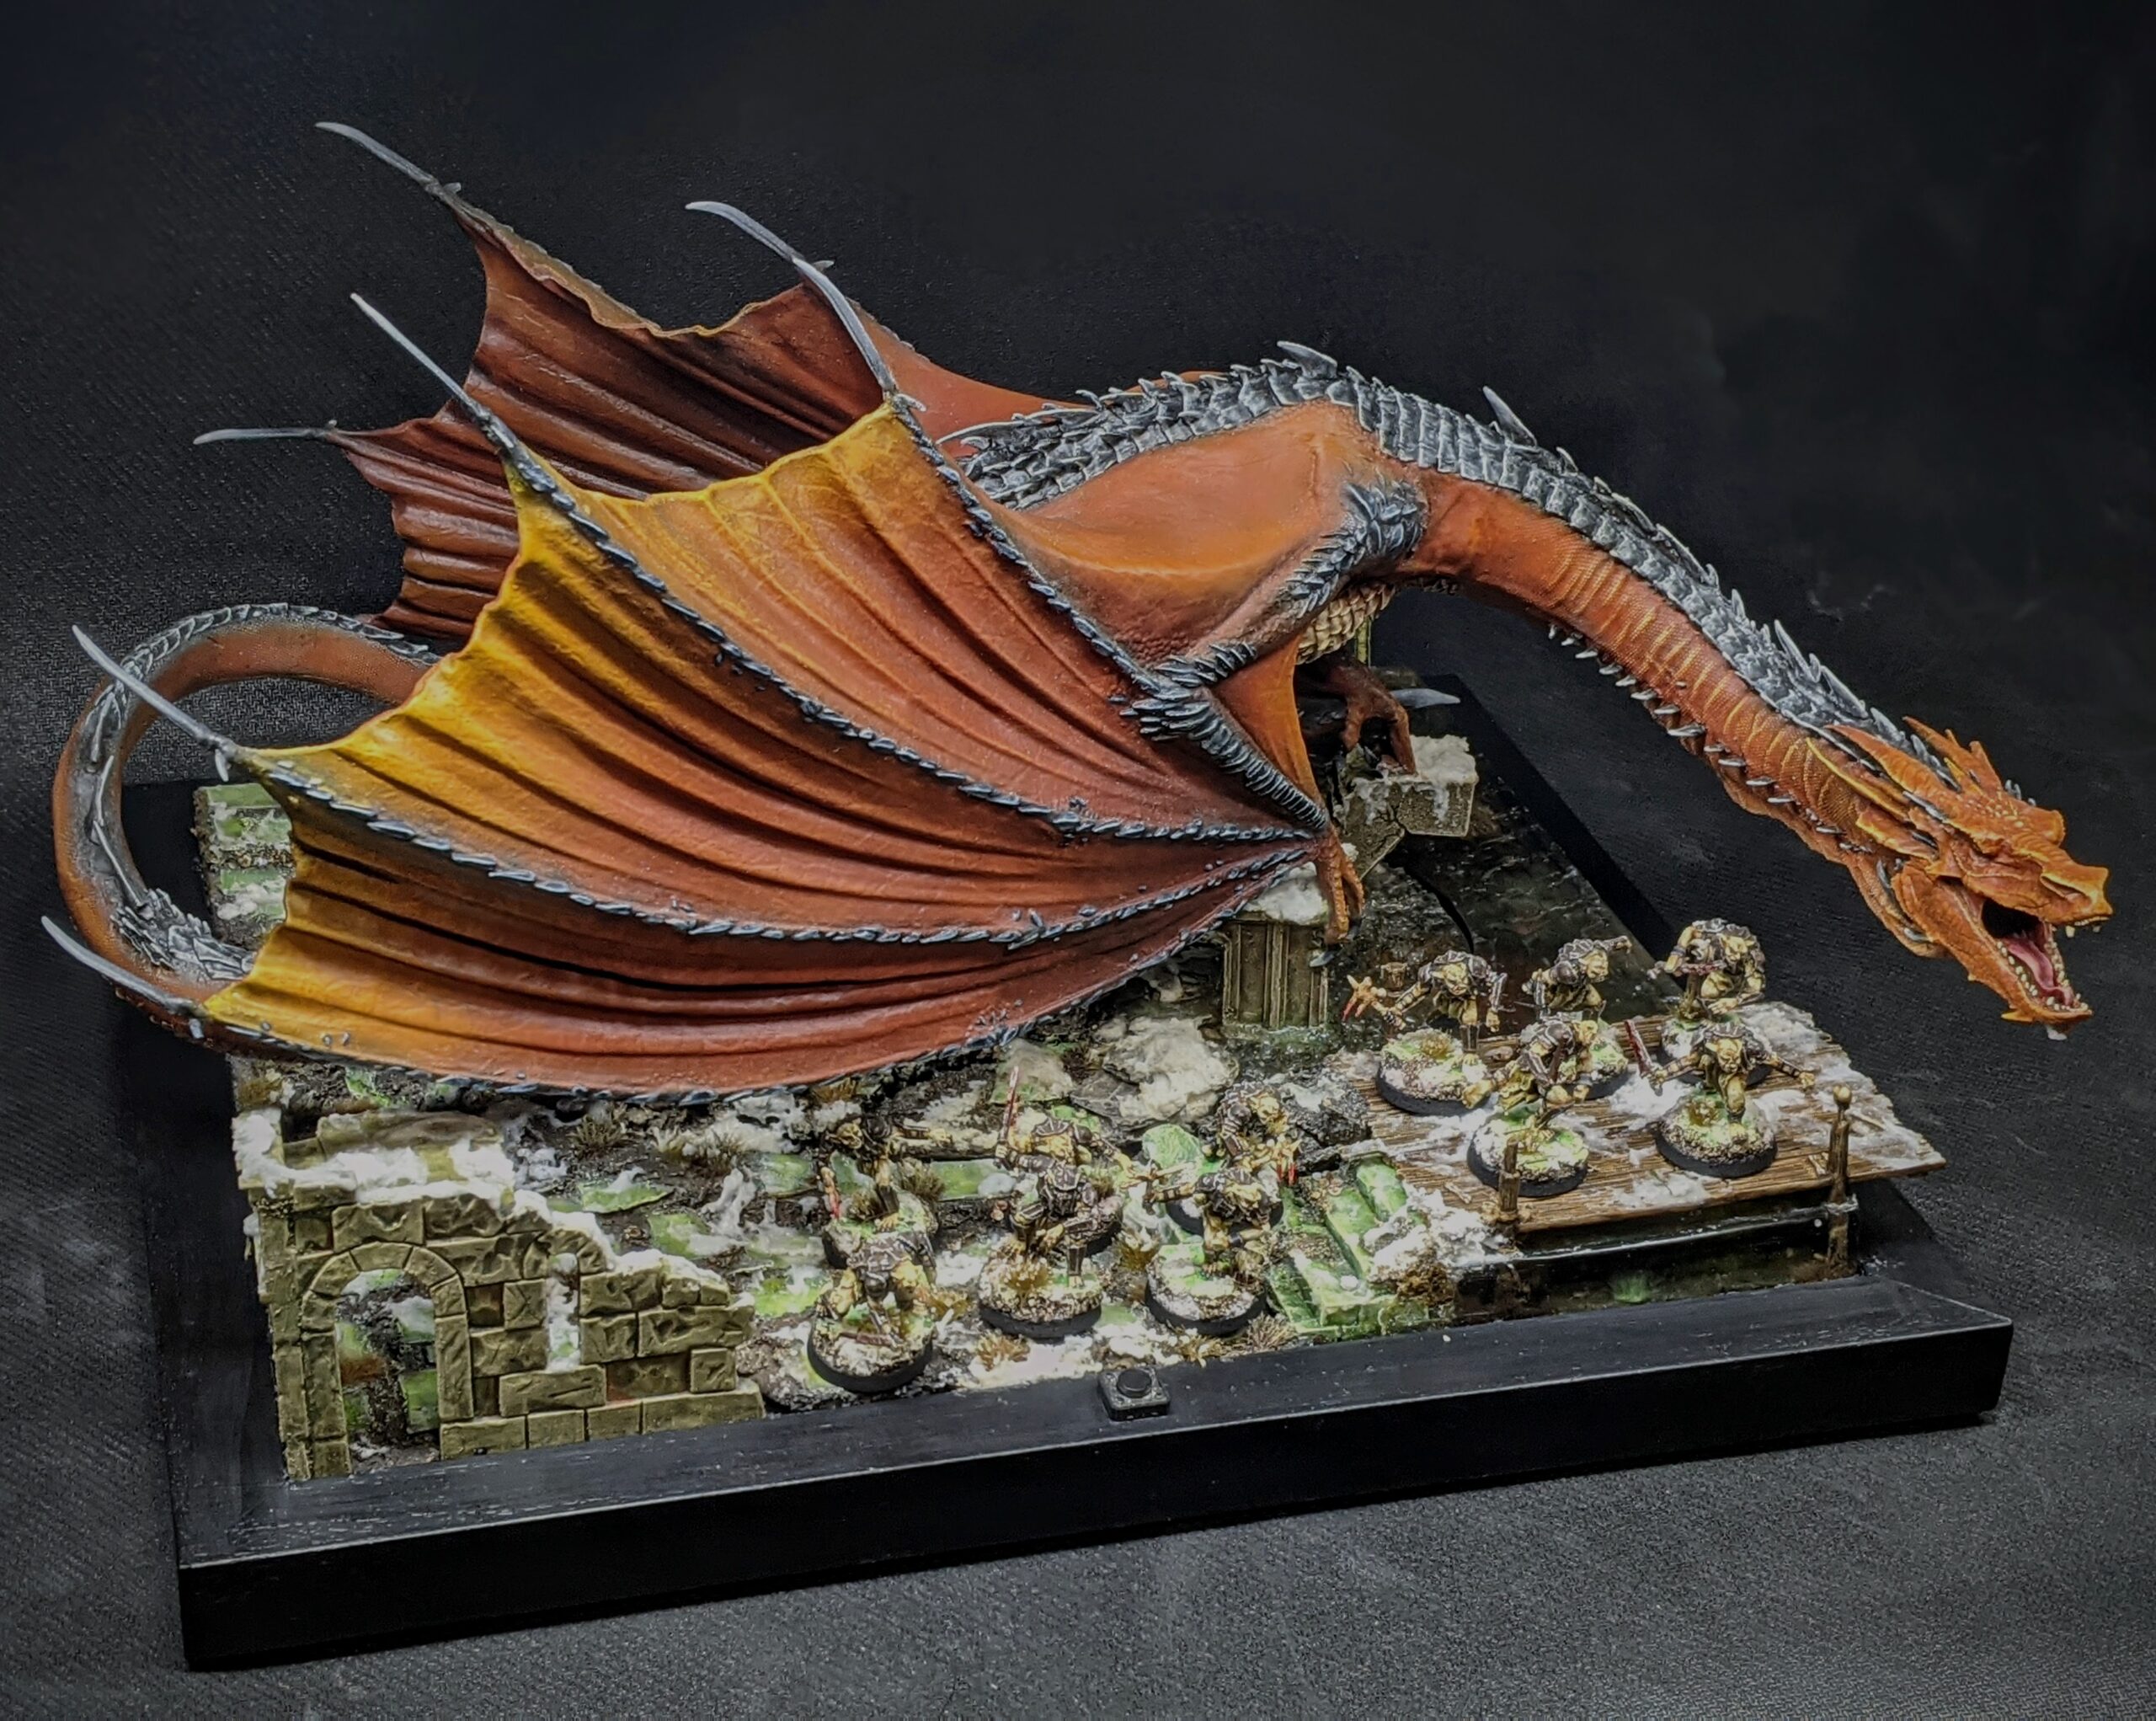
One thorough, strung out emergency paint job repair later, I could finally call the whole project complete. It’s taken about a month of on and off construction, painting, resin pouring, ripping out resin, repainting, resin pouring, resin sanding, ripping out hair and repainting later, but I’m really happy with the final results.
Alright, enough WIPs and rambling – it’s time for some finished photographs!

And of course – as promised – a video of the sound effects in action!
As ever, it’s been an unexpectedly huge amount of work, time and effort but I’m really happy with how everything turned out in the end. The display board just really gives Smaug that little extra presence as a display miniature and I do feel like there’s much more of ‘me’ in this piece now. Besides the end result, I feel like I learned a lot on this display board – the dimensions finally feel ‘just right’ for my Detolf cabinets, and every time I work with pouring resin I feel like I come away from the experience a little wiser and a little better prepared for next time.
So, what’s coming up next on Plastic Cracked? Well, we’re finally getting into the next big thing as it were – and it’s a doozy! Next on the painting table is a project that has, in some ways, been in the works for a few years now. I can’t wait to tell you all about it soon.
Until then, thanks for reading and happy wargaming!
1 Credit for this idea goes to my fiance. I just thought it was a cool little detail that succinctly conveys something about the character of Smaug on the model.
2 It’s important to work your way through the various grit sandpapers slowly, otherwise you may end up leaving some big, unsightly scratches behind. 200 grit sandpaper has a much easier time smoothing out any scratches or rough edges created by 120 grit sandpaper than, say, 800 grit does. On my first pass at sanding the water resin, I rushed my way through the 200-1000 grit papers and by the time I was at 2500, I still had some fairly noticeable scratches that 2500 was never going to remove. It pays to be thorough here.