
2020 kicked off in a pretty intense way for me, as far as hobby was concerned. After what was meant to be a few additions to my Warhammer Fantasy Skaven army spiralled into a six part series of rapid expansion, I was more than ready for a well earned break. I’d planned for a bit of a more relaxed approach to my hobby over the coming months, especially with the impending release of Elden Ring. As ever, what actually transpired was.. not that.
The timing of this post ultimately comes down to an article on Warhammer Community, informing their customers that as of March 1st, Games Workshop would be increasing the price of the overwhelming majority of it’s products. In particular, I noted that ForgeWorld would be seeing a price rise of 10% across the board. This was unwelcome news to be sure, but the upshot was a brief window where I – aware of this impending price hike – could get in any last minute purchases at the original price point.
Long term readers of this blog may be aware that I have been banging on about buying a Thunderhawk Gunship for my Space Wolves legion for years now. I already slept on the last price hike, so I wasn’t about to pay another £50 for the sake of getting one a couple of months down the line. I took the plunge, added it to my cart and within 24 hours I was looking at the familiar yet consistently intimidating sight of one of ForgeWorld’s big red boxes. So much for taking it easy, I suppose.
After going through the kit with a fine tooth comb, ensuring all parts were present and in good condition, I dropped the lot in a couple of salad bowls filled with soapy water for 48 hours of soaking and scrubbing to get all of that mould release gunk off. One mangled toothbrush later, the parts were left to air dry on some kitchen roll for 24 hours and inspected to ensure everything was nice and clean. Time to get cracking!
I won’t bore you with the minutia of every little step that went into constructing this model – there’s plenty of other places you can go for a detailed breakdown like that – but I’ll run you through a few of the key areas of interest.
Before I even put the whole thing together, I knew there would be at least one major painting subassembly to do – the vehicle interior. Thus far, I’ve made sure to paint any detailed interior provided on every one of the vehicles for my Space Wolves. From the humblest Mars-pattern Rhino to the MkIIb Land Raider to the towering presence of my Warhound Titan, everything that can open does open up for anyone interested in a wee swatch of the upholstry. It’s a nice little excuse to really indulge some of the most criminally underrated features of Games Workshop and Forgeworld’s miniatures over the years. Besides, how many opportunities do you get to paint a Thunderhawk Gunship, right1? On a big miniature like this which is mostly going to be relegated to eye candy on the display shelf, you might as well paint every square millimetre it has to offer.
Now, painting vehicle interiors can be a bit hit or miss, depending on the kit. Plastic kits like the Rhino or Land Raider are pretty painless. There’s not a lot of margin for error there – those kits fit together one way, without any gaps or flexibility to worry about. On the other side of this coin, the (resin) Spartan Assault Tank was a bit of a chore to put together after painting the interior – I dry fitted that thing several times before painting, but it really didn’t want to go together cleanly after painting. It’s awkward enough to square a tank comprised of four pieces without having to worry about messing up a paint job by scraping bits together or leaking superglue down the insides.

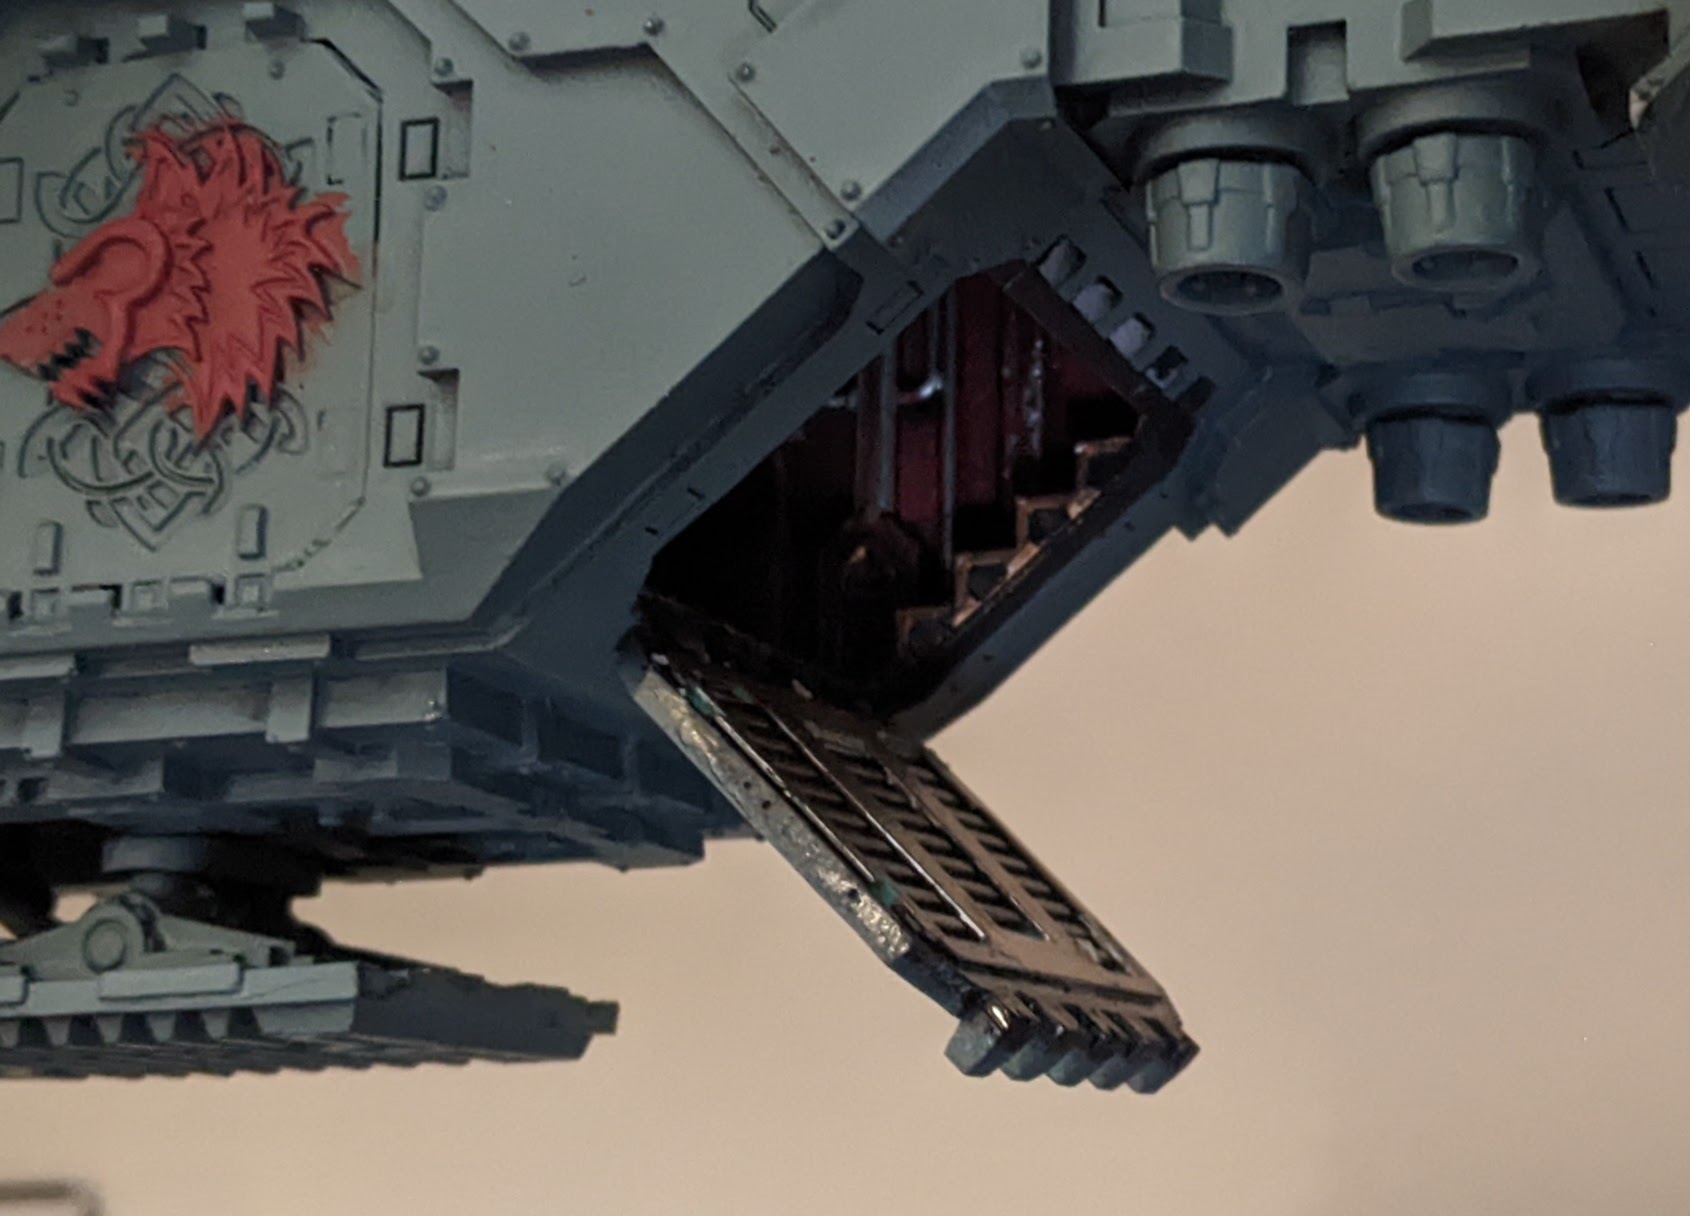
The Thunderhawk, I’m pleased to say, does not have this issue. The front section of the fuselage comes in two separate U shaped parts which slot together nice and snug without any painted segments coming in contact with another. In addition to the top and bottom of the fuselage, there’s an interior rear panel that slips into a recessed section of the bottom half of the fuselage with no discernible gaps and the nose section which includes the working front hatch which can move freely. Compared to the assault ramp on Spartan or Land Raider, the mechanism is actually quite loose and won’t stay shut on it’s own volition – this is not a big deal, however, as the ramp and the fuselage above is a nice, chunky bit of resin, so it’s fairly effortless to install a magnet in there to keep it shut. I will say that there was a pretty noticeable gap left between the front fuselage and the nose cone, but fortunately these gaps were exclusive to the exterior of the ship – the join on the interior is quite cleverly concealed by a ladder piece which connects the cockpit to the troop compartment. This was very much appreciated as gap filling on the outside is fairly trivial, but it would’ve been infuriating to have to try and fill a gap and paint over it again on the inside after assembly.
Aside from magnetising the assault ramp, I also went to great pains to magnetise the rear access hatch. I figured it wouldn’t hurt to let little more light in. At first, I just installed a little magnet at the top and the bottom, but shortly after, it occurred to me that I could potentially get this rear hatch actually working like a, well, a hatch. Cut to me huddled over this lump of resin for hours, drilling tiny little holes into the tiny little hinges and making tiny little incremental tweaks to the magnet placement on the fuselage, trying desperately to get it to open and shut evenly. It took a ton of time, and I had to cut away and resculpt some of the resin, but by jove, I did it!
The interior detail was a doddle to paint, really. As is custom for my Space Wolves vehicles, the walls were painted in Heavy Red, with Plate Mail Metal and Brassy Brass metallic features and Filthy Brown buttons and switches. There were a few other little details such as lights and lenses to pick out here and there, but nothing terribly taxing or time consuming.
With the interior detail finished, it was time for the rest of the build. Once again, I’m happy to report this was a fairly simple task despite the monumental size and weight of the model. There wasn’t too much warpage in the kit, and anything that needed adjusted coped well with getting set back into the right shape with a hairdryer and a bowl of ice water. I kind of assumed that I’d need to use some epoxy like JB Weld when putting the bulk of the thing together, but the kit didn’t really need anything like that. The front and rear fuselage slot together nice and snug, with a big honkin’ slab of resin that overlaps the two across the bottom that prevents any shaking once they’re together. I put a fair amount of superglue in that joint, and it held together like welded metal. Hell, the only part of this miniature that needed pinning in any real sense were the wings.
Oh boy, do the wings need pinning. Those things are heavy slabs of solid resin. For those, I got a pair of 100mm long, 2mm thick brass rods and drilled two holes into the fuselage all the way through – one for the ‘upper’ part of the wing, one for the ‘lower’ part – and in the wings themselves. The brass rods have very little flex to them, and having two of them – one upper and one lower – means they’re less likely to bend as pressure is spread out across the both of them. A little (okay, a lot of) superglue, and the wings were on nice and snug.
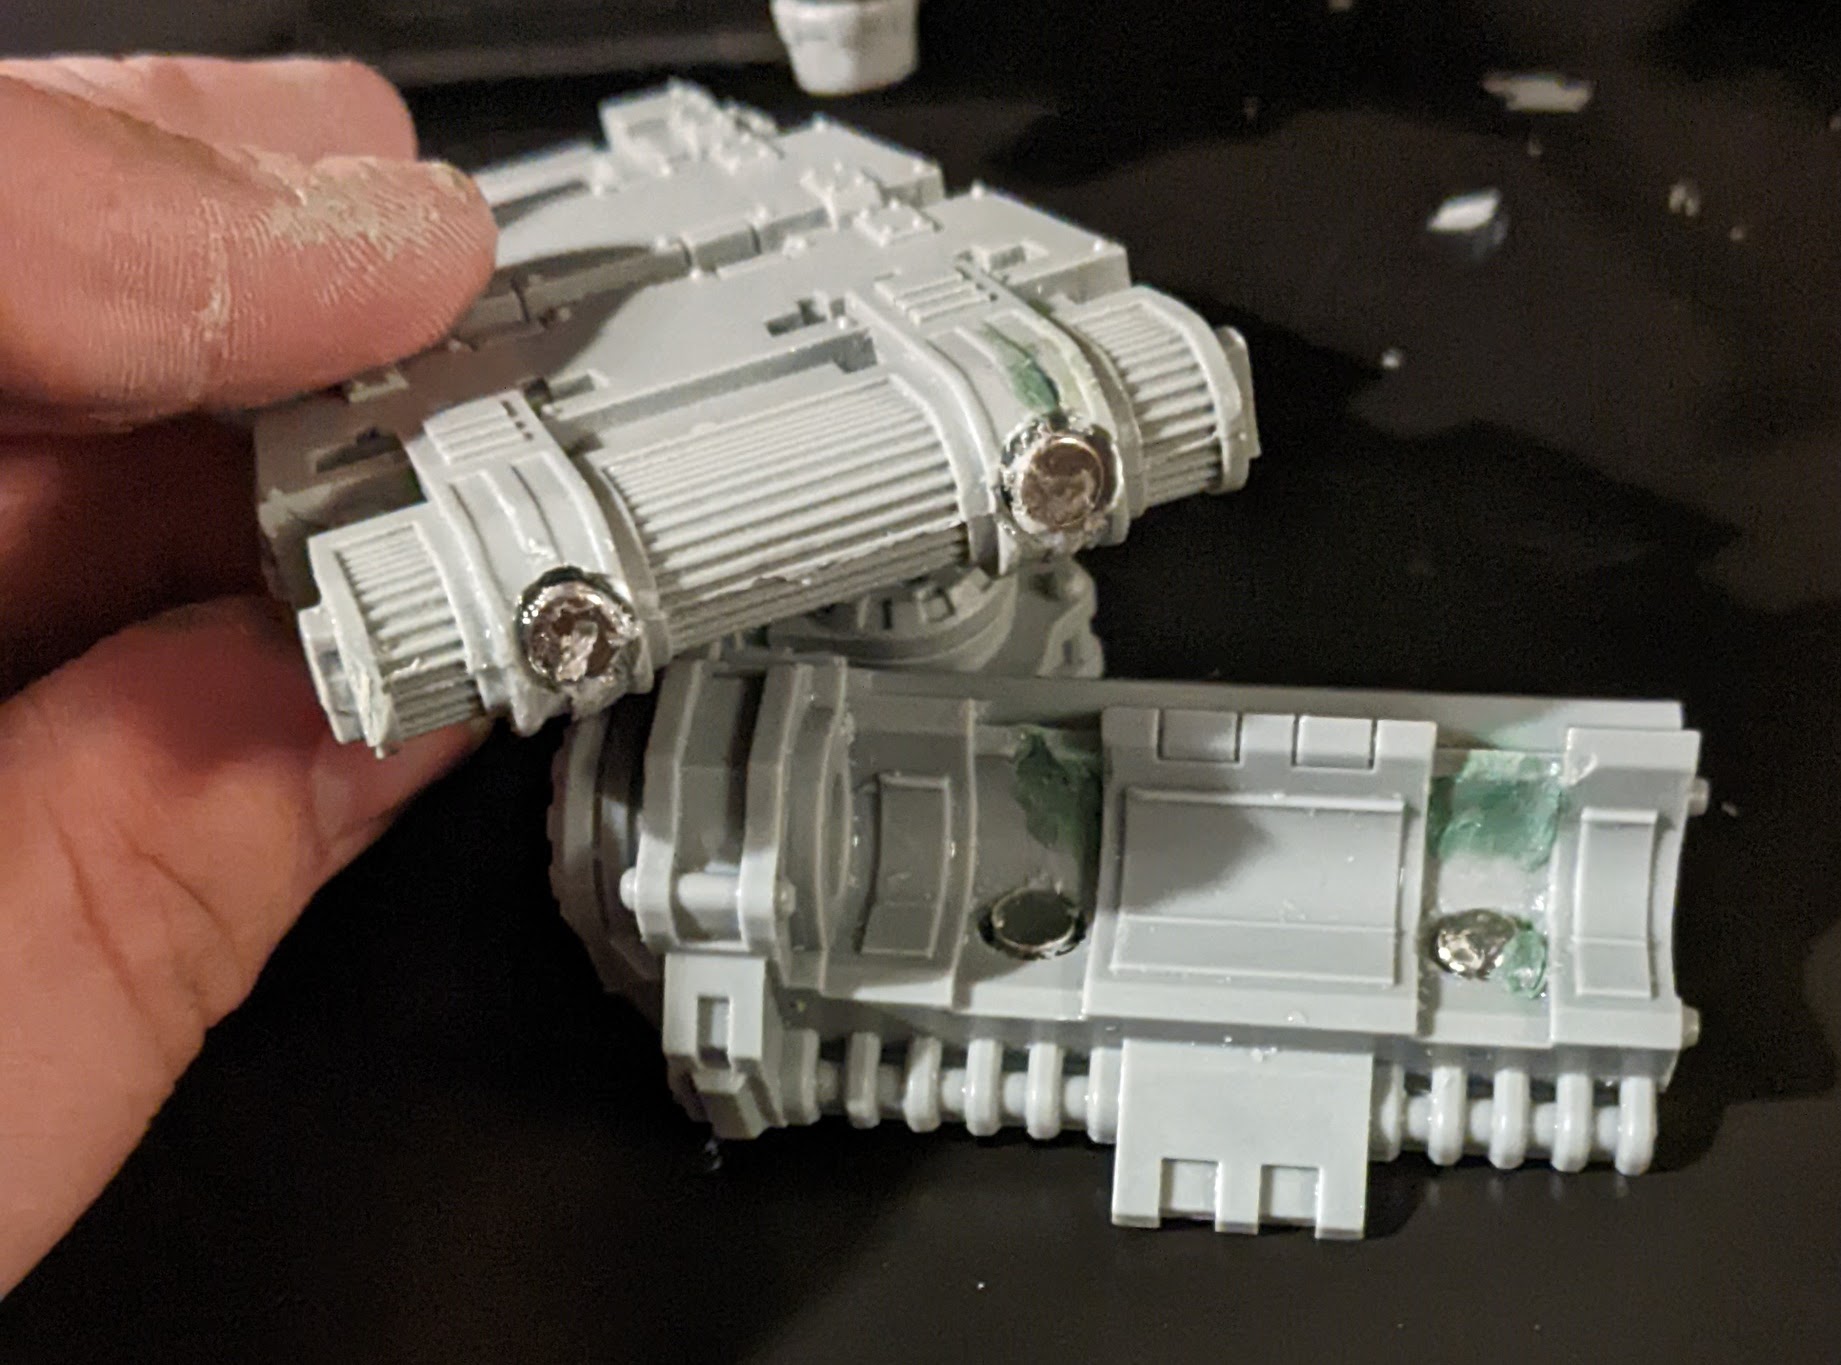
I didn’t bother magnetising the cockpit canopy – I may regret this decision if the transparent resin yellows over time, but there’s just something about locking painted detail behind a window that really appeals to me – it rewards close examination of a model and taking it in from different angles. I did, however, install a pair of N52 grade 2mmx1mm magnets in each of the missile racks, allowing me to detach and remove each one-use missile from the Thunderhawk as they’re launched in game. Additionally, I installed several stacked 6mm magnets in the heavy bolter mounts on the wings, allowing the turrets to turn freely in their mounts. Thanks to leakycheese for the inspiration for both of these magnetisations. I used a similar sort of idea for magnetising the attack wings, however after a bit of experimentation, I decided to opt for a simpler approach. I put a set of three 5x3mm N52 grade neodymium magnets evenly spaced along the inner edge of the attack wing, and a corresponding set of three into the attack wing housing where they would sit to hold the wing in the ‘up’ position. And that’s it. No magnets on the wing clamps, no second set of magnets in the housing to keep it down. I figure gravity is already kind of doing the work there when the wings are down – it’s keeping them in the ‘up’ position that needs the help of the magnets. If I’m ever going to take this model anywhere, I’ll wrap up the wings in a little bubble wrap to stop them clanking against the body.
Going back to the cockpit, I did do a few small conversions in there. Given that I was going to be leaving the cockpit visible, the crew would need a little conversion in order to make them look convincingly era-appropriate with the rest of the army. After all, it would be a little jarring to see a pair of MKVII armoured Marines piloting the Thunderhawk when there was literally no other instance of this throughout the army. Fortunately, this was a fairly simple job in the end largely thanks to the Legion Pintle Weapons kit. I tend not to bother putting Marines in the cupola of any of my tanks. Something about the scale feels off to me, and I’m always a little confused with how they fit those huge shoulder pads through there – having the mini present just makes the scale difference seem more visibly jarring to me. As a result, I’ve got tons of spare sets of Mark 4 Pintle Weapon arms, which – to my great fortune – seem to match up perfectly with the Thunderhawk steering wheel arms. With the arms sorted, all that remains is to replace the torso (I used some spare Space Wolves Heresy torsos I had lying about), helmets (I went for bare heads) and to make some slight adjustments to the legs. The legs are fairly simple – just cut away at the round knee pad until it’s in a similar shape the square pad that MKIV armour uses then tidy up the edges with a little green stuff. This doesn’t have to look perfect – the cockpit will be mostly obscured behind the clear resin anyway, and the legs will be mostly hidden beneath the steering wheels. Still, it’s nice to be able to stand up to even severe scrutiny – that’s part of the fun of the Horus Heresy setting, after all!
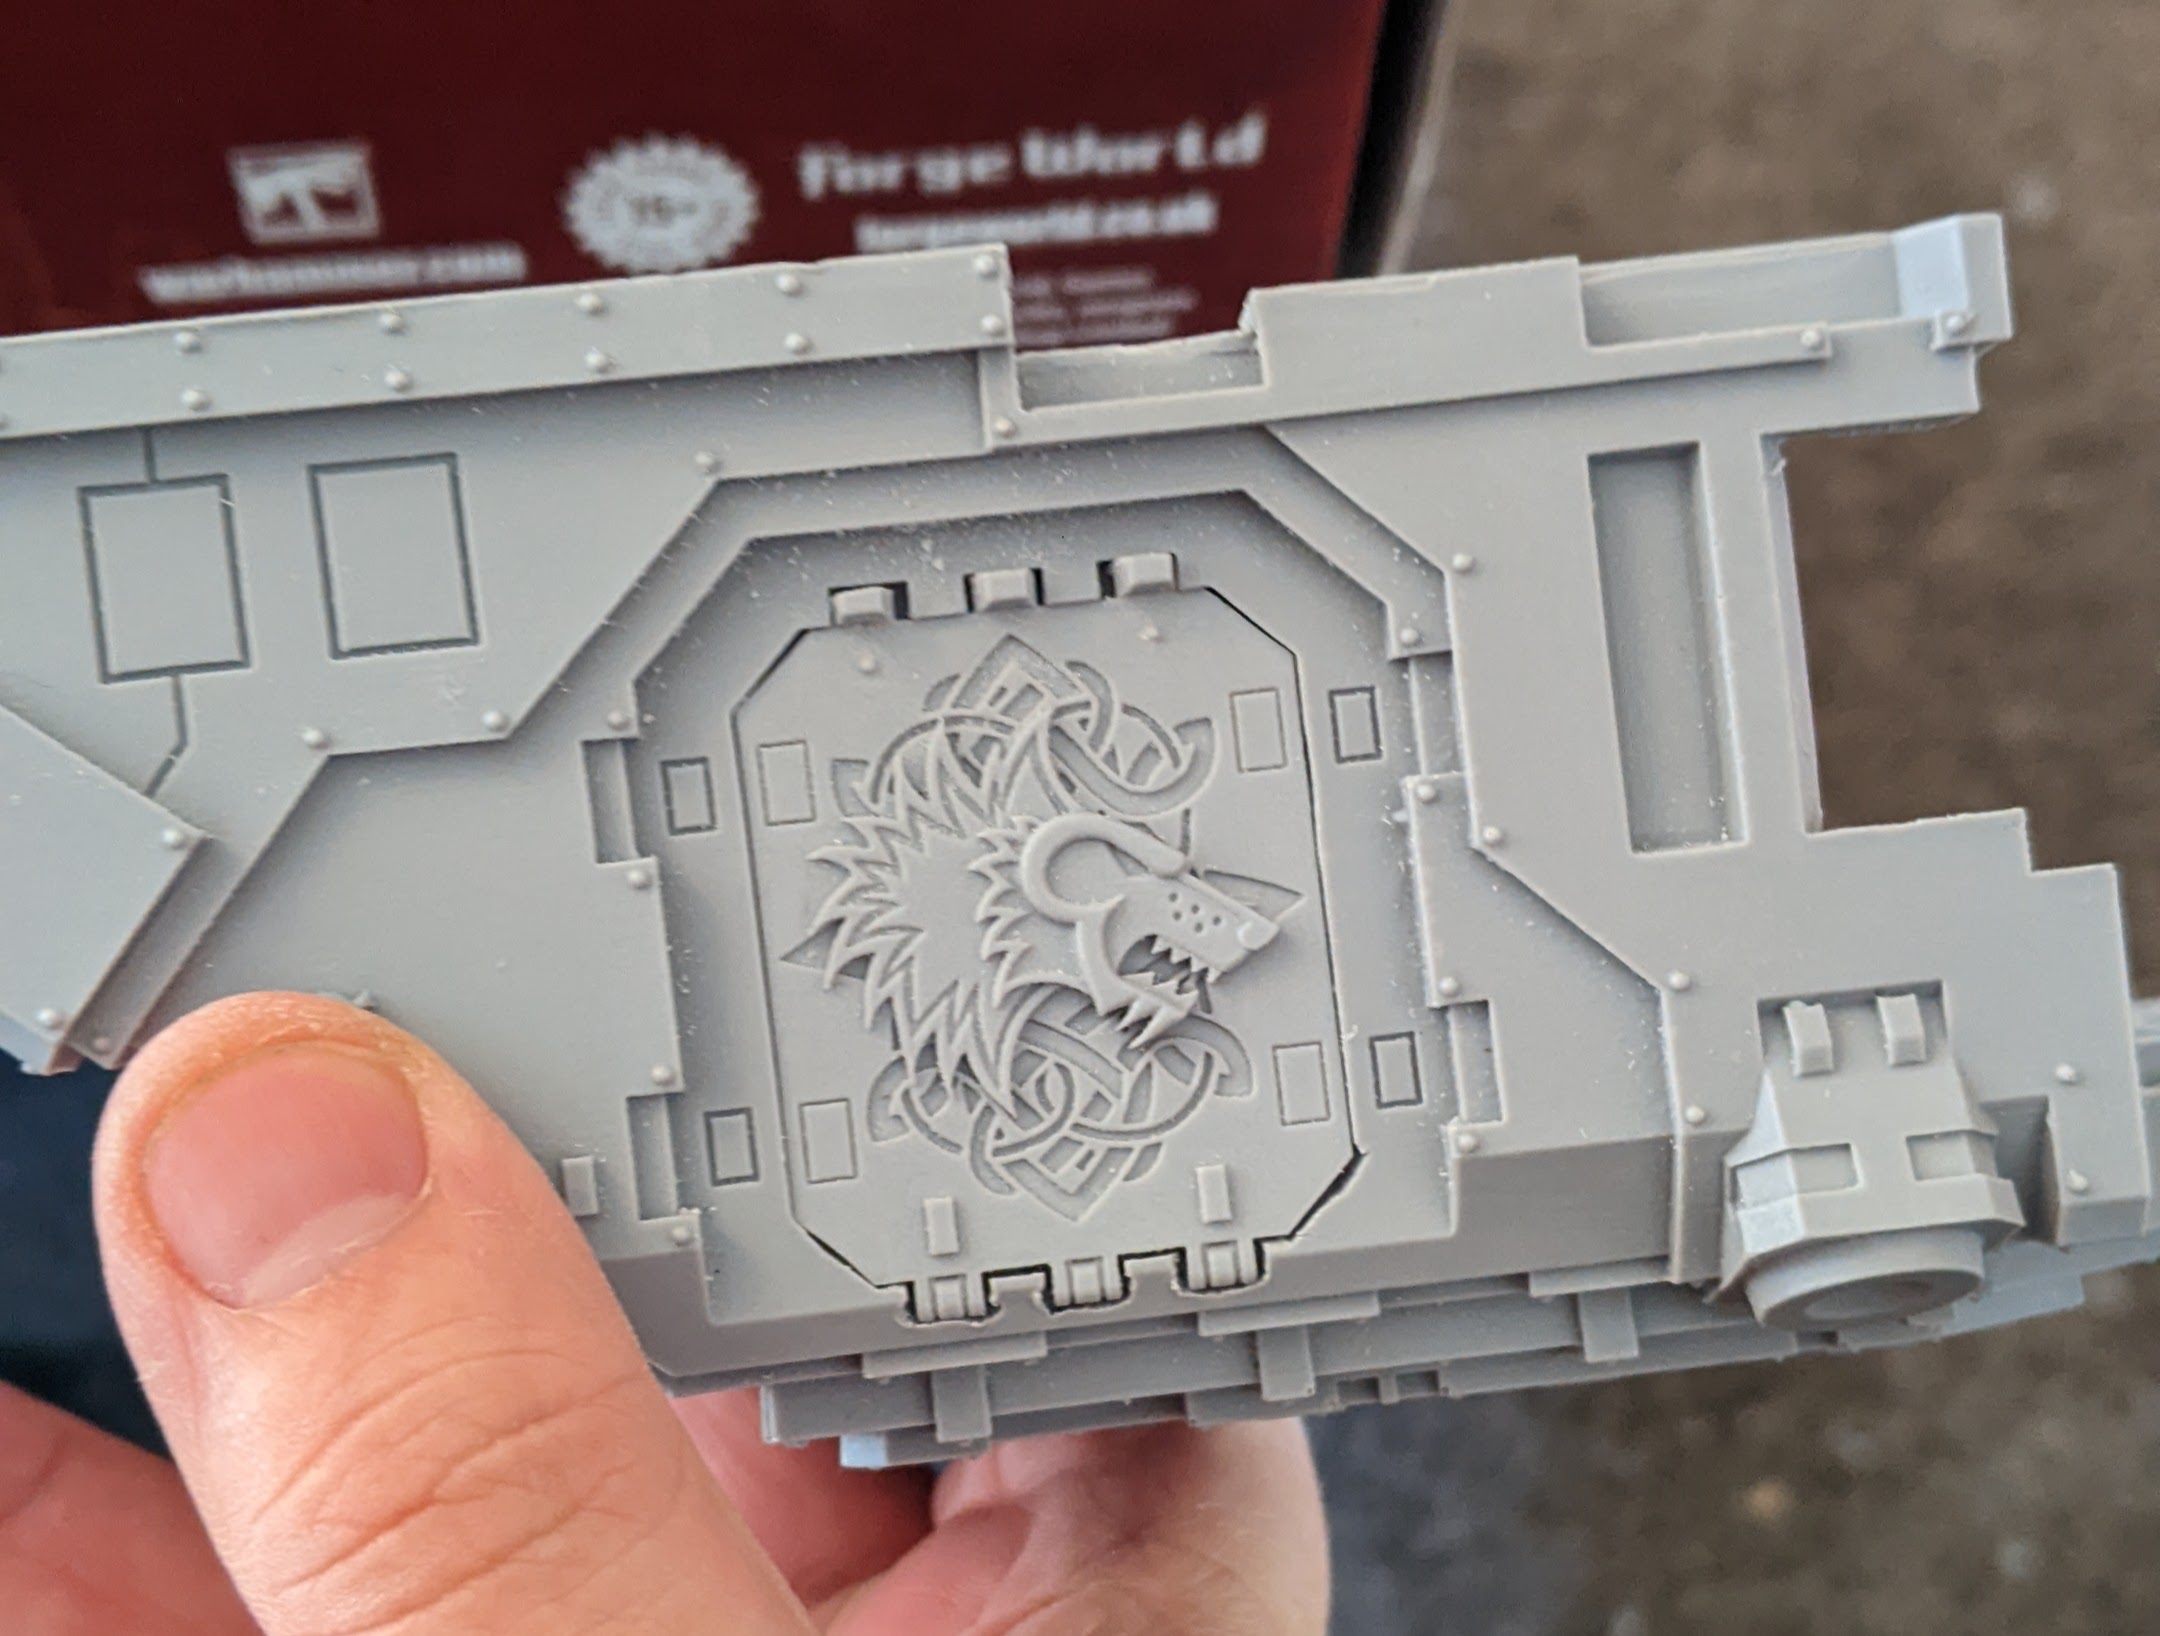
The cockpit was the only area to receive any real conversion/kitbashing work, although I did put on a set of Horus Heresy Space Wolves Legion Land Raider doors on the Thunderhawk. This was a pretty exciting moment, as I’ve been holding onto these doors specifically for a Thunderhawk project for over three years now. This excitement was dampened somewhat by discovering the fit was far from perfect. The Thunderhawk hatch openings are slightly different to those from the Land Raider – they’re either more snug, or the hinge placements are shifted by about a millimetre. Additionally, as the Land Raider doors are not visible from the back, they don’t have any of the kinda cool and crisp rear detail that can be viewed from the Thunderhawk interior. Undeterred, I did a little creative cutting and sculpting to make the doors fit. The 3D emblem looked too cool not to.
I took further inspiration from Leakycheese’s Thunderhawk video when building my flight stand. I drilled an 18mm hole in the bottom of the fuselage in the middle of the air intake just in front of the wings using an 18mm Forstner drill bit. For my flight stand, I bought a nice thick 250mm x 20mm base made out of solid oak. I had hoped this would be heavy enough on it’s own, but after learning it only weighed somewhere in the region of 750g or so, I purchased a 2kg weight for a dumbbell to help increase the low centre of gravity. I drilled another 18mm hole about 15mm deep into the base, drilled a smaller hole in the centre of my acrylic rod (to increase contact the surface area) and glued this into the recess using some JB Weld Epoxy for extra strength.
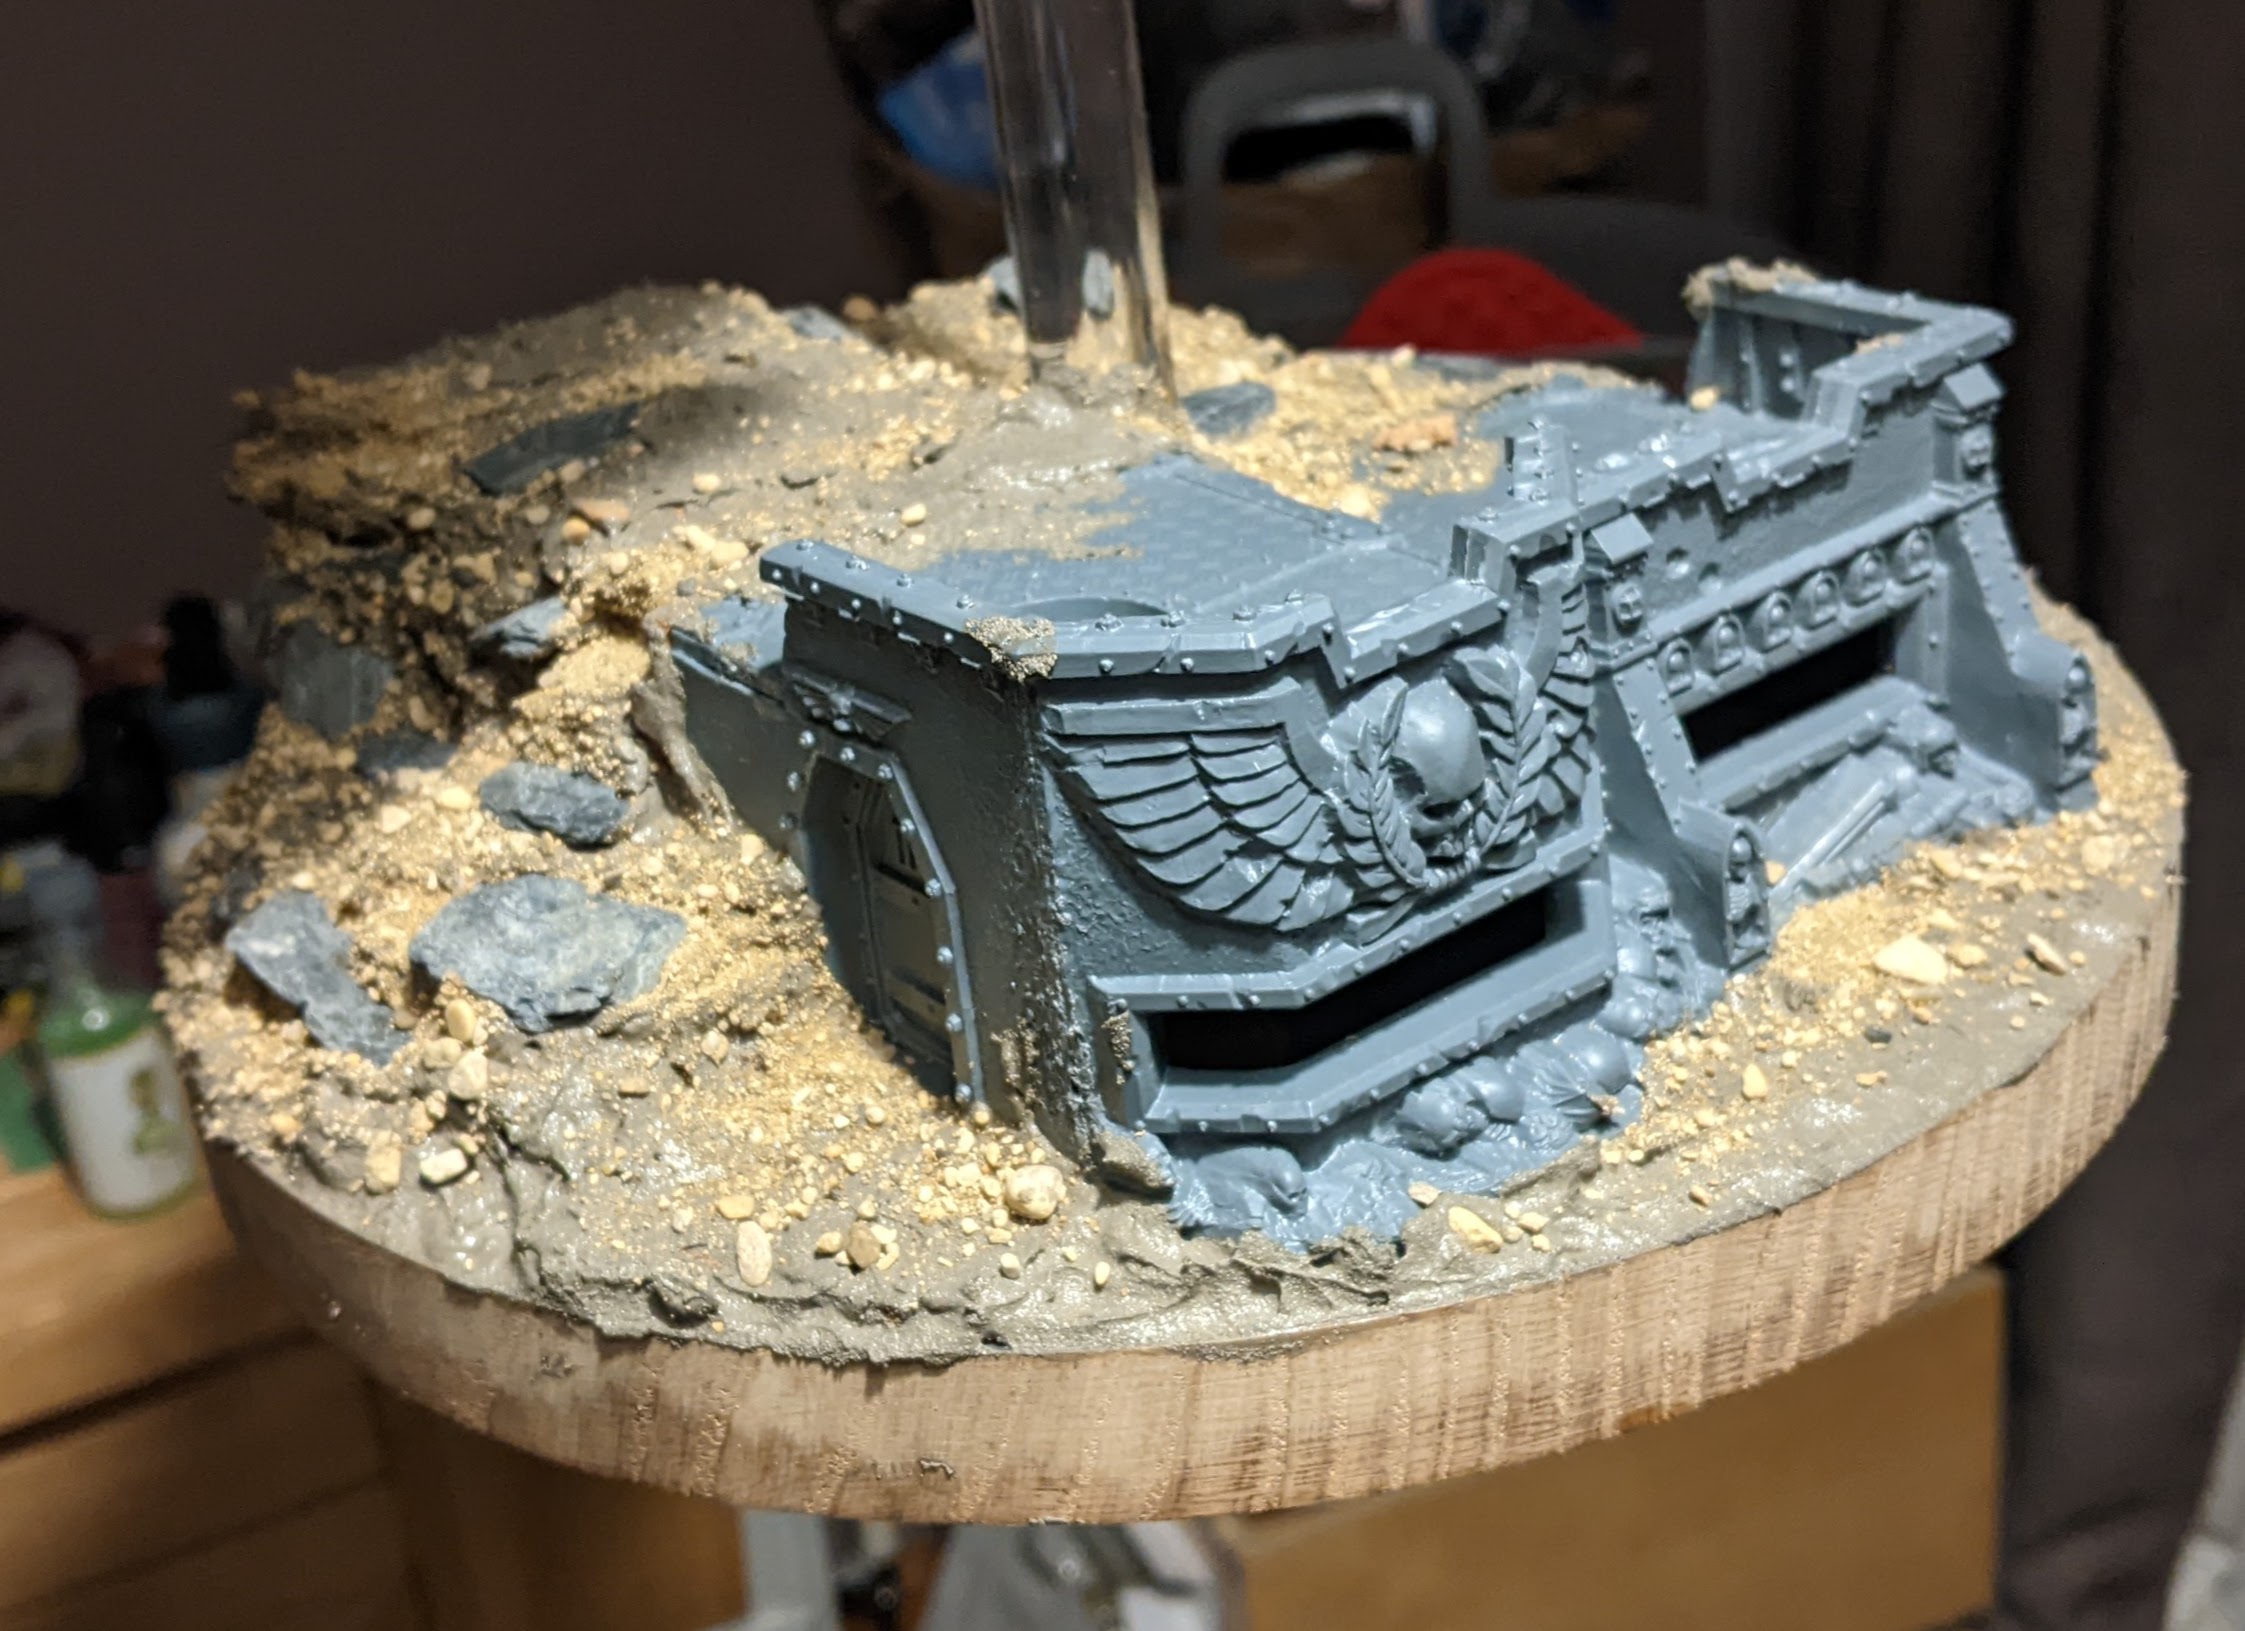
I’m quite fond of the base I built for my Warhound Titan and how it utilised a pair of Imperial Gothic Ruins from the 3rd edition box set. Most importantly however, I like how flat it is – the display base takes up an awful lot of space, and it’s nice to be able to place smaller miniatures on it, taking cover in the ruins. This not only looks cool, but it helps emphasise the massive scale of the miniature. I wanted to do a similar sort of thing with my Thunderhawk base, but I needed a way to conceal or lean into the raised area of the attached dumbbell plate without making it a big conical hill. After a little bit of searching, I stumbled upon the Wall of Martyrs Imperial Bunker. It’s grim, it’s chunky and – most importantly – wide enough to fit the whole damn weight inside. My plan was to build a bunker inside of a hill, filling the space between the bunker and the rear panel with layers of cork board to build a stepped hill, then smooth out the layers with texture paint, slate and gravel. The end result is another huge base with a nice chunky terrain feature and plenty of flat space to place miniatures.
While I was building the base, I had a bit of a brainwave. While it’s currently looking like the Thunderhawk will spend the majority of it’s existence on it’s flight stand, there is a pretty good chance this will change and it will have to be supported for extended periods on it’s landing gear. Being a very heavy resin miniature, this runs the risk of the landing gear warping and buckling under the weight of the whole model. While others have solved this by running some metal pins inside the landing gear to reinforce them, this felt.. Well, it felt a little risky to me. Instead, I opted to leverage the hole in the bottom of the model that already exists for the flight stand. I ordered myself a second 18mm acrylic rod (this time only 20cm tall), installed in the flight stand hole and marked off on the rod where it reaches the bottom of the landing gear. I cut the rod to size using a hand saw to get it to roughly the right height, then slowly filed away at it until it was completely flush with the landing gear. This took a lot of trial and error, sanding away fractions of a millimetre at a time. The trick is to get it just short enough that the landing gear are making contact with the surface, but just tall enough to take some of the pressure off of them. My gauge for this was putting it on a smooth surface with the rod inserted, then tapping the side of the nose to see how easily it would ‘spin’ on the rod. As soon as you can tap it with a small amount of force without spinning, it’s at the ideal height.
With the addition of the landing gear stabaliser, the build of my Thunderhawk was finished and I was ready to move onto the next, incredibly daunting phase – the (exterior) painting. Since this post is already running on a little bit, I’m going to split the post here and save the rest for a Part Two. Keep your eyes peeled!
Until then, thanks for reading and happy wargaming!
1 This is foreshadowing something.